HONDA INTEGRA 1994 4.G Workshop Manual
INTEGRA 1994 4.G
HONDA
HONDA
https://www.carmanualsonline.info/img/13/6067/w960_6067-0.png
HONDA INTEGRA 1994 4.G Workshop Manual
Trending: relay, tow, fuel cap, Main harness, child lock, alternator, steering wheel adjustment
Page 1191 of 1413
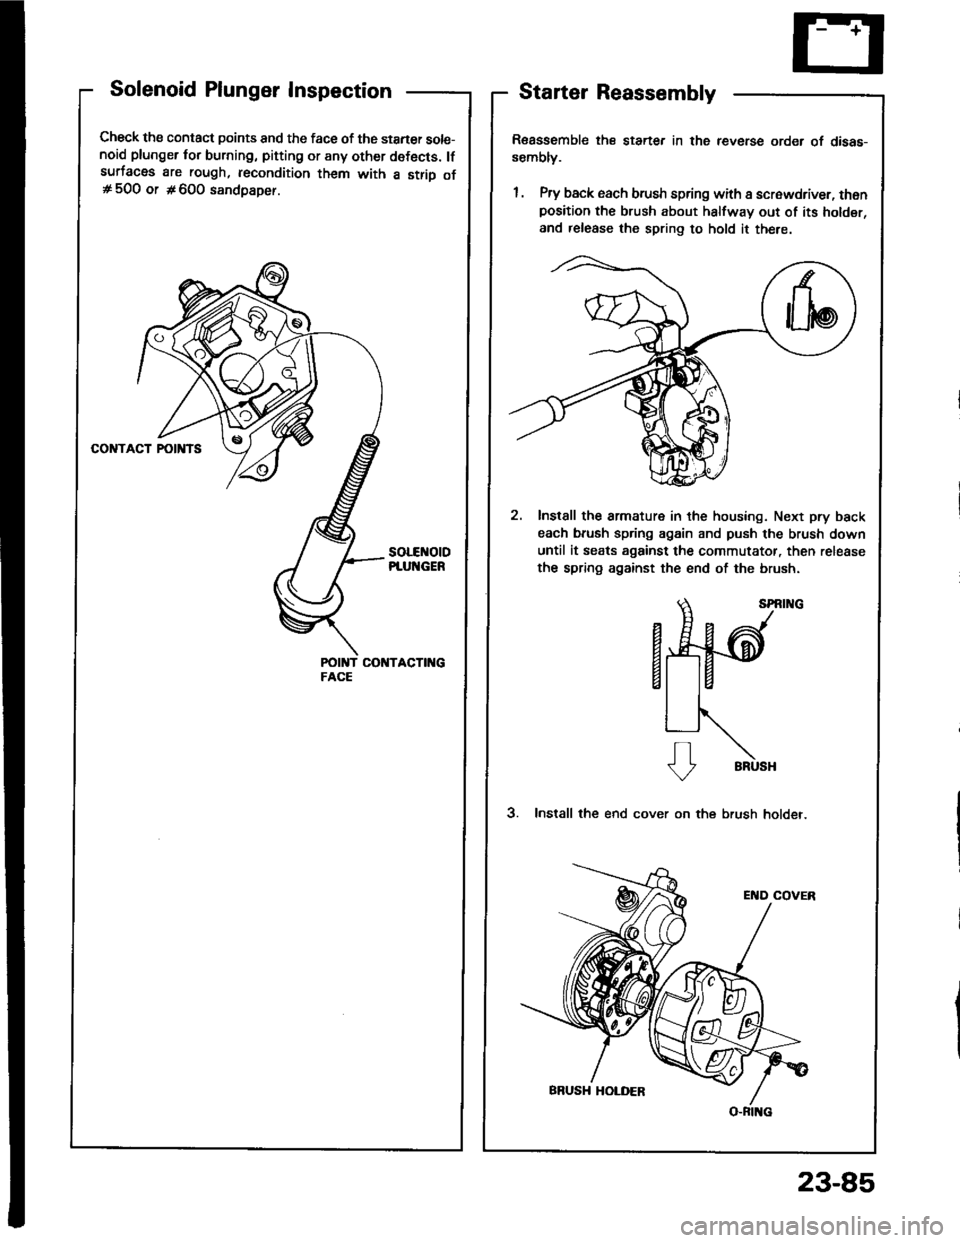
Solenoid Plunger Inspection
Check the contact points and the face of the staner sole-noid plunger for burning, pitting or any other defects. lfsurfacas are rough, recondition them with a strio of# 500 or #600 sandpaper.
soLEr{otDPIUNGER
Starter Reassembly
R€assemble the starter in the reverse order of disas-sembly.
1. Pry back each brush spring with a screwdriver, thonposition the brush about halfway out of its holder,
and release the spring to hold it there.
2. Instsll the armature in the housing. Next pry back
each brush spring again and push the brush down
until it seats against the commutator, then release
the spring against the end of the brush.
a&T&'
s..
V BRUSH
3. Install the end cover on the brush holder.
23-85
Page 1192 of 1413
Starting System
Performance Test
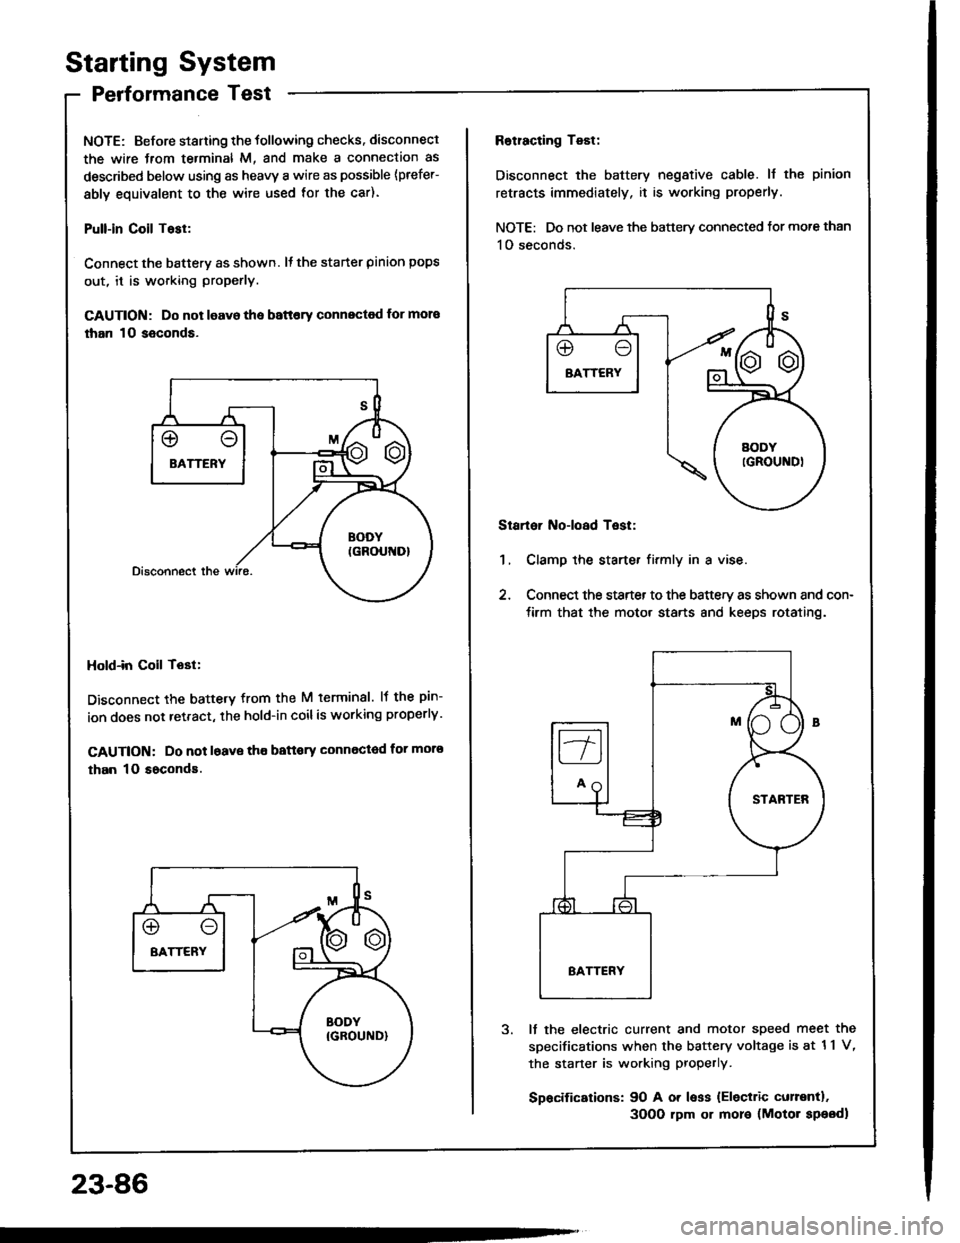
NOTE: Before staning the tollowing checks. disconnect
the wire Jrom te.minal M, and make a connection as
described below using as heavy a wire as possible {prefer-
ably equivalent to the wire used for the car).
Pull-in Coil Tasl:
Connect the batterv as shown. It the starter pinion pops
out, it is working properly.
GAUTION: Do not leavo the battery connectod for mora
than 10 seconds.
Hold-in Coil Tost:
Disconnect the battetv from the M terminal. lf the pin-
ion does not retract, the hold-in coilis working properly.
CAUTION: Do not l6ave tho battory Gonnected for moro
than 10 soconds.
23-86
Rotracting Test:
Disconnect the battery negative cable. ll the pinion
retracts immediately, it is working properly.
NOTE: Do not leave the battery connected tor more than
1O seconds.
Startoi Noioad Test:
1, Clamp the starte. firmly in a vise.
2, Connect the starter to the battery as shown and con-
tirm that the motor starts 8nd keeps rotating.
It the electric current and motor speed meet the
sDecifications when the battery voltage is at 11 V,
the staner is working properly.
Spacifications: 90 A or less {Eleciric curentl.
3OO0 rpm or more (Motor speodl
Page 1193 of 1413
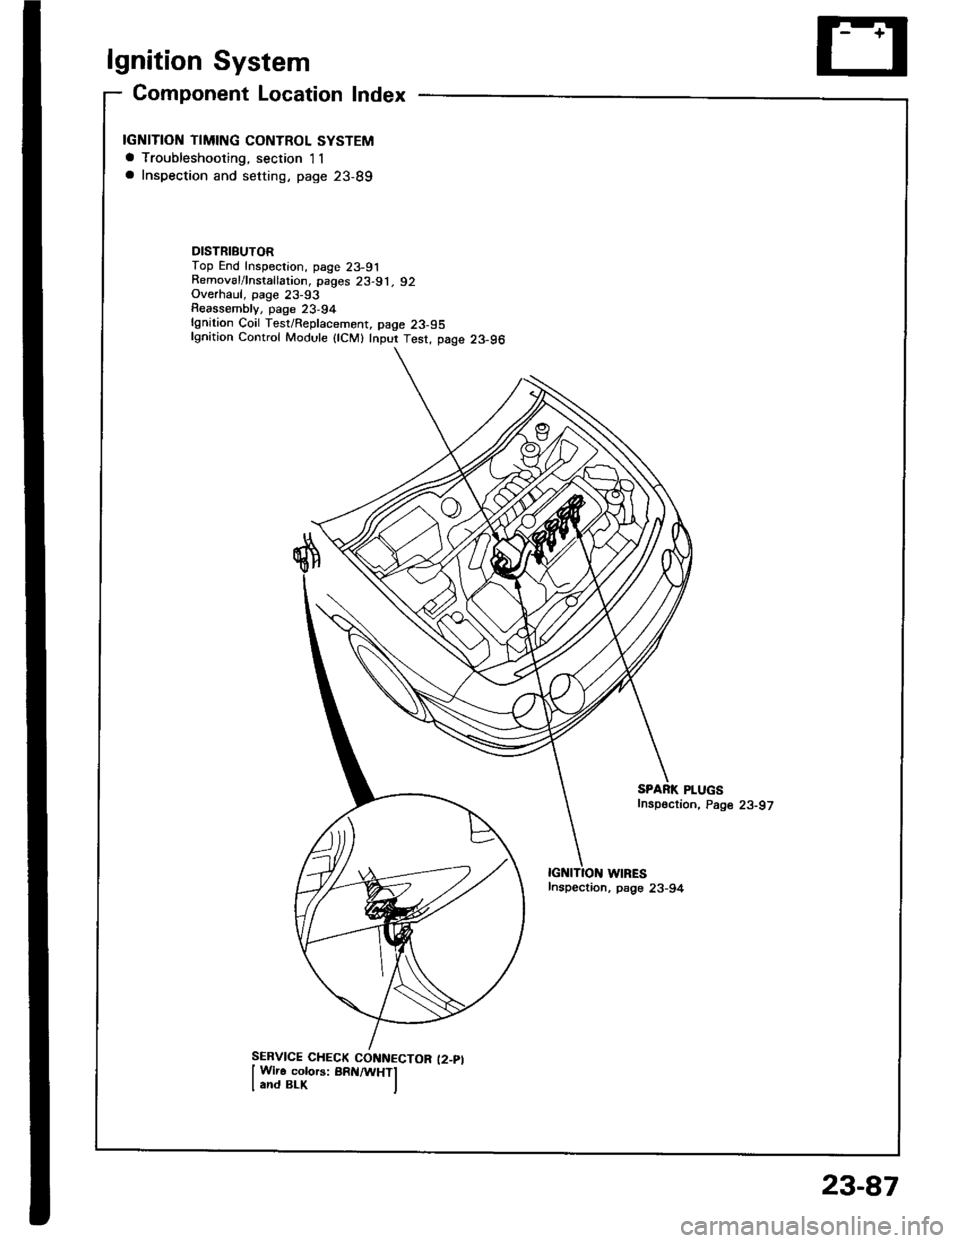
lgnition System
Gomponent Location Index
IGNITION TIMING CONTROL SYSTEMa Troubleshooting, section I1a Inspection and setting, page 23-89
DISTRIBUTORTop End Inspection, page 23-91Removal/lnstallation, pages 23-91, 92Overhaul, page 23-93Reassemblv, page 23,94lgnition Coil Test/Replacement, page 23-95lgnition Control Module {lCM} Inpur Test, page 23-96
WIRESInspection, psge 23-94
SPARK PLUGSfnspection, Page 23-97
23-87
Page 1194 of 1413
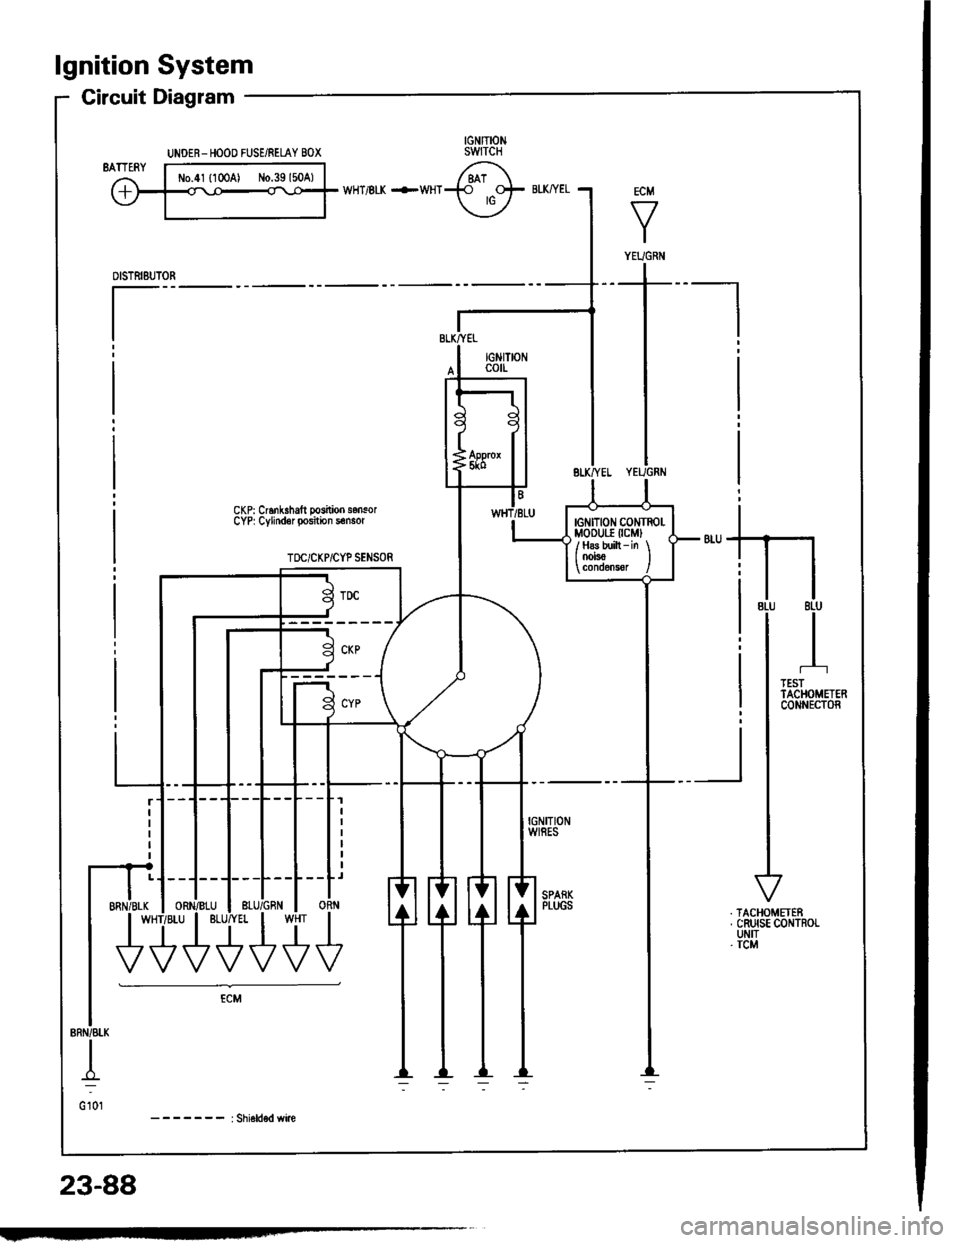
lgnition System
Circuit Diagram
CKP: Cr6nk.halt posilioo sonsorCYP| Cylindor position s€nsor
TOC/CKP/CYP SENSOR
-_r_1=__E
-J---L--L--Lr
ORN
U'+++
UNOER- HOOO FUSE/RELAY BOX
ECM
V
I
YEUGNiI
tG tTtoN c0NTROl-MoDUr.r (cMl
/ H8s built - in \I OOrsO I
23-88
Page 1195 of 1413
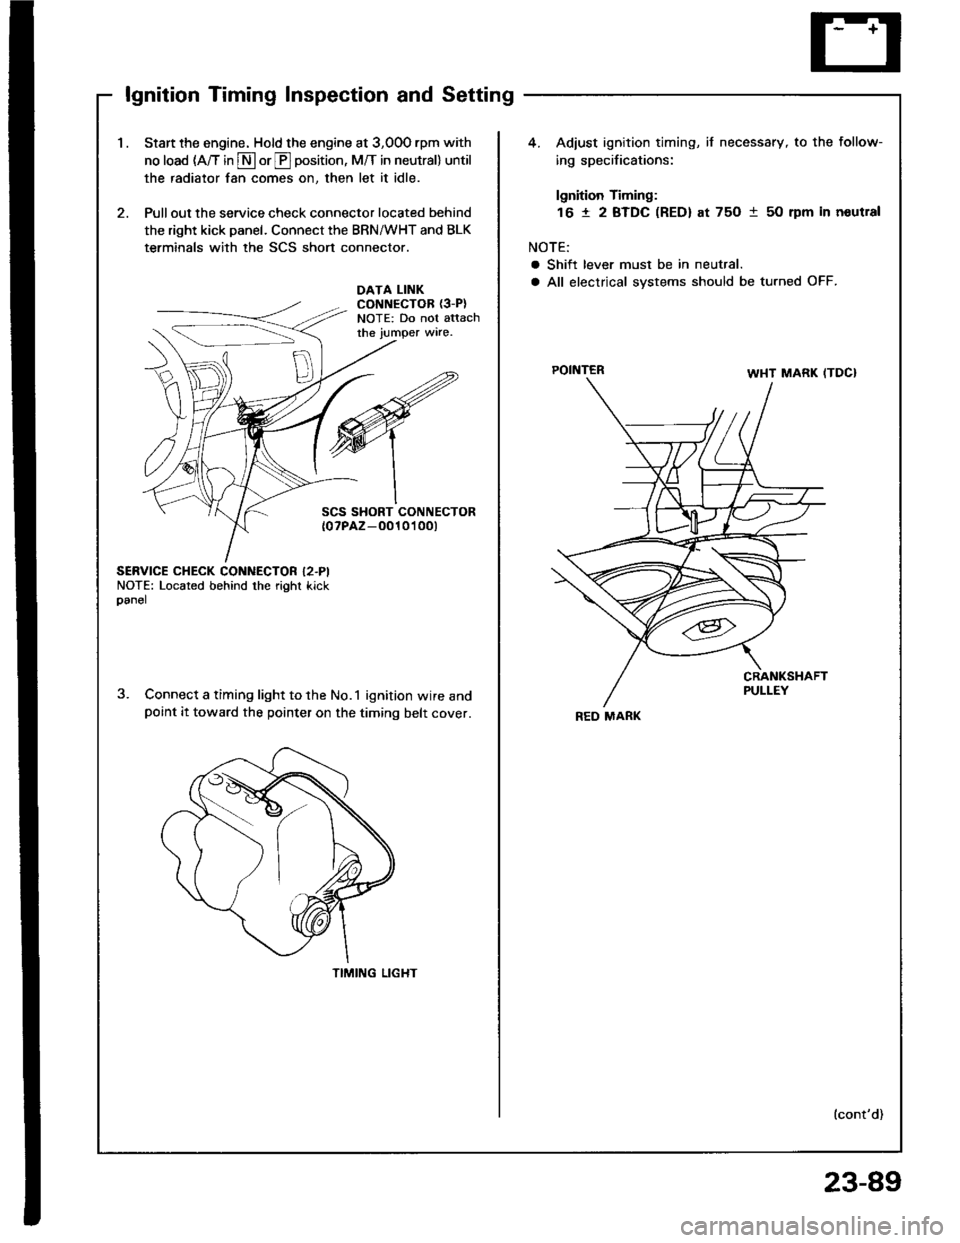
lgnition Timing Inspection and Setting
1.Start the engine. Hold the engine at 3,00O rpm with
no load (A/T in S or E position, M/T in neutral) until
the radiator fan comes on, then let it idle.
Pull out the service check connector located behind
the right kick panel. Connect the BRN/WHT and BLK
terminals with the SCS short connector.
4. Adiust ignition timing, if necessary, to the follow-
ing specifications:
lgnition Timing:
16 t 2 BTDC (RED) at 75O 1 50 rpm in noutral
NOTE:
a Shift lever must be in neutral.
a All electrical systems should be turned OFF.DATA LINKCONNECTOR {3-P}NOTE: Do not attachthe jumper wire.
POINTER
SCS SHORT CONNECTOR{0?PAZ-O010't 00t
SERVICE CHECK CONNECTOR I2.PINOTE: Located behind the right kickoanel
Connect a timing light to the No.1 ignition wire andpoint it toward the pointer on the timing belt cover.
TIMING LIGHT
lcont'd)
REO MARK
23-89
Page 1196 of 1413
lgnition System
lgnition Timing lnspection and
Setting (cont'd)
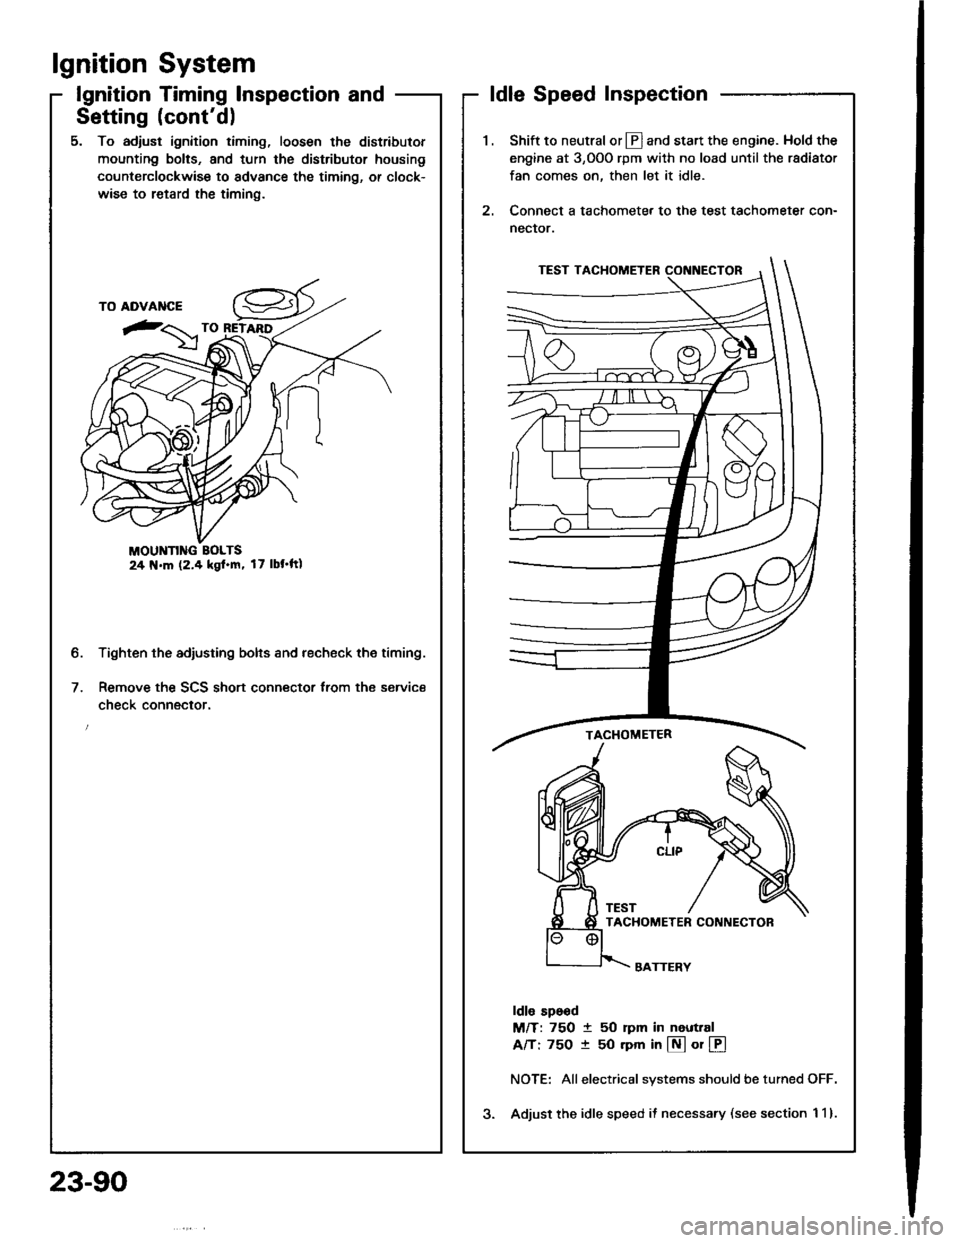
5. To adjust ignition timing, loosen the distributor
mounting bolts, and turn the distributor housing
counterclockwise to advance the timing, or clock-
wise to retard the timing.
MOUNN G BOLTS24 N.m (2.4 kgl.m, 17 lbt'ftl
Tighten the adjusting bolts and recheck the timing.
Remove the SCS short connector trom the service
check connector.
2.
ldle Speed Inspection
Shift to neutral or Ll] and start the engine. Hold the
engine at 3,OOO rpm with no load until the radiator
fan comes on, then let it idle.
Connect a tachometer to the test tachometer con-
nector.
ldle sp6od
M/T: 750 t 50 rpm in neuttal
A/T: 75O t 50 rpm in @ or @
NOTE: Allelectrical systems should be turned OFF.
Adjust the idle speed il necessary (see section 1 1).
b.
23-90
Page 1197 of 1413
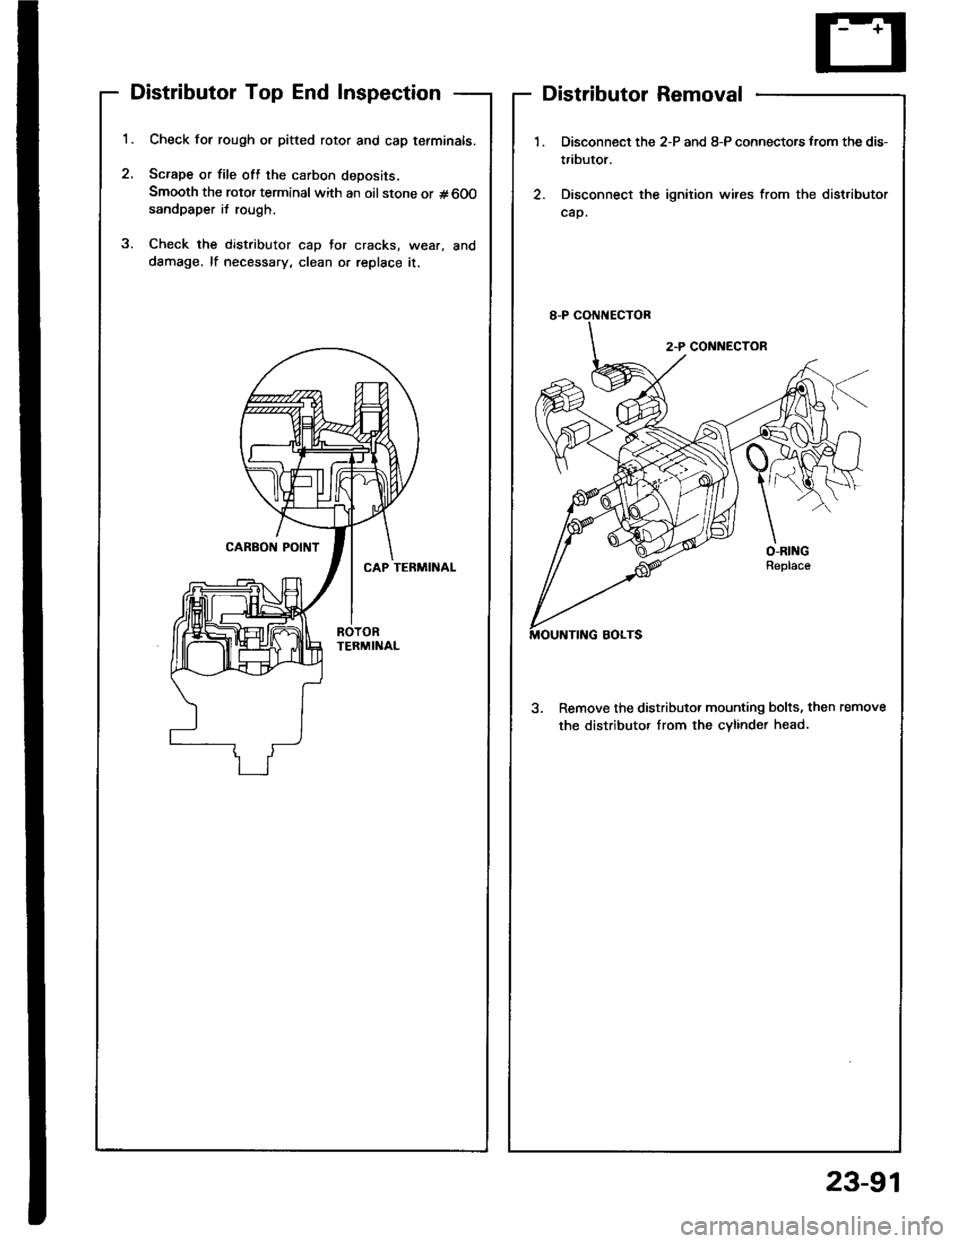
Distributor Top End Inspection
1.
2.
Check for rough or pitted rotor and cap tefminals.
Scrape or file oft the carbon deposits.
Smooth the rotor terminal with an oil stone or #600sandpaper i{ rough.
Check the distributor cap Jor cracks, wear, and
dSmage, lf necessary, clean or replace it.
2
Distributor Removal
1.
2.
Disconnect the 2-P and 8-P connectors from the dis-
tributor.
Disconnect the ignition wires from the distributor
cap.
3. Remove the distributor mounting bolts, then remove
the distributor Irom the cvlinder head.
23-91
Page 1198 of 1413
lgnition System
Distributor Installation
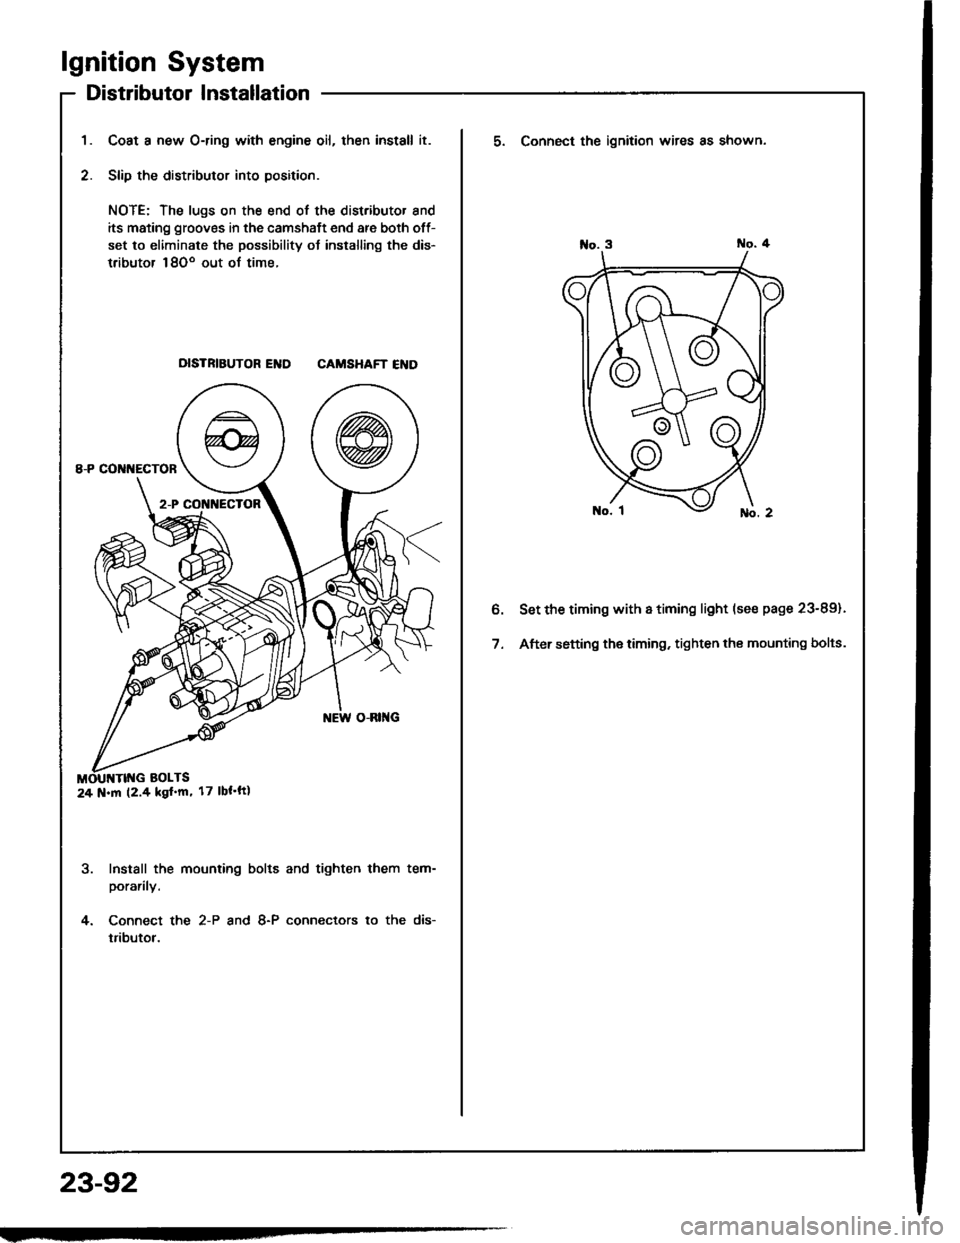
Coat a new O-ring with engine oil, then install it.
Slip the distributor into position.
NOTE: The lugs on the end of the distributor and
its mating grooves in the camshaft end are both off-
set to eliminate the possibility ot installing the dis-
tributor 18Oo out of time.
DISTRIBUTOR END CAMSHAFT END
Install the mounting bolts and tighten them tem-
porarily.
Connect the 2-P and 8-P connectors to the dis-
tributor.
24 N.m (2.4 kgf'm' 17 lbt'ft|
23-92
5. Connect the ignition wires as shown.
Set the timing with a timing light (se€ page 23-89).
After setting the timing, tighten the mounting bolts.
Page 1199 of 1413
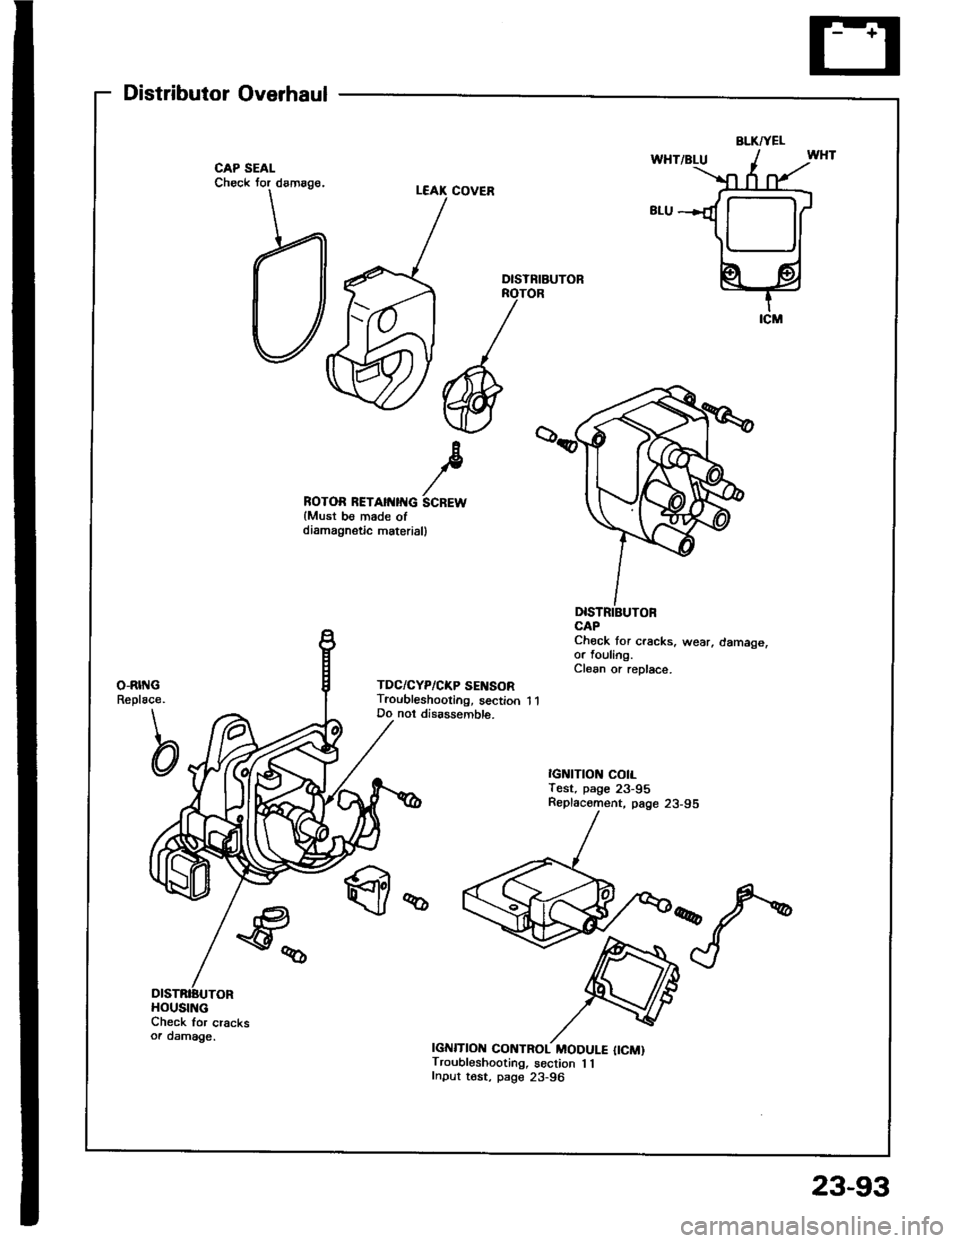
Distributor Overhaul
Check for cracksoa damage.
ROTOR RETAII{IITG SCREWlMust be made ofdiamagnstic materiall
DlsTNIBUTOR
Chock tor cracks, wear, damage,or fouling.Clean or replace.
IGNITION CONTROL MODULE {ICM)Troubleshooting, section 1 1Input tost, page 23-96
BLKTYEL
HOUSING
23-93
Page 1200 of 1413
lgnition System
Distributor Reassembly
23-94
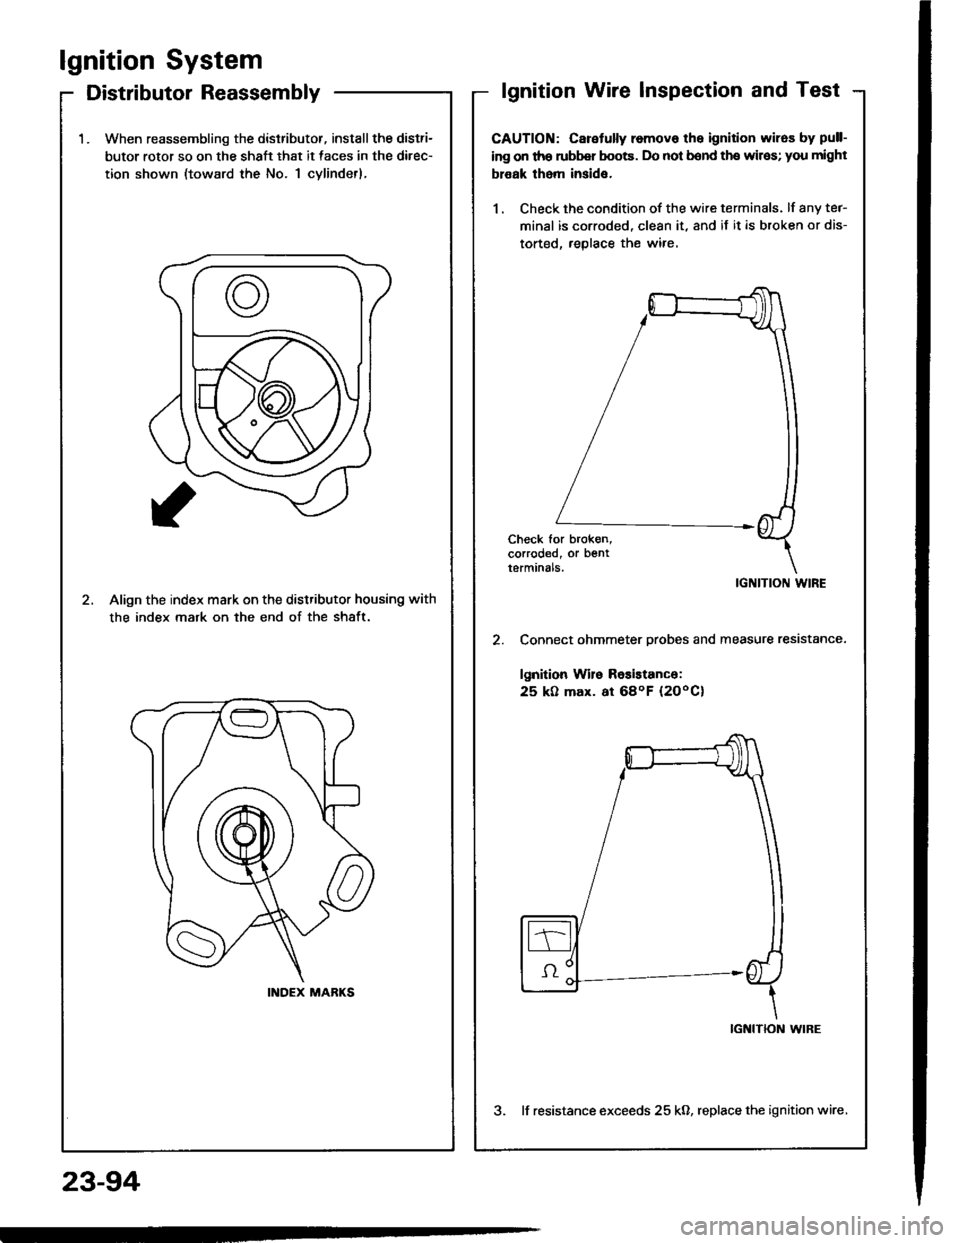
1.When reassembling the dislributor, install the distri-
butor rotor so on the shaft that it faces in the direc-
tion shown (toward the No. 1 cylindetl,
2.Align the index mark on the distributor housing with
the index mark on the end of the shaft.
INDEX MARKS
lgnition Wire lnspection and Test
CAUTION: Caretully removo the ignition wiros by pull-
ing on tho rubbq boots. Do not bend the wilos; you might
bl€ak tham inside.
1 . Check the condition of the wire terminals. lf any te.-
minal is corroded, clean it. and if it is broken or dis-
torted. reolace the wire.
IGNITION WIRE
Connect ohmmeter probes and measure resistance.
lgnition Wile Roaistanco:
25 k0 max. at 68oF (2OoCl
2.
IGNITION WIRE
3. lf resistance exceeds 25 kO, replace the ignition wire,
Trending: Piston ring, trailer, seats, battery harness, battery replacement, fuel tank removal, CD player
