Page 98 HONDA INTEGRA 1994 4.G Workshop Manual
[x] Cancel search | Manufacturer: HONDA, Model Year: 1994, Model line: INTEGRA, Model: HONDA INTEGRA 1994 4.GPages: 1413, PDF Size: 37.94 MB
Page 962 of 1413
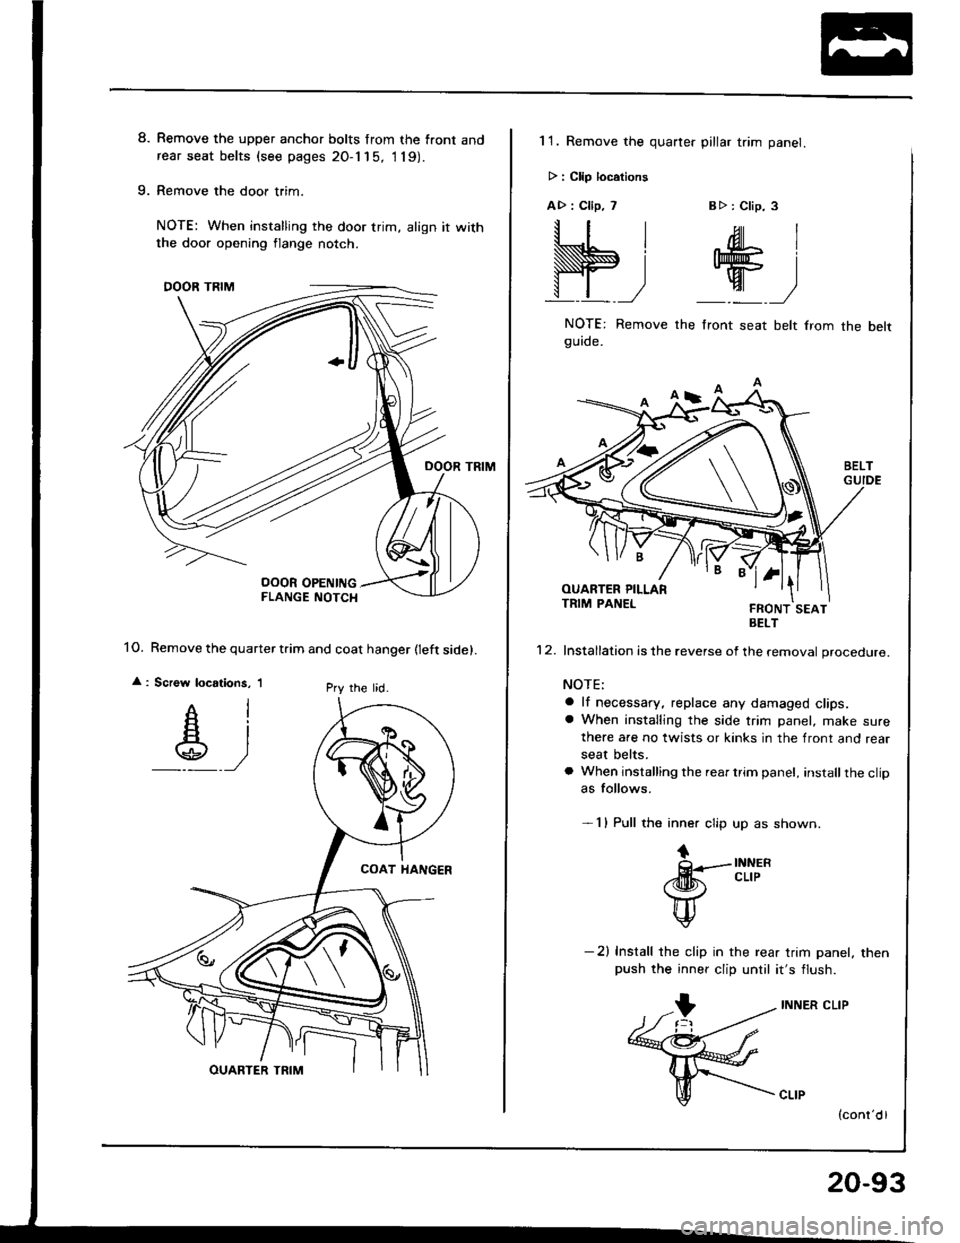
8. Remove the upper anchor bolts from the front andrear seat belts (see pages 20-1 15, 1 19).
9. Remove the door trim.
NOTE: When installing the door trim, align it with
1O. Remove the quarter tiim and coat hanger fleft sidel.
: Screw locstions, 'lPry lhe lid.
the door opening flange notch.
11. Remove the quarter pillar trim panel.
> : Clip locations
A>: Clip, 7 Btr: Clip. 3
S;+)
NOTE: Remove the front seat belt lrom
9UrOe.
the belt
BELT
'12. Installation is the reverse of the removal procedure.
NOTE:
a lf necessary, .eplace any damaged clips.a When installing the side trim panel, make sure
there are no twists or kinks in the front and rear
seat belts.
a When installing the rear trim panel, installthe clipas follows.
- 1 I Pull the inner clip up as shown.
tQ-.-INNER./ilk cLrP( \c4z )\/
tl\#
-2) Install the clip in the rear trim panel. thenpush the inner clip until it's flush.
INNER CLIP
20-93
Page 964 of 1413
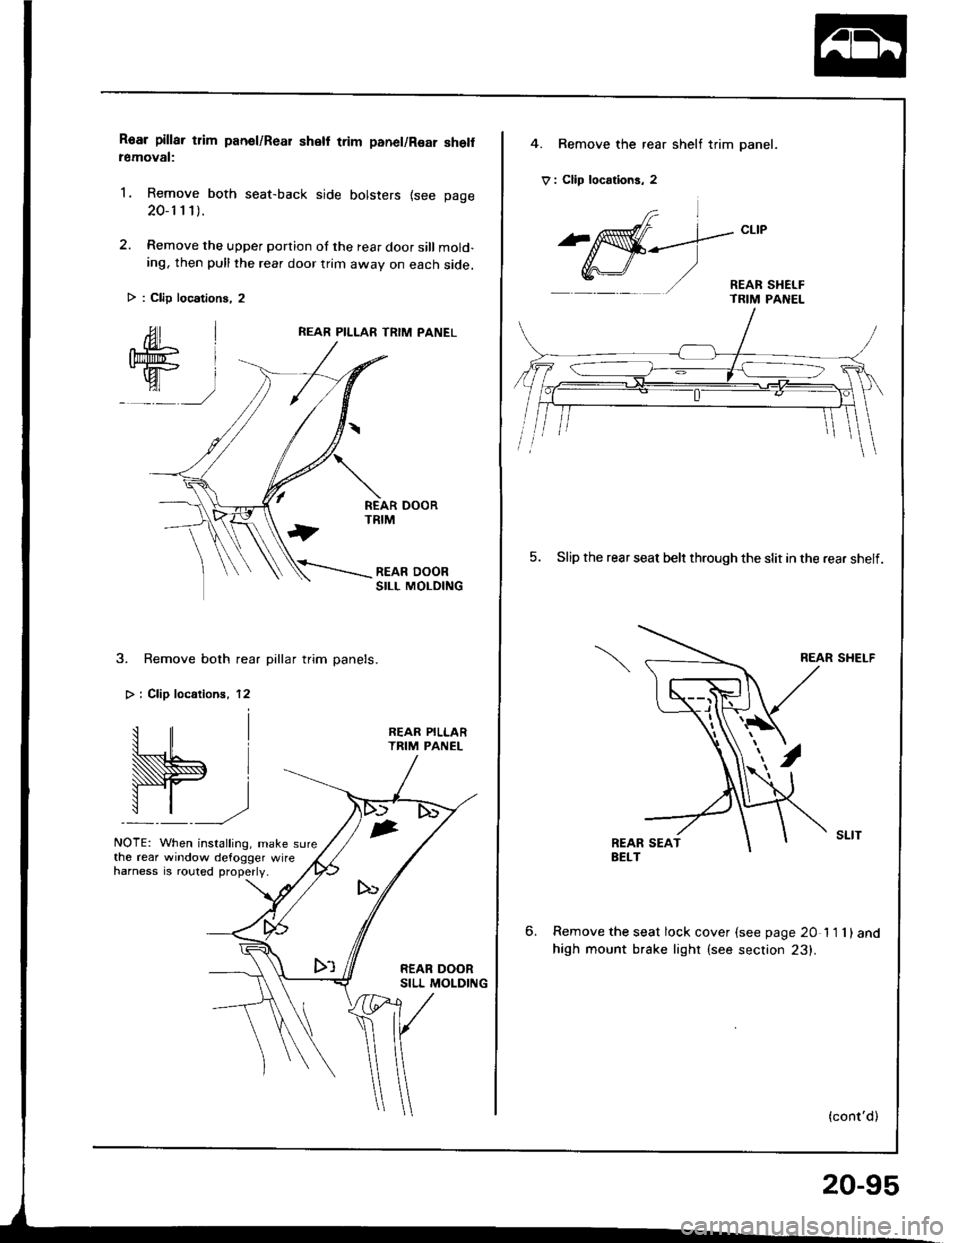
Roar pillar tlim panel/Rear shell trim panel/Rsar she removal:
1. Remove both seat-back side bolsters {see page
20-1 1 1).
2. Remove the upper portion of the rear door sill mold-ing, then pull the rear door trim awav on each side.
REAR PILLAR TRIM PANEL
3. Remove both rear pillar trim panels.
> i Clip localionr, 12
W.,
NOTE: When installing, make sure
REAR PILLARTRIM PANEL
the rear window defogger wireharness is .outed properly.
> : Clip locations, 2
4. Bemove the rear shelf trim panel.
V : Clip locrtions, 2
frl
^affi-_--.]-"t't
Y,r\-J/ '/ - REAR sHEr-F- TRIM PANEL
5. Slip the rear seat belr through the slit in the rear shelf.
REAR SHELF
6.Remove the seat lock cover {see page 20 11 1)and
high mount brake lighr (see section 23).
(cont'd)
20-95
Page 967 of 1413
Headliner
Replacement
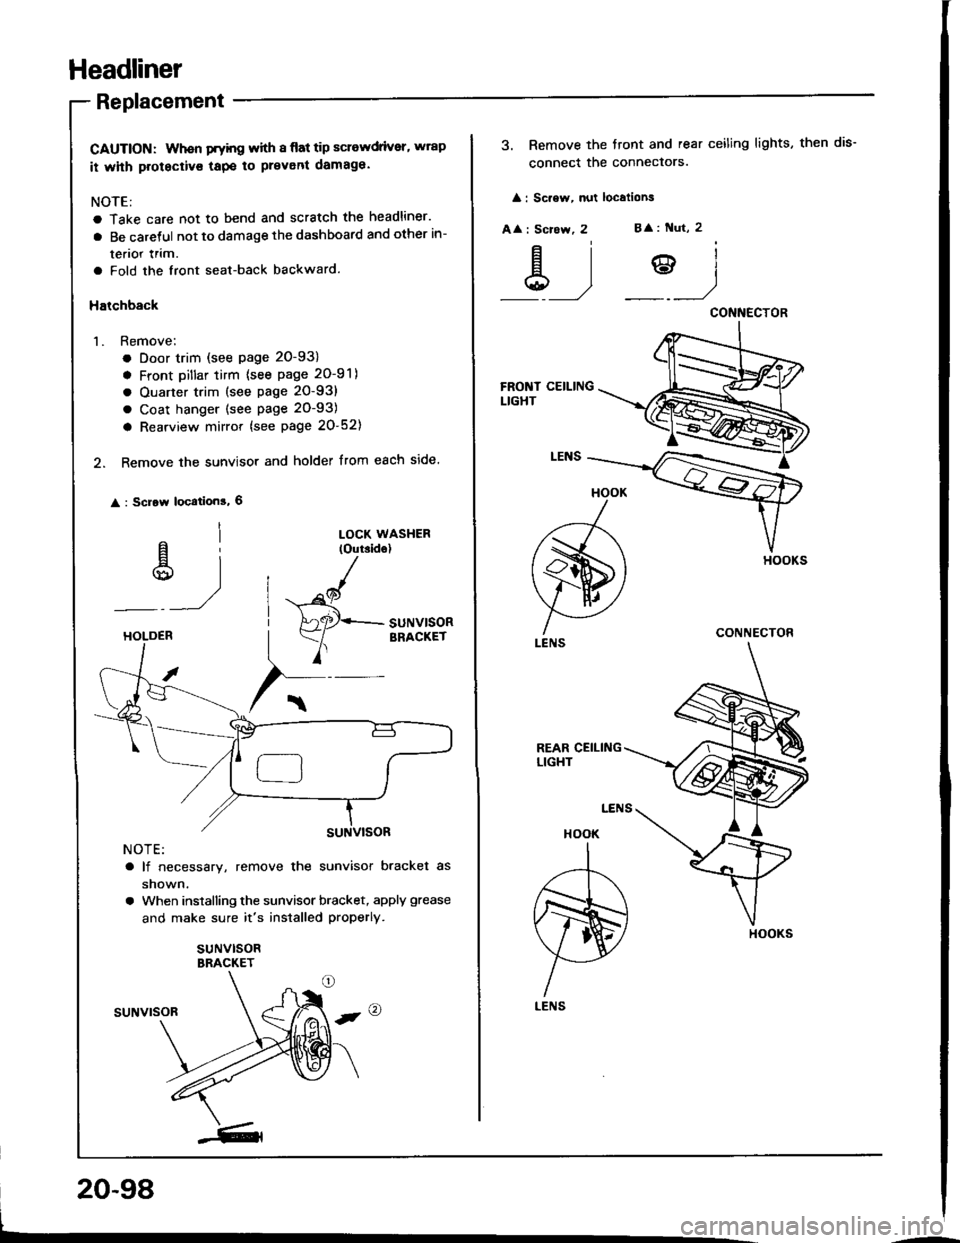
CAUTION: Whon Fyhg with I flat tip sclewdrivsr, wrap
it whh protectivs tapo to prevent damaga.
NOTE:
a Take care not to bend and scratch the headliner.
a Be caretul not to damage the dashboard and other in-
terior lrim.
a Fold the front seat-back backward.
Halchback
1. Remove;
. Door trim (see page 20-93)
a Front Dillar tirm {see page 20-91)
a Ouarter trim (see page 20-93)
a Coat hanger (see page 20-93)
a Rearview mirror {see page 20-52)
2. Remove the sunvisor and holder from each side.
: Scrow location!, 6
al
u)
LOCK WASHER(Outside)
"^/
HAaqr+- SUNV|SOR
Y
BRACKETHOLDEB
NOTE:
a lf necessary, remove the sunvisor bracket as
shown.
a When installing the sunvisor bracket, apply grease
and make sure it's installed properly.
suNvlsoRBRACKET
suNvrsoR
20-98
3. Remove the tront and rear ceiling lights, then dis-
connect the conneclors.
: Sc.ew, nut localions
A
: Scrcw, 2B
: Nut, 2
&)?)
HOOK
A
ffi)
LENS
HOOK
I
,r--T-\
m)
H
LENS
CONNECTOR
CONNECTOR
HOOKS
Page 968 of 1413
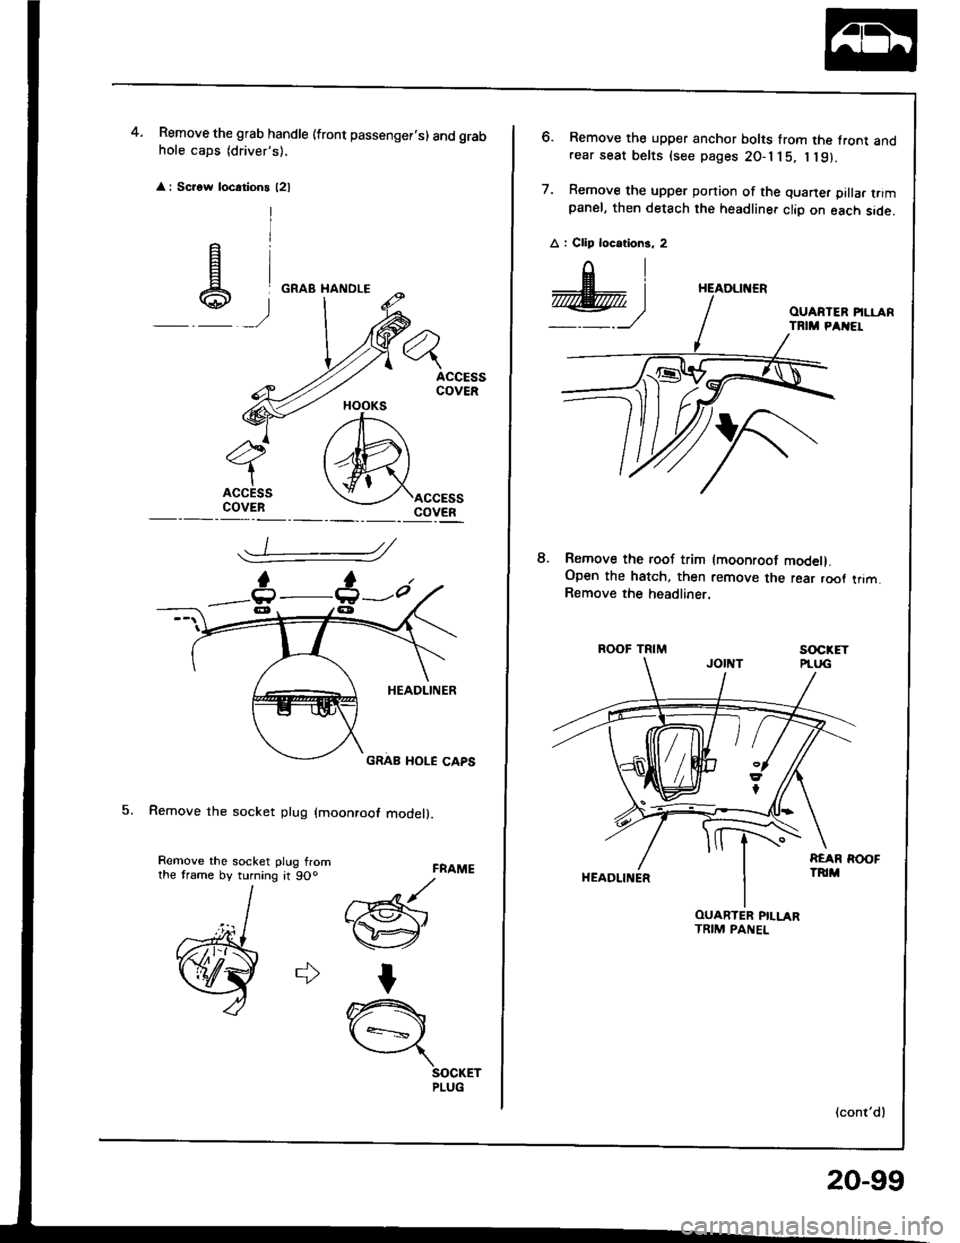
Remove the grab handle (front passenger.s) and grabhole caps (driver's),
: Scrow locations l2l
5. Remove the socket plug (moonroof model).
4.
FRAME
//Gr-@'
I
n{ +=s ,
SOCKETPLUG
HOOKS
_t :
e)
Remove the roof trim (moonroot model).Open the hatch, then remove the rear root trim.Remove the headliner.
ROOF TRIMsocxET
HEADLII{ER
(cont'dl
6. Remove the upper anchor bolts from the front andrear seat belts (see pages 2O-l j 5, I l9).
7. Remove the upper ponion of the quaner pilla. trimpanel, then detach the headliner clio on each side.
A : Clip locotions, 2
8.
HEADLINER
OUARTER PILLARTRIM PANEL
20-99
Page 969 of 1413
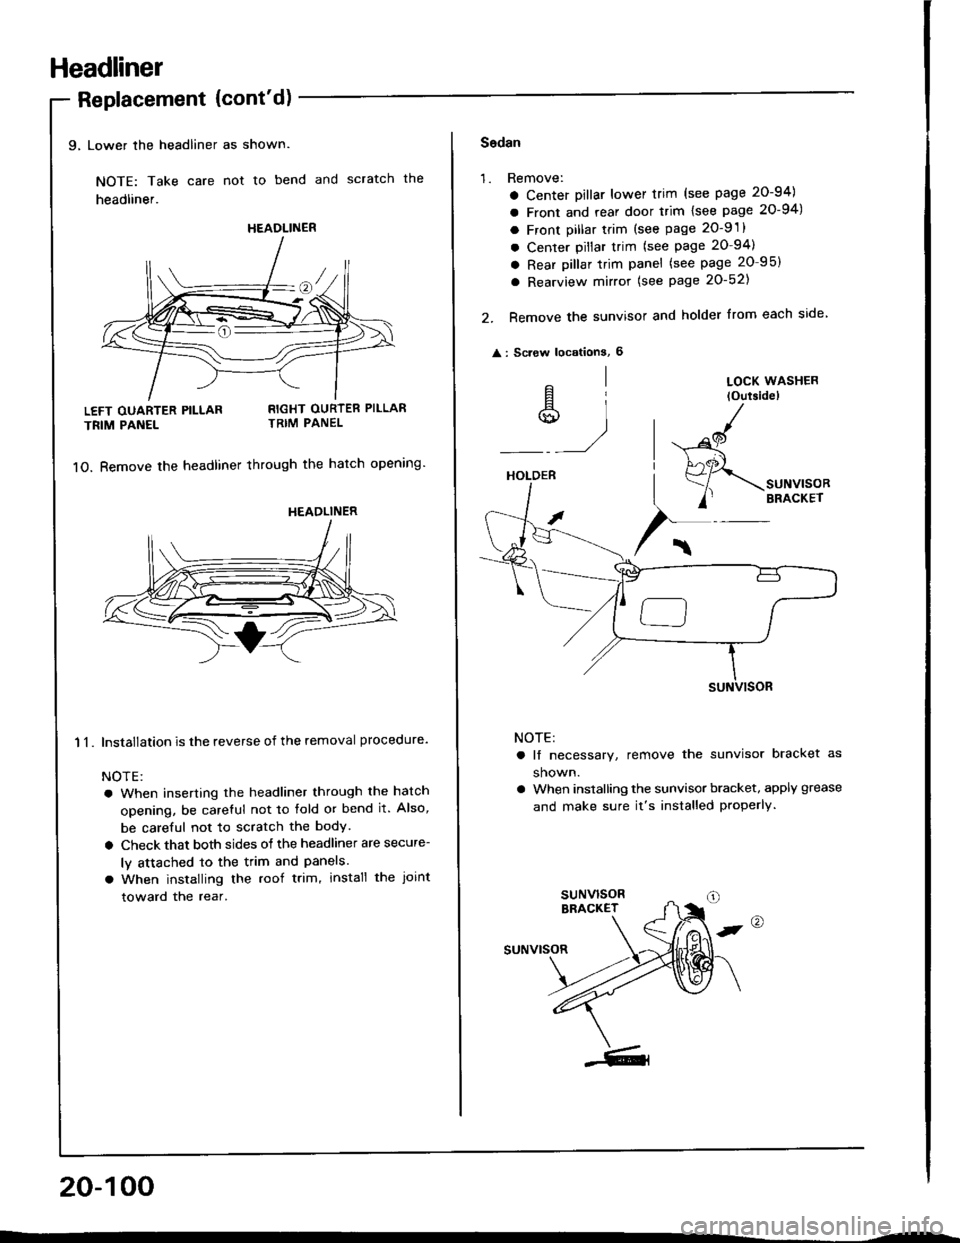
Headliner
9, Lower the headliner as shown.
NOTE: Take care not to bend and scratch the
headliner.
Replacement {cont'd)
LEFT OUARTER PILLAR
TRIM PANEL
11.
RIGHT OURTER PILLARTRIM PANEL
1O. Bemove the headliner through the hatch opening'
Installation is the reverse of the removal procedure.
NOTE:
a When inserting the headliner through the hatch
opening, be careful not to fold or bend it. Also,
be careful not to scratch the bodY.
a Check that both sides of the headliner are secure-
ly attached to the trim and Panels.
a When installing the roof trim, install the Joint
toward the rear.
20-100
HEADLINER
HEADLINER
Sodan
'1.Remove:
a Center Dillar lower trim (see page 20-94)
a Front and rear door trim lsee page 20-94)
a Front pillar trim (see page 2O-9 .
a Center pillar trim (see page 20-94)
a Rear pillar trim panel (see page 20 95)
a Rearview mirror (see Page 20-521
Remove the sunvisor and holder from each side
: Screw locationS, 6
2.
^l
s,1
LOCK WASHER
loutsidel
HOLDER
/
$-.unu,"o"
/' BRACKET
NOTE:
a lf necessary, remove the sunvisor bracket as
shown.
a When installing the sunvisor bracket, apply grease
and make sure it's installed properly.
,@
suNvrsoR
Page 973 of 1413
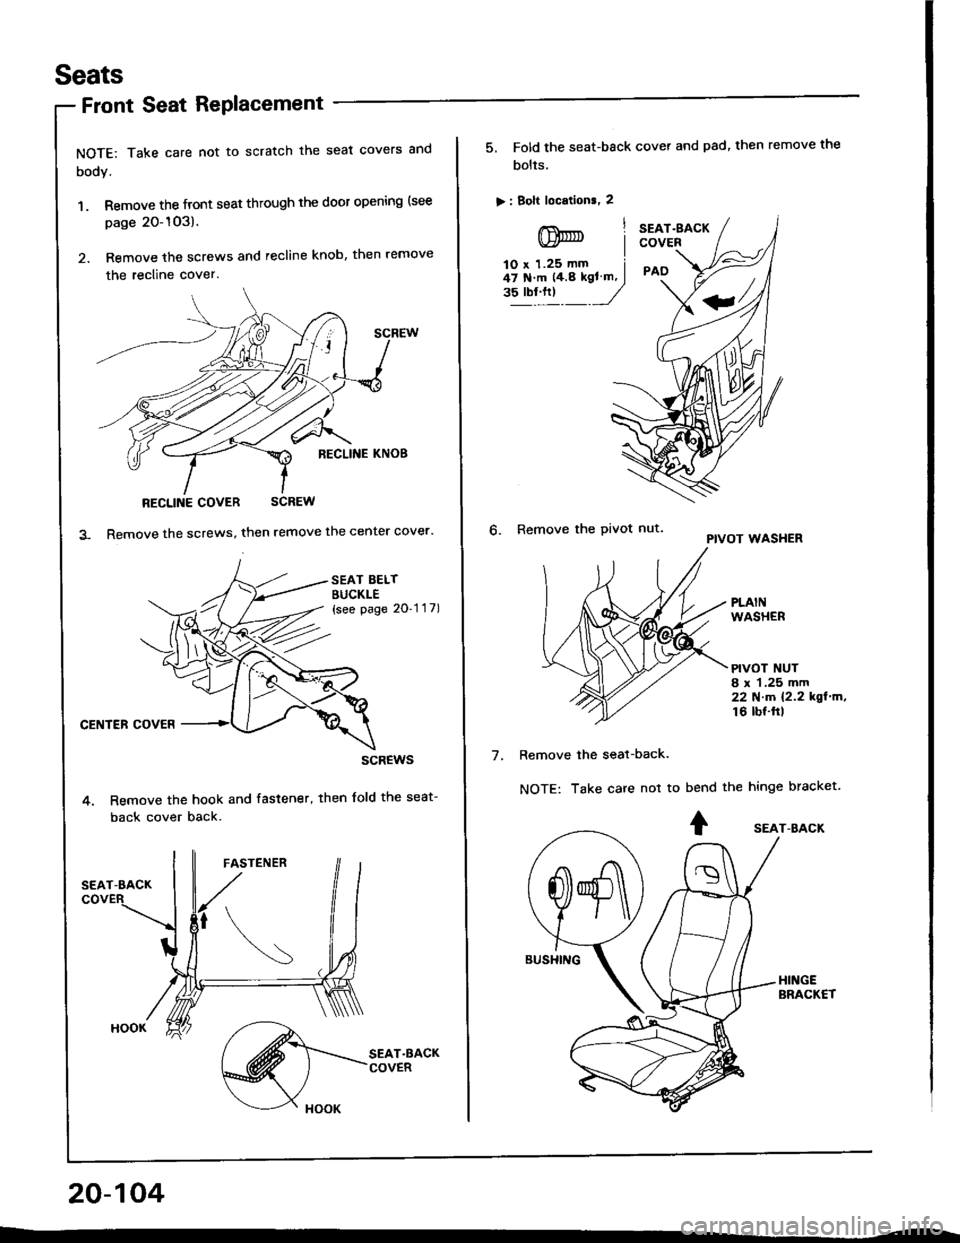
Seats
NOTE: Take care not to scratch the seat covers and
body.
1. Remove the front seat through the door opening (see
page 20-1O3).
2. Remove the screws and recline knob, then remove
the recline cover.
RECLINE COVER SCREW
Remove the screws, then remove the center cover.
SEAT BELTBUCKLE{see page 2O'1 '1 7)
CENTER COVER
scREws
Remove the hook and fastener, then lold the seat-
back cover back.
20-104
Front Seat RePlacement
5, Fold the seat-back cover and pad, then remove the
bolts.
> : Bolt location., 2
lnnrnt Iv)* |lO x 1.25 mm i47 N'm 14.8 kgl ln, I"?"!."t _J
SEAT.gACKCOVER
PAO
6. Remove the Pivot nut.PIVOT WASHER
PLAINWASHER
PIVOT NUT8 r 1.25 mm22Nm12.2kgl'm,16 lbf.ftl
7.Remove the seat-back.
NOTE: Take care not tobend the hinge bracket.
+ sEAr-BAcK
Page 976 of 1413
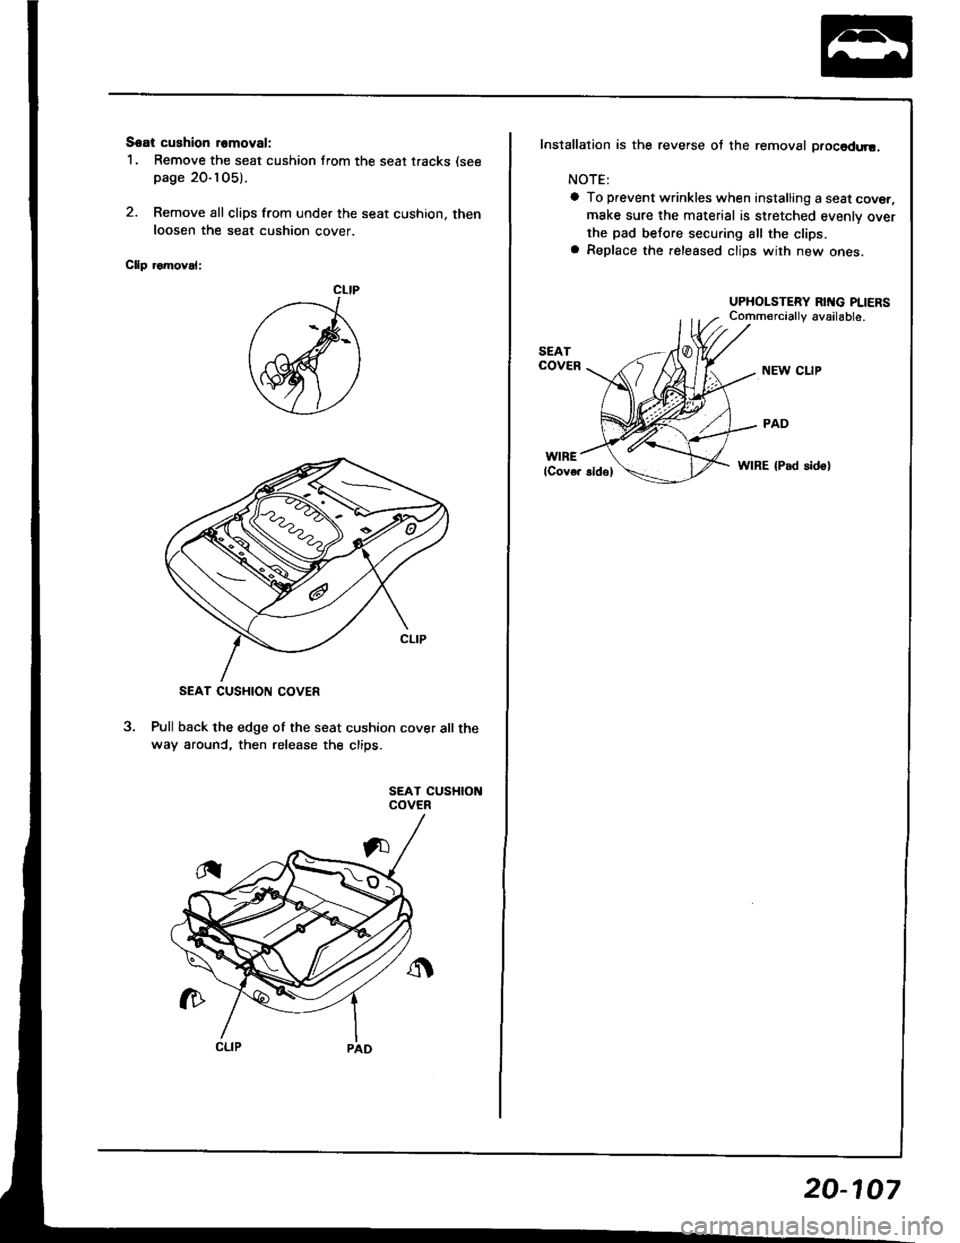
Seat cushion romoval:
1. Remove the seat cushion from the seat tracks (see
page 20-105).
2. Remove all clips from under the seat cushion, then
loosen the seat cushion cover
Cllp romoval:
Pull back the edge of the seat cushion cover all the
way arounC, then release the clips.
SEAT CUSHIONCOVER
2
CLIP
SEAT CUSHION COVER
Installation is the reverse of the removal ptocadtr!.
NOTE:
a To prevent wrinkles when installing a seat cover,
make sure the material is stretched evenly over
the pad before securing all the clips.a Replace the.eleased clips with new ones.
UPHOLSTERY RING PLIERS
NEW CLIP
PAD
WIRE {Pad sido}
20-107
Page 977 of 1413

Seats
Rear Seat Replacement
Hatchback
NOTE: Take care not to scratch the seat covers and
body.
1. Fold the seat-backs {orward.
2. Remove the clips, then fold the trunk mat.
V: Clip locations, 14
I
+ |
v/J
20-108
(see page 20-1Og)
SEAT.BACKS
TRUNK MAT
3. Remove the cliD pin on each side.
Slide the seat-backs outward, then remove the seat-
backs from the pivot bracket.
SEAT.BACK
SEAT-BACK PIVOTBRACKET
CLIP PIN
Page 978 of 1413
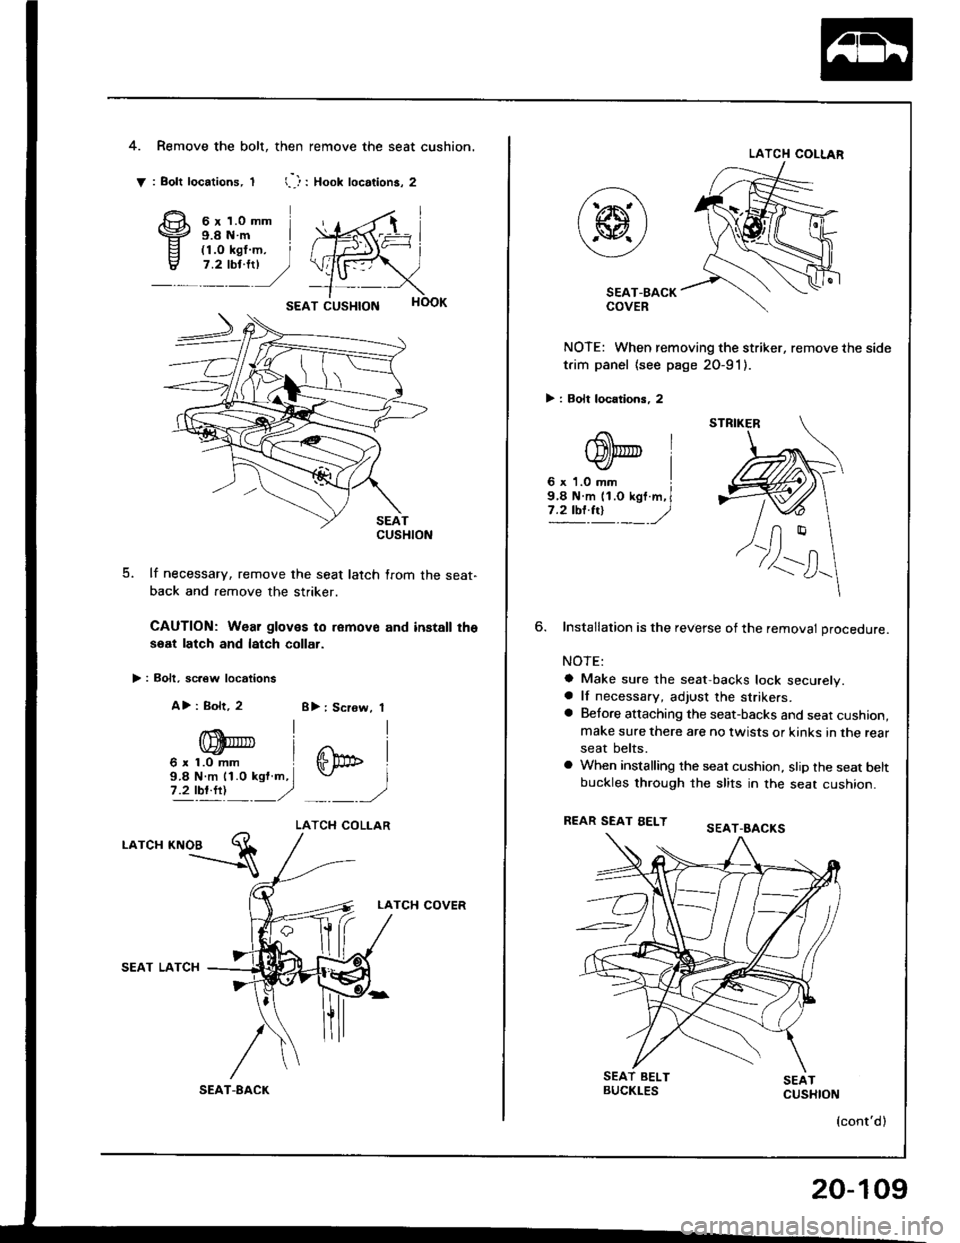
4.Remove the bolt, then remove the seat cushion.
: Bolt locations, t l--): Xoot locations, 2
6 r 1.0 mm9.8Nm I
SEAT CUSHION
5. lf necessary, remove the seat latch lrom the seat-
back and remove the striker.
CAUTION: Wear gloves to remov€ and install the
soat latch and latch collar.
> : Bolt, sc.€w locrtions
A>: Bolt, 2 8): Screw, 1
^{ll
.,,W '
Gp" I9.8 N.m 11.0 ksf m.I I7 2 tP!ft!---/'� ./
LATCH COLLAR
.otc" rtroa El
LATCH COVER
SEAT LATCH
t'
T-8ACK
CUSHION
LATCH COLIAR
SEAT-BACKCOVER
NOTE: When removing the striker, remove
t.im panel (see page 20-91).
> : Bolt locations, 2
the side
.a |tDt@ l
NOTE:
a Make sure the seat,backs lock securely.a lf necessary, adjust the strikers.a Betore attaching the seat-backs and seat cushion,make sure there are no twists or kinks in the rear
seat belts.
a When installing the seat cushion, stip the seat beltbuckles through the slits in the seat cushion.
REAR SEAT EELT
(cont'd )
STRIKER
20-109
Page 979 of 1413
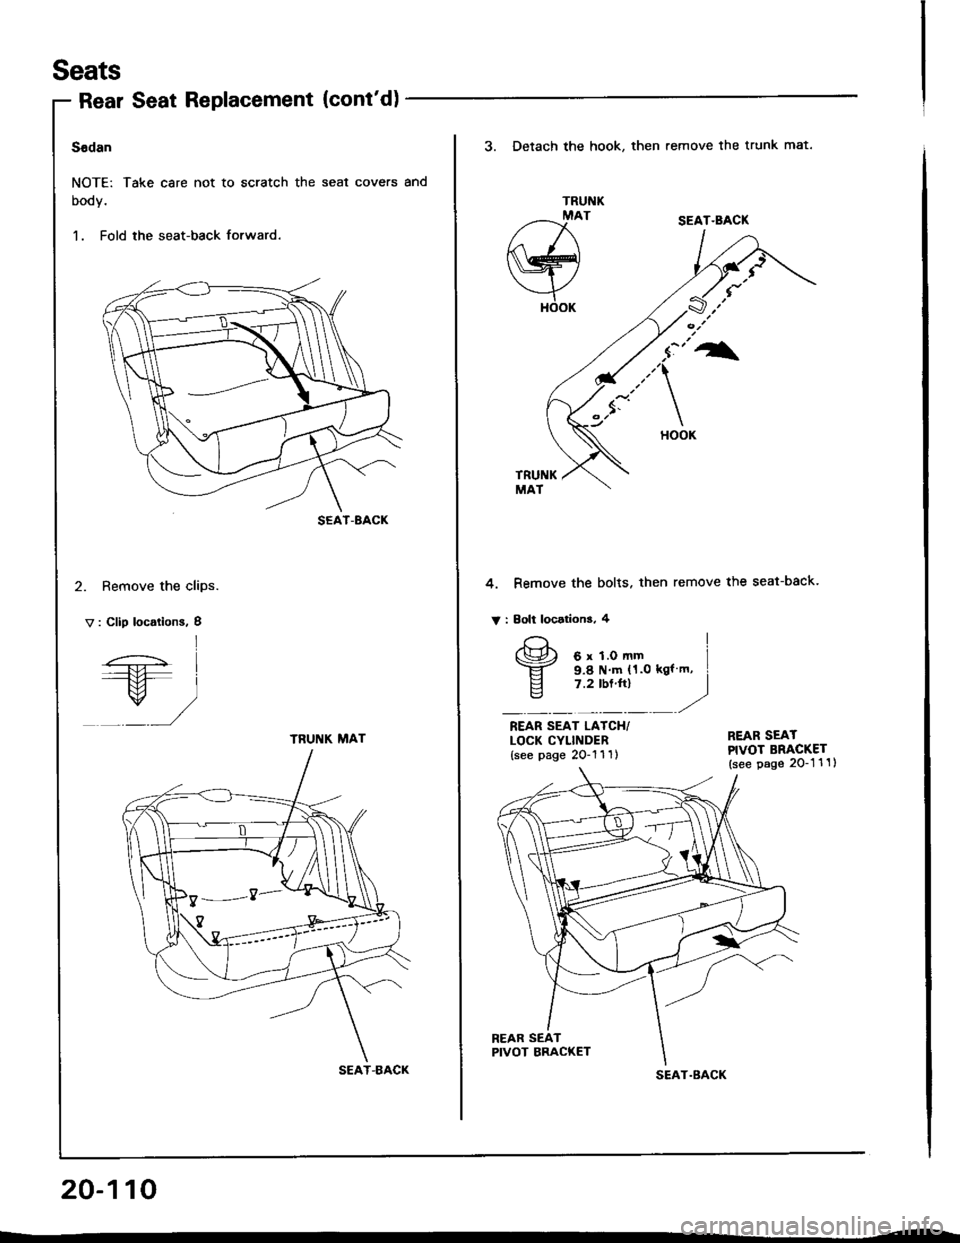
Seats
Rear Seat Replacement (cont'd)
Sedan
NOTE: Take care not to scratch the seal covers and
booy.
1. Fold the seat-back forward.
2. Remove the clips.
V : Clip locations, I
SEAT-8ACK
l
/-.;- I----+tl l---M- I
/ /,/
TRUNK MAT
SEAT-BACK
20-110
3. Detach the hook, then remove the trunk mat.
TRUNKMAT
a-^I{ \
Nry
YHOOK
SEAT.BACK
TRUNKMAT
4. Remove the bolts. then remove the seat-back.
V : Eolt locations, 4
REAR SEAT LAICH/LOCK CYLINDER{see page 2O-'l 1 1l
REAR SEATPIVOT BRACKET(see page 2O-1 1 1)
REAR SEATPIVOT BRACKET
I
I gel?"Til.*,,", i
E 7.2 tbt'trl I" -----r"
SEAT.BACK