Page 98 HONDA INTEGRA 1994 4.G Workshop Manual
[x] Cancel search | Manufacturer: HONDA, Model Year: 1994, Model line: INTEGRA, Model: HONDA INTEGRA 1994 4.GPages: 1413, PDF Size: 37.94 MB
Page 980 of 1413
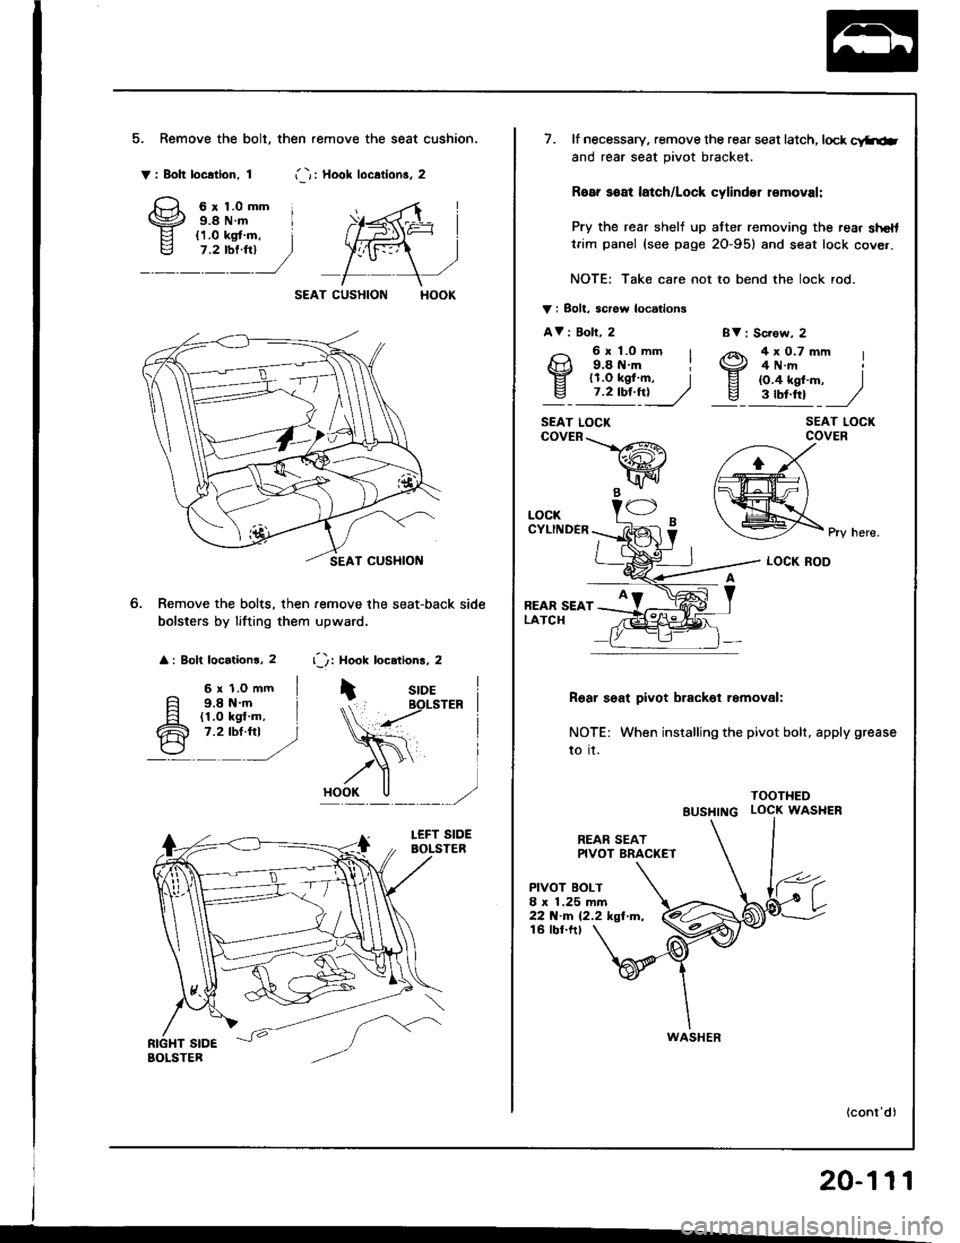
5. Remove the bolt, then .emove the seat cushion.
Y: Bolt location. 1i -r i Hool loc.lion3. 2
6r1.0mm i9.8 N.m I
SEAT CUSHION
Remove the bolts, then remove the seat-back side
bolsters by lifting them upward.
: Bolt locationr, 2 r'): Hook locetions, 2
6 r 1.o mm I9.8 N.m i(1.0 kgl'm, I7.2 tbt.fti )
BV : Sc?ow, 2
SEAT LOCKCOVER
Pry here.
LOCK ROD
R6ar seat pivot brackol removal:
NOTE: When installing the pivot bolt, apply grease
to it.
TOOTHED
BUSHTNG LOCK WASHER
REAR SEATPIVOT BRAC(ET
PIVOT BOLT8 x 1.25 mm22 N.m (2.2 kgf m,16 tbf.ftt
20-111
7. lf necessary, remove the rear seat latch, lock c!ftiab
and rear seat pivot bracket.
Roar soat latch/Lock cylinder r€moval:
Pry the rear shelj up after removing the rear shelttrim panel (see page 2O-95) and seat lock cover.
NOTE: Take care not to bend the lock rod.
V i Bolt. scrow locations
AV i Boll, 2
9: l;o--' I4x0.7mm I4 N.rrt
EI lr.o tgf .m, Iv_ 7.2 tbf.ft!____//
9.8 tt.m il1.O kgf.m, I{O.4 kgf'm, )3tbt.ttt J
SEAT LOCKcovER\-_L/-R\
wB -"1/ -
LOCKCYLINDER
REAR SEATLATCH
WASHER
Page 981 of 1413
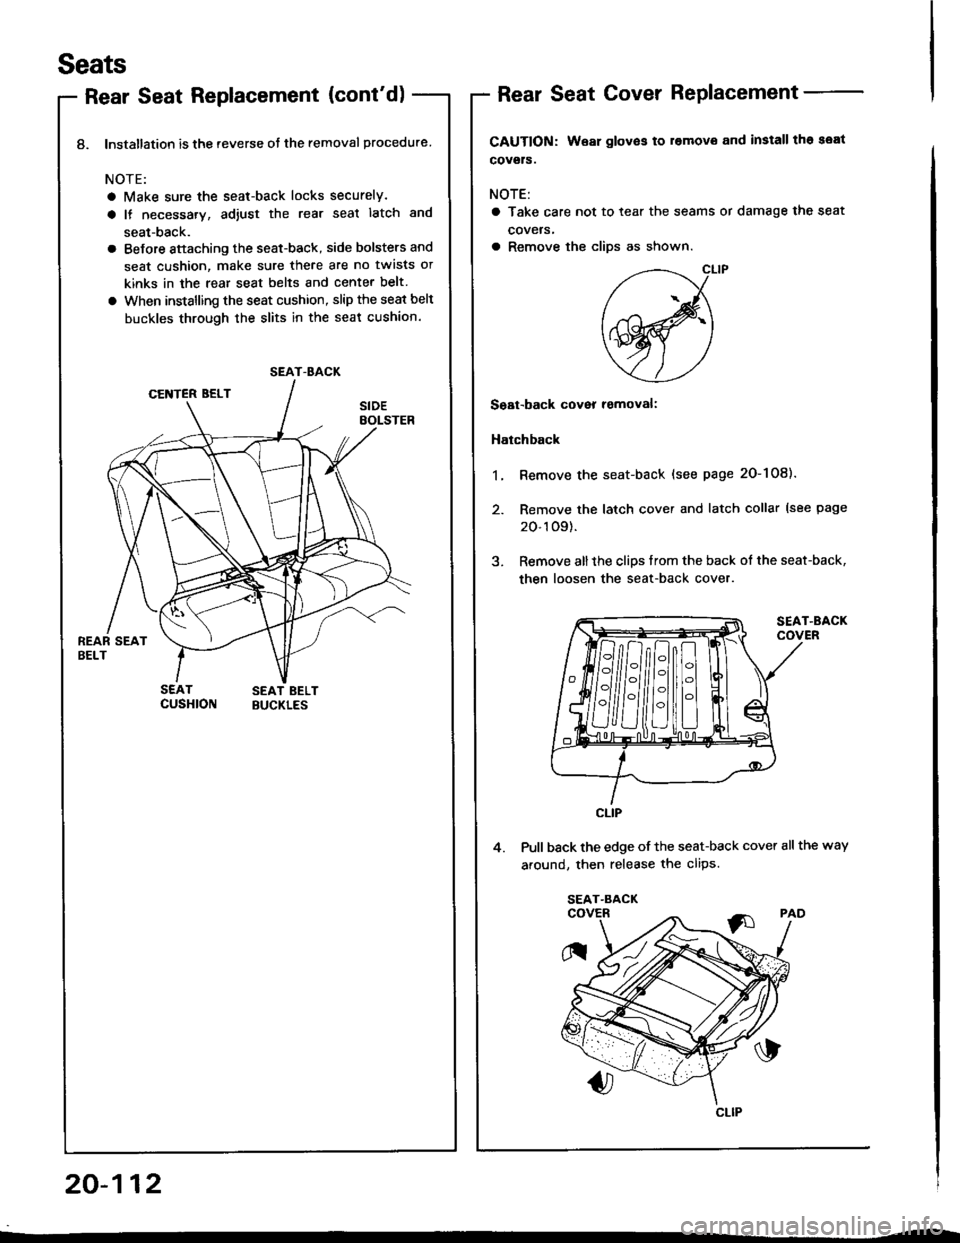
8. lnstallation is the reverse ot the removal procedure
NOTE:
a Make sure the seat-back locks securely.
a It necessary, adiust the rear seal latch and
seat-back.
a BeJore sttaching the seat-back, side bolsters and
seat cushion, make sure there are no twlsts or
kinks in the rear seat belts and center belt
a When installing the seat cushion, slip the seat belt
buckles through the slits in the seat cushion.
1.
2.
SEAT-BACK
Seats
Rear Seat Replacement (cont'd)Rear Seat Cover RePlacement
CAUTION: Wear glov€s to l€movo and install tho seat
covgls.
NOTE:
a Take care not to tear the seams or damage the seat
covels,
a Remove the cliDs as shown.
Soat-back cover romoval:
Hatchback
Remove the seat-back (see page 20-108).
Remove the latch cover and latch collar (see page
20-109).
Remove allthe clips trom the back of the seat-back,
then loosen the seat-back cover.
SEAT.BACKCOVER
4.Pull back the edge of the seat-back cover all the way
around, then release the clips.
ilg
E
F]
CLIP
SEAT-BACK
CLIP
20-112
Page 982 of 1413
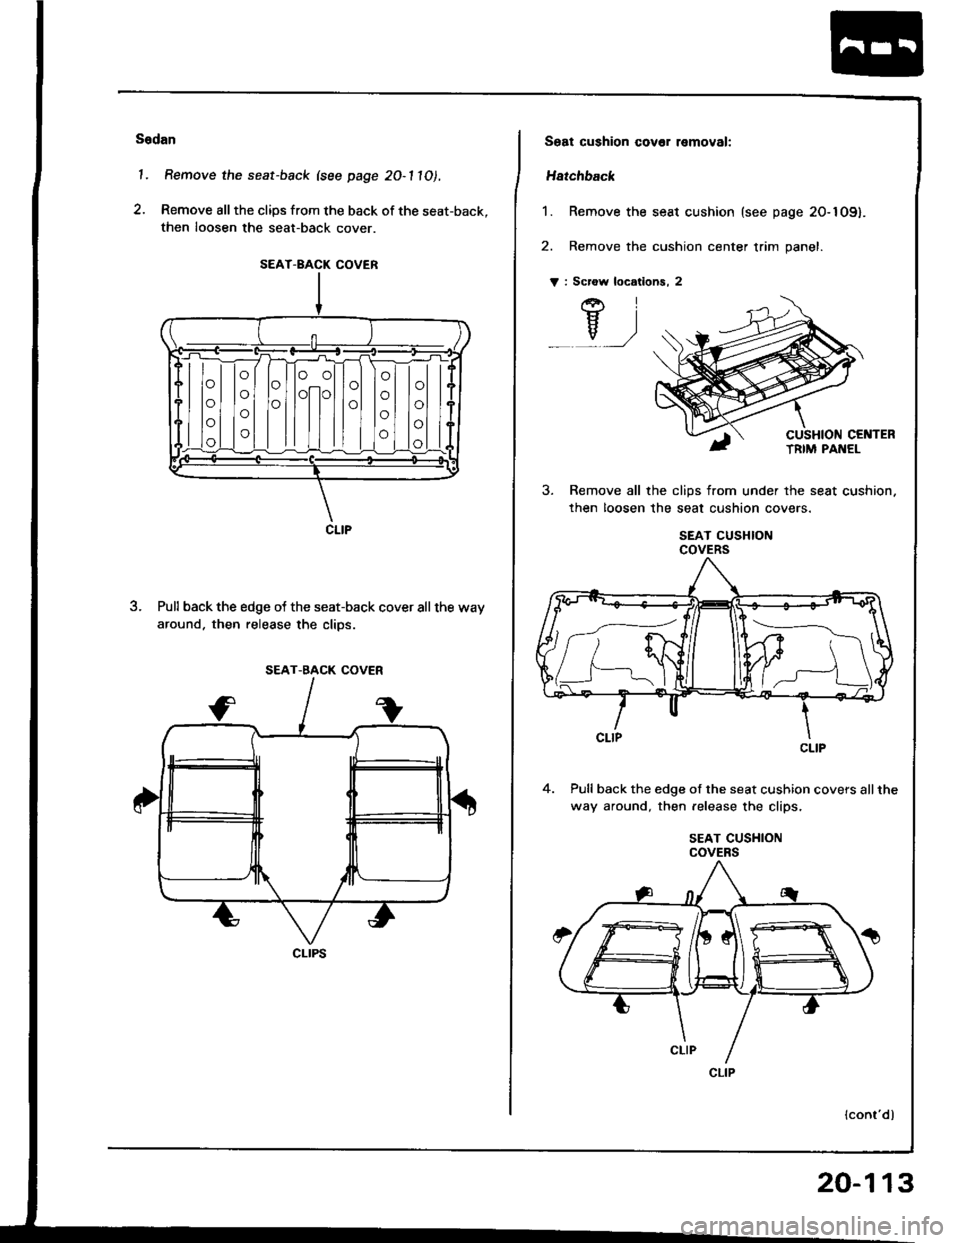
Sodan
l. Remove the seat-back (see page 2O-11O1.
2. Remove all the clips from the back of the seat-back,
then loosen the seat-back cover.
3. Pull back the edge of the seat-back cover all the way
around, then release the clios.
SEAT-BACK COVER
CLIP
SEAT-8ACK COVER
CLIPS
Seat cushion cover lsmoval:
Harchbacr(
1. Remove the seat cushion (see page 20-lOg).
2. Remove the cushion center trim panel.
V : Scrow locations, 2
/+r I
YIv ,-.,)
J.Remove all :he clips from under the seat cushion.
then loosen the seat cushion covers.
SEAT CUSHIONcovERs
Pull back the edge of the seat cushion covers allthe
way around, then release the clips.
SEAT CUSHIONcovEBs
4.
CEITTER
CLIP
CLIP
lconl'dl
20-113
Page 983 of 1413
Seats
Rear Seat Cover Replacement
the
(cont'd)
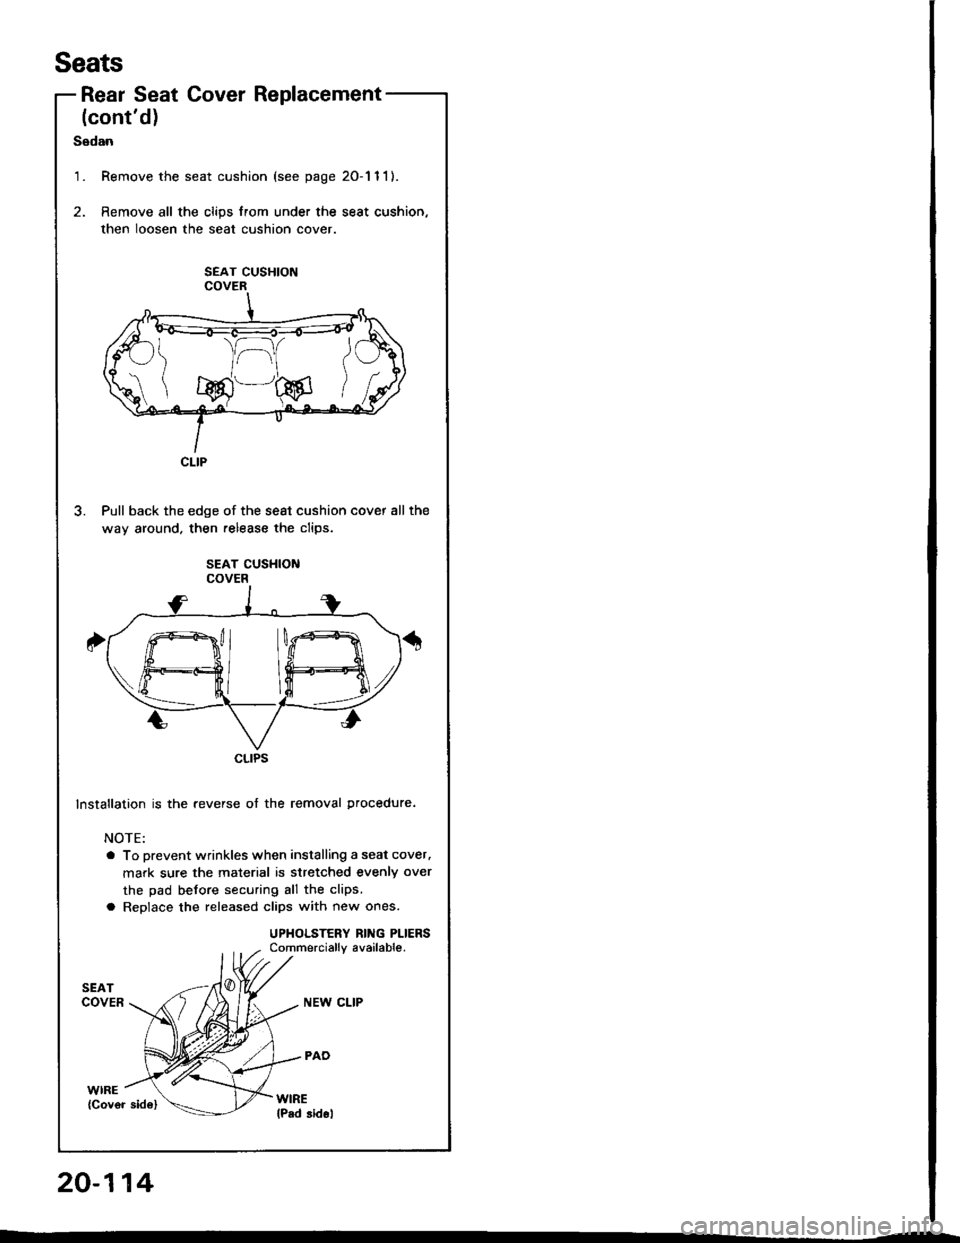
S6dan
1.Remove the seat cushion (see page 20-1 1 1).
Remove all the clips from under the seat cushion,
then loosen the seat cushion cover
SEAT CUSHIONCOVER
Pull back the edge of the seat cushion cover all
way around. then release the clips.
SEAT CUSHIONCOVER
Installation is the reverse of the removal procedure.
NOTE:
a To prevent wrinkles when installing a seat cover.
mark sure the material is stretched evenlY over
the pad before securing all the clips.
a Replace the released clips with new ones.
UPHOLSTERY RING PLIERSCommercially available.
{Cover sid6}
)rir
ry"M
CLIP
t)llll
CLIPS
20-114
Page 984 of 1413
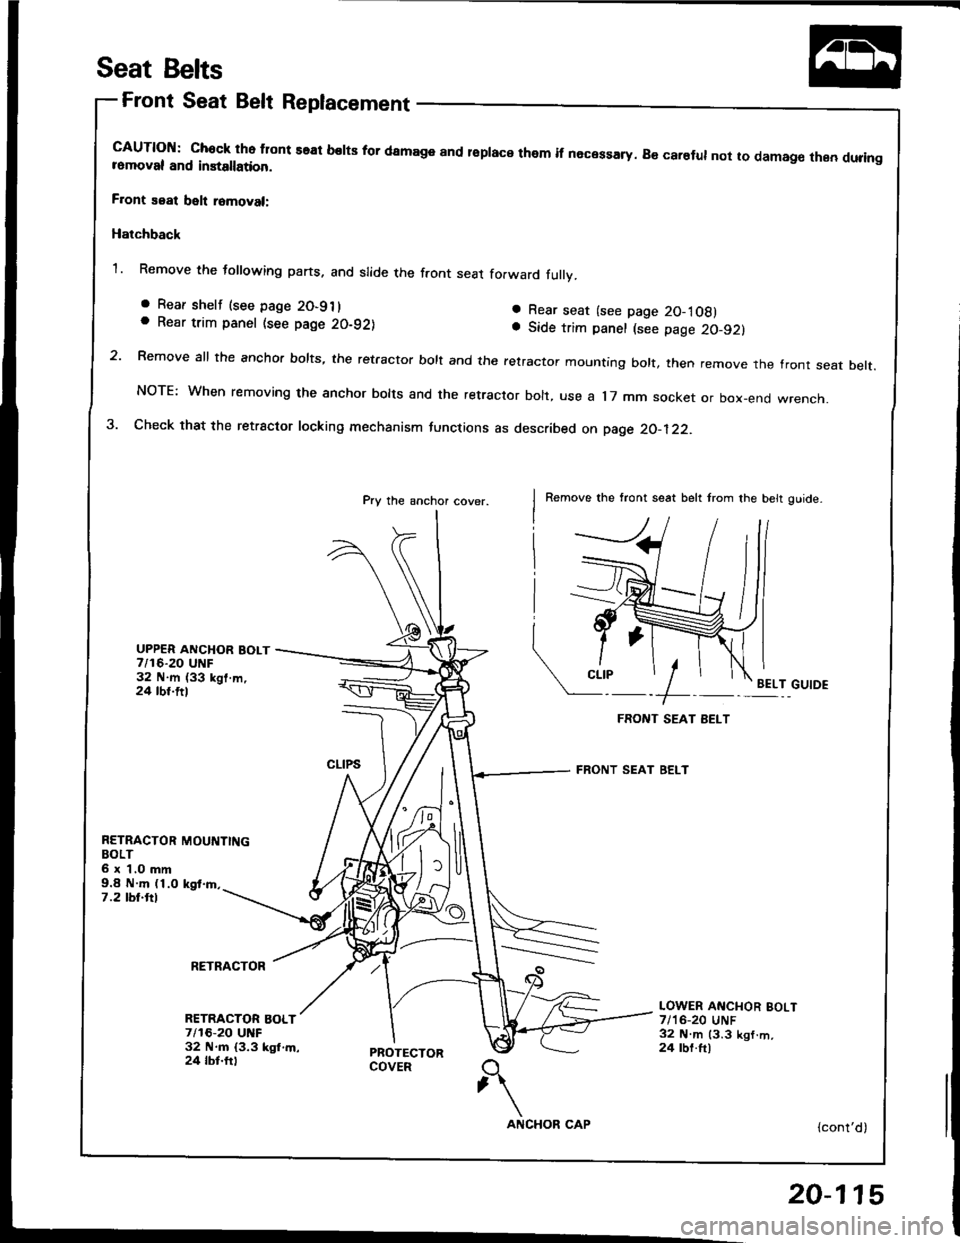
Seat Belts
Front Seat Belt Replacement
cAUTloN: chock tho tlont seal belts for damage and lsplace them if necessary. B€ carelul not to damag€ then duringromoval and installation.
F.ont seat belt romoval:
Hatchback
1. Remove the following parts, and slide the front seat fo.ward fullv.
a Rear seat (see page 20-1Og)a Side trim panel (see page 2c,-92}
2 Remove all the anchor bolts, the retractor bolt and the retractor mountrng bott, then remove the front seat belt.
NOTE: When removing the anchor bolts and the retractor bolt, use a l7 mm socket or box-end wrench.
3. Check that the retractor locking mechanism functions as described on page 20_122-
Pry the anchor cover.Remove the tront seat belt trom the belt ouide-
UPPER ANCHOR BOLT7/16-20 UNF32 N.m (33 kgl.m,24 tbt.ttlEELT GUIDE
RETRACTOR MOUNTINGBOLT6 x 1.O mm9.8 N.m (1.0 kgt.rn.7.2 tbl.ftl
RETRACTOR
. Rear shelf (see page 20-911. Rear trim panel (see page 20-921
RETRACTOR BOLT7/16-20 UNF32 ltl.m {3.3 kgl,m,24 tbt.ftl
LOWER ANCHOR BOLT7/'16-20 UNF32 N.m 13.3 kgl.m,24 rbf.ft)
{cont'd)
20-115
Page 985 of 1413
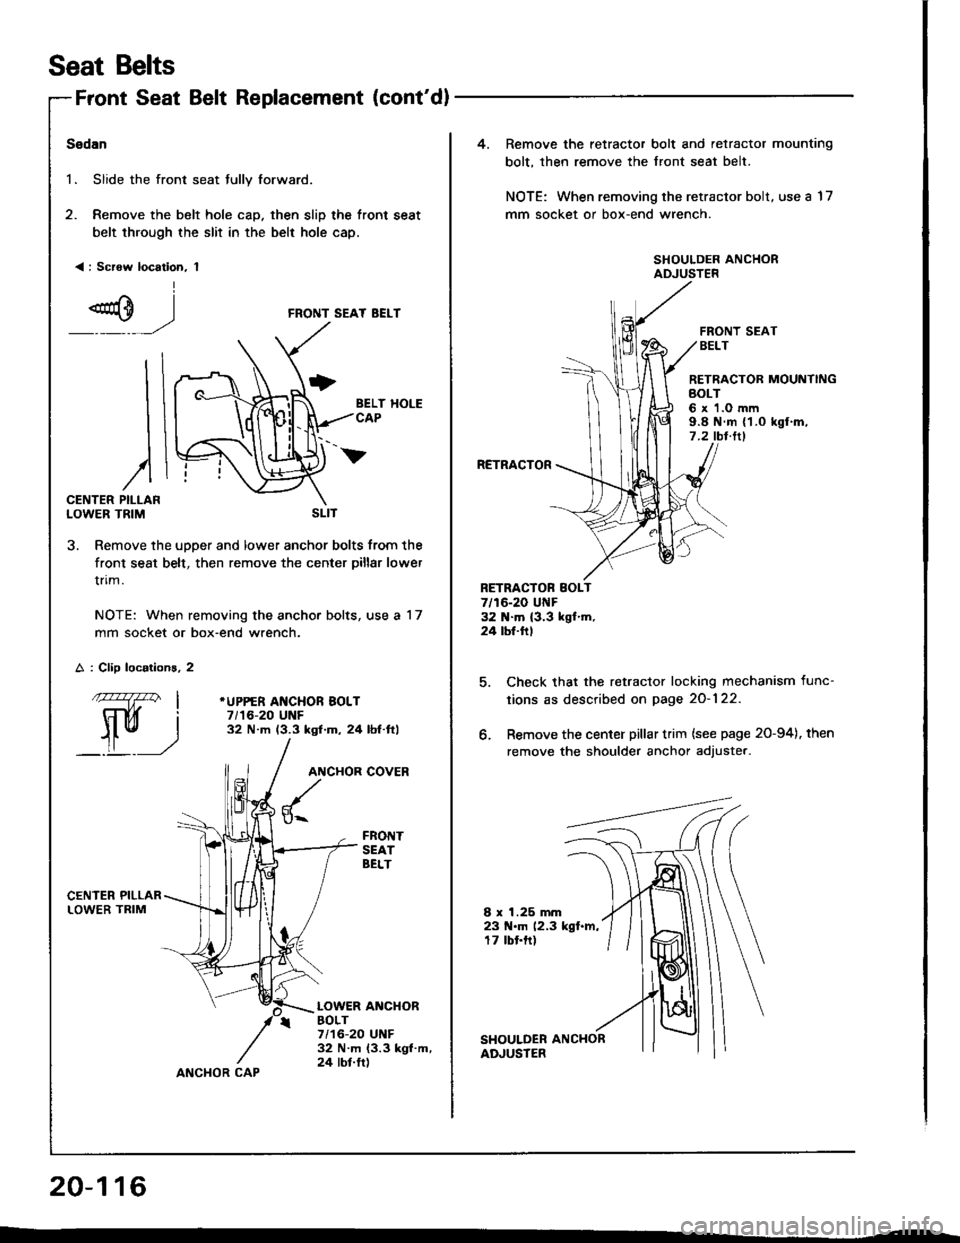
Seat Belts
Front Seat Belt Replacement {cont'dl
Sedan
1. Slide the front seat tully forward.
2. Remove the belt hole cap. then slip the front seat
belt through the slit in the belt hole cap.
< : Screw location, 1
I
FRONT SEAT BEI.T
BELT HOLECAP
I
I
I
)PILLARTRIM
A : Clip locations, 2
ffil'" -1t'- l
rui
_.| _J
v
CENTERLOWER
3. Remove the upper and lower anchor bolts from the
front seat belt, then remove the center pillar lower
trim.
NOTE: When removing the anchor bolts, use a 17
mm socket or box-end wrench.
*UPPER ANCHOR BOLT7/16-20 UNF32 N.m (3.3 ksf'm, 24 lbf.ftl
ANCHOR
u-.
COVER
FRONTSEATBELT
LOWER ANCHORBOLT7/16-20 UNF32 N.m (3.3 kgt.m,24 tbt.ftlANCHOR CAP
20-116
SLIT
4.Remove the retractor bolt and retractor mounting
bolt, then remove the front seat belt.
NOTE: When removing the retractor bolt, use a 17
mm socket or box-end wrench.
FRONT SEATBELT
RETRACTOB MOUNTINGBOLT6 x 'l.O mm9.8 N.m {1.o kgl.m,7 .2 tbt.ltl
RCTRACTOR
RETRACTOF SOLT7/16-20 UI{F32 N.m {3.3 kgl.m.24 tbf.ftl
6.
8 x 1.25 mm23 N.m 12.3 kgl.m,17 tbt.ft)
Check that the retractor locking mechanism func-
tions as described on page 2O-122.
Remove the center pillar trim {see page 20-94}. then
remove the shoulder anchor adjuster.
Page 986 of 1413
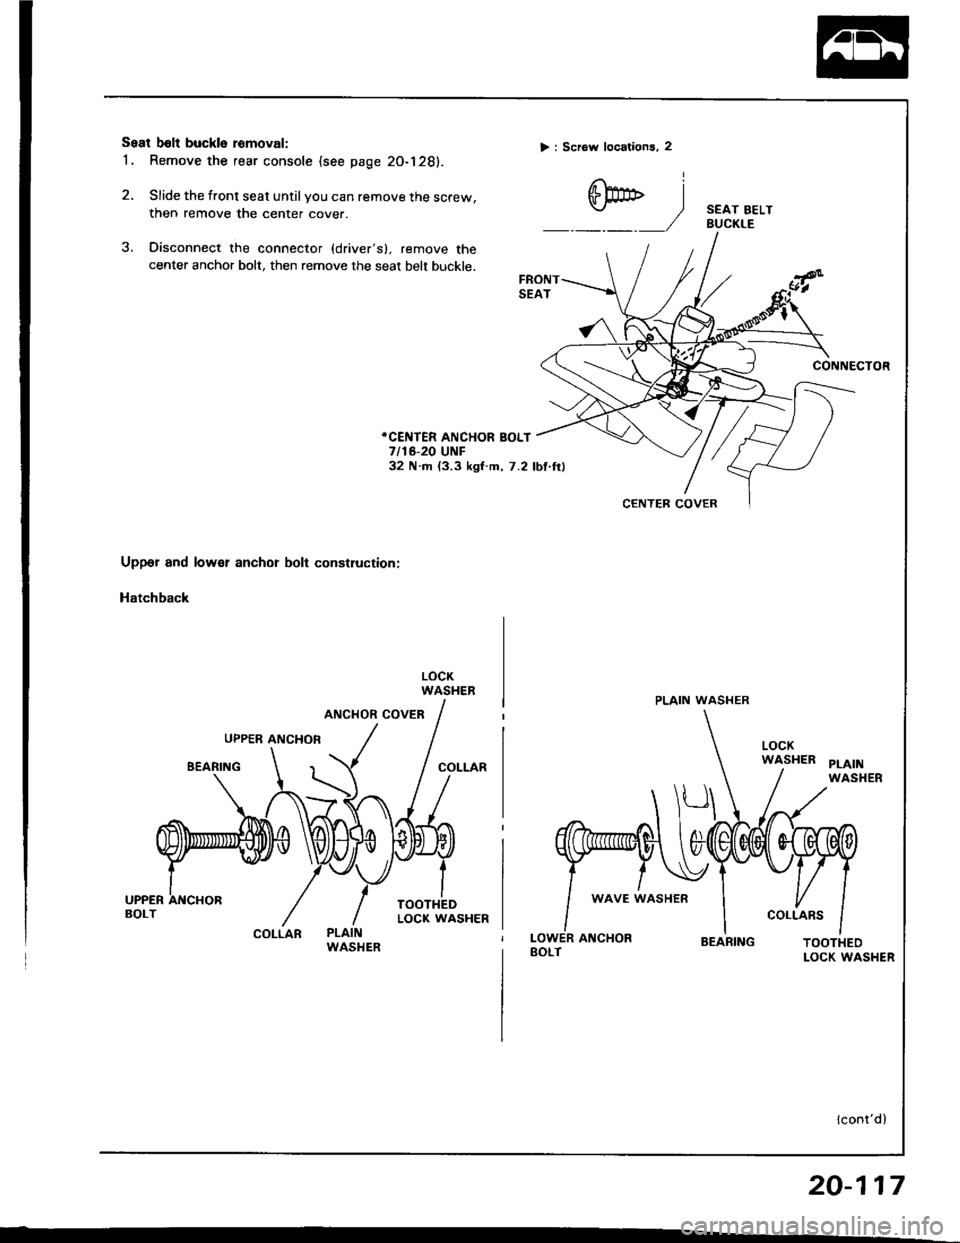
Seal b6lt buckle romoval:
1 . Remove the rear console (see page 20-128).
2. Slide the front seat until you can remove the screw.
then remove the center cover.
3. Oisconnect the connector (driver's), remove the
center anchor bolt, then remove the seat belt buckle.
> : Scrow locations, 2
CENTEB COVER
PLAIN WASHER
SEAT BELTBUCKLE
CONNECTOR
Upper and lower anchor bolt construction:
Hatchback
COLLARPLAINWASI{ER
iCENTER ANCHOR BOLT7/16-20 UNF32 N.m (3.3 ksf.m,7.2 lbf.ftl
LOCKWASHER
LOWER A CHORBOLTBEARING
lcont'd)
20-117
Page 988 of 1413
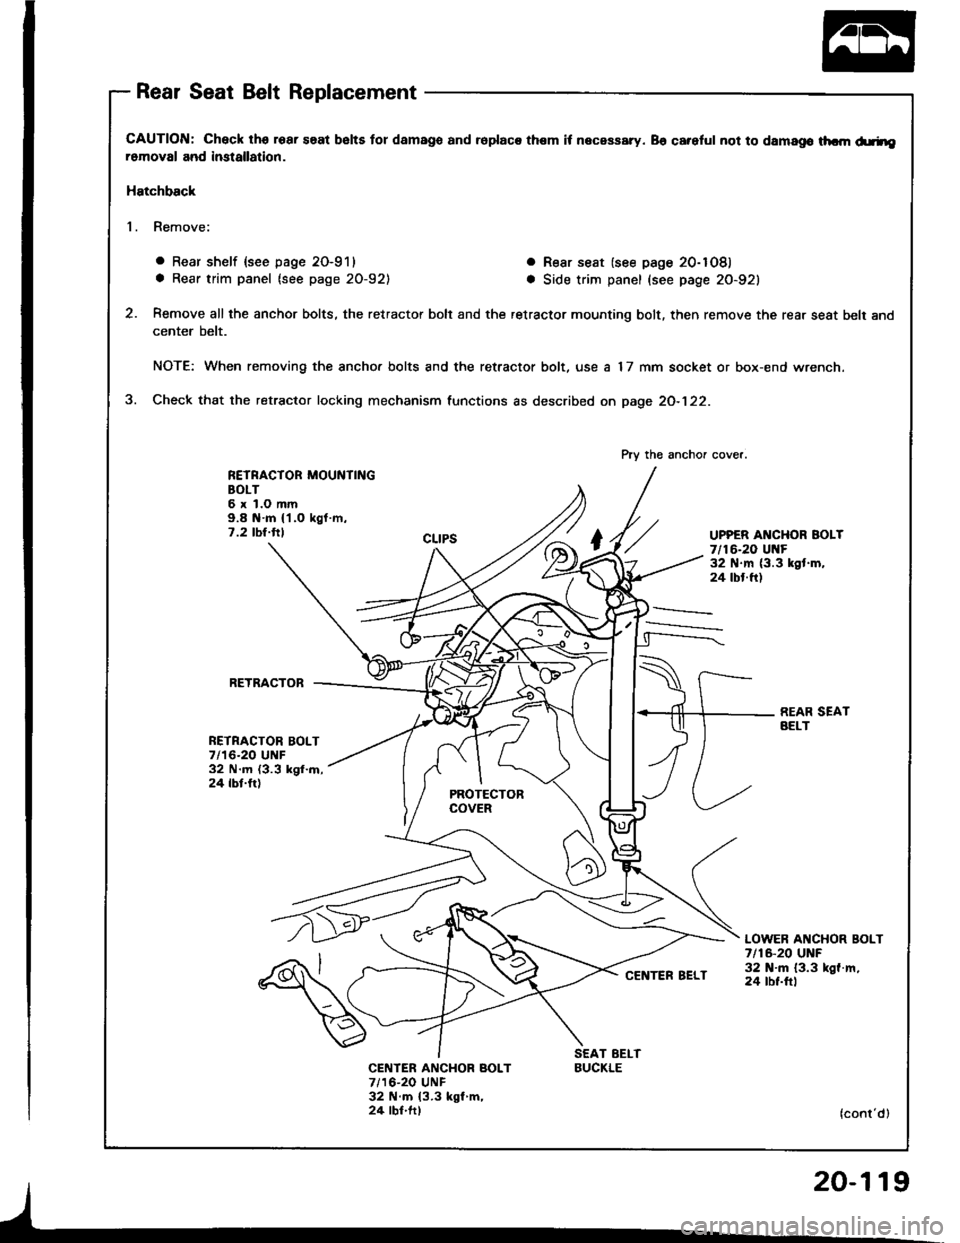
Rear Seat Belt Replacement
CAUTION: Check lhs roar saat bslts tor damago and ioplaca them it necassary. 86 careful not to damago thcm d.rheromoval and imtallation.
Hatchback
1. Remove:
o Rear shelf {see page 20-911
a Rear trim panel (see page 20-921
. R€ar seat (see page 20-1081
a Side trim panel (see page 20-921
Remove all the anchor bolts, the retractor bolt and the retractor mounting bolt, then remove the rear seat belt and
center belt.
NOTE: When removing the ancho. bolts and the retractor bolt, use a 17 mm socket or box-end wrench.
Check that the retractor locking mechanism functions as described on page 2O-122.
RETRACTOR MOUNTINGBOLT6xl.Omm9.8 N.m {'l.O kgf.m,7 .2 tbt.ttlUPPER ANCHOR BOLT7/16-20 Ul{F32 N.m (3.3 kgt.m,24 tbt.ft)
RETRACTOB
NETRACTOR BOLT7/16-20 UNF32 N.m (3.3 kgl.m,24 tbt.fr)
REAR SEATAELT
LOWER ANCHOR BOLT7 t16-20 UNF32 N'm 13.3 kgf.m,24 tbt.ftl
CENTER ANCHOR BOLT7/16-20 UNF32 N.m {3.3 kgl m,24 lbf.ft)
Pry the anchor cover.
BUCKLE
(cont'd)
Page 989 of 1413
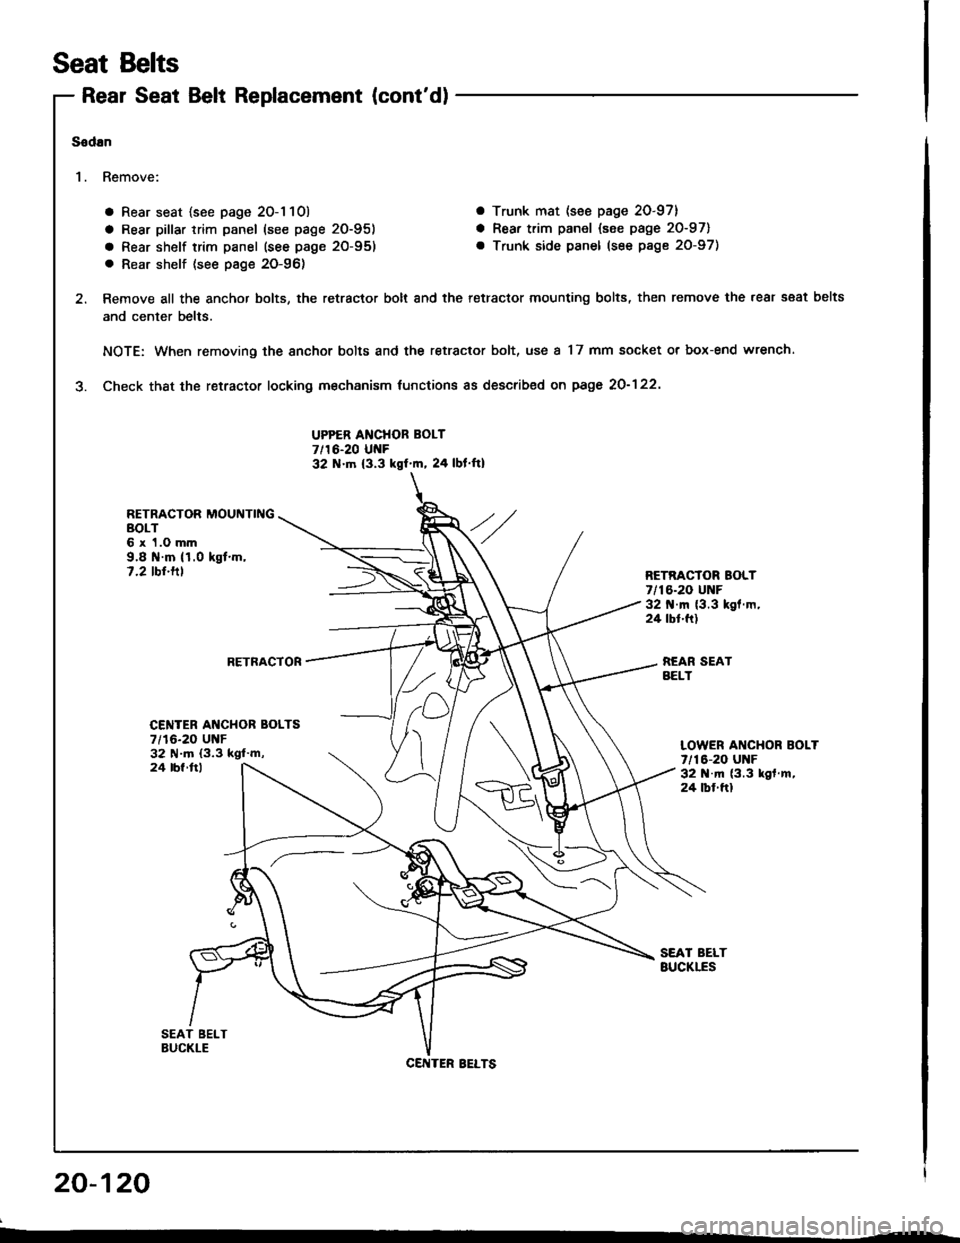
Rear Seat Belt Replacement (cont'd)
a Rear seat {see page 20-1 10) a Trunk mat (see page 20-97}
a Rear pillar trim panel (see page 20-951 a Rear trim panel {see page 20-971
a Rear shelf trim panel (see page 20-95) . Trunk side panel (see page 20-97)
. Rear shelf (see pag€ 20-96)
Remove all the anchor bolts, the retractor bolt and the retractor mounting bolts, then remove the rear s€at belts
and center belts.
NOTE: When removing the anchor bolts and the retractor bolt, use a 17 mm socket or box-end wrench.
Check thst the retractor locking m€chanism tunctions as described on page 2O-122'
UPPER ANCHOR BOLT7/16-20 UNF32 N.tn (3.3 kgf'm, 24 lbl ft)
RETRACTOR MOUNTINGBOLT6 x 1.0 mm9.8 il.m (1.0 kgt.m,7.2 tbt.tllRETRACTOR BOLT7/16-20 UNF32 .m (3.3 kgl.m,24 tbt.ft)
RETRACTORREAR SEATBELT
Seat Belts
Sodan
'I . Remove:
20-120
CENTER AI{CHOR BOLTS7/16-20 UNF32 N.m (3.3 ksl'm,LOWER ANCHOR BOLT7/16-20 UNF32 N.m (3.3 kgf .m,
24 tbf.ftl
24 lbl ftl
CENTER BELTS
Page 993 of 1413
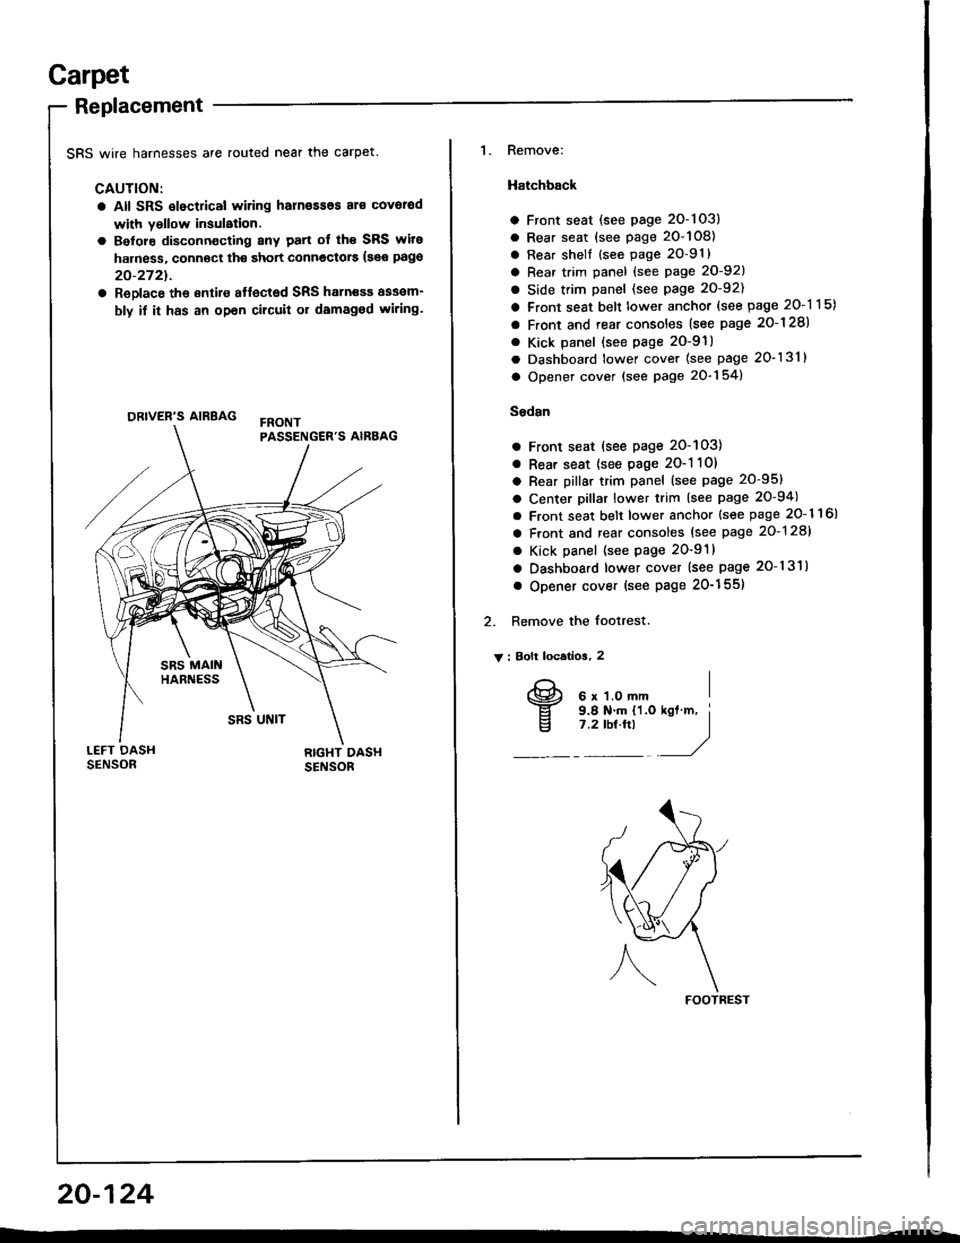
Garpet
Replacement
SRS wire harnesses are routed near the carpet.
CAUTION:
a All SRS slectrical wiring harn€ssos al€ covorod
with yollow insulation.
a Belore disconn€cting 8ny patt of th€ SRS wite
harness, connoct th€ short connectors {see pago
20-2721.
a ReDlace the €ntire affected SRS haln€sa assam-
bly if it has an opan cilcuit or damaged wiring.
ORIVER'S AIRBAG
1. Remove:
Hatchback
a Front seat (see page 2O-103)
a Rear seat (see page 20-108)
a Rear shell {see page 2O-91}
a Rear trim panel {see Page 20-921
a Side trim panel (see page 20-92)
a Front seat belt lower anchor (see page 20-115)
a Front and rear consoles (see page 2o-128)
. Kick panel (see page 2O-91)
a Dashboard lower cover (see page 20-131)
a Opener cover (see page 20-154)
Sedsn
a Front seat (see page 20-103)
a Rear seat {see page 2O-1 10)
a Rear pillar trim panel (see page 20-95)
a Center pillar lower trim (see page 20-94)
a Front seat belt lower anchor {see page 20- 1 1 6l
a Front and rear consoles (see page 20-128)
a Kick panel (see page 20-91)
a Dashboard lower cover (see page 20-131)
o Opener cover (see Page 20-155)
2. Remove the footrest.
V : Bolt locatios, 2
FOOTREST
20-124
I
v
6 x 1.O mm9.8 N.m {'l.o7 .2 tbt.ftl