ignition HONDA INTEGRA 1998 4.G Workshop Manual
[x] Cancel search | Manufacturer: HONDA, Model Year: 1998, Model line: INTEGRA, Model: HONDA INTEGRA 1998 4.GPages: 1681, PDF Size: 54.22 MB
Page 779 of 1681
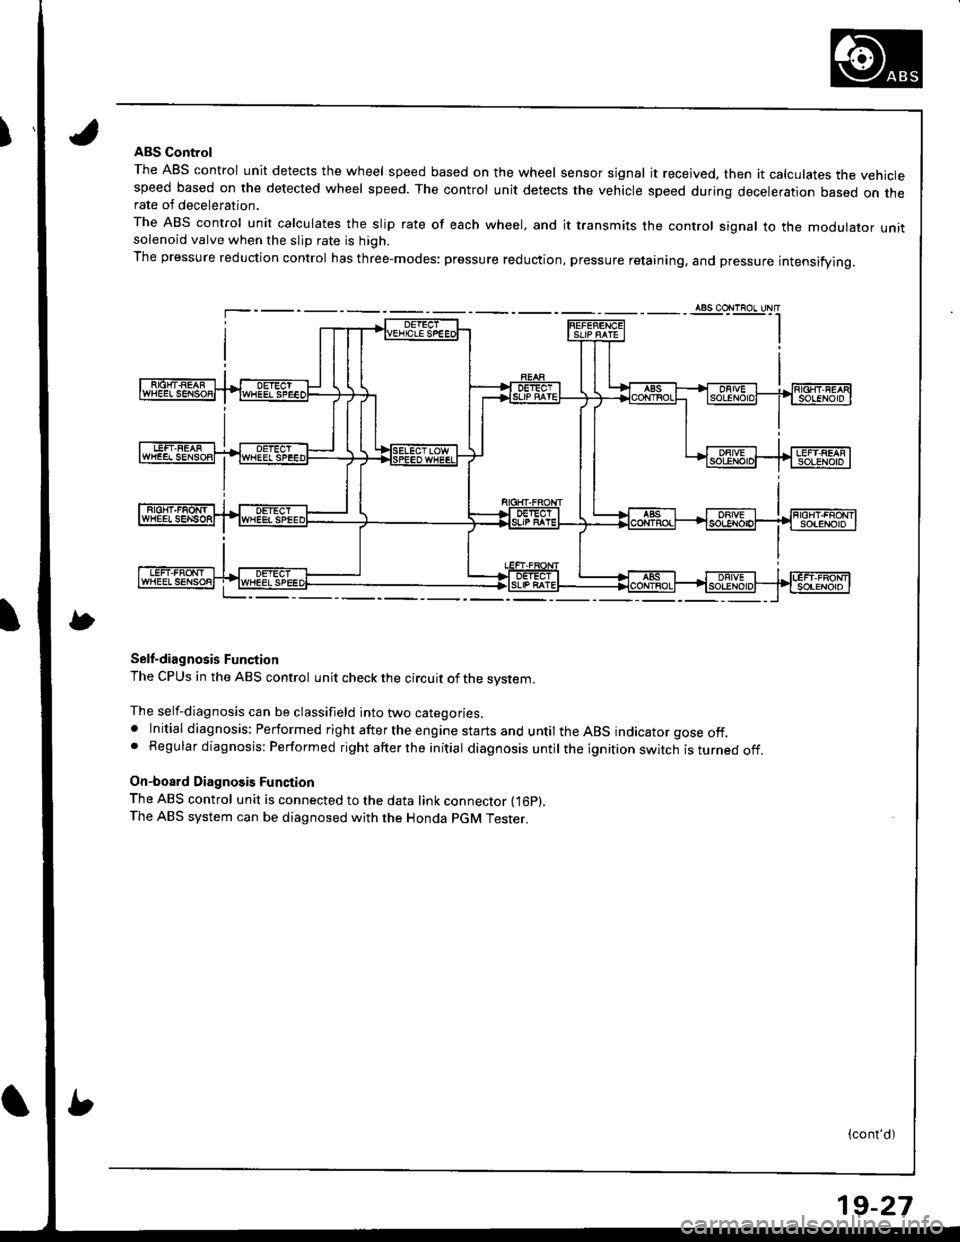
IABS Control
The ABS control unit detects the wheel speed based on the wheel sensor signal it received, then it calculates the vehiclespeed based on the detected wheel speed. The control unit detects the vehicle speed during deceleration based on therate of deceleration.
The ABS control unit calculates the slip rate of each wheel, and it transmits the control signal to the modulator unitsolenoid valve when the slip rate is high.
The pressure reduction control has three-modes: pressure reduction, pressure retaining, and pressure intensifying.
Self-diagnosis Function
The CPUS in the ABS control unit check the circuit of the system.
The self-diagnosis can be classifield into two categories.. Initial diagnosis: Performed right after the engine starts and until the ABS indicator gose off.. Regular diagnosis: Performed right after the initial diagnosis until the ignition switch isturnedoff.
On-board Diagnosis Function
The ABS control unit is connected to the data link connector fi6p).The ABS system can be diagnosed with the Honda PGM Tester.
(cont'd)
19-27
Page 787 of 1681
Troubleshooting Precautions
ABS lndicator
1. lf the system is OK. the ABS indicator goes off two seconds after turning the ignition switch ON (ll) without starting
the engine, and then comes on again and goes off after two seconds. This occurs because the ABS control unit is
turned on bv the lG2 oower source.
2. The ABS indicator comes on when the ABS control unit detects a problem in the system. However, even though the
system is operating properly, the ABS indicator will come on under the following conditions.. Onlv drive wheels rotate
. One drive wheel is stuck
. Vehicle spin
. ABS continues to operate for a long time
. Signal disturbance
To determine the actual cause of problem. question the customer about the problem, taking these conditions into
consideration.
3. When a problem is detected and the ABS indicator comes on, there are cases when the indicator stays on until the
ignition switch is turned OFF, and cases when the indicator goes off automatically when the system returns to nor-
mal. For DTCS 61 and 62, the indicator goes off automatically when the system returns normal. For all other codes.
the indicator stays on until the ignition switch is turned OFF.
4. For DTCS 12, 14, 16, '18, 2'1,22, 23, 24,51,52 and 53, the indicator goes off when the vehicle is driven again and the
system is OK after the ignition switch is turned from OFF to ON (ll). However, if the DTC is erased, the CPU is reset
and the indicator goes off right after the engine is started if the system is OK.
Diagnostic Trouble Code (DTC)
1. lf the CPU cannot be actlvated and the indicator comes on, the DTC is not memorized.
2. The memory can hold any number of DTCS. However, when the same DTC is detected more than once, the later one
is written over the old one. Therefore, when the same problem is detected repeatedly, it is memorized as one DTC.
3. The DTCs are indicated in the order of ascending number, not in the order they occur.
4, The DTCS are memorized in the EEPROM (non-volatile memory). Therefore, the memorized DTCS cannot be canceled
by disconnecting the battery. Perform the specified procedures to erase the DTCS,
S6lt-dirgnosis
1. Self-diagnosis can be classifield into two categories.
. Initial diagnosis: Performed right afterthe enginestansand untiltheABS indicator goes off.. Regular diagnosis: Performed rightafterthe initial diagnosis untilthe ignition switch isturned OFF.
2. When a problem is detected by self-diagnosis, the system
. Turns the fail-safe relay OFF
. Turns the solenoid valve OFF
. Turns the oumo motor OFF
. Turns the ABS indicator ON
Page 789 of 1681
I
\
I
Diagnostic Trouble Code (DTC)
DTG lndication
a
t
NOTE: This operation can also be done with the Honda PGM Tester.
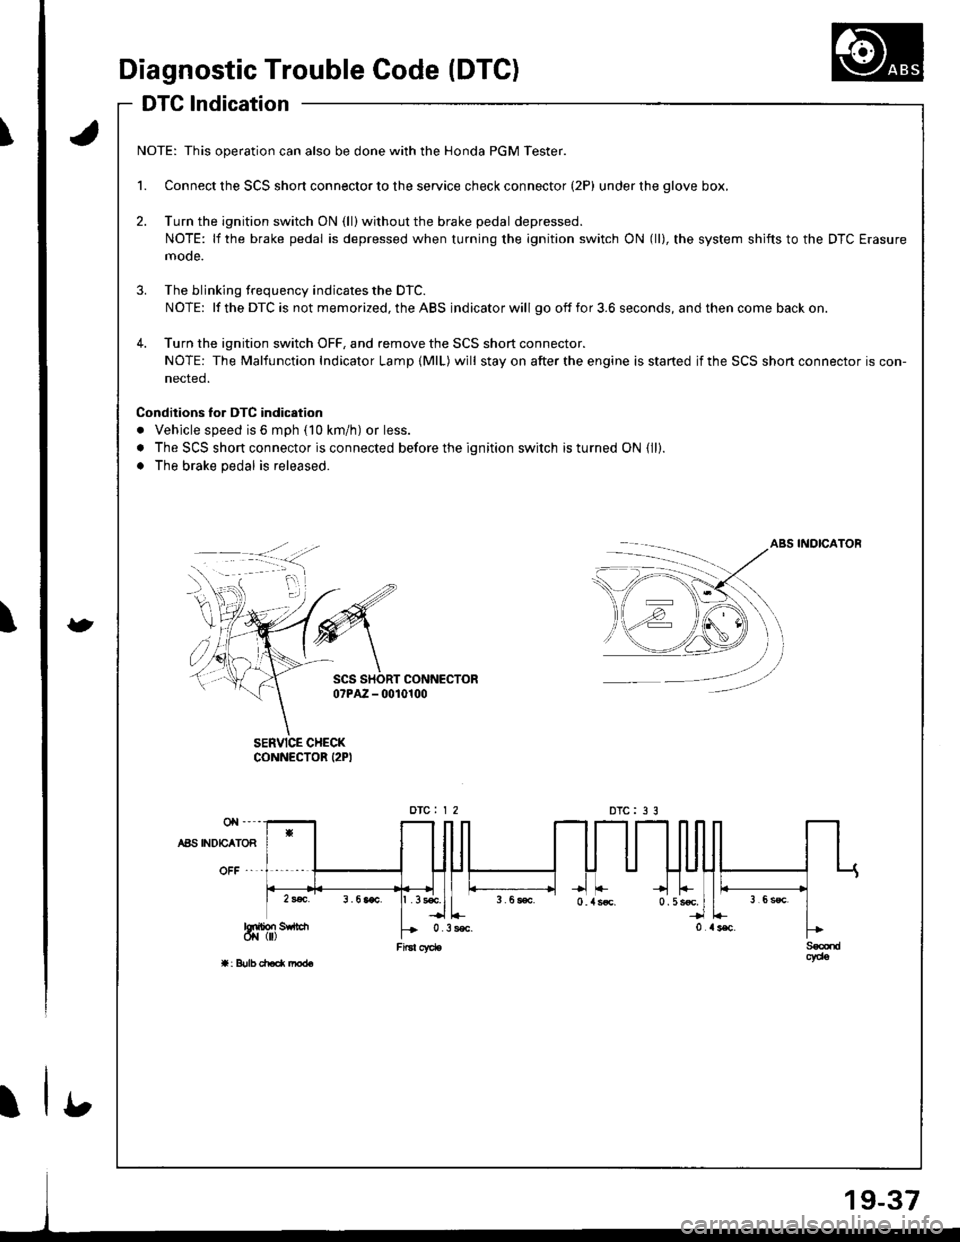
1. Connect the SCS short connector to the service check connector (2P) under the glove box,
2. Turn the ignition switch ON (ll) without the brake pedal depressed.
NOTE: lf the brake pedal is depressed when turning the ignition switch ON (ll), the system shifts to the DTC Erasure
mode.
3. The blinking frequency indicates the DTC.
NOTE: lf the DTC is not memorized, the ABS indicator will go off fo r 3.6 seconds, and then come back on.
4. Turn the ignition switch OFF, and remove the SCS short connector.
NOTE: The Malfunction Indicator Lamp (MlL) will stay on after the engine is started if the SCS shon connector is con-
nected.
Conditions lor DTC indication
. Vehicle speed is 6 mph (10 km/h) or less.
. The SCS short connector is connected before the ignition switch is turned ON {ll).
. The brake pedal is released.
ABS INOICATOB
SCS SHORT CONNECTORo?PAZ - 0010100
SERVICE CHECKCONNECTOR I2PI
DTC : 3 3
b
Page 790 of 1681
Diagnostic Trouble Code (DTC)
DTG Erasure (MES Mode)
NOTE: This operation can also be done with the Honda PGM Tester.
1. Connect the SCS short connector to the service check connector (2P) underthe glove box.
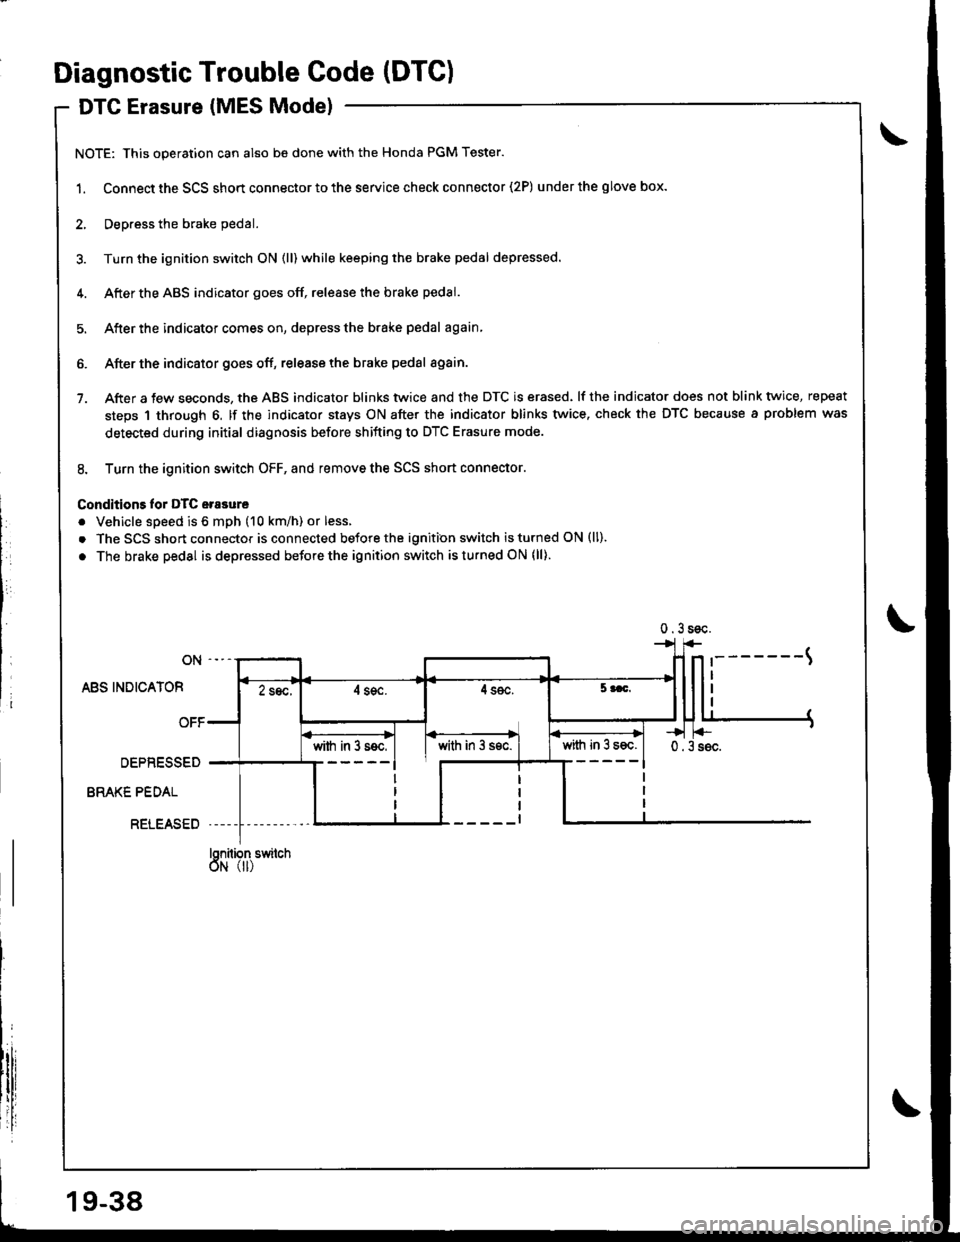
2, Deoress the brake pedal.
3. Turn the ignition switch ON (ll) while keeping the brake pedal depressed.
4. Afterthe ABS indicator goes off, release the brake pedal.
5. After the indicator comes on, depress the brake pedal again
6. After the indicator goes off, release the brake pedal again.
7. After a few seconds, the ABS indicator blinks twice and the DTC is erased. lf the indicator does not blink twice, repeat
steps 1 through 6. lf the indicator stays ON after the indicator blinks twice. check the DTC because a problem was
detected during initial diagnosis before shifting to DTC Erasure mode.
8. Turn the ignition switch OFF, and remove the SCS short connector.
Conditions lor DTC erasure
. Vehicle speed is 6 mph (10 km/h) or less.
. The SCS short connector is connected before the ignition switch is turned ON (ll).
. The brake pedal is depressed before the ignition switch isturned ON (ll)
ON
ABS INDICATOF
OFF
DEPRESSED
BRAKE PEDAL
RELEASED
Snilion switch
illr'I'
0.3soc.
'-------t
II2 sec,4 sgc.4 sec.5 aac.
0.3s6c.with in 3 s6c.with in 3 ssc.with in 3 s€c.
T
19-38
Page 792 of 1681
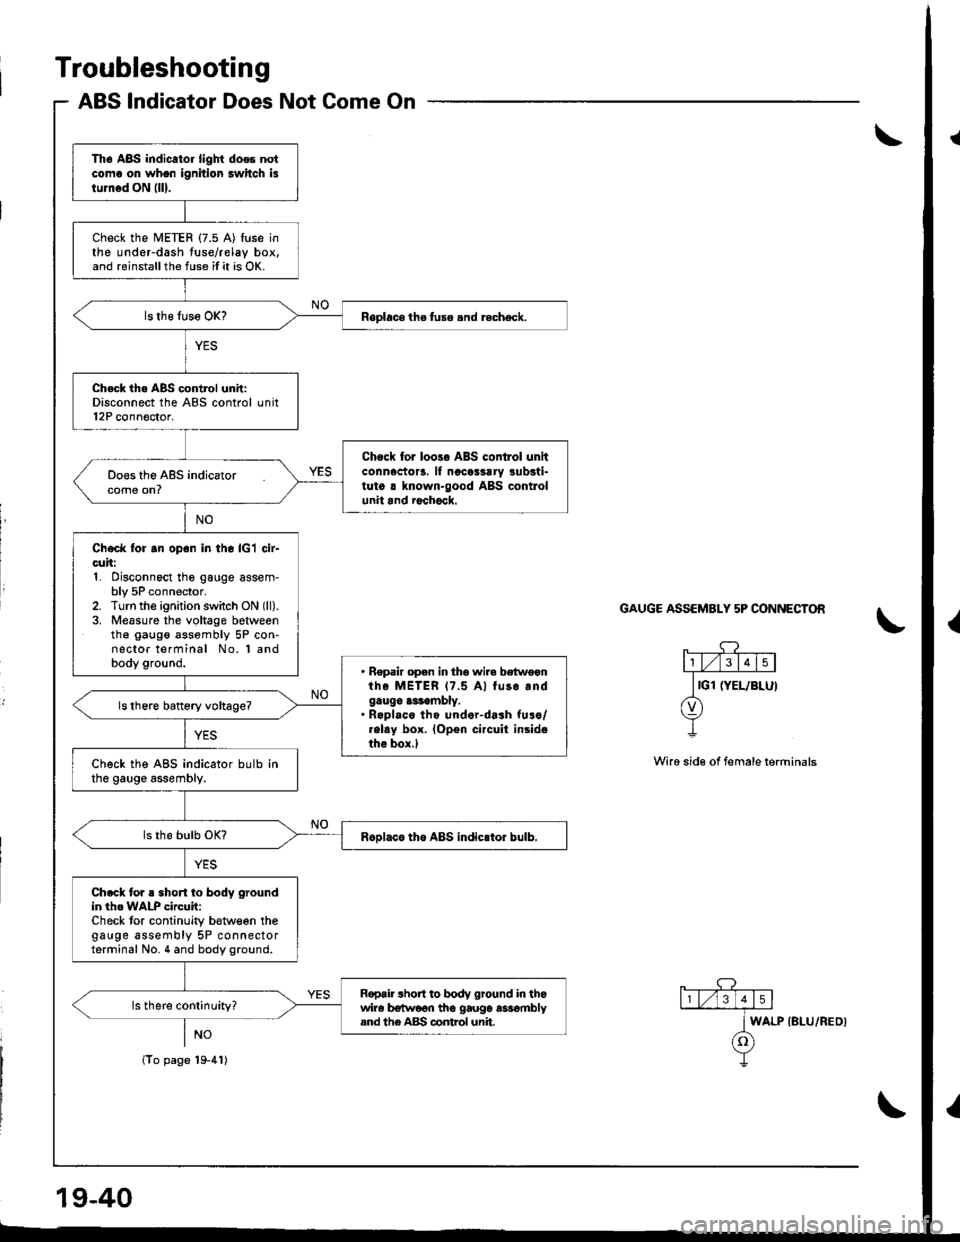
Troubleshooting
ABS lndicator Does Not Come On
\
GAUGE ASSEMBLY 5P CONNECTON
Wire sid€ of female terrninals
Th. A8S indicator light does notcoma on whon ignition swhch islum6d ON llll.
check the METER {7.5 A) tuse inthe under-dash tuse/relay box.and reinstallthe fuse it it is OK.
Replacsthefuse.nd recheck.
Ch.ck th. ABS control unit:Disconnect the ABS control unit12P connector.
Chock for loola ABS contlol unitconnector!. ll noco$rry !ubsti-tut6 a known-good ABS controlunit and r6chock.
Check tor .n opon in the lcl cir-cuit:1. Disconnect the gauge assem-bly 5P connector.2. Turn the ignition switch ON (ll).
3. Measure the voltage botweenthe gaugo assombly 5P con-nector terminal No. 'l andbody ground.. Repair open in tho wir. betwoanthe METER 17.5 A) tuso.ndgaugo a$embly.. R.pl.co tho under-dash furo/.elay box. lopen circuit insidethe box.l
check the A8s indicator bulb inthe gauge assembly.
R6olace tho ABS indicrtor bulb.
Ch.ck tor ! short to body groundin th6 WALP circuit:Check tor continuity b€tween thegauge assembly 5P connectorterminal No. 4 and body ground.
R€pair short to body ground in thowira b€tw6on tho gaug6 asscmblysnd the A&S control unit.
lTo page'19-41)
WALP {BLU/REO}
Page 793 of 1681
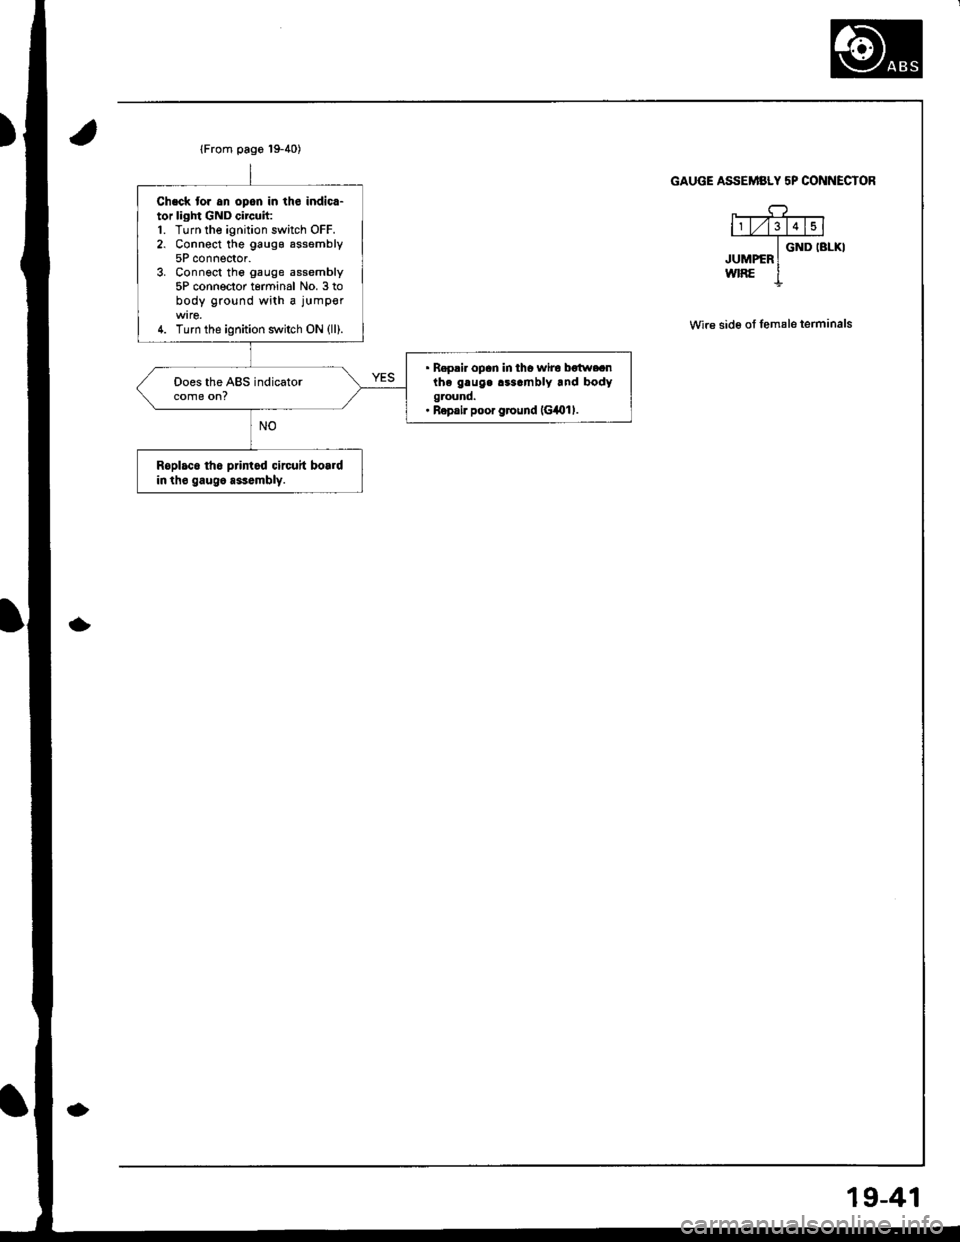
Chsck tor an opon in th6 indicr-tor light GND circuh:'1. Turn the ignition switch OFF.2. Connect the gaugs assembly5P connector.3. Connect the gauge assembly5P conneclor tgrminal No. 3 tobody ground with a jumper
4. Turn the ignition s:witch ON (ll).
. R€pair opan in tho wiro botw.anthe gaug. r$.mbly .nd bodyground.. Ropsir poor ground lcil()i l.
Does the ABS indicatorcome on?
Roplac6 th6 printod circuit bo.rdin tho gaug6 assembly.
GAUGE ASSEMBLY 5P CONNECIOR
F---.q-l1 l/l3l415l-J6ii-6r-xr
JUMPER IwrRE I
Wre sid6 of lemale terminals
19-41
Page 794 of 1681
Troubleshooting
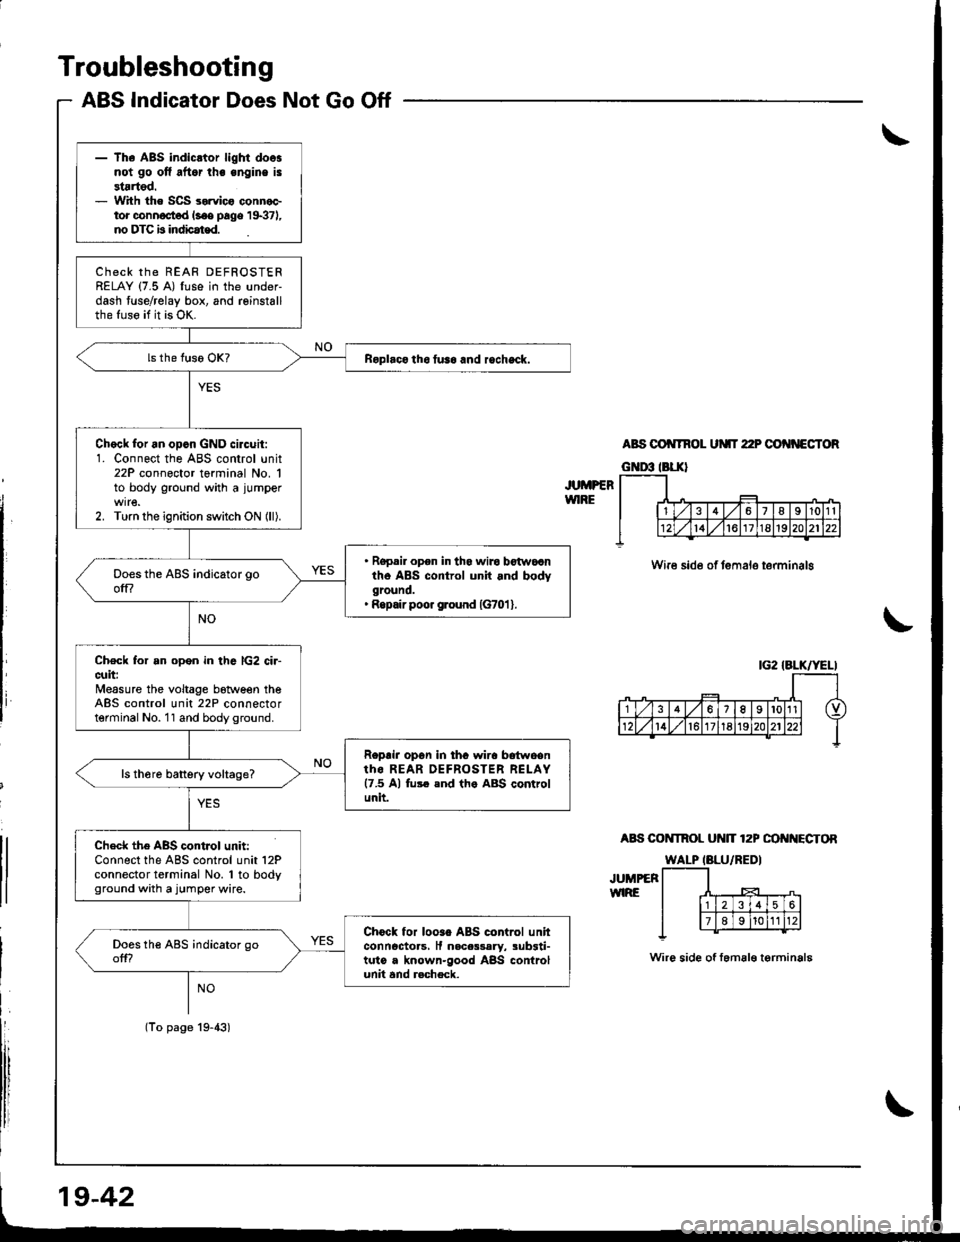
ABS Indicator Does Not Go Off
JUMPERWIRE
ABS OO TNOL UMT 22P OO'{NECTOR
Wire side of temalo terminalg
A8S COI{TROL Ut{lT 12P OO I{ECTOR
JUMPEFWIRE
Wire side of femal€ terminala
|G2 IALK/YELI
- The ABS indicltor light doosnot go ofl aftor lhe engine is3tartod.- With the SCS sorvico connoctor connoct d l.oe page 19371,no DTC b indbat€d.
ChECK thE REAF DEFROSTERRELAY (7.5 A) fuse in the under-dash fuse/relay box, and reinstallthe fuso if it is OK.
Roplaco tho tusa and rocheck.
Chock for an opcn GND circuit:1. Connect the ABS control unit22P connector terminal No. 1to body ground with a jumper
2. Turn the ignition switch ON (ll).
. Ropair opon in tha wiro botwocntho ABS control unit and bodyground.' Ropair poo. ground {G701 }.
Check for an open in thc lG2 ci.-cuit:Measure the voltage botween theABS control unit 22P connectorterminal No. 11 and body ground.
Roprir opon in thc wira bdtwoentho REAR OEFROSTER RELAY17.5 Al fu$ end th. ABS controlunit.
ls th6re battery voltage?
Check the ABS contJol unit:Connect the ABS control unit 12Pconnector terminal No. 1 to bodyground with a jumper wire.
Chock for looao ABS control unhconncctoas, It nacas3aly, sub3ti-tuto a known-good ABS controlunit and r.check.
(To page 19-43)
19-42
Page 796 of 1681
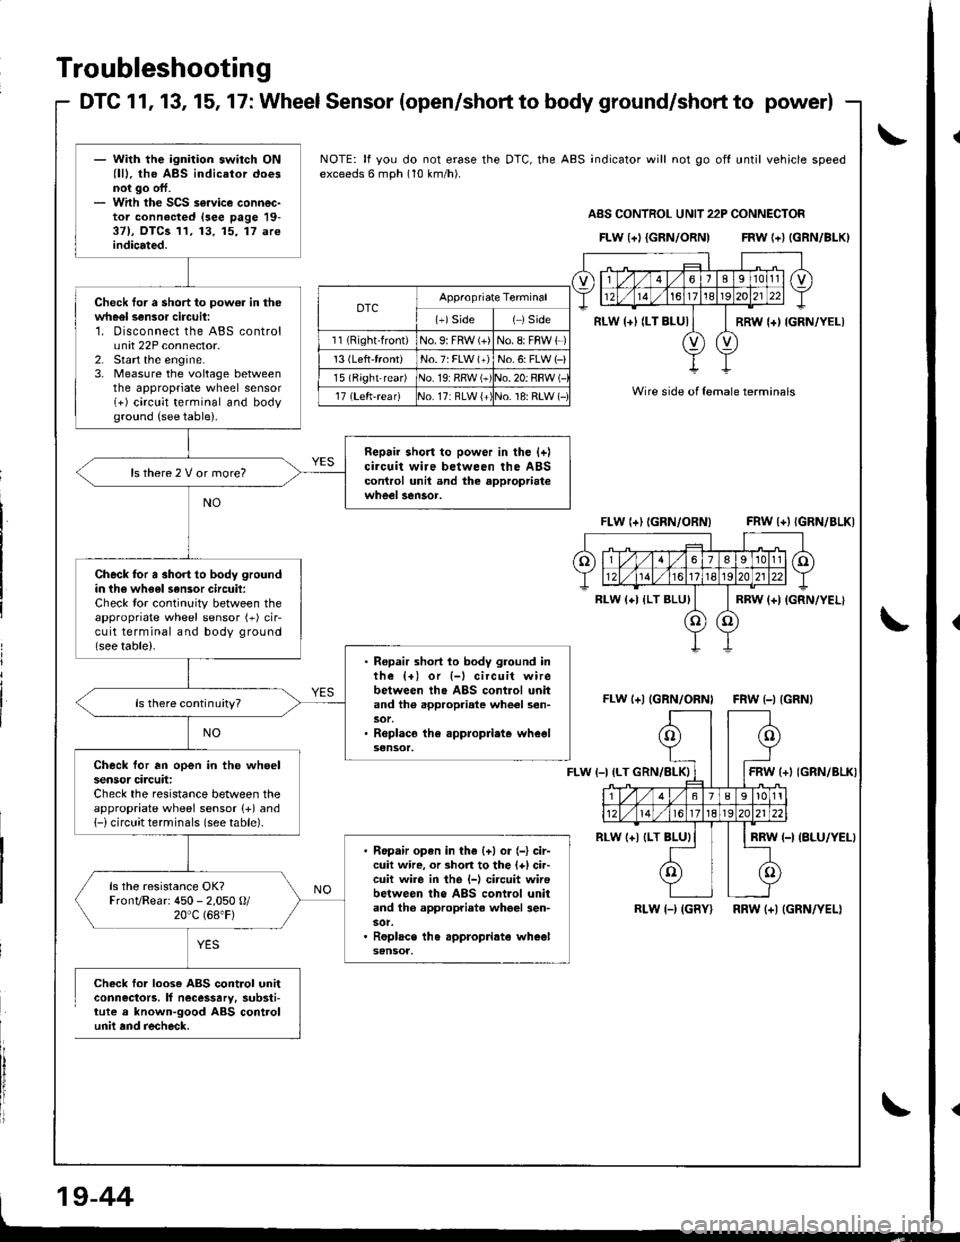
- With the ignition switch ON(lll, the ABS indicator doesnot go off.- With the SCS s€.vice connec-tor connected lsee page 19-37), OTCS 11, 13, 15, 17 areindicated.
Check for a short to pow6r in thewheel sensor circuii:1. Disconnect the ABS controlu nit 22P connector.2. Start the engine.3, Measure the voltage betweenthe appropriate wheel sensor(+) circlit terminal and bodyground (see table).
Repair short to power in the {+)circuit wire between the ABScontrol unil and the approprialewheel sensor.
ls there 2 V or more?
Check for a short to body groundin th6 wheel sensor circuil:Check tor continuity between theappropriate wheel sensor (+) cir-cuit terminal and body ground(see table).. Ropair short lo body ground inthe {+) or {-l circuit wirebetween tho ABS contlol unitand th6 .ppropriate whe€l sen-
. Roplaco the .ppropliate wheelsensot.
ls there continuity?
Check for an open in the wheelsensor circuit:Check the resistance between theappropriate wheel sensor (+) and1-) circuit terminals (see table).
Ropair open in the {+) or (-} cir-cuit wire, or 3hort to the l+) cir-cuit wire in the l-l circuit wirebetween tho ABS control unitand th6 appropriate whgel 3en-
Replace th6 appropdate wh€elsensot.
ls the resistance OK?FronvRear: 450 - 2,050 O/20"c (68.F)
NOTE: lf you do not erase the DTC, the ABS indicator will not go off until vehicle speedexceeds 6 mph (10 km/h).
ABS CONTNOL UNIT 22P CONNECTOF
FLw {+l {GRN/ORN) FRw {+} (GRN/BLKI
oTcAppropriate Terminal
(+)Side( )side
11 (Right-front)No. 9: FRW (+)No. 8: FBW {-)
13 (Left'front)No.7: FLW (+)No.6: FLW 1-)
l5lBight-rear) iNo. 19:RRW (+!o. 20: RBW (-
17 (Left'r€af)17: RLW {+',1o. 18: RLW (-Wire side of lemale terminals
FLW (+) (GRN/ORN) FRW l+){GRN/BLK)
FLw l+l (GRN/ORNI FRW {-) {GRN}
FLW t-l(+l (GRN/BLKI
RL(-I {BLU/YELI
RLW l-) (GBY) RRW (+) (GRN/YEL)
Check for loose ABS control unitconnectors. lf necessary. substi-tute a known-good ABS controlunii and recheck.
RLW {+l (LT BLUI
RLw (+l {LT BLU}
-t(o
___r
l'!*
6l89l01t
1417t8t920
| ***-t
(()
Y
Troubleshooting
DTC 1 1, 13, 15, 17 : Wheel Sensor (open/short to body ground/short to power)
\
L
9-44
\
Page 797 of 1681
l
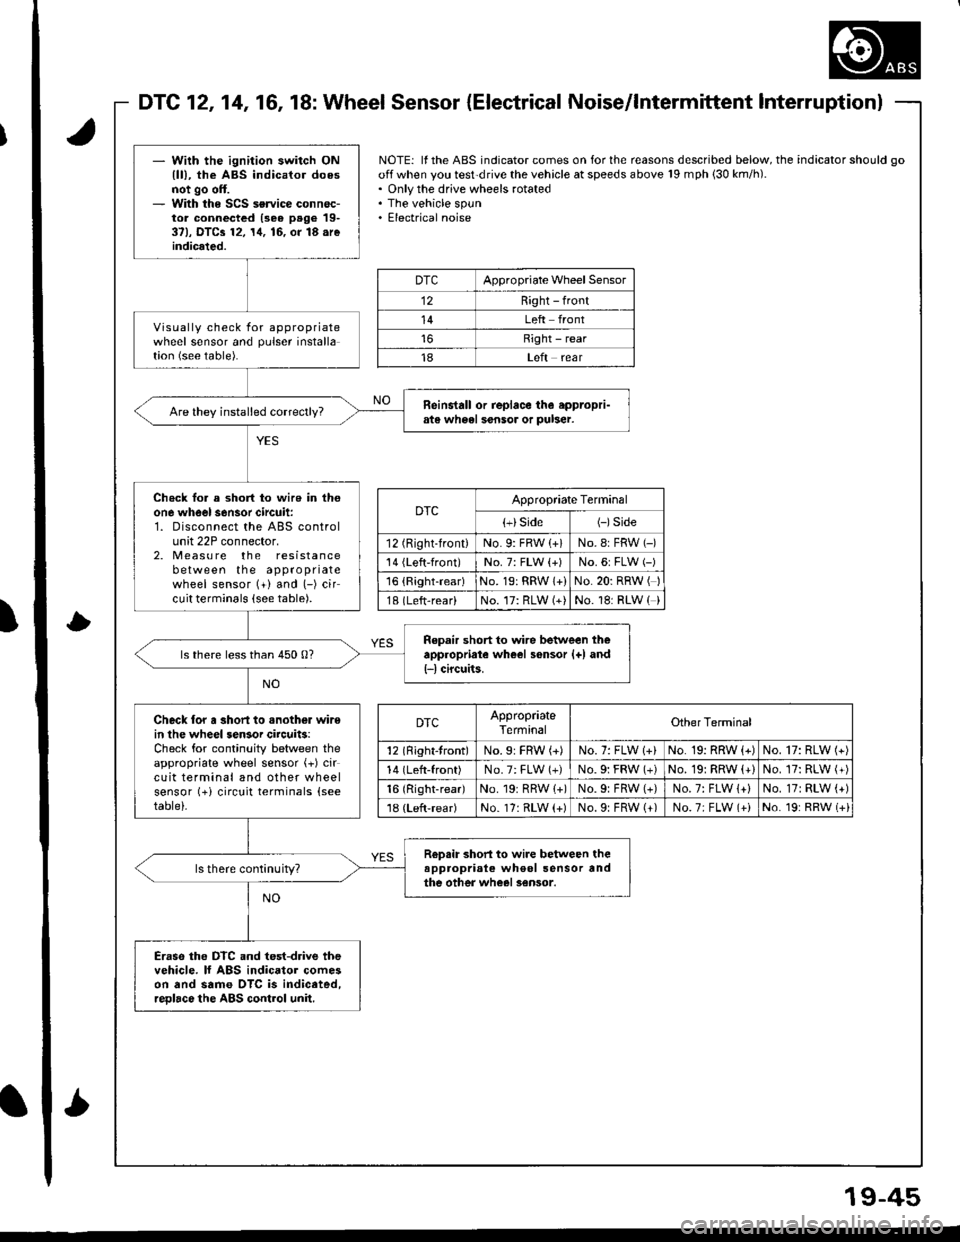
DTC121416, 18: Wheel Sensor {Electrical Noise/lntermittent lnterruptionl
- Wilh the ignition switch ONlll), the ABS indicator doesnot go off.- With the SCS service connec-tor connectcd (3e6 page 19-37), DTCa 12, 14, 16, or 18.reindicated.
Visually check for appropriatewheel sensor and pulser installation (see table).
Reinstall or replace th6 eppropri-ats wh6el sensor or puber.
Ch€ck lor a short to wire in thoone wheel s6nsor circuit:1. Disconnect the ABS controlunit 22P connector.2. Measu re the resistancebetween the appropriatewheel sensor (+) and (-) circuit terminals (see table).
Repair short to wire between theappropriate wheel sensor {+) and{-l circuits.ls there less than 450 0?
Check lor a short to .nother wirein lhe wheel sensor circuits:Check for continuity between theappropriate wheel sensor (+) circuit terminal and other wheelsensor (+i circuit terminals (see
table)-
R€psir short to wire between theappropriale wheol sensor andthe other wheel sensor.ls there continuity?
Eraso the DTC and test-drive thevehicle. lf ABS indicator comeson and same OTC is indiceted,reDlace the ABS control unil.
NOTE: ll the ABS indicator comes on for the reasons described below, the indicator should go
off when you test'drive the vehicle at speeds above 19 mph 130 km/h).. Only the drive wheels rotated. The vehicle spun. Electrical noise
DTCAppropriate Wheel Sensor
12Right - front
14Left front
Right - rear
18Left rear
DTCAppropriate Terminal
{+}Side(-)Side
12 (Right-front)No. 9: FRW (+)No.8: FRW (-)
'14 {Left-front)No. 7: FLW {+)No.6: FLW (-)'16 {Right-rear)No. 19: RRW 1+)No.20: RRW ( )
18 (Left-rear)No. 17: RLW (+)No. 18: RLW ( )
DTCAppropriateTerminalOther Terminal
12 (Right-tront)No.9: FBW (+)No. 7: FLW 1+)No. 19: RRW (+)No. 17: RLW (+)
14 (Left-front)No.7: FLW (+)No.9i FRW (+)No. 19: RRW (+)No. 17: RLW (+)
16 (Right-rear)No. 19r RRW {+)No.9: FRW (+)No. 7: FLW 1+)No.17: RLW (+)'18 (Left-rear)No. 17: RLW (+)No.9: FRW (+)No.7; FLW (+iNo. 19: RRW (+i
'
L
19-45
Page 798 of 1681
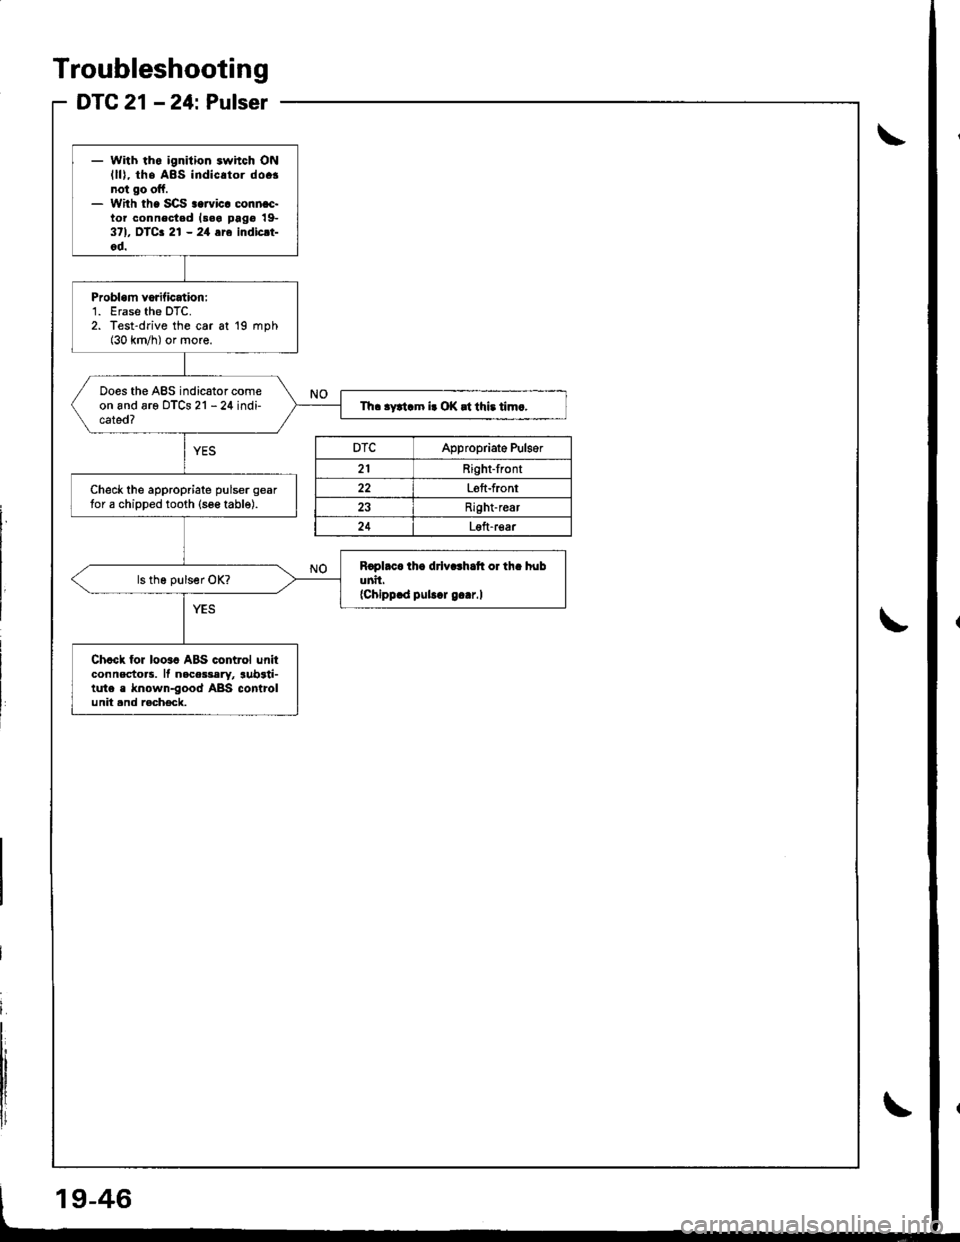
Troubleshooting
DTC 21 - 24: Pulser
- With tho ignition .whch ONlll), the A8s indic.tor do.!not go off.- With th. SCS..rvic. conn.c.tor connested l3.a pag€ 19-371, OTCa 21 - 24 116 indicrt-od.
Probl.m vorification:'1. Erase the DTC.2. Test-drive the car at 19 mph(30 km/h) or more.
Does the ABS indicator comeon and are oTCs 21 - 24 indi-cated?Th. .ytiam i. OK |t thi. tim.,
Check the appropriate pulser geartor a chipped tooth {see table).
Rcpl.c. ih. drlv..h.tt or th. hubunil.{Chippld pubd g..r.l
Chcck for loo.c ABS control unitconnectors. ll nace$ery, aubrti-tute . known-good ABS controlunit and racheck.
9-46
DTCAppropriate Pulger
21Right-front
22Left-front
Right-rear
Loft-rear