HONDA INTEGRA 1998 4.G Workshop Manual
Manufacturer: HONDA, Model Year: 1998, Model line: INTEGRA, Model: HONDA INTEGRA 1998 4.GPages: 1681, PDF Size: 54.22 MB
Page 921 of 1681
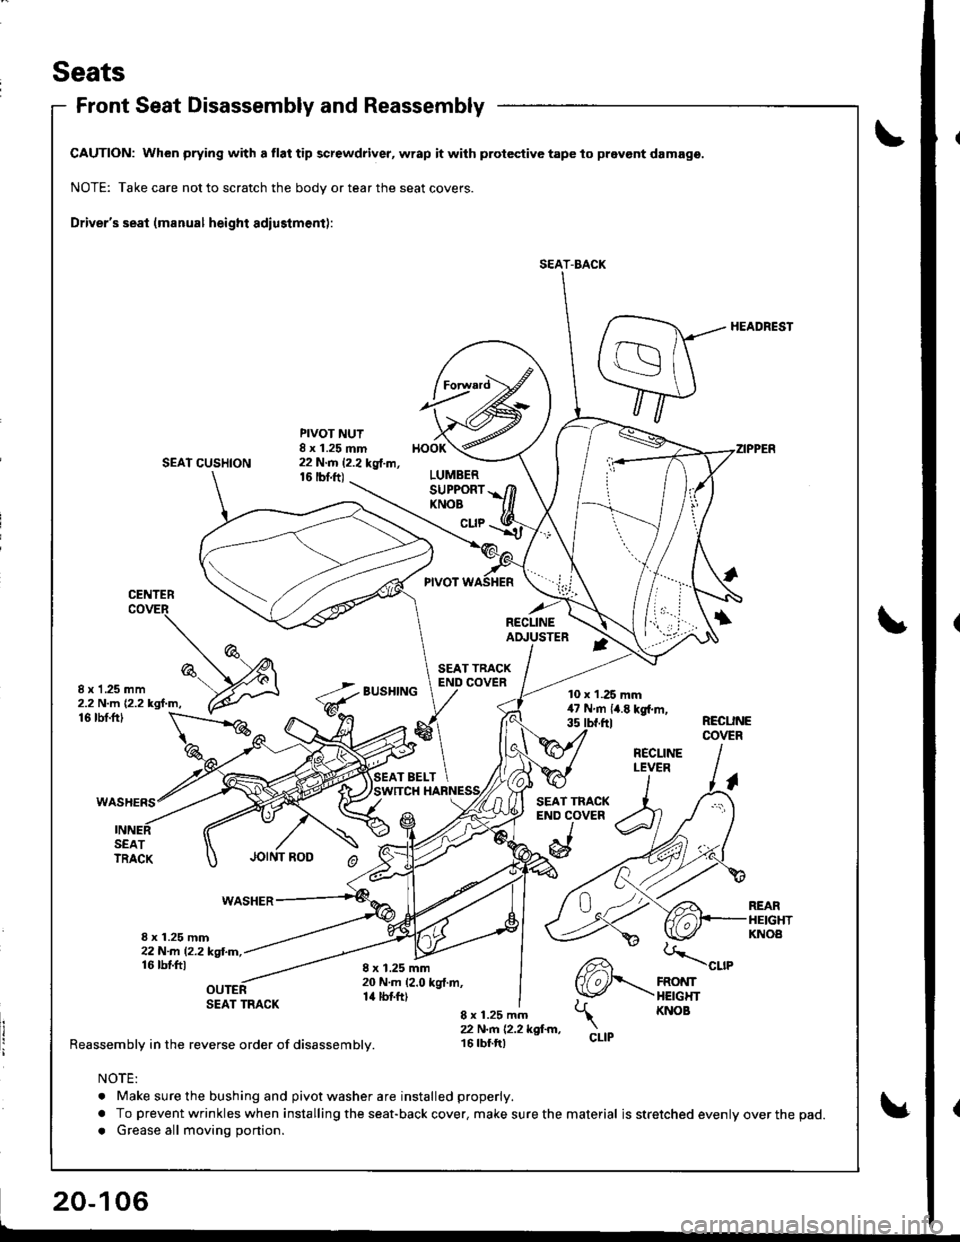
Seats
Front Seat Disassembly and Reassembly
CAUTION: When prying with a tlat tip screwdriver, wrap it with protective tape to pravont damage.
NOTE: Take care not to scratch the body or tear the seat covers.
Driver's seat (manual height adiustment):
HEADREST
SEAT CUSHION
PIVOT NUT8 x 1.25 mm22 N.m 12.2 kg{.m,16 |bnft)
BUSHING
HOOK
LUMBERSUPPORTKNOB
cuP
CENTER
RECLINEAI!USTER
8 x 1 .25 mm2.2 N.m {2.2 kgf.m,10 x 1.25 mm47Nm{4.Ekgl.m,35 tbt.ftl
CLIP
16 tbf.ftlRECUNECOVER
SEATTRACK
WASHER
8 x 1.25 mm22N-m l2.2kgl.m,16 tbtftl
SEAT TRACK
Reassembly in the reverse order of disassembly.
REARHEIGHTKNOA
8 x 1.25 mm20 N.m 12.0 kgt.m,14 tbtft)
CLIP
8 x 1.25 mm22 N.n 12.2 kgl.m,16 tbf.tt)
NOTE:
. Make sure the bushing and pivot washer are installed properly.
a To prevent wrinkles when installing the seat-back cover. make sure the material is stretched evenly over the pad.
a Grease all moving portion.
SEAT-BACK
RECLINELEVER
Page 922 of 1681
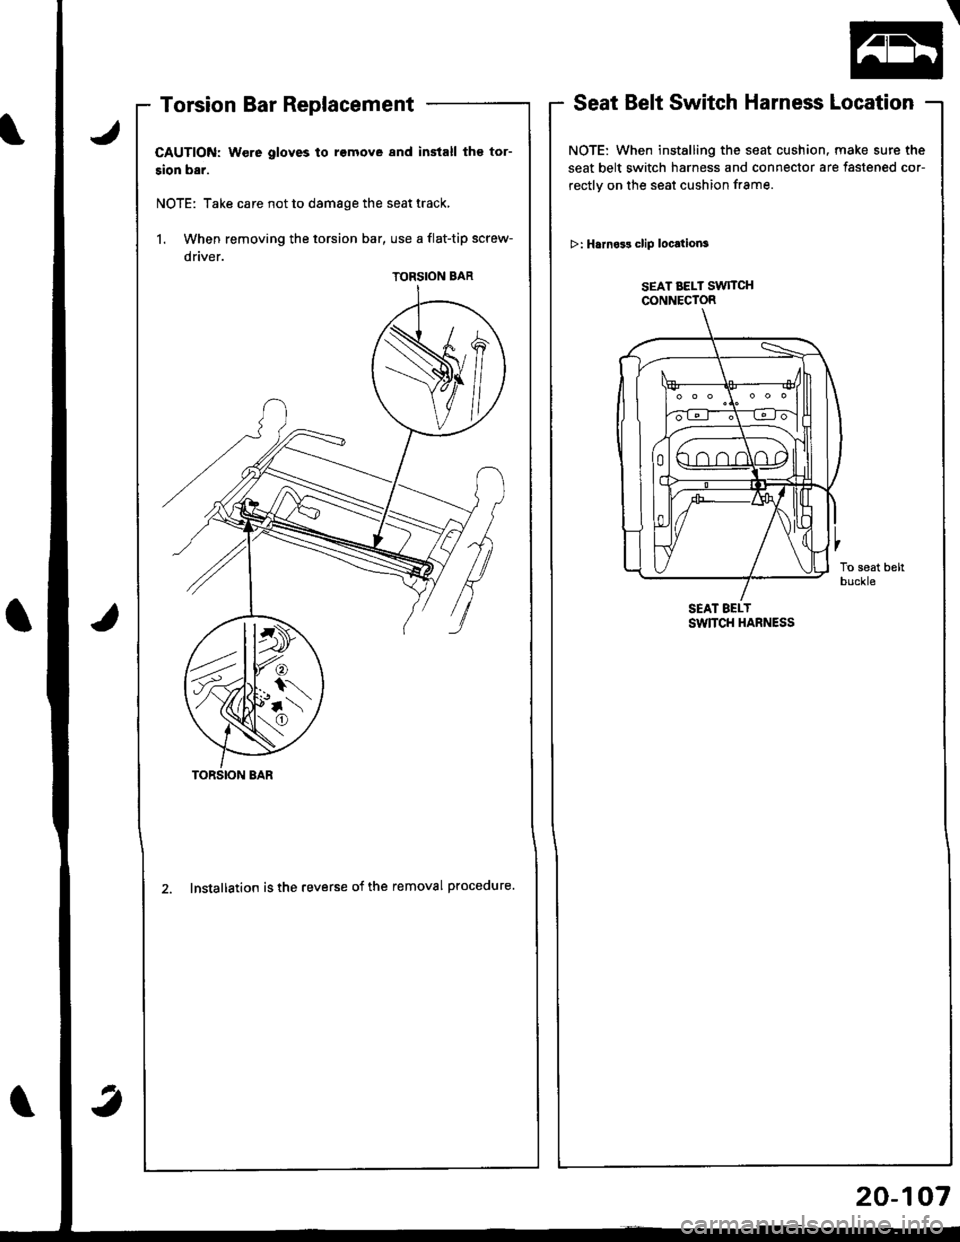
Torsion Bar Replacement
CAUTION: Were gloves to rsmove and install th€ tor-
sion bar.
NOTE: Take care not to damage the seat track,
1. When removing the torsion bar, use a flat-tip screw-
2. Installation is the reverse of the removal procedure.
.Z
tz]il\
H
Seat Belt Switch Harness Location
NOTE: When installing the seat cushion. make sure the
seat belt switch harness and connector are fastened cor-
rectly on the seat cushion frame.
>: Harnos! clip locations
SEAT BELT SWTTCHCONNECTOR
To seat beltbuckle
SEAT EELTSW]TCH HARNESS
TORSION BAR
-_2U t
foo
..1\
,l| \\o
,a
20-107
Page 923 of 1681
Seats
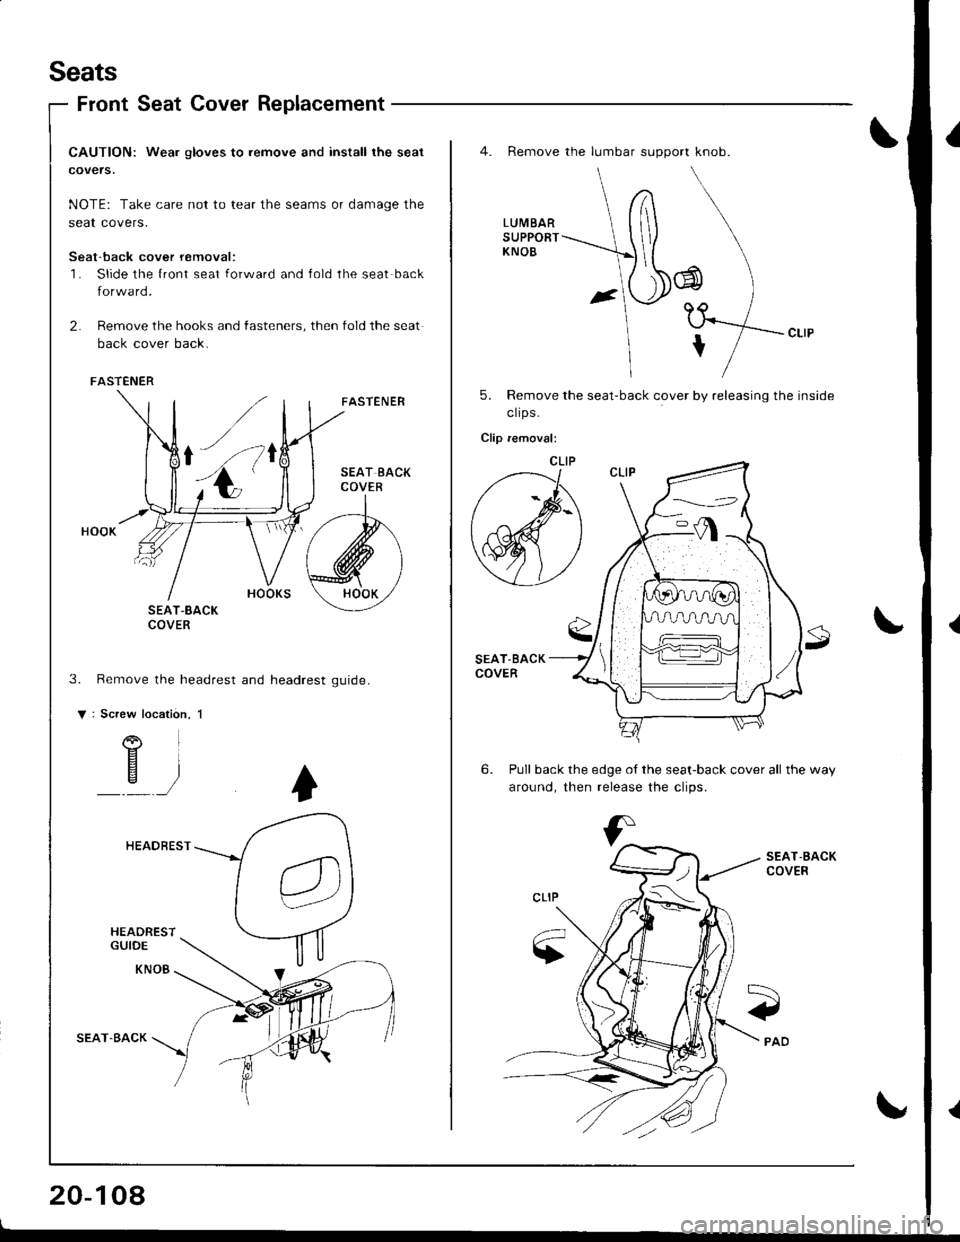
Front Seat Cover Replacement
CAUTION: Wea. gloves to remove and install the seat
covers.
NOTE: Take care not to tear the seams or damage the
seat covers.
Seat-back cover removal:'l- Slide the {ront seat forward and Jold the seat back
forward.
2. Remove the hooks and fasteners, then fold the seat
back cover back.
FASTENER
SEAT-8ACKCOVER
Remove the headrest and headrest
Screw
o
FASTENER
gu rd e.
location, 1
)
HEADREST
HEADRESTGUIDE
KNOB
SEAT.BACK
20-108
o
4. Remove the lumbar support knob.
LUMBARSUPPORTKNOB
J
tf*,,
5. Remove the seat-back cover by releasing the inside
clrps -
Clip removal:
SEAT-BACKCOVER
6. Pull back the edge of the seat-back cover all the way
around. then release the clios.
SEAT,BACKCOVER
Page 924 of 1681
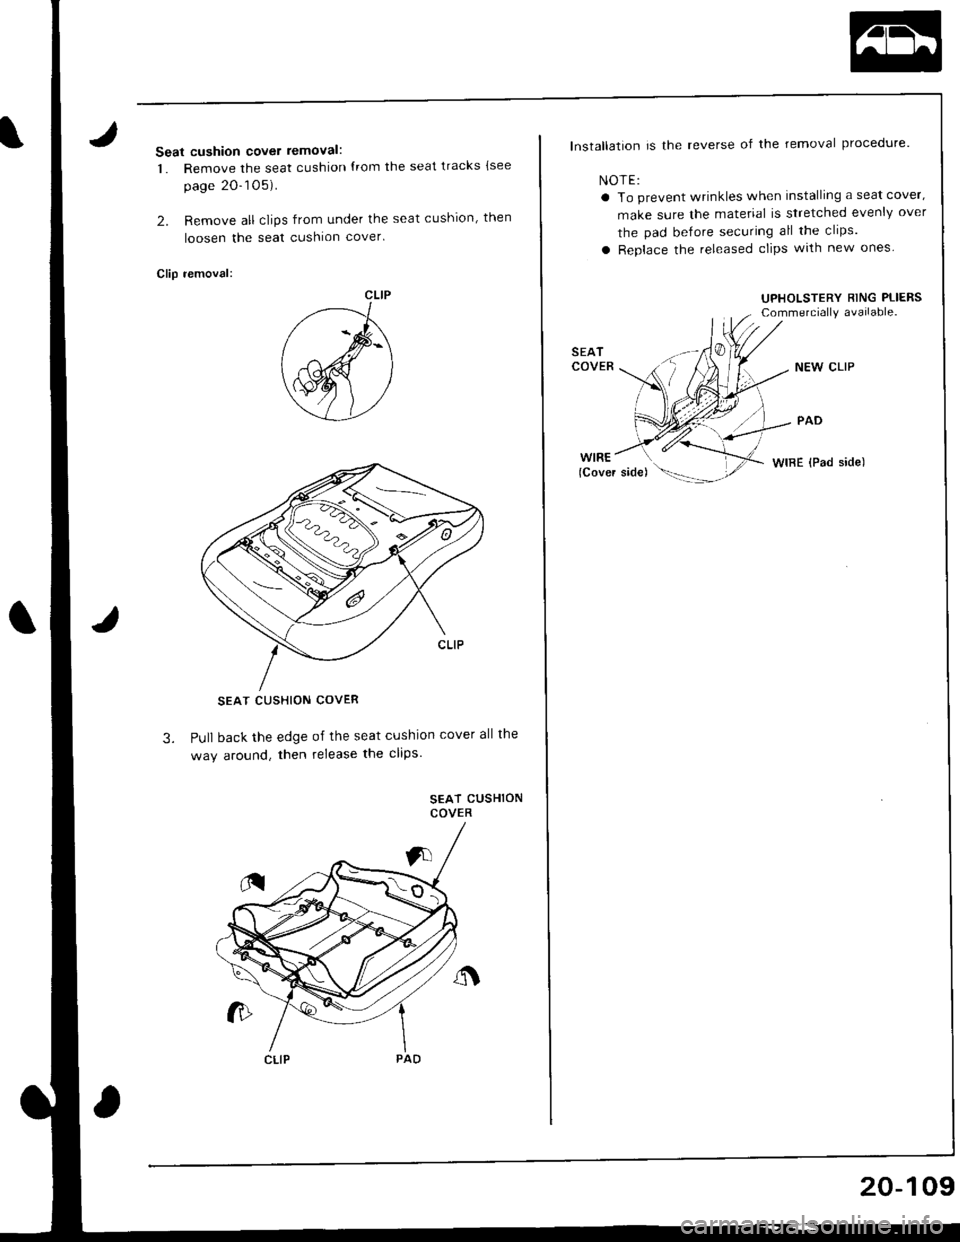
Seat cushion cover removal:
1. Remove the seat cushion {rom the seat tracks {see
page 20-105).
2. Remove all clips from under the seat cushion, then
loosen the seat cushion cover
Clip removal:
SEAT CUSHION COVER
Pull back the edge of the seat cushion cover all the
way around, then release the cltps3.
SEAT CUSHIONCOVER
CLIP
lnstallation is the reverse of the removal procedure.
NOTE:
a To prevent wrinkles when installing a seat cover,
make sure the material is stretched evenly over
the pad before securing atl the clrps.
a Replace the released clips with new ones.
UPHOLSTERY RING PLIERScommercially available.
SEATCOVER
WIBE (Pad side)
20-109
Page 925 of 1681
Seats
Rear Seat Replacement
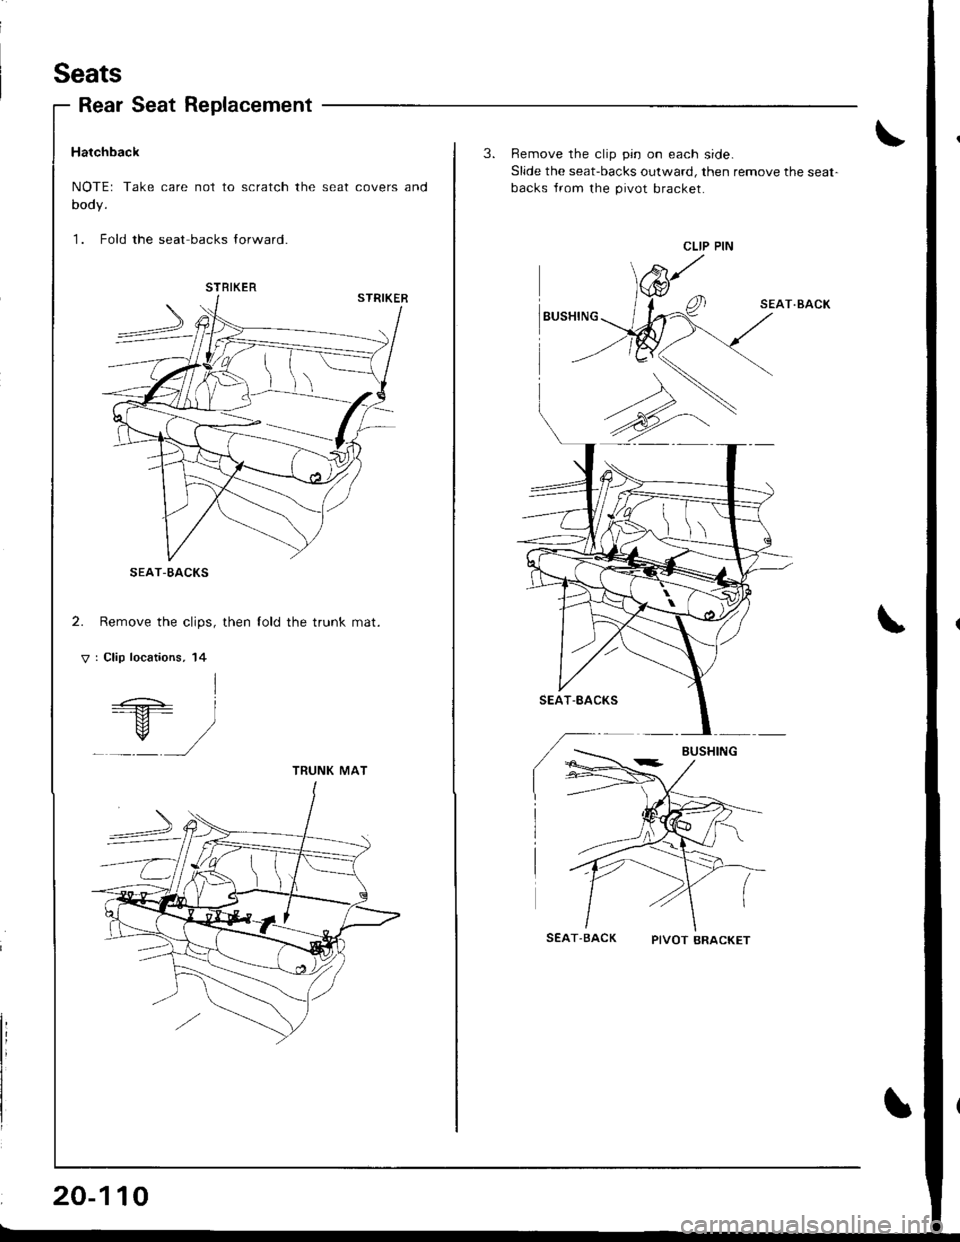
Hatchback
NOTEr Take care not to scratch the seat covers and
body.
1. Fold the seat backs lorward.
2. Remove the clips, then lold the trunk mat.
V : Clip locations, 14
I=+ i---M- l
_Y/
STRIKER
I\.
TRUNK MAT
20-110
3. Remove the clip pin on each side.
Slide the seat-backs outward, then remove the seat-
backs Jrom the pivot bracket.
SEAT.BACK
SEAT-BACK PTVOTBRACKET
\
CLIP PIN
Page 926 of 1681
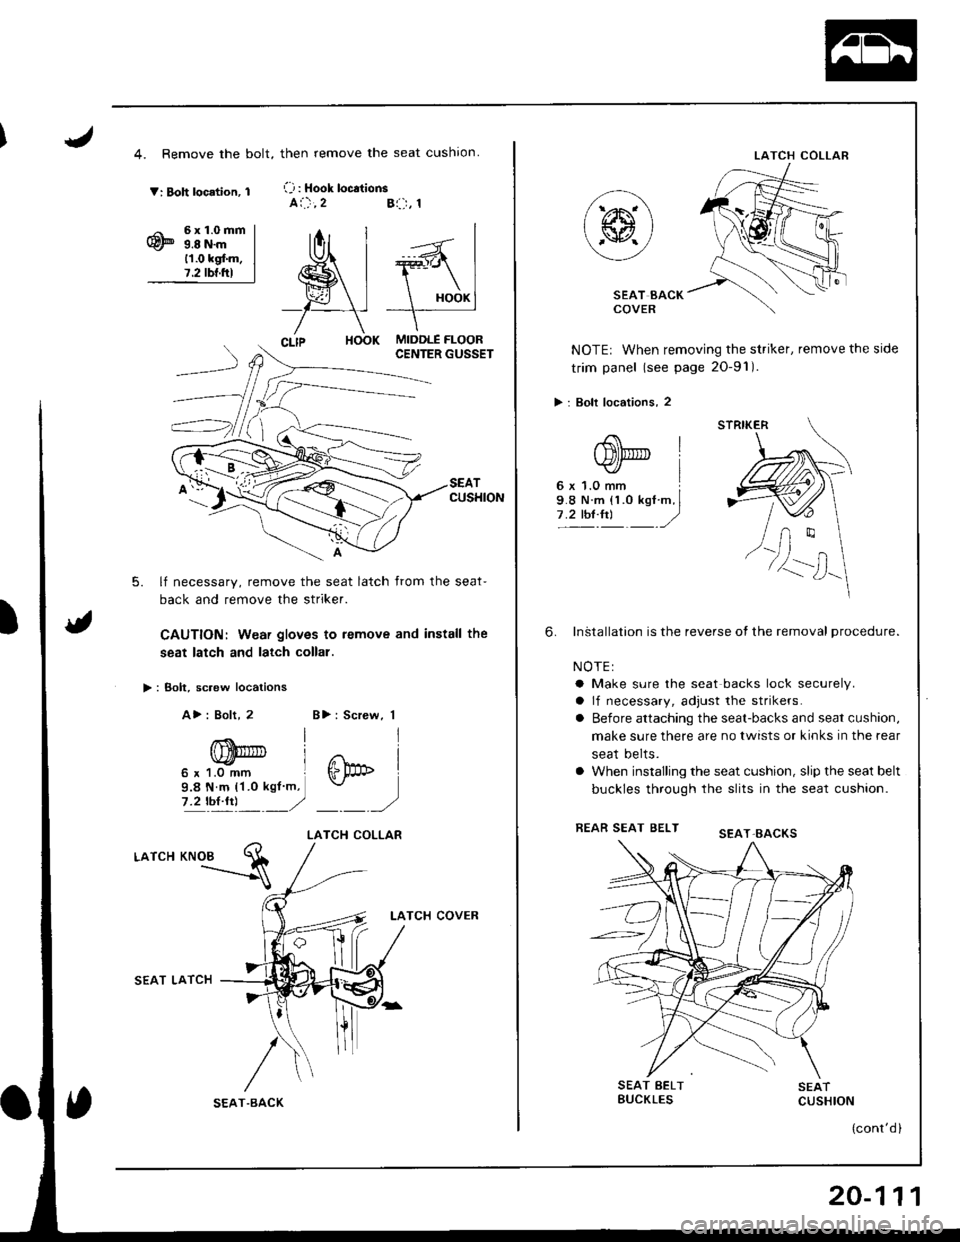
4. Remove the bolt,
V: Boh location, 1
6x1.0mm9.8 N.m11.0 kgf.m.7.2 tbf.ftl
>: Bolt, sc.ew locations
A>: Bolt, 2
CUSHION
5. lf necessary, remove the seat latch from the seat-
back and remove the striker.
CAUTION: Weai gloves to remove and install the
seat latch and latch collal.
-"":=s
then remove the seat cushron.
(-j : Hook loc.tionsai.),2Bl:-r, 1
MIDDLE FLOORCENTER GUSSET
T
)
B>: Screw, 1
j
I
ffipb I
)
LATCH COLLAR
LATCH
SEAT LATCH
LATCH COVER
/
T.BACK
LATCH COLLAR
SEAT BACKCOVER
NOTE: When removing the striker, remove the side
trim panel (see page 2O-91).
> : Bolt locations, 2
InStallation is the reverse ot the removal procedure.
NOTEI
a Make sure the seat backs lock securely.
a lf necessary, adjust the strikers.
o Before attaching the seat-backs and seat cushion,
make sure there are no twists or kinks in the rear
seat belts.
a When installing the seat cushion, slip the seat belt
buckles through the slits in the seat cushion.
FEAR SEAT BELT
6.
SEAT BELTBUCKLESSEATCUSHION
(cont'd )
STRIKER
SEAT.EACKS
20-111
Page 927 of 1681
Seats
Rear Seat Replacement {cont'd)
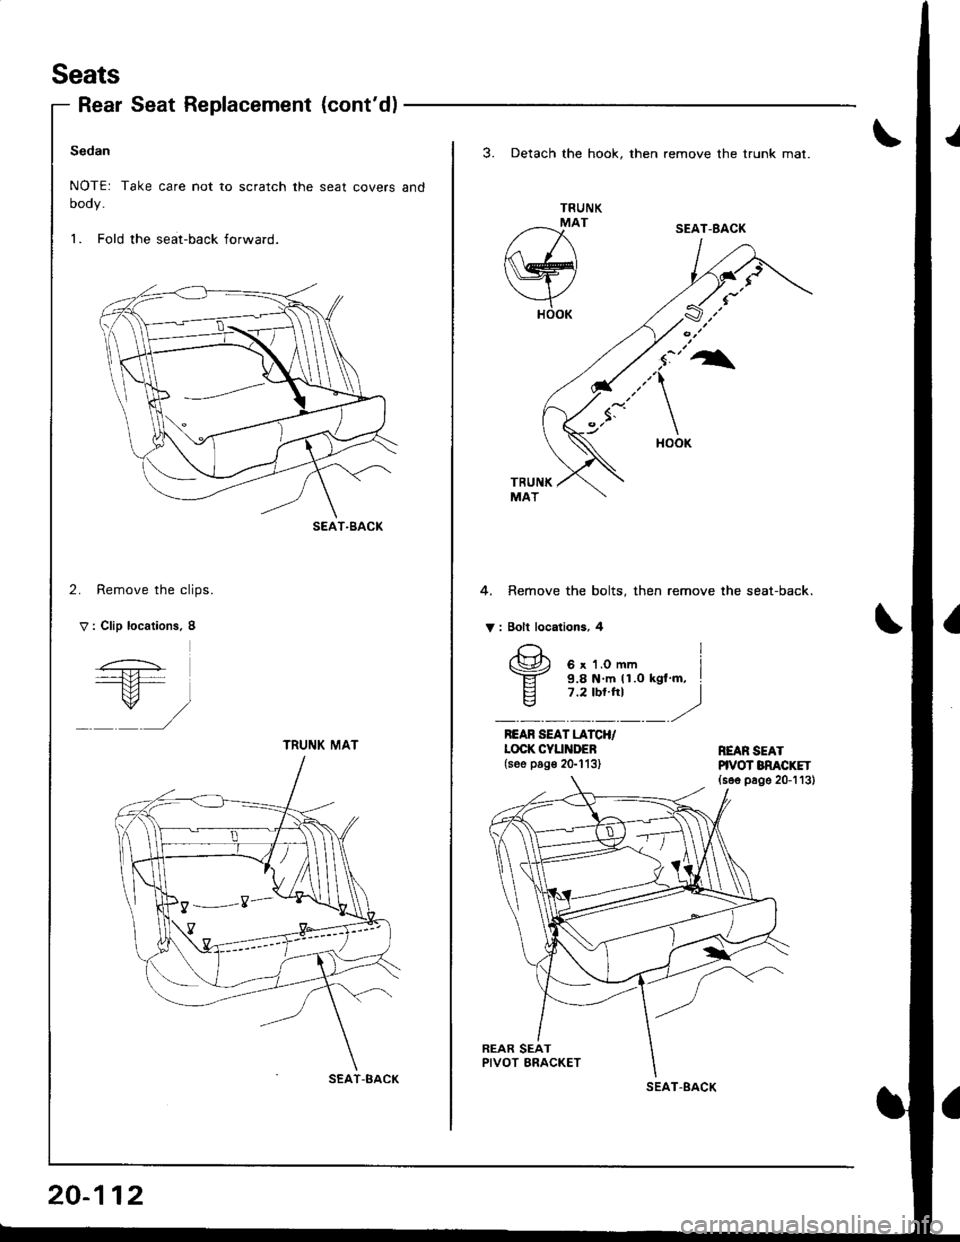
Sedan
NOTE: Take care not to scratch the seat covers and
oooy.
1. Fold the seat-back forward.
2. Remove the clips.
V : Clip locations. 8
SEAT-BACK
TRUNI( MAT
SEAT-BACK
20-112
3. Detach the hook. then remove the trunk mat.
TRUNK
/--x'
w
YHOOK
4. Remove the bolts, then remove the seat-back.
V : Bolt locations, 4
REAR SEAT LATCH/LOCK CYUiIDEB(see pog€ 2G113)REAR SEATHVOT BNACKET(s6e page 20-113)
SEAT-BACK
I
(\Jr', 6 x 1.0 mm I-ET- 9.8 N m (1.0 kgl'm, I
E 7.2 tbt.ht Iq7 ,2'/.
SEAT.BACK
Page 928 of 1681
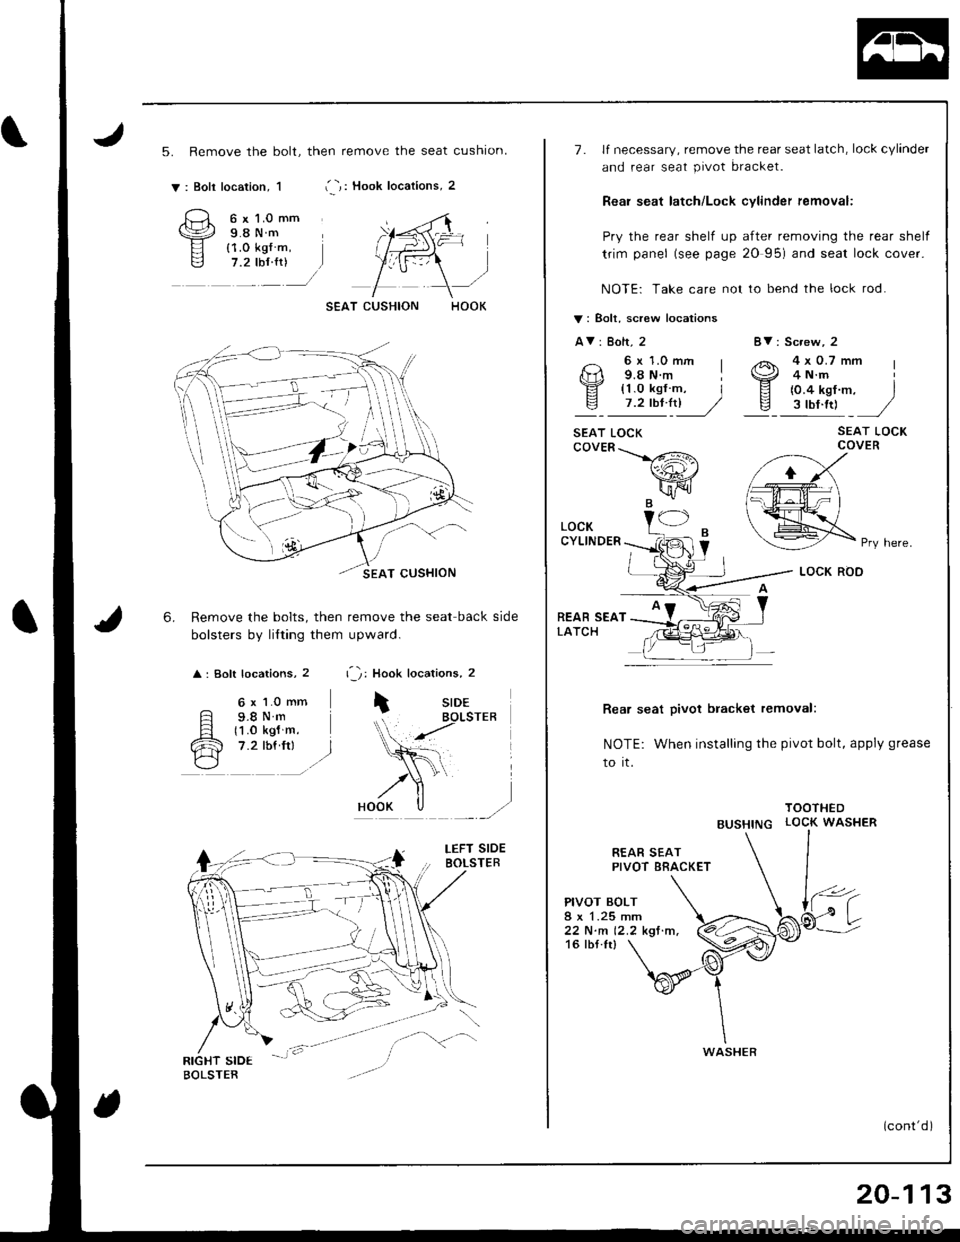
5. Remove the bolt, then remove the seat cushion.
i -,: Hook locations, 2v: Boli location, 1
6.
6 x l.0 mm9.8Nm{1.0 kg{ m,7.2 tbf {r)
6 x 1.0 mm
F s.sN.Fl t1 .o ksl m.
cR 7.2 rbf.frr l./\---l
Remove the bolts, then remove the seat back side
bolsters by lilting them upward.
: Soft locations, 2 r '1: Hook locations, 2
iSIDEBOLSTER
r,1F=
8V: Screw, 2
4x0.7mm4 N.m
{0.4 kgf m, Is ttt.ttl ,/
SEAT LOCKCOVER
Rea, seat pivot bracket removal:
NOTE: When installing the pivot bolt, apply grease
to it.
TOOTHED
BUSHTNG LOCK WASHER
7. lf necessary, remove the rear seat latch, lock cylinder
and rear seat pivot bracket.
Reai seat latch/Lock cylinder femoval:
Pry the rear shelf up after removing the rear shelf
trim panel (see page 20 95) and seal lock cover.
NOTE: Take care not to bend the lock rod.
V: Bolt, screw locations
AV: Bolt, 2
6x1.0mm I9.8 N.m I
!l' {1.0 kgf m, Iv 7.2tbt4l]� //
SEAT LOCKcovER\>#\
wr'\[FIJB.
REAR SEATPIVOT BRACKET
PIVOT BOLT
22 N.m 12.2 kgf.m.16 tbf.Ir)
LOCKCYLINDER
REAR SEATLATCH
Pry here.
WASHER
20-113
Page 929 of 1681
Seats
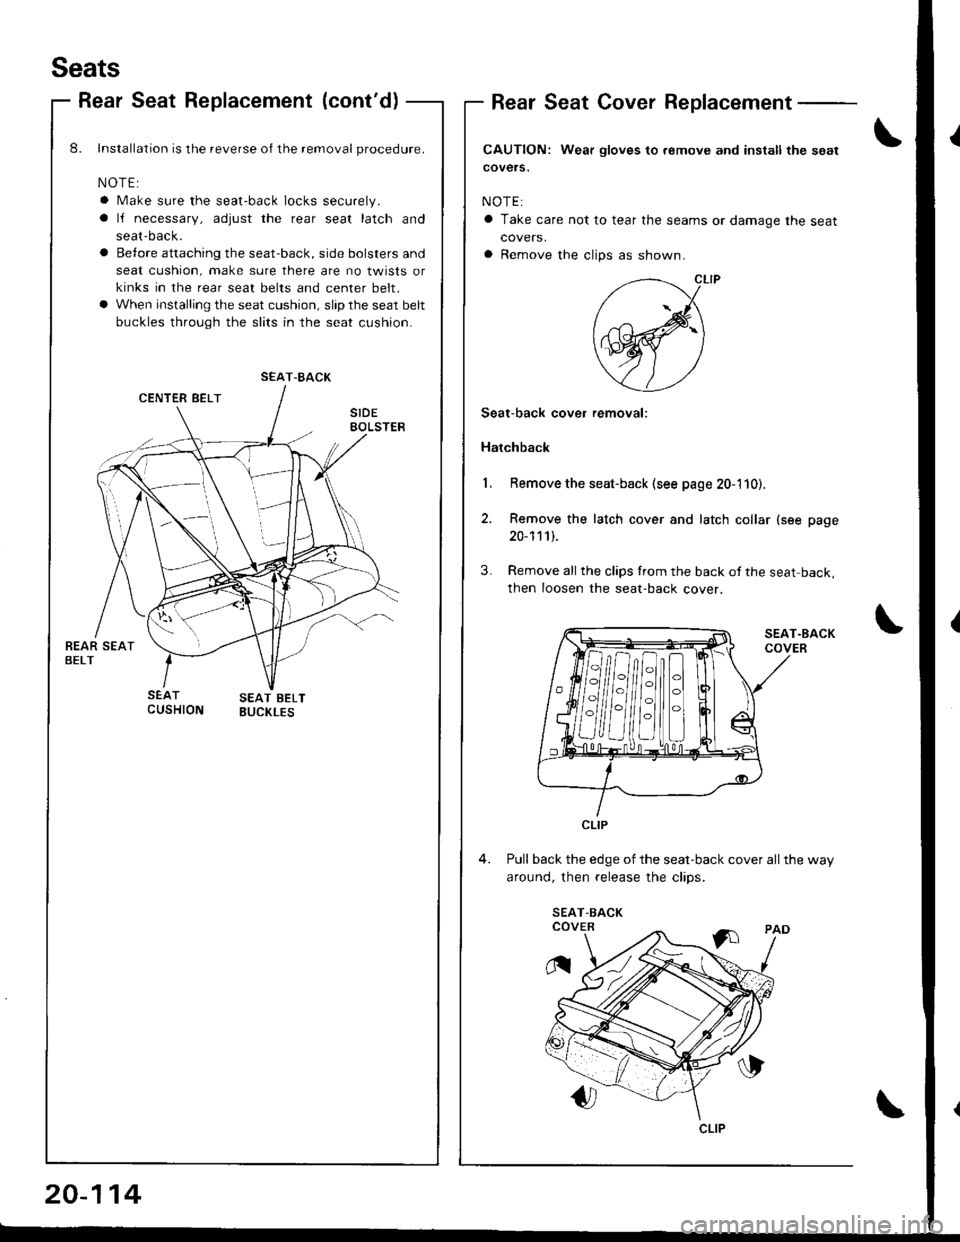
Rear Seat Replacement (cont'd)Rear Seat Cover Replacement
CAUTION: Wear gloves to.emove and install the sgat
covers.
NOTE:
a Take care not to tear the seams or damage the seat
covers,
a Remove the clips as shown.
8. Installalion is the reverse oI the removal procedure.
NOTE:
a Make sure the seat-back locks securely.
a lJ necessary, adjust the rear seat latch and
seat-back.
a Betore attaching the seat-back, side bolsters and
seat cushion, make sure there are no twists or
kinks in the rear seat belts and center belt.
a When installing the seat cushion, slip the seat belt
buckles through the slits in the seat cushion.
Remove the seat-back (see page 20-110).
Remove the latch cover and latch collar (see page
20-111).
Remove all the clips from rhe back of the seat back,
then Ioosen the seat-back cover.
Pull back the edge of the seat-back cover all the way
around. then release the clios.
Seat-back cover removal:
Hatchback
SEAT-BACK
H/HilflH
CLIP
CLIP
20-114
Page 930 of 1681
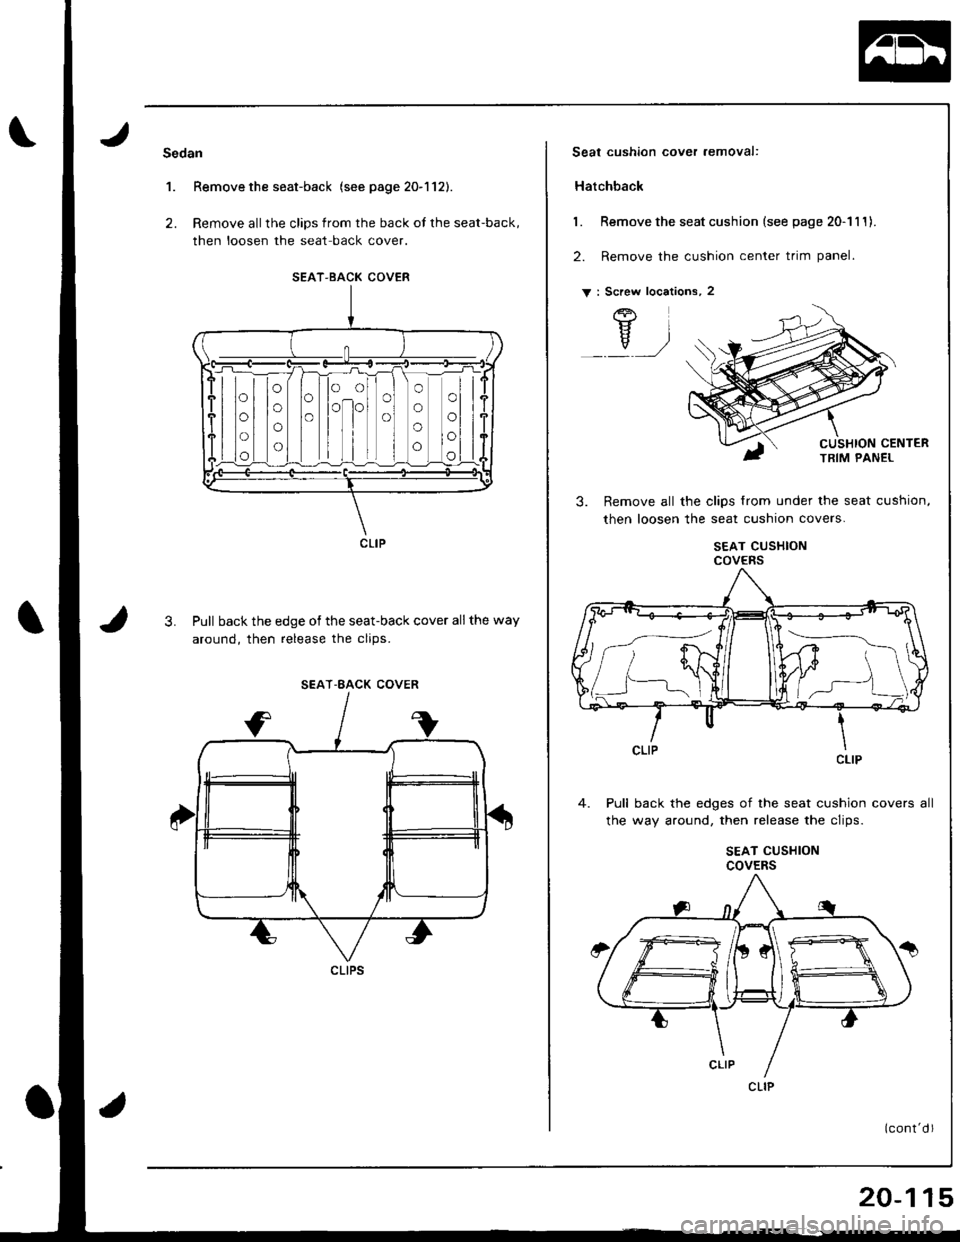
Sedan
1. Remove the seat-back (see page 20-112).
2. Remove allthe clips from the back of the seat-back,
then loosen the seat back cover.
Pull back the edge of the seat-back cover all the way
around. then release the cliDs.
3.
SEAT-BACK COVER
CLIP
SEAT-BACK COVER
CLIPS
Seat cushion cover aemoval:
Hatchback
1. Remove the seat cushion (see page 20-1 I 1).
2. Remove the cushion center trim panel.
v : Screw locations, 2
3.
]ft
v):,J
Remove all the clips {rom under the seat cushion,
then loosen the seat cushion covers.
SEAT CUSHIONCOVEFS
- CLIP
back the edges of the seat cushion covers all
way around, then release the clips
4. Pull
the
SEAT CUSHIONcovERs
CLIP
20-115