HONDA INTEGRA 1998 4.G Workshop Manual
Manufacturer: HONDA, Model Year: 1998, Model line: INTEGRA, Model: HONDA INTEGRA 1998 4.GPages: 1681, PDF Size: 54.22 MB
Page 931 of 1681
Seats
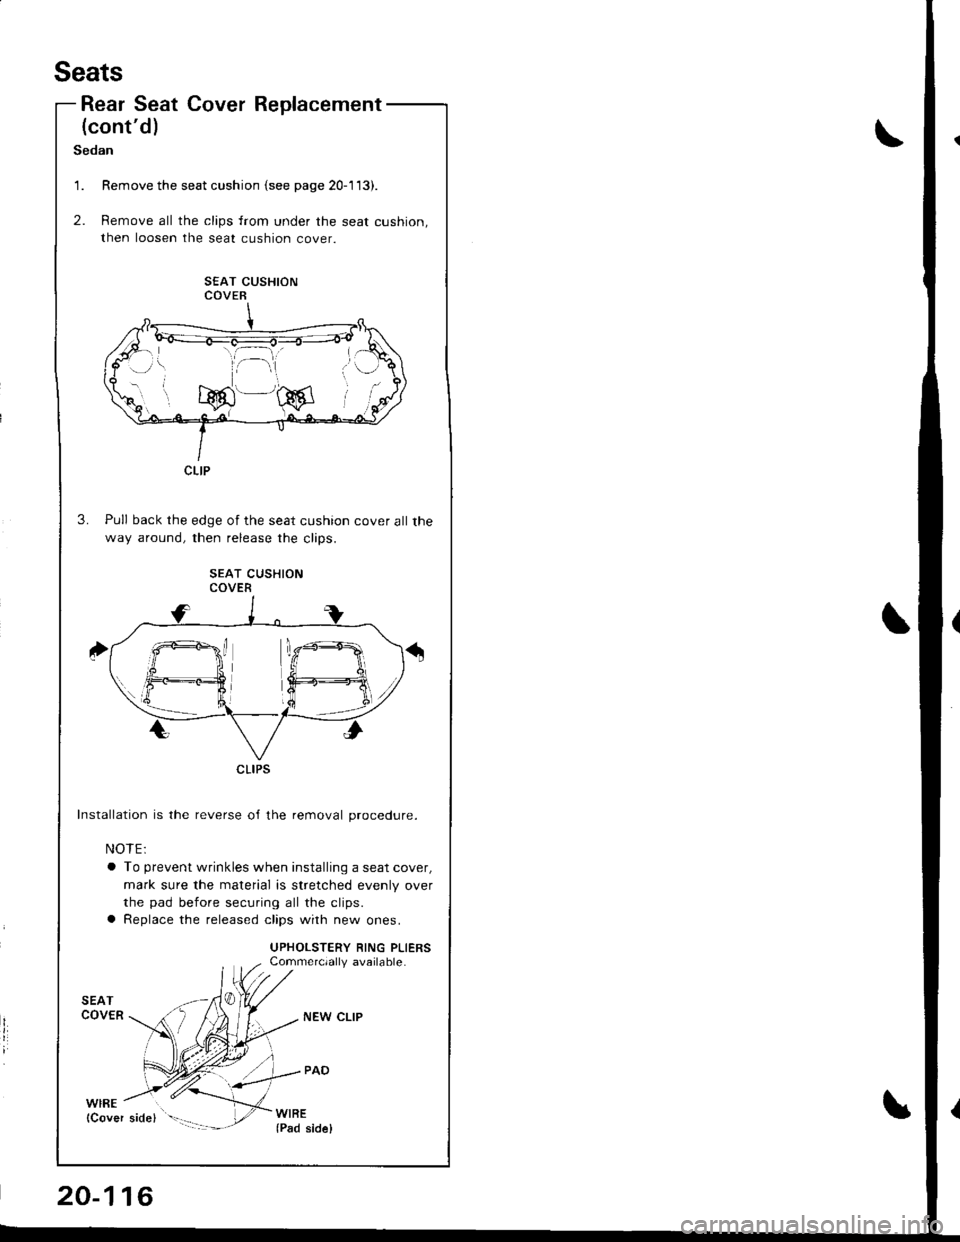
Rear Seat Cover
(cont'd)
Replacement
Sedan
Remove the seat cushion {see page 20-113).
Remove all the clips from under the seat cushion,
then loosen the seat cushion cove
SEAT CUSHIONCOVER
Pull back the edge of the seat cushion cover all the
way around, then release the clios
SEAT CUSHIONCOVER
Installation is the reverse o,f the removal procedure.
NOTE:
a To prevent wrinkles when installing a seat cover,
mark sure the material is stretched evenly over
the pad before securing all the clips.
a Replace the released clips with new ones.
UPHOLSTERY RING PLIERSCommercially available.
't.
2.
CLIP
CLIPS
20-116
NEW CLIP
Page 932 of 1681
zril
HSeat Belts
I
I
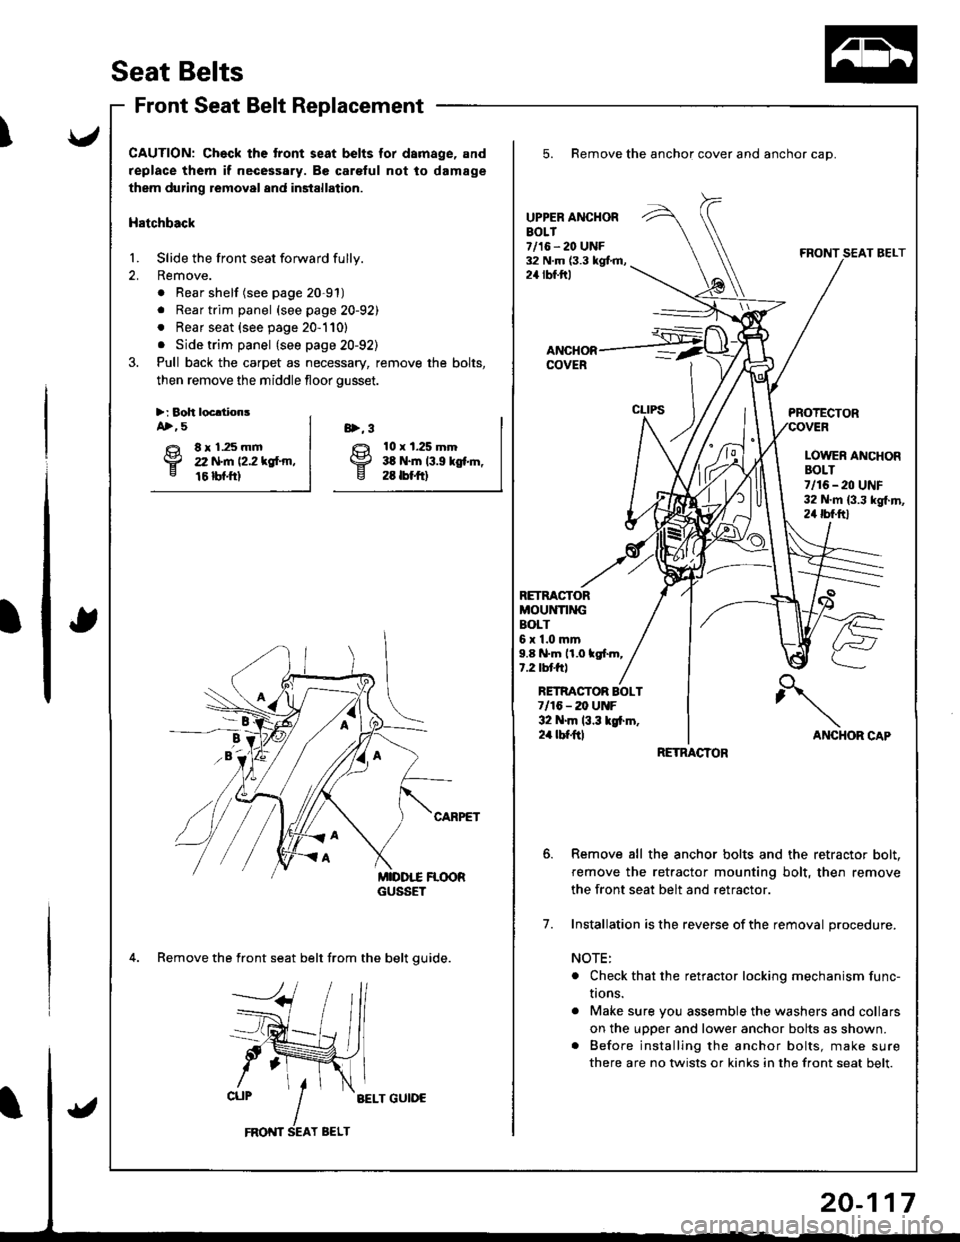
Front Seat Belt Replacement
CAUTION: Ch€ck the tront seat belts for dsmage, and
replace them if necessary. Be car€ful not to damage
them during removal and installation.
Hatchback
1. Slide the front seat forward fully.
2. Remove.
. Rear shelf (see page 20-91)
. Rear trim panel (see page 20-92)
. Rear seat {see page 20-110}
. Side trim panel {see page 20-92)
3. Pull back the carpet as necessary, remove the bolts,
then remove the middle floor gusset.
>:8oh locldonsA>, 5
€t 8r1.25mmp zz trt'm tz.z rgf.m,e 16 bf.ftl
10 x t.25 mm:ta N.m 13.9 kgf.m,26 tbrftl
8>, 3
4. Remove the front seat belt from the belt quide.
BELT GUIDE
5. Remove the anchor cover and anchor cap.
UPPER ANCHOREOLT7/16 - 20 UNF32 N.m (3.3 kgt m,24 rbf.ftl
RETRACTORMOUNTI]IIGBOLT6r1.0mm9.8 N.m 11.0 tgf.m,1.2 tblJftl
PROTECTOR
LOWER ANCHORBOLT7/16-20 UNF32 N.m {3.3 kg{.m,24 tbf.ftl
ANCHOR CAP
AL-
RETMCTOR BOLT7/16 - 20 UtrtF32 N.m 13.3 lgi.m,2'a tbt ftl
7.
Remove all the anchor bolts and the retractor bolt.
remove the retractor mounting bolt, then remove
the front seat belt and retractor.
Installation is the reverse of the removal procedure.
NOTE:
o Check that the retractor locking mechanism func-
I|ons.
. Make sure you assemble the washers and collars
on the upDer and lower anchor bolts as shown.. Before installing the anchor bolts, make sure
there are no twists or kinks in the front seat belt.
RETRACTOR
Page 933 of 1681
Seat Belts
Front Seat Belt Replacement {cont'd}
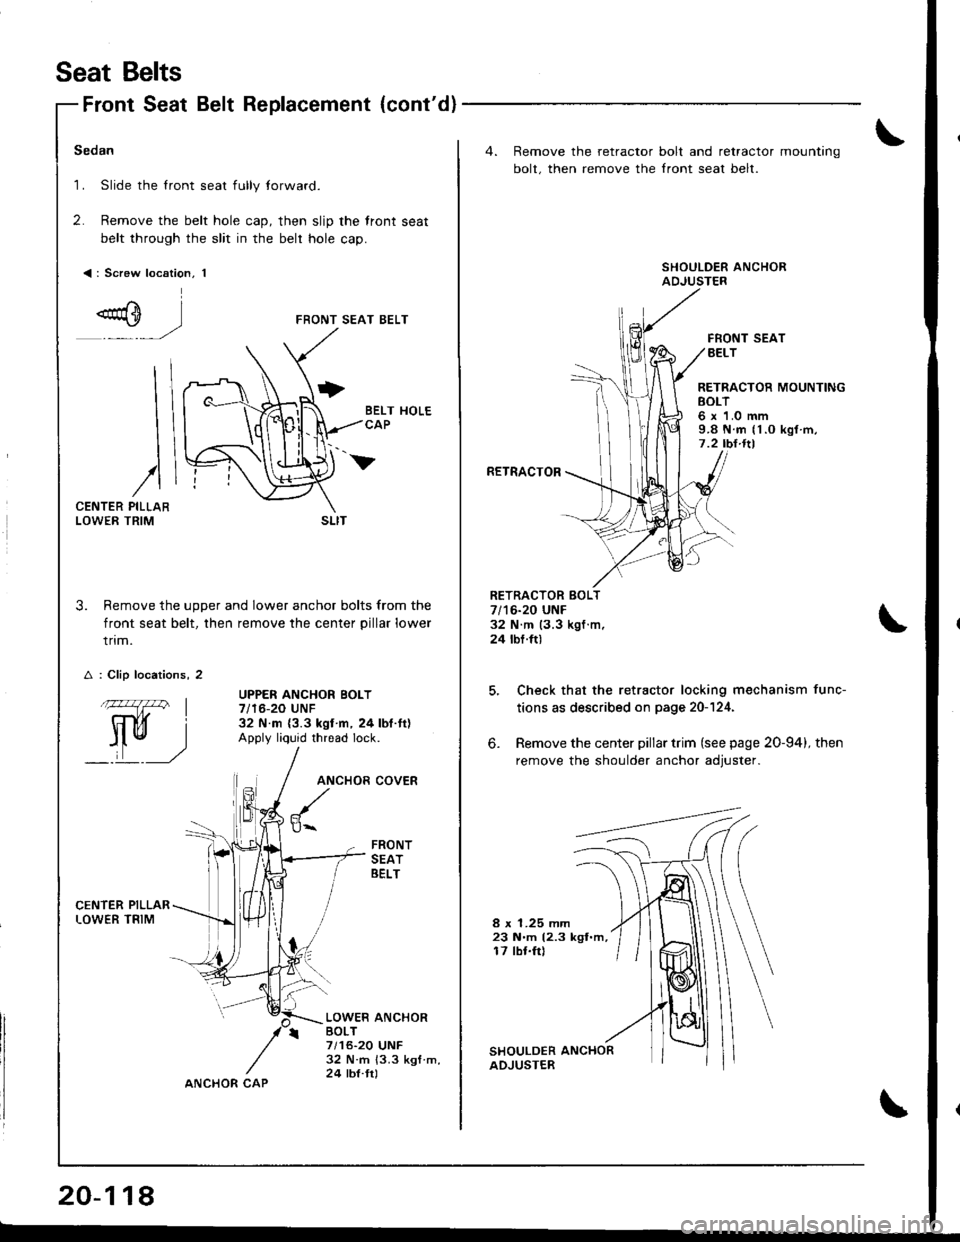
Sedan
1. Slide the lront seat fully lorward.
2. Remove the belt hole cap, then slip the front seat
belt through the slit in the belr hole cap.
<: Screw location, 1
FRONT SEAT BELT
CENTERLOWER
3. Remove the uoDer and lower anchor bolts from the
front seat belt, then remove the center pillar lower
trim.
UPPER ANCHOR BOLT7/16-20 UNF32 N.m {3.3 kgl n, 24 lbt.tt)Apply liquid thread lock.
ANCHOR
$..
FRONTSEATBELT
LOWER ANCHORBOLT7/16-20 UNF32 N.m 13.3 ksf m,24 tbl.trl
I
I
I
/PILLARTRIM
A : Clip locations, 2
.144l I
Il ru, I
_:,t __,)
SLIT
20-118
ANCHOR CAP
4. Remove the retractor
bolt, then remove the
bolt and retractor mounting
Iront seat belt.
FRONT SEATBELT
RETRACTOR MOUNTINGEOLT6 x 1.0 mm9.8 N.m (1.O kgl m,7 .2 tbl.ltl
RETRACTOR
RETRACTOR BOLT7/16-20 UNF32 N.m (3.3 kgf.m,24 tbt.ft)
6.
Check that the retractor locking mechanism func-
tions as described on page 20-124.
Remove the center pillar trim (see page 20-94), then
remove the shoulder anchor adiuster.
8 x 1.25 mm23 N.m (2.3 kgt.m,17 lbr.frl
Page 934 of 1681
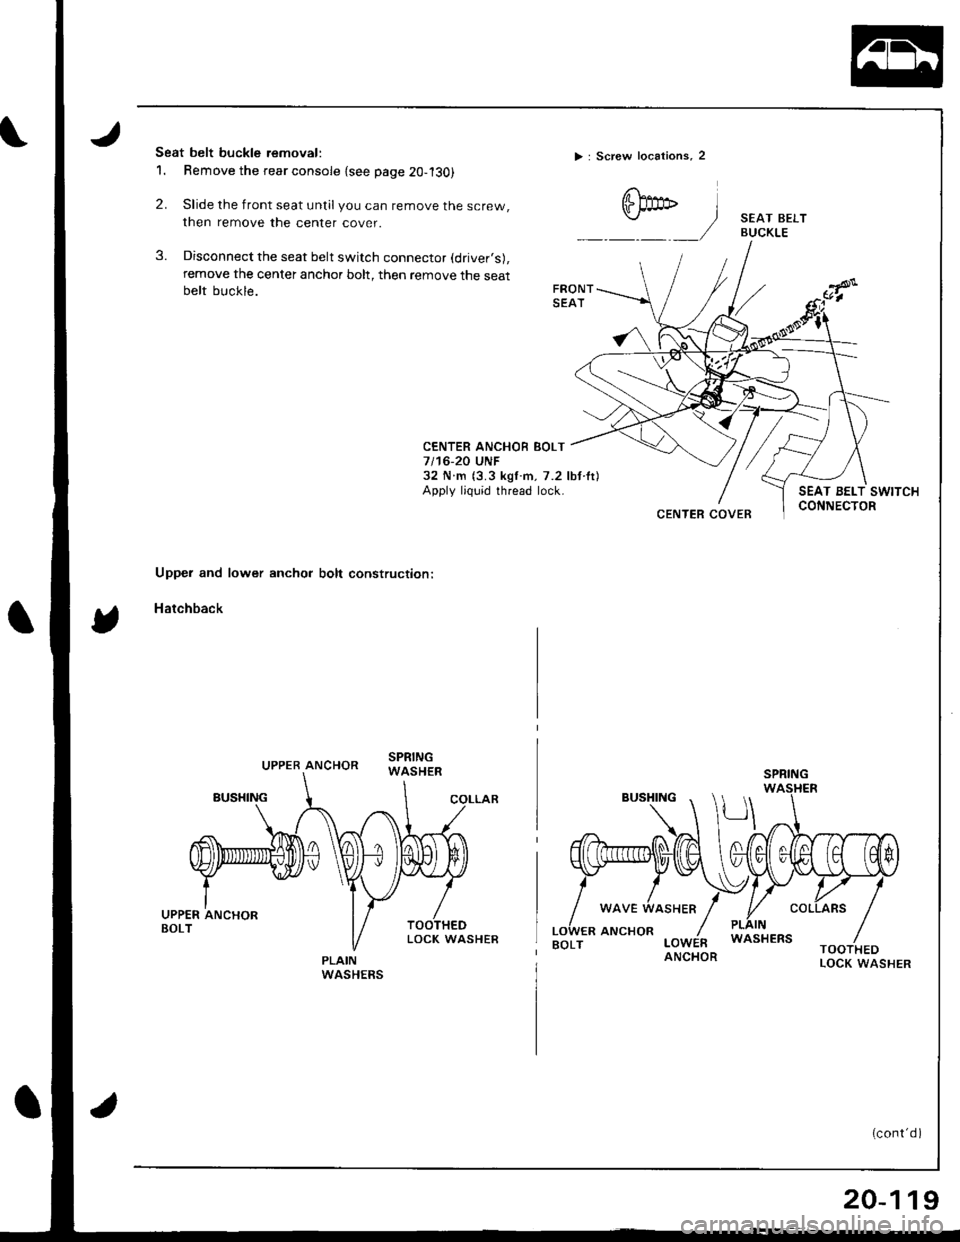
Seat belt buckle removal:
1. Remove the rear console {see page 20-'l30)
2. Slide the front seat untilyou can remove the screw,
then remove the center cover.
3. Disconnect the seat belt switch connector (driver,s),
remove the center anchor bolt, then remove the seatbelt buckle.
> : Screw locations, 2
CENTER ANCHOB BOLT7 t't6-20 UNF32 N m (3.3 kgf.m, 7.2 lbt lt)Apply ljquid thread lock.SEAT BELT SWITCHCONNECTOR
'
) sEAr BEL'
_/ BUCKLE
CENTER COVER
Upper and lower anchor bolt construction:
Hatchback
PLAINWASHERS
UPPER ANCHORSPRING
WAVE
ANCHOR
(cont'd )
20-119
Page 935 of 1681
![HONDA INTEGRA 1998 4.G Workshop Manual Seat Belts
Retractol bolt construction:
RETRACTOBBOLTTOOTHEOLOCK WASHERCENTER ANCHORBOLTApply liquid thread lock.
L l, \]t-. la I ra\
u#/uu_(Jrd
Front Seat Belt Replacement (contdl
PUSH NUT
UPPER AN HONDA INTEGRA 1998 4.G Workshop Manual Seat Belts
Retractol bolt construction:
RETRACTOBBOLTTOOTHEOLOCK WASHERCENTER ANCHORBOLTApply liquid thread lock.
L l, \]t-. la I ra\
u#/uu_(Jrd
Front Seat Belt Replacement (contdl
PUSH NUT
UPPER AN](/img/13/6069/w960_6069-934.png)
Seat Belts
Retractol bolt construction:
RETRACTOBBOLTTOOTHEOLOCK WASHERCENTER ANCHORBOLTApply liquid thread lock.
L l, \]t-. la I ra\
u#/uu_(Jrd
Front Seat Belt Replacement (cont'dl
PUSH NUT
UPPER ANCHOREOLTApply liquid thread lock.
Center anchor bolt construction:
TOOTHEDLOCK WASHER
CENTERANCHOR
Installation is the reverse of the removal procedure.
NOTE:
a Make sure you assemble the washers and collars on the upper and lower anchor bolts as shown.
a Before attaching the side trim panel (Hatchback) or center pillar lower trim (Sedan), make sure there are no twists
or kinks in the front seat belt.
PLAIN
BUSHING
WAVE WASHER
20-120
Page 936 of 1681
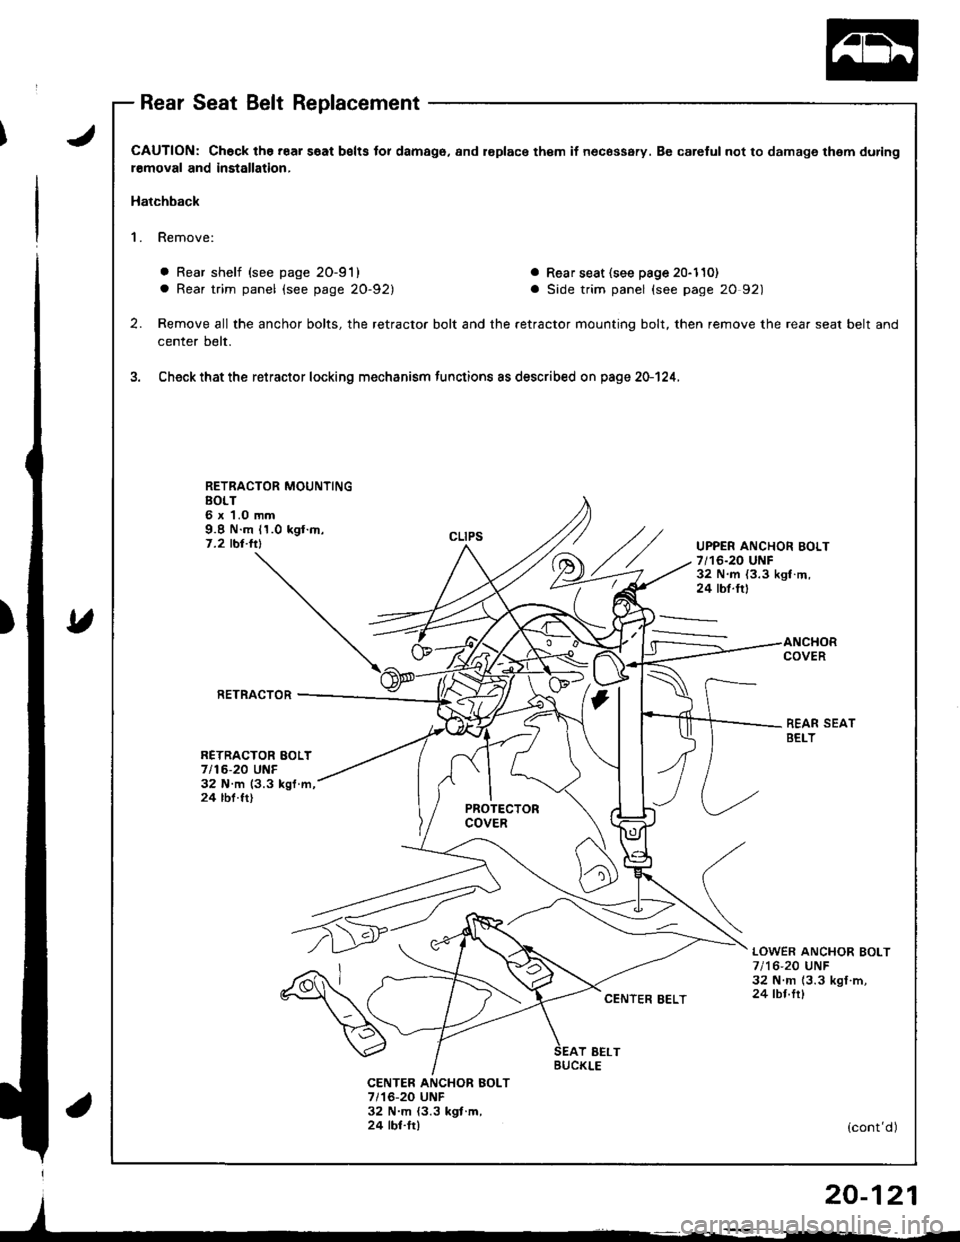
J
v
CAUTION: Check the.oar s€at belts tor damago, and l€placo th€m il necossary. Be carelul not to damage them during
r€moval and installation,
Hatchback
1. Remove:
. Rear shelf (see page 2O-91)a Rear trim panel (see page 20-92)
a Rear seat (see page 20-110)
a Side trim panel (see page 20 92)
2.Remove all the anchor bolts, the retractor bolt and the retractor mounting bolt, then remove the rea. seat belt and
center belt.
Check that the retractor locking mechanism functions as described on page 20-124,
RETRACTOR MOUNTINGBOLT6 x 1.0 mm9.8 N.m 11.0 kgf.m,7.2 tbt.ltlUPPER ANCHOR BOLT7/16-20 UNF32 N.m {3.3 kgl.m,24 tbl.lrl
COVER
RETRACTOR
REAR SEATBELT
RETRACTOR BOLT7/16-20 UNF32 N.m (3.3 kgf.m,24 tbt.ft)PROTECTORCOVER
CENTER BELT
LOWER ANCHOR BOLT7/16,20 UNF32 N.m {3.3 kgI.m,24 lbr.frl
T SELTBUCKLE
CENTER ANCHOR BOLT7/'16-20 UNF32 N.m (3.3 kgt.m,24 lbf.Ir)(cont'd )a
Page 937 of 1681
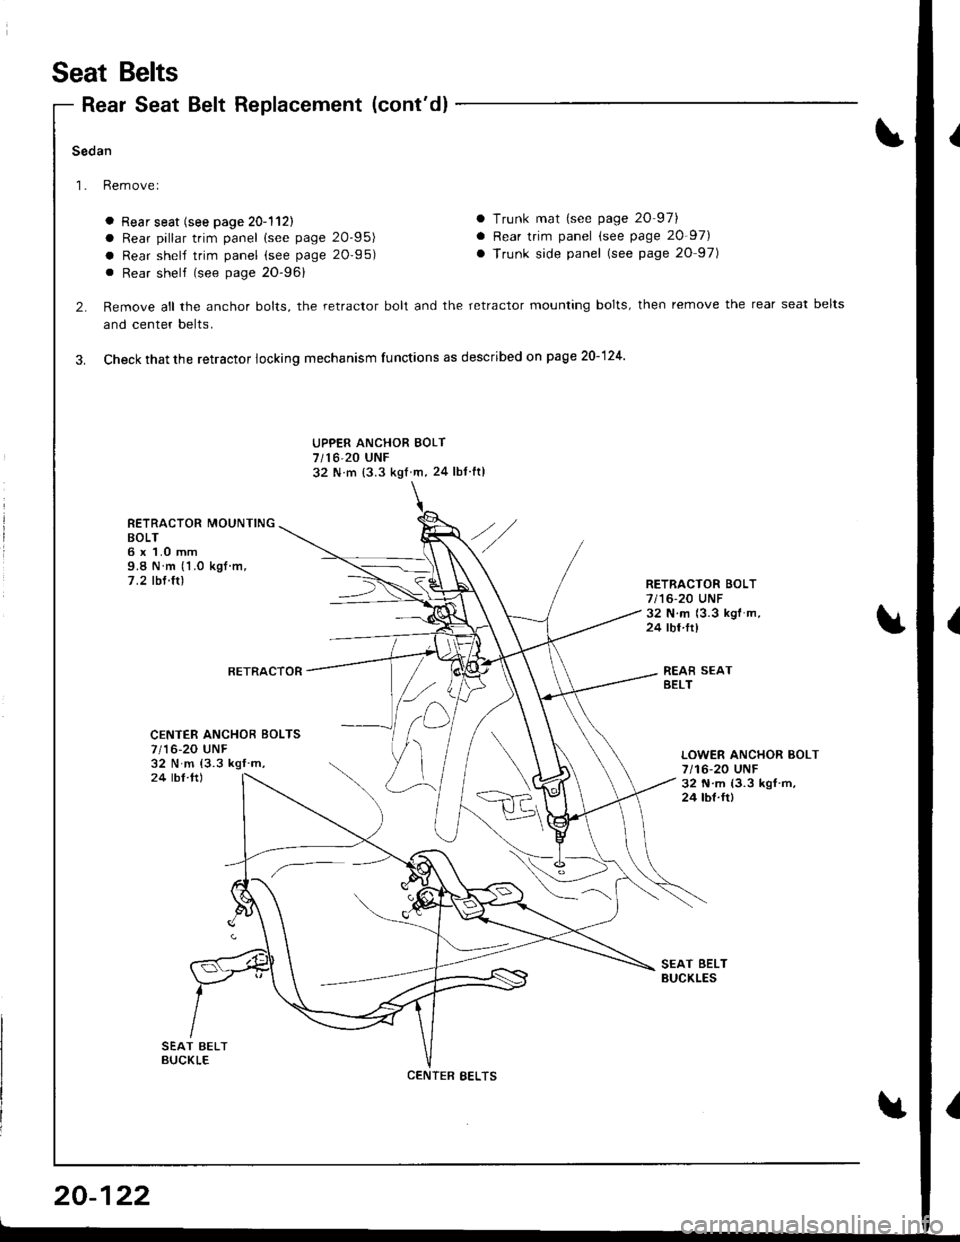
Seat Belts
Rear Seat Belt Replacement (cont'dl
Sedan
Rem ove I
a Rear seat (see page 20-1'l2l
a Rear pillar trim panel (see page 20'95)
a Rear shelf trim panel (see page 20-95)
. Rear shelf (see page 20-961
2. Remove all the anchor bolts, the retractor bolt and the retractor mounting bolts, then remove the rear seat belts
and center belts.
3. Check that the retractor locking mechanism functions as described on page 20-124
a Trunk mat {see page 20 97}
a Rear trim panel (see page 20-971
a Trunk side panel (see page 20 97)
UPPER ANCHOR BOLT7/16,20 UNF
32 N m 13.3 kgt m, 24 lbt ltl
RETRACTOR MOUNTINGBOLT6 x 1.0 mm9.8 N m (1.0 kgf .m,
7 .2 tbl.ltlRETRACTOR BOLT7/16-20 UNF32 N.m {3.3 kgl'm,24 tbt,ttl
RETRACTOR
CENTER ANCHOR EOLTS7/16-20 UNF32 N m {3.3 kgf m,24 tbf.td
LOWER ANCHOR BOLT7/16-20 UNF32 N.m 13.3 kgf.m,24 lbf.It)
SEAT EELTBUCKLES
CENTER EELTS
20-122
Page 938 of 1681
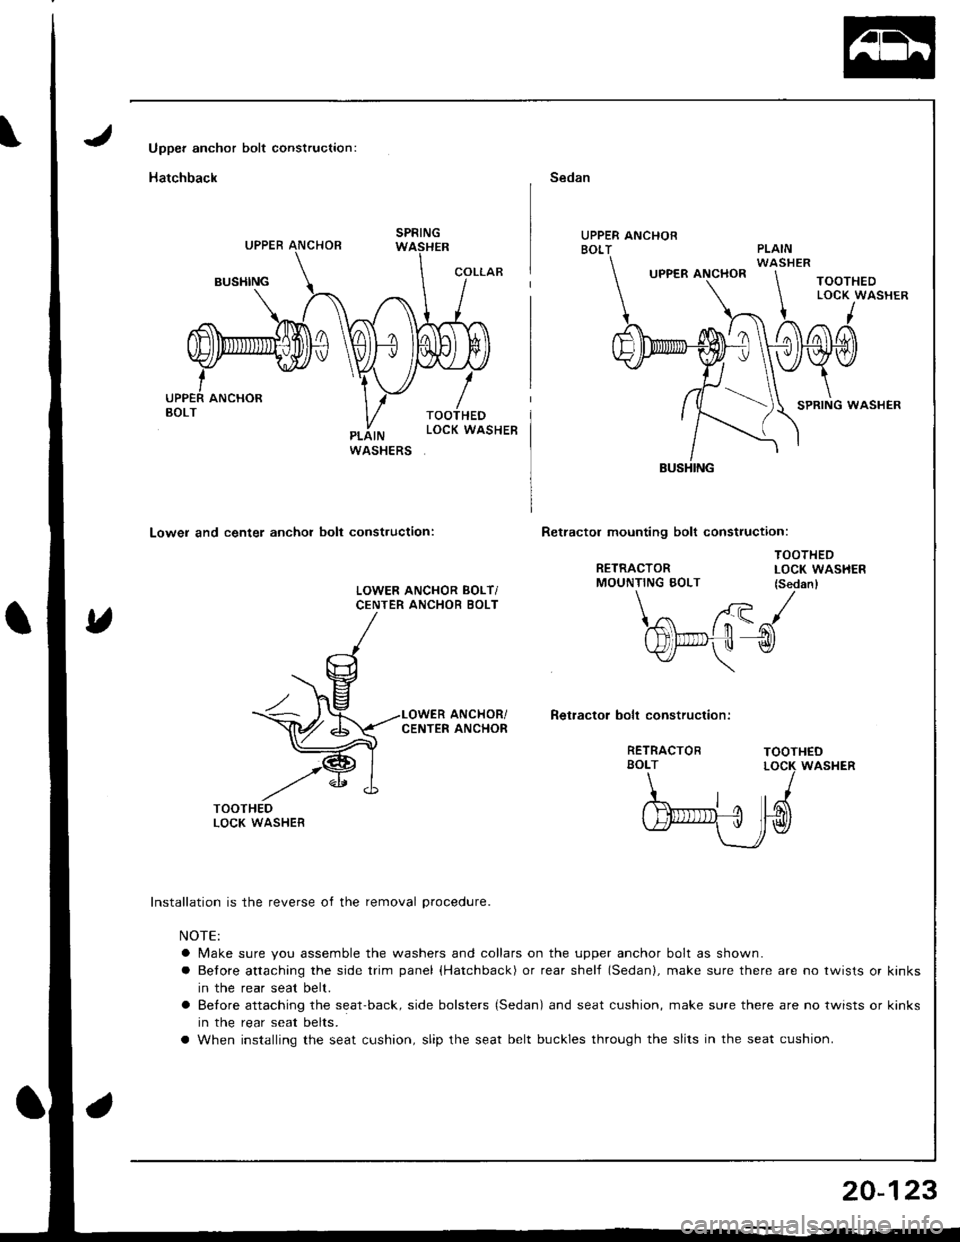
Upper anchor bolt construction:
Hatchback
Lower and center anchor bolt construction:
Sedan
UPPER ANCHORBOLT
TOOTHEDLOCK WASHER
I
0
SPRING WASHER
Retractol mounting bolt construction:
RETRACTORMOUNTING BOLT
TOOTHEDLOCK WASHER(SedanlLOWER ANCHOR BOLT/CENTER ANCHOR BOLT
RETRACTORBOLTTOOTHEDLOCK WASI{ER
,l
/Blnrmi !r L6\\h/*vJv)
WASHERUPPER ANCHOR
\\,..--. t
W/
ANCHOR/Retractor boh construction:CENTER ANCHOR
lnstallation is the reverse of the removal orocedure.
NOTE:
o Make sure you assemble the washers and collars on the upper anchor bolt as shown.
a Betore attaching the side trim panel (Hatchback) or rear shelf (Sedan), make sure there are no twists or kinks
in the rear seat belt.
a Betore attaching the seat'back, side bolsters {Sedan) and seat cushion, make sure there are no twists or kinks
in the rear seat belts.
a When installing the seat cushion, slip the seat belt buckles through the slits in the seat cushion.
20-123
Page 939 of 1681
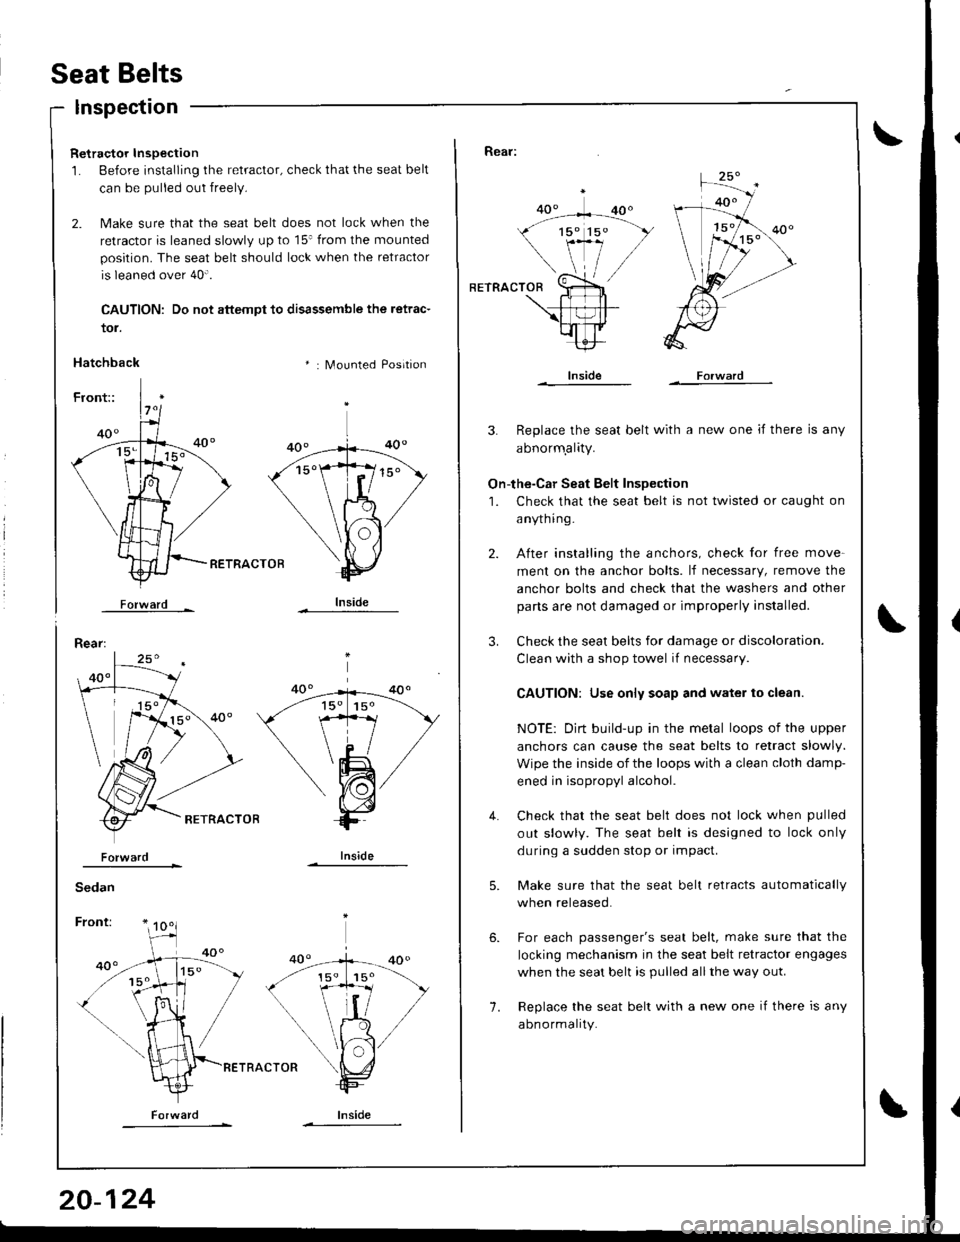
Seat Belts
tor.
Hatchback
lnspection
Retractor Inspection
1. Before installing the retractor, check that the seat belt
can be pulled out freely.
2. Make sure that the seat belt does not lock when the
retractor is leaned slowly up to 15' from the mounted
position. The seat belt should lock when the retractor
is leaned over 40".
CAUTION: Do not attempt to disassemble the retrac-
* : Mounted Position
RETRACTOB
Forward -
Rear:
lnside
Rear:
RETRACTOR
lnside
3. Replace the seat belt with a new one if there is any
abnorm.ality.
On-the-Car Seat Belt Inspection
1. Check that the seat belt is not twisted or caught on
anytnrng-
After installing the anchors, check for free move-
ment on the anchor bolts. lf necessary, remove the
anchor bolts and check that the washers and other
parts are not damaged or improperly installed.
Check the seat belts for damage or discoloration.
Clean with a shop towel if necessary
CAUTION: Use only soap and water to clean.
NOTE: Dirt build-up in the metal loops of the upper
anchors can cause the seat belts to retract slowly.
Wipe the inside of the loops with a clean cloth damp-
ened in isopropyl alcohol.
Check that the seat belt does not lock when pulled
out slowly. The seat belt is designed to lock only
during a sudden stop or impact.
Make sure that the seat belt retracts automatically
when released.
For each passenger's seat belt, make sure that the
locking mechanism in the seat belt retractor engages
when the seat belt is pulled allthe way out.
Replace the seat belt with a new one if there is any
abnormality.
4.
1.
6.
Page 940 of 1681
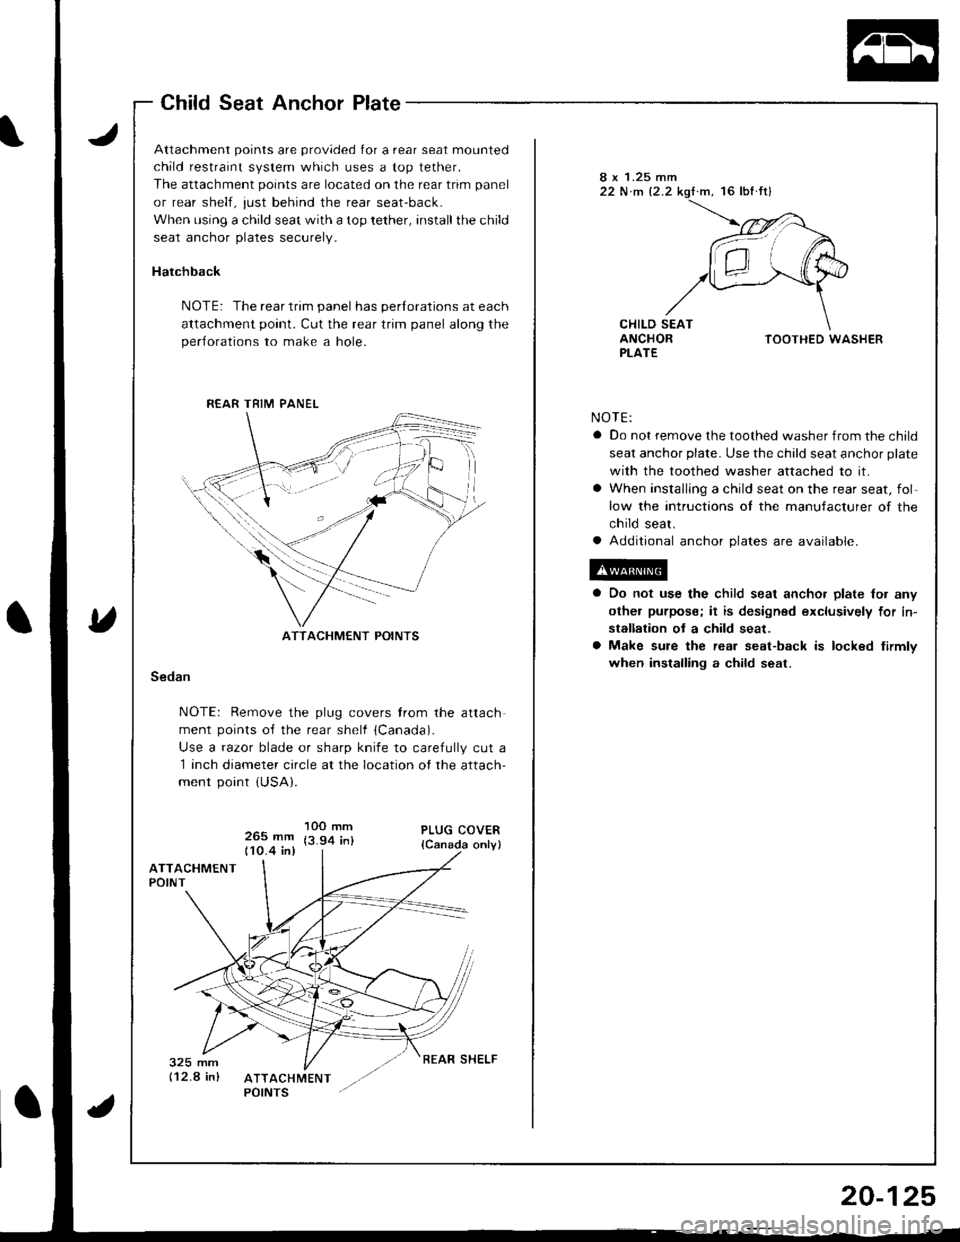
Child Seat Anchor Plate
Attachment points are provided for a rear seat mounted
child restraint system which uses a top tether.
The attachment points are located on the rear trim panel
or rear shelf, just behind the rear seat-back.
When using a child seat with a top tether, installthe child
seat anchor plates securely.
Hatchback
NOTE: The rear trim panel has perlorations at each
attachment point. Cut the rear trim panel along the
perlorations to make a hole.
8 x 1.25 mm22 N.m 12.2.m, 16 lbf fr)
CHILD SEATANCHORPLATETOOTHED WASHER
NOTE:
a Do not remove the toothed washer from the child
seat anchor plate. Use the child seat anchor plate
with the toothed washer attached to it.
a When installlng a child seat on the rear seat, fol-
low the intructions ol the manufacturer of the
child seat.
a Additional anchor plates are available.
Do not use the child seat ancho. plate lor any
othel purpose; it is designed exclusively for in-
stallation ot a child seat.
Make sure the rear seat-back is locked tirmlv
when installing a child seat.Sedan
NOTE: Remove the plug covers trom the attach
ment points o{f the rear shelf {Canada).
Use a razor blade or sharp knife to carefully cut a
1 inch diameter circle at the location of the attach-
ment point {USA}.
265 mm110.4 in)
1OO mm(3.94 in)
R€AR TRIM PANEL
ATTACHMENT POINTS
REAR SHELF