steering wheel Hyundai Ioniq Electric 2017 Owner's Manual
[x] Cancel search | Manufacturer: HYUNDAI, Model Year: 2017, Model line: Ioniq Electric, Model: Hyundai Ioniq Electric 2017Pages: 582, PDF Size: 37.73 MB
Page 94 of 582
1-6
Your vehicle at a glance
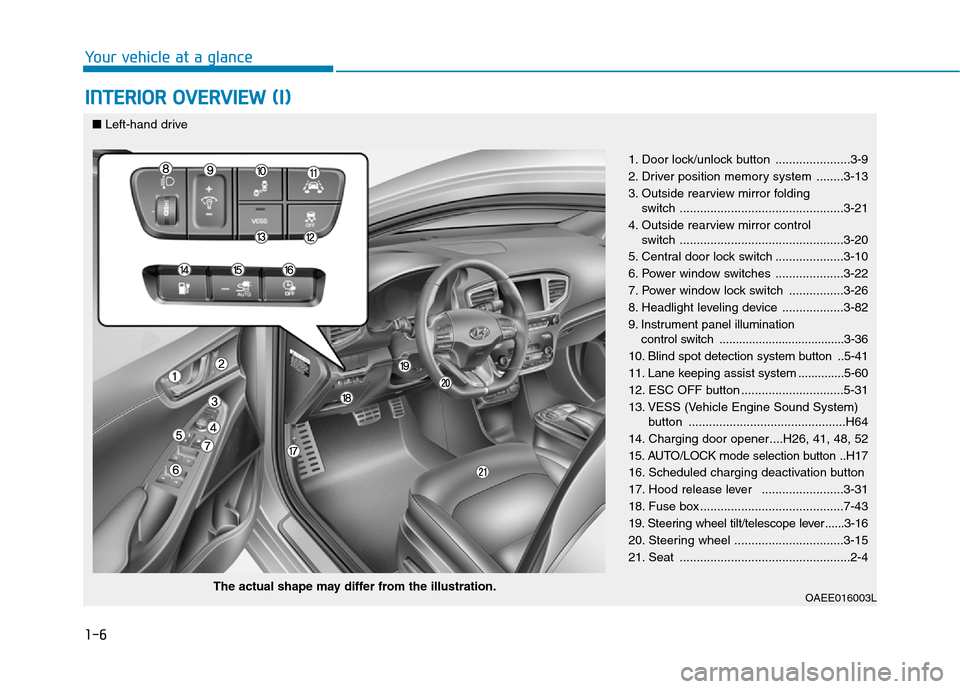
INTERIOR OVERVIEW (I)
1. Door lock/unlock button ......................3-9
2. Driver position memory system ........3-13
3. Outside rearview mirror folding switch ................................................3-21
4. Outside rearview mirror control switch ................................................3-20
5. Central door lock switch ....................3-10
6. Power window switches ....................3-22
7. Power window lock switch ................3-26
8. Headlight leveling device ..................3-82
9. Instrument panel illumination control switch ......................................3-36
10. Blind spot detection system button ..5-41
11. Lane keeping assist system ..............5-60
12. ESC OFF button ..............................5-31
13. VESS (Vehicle Engine Sound System) button ..............................................H64
14. Charging door opener....H26, 41, 48, 52
15. AUTO/LOCK mode selection button ..H17
16. Scheduled charging deactivation button
17. Hood release lever ........................3-31
18. Fuse box ..........................................7-43
19. Steering wheel tilt/telescope lever ......3-16
20. Steering wheel ................................3-15
21. Seat ..................................................2-4
OAEE016003L
The actual shape may differ from the illustration.
■
Left-hand drive
Page 95 of 582
1-7
Your vehicle at a glance
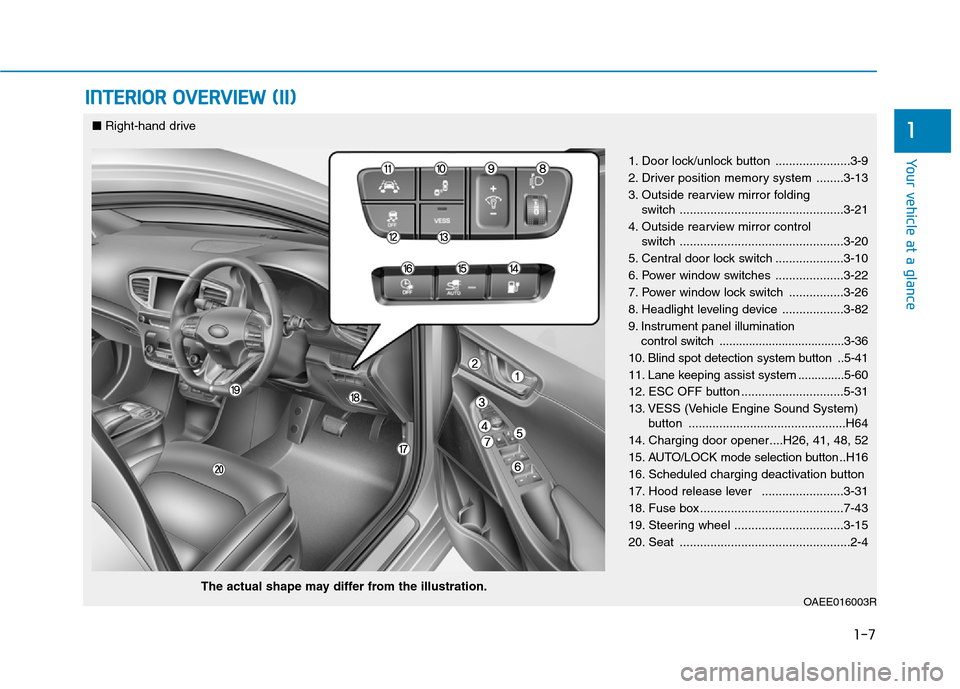
INTERIOR OVERVIEW (II)
1
1. Door lock/unlock button ......................3-9
2. Driver position memory system ........3-13
3. Outside rearview mirror folding switch ................................................3-21
4. Outside rearview mirror control switch ................................................3-20
5. Central door lock switch ....................3-10
6. Power window switches ....................3-22
7. Power window lock switch ................3-26
8. Headlight leveling device ..................3-82
9. Instrument panel illumination control switch ......................................3-36
10. Blind spot detection system button ..5-41
11. Lane keeping assist system ..............5-60
12. ESC OFF button ..............................5-31
13. VESS (Vehicle Engine Sound System) button ..............................................H64
14. Charging door opener....H26, 41, 48, 52
15. AUTO/LOCK mode selection button ..H16
16. Scheduled charging deactivation button
17. Hood release lever ........................3-31
18. Fuse box ..........................................7-43
19. Steering wheel ................................3-15
20. Seat ..................................................2-4
OAEE016003R
■ Right-hand drive
The actual shape may differ from the illustration.
Page 104 of 582
2-6
Safety system of your vehicle
To reduce the risk of serious
injury or death from an inflating
air bag, take the following pre-cautions:
•Adjust the driver’s seat as far
to the rear as possible main-
taining the ability to control of
the vehicle.
Adjust the front passenger seat
as far to the rear as possible.(Continued)
WARNING
(Continued)
Hold the steering wheel by the
rim with hands at the 9 o’clock
and 3 o’clock positions to min-
imize the risk of injuries to
your hands and arms.
NEVER place anything or any-
one between the air bag.
Do not allow the front passen-
ger to place feet or legs on the
dashboard to minimize the riskof leg injuries.
Safety precautions
Adjusting the seats so that you are sit-
ting in a safe, comfortable position
plays an important role in driver and
passenger safety together with theseat belts and air bags in an accident.
Air bags
You can take steps to reduce the risk
of being injured by an inflating air
bag. Sitting too close to an air bag
greatly increases the risk of injury in
the event the air bag inflates. Move
your seat as far back as possible
from front air bags, while still main-
taining control of the vehicle.
Do not use a cushion that reduces
friction between the seat and the
passenger. The passenger's hips
may slide under the lap portionof the seat belt during an acci-
dent or a sudden stop. Serious or fatal internal injuries could result because the seat
belt cannot operate properly.
WARNING
Page 105 of 582
2-7
Safety system of your vehicle
2
Seat belts
Always fasten your seat belt before
starting any trip.
At all times, passengers should sit
upright and be properly restrained.
Infants and small children must be
restrained in appropriate Child Restraint
Systems. Children who have outgrown a
booster seat and adults must be
restrained using the seat belts.
Front seats
The front seat can be adjusted by
using the control lever or switcheslocated on the outside of the seat
cushion. Before driving, adjust the
seat to the proper position so that you
can easily control the steering wheel,
foot pedals and controls on the instru-ment panel.
Take the following precautions
when adjusting your seat belt:
NEVER use one seat belt for more than one occupant.
Always position the seatback
upright with the lap portion of
the seat belt snug and low
across the hips.
NEVER allow children or small
infants to ride in a passenger’slap. (Continued)
(Continued)
Do not route the seat belt
across your neck, across sharp
edges, or reroute the shoulder
strap away from your body.
Do not allow the seat belt to become caught or jammed.
WARNING Take the following precautions
when adjusting your seat:
NEVER attempt to adjust the
seat while the vehicle is mov-
ing. The seat could respond
with unexpected movement
and may cause loss of vehicle
control resulting in an acci-dent.
Do not place anything under
the front seats. Loose objects
in the driver’s foot area could
interfere with the operation of
the foot pedals, causing anaccident.
(Continued)
WARNING
Page 108 of 582
2-10
Safety system of your vehicle
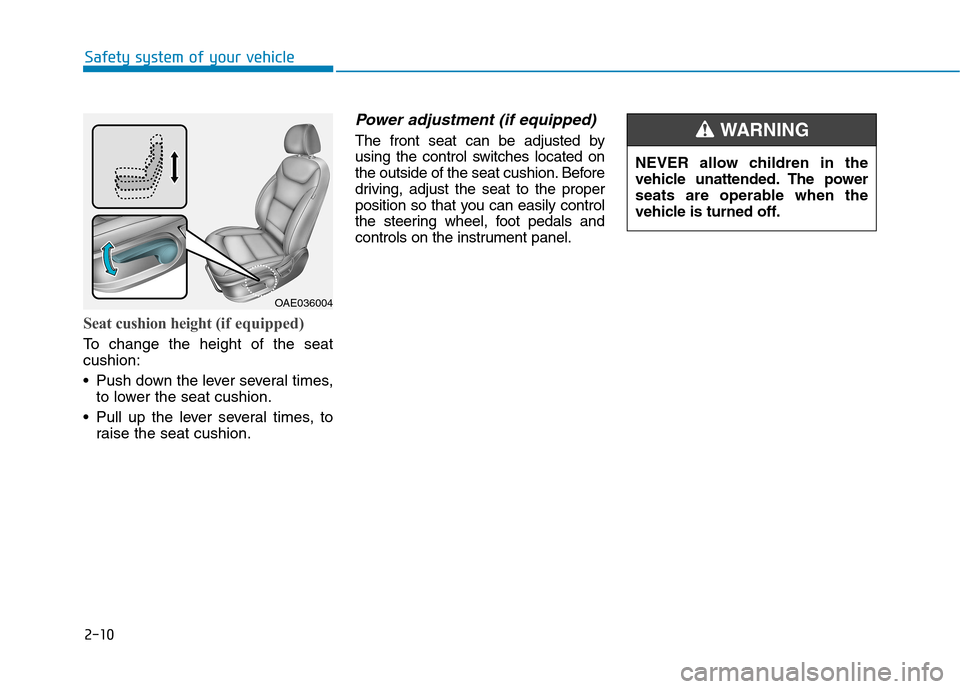
Seat cushion height (if equipped)
To change the height of the seat cushion:
• Push down the lever several times,
to lower the seat cushion.
Pull up the lever several times, to raise the seat cushion.
Power adjustment (if equipped)
The front seat can be adjusted by
using the control switches located on
the outside of the seat cushion. Before
driving, adjust the seat to the proper
position so that you can easily control
the steering wheel, foot pedals and
controls on the instrument panel.
OAE036004 NEVER allow children in the
vehicle unattended. The power
seats are operable when the
vehicle is turned off.
WARNING
Page 152 of 582
2-54
Safety system of your vehicle
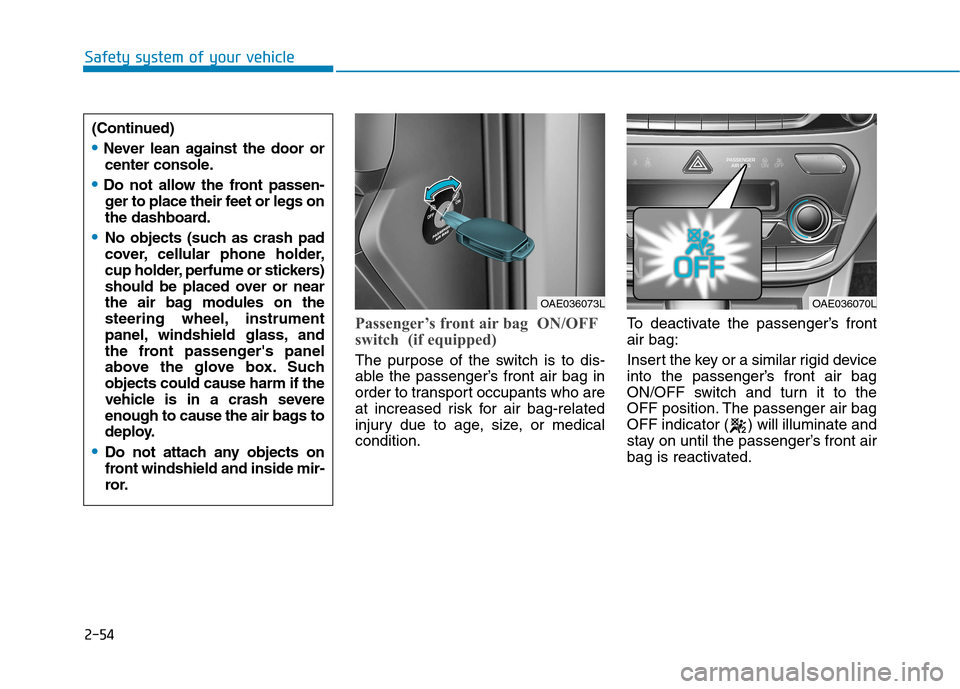
Passenger’s front air bag ON/OFF
switch (if equipped)
The purpose of the switch is to dis-
able the passenger’s front air bag in
order to transport occupants who are
at increased risk for air bag-related
injury due to age, size, or medicalcondition.To deactivate the passenger’s frontair bag:
Insert the key or a similar rigid device
into the passenger’s front air bag
ON/OFF switch and turn it to the
OFF position. The passenger air bag
OFF indicator ( ) will illuminate and
stay on until the passenger’s front air
bag is reactivated.
OAE036073LOAE036070L
(Continued)
Never lean against the door or
center console.
Do not allow the front passen-ger to place their feet or legs on
the dashboard.
No objects (such as crash pad
cover, cellular phone holder,
cup holder, perfume or stickers)
should be placed over or near
the air bag modules on the
steering wheel, instrument
panel, windshield glass, and
the front passenger's panel
above the glove box. Suchobjects could cause harm if the
vehicle is in a crash severe
enough to cause the air bags to
deploy.
Do not attach any objects on
front windshield and inside mir-
ror.
Page 154 of 582
2-56
Safety system of your vehicle
Side air bags
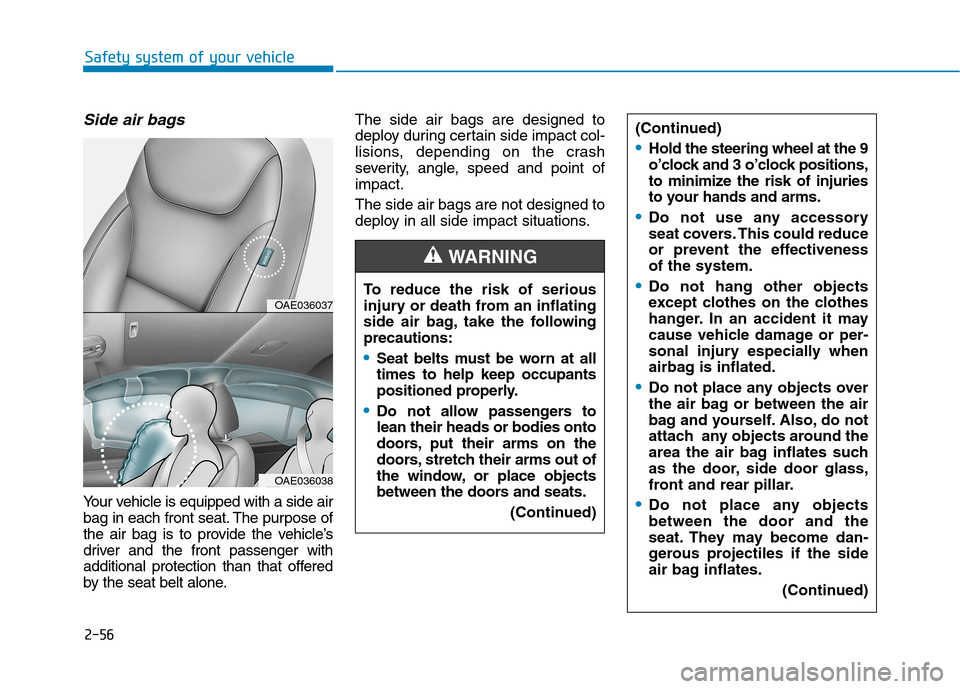
Your vehicle is equipped with a side air
bag in each front seat. The purpose of
the air bag is to provide the vehicle’s
driver and the front passenger with
additional protection than that offered
by the seat belt alone.The side air bags are designed to
deploy during certain side impact col-
lisions, depending on the crash
severity, angle, speed and point ofimpact. The side air bags are not designed to
deploy in all side impact situations.
To reduce the risk of serious
injury or death from an inflating
side air bag, take the follo wing
precautions:
Seat belts must be worn at all times to help keep occupants
positioned properly.
Do not allow passengers to lean their heads or bodies onto
doors, put their arms on the
doors, stretch their arms out of
the window, or place objects
between the doors and seats.
(Continued)
WARNING
OAE036037
OAE036038
(Continued)
Hold the steering wheel at the 9
o’clock and 3 o’clock positions,
to minimize the risk of injuries
to your hands and arms.
Do not use any accessory
seat covers. This could reduce
or prevent the effectivenessof the system.
Do not hang other objects
except clothes on the clothes
hanger. In an accident it may
cause vehicle damage or per-
sonal injury especially when
airbag is inflated.
Do not place any objects over
the air bag or between the air
bag and yourself. Also, do not
attach any objects around the
area the air bag inflates such
as the door, side door glass,
front and rear pillar.
Do not place any objects between the door and the
seat. They may become dan-
gerous projectiles if the side
air bag inflates.(Continued)
Page 158 of 582
2-60
Safety system of your vehicle
Air bag deployment depends on anumber of factors including vehicle speed, angles of impact and the
density and stiffness of the vehicles
or objects which your vehicle
impacts during a collision. The
determining factors are not limited
to those mentioned above.
The front air bags will completely inflate and deflate in an instant. It is
virtually impossible for you to see
the air bags inflate during an acci-
dent. It is much more likely that youwill simply see the deflated air bags
hanging out of their storage com-
partments after the collision. To help provide protection, the air
bags must inflate rapidly. The speedof air bag inflation is a consequence
of extremely short time in which to
inflate the air bag between the
occupant and the vehicle structures
before the occupant impacts those
structures. This speed of inflation
reduces the risk of serious or life-
threatening injuries and is thus a
necessary part of air bag design.
However, the rapid air bag inflation
can also cause injuries which can
include facial abrasions, bruises
and broken bones because theinflation speed also causes the air
bags to expand with a great deal of
force.
There are even circumstances under which contact with the air
bag can cause fatal injuries, espe-cially if the occupant is positioned
excessively close to the air bag. You can take steps to reduce the risk
of being injured by an inflating air
bag. The greatest risk is sitting too
close to the air bag. An air bag needs
space to inflate. It is recommended
that drivers sit as far as possible
between the center of the steeringwheel and the chest while still main-
taining control of the vehicle.
Page 167 of 582
2-69
Safety system of your vehicle
2
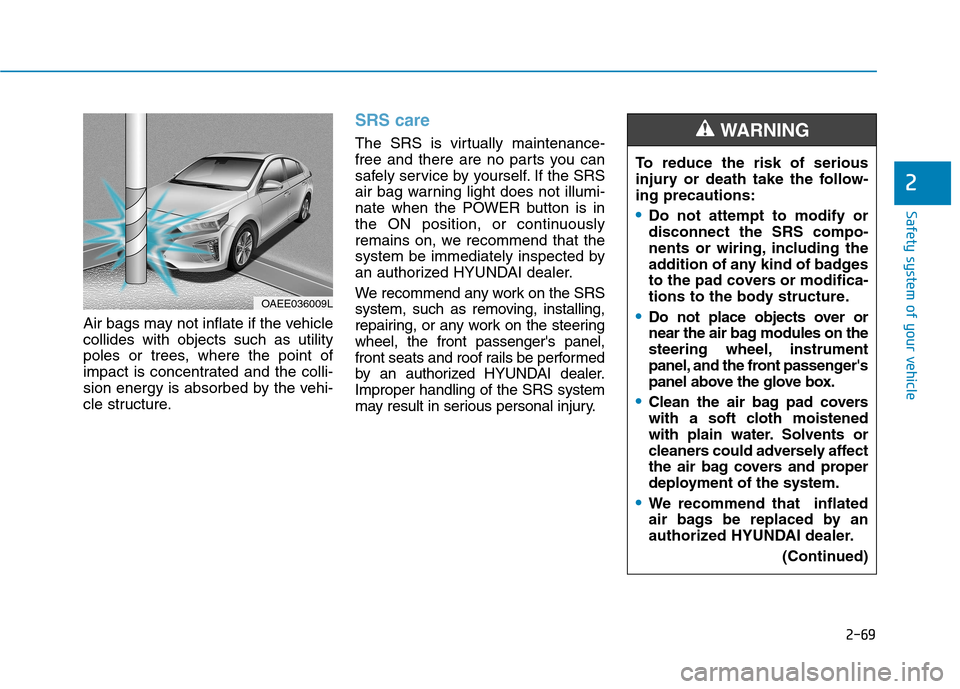
Air bags may not inflate if the vehicle collides with objects such as utility
poles or trees, where the point of
impact is concentrated and the colli-
sion energy is absorbed by the vehi-
cle structure.
SRS care
The SRS is virtually maintenance-
free and there are no parts you can
safely service by yourself. If the SRS
air bag warning light does not illumi-
nate when the POWER button is in
the ON position, or continuously
remains on, we recommend that the
system be immediately inspected by
an authorized HYUNDAI dealer.
We recommend any work on the SRS
system, such as removing, installing,
repairing, or any work on the steeringwheel, the front passenger's panel,
front seats and roof rails be performed
by an authorized HYUNDAI dealer.Improper handling of the SRS system
may result in serious personal injury.
OAEE036009LTo reduce the risk of serious
injury or death take the follow-ing precautions:
Do not attempt to modify or disconnect the SRS compo-
nents or wiring, including the
addition of any kind of badges
to the pad covers or modifica-
tions to the body structure.
Do not place objects over or
near the air bag modules on the
steering wheel, instrument
panel, and the front passenger's
panel above the glove box.
Clean the air bag pad covers
with a soft cloth moistened
with plain water. Solvents or
cleaners could adversely affect
the air bag covers and proper
deployment of the system.
We recommend that inflated
air bags be replaced by an
authorized HYUNDAI dealer.
(Continued)
WARNING
Page 170 of 582
Convenient features of your vehicle
Accessing your vehicle .........................................3-3Smart key ............................................................................3-3
Immobilizer system ..........................................................3-7
Door locks ...............................................................3-8 Operating door locks from outside the vehicle .......3-8
Operating door locks from inside the vehicle ..........3-9
Auto door lock/unlock features ................................3-11
Child-protector rear door locks ..................................3-11
Theft-alarm system.............................................3-12
Driver position memory system ........................3-13 Storing memory positions .............................................3-13
Easy access function ....................................................3-14
Steering wheel......................................................3-15 Electric power steering (EPS) ......................................3-15
Tilt steering / Telescope steering...............................3-16
Heated steering wheel .................................................3-16
Horn ....................................................................................3-17
Mirrors ...................................................................3-17 Inside rearview mirror....................................................3-17
Outside rearview mirror ................................................3-19
Windows ................................................................3-22 Power windows ..............................................................3-22 Sunroof..................................................................3-28
Sunroof opening and closing .......................................3-28
Sliding the sunroof .........................................................3-28
Tilting the sunroof ..........................................................3-29
Sunshade ...........................................................................3-30
Resetting the sunroof ....................................................3-30
Exterior features .................................................3-31 Hood ...................................................................................3-31
Tailgate...............................................................................3-33
Instrument cluster................................................3-35 Instrument cluster control ............................................3-36
Gauges and meters .........................................................3-37
Warning and indicator lights ........................................3-42
LCD display messages ..................................................3-52
LCD Display ..........................................................3-65 LCD display control.........................................................3-65
LCD modes .....................................................................3-66
Trip computer .......................................................3-73
3