engine INFINITI FX35 2008 Service Manual
[x] Cancel search | Manufacturer: INFINITI, Model Year: 2008, Model line: FX35, Model: INFINITI FX35 2008Pages: 3924, PDF Size: 81.37 MB
Page 317 of 3924

AT-244
< SERVICE INFORMATION >
TRANSMISSION ASSEMBLY
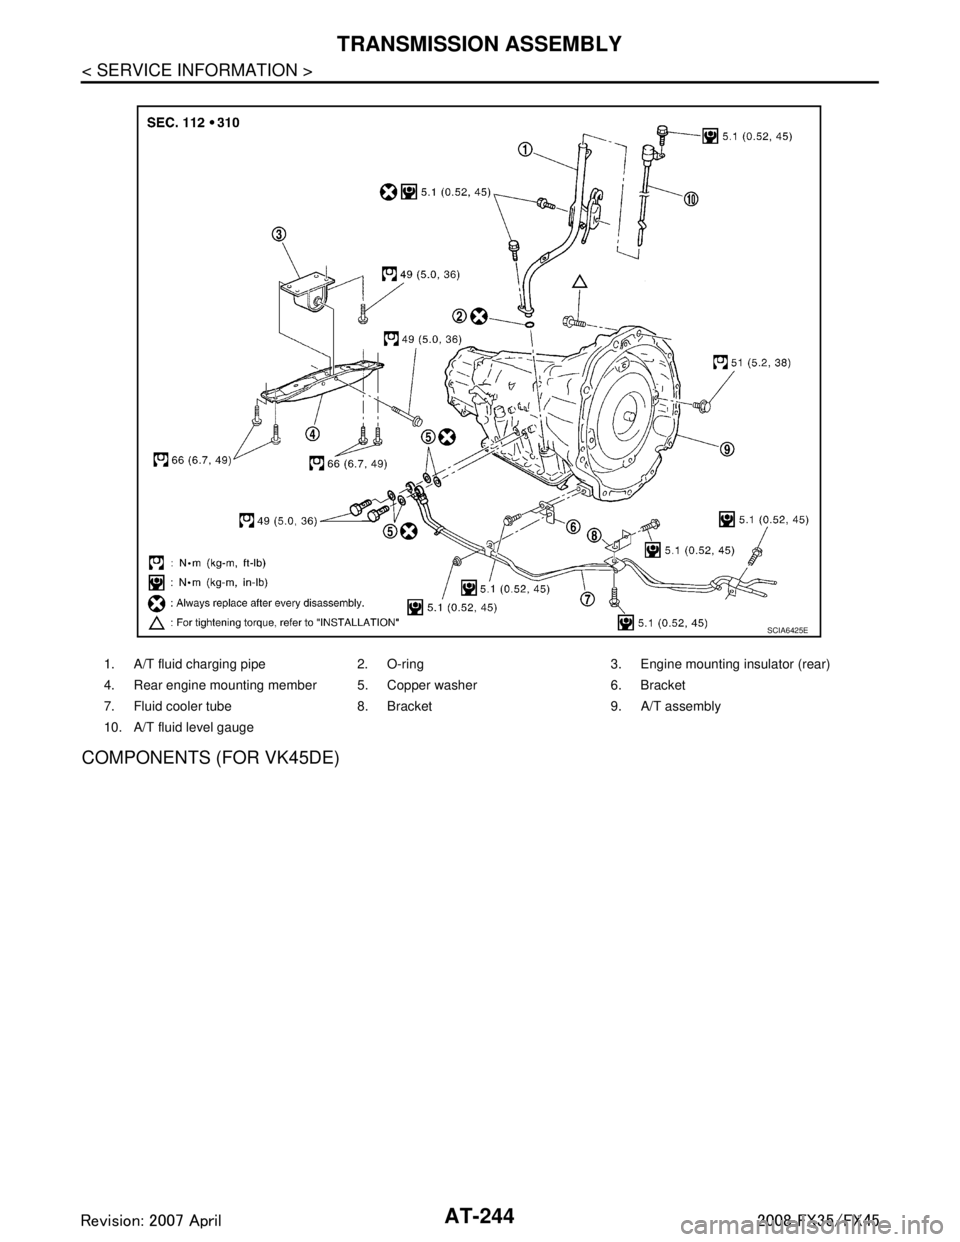
COMPONENTS (FOR VK45DE)
1. A/T fluid charging pipe 2. O-ring 3. Engine mounting insulator (rear)
4. Rear engine mounting member 5. Copper washer 6. Bracket
7. Fluid cooler tube 8. Bracket 9. A/T assembly
10. A/T fluid level gauge
SCIA6425E
3AA93ABC3ACD3AC03ACA3AC03AC63AC53A913A773A893A873A873A8E3A773A983AC73AC93AC03AC3
3A893A873A873A8F3A773A9D3AAF3A8A3A8C3A863A9D3AAF3A8B3A8C
Page 318 of 3924

TRANSMISSION ASSEMBLYAT-245
< SERVICE INFORMATION >
DE
F
G H
I
J
K L
M A
B
AT
N
O P
REMOVAL
CAUTION:
When removing the A/T assembly from engine, fi rst remove the crankshaft position sensor (POS)
from the A/T assembly.
Be careful not to damage sensor edge.
1. Disconnect the battery cabl e from the negative terminal.
2. Remove engine cover.
3. Remove A/T fluid level gauge.
4. Remove engine under cover with power tool.
5. Remove front cross bar. Refer to FSU-6, "
Removal and Installation".
6. Remove exhaust front tube and center muffler with power tool. Refer to EX-3, "
Component".
7. Remove three way catalyst. Refer to EM-179, "
Removal and Installation".
8. Remove front propeller shaft. Refer to PR-4, "
Removal and Installation".
9. Remove rear propeller shaft. Refer to PR-9, "
Removal and Installation".
10. Remove control rod. Refer to AT-206, "
Control Rod Removal and Installation".
1. A/T fluid charging pipe 2. O-ring 3. Engine mounting insulator (rear)
4. Rear engine mounting member 5. Copper washer 6. Bracket
7. Fluid cooler tube 8. Bracket 9. Bracket
10. Bracket 11. A/T assembly 12. A/T fluid level gauge
SCIA6426E
3AA93ABC3ACD3AC03ACA3AC03AC63AC53A913A773A893A873A873A8E3A773A983AC73AC93AC03AC3
3A893A873A873A8F3A773A9D3AAF3A8A3A8C3A863A9D3AAF3A8B3A8C
Page 319 of 3924

AT-246
< SERVICE INFORMATION >
TRANSMISSION ASSEMBLY
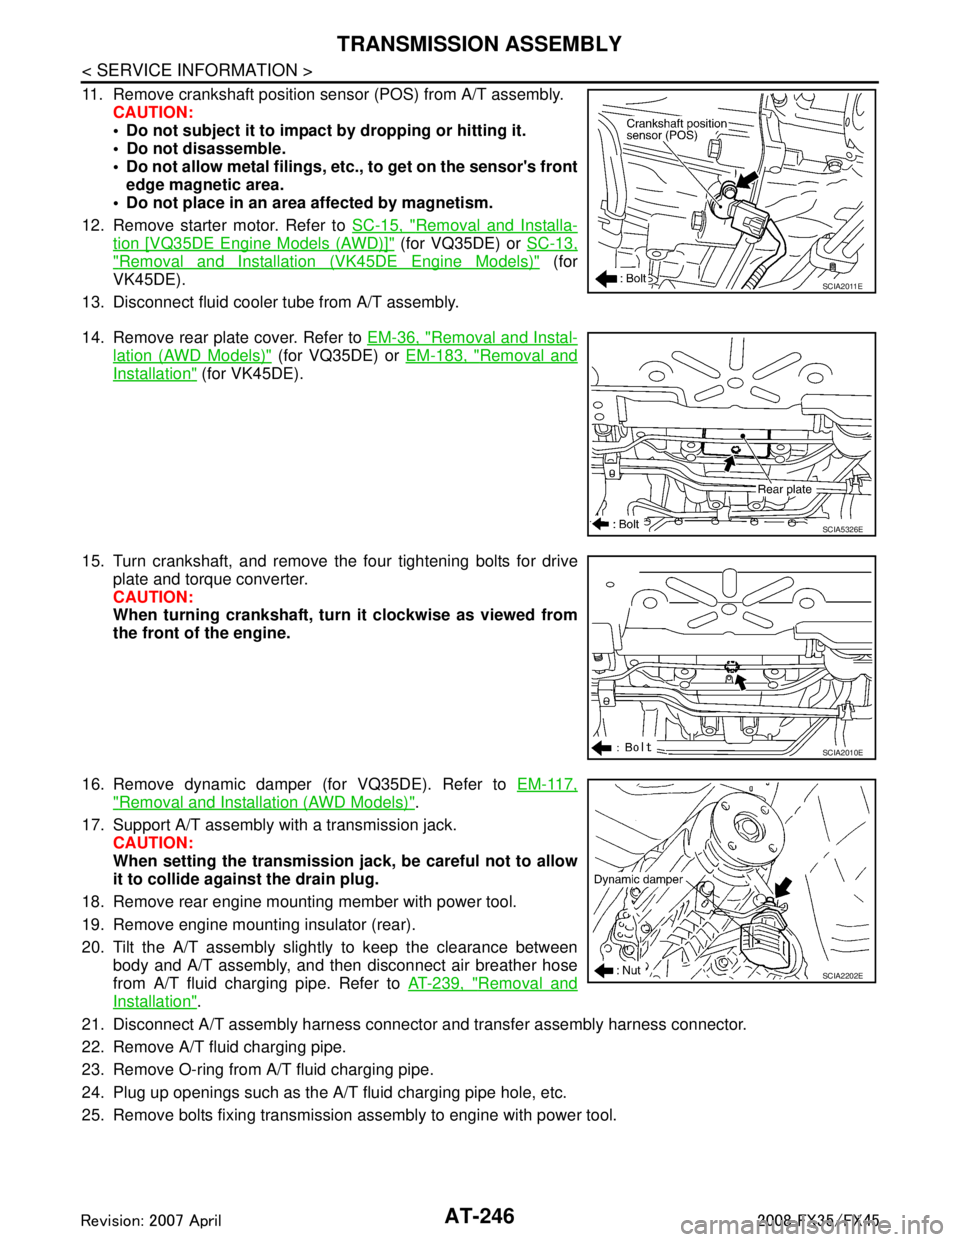
11. Remove crankshaft position sensor (POS) from A/T assembly.CAUTION:
Do not subject it to impact by dropping or hitting it.
Do not disassemble.
Do not allow metal filings, et c., to get on the sensor's front
edge magnetic area.
Do not place in an area affected by magnetism.
12. Remove starter motor. Refer to SC-15, "
Removal and Installa-
tion [VQ35DE Engine Models (AWD)]" (for VQ35DE) or SC-13,
"Removal and Installation (VK45DE Engine Models)" (for
VK45DE).
13. Disconnect fluid cooler tube from A/T assembly.
14. Remove rear plate cover. Refer to EM-36, "
Removal and Instal-
lation (AWD Models)" (for VQ35DE) or EM-183, "Removal and
Installation" (for VK45DE).
15. Turn crankshaft, and remove the four tightening bolts for drive plate and torque converter.
CAUTION:
When turning crankshaft, turn it clockwise as viewed from
the front of the engine.
16. Remove dynamic damper (for VQ35DE). Refer to EM-117,
"Removal and Installation (AWD Models)".
17. Support A/T assembly with a transmission jack. CAUTION:
When setting the transmission j ack, be careful not to allow
it to collide agai nst the drain plug.
18. Remove rear engine mounting member with power tool.
19. Remove engine mounting insulator (rear).
20. Tilt the A/T assembly slightly to keep the clearance between body and A/T assembly, and then disconnect air breather hose
from A/T fluid charging pipe. Refer to AT-239, "
Removal and
Installation".
21. Disconnect A/T assembly harness connector and transfer assembly harness connector.
22. Remove A/T fluid charging pipe.
23. Remove O-ring from A/T fluid charging pipe.
24. Plug up openings such as the A/T fluid charging pipe hole, etc.
25. Remove bolts fixing transmission assembly to engine with power tool.
SCIA2011E
SCIA5326E
SCIA2010E
SCIA2202E
3AA93ABC3ACD3AC03ACA3AC03AC63AC53A913A773A893A873A873A8E3A773A983AC73AC93AC03AC3
3A893A873A873A8F3A773A9D3AAF3A8A3A8C3A863A9D3AAF3A8B3A8C
Page 320 of 3924

TRANSMISSION ASSEMBLYAT-247
< SERVICE INFORMATION >
DE
F
G H
I
J
K L
M A
B
AT
N
O P
26. Remove A/T assembly with transfer from vehicle. Secure torque converter to prevent it from dropping.
Secure A/T assembly to a jack.
27. Remove transfer from A/T assembly. Refer to TF-40, "
Removal
and Installation".
INSPECTION
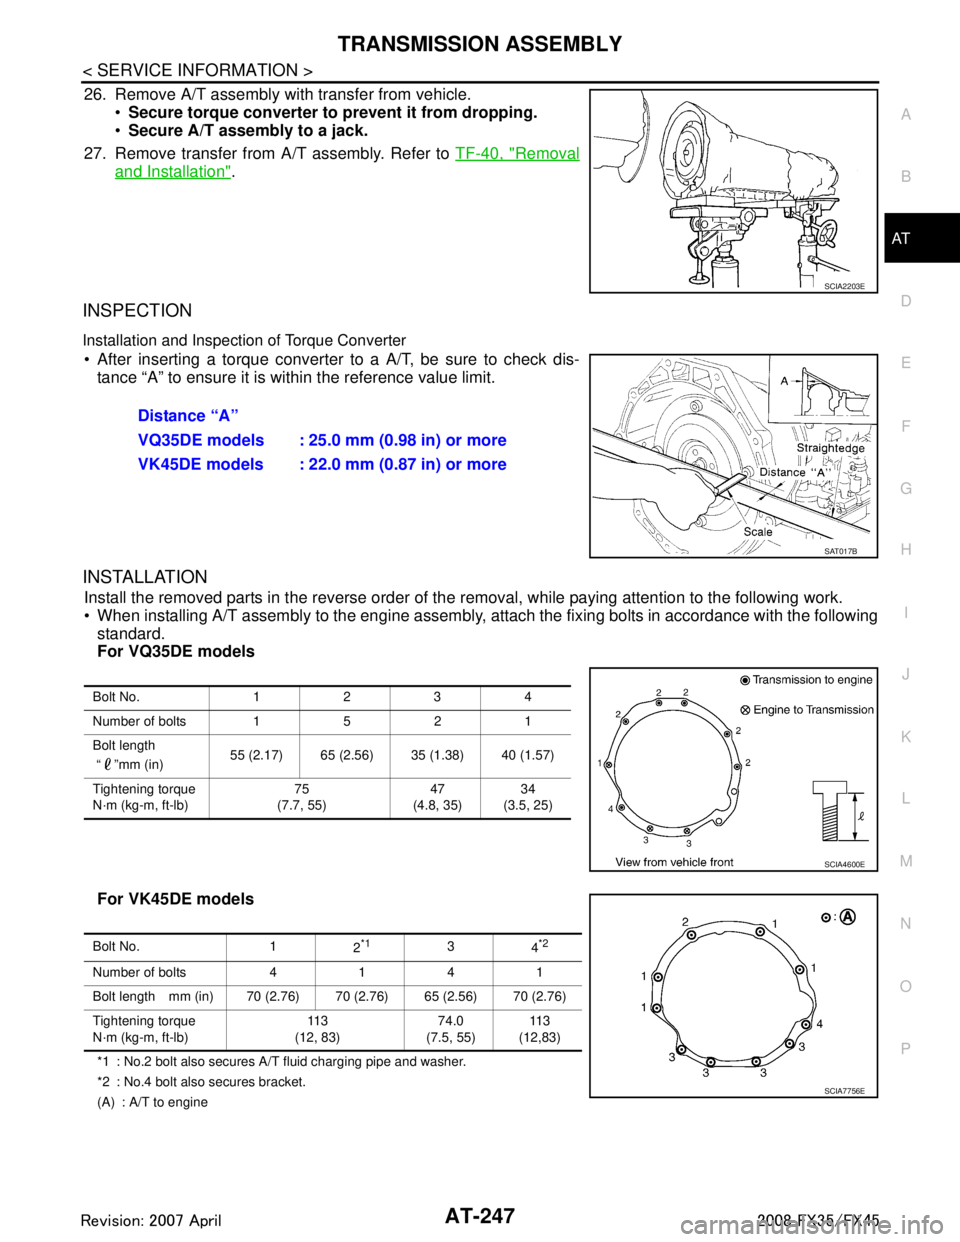
Installation and Inspection of Torque Converter
After inserting a torque converter to a A/T, be sure to check dis-
tance “A” to ensure it is within the reference value limit.
INSTALLATION
Install the removed parts in the reverse order of the removal, while paying attention to the following work.
When installing A/T assembly to the engine assembly, atta ch the fixing bolts in accordance with the following
standard.
For VQ35DE models
For VK45DE models
*1 : No.2 bolt also secures A/T fluid charging pipe and washer.
*2 : No.4 bolt also secures bracket.
(A) : A/T to engine
SCIA2203E
Distance “A”
VQ35DE models : 25.0 mm (0.98 in) or more
VK45DE models : 22.0 mm (0.87 in) or more
SAT017B
Bolt No. 1234
Number of bolts1521
Bolt length
“”mm (in) 55 (2.17) 65 (2.56) 35 (1.38) 40 (1.57)
Tightening torque
N·m (kg-m, ft-lb) 75
(7.7, 55) 47
(4.8, 35) 34
(3.5, 25)
SCIA4600E
Bolt No. 1 2*134*2
Number of bolts 4 1 4 1
Bolt length mm (in) 70 (2.76) 70 (2.76) 65 (2.56) 70 (2.76)
Tightening torque
N·m (kg-m, ft-lb) 11 3
(12, 83) 74.0
(7.5, 55) 11 3
(12,83)
SCIA7756E
3AA93ABC3ACD3AC03ACA3AC03AC63AC53A913A773A893A873A873A8E3A773A983AC73AC93AC03AC3
3A893A873A873A8F3A773A9D3AAF3A8A3A8C3A863A9D3AAF3A8B3A8C
Page 321 of 3924

AT-248
< SERVICE INFORMATION >
TRANSMISSION ASSEMBLY
Align the positions of tightening bolts for drive plate with those ofthe torque converter, and temporarily tighten the bolts. Then,
tighten the bolts with the specified torque. Refer to "COMPO-
NENTS (FOR VQ35DE)" or "COMPONENTS (FOR VK45DE)".
CAUTION:
Do not reuse O-ring and copper washers.
When turning crankshaft, turn it clockwise as viewed from the
front of the engine.
When tightening the tightening bolts for the torque converter
after fixing the crankshaft pulley bolts, be sure to confirm the
tightening torque of the crankshaft pulley mounting bolts.
Refer to EM-65, "
Removal and Installation" (for VQ35DE) or
EM-200, "
Removal and Installation" (for VK45DE)
After converter is installed to drive plate, rota te crankshaft several turns and check to be sure that
transmission rotates fr eely without binding.
Install crankshaft position sensor (POS). Refer to EM-35, "
Component (AWD Models)" (for VQ35DE) or EM-
183, "Component" (for VK45DE).
After completing installation, check A/T fluid leakage, A/T fluid level, and the positions of A/T. Refer to AT- 11 ,
"Checking A/T Fluid", AT-207, "Checking of A/T Position".
SCIA2010E
3AA93ABC3ACD3AC03ACA3AC03AC63AC53A913A773A893A873A873A8E3A773A983AC73AC93AC03AC3
3A893A873A873A8F3A773A9D3AAF3A8A3A8C3A863A9D3AAF3A8B3A8C
Page 403 of 3924

AT-330
< SERVICE INFORMATION >
SERVICE DATA AND SPECIFICATIONS (SDS)
SERVICE DATA AND SPECIFICATIONS (SDS)
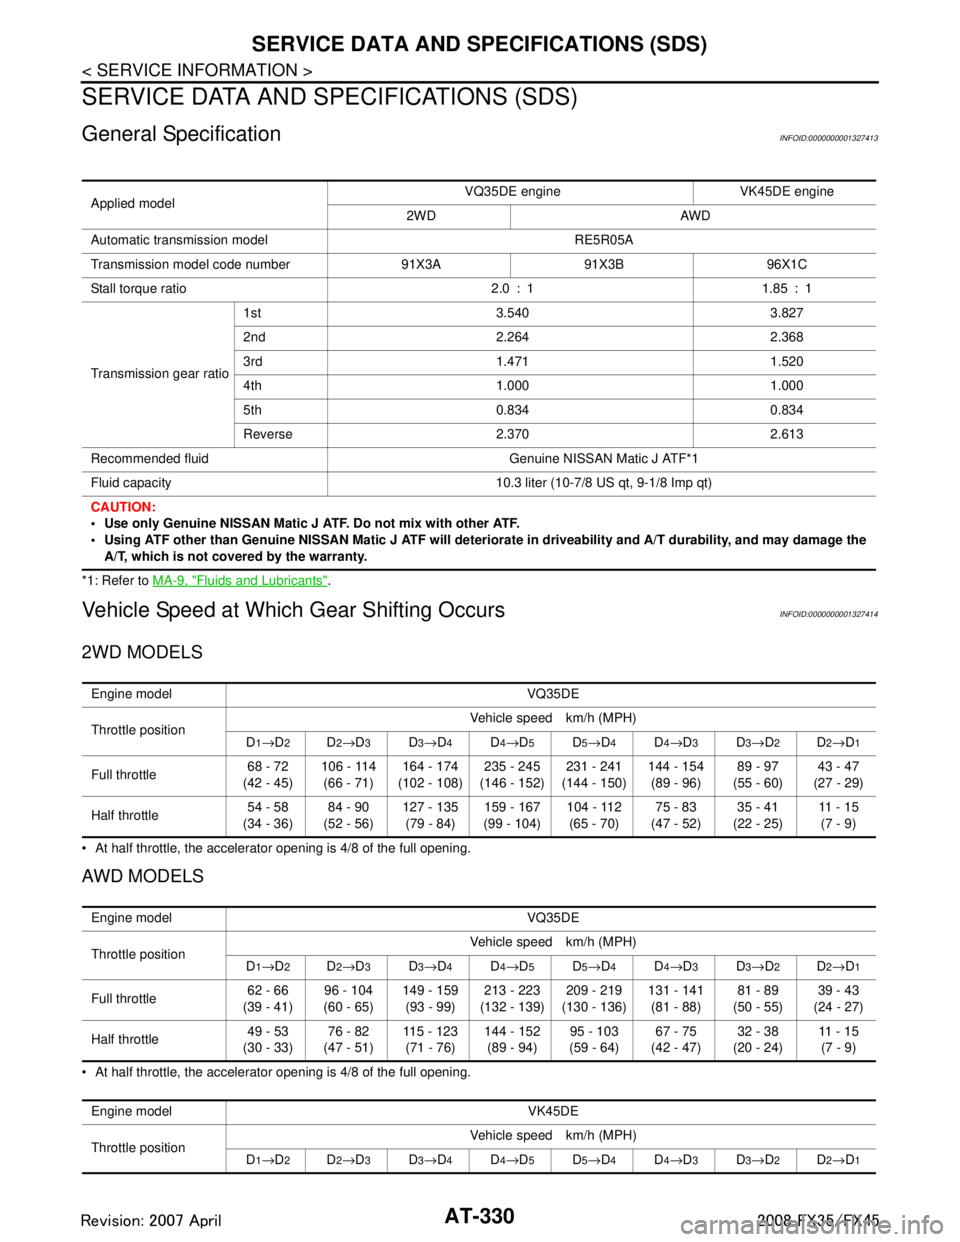
General SpecificationINFOID:0000000001327413
*1: Refer to MA-9, "Fluids and Lubricants".
Vehicle Speed at Which Gear Shifting OccursINFOID:0000000001327414
2WD MODELS
At half throttle, the accelerator opening is 4/8 of the full opening.
AWD MODELS
At half throttle, the accelerator opening is 4/8 of the full opening.Applied model
VQ35DE engine VK45DE engine
2WD AWD
Automatic transmission model RE5R05A
Transmission model code number 91X3A 91X3B 96X1C
Stall torque ratio 2.0 : 1 1.85 : 1
Transmission gear ratio 1st 3.540 3.827
2nd 2.264 2.368
3rd 1.471 1.520
4th 1.000 1.000
5th 0.834 0.834
Reverse 2.370 2.613
Recommended flui d Genuine NISSAN Matic J ATF*1
Fluid capacity 10.3 liter (10-7/8 US qt, 9-1/8 Imp qt)
CAUTION:
Use only Genuine NISSAN Matic J ATF. Do not mix with other ATF.
Using ATF other than Genuine NISSAN Matic J ATF will deteriorate in driveability and A/T durability, and may damage the A/T, which is not covered by the warranty.
Engine model VQ35DE
Throttle position Vehicle speed km/h (MPH)
D
1→ D2D2→D3D3→D4D4→D5D5→D4D4→D3D3→D2D2→D1
Full throttle 68 - 72
(42 - 45) 106 - 114
(66 - 71) 164 - 174
(102 - 108) 235 - 245
(146 - 152) 231 - 241
(144 - 150) 144 - 154
(89 - 96) 89 - 97
(55 - 60) 43 - 47
(27 - 29)
Half throttle 54 - 58
(34 - 36) 84 - 90
(52 - 56) 127 - 135
(79 - 84) 159 - 167
(99 - 104) 104 - 112
(65 - 70) 75 - 83
(47 - 52) 35 - 41
(22 - 25) 11 - 1 5
(7 - 9)
Engine model VQ35DE
Throttle position Vehicle speed km/h (MPH)
D
1→ D2D2→D3D3→D4D4→D5D5→D4D4→D3D3→D2D2→D1
Full throttle 62 - 66
(39 - 41) 96 - 104
(60 - 65) 149 - 159
(93 - 99) 213 - 223
(132 - 139) 209 - 219
(130 - 136) 131 - 141
(81 - 88) 81 - 89
(50 - 55) 39 - 43
(24 - 27)
Half throttle 49 - 53
(30 - 33) 76 - 82
(47 - 51) 115 - 123
(71 - 76) 144 - 152
(89 - 94) 95 - 103
(59 - 64) 67 - 75
(42 - 47) 32 - 38
(20 - 24) 11 - 1 5
(7 - 9)
Engine model VK45DE
Throttle position Vehicle speed km/h (MPH)
D
1→ D2D2→D3D3→D4D4→D5D5→D4D4→D3D3→D2D2→D1
3AA93ABC3ACD3AC03ACA3AC03AC63AC53A913A773A893A873A873A8E3A773A983AC73AC93AC03AC3
3A893A873A873A8F3A773A9D3AAF3A8A3A8C3A863A9D3AAF3A8B3A8C
Page 404 of 3924

SERVICE DATA AND SPECIFICATIONS (SDS)
AT-331
< SERVICE INFORMATION >
D E
F
G H
I
J
K L
M A
B
AT
N
O P
At half throttle, the accelerator opening is 4/8 of the full opening.
Vehicle Speed at Which Lock-up Occurs/ReleasesINFOID:0000000001327415
2WD MODELS
At closed throttle, the accelerator opening is less than 1/8 condition. (Closed throttle position signal: OFF)
At half throttle, the accelerator opening is 4/8 of the full opening.
AWD MODELS
At closed throttle, the accelerator opening is less than 1/8 condition. (Closed throttle position signal: OFF)
At half throttle, the accelerator opening is 4/8 of the full opening.
At closed throttle, the accelerator opening is less than 1/8 condition. (Closed throttle position signal: OFF)
At half throttle, the accelerator opening is 4/8 of the full opening.
Stall SpeedINFOID:0000000001327416
Line PressureINFOID:0000000001327417
Full throttle 59 - 63
(37 - 39) 95 - 103
(59 - 64) 147 - 157
(92 - 98) 219 - 229
(137 - 143) 215 - 225
(134 - 141) 130 - 140
(81 - 88) 82 - 90
(51 - 56) 35 - 39
(22 - 24)
Half throttle 48 - 52
(30 - 33) 78 - 84
(48 - 52) 122 - 130
(76 - 81) 154 - 162
(96 - 101) 122 - 130
(76 - 81) 68 - 76
(42 - 47) 40 - 46
(25 - 29) 9 - 13
(6 - 8)
Engine model VQ35DE
Throttle position Vehicle speed km/h (MPH)
Lock-up ON Lock-up OFF
Closed throttle 65 - 73 (4 0 - 45) 62 - 70 (39 - 43)
Half throttle 196 - 204 (122 - 127) 153 - 161 (95 - 100)
Engine model VQ35DE
Throttle position Vehicle speed km/h (MPH)
Lock-up ON Lock-up OFF
Closed throttle 59 - 67 (3 7 - 42) 56 - 64 (35 - 40)
Half throttle 178 - 186 (111 - 116) 139 - 147 (86 - 91)
Engine model VK45DE
Throttle position Vehicle speed km/h (MPH)
Lock-up ON Lock-up OFF
Closed throttle 66 - 74 (41 - 46) 53 - 61 (33 - 38)
Half throttle 191 - 199 (119 - 124) 145 - 153 (90 - 95)
Engine model VQ35DE VK45DE
Stall speed 2,650 - 2,950 rpm 2,260 - 2,560 rpm
Engine speed Line pressure kPa (kg/cm2, psi)
“R” position “D” an d “M” positions
At idle speed 425 - 465 (4.3 - 4.7, 62 - 67) 379 - 428 (3.9 - 4.4, 55 - 62)
At stall speed 1,605 - 1,950 (16.4 - 19.9, 233 - 283) 1,310 - 1,500 (13.4 - 15.3, 190 - 218)
3AA93ABC3ACD3AC03ACA3AC03AC63AC53A913A773A893A873A873A8E3A773A983AC73AC93AC03AC3
3A893A873A873A8F3A773A9D3AAF3A8A3A8C3A863A9D3AAF3A8B3A8C
Page 407 of 3924

ATC-2
Removal and Installation .......................................101
INTAKE SENSOR ............................................102
Removal and Installation ..................................... ..102
BLOWER UNIT ................................................103
Removal and Installation ..................................... ..103
Disassembly and Assembly ...................................104
BLOWER MOTOR ...........................................105
Removal and Installation ..................................... ..105
INTAKE DOOR MOTOR ..................................106
Removal and Installation ..................................... ..106
IN-CABIN MICROFILTER ................................107
Removal and Installation ..................................... ..107
HEATER & COOLING UNIT ASSEMBLY .......108
Removal and Installation ..................................... ..108
Disassembly and Assembly ...................................111
MODE DOOR MOTOR ....................................113
Removal and Installation ..................................... ..113
AIR MIX DOOR MOTOR ..................................114
Removal and Installation ..................................... ..114
HEATER CORE ...............................................115
Removal and Installation ..................................... ..115
DUCTS AND GRILLES ....................................116
Removal and Installation ..................................... ..116
REFRIGERANT LINES ....................................120
HFC-134a (R-134a) Service Procedure .............. ..120
Component .......................................................... .121
Removal and Installation of Compressor ..............123
Removal and Installation of Compressor Clutch ...125
Removal and Installation of Low-Pressure Flexi-
ble Hose ............................................................... .
128
Removal and Installation of High-pressure Flexi-
ble Hose ................................................................
129
Removal and Installation of Low-Pressure Pipe 1
(Engine Compartment) ..........................................
131
Removal and Installation of High-pressure Pipe 1
and 2 (Engine Compartment) ................................
132
Removal and Installation of Low-Pressure Pipe 2
and High-pressure Pipe 3 .....................................
133
Removal and Installation of Liquid Tank ...............134
Removal and Installation of Condenser ................135
Removal and Installation of Refrigerant Pressure
Sensor .................................................................. .
137
Removal and Installation of Evaporator ................137
Removal and Installation of Expansion Valve .......138
Checking of Refrigerant Leaks ............................. .138
Checking System for Leaks Using the Fluorescent
Leak Detector ........................................................
138
Dye Injection .........................................................139
Electrical Leak Detector ........................................139
SERVICE DATA AND SPECIFICATIONS
(SDS) ................................................................
142
Compressor ......................................................... .142
Lubricant ...............................................................142
Refrigerant ............................................................142
Engine Idling Speed ..............................................142
Belt Tension ..........................................................142
3AA93ABC3ACD3AC03ACA3AC03AC63AC53A913A773A893A873A873A8E3A773A983AC73AC93AC03AC3
3A893A873A873A8F3A773A9D3AAF3A8A3A8C3A863A9D3AAF3A8B3A8C
Page 414 of 3924

PRECAUTIONSATC-9
< SERVICE INFORMATION >
C
DE
F
G H
I
K L
M A
B
AT C
N
O P
CAUTION:
When replacing or cleaning refrigerant cycle components, observe the following.
When the compressor is removed, store it in the sam e way at it is when mounted on the car. Failure
to do so will cause lubricant to enter the low-pressure chamber.
When connecting tubes, always use a to rque wrench and a back-up wrench.
After disconnecting tubes, immediately plug all op enings to prevent entry of dust and moisture.
When installing an air conditioner in the vehicle, connect the pipes at the final stage of the operation.
Never remove the seal caps of pipes and other compon ents until just before required for connection.
Allow components stored in cool areas to warm to working area temperature before removing seal
caps. This prevents condensation from forming inside A/C components.
Thoroughly remove moisture from the refriger ation system before charging the refrigerant.
Always replace used O-rings.
When connecting tubes, apply lubricant to circle of the O-rings shown in illustration. Be careful not
to apply lubricant to threaded portion.
O-ring must be closely att ached to the groove of tube.
When replacing the O-ring, be careful not to damage O-ring and tube.
Connect tube until a click can be heard, then tighten the nut or bolt by hand. Make sure that the O-
ring is installed to tube correctly.
After connecting line, perform leak test and make sure that there is no leakage from connections.
When the refrigerant leaking point is found, disconnect that line and replace the O-ring. Then tighten
connections of seal seat to the specified torque.
Precaution for Service of CompressorINFOID:0000000001328156
Plug all openings to prevent moisture and foreign matter from entering.
When the compressor is removed, store it in th e same way at it is when mounted on the car.
When replacing or repairing compressor, follow “Maintenance of Lubricant Quantity in Compressor”
exactly. Refer to ATC-22, "
Maintenance of Lubricant Quantity in Compressor".
Keep friction surfaces between clut ch and pulley clean. If the surface is contaminated with lubricant,
wipe it off by using a clean w aste cloth moistened with thinner.
After compressor service operation, turn the compr essor shaft by hand more than five turns in both
directions. This will equally dist ribute lubricant inside the compressor. After the compressor is
installed, let the engine idle and operate the compressor for one hour.
After replacing the compressor magnet clutch, ap ply voltage to the new one and check for normal
operation.
Precaution for Service EquipmentINFOID:0000000001328157
RECOVERY/RECYCLING EQUIPMENT
Name : Nissan A/C System Oil Type S
RHA861F
3AA93ABC3ACD3AC03ACA3AC03AC63AC53A913A773A893A873A873A8E3A773A983AC73AC93AC03AC3
3A893A873A873A8F3A773A9D3AAF3A8A3A8C3A863A9D3AAF3A8B3A8C
Page 416 of 3924

PRECAUTIONSATC-11
< SERVICE INFORMATION >
C
DE
F
G H
I
K L
M A
B
AT C
N
O P
Never attempt to connect HFC-134a (R-134a) service couplers to a
CFC-12 (R-12) A/C system. T he HFC-134a (R-134a) couplers will
not properly connect to the CFC-12 (R-12) system. However, if an
improper connection is attempted, discharging and contamination
may occur.
REFRIGERANT WEIGHT SCALE
Verify that no refrigerant other than HFC-134a (R-134a) and speci-
fied lubricants have been used with the scale. If the scale controls
refrigerant flow electronically, the hose fitting must be 1/2
″-16 ACME.
CHARGING CYLINDER
Using a charging cylinder is not recommended. Refrigerant may be vented into air from cylinder’s top valve
when filling the cylinder with refrigerant. Also, the accura cy of the cylinder is generally less than that of an
electrical scale or of quality recycle/recharge equipment.
Precaution for Leak Detection DyeINFOID:0000000001328158
The A/C system contains a fluorescent leak detection dy e used for locating refrigerant leaks. An ultraviolet
(UV) lamp is required to illuminate the dye when inspecting for leaks.
Always wear fluorescence enhancing UV safety goggles to protect your eyes and enhance the visibility of
the fluorescent dye.
The fluorescent dye leak detector is not a replacement for an electrical leak detector (SST: J-41995). The flu-
orescent dye leak detector should be used in conjunc tion with an electrical leak detector (SST: J-41995) to
pin-point refrigerant leaks.
For the purpose of safety and customer’s satisfacti on, read and follow all manufacture’s operating instruc-
tions and precautions prior to performing the work.
A compressor shaft seal should not necessarily be re paired because of dye seepage. The compressor shaft
seal should only be repaired after confirming the l eak with an electrical leak detector (SST: J-41995).
Always remove any remaining dye from the leak area after repairs are completed to avoid a misdiagnosis during a future service.
Never allow dye to come into contact with painted body panels or interior components. If dye is spilled, clean
immediately with the approved dye cleaner. Fluorescent dye left on a surface for an extended period of time
cannot be removed.
Never spray the fluorescent dye cleaning agent on hot surfaces (engine exhaust manifold, etc.).
Never use more than one refrigerant dye bot tle (1/4 ounce /7.4 cc) per A/C system.
Leak detection dyes for HFC-134a (R-134a) and CFC-12 (R-12) A/C systems are different. Never use HFC-
134a (R-134a) leak detection dye in CFC-12 (R-12) A/ C system, or CFC-12 (R-12) leak detection dye in
HFC-134a (R-134a) A/C system, or A/C system damage may result.
The fluorescent properties of the dye will remain for thr ee years or a little over unless a compressor malfunc-
tion occurs.
IDENTIFICATION
NOTE:
Vehicles with factory installed fluorescent dye have a green label.
Vehicles without factory installed fluorescent dye have a blue label.
IDENTIFICATION LABEL FOR VEHICLE
Shut-off valve rotati on A/C service valve
Clockwise Open
Counterclockwise Close
RHA273D
RHA274D
3AA93ABC3ACD3AC03ACA3AC03AC63AC53A913A773A893A873A873A8E3A773A983AC73AC93AC03AC3
3A893A873A873A8F3A773A9D3AAF3A8A3A8C3A863A9D3AAF3A8B3A8C