ECU INFINITI M35 2006 Factory Service Manual
[x] Cancel search | Manufacturer: INFINITI, Model Year: 2006, Model line: M35, Model: INFINITI M35 2006Pages: 5621, PDF Size: 65.56 MB
Page 5363 of 5621

SRS-2Revision: 2006 January2006 M35/M45 FRONT SEAT BELT PRE-TENSIONER ................... 47
Removal and Installation ........................................ 47
DIAGNOSIS SENSOR UNIT ..................................... 48
Removal and Installation ........................................ 48
REMOVAL ........................................................
... 48
INSTALLATION .................................................... 48
ECU DISCRIMINATED NO. ................................. 48
OCCUPANT CLASSIFICATION SYSTEM CON-
TROL UNIT ................................................................ 49
Removal and Installation ........................................ 49COLLISION DIAGNOSIS .......................................... 50
For Frontal Collision ................................................ 50
SRS INSPECTION (FOR FRONTAL COLLI-
SION) ................................................................... 50
For Side Collision .................................................... 52
WHEN THE SIDE AIR BAG IS ACTIVATED IN
THE SIDE COLLISION: ....................................... 52
WHEN SRS IS NOT ACTIVATED IN THE SIDE
COLLISION: ......................................................... 52
SRS INSPECTION (FOR SIDE COLLISION) ...... 52
Page 5367 of 5621
SRS-6
SUPPLEMENTAL RESTRAINT SYSTEM (SRS)
Revision: 2006 January2006 M35/M45
Front Seat Belt Pre-Tensioner with Load LimiterNHS0008T
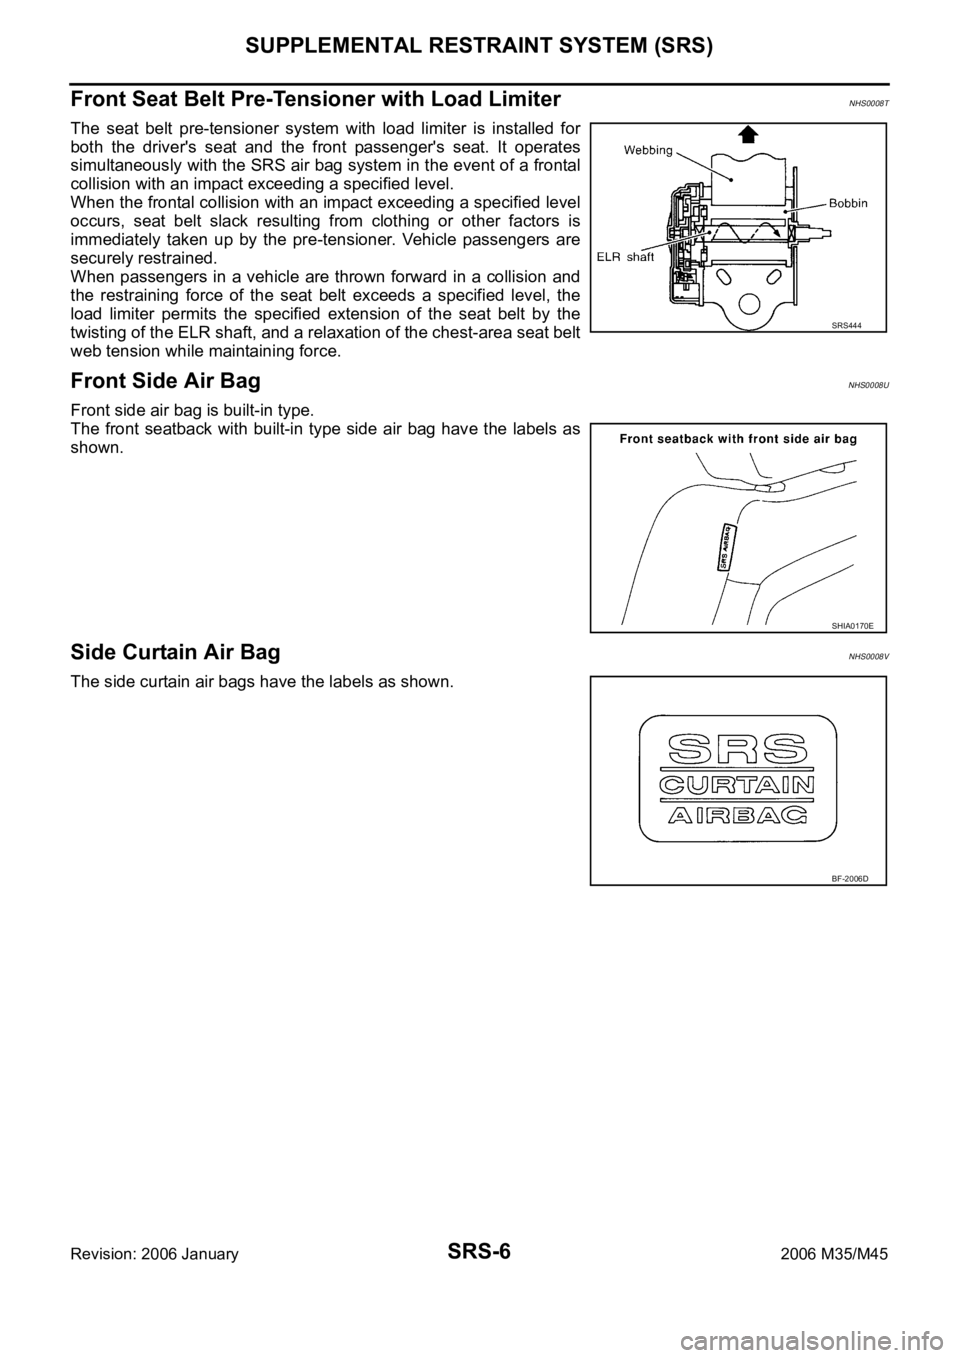
The seat belt pre-tensioner system with load limiter is installed for
both the driver's seat and the front passenger's seat. It operates
simultaneously with the SRS air bag system in the event of a frontal
collision with an impact exceeding a specified level.
When the frontal collision with an impact exceeding a specified level
occurs, seat belt slack resulting from clothing or other factors is
immediately taken up by the pre-tensioner. Vehicle passengers are
securely restrained.
When passengers in a vehicle are thrown forward in a collision and
the restraining force of the seat belt exceeds a specified level, the
load limiter permits the specified extension of the seat belt by the
twisting of the ELR shaft, and a relaxation of the chest-area seat belt
web tension while maintaining force.
Front Side Air BagNHS0008U
Front side air bag is built-in type.
The front seatback with built-in type side air bag have the labels as
shown.
Side Curtain Air BagNHS0008V
The side curtain air bags have the labels as shown.
SRS444
SHIA0170E
BF-2006D
Page 5378 of 5621
![INFINITI M35 2006 Factory Service Manual TROUBLE DIAGNOSIS
SRS-17
C
D
E
F
G
I
J
K
L
MA
B
SRS
Revision: 2006 January2006 M35/M45
CONSULT-II FunctionNHS00094
DIAGNOSIS MODE FOR CONSULT-II
“SELF-DIAG [CURRENT]”
A current self-diagnosis r INFINITI M35 2006 Factory Service Manual TROUBLE DIAGNOSIS
SRS-17
C
D
E
F
G
I
J
K
L
MA
B
SRS
Revision: 2006 January2006 M35/M45
CONSULT-II FunctionNHS00094
DIAGNOSIS MODE FOR CONSULT-II
“SELF-DIAG [CURRENT]”
A current self-diagnosis r](/img/42/57023/w960_57023-5377.png)
TROUBLE DIAGNOSIS
SRS-17
C
D
E
F
G
I
J
K
L
MA
B
SRS
Revision: 2006 January2006 M35/M45
CONSULT-II FunctionNHS00094
DIAGNOSIS MODE FOR CONSULT-II
“SELF-DIAG [CURRENT]”
A current self-diagnosis results (also indicated by the number of warning lamp flashes in the Diagnosis
mode) is displayed on the CONSULT-II screen in real time. This refers to a malfunctioning part requiring
repairs.
“SELF-DIAG [PAST]”
Diagnosis results previously stored in the memory are displayed on the CONSULT-II screen. The stored
results are not erased until memory erasing is executed.
“TROUBLE DIAG RECORD”
With TROUBLE DIAG RECORD, diagnosis results previously erased by a reset operation can be dis-
played on the CONSULT-II screen.
“ECU DISCRIMINATED NO.”
The diagnosis sensor unit for each vehicle model is assigned
with its own, individual classification number. This number will
be displayed on the CONSULT-II screen, as shown. When
replacing the diagnosis sensor unit, refer to the part number for
the compatibility. After installation, replacement with a correct
unit can be checked by confirming this classification number on
the CONSULT-II screen.
After repair, make sure the discriminated number of diagnosis
sensor unit installed to vehicle are same. Refer to SRS-48,
"ECU DISCRIMINATED NO." .
PASSENGER AIR BAG
The STATUS (Readiness) of the front passenger air bag module is displayed.The STATUS displayed
(ON/OFF) depends on the signals supplied to the occupant classification system control module and
air bag diagnosis sensor unit. Refer to SRS-7, "
Occupant Classification System (OCS)" for more infoma-
tion.
HOW TO CHANGE SELF-DIAGNOSIS MODE WITH CONSULT-II
From User Mode to Diagnosis Mode
After selecting “AIR BAG” on the “SELECT SYSTEM” screen, User mode automatically changes to Diagnosis
mode.
From Diagnosis Mode to User Mode
To return to User mode from Diagnosis mode, touch “BACK” key of CONSULT-II until “SELECT SYSTEM”
appears, then diagnosis mode automatically changes to User mode.
PHIA0218E
SRS803
SRS804
Page 5399 of 5621
SRS-38
DRIVER AIR BAG MODULE
Revision: 2006 January2006 M35/M45
DRIVER AIR BAG MODULEPFP:K8510
Removal and InstallationNHS0009C
REMOVAL
CAUTION:
Before servicing, turn ignition switch OFF, disconnect both battery terminal and wait at
least 3 minutes.
Do not use air tools or electric tools for servicing.
Always work from the side of air bag module. Do not work from the front of it.
Always place air bag module with pad side facing upward.
Do not use old TORX bolts after removal; replace with new bolts.
Do not make an impact to the air bag module by dropping etc. Replace the air bag module if it has
been dropped or sustained an impact.
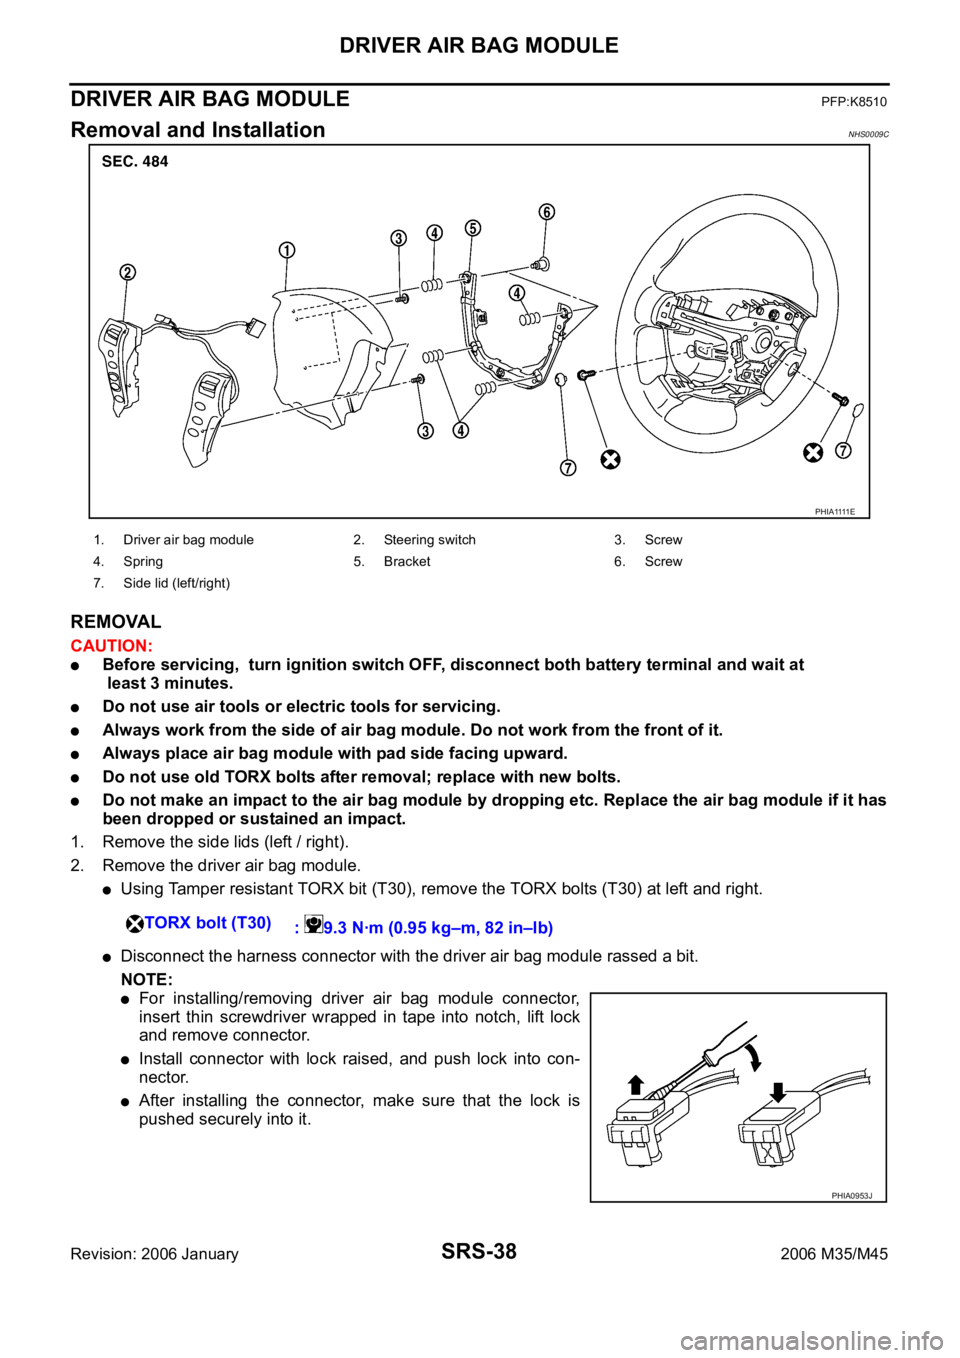
1. Remove the side lids (left / right).
2. Remove the driver air bag module.
Using Tamper resistant TORX bit (T30), remove the TORX bolts (T30) at left and right.
Disconnect the harness connector with the driver air bag module rassed a bit.
NOTE:
For installing/removing driver air bag module connector,
insert thin screwdriver wrapped in tape into notch, lift lock
and remove connector.
Install connector with lock raised, and push lock into con-
nector.
After installing the connector, make sure that the lock is
pushed securely into it.
P H I A 1111 E
1. Driver air bag module 2. Steering switch 3. Screw
4. Spring 5. Bracket 6. Screw
7. Side lid (left/right)
TORX bolt (T30)
: 9.3 Nꞏm (0.95 kg–m, 82 in–lb)
PHIA0953J
Page 5400 of 5621

DRIVER AIR BAG MODULE
SRS-39
C
D
E
F
G
I
J
K
L
MA
B
SRS
Revision: 2006 January2006 M35/M45
3. Remove the screws then remove the steering switch.
INSTALLATION
Install in the reverse order of removal.
CAUTION:
Fix the air bag module harness (shown as A in the figure) to
the harness fixing hook (shown as B in the figure).
Be careful not to damage the harness while installing.
Tighten the special bolts after exactly adjusting the centers of fixing holes on the air bag module
side and the steering wheel side. If the holes are misaligned, the bolt threads are damaged and the
module is not installed securely.
After the work is completed, make sure no system malfunction is detected by air bag warning
lamp.
In case that malfunction is detected by the air bag warning lamp, reset by the self-diagnosis func-
tion and delete the memory by CONSOULT–II.
In case that malunction is still detected after the above operation, peform self-diagnosis to repair
malfunctions. Refer to SRS-19, "
SRS Operation Check" .
PHIA0885J
Page 5402 of 5621
SPIRAL CABLE
SRS-41
C
D
E
F
G
I
J
K
L
MA
B
SRS
Revision: 2006 January2006 M35/M45
CAUTION:
The spiral cable may snap by steering operation if the cable
is installed in an improper position.
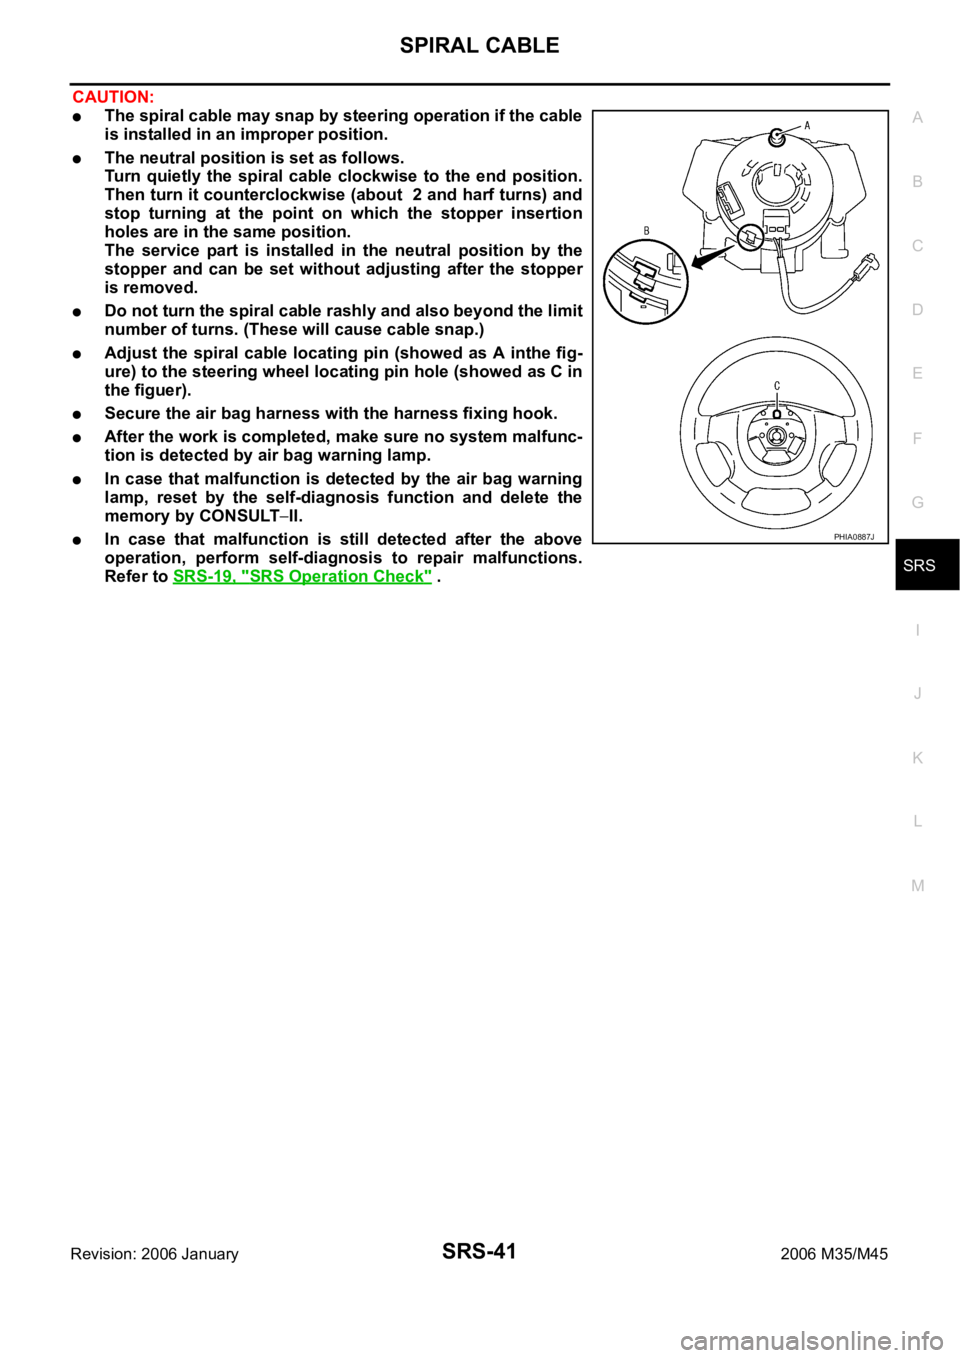
The neutral position is set as follows.
Turn quietly the spiral cable clockwise to the end position.
Then turn it counterclockwise (about 2 and harf turns) and
stop turning at the point on which the stopper insertion
holes are in the same position.
The service part is installed in the neutral position by the
stopper and can be set without adjusting after the stopper
is removed.
Do not turn the spiral cable rashly and also beyond the limit
number of turns. (These will cause cable snap.)
Adjust the spiral cable locating pin (showed as A inthe fig-
ure) to the steering wheel locating pin hole (showed as C in
the figuer).
Secure the air bag harness with the harness fixing hook.
After the work is completed, make sure no system malfunc-
tion is detected by air bag warning lamp.
In case that malfunction is detected by the air bag warning
lamp, reset by the self-diagnosis function and delete the
memory by CONSULT
II.
In case that malfunction is still detected after the above
operation, perform self-diagnosis to repair malfunctions.
Refer to SRS-19, "
SRS Operation Check" .
PHIA0887J
Page 5404 of 5621
SIDE CURTAIN AIR BAG MODULE
SRS-43
C
D
E
F
G
I
J
K
L
MA
B
SRS
Revision: 2006 January2006 M35/M45
SIDE CURTAIN AIR BAG MODULEPFP:985P0
Removal and InstallationNHS0009F
REMOVAL
CAUTION:
Before servicing, turn ignition switch OFF, disconnect both battery terminal and wait at least 3
minutes.
Do not use air tools or electric tools for servicing.
Always work from the side of air bag module. Do not work from the front of it.
Leave the curtain air bag module with air bag deployment side facing upward.
Do not make an impact to the air bag module by dropping etc. Replace the air bag module if it has
been dropped or sustained an impact.
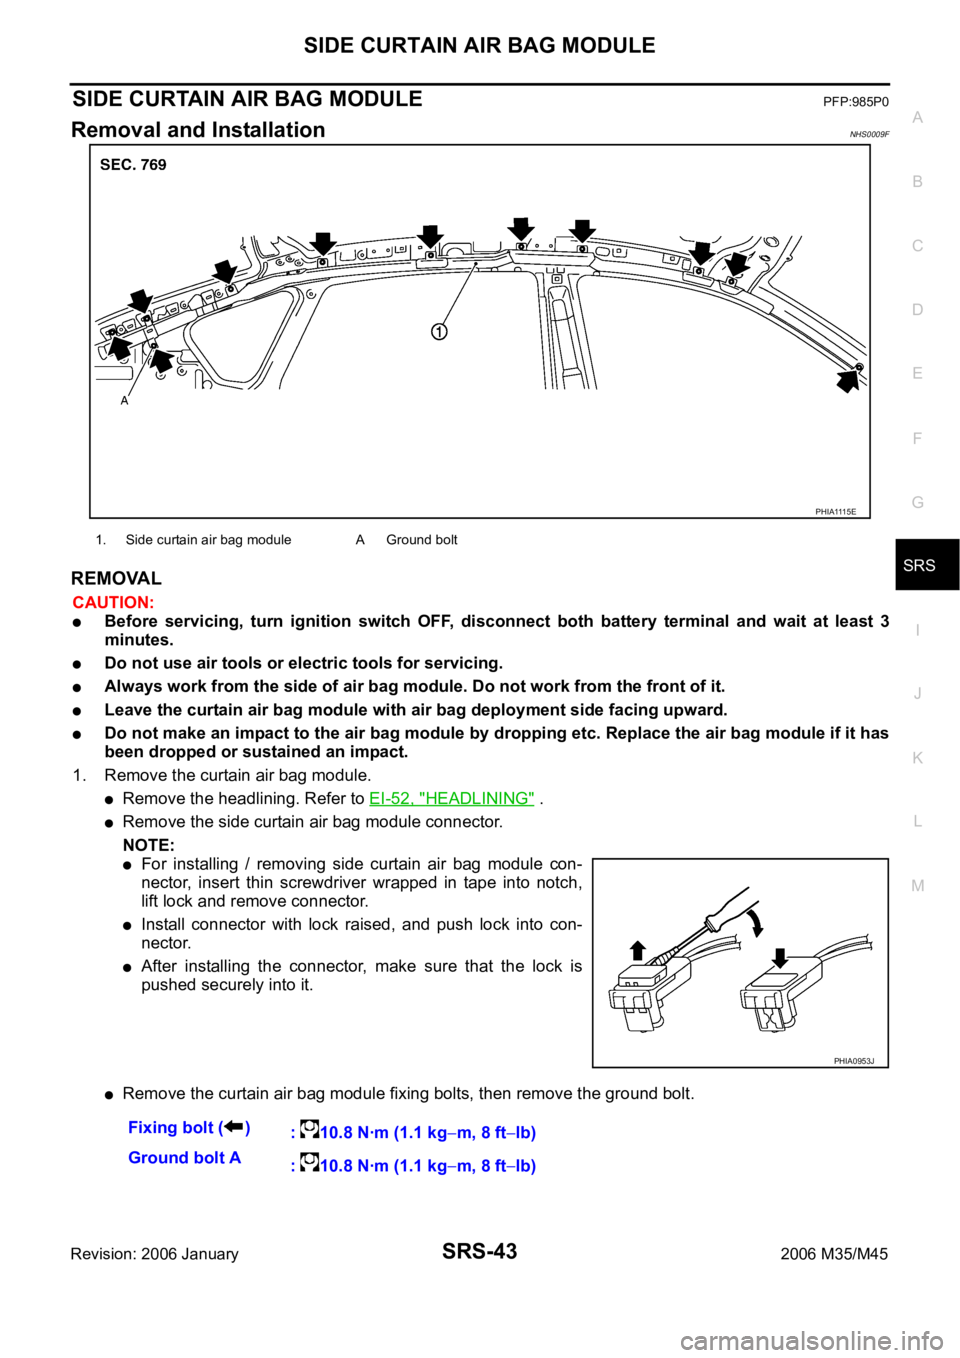
1. Remove the curtain air bag module.
Remove the headlining. Refer to EI-52, "HEADLINING" .
Remove the side curtain air bag module connector.
NOTE:
For installing / removing side curtain air bag module con-
nector, insert thin screwdriver wrapped in tape into notch,
lift lock and remove connector.
Install connector with lock raised, and push lock into con-
nector.
After installing the connector, make sure that the lock is
pushed securely into it.
Remove the curtain air bag module fixing bolts, then remove the ground bolt.
PHIA1115E
1. Side curtain air bag module A Ground bolt
PHIA0953J
Fixing bolt ( )
: 10.8 Nꞏm (1.1 kgm, 8 ftlb)
Ground bolt A
: 10.8 Nꞏm (1.1 kg
m, 8 ftlb)
Page 5409 of 5621
SRS-48
DIAGNOSIS SENSOR UNIT
Revision: 2006 January2006 M35/M45
DIAGNOSIS SENSOR UNITPFP:28556
Removal and InstallationNHS0009J
REMOVAL
CAUTION:
Before servicing, turn ignition switch OFF, disconnect both battery terminal and wait at least 3
minutes.
Before disconnecting the air bag sensor unit harness connector, be sure to disconnect the each
harness connector of the air bag module and pre-tensioner seatbelt to prevent air bag deployment
by static electricity and pre-tensioner seatbelt operation.
Do not use air tools or electric tools for servicing.
Do not use old fixing bolts after removal; replace with new bolts.
Do not make an impact to the diagnosis sensor unit by dropping etc. Replace the diagnosis sen-
sor unit if it has been dropped or sustained an impact.
Replace the diagnosis sensor unit of deployed SRS air bag and deployed SRS front seat belt pre-
tensioner.
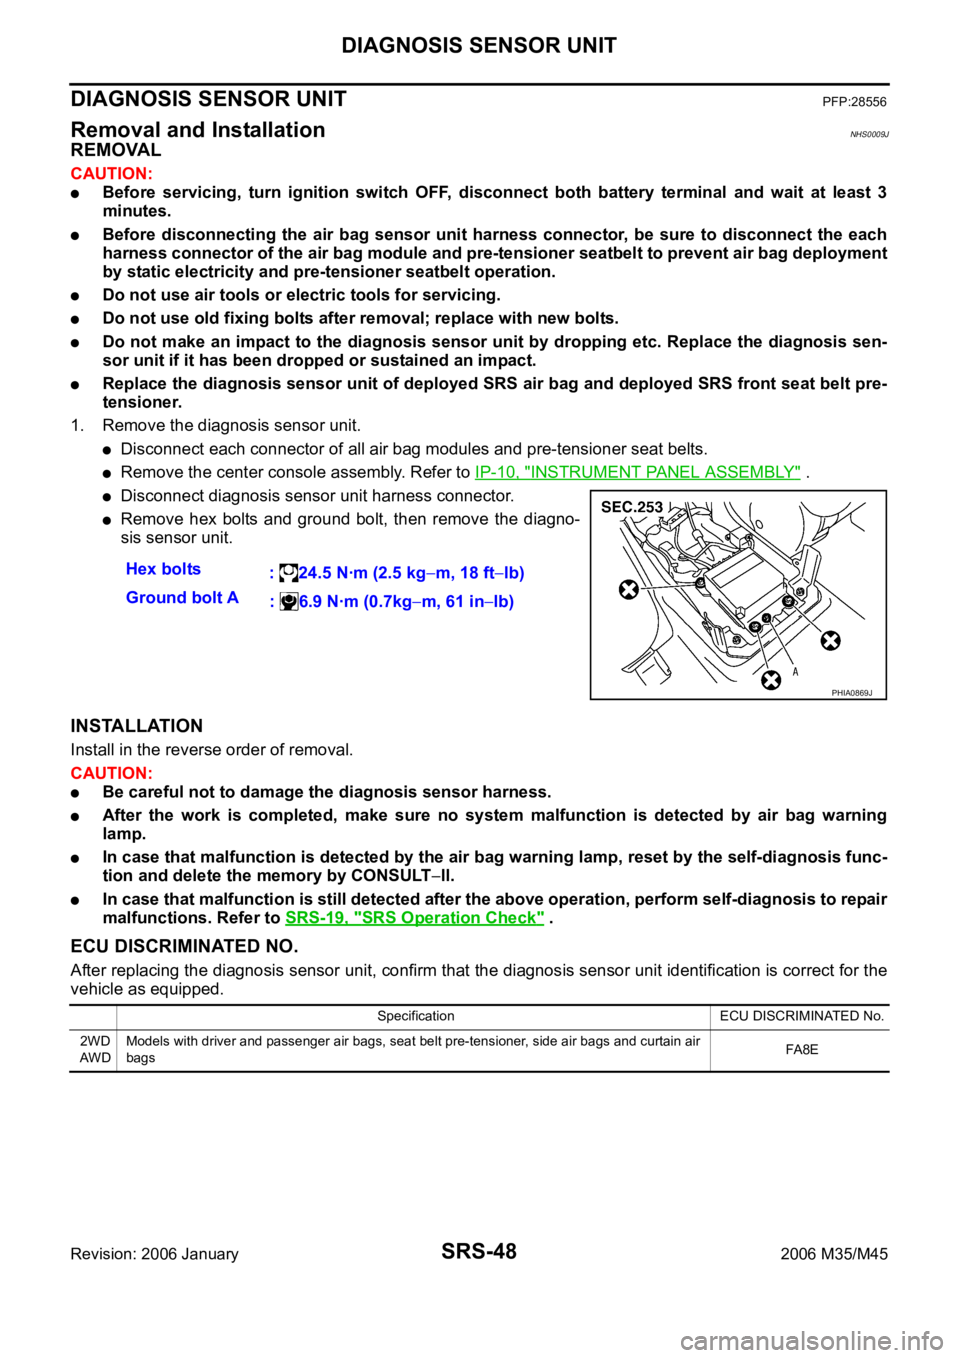
1. Remove the diagnosis sensor unit.
Disconnect each connector of all air bag modules and pre-tensioner seat belts.
Remove the center console assembly. Refer to IP-10, "INSTRUMENT PANEL ASSEMBLY" .
Disconnect diagnosis sensor unit harness connector.
Remove hex bolts and ground bolt, then remove the diagno-
sis sensor unit.
INSTALLATION
Install in the reverse order of removal.
CAUTION:
Be careful not to damage the diagnosis sensor harness.
After the work is completed, make sure no system malfunction is detected by air bag warning
lamp.
In case that malfunction is detected by the air bag warning lamp, reset by the self-diagnosis func-
tion and delete the memory by CONSULT
ll.
In case that malfunction is still detected after the above operation, perform self-diagnosis to repair
malfunctions. Refer to SRS-19, "
SRS Operation Check" .
ECU DISCRIMINATED NO.
After replacing the diagnosis sensor unit, confirm that the diagnosis sensor unit identification is correct for the
vehicle as equipped.Hex bolts
: 24.5 Nꞏm (2.5 kg
m, 18 ftlb)
Ground bolt A
: 6.9 Nꞏm (0.7kg
m, 61 inlb)
PHIA0869J
Specification ECU DISCRIMINATED No.
2WD
AW DModels with driver and passenger air bags, seat belt pre-tensioner, side air bags and curtain air
bagsFA 8 E
Page 5443 of 5621
![INFINITI M35 2006 Factory Service Manual STC-28
[RAS]
TROUBLE DIAGNOSIS
Revision: 2006 January2006 M35/M45
CONSULT-II Function (RAS)NGS000EG
FUNCTION
CONSULT-II can display each self-diagnostic item using the diagnostic test modes shown foll INFINITI M35 2006 Factory Service Manual STC-28
[RAS]
TROUBLE DIAGNOSIS
Revision: 2006 January2006 M35/M45
CONSULT-II Function (RAS)NGS000EG
FUNCTION
CONSULT-II can display each self-diagnostic item using the diagnostic test modes shown foll](/img/42/57023/w960_57023-5442.png)
STC-28
[RAS]
TROUBLE DIAGNOSIS
Revision: 2006 January2006 M35/M45
CONSULT-II Function (RAS)NGS000EG
FUNCTION
CONSULT-II can display each self-diagnostic item using the diagnostic test modes shown following.
CONSULT-II SETTING PROCEDURE
Refer to GI-39, "CONSULT-II Start Procedure" .
SELF-DIAG RESULT MODE
Operation Procedure
1. Perform “CONSULT-II Start Procedure”. Refer to GI-39, "CONSULT-II Start Procedure" .
2. Touch “PRINT” to print out the self-diagnostic results if necessary. Check RAS warning lamp if “NO FAIL-
URE” is displayed.
3. Perform the appropriate inspection from the display item list, and repair or replace the malfunctioning
component. Refer to STC-28, "
Display Item List" .
Display Item List
CAUTION:
When malfunctions are detected in several systems, including the “CAN COMM [U1000]” and
“CONTROL_UNIT (CAN) [U1010]”, inspect the CAN communication system.
Mode Function Reference
SELF-DIAG RESULTSReceives self-diagnosis results from RAS control unit and
indicates DTCs.STC-28, "
SELF-DIAG RESULT
MODE"
DATA MONITORReceives input/output signals from RAS control unit and
indicates and stores them to facilitate locating cause of
malfunctions.STC-30, "DATA MONITOR MODE"
CAN DIAG SUPPORT MNTRMonitors transmitting/receiving status of CAN communi-
cation.STC-31, "CAN Communication"
ACTIVE TESTSends command to RAS actuator to change output sig-
nals and check operation of output system.STC-30, "ACTIVE TEST MODE"
ECU PART NUMBER Displays RAS control unit part number.STC-30, "RAS CONTROL UNIT
PART NUMBER"
DTC code Diagnostic item Diagnostic item is detected when... Check items
C1923 STEERING_ANGLE_SEN [NO_CHANGE] (ꞏ a)While driving at 60 km/h (37 MPH)
or more, steering angle does not
change for a while.STC-38
C1924 STEERING_ANGLE_SEN [NO_NEUT_STATE] (ꞏ b)When driving some distance, no
neutral signal (ON signal) is input.STC-38
C1915 RR_ST_ANGLE_SENSOR [MAIN_SIGNAL] (ꞏ a)The main sensor input signal is
malfunctioning for some time
against the sensor power supply
value.STC-40
C1916 RR_ST_ANGLE_SENSOR [SUB_SIGNAL] (ꞏ b)When the main sensor input signal
is 2.4 - 2.6 V, the sub sensor input
signal is malfunctioning for some
time compared to the sensor power
supply value.STC-40
C1917, C1918 RR_ST_ANGLE_SENSOR [OFFSET_SIG1,2] (ꞏ c)An excessive difference has
occurred in the input values of main
sensor and sub sensor.STC-40
C1914 RR_ST_ANGLE_SENSOR [ABNORMAL_VOL] (ꞏ d)Higher or lower value compared to
the standard voltage.STC-40
C1921 MOTOR_OUTPUTNo engine speed is input for a cer-
tain time.STC-43
C1911 MOTOR_VOLTAGE [LOW_VOLTAGE] (ꞏ a)The motor power supply voltage is
lower than ignition power supply
voltage with RAS motor relay ON.STC-35
Page 5450 of 5621
![INFINITI M35 2006 Factory Service Manual TROUBLE DIAGNOSIS
STC-35
[RAS]
C
D
E
F
H
I
J
K
L
MA
B
STC
Revision: 2006 January2006 M35/M45
Inspection 1: RAS Control Unit MalfunctionNGS000EQ
1. CHECK SELF-DIAGNOSIS RESULTS
Check self-diagnosis res INFINITI M35 2006 Factory Service Manual TROUBLE DIAGNOSIS
STC-35
[RAS]
C
D
E
F
H
I
J
K
L
MA
B
STC
Revision: 2006 January2006 M35/M45
Inspection 1: RAS Control Unit MalfunctionNGS000EQ
1. CHECK SELF-DIAGNOSIS RESULTS
Check self-diagnosis res](/img/42/57023/w960_57023-5449.png)
TROUBLE DIAGNOSIS
STC-35
[RAS]
C
D
E
F
H
I
J
K
L
MA
B
STC
Revision: 2006 January2006 M35/M45
Inspection 1: RAS Control Unit MalfunctionNGS000EQ
1. CHECK SELF-DIAGNOSIS RESULTS
Check self-diagnosis results.
With CONSULT-II
Without CONSULT-II
Is above displayed on self-diagnosis display?
YES >> Replace RAS control unit. Perform self-diagnosis again after replacing.
NO >> INSPECTION END
Inspection 2: Motor Power Supply SystemNGS000ER
1. CHECK RAS CONTROL UNIT CONNECTOR
1. Turn ignition switch OFF, disconnect RAS control unit harness connector and motor connector, and check
terminal for deformation, disconnection, looseness, etc.
2. Reconnect harness connector securely, and perform self-diagnosis.
With CONSULT-II
Without CONSULT-II
Is above displayed on self-diagnosis display?
YES >> GO TO 2.
NO >> Connector terminal connection is loose, damaged, open, or shorted. Repair or replace the termi-
nal.
2. CHECK RAS MOTOR RELAY BATTERY CIRCUIT
1. Turn ignition switch OFF, and disconnect RAS motor relay harness connector B126.
2. Check voltage between RAS motor relay harness connector
B126 and ground.
OK or NG
OK >> GO TO 3.
NG >> RAS motor relay power supply circuit open or shorted.
Repair or replace power supply circuit and fuse.
Self-diagnostic results
CONTROL_UNIT [ABNORMAL1 - 9]
DTC (warning lamp blinks)
11
Self-diagnosis results
MOTOR_VOLTAGE [LOW_VOLTAGE] (ꞏ a)
MOTOR_VOLTAGE [BAD_OBSTRCT] (ꞏ b)
DTC (warning lamp blinks)
12
Terminal 3 – Ground : Battery voltage (Approx. 12 V)
SGIA1246E