IDX INFINITI QX4 2001 Factory Service Manual
[x] Cancel search | Manufacturer: INFINITI, Model Year: 2001, Model line: QX4, Model: INFINITI QX4 2001Pages: 2395, PDF Size: 43.2 MB
Page 366 of 2395
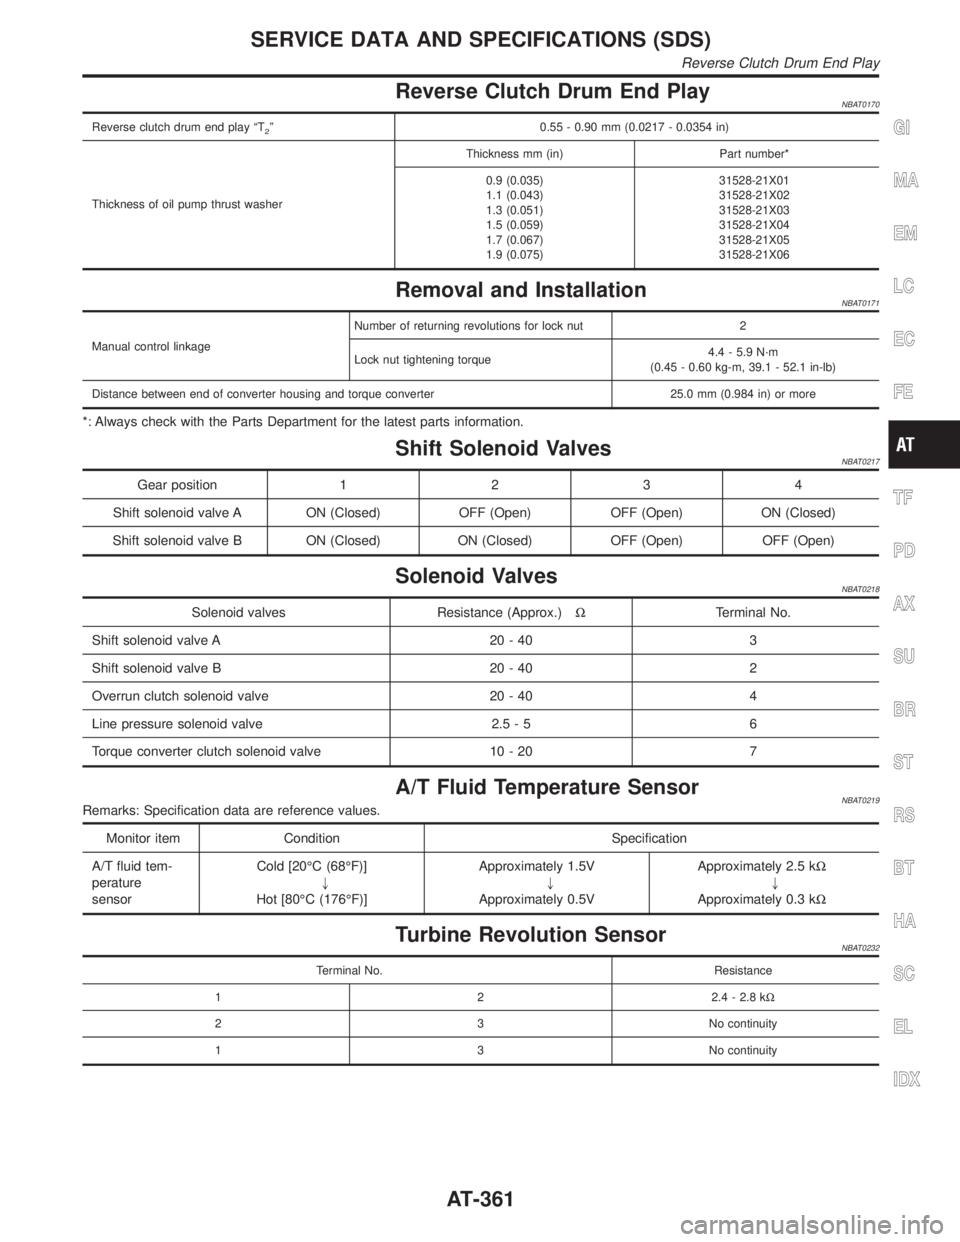
Reverse Clutch Drum End PlayNBAT0170
Reverse clutch drum end play ªT2º 0.55 - 0.90 mm (0.0217 - 0.0354 in)
Thickness of oil pump thrust washerThickness mm (in) Part number*
0.9 (0.035)
1.1 (0.043)
1.3 (0.051)
1.5 (0.059)
1.7 (0.067)
1.9 (0.075)31528-21X01
31528-21X02
31528-21X03
31528-21X04
31528-21X05
31528-21X06
Removal and InstallationNBAT0171
Manual control linkageNumber of returning revolutions for lock nut 2
Lock nut tightening torque4.4 - 5.9 N´m
(0.45 - 0.60 kg-m, 39.1 - 52.1 in-lb)
Distance between end of converter housing and torque converter 25.0 mm (0.984 in) or more
*: Always check with the Parts Department for the latest parts information.
Shift Solenoid ValvesNBAT0217
Gear position1234
Shift solenoid valve A ON (Closed) OFF (Open) OFF (Open) ON (Closed)
Shift solenoid valve B ON (Closed) ON (Closed) OFF (Open) OFF (Open)
Solenoid ValvesNBAT0218
Solenoid valves Resistance (Approx.)WTerminal No.
Shift solenoid valve A 20 - 40 3
Shift solenoid valve B 20 - 40 2
Overrun clutch solenoid valve 20 - 40 4
Line pressure solenoid valve 2.5 - 5 6
Torque converter clutch solenoid valve 10 - 20 7
A/T Fluid Temperature SensorNBAT0219Remarks: Specification data are reference values.
Monitor item Condition Specification
A/T fluid tem-
perature
sensorCold [20ÉC (68ÉF)]
"
Hot [80ÉC (176ÉF)]Approximately 1.5V
"
Approximately 0.5VApproximately 2.5 kW
"
Approximately 0.3 kW
Turbine Revolution SensorNBAT0232
Terminal No. Resistance
1 2 2.4 - 2.8 kW
2 3 No continuity
1 3 No continuity
GI
MA
EM
LC
EC
FE
TF
PD
AX
SU
BR
ST
RS
BT
HA
SC
EL
IDX
SERVICE DATA AND SPECIFICATIONS (SDS)
Reverse Clutch Drum End Play
AT-361
Page 368 of 2395

FRONT & REAR AXLE
SECTION
AX
CONTENTS
FRONT AXLE..................................................................2
Precautions ..................................................................2
PRECAUTIONS.........................................................2
Preparation ..................................................................2
SPECIAL SERVICE TOOLS........................................2
COMMERCIAL SERVICE TOOLS................................2
Noise, Vibration and Harshness (NVH)
Troubleshooting ...........................................................3
NVH TROUBLESHOOTING CHART............................3
On-vehicle Service.......................................................3
FRONT AXLE PARTS................................................3
FRONT WHEEL BEARING.........................................4
DRIVE SHAFT...........................................................5
Wheel Hub and Rotor Disc..........................................6
COMPONENTS.........................................................6
REMOVAL.................................................................6
INSTALLATION..........................................................7
DISASSEMBLY..........................................................8
INSPECTION.............................................................8
ASSEMBLY...............................................................8
Knuckle Spindle ...........................................................9
REMOVAL.................................................................9
INSPECTION...........................................................10
INSTALLATION........................................................10
Drive Shaft .................................................................10
COMPONENTS.......................................................10
REMOVAL............................................................... 11
DISASSEMBLY........................................................ 11
INSPECTION...........................................................12
ASSEMBLY.............................................................13
INSTALLATION........................................................14
Service Data and Specifications (SDS).....................15
WHEEL BEARING (FRONT).....................................15
DRIVE SHAFT.........................................................16
REAR AXLE...................................................................17
Precautions ................................................................17
PRECAUTIONS.......................................................17
Preparation ................................................................17
SPECIAL SERVICE TOOLS......................................17
COMMERCIAL SERVICE TOOLS..............................18
Noise, Vibration and Harshness (NVH)
Troubleshooting .........................................................18
On-vehicle Service.....................................................18
REAR AXLE PARTS.................................................18
REAR WHEEL BEARING.........................................18
Components...............................................................19
Removal .....................................................................19
Inspection...................................................................21
AXLE SHAFT...........................................................21
BEARING CAGE......................................................21
REAR AXLE HOUSING............................................21
Installation ..................................................................21
Service Data and Specifications (SDS).....................22
WHEEL BEARING (REAR).......................................22
GI
MA
EM
LC
EC
FE
AT
TF
PD
SU
BR
ST
RS
BT
HA
SC
EL
IDX
Page 370 of 2395
Noise, Vibration and Harshness (NVH)
Troubleshooting
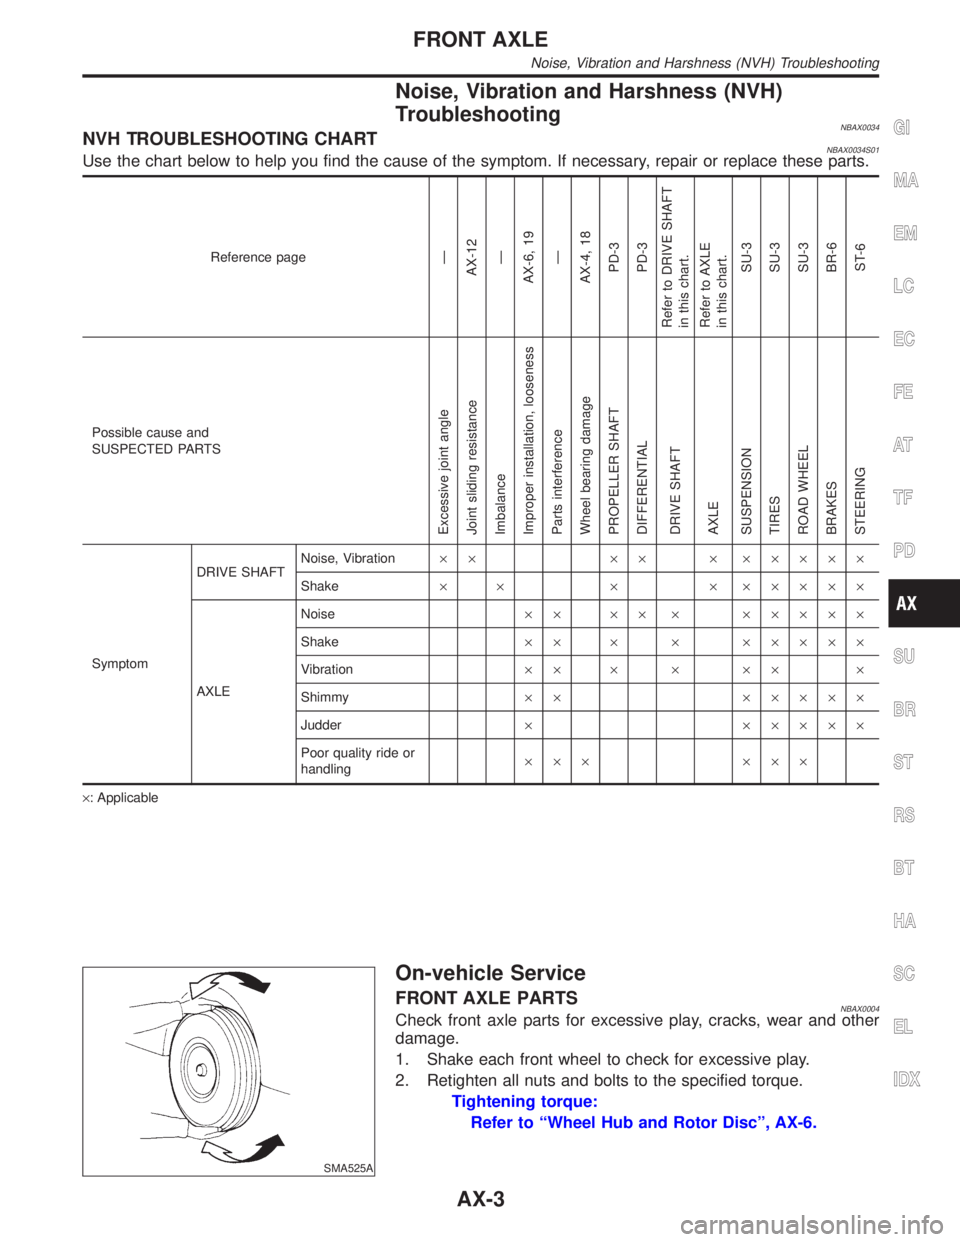
NBAX0034NVH TROUBLESHOOTING CHARTNBAX0034S01Use the chart below to help you find the cause of the symptom. If necessary, repair or replace these parts.
Reference pageÐ
AX-12
Ð
AX-6, 19
Ð
AX-4, 18
PD-3
PD-3
Refer to DRIVE SHAFT
in this chart.
Refer to AXLE
in this chart.
SU-3
SU-3
SU-3
BR-6
ST-6
Possible cause and
SUSPECTED PARTS
Excessive joint angle
Joint sliding resistance
Imbalance
Improper installation, looseness
Parts interference
Wheel bearing damage
PROPELLER SHAFT
DIFFERENTIAL
DRIVE SHAFT
AXLE
SUSPENSION
TIRES
ROAD WHEEL
BRAKES
STEERING
SymptomDRIVE SHAFTNoise, Vibration´´ ´´ ´ ´´´´´
Shake´ ´ ´ ´ ´´´´´
AXLENoise´´ ´´ ´ ´´´´´
Shake´´ ´ ´ ´´´´´
Vibration´´ ´ ´ ´´ ´
Shimmy´´ ´´´´´
Judder´ ´´´´´
Poor quality ride or
handling´´´ ´´´
´: Applicable
SMA525A
On-vehicle Service
FRONT AXLE PARTSNBAX0004Check front axle parts for excessive play, cracks, wear and other
damage.
1. Shake each front wheel to check for excessive play.
2. Retighten all nuts and bolts to the specified torque.
Tightening torque:
Refer to ªWheel Hub and Rotor Discº, AX-6.
GI
MA
EM
LC
EC
FE
AT
TF
PD
SU
BR
ST
RS
BT
HA
SC
EL
IDX
FRONT AXLE
Noise, Vibration and Harshness (NVH) Troubleshooting
AX-3
Page 372 of 2395

SMA580A
10. Measure starting force ªAº at wheel hub bolt.
SFA830
11. Install lock washer by tightening the lock nut within 15 to 30
degrees.
12. Turn wheel hub several times in both directions to seat wheel
bearing correctly.
13. Measure starting force ªBº at wheel hub bolt. Refer to proce-
dure 10.
14. Wheel bearing preload ªCº can be calculated as shown below.
C=BþA
Wheel bearing preload ªCº:
7.06 - 20.99 N (0.72 - 2.14 kg, 1.59 - 4.72 lb)
15. If wheel bearing preload ªCº is outside specifications, remove
lock washer. Tighten or loosen lock nut within±15 degrees
(Refer to step 11 above). Install lock washer, then repeat steps
12, 13 and 14.
16. Repeat above procedures until correct axial end play and
wheel bearing preload are obtained.
17. Install drive flange and wheel hub cap.
SFA901
DRIVE SHAFTNBAX0006ICheck boot and drive shaft for cracks, wear, damage and
grease leakage.
GI
MA
EM
LC
EC
FE
AT
TF
PD
SU
BR
ST
RS
BT
HA
SC
EL
IDX
FRONT AXLE
On-vehicle Service (Cont'd)
AX-5
Page 374 of 2395

SFA802B
2. Remove hub cap with suitable tool.
SFA753B
3. Remove snap ring with suitable tool.
4. Remove drive flange.
SFA364BA
5. Remove lock washer.
SFA754B
6. Remove wheel bearing lock nut.
SFA832
7. Remove wheel hub and wheel bearing.
Be careful not to drop outer bearing.
INSTALLATIONNBAX00091. After installing wheel hub and wheel bearing, adjust wheel
bearing preload.
Refer to ªPreload Adjustmentº, ªFRONT WHEEL BEARINGº,
ªOn-vehicle Serviceº, AX-4.
GI
MA
EM
LC
EC
FE
AT
TF
PD
SU
BR
ST
RS
BT
HA
SC
EL
IDX
FRONT AXLE
Wheel Hub and Rotor Disc (Cont'd)
AX-7
Page 376 of 2395

SFA891-A
2. Pack multi-purpose grease into wheel hub.
SFA459B
3. Apply multi-purpose grease to each bearing cone.
4. Pack grease seal lip with multi-purpose grease, then install it
into wheel hub with suitable drift.
Knuckle Spindle
REMOVALNBAX00131. Remove drive shaft.
Refer to ªDrive Shaftº, AX-11.
SFA756B
2. Separate tie-rod end and lower ball joint from knuckle with
Tool.
Install stud nut conversely on stud bolt so as not to damage
stud bolt.
SFA758B
3. Separate knuckle from strut.
GI
MA
EM
LC
EC
FE
AT
TF
PD
SU
BR
ST
RS
BT
HA
SC
EL
IDX
FRONT AXLE
Wheel Hub and Rotor Disc (Cont'd)
AX-9
Page 378 of 2395
SFA236
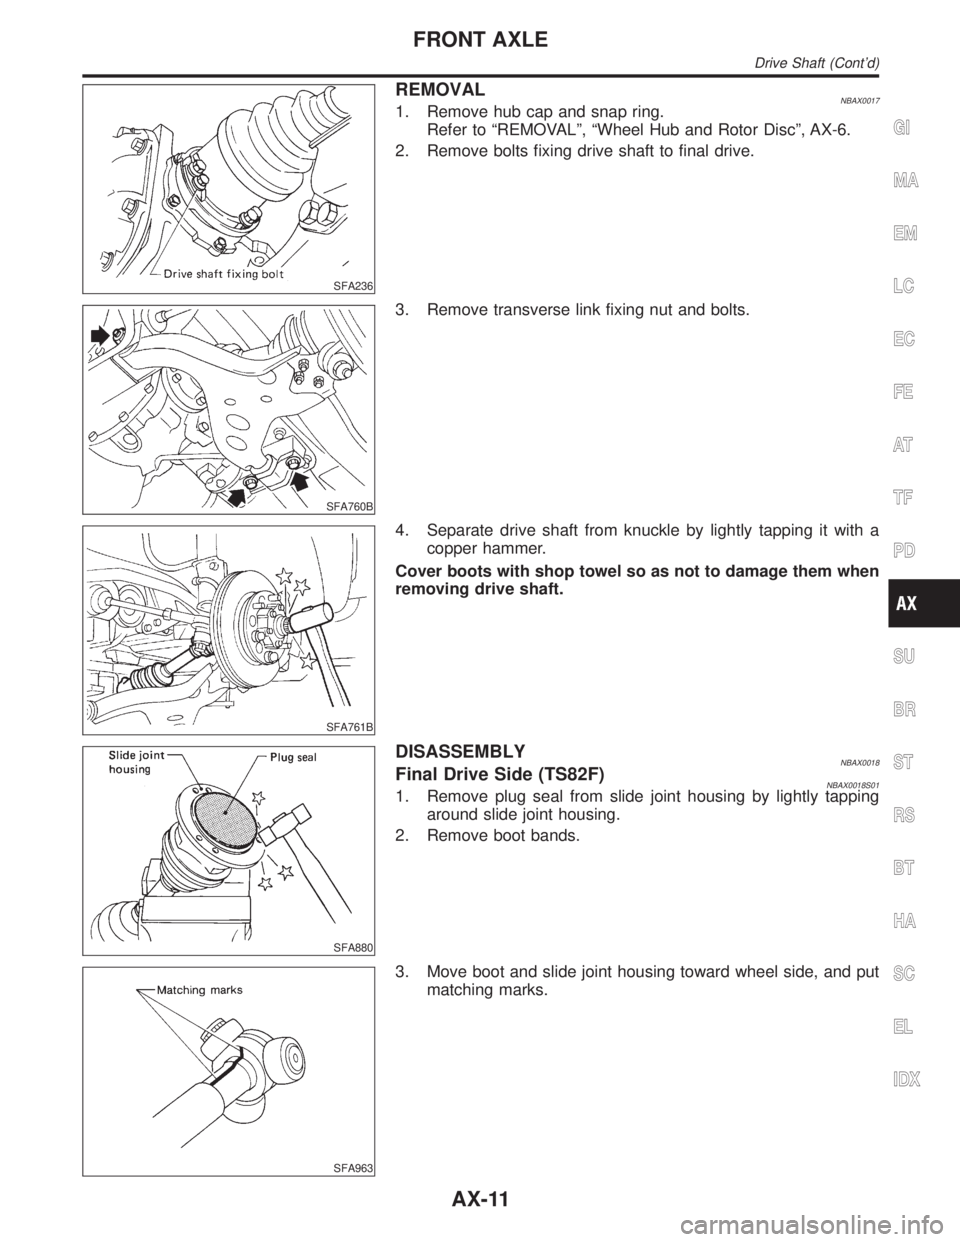
REMOVALNBAX00171. Remove hub cap and snap ring.
Refer to ªREMOVALº, ªWheel Hub and Rotor Discº, AX-6.
2. Remove bolts fixing drive shaft to final drive.
SFA760B
3. Remove transverse link fixing nut and bolts.
SFA761B
4. Separate drive shaft from knuckle by lightly tapping it with a
copper hammer.
Cover boots with shop towel so as not to damage them when
removing drive shaft.
SFA880
DISASSEMBLYNBAX0018Final Drive Side (TS82F)NBAX0018S011. Remove plug seal from slide joint housing by lightly tapping
around slide joint housing.
2. Remove boot bands.
SFA963
3. Move boot and slide joint housing toward wheel side, and put
matching marks.
GI
MA
EM
LC
EC
FE
AT
TF
PD
SU
BR
ST
RS
BT
HA
SC
EL
IDX
FRONT AXLE
Drive Shaft (Cont'd)
AX-11
Page 380 of 2395

Joint Assembly (Final drive side)NBAX0019S03IReplace any parts of double offset joint which show signs of
scorching, rust, wear or excessive play.
ICheck serration for deformation. Replace if necessary.
ICheck slide joint housing for any damage. Replace if neces-
sary.
Joint Assembly (Wheel side)NBAX0019S04Replace joint assembly if it is deformed or damaged.
ASSEMBLYNBAX0020IAfter drive shaft has been assembled, ensure that it
moves smoothly over its entire range without binding.
IUse NISSAN GENUINE GREASE or equivalent after every
overhaul.
SFA800
Final Drive Side (TS82F)NBAX0020S011. Install new small boot band, boot and side joint housing to
drive shaft.
Cover drive shaft serration with tape so as not to damage boot
during installation.
SFA397
2. Install spider assembly securely, ensuring marks are properly
aligned.
IPress-fit with spider assembly serration chamfer facing
shaft.
3. Install new snap ring.
SFA460BA
4. Pack with grease.
Specified amount of grease:
95 - 105 g (3.35 - 3.70 oz)
5. Make sure that boot is properly installed on the drive shaft
groove. Set boot so that it does not swell and deform when its
length is ªL
1º.
Length ªL
1º: 95 - 97 mm (3.74 - 3.82 in)
GI
MA
EM
LC
EC
FE
AT
TF
PD
SU
BR
ST
RS
BT
HA
SC
EL
IDX
FRONT AXLE
Drive Shaft (Cont'd)
AX-13
Page 382 of 2395
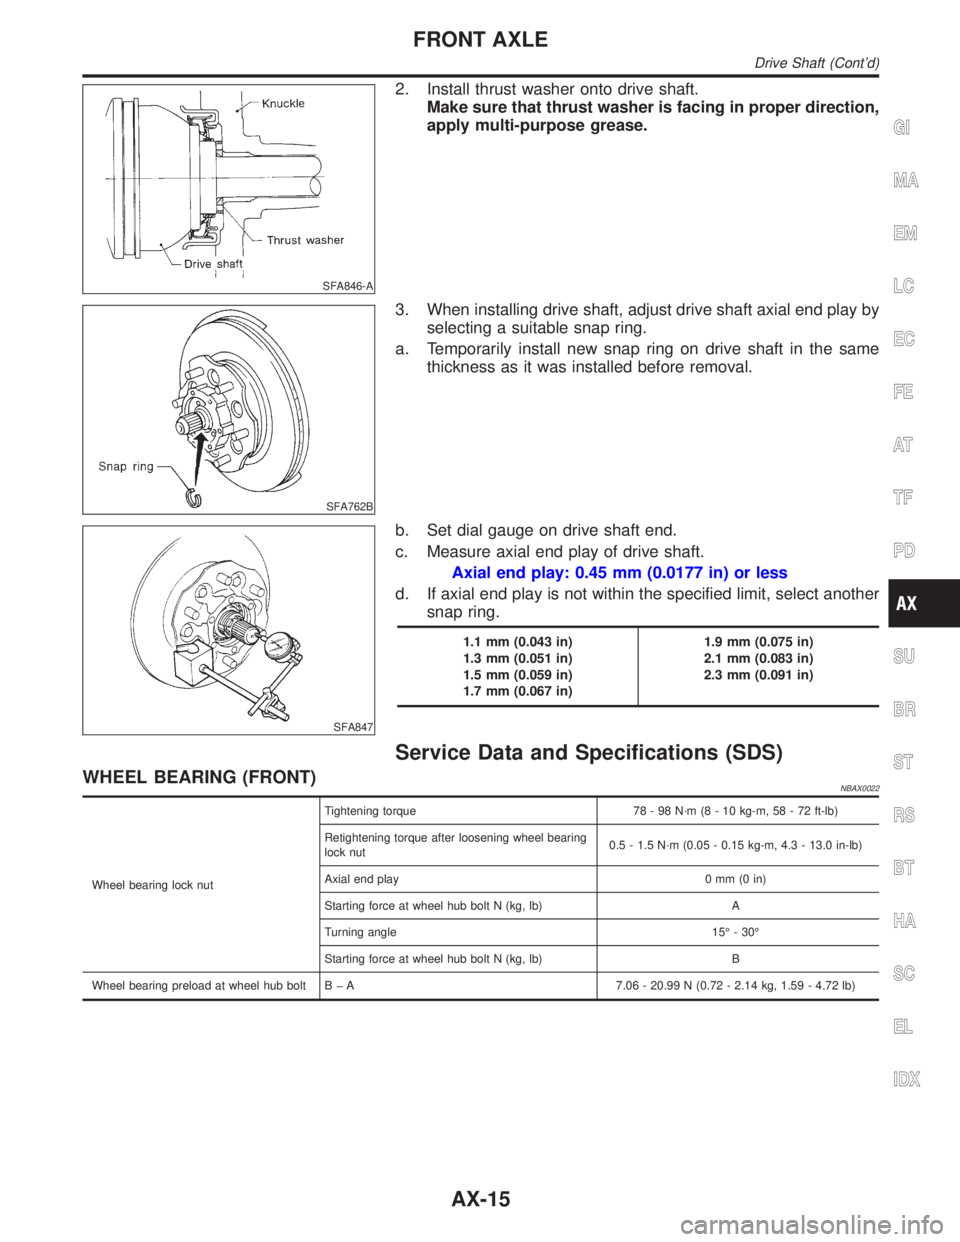
SFA846-A
2. Install thrust washer onto drive shaft.
Make sure that thrust washer is facing in proper direction,
apply multi-purpose grease.
SFA762B
3. When installing drive shaft, adjust drive shaft axial end play by
selecting a suitable snap ring.
a. Temporarily install new snap ring on drive shaft in the same
thickness as it was installed before removal.
SFA847
b. Set dial gauge on drive shaft end.
c. Measure axial end play of drive shaft.
Axial end play: 0.45 mm (0.0177 in) or less
d. If axial end play is not within the specified limit, select another
snap ring.
1.1 mm (0.043 in)
1.3 mm (0.051 in)
1.5 mm (0.059 in)
1.7 mm (0.067 in)1.9 mm (0.075 in)
2.1 mm (0.083 in)
2.3 mm (0.091 in)
Service Data and Specifications (SDS)
WHEEL BEARING (FRONT)NBAX0022
Wheel bearing lock nutTightening torque 78 - 98 N´m (8 - 10 kg-m, 58 - 72 ft-lb)
Retightening torque after loosening wheel bearing
lock nut0.5 - 1.5 N´m (0.05 - 0.15 kg-m, 4.3 - 13.0 in-lb)
Axial end play 0 mm (0 in)
Starting force at wheel hub bolt N (kg, lb) A
Turning angle 15É - 30É
Starting force at wheel hub bolt N (kg, lb) B
Wheel bearing preload at wheel hub bolt B þ A 7.06 - 20.99 N (0.72 - 2.14 kg, 1.59 - 4.72 lb)
GI
MA
EM
LC
EC
FE
AT
TF
PD
SU
BR
ST
RS
BT
HA
SC
EL
IDX
FRONT AXLE
Drive Shaft (Cont'd)
AX-15
Page 384 of 2395
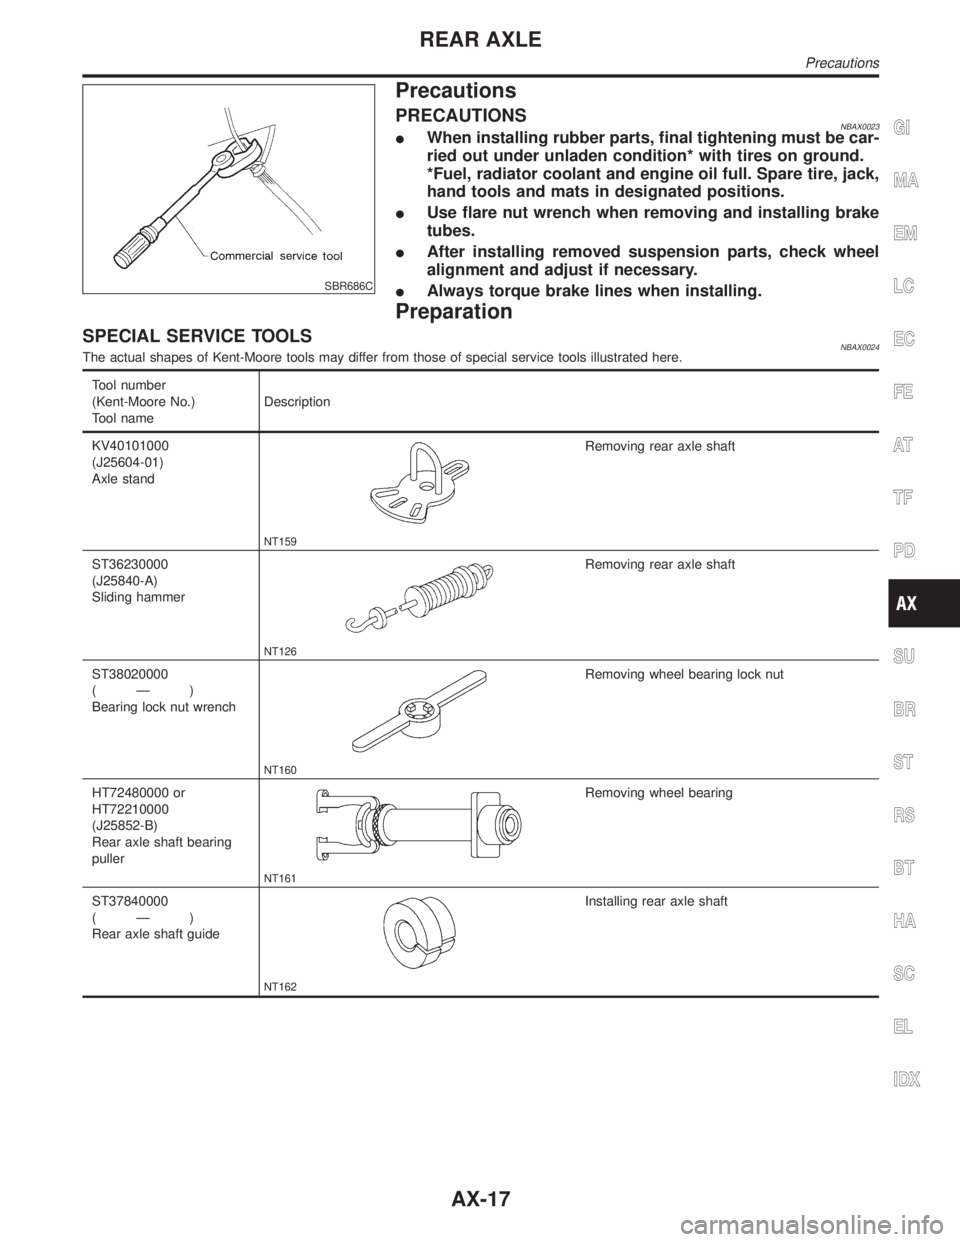
SBR686C
Precautions
PRECAUTIONSNBAX0023IWhen installing rubber parts, final tightening must be car-
ried out under unladen condition* with tires on ground.
*Fuel, radiator coolant and engine oil full. Spare tire, jack,
hand tools and mats in designated positions.
IUse flare nut wrench when removing and installing brake
tubes.
IAfter installing removed suspension parts, check wheel
alignment and adjust if necessary.
IAlways torque brake lines when installing.
Preparation
SPECIAL SERVICE TOOLSNBAX0024The actual shapes of Kent-Moore tools may differ from those of special service tools illustrated here.
Tool number
(Kent-Moore No.)
Tool nameDescription
KV40101000
(J25604-01)
Axle stand
NT159
Removing rear axle shaft
ST36230000
(J25840-A)
Sliding hammer
NT126
Removing rear axle shaft
ST38020000
(Ð)
Bearing lock nut wrench
NT160
Removing wheel bearing lock nut
HT72480000 or
HT72210000
(J25852-B)
Rear axle shaft bearing
puller
NT161
Removing wheel bearing
ST37840000
(Ð)
Rear axle shaft guide
NT162
Installing rear axle shaft
GI
MA
EM
LC
EC
FE
AT
TF
PD
SU
BR
ST
RS
BT
HA
SC
EL
IDX
REAR AXLE
Precautions
AX-17