INFINITI QX4 2001 Factory Workshop Manual
Manufacturer: INFINITI, Model Year: 2001, Model line: QX4, Model: INFINITI QX4 2001Pages: 2395, PDF Size: 43.2 MB
Page 51 of 2395

Diagnostic Procedure Without CONSULT-IINBAT0206OBD-II SELF-DIAGNOSTIC PROCEDURE (WITH GST)NBAT0206S01Refer to EC-95, ªDESCRIPTIONº.
OBD-II SELF-DIAGNOSTIC PROCEDURE (NO
TOOLS)
NBAT0206S02Refer to EC-74, ªDESCRIPTIONº.
SAT491J
SAT132K
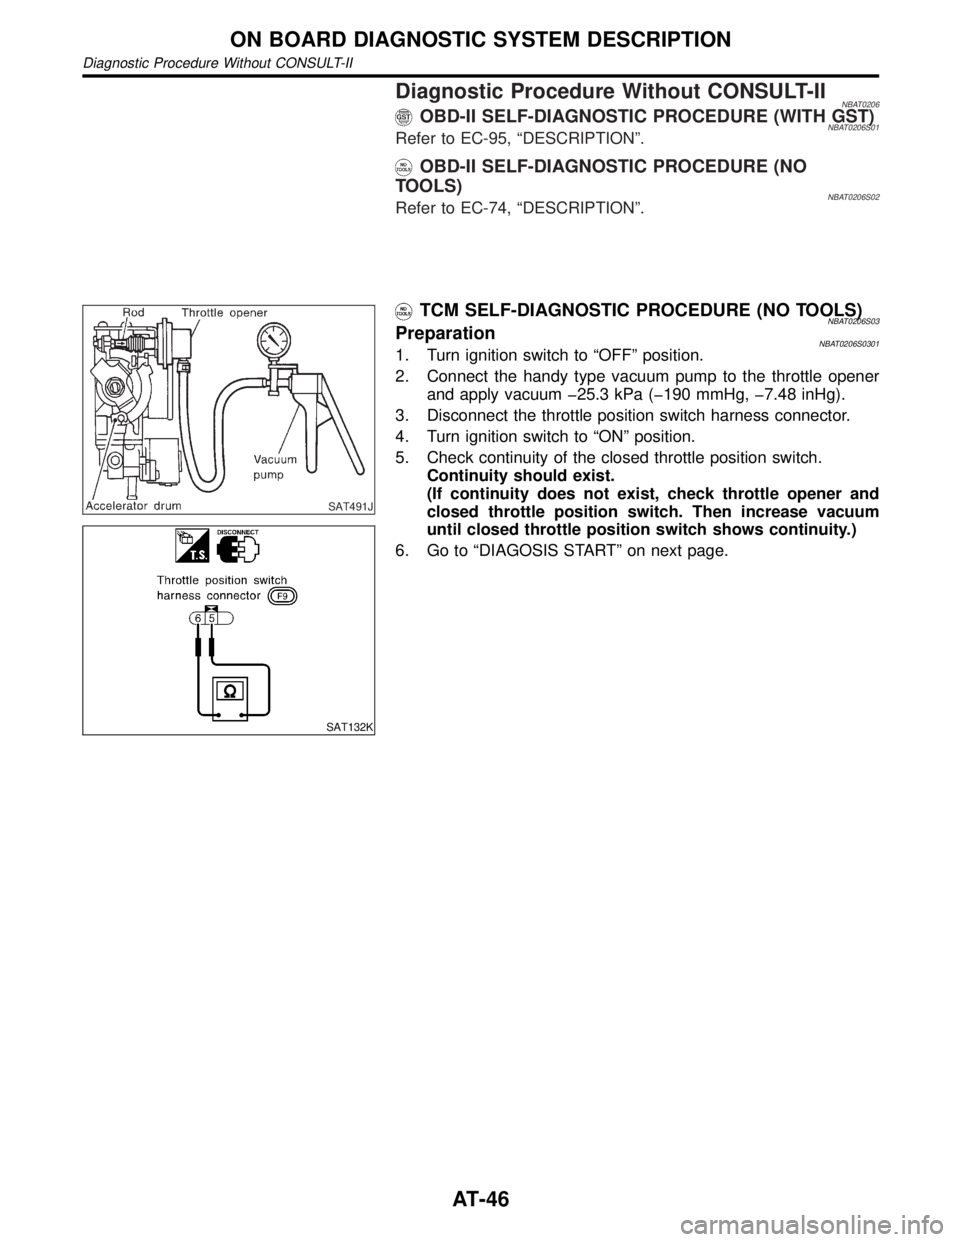
TCM SELF-DIAGNOSTIC PROCEDURE (NO TOOLS)NBAT0206S03PreparationNBAT0206S03011. Turn ignition switch to ªOFFº position.
2. Connect the handy type vacuum pump to the throttle opener
and apply vacuum þ25.3 kPa (þ190 mmHg, þ7.48 inHg).
3. Disconnect the throttle position switch harness connector.
4. Turn ignition switch to ªONº position.
5. Check continuity of the closed throttle position switch.
Continuity should exist.
(If continuity does not exist, check throttle opener and
closed throttle position switch. Then increase vacuum
until closed throttle position switch shows continuity.)
6. Go to ªDIAGOSIS STARTº on next page.
ON BOARD DIAGNOSTIC SYSTEM DESCRIPTION
Diagnostic Procedure Without CONSULT-II
AT-46
Page 52 of 2395

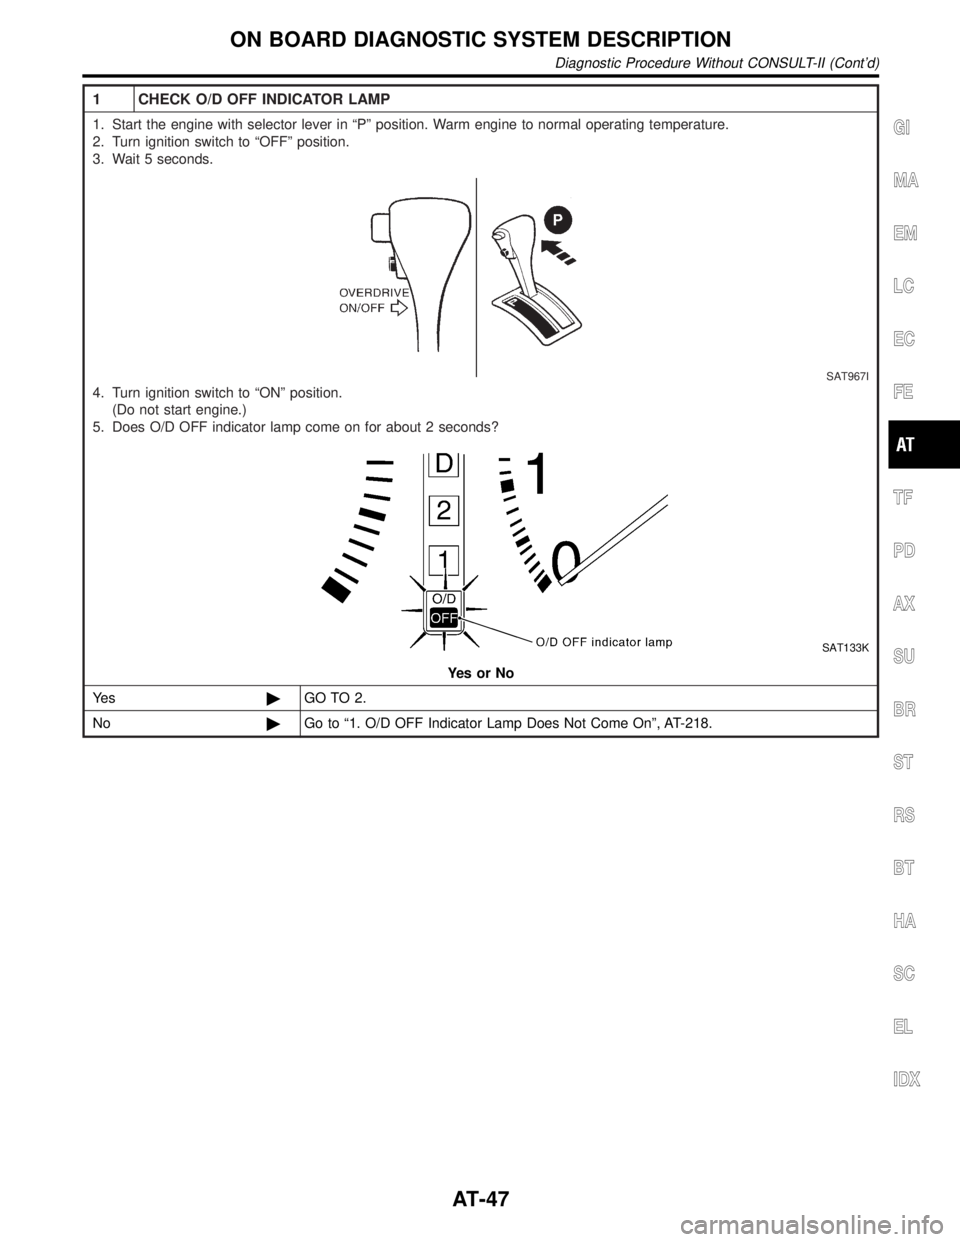
1 CHECK O/D OFF INDICATOR LAMP
1. Start the engine with selector lever in ªPº position. Warm engine to normal operating temperature.
2. Turn ignition switch to ªOFFº position.
3. Wait 5 seconds.
SAT967I
4. Turn ignition switch to ªONº position.
(Do not start engine.)
5. Does O/D OFF indicator lamp come on for about 2 seconds?
SAT133K
YesorNo
Ye s©GO TO 2.
No©Go to ª1. O/D OFF Indicator Lamp Does Not Come Onº, AT-218.
GI
MA
EM
LC
EC
FE
TF
PD
AX
SU
BR
ST
RS
BT
HA
SC
EL
IDX
ON BOARD DIAGNOSTIC SYSTEM DESCRIPTION
Diagnostic Procedure Without CONSULT-II (Cont'd)
AT-47
Page 53 of 2395

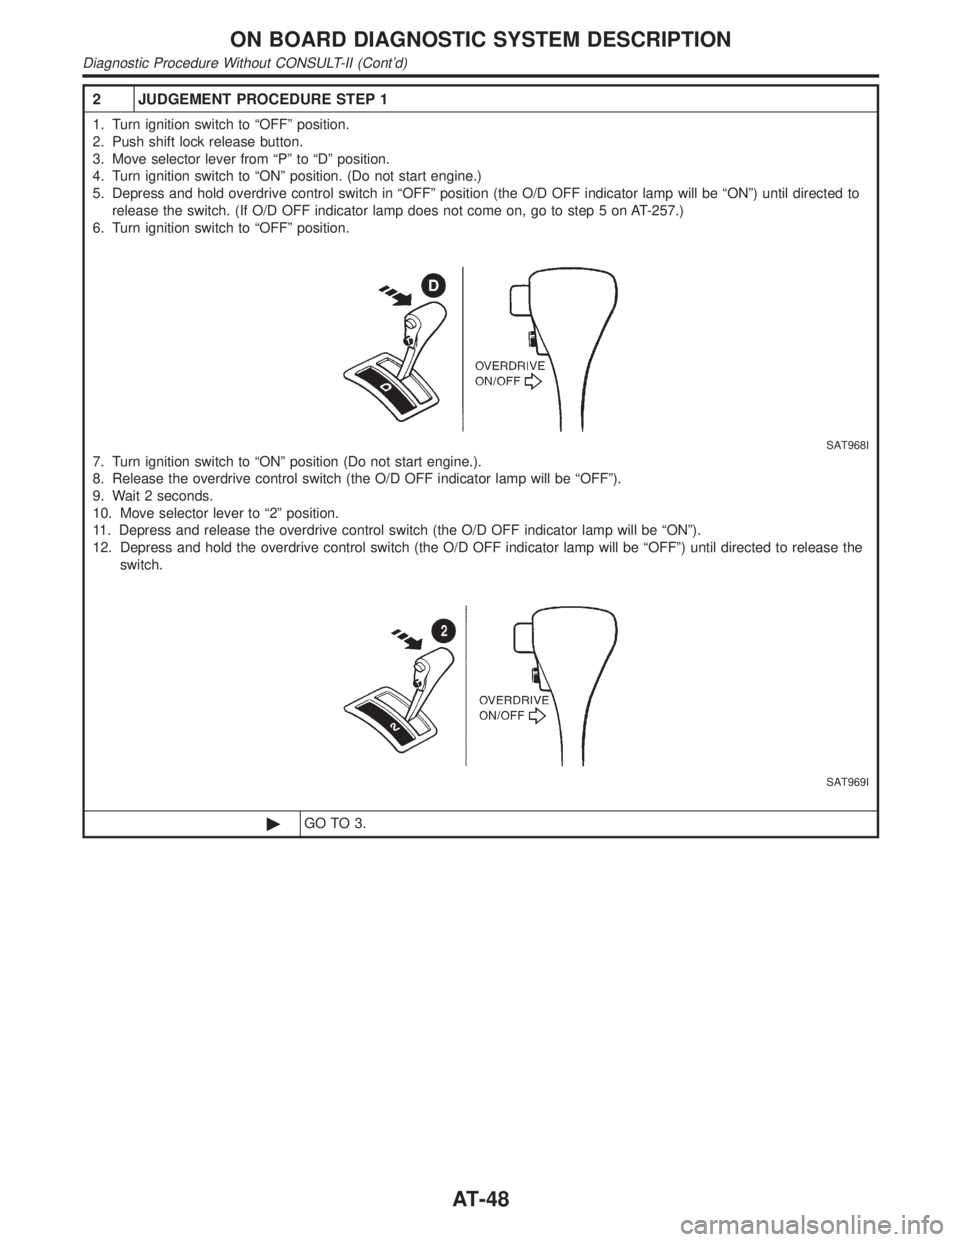
2 JUDGEMENT PROCEDURE STEP 1
1. Turn ignition switch to ªOFFº position.
2. Push shift lock release button.
3. Move selector lever from ªPº to ªDº position.
4. Turn ignition switch to ªONº position. (Do not start engine.)
5. Depress and hold overdrive control switch in ªOFFº position (the O/D OFF indicator lamp will be ªONº) until directed to
release the switch. (If O/D OFF indicator lamp does not come on, go to step 5 on AT-257.)
6. Turn ignition switch to ªOFFº position.
SAT968I
7. Turn ignition switch to ªONº position (Do not start engine.).
8. Release the overdrive control switch (the O/D OFF indicator lamp will be ªOFFº).
9. Wait 2 seconds.
10. Move selector lever to ª2º position.
11. Depress and release the overdrive control switch (the O/D OFF indicator lamp will be ªONº).
12. Depress and hold the overdrive control switch (the O/D OFF indicator lamp will be ªOFFº) until directed to release the
switch.
SAT969I
©GO TO 3.
ON BOARD DIAGNOSTIC SYSTEM DESCRIPTION
Diagnostic Procedure Without CONSULT-II (Cont'd)
AT-48
Page 54 of 2395

3 JUDGEMENT PROCEDURE STEP 2
1. Move selector lever to ª1º position.
2. Release the overdrive control switch.
3. Depress and release the overdrive control switch (the O/D OFF indicator lamp will be ªONº).
4. Depress and release the overdrive control switch (the O/D OFF indicator lamp will be ªOFFº).
5. Depress and hold the overdrive control switch (the O/D OFF indicator lamp will be ªONº) until directed to release the
switch.
SAT970I
6. Depress accelerator pedal fully and release it.
7. Release the overdrive control switch (the O/D OFF indicator lamp will begin to flash ªONº and ªOFFº).
SAT981F
©GO TO 4.
4 CHECK SELF-DIAGNOSIS CODE
Check O/D OFF indicator lamp.
Refer to JUDGEMENT OF SELF-DIAGNOSIS CODE, AT-50.
SAT133K
©DIAGNOSIS END
GI
MA
EM
LC
EC
FE
TF
PD
AX
SU
BR
ST
RS
BT
HA
SC
EL
IDX
ON BOARD DIAGNOSTIC SYSTEM DESCRIPTION
Diagnostic Procedure Without CONSULT-II (Cont'd)
AT-49
Page 55 of 2395

JUDGEMENT OF SELF-DIAGNOSIS CODENBAT0206S04
O/D OFF indicator lamp:
All judgement flickers are same.
SAT666I
All circuits that can be confirmed by self-diagnosis are OK.1st judgement flicker is longer than others.
SAT667I
Revolution sensor circuit is short-circuited or disconnected.
ÞGo to DTC P0720 VEHICLE SPEED SENSOR´A/T (REVO-
LUTION SENSOR), AT-111.
2nd judgement flicker is longer than others.
SAT668I
Vehicle speed sensor circuit is short-circuited or disconnected.
ÞGo to DTC VEHICLE SPEED SENSOR´MTR, AT-197.3rd judgement flicker is longer than others.
SAT669I
Throttle position sensor circuit is short-circuited or disconnected.
ÞGo to DTC P1705 THROTTLE POSITION SENSOR,
AT-176.
4th judgement flicker is longer than others.
SAT670I
Shift solenoid valve A circuit is short-circuited or disconnected.
ÞGo to DTC P0750 SHIFT SOLENOID VALVE A, AT-168.5th judgement flicker is longer than others.
SAT671I
Shift solenoid valve B circuit is short-circuited or disconnected.
ÞGo to DTC P0755 SHIFT SOLENOID VALVE B, AT-172.
ON BOARD DIAGNOSTIC SYSTEM DESCRIPTION
Diagnostic Procedure Without CONSULT-II (Cont'd)
AT-50
Page 56 of 2395

O/D OFF indicator lamp:
6th judgement flicker is longer than others.
SAT672I
Overrun clutch solenoid valve circuit is short-circuited or discon-
nected.
ÞGo to DTC P1760 OVERRUN CLUTCH SOLENOID VALVE,
AT-185.7th judgement flicker is longer than others.
SAT673I
Torque converter clutch solenoid valve circuit is short-circuited
or disconnected.
ÞGo to DTC P0740 TORQUE CONVERTER CLUTCH SOLE-
NOID VALVE, AT-148.
8th judgement flicker is longer than others.
SAT674I
A/T fluid temperature sensor is disconnected or TCM power
source circuit is damaged.
ÞGo to DTC BATT/FLUID TEMP SEN (A/T FLUID TEM-
PERATURE SENSOR AND TCM POWER SOURCE), AT-190.9th judgement flicker is longer than others.
SAT675I
Engine speed signal circuit is short-circuited or disconnected.
ÞGo to DTC P0725 ENGINE SPEED SIGNAL, AT-116.
10th judgement flicker is longer than others.
SAT676I
Turbine revolution sensor circuit is short-circuited or discon-
nected.
ÞGo to DTC Turbine Revolution Sensor, AT-202.11th judgement flicker is longer than others.
SAT677I
Line pressure solenoid valve circuit is short-circuited or discon-
nected.
ÞGo to DTC P0745 LINE PRESSURE SOLENOID VALVE,
AT-162.
GI
MA
EM
LC
EC
FE
TF
PD
AX
SU
BR
ST
RS
BT
HA
SC
EL
IDX
ON BOARD DIAGNOSTIC SYSTEM DESCRIPTION
Diagnostic Procedure Without CONSULT-II (Cont'd)
AT-51
Page 57 of 2395

O/D OFF indicator lamp:
12th judgement flicker is longer than others.
SAT678I
The ECM-A/T communication line is open or shorted.
ÞGo to DTC A/T Communication Line, AT-207.Flickers as shown below.
SAT679I
Battery power is low.
Battery has been disconnected for a long time.
Battery is connected conversely.
(When reconnecting TCM connectors. Ð This is not a problem.)
Lamp comes on.
SAT367J
PNP switch, overdrive control switch or throttle position switch
circuit is disconnected or TCM is damaged.
ÞGo to 21. TCM Self-diagnosis Does Not Activate (PNP,
OVERDRIVE CONTROL AND THROTTLE POSITION
SWITCHES), AT-257.
t
1= 2.5 seconds t2= 2.0 seconds t3= 1.0 second t4= 1.0 second
ON BOARD DIAGNOSTIC SYSTEM DESCRIPTION
Diagnostic Procedure Without CONSULT-II (Cont'd)
AT-52
Page 58 of 2395

SAT631IB
IntroductionNBAT0019
SAT632I
SEF234G
The TCM receives a signal from the vehicle speed sensor, throttle
position sensor or PNP switch and provides shift control or lock-up
control via A/T solenoid valves.
The TCM also communicates with the ECM by means of a signal
sent from sensing elements used with the OBD-related parts of the
A/T system for malfunction-diagnostic purposes. The TCM is
capable of diagnosing malfunctioning parts while the ECM can
store malfunctions in its memory.
Input and output signals must always be correct and stable in the
operation of the A/T system. The A/T system must be in good
operating condition and be free of valve seizure, solenoid valve
malfunction, etc.
It is much more difficult to diagnose a problem that occurs intermit-
tently rather than continuously. Most intermittent problems are
caused by poor electric connections or improper wiring. In this
case, careful checking of suspected circuits may help prevent the
replacement of good parts.
A visual check only may not find the cause of the problems. A road
test with CONSULT-II (or GST) or a circuit tester connected should
be performed. Follow the ªWork Flowº. Refer to AT-57.
Before undertaking actual checks, take a few minutes to talk with
a customer who approaches with a driveability complaint. The cus-
tomer can supply good information about such problems, espe-
cially intermittent ones. Find out what symptoms are present and
under what conditions they occur. A ªDiagnostic Worksheetº like the
example (AT-55) should be used.
Start your diagnosis by looking for ªconventionalº problems first.
This will help troubleshoot driveability problems on an electronically
controlled engine vehicle.
Also check related Service bulletins.GI
MA
EM
LC
EC
FE
TF
PD
AX
SU
BR
ST
RS
BT
HA
SC
EL
IDX
TROUBLE DIAGNOSIS Ð INTRODUCTION
Introduction
AT-53
Page 59 of 2395

DIAGNOSTIC WORKSHEET=NBAT0019S01Information From CustomerNBAT0019S0101KEY POINTS
WHAT..... Vehicle & A/T model
WHEN..... Date, Frequencies
WHERE..... Road conditions
HOW..... Operating conditions, Symptoms
Customer name MR/MS Model & Year VIN
Trans. model Engine Mileage
Incident Date Manuf. Date In Service Date
FrequencylContinuouslIntermittent ( times a day)
SymptomslVehicle does not move. (lAny positionlParticular position)
lNo up-shift (l1st,2ndl2nd,3rdl3rd,O/D)
lNo down-shift (lO/D,3rdl3rd,2ndl2nd,1st)
lLockup malfunction
lShift point too high or too low.
lShift shock or slip (lN,DlLockuplAny drive position)
lNoise or vibration
lNo kickdown
lNo pattern select
lOthers
()
O/D OFF indicator lamp Blinks for about 8 seconds.
lContinuously litlNot lit
Malfunction indicator lamp (MIL)lContinuously litlNot lit
TROUBLE DIAGNOSIS Ð INTRODUCTION
Introduction (Cont'd)
AT-54
Page 60 of 2395

Diagnostic Worksheet=NBAT0019S0102
1.lRead the Fail-safe Remarks and listen to customer complaints. AT-8
2.lCHECK A/T FLUIDAT-59
lLeakage (Follow specified procedure)
lFluid condition
lFluid level
3. Perform STALL TEST and LINE PRESSURE TEST. AT-59, AT-62
lStall test Ð Mark possible damaged components/others.
lTorque converter one-way clutch
lReverse clutch
lForward clutch
lOverrun clutch
lForward one-way clutchlLow & reverse brake
lLow one-way clutch
lEngine
lLine pressure is low
lClutches and brakes except high clutch and
brake band are OK
lPressure test Ð Suspected parts:
4.lPerform all ROAD TEST and mark required procedures. AT-63
4-1. Check before engine is started.AT-64
lSELF-DIAGNOSTIC PROCEDURE - Mark detected items.
lDTC P0705 PNP switch, AT-99.
lDTC P0710 A/T fluid temperature sensor, AT-105.
lDTC P0720 Vehicle speed sensor´A/T (Revolution sensor), AT-111.
lDTC P0725 Engine speed signal, AT-116.
lDTC P0740 Torque converter clutch solenoid valve, AT-148.
lDTC P0745 Line pressure solenoid valve, AT-162.
lDTC P0750 Shift solenoid valve A, AT-168.
lDTC P0755 Shift solenoid valve B, AT-172.
lDTC P1705 Throttle position sensor, AT-176.
lDTC P1760 Overrun clutch solenoid valve, AT-185.
lDTC BATT/FLUID TEMP SEN (A/T fluid temperature sensor and TCM power source), AT-190.
lDTC Vehicle speed sensor´MTR, AT-197.
lDTC Turbine revolution sensor, AT-202.
lDTC A/T communication line, AT-207.
lDTC Control unit (RAM), control unit (ROM), AT-211.
lDTC Control unit (EEP ROM), AT-213.
lPNP, overdrive control and throttle position switches, AT-257.
lBattery
lOthers
4-2. Check at idleAT-66
l1. O/D OFF Indicator Lamp Does Not Come On, AT-218.
l2. Engine Cannot Be Started In ªPº And ªNº Position, AT-221.
l3. In ªPº Position, Vehicle Moves Forward Or Backward When Pushed, AT-222.
l4. In ªNº Position, Vehicle Moves, AT-223.
l5. Large Shock. ªNº,ªRº Position, AT-225.
l6. Vehicle Does Not Creep Backward In ªRº Position, AT-227.
l7. Vehicle Does Not Creep Forward In ªDº, ª2º Or ª1º Position, AT-230.GI
MA
EM
LC
EC
FE
TF
PD
AX
SU
BR
ST
RS
BT
HA
SC
EL
IDX
TROUBLE DIAGNOSIS Ð INTRODUCTION
Introduction (Cont'd)
AT-55