INFINITI QX4 2005 Factory Service Manual
QX4 2005
INFINITI
INFINITI
https://www.carmanualsonline.info/img/42/57035/w960_57035-0.png
INFINITI QX4 2005 Factory Service Manual
Trending: fuse box diagram, key fob, tire size, oil capacities, odometer, oil dipstick, automatic transmission fluid
Page 3291 of 3419
TF-148
TRANSFER ASSEMBLY
Revision: October 20052005 QX56
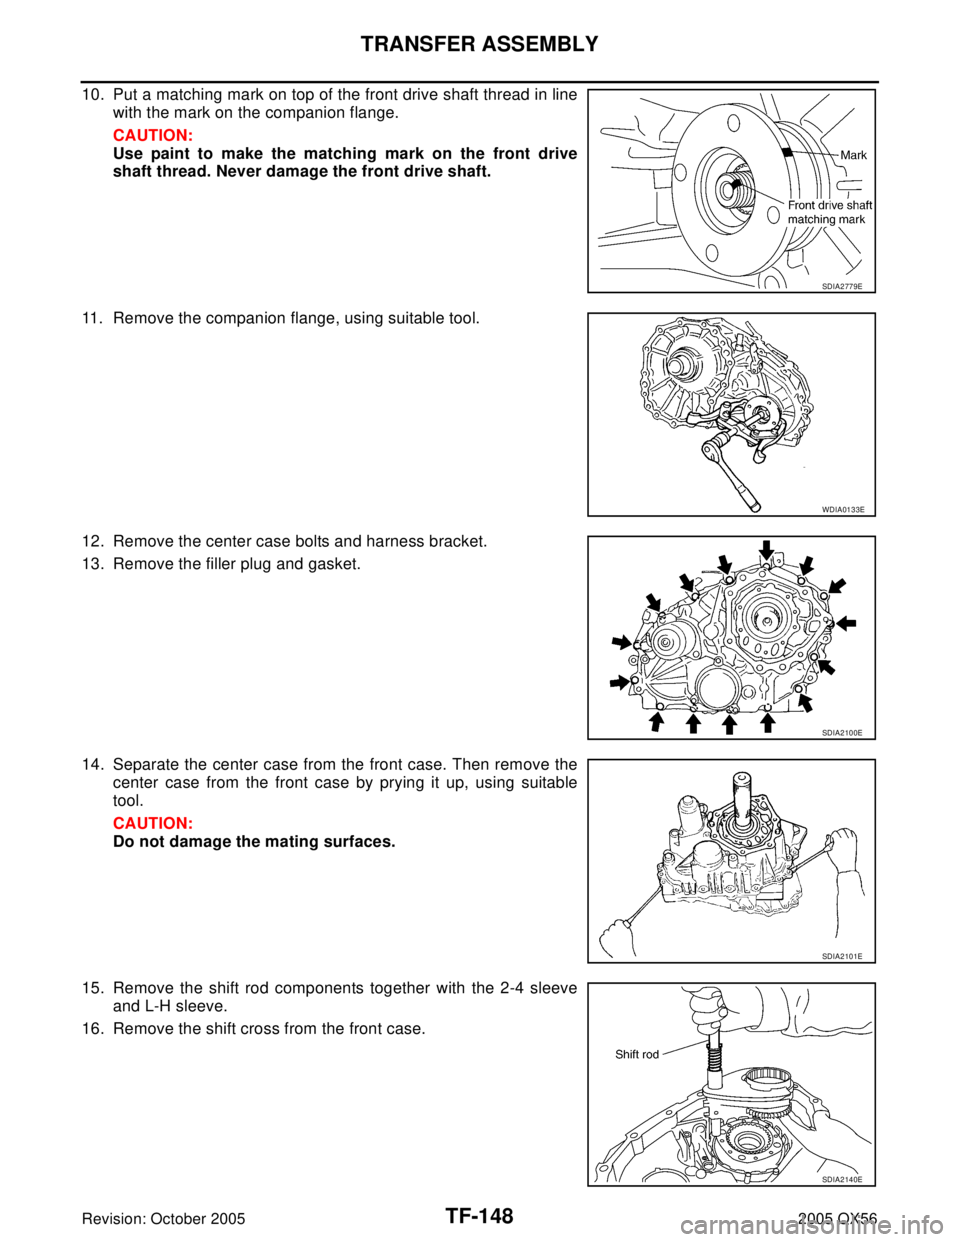
10. Put a matching mark on top of the front drive shaft thread in line
with the mark on the companion flange.
CAUTION:
Use paint to make the matching mark on the front drive
shaft thread. Never damage the front drive shaft.
11. Remove the companion flange, using suitable tool.
12. Remove the center case bolts and harness bracket.
13. Remove the filler plug and gasket.
14. Separate the center case from the front case. Then remove the
center case from the front case by prying it up, using suitable
tool.
CAUTION:
Do not damage the mating surfaces.
15. Remove the shift rod components together with the 2-4 sleeve
and L-H sleeve.
16. Remove the shift cross from the front case.
SDIA2779E
WDIA0133E
SDIA2100E
SDIA2101E
SDIA2140E
Page 3292 of 3419
TRANSFER ASSEMBLY
TF-149
C
E
F
G
H
I
J
K
L
MA
B
TF
Revision: October 20052005 QX56
17. Remove the 2-4 sleeve and L-H sleeve from the 2-4 fork and L-
H fork respectively.
18. Drive out the retaining pin from the shift rod, using suitable tool.
19. Remove the L-H fork, 2-4 fork, shift fork spring and fork guide
from the shift rod.
20. Remove the oil seal from the front case, using suitable tool.
CAUTION:
Do not damage front case or sun gear.
21. Remove the snap ring from the sun gear.
CAUTION:
Do not damage front case or sun gear.
SMT992C
WDIA0134E
SDIA2142E
SDIA2143E
SDIA2144E
Page 3293 of 3419
TF-150
TRANSFER ASSEMBLY
Revision: October 20052005 QX56
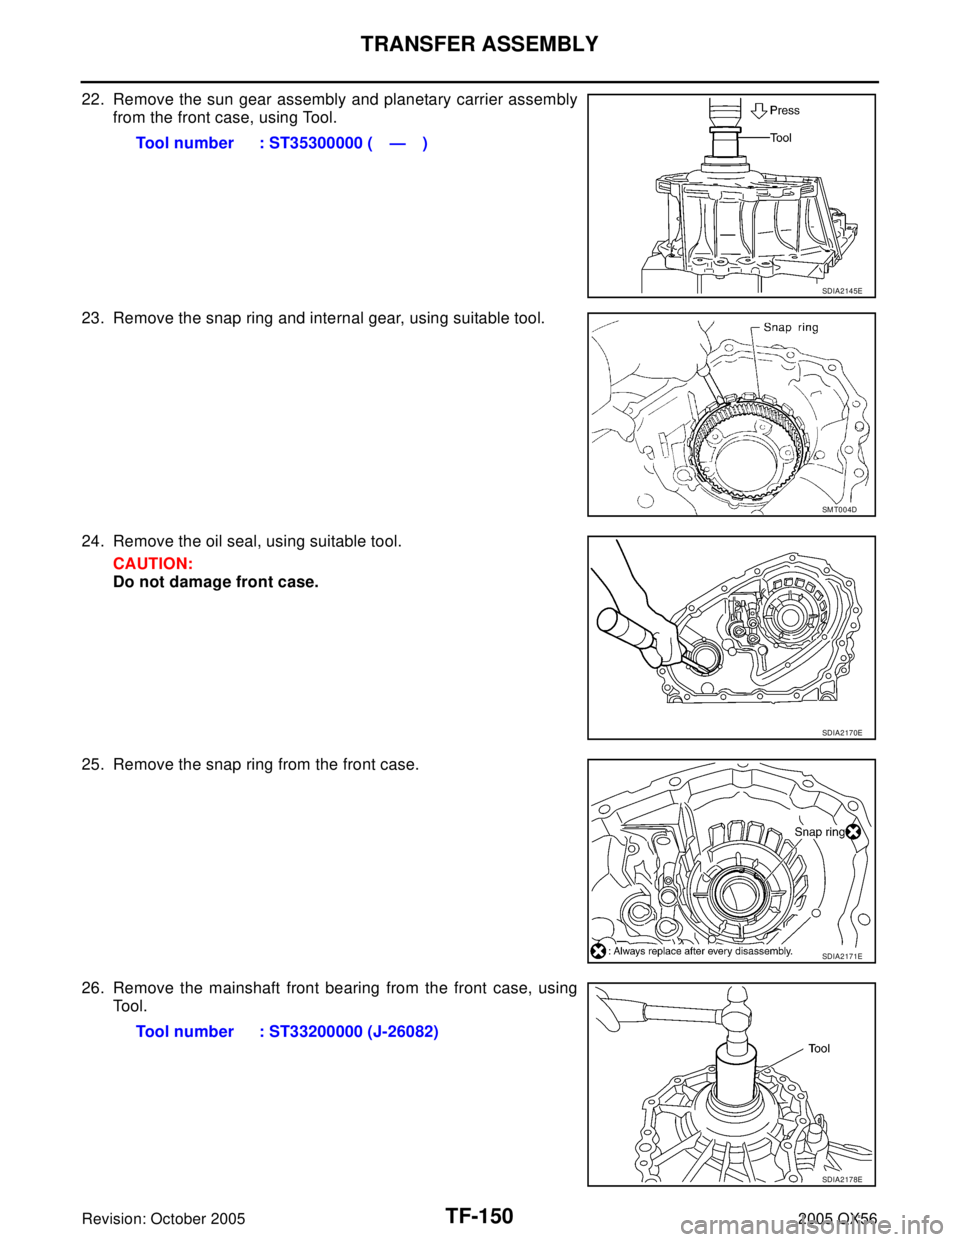
22. Remove the sun gear assembly and planetary carrier assembly
from the front case, using Tool.
23. Remove the snap ring and internal gear, using suitable tool.
24. Remove the oil seal, using suitable tool.
CAUTION:
Do not damage front case.
25. Remove the snap ring from the front case.
26. Remove the mainshaft front bearing from the front case, using
Tool.Tool number : ST35300000 ( — )
SDIA2145E
SMT004D
SDIA2170E
SDIA2171E
Tool number : ST33200000 (J-26082)
SDIA2178E
Page 3294 of 3419
TRANSFER ASSEMBLY
TF-151
C
E
F
G
H
I
J
K
L
MA
B
TF
Revision: October 20052005 QX56
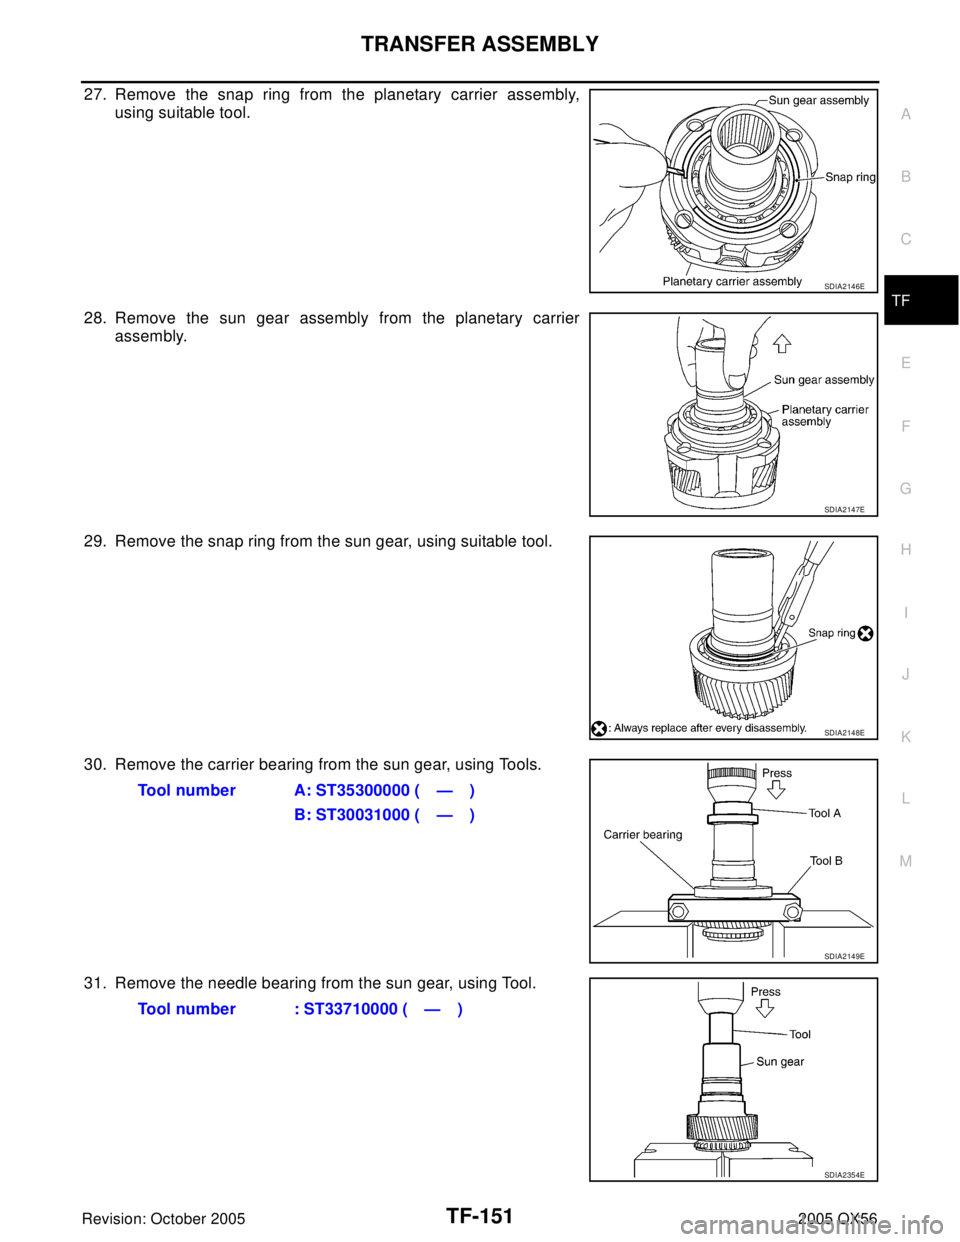
27. Remove the snap ring from the planetary carrier assembly,
using suitable tool.
28. Remove the sun gear assembly from the planetary carrier
assembly.
29. Remove the snap ring from the sun gear, using suitable tool.
30. Remove the carrier bearing from the sun gear, using Tools.
31. Remove the needle bearing from the sun gear, using Tool.
SDIA2146E
SDIA2147E
SDIA2148E
Tool number A: ST35300000 ( — )
B: ST30031000 ( — )
SDIA2149E
Tool number : ST33710000 ( — )
SDIA2354E
Page 3295 of 3419
TF-152
TRANSFER ASSEMBLY
Revision: October 20052005 QX56
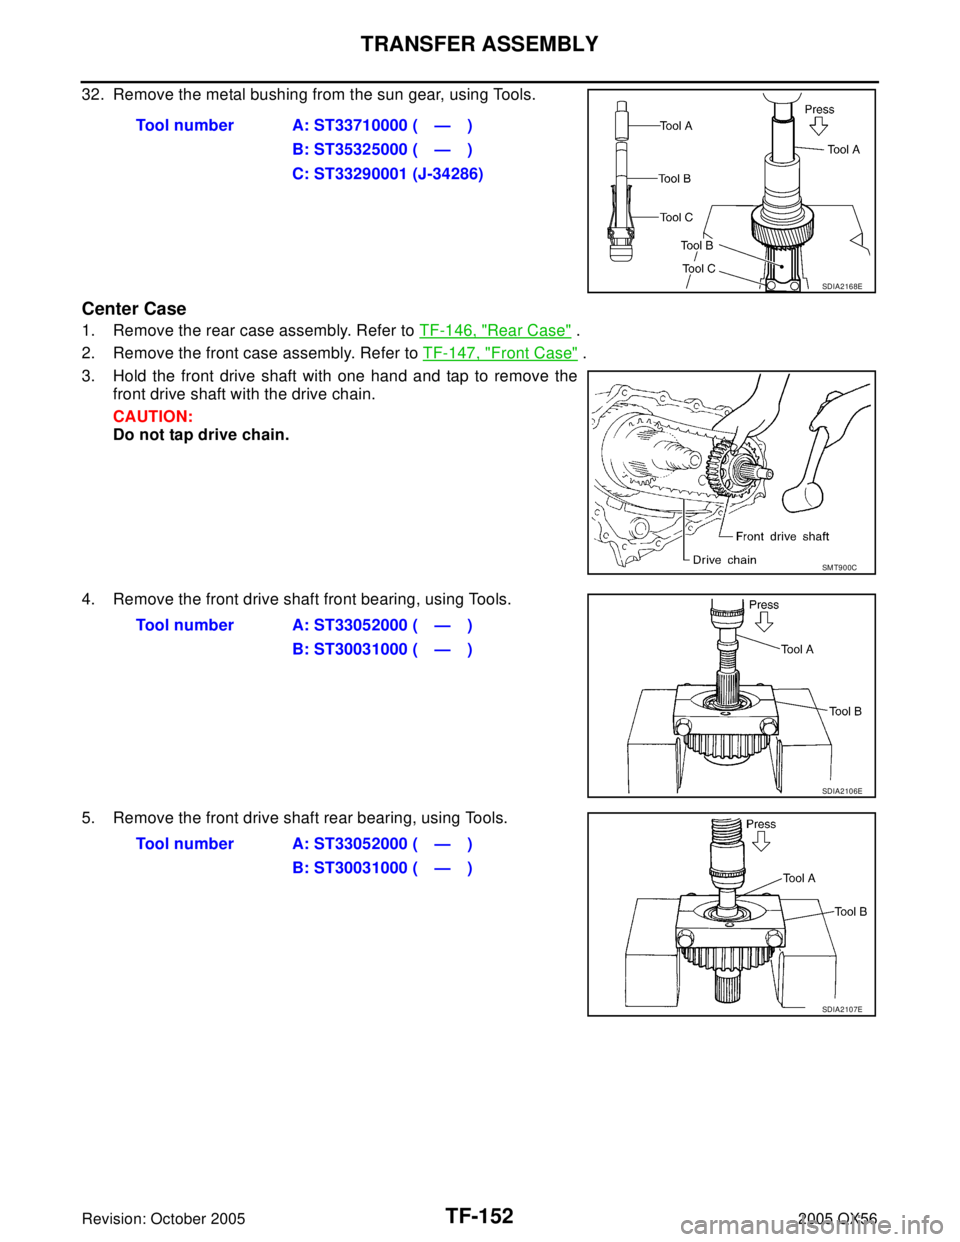
32. Remove the metal bushing from the sun gear, using Tools.
Center Case
1. Remove the rear case assembly. Refer to TF-146, "Rear Case" .
2. Remove the front case assembly. Refer to TF-147, "
Front Case" .
3. Hold the front drive shaft with one hand and tap to remove the
front drive shaft with the drive chain.
CAUTION:
Do not tap drive chain.
4. Remove the front drive shaft front bearing, using Tools.
5. Remove the front drive shaft rear bearing, using Tools.Tool number A: ST33710000 ( — )
B: ST35325000 ( — )
C: ST33290001 (J-34286)
SDIA2168E
SMT900C
Tool number A: ST33052000 ( — )
B: ST30031000 ( — )
SDIA2106E
Tool number A: ST33052000 ( — )
B: ST30031000 ( — )
SDIA2107E
Page 3296 of 3419
TRANSFER ASSEMBLY
TF-153
C
E
F
G
H
I
J
K
L
MA
B
TF
Revision: October 20052005 QX56
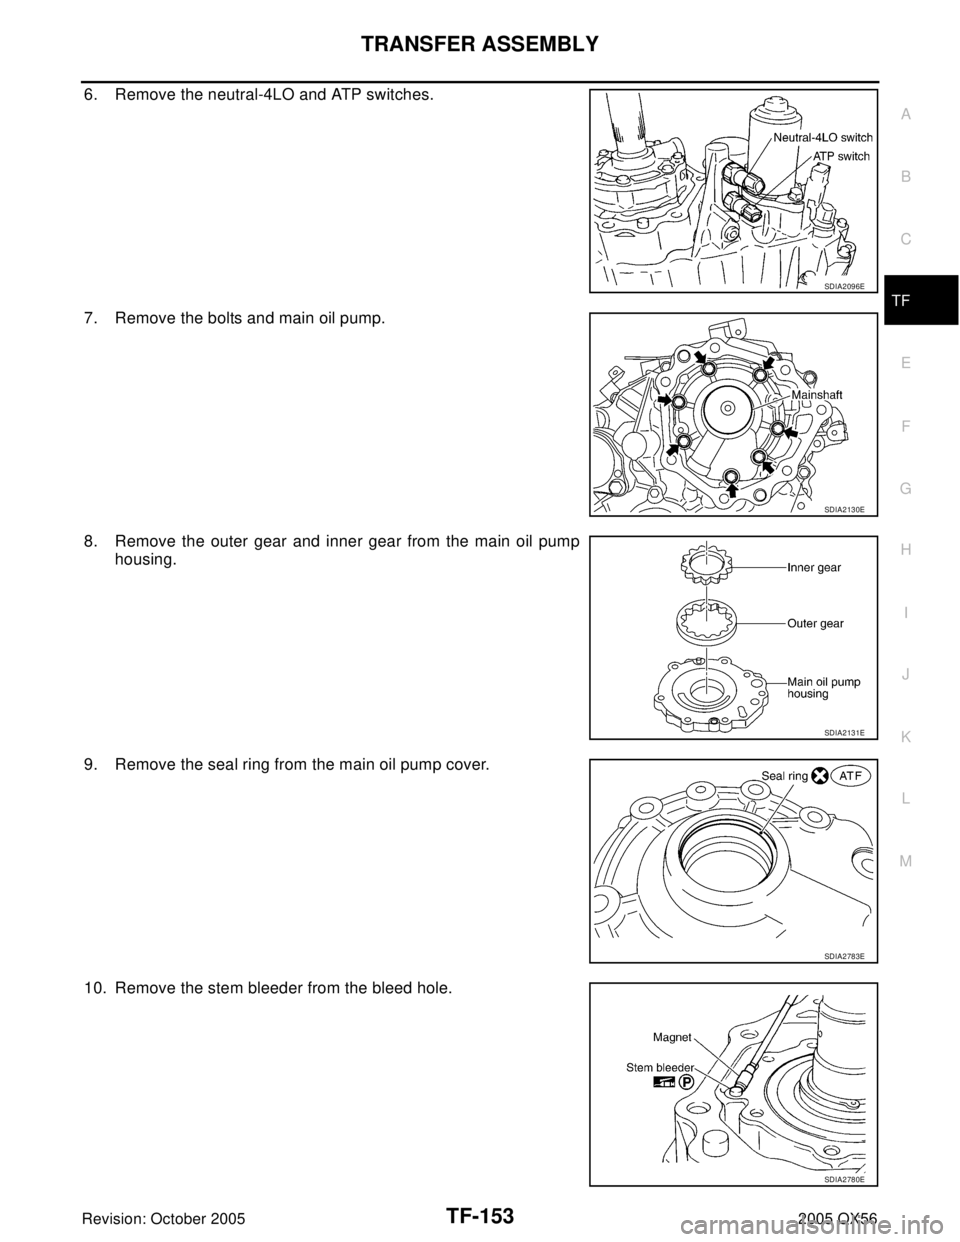
6. Remove the neutral-4LO and ATP switches.
7. Remove the bolts and main oil pump.
8. Remove the outer gear and inner gear from the main oil pump
housing.
9. Remove the seal ring from the main oil pump cover.
10. Remove the stem bleeder from the bleed hole.
SDIA2096E
SDIA2130E
SDIA2131E
SDIA2783E
SDIA2780E
Page 3297 of 3419
TF-154
TRANSFER ASSEMBLY
Revision: October 20052005 QX56
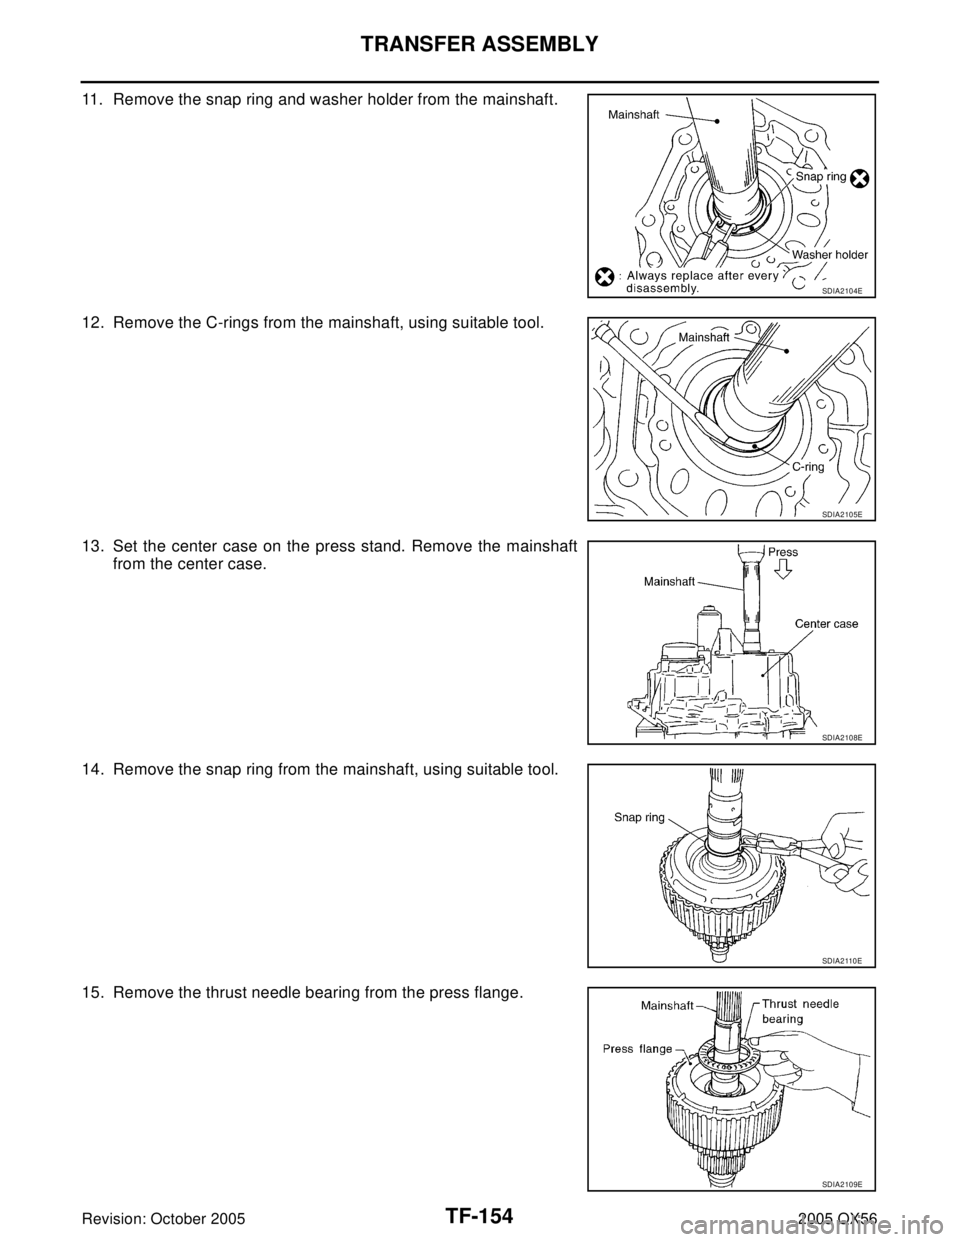
11. Remove the snap ring and washer holder from the mainshaft.
12. Remove the C-rings from the mainshaft, using suitable tool.
13. Set the center case on the press stand. Remove the mainshaft
from the center case.
14. Remove the snap ring from the mainshaft, using suitable tool.
15. Remove the thrust needle bearing from the press flange.
SDIA2104E
SDIA2105E
SDIA2108E
SDIA2 110 E
SDIA2109E
Page 3298 of 3419
TRANSFER ASSEMBLY
TF-155
C
E
F
G
H
I
J
K
L
MA
B
TF
Revision: October 20052005 QX56
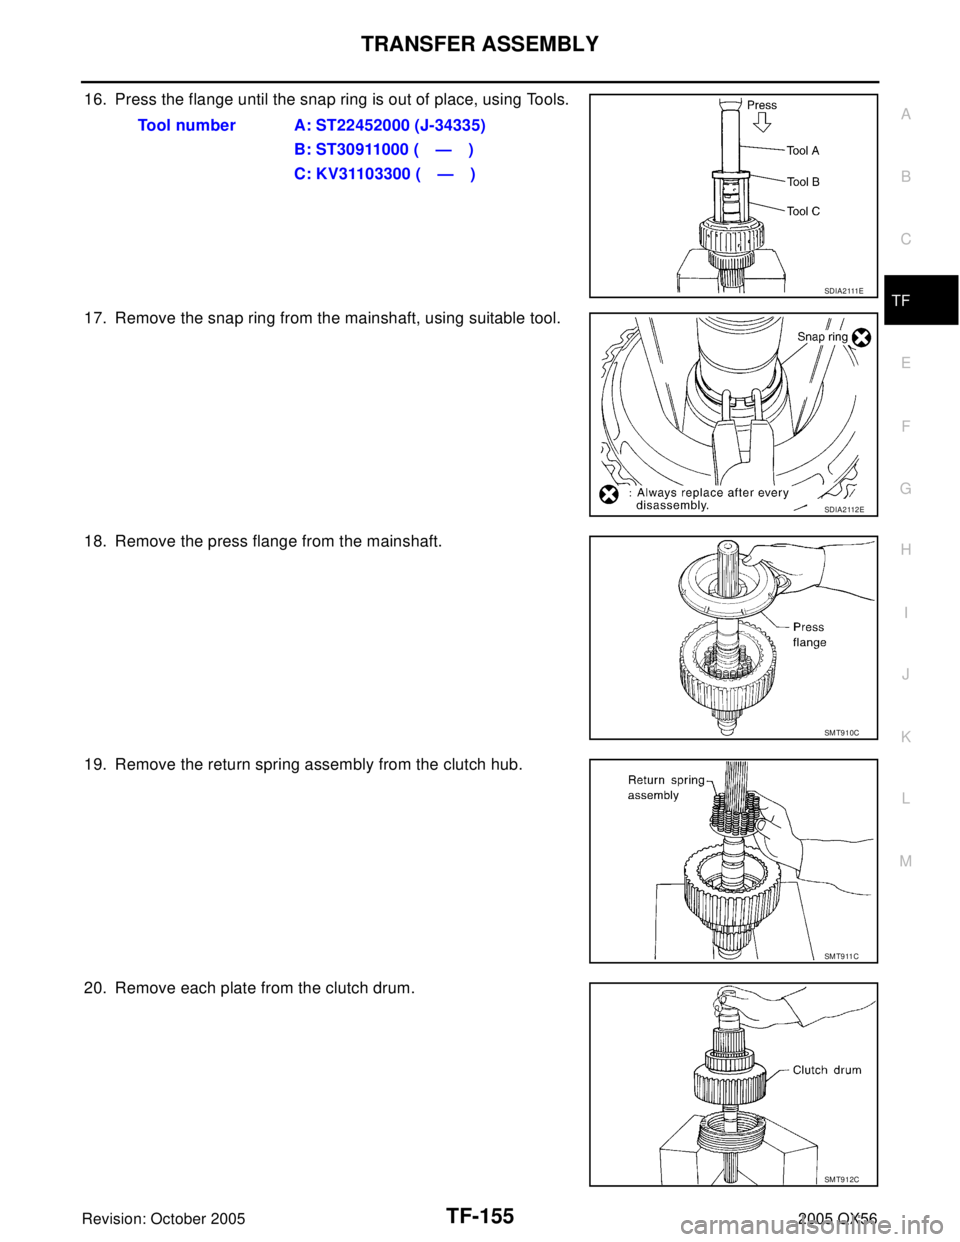
16. Press the flange until the snap ring is out of place, using Tools.
17. Remove the snap ring from the mainshaft, using suitable tool.
18. Remove the press flange from the mainshaft.
19. Remove the return spring assembly from the clutch hub.
20. Remove each plate from the clutch drum.Tool number A: ST22452000 (J-34335)
B: ST30911000 ( — )
C: KV31103300 ( — )
SD I A 2 111E
SDIA2 112 E
SMT910C
SM T9 11 C
SMT912C
Page 3299 of 3419
TF-156
TRANSFER ASSEMBLY
Revision: October 20052005 QX56
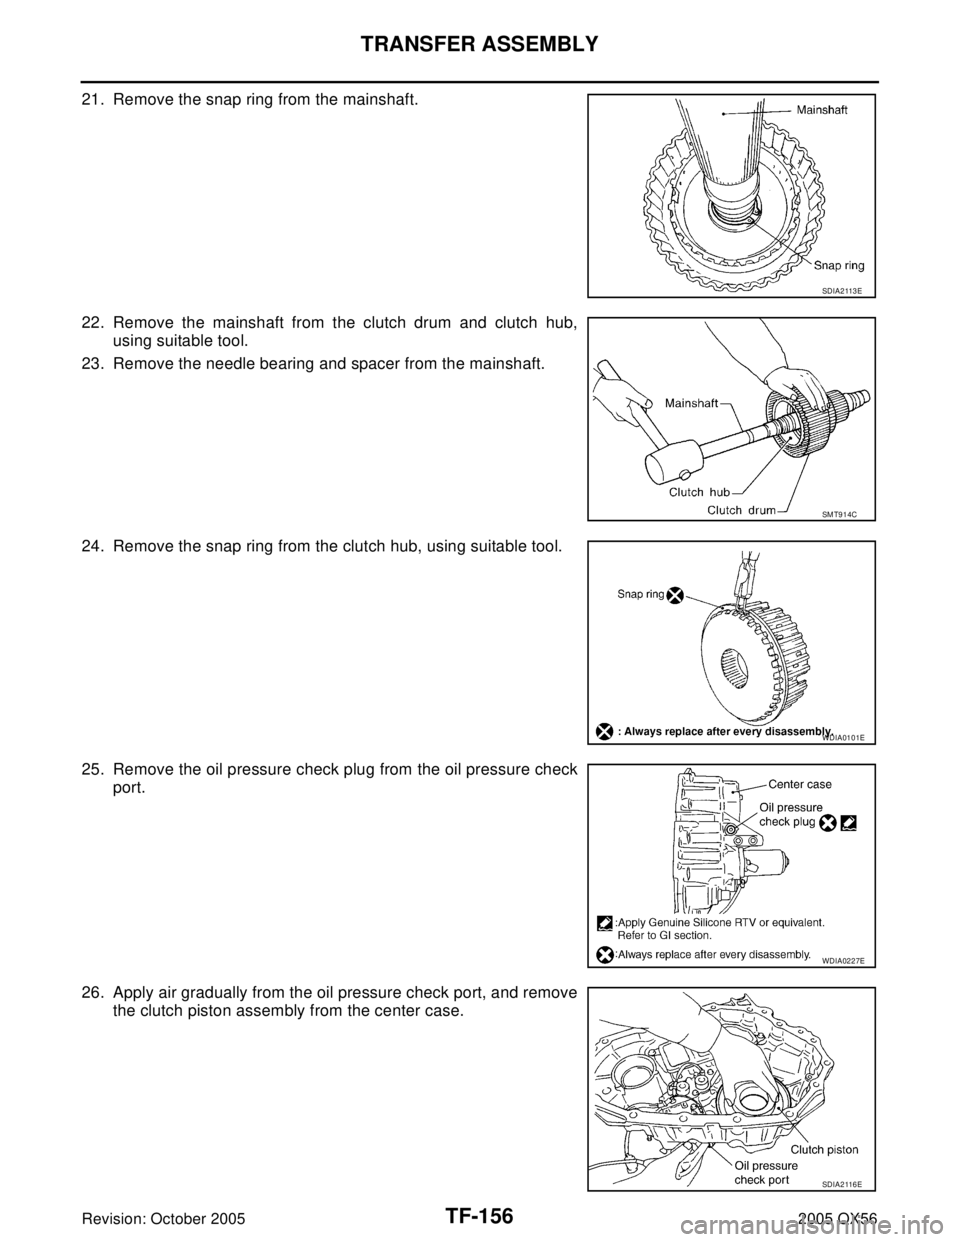
21. Remove the snap ring from the mainshaft.
22. Remove the mainshaft from the clutch drum and clutch hub,
using suitable tool.
23. Remove the needle bearing and spacer from the mainshaft.
24. Remove the snap ring from the clutch hub, using suitable tool.
25. Remove the oil pressure check plug from the oil pressure check
port.
26. Apply air gradually from the oil pressure check port, and remove
the clutch piston assembly from the center case.
SDIA2 113 E
SMT914C
WDIA0101E
WDIA0227E
SDIA2 116 E
Page 3300 of 3419
TRANSFER ASSEMBLY
TF-157
C
E
F
G
H
I
J
K
L
MA
B
TF
Revision: October 20052005 QX56
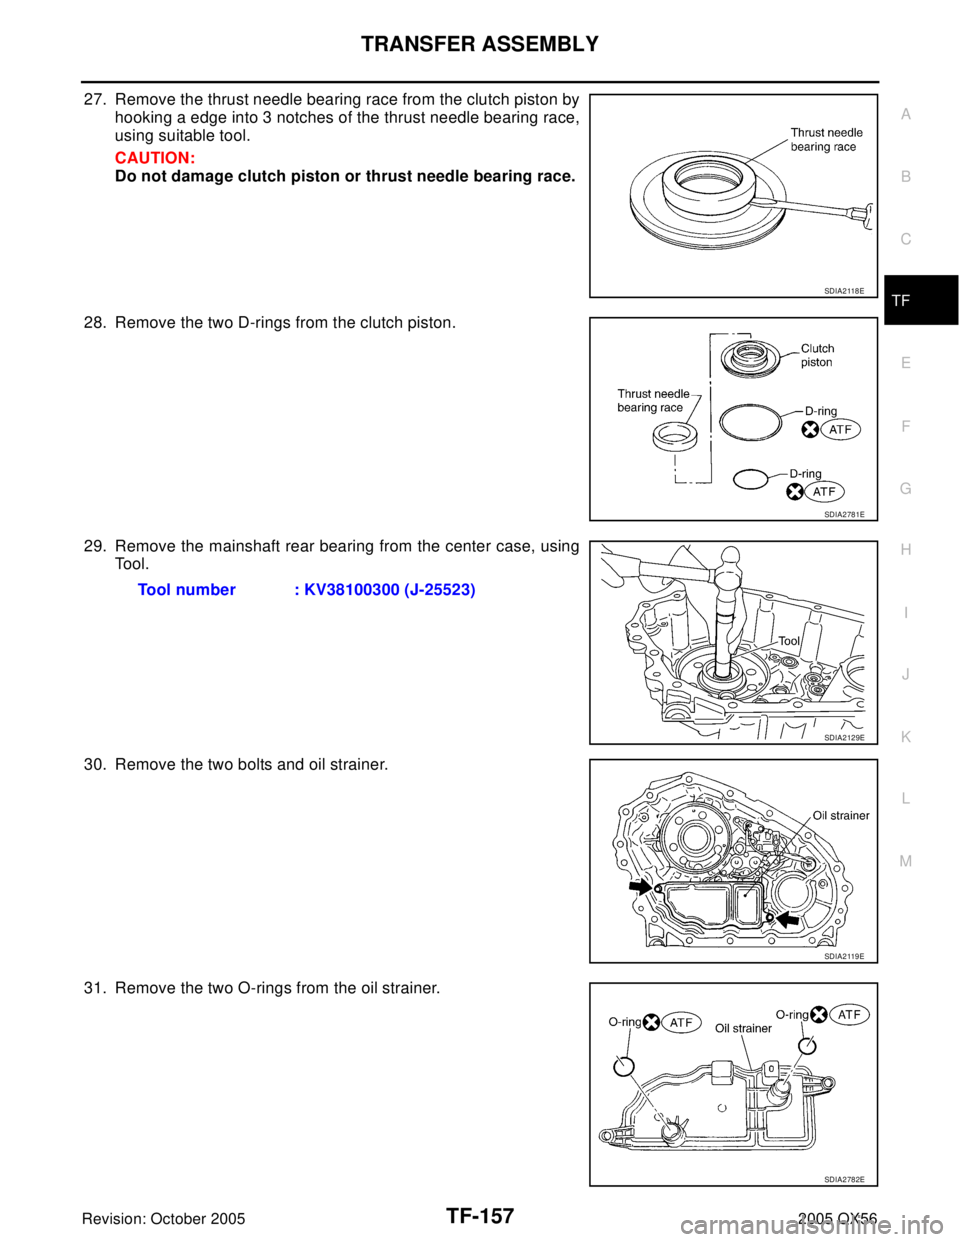
27. Remove the thrust needle bearing race from the clutch piston by
hooking a edge into 3 notches of the thrust needle bearing race,
using suitable tool.
CAUTION:
Do not damage clutch piston or thrust needle bearing race.
28. Remove the two D-rings from the clutch piston.
29. Remove the mainshaft rear bearing from the center case, using
Tool.
30. Remove the two bolts and oil strainer.
31. Remove the two O-rings from the oil strainer.
SDIA2 118 E
SDIA2781E
Tool number : KV38100300 (J-25523)
SDIA2129E
SDIA2 119 E
SDIA2782E
Trending: light, fuel filter location, ABS, air suspension, seats, high beam, headlights
