torque INFINITI QX56 2007 Factory Service Manual
[x] Cancel search | Manufacturer: INFINITI, Model Year: 2007, Model line: QX56, Model: INFINITI QX56 2007Pages: 3061, PDF Size: 64.56 MB
Page 72 of 3061

AT-2
DTC P0700 TCM ................................................98
Description ..............................................................98
On Board Diagnosis Logic ......................................98
Possible Cause .......................................................98
DTC Confirmation Procedure .................................98
Diagnosis Procedure ..............................................98
DTC P0705 PARK/NEUTRAL POSITION
SWITCH .............................................................
99
Description ..............................................................99
CONSULT-II Reference Value in Data Monitor
Mode .......................................................................
99
On Board Diagnosis Logic ......................................99
Possible Cause .......................................................99
DTC Confirmation Procedure .................................99
Wiring Diagram - AT - PNP/SW .............................100
Diagnosis Procedure .............................................100
DTC P0717 TURBINE REVOLUTION SEN-
SOR ..................................................................
103
Description .............................................................103
CONSULT-II Reference Value in Data Monitor
Mode ......................................................................
103
On Board Diagnosis Logic .....................................103
Possible Cause ......................................................103
DTC Confirmation Procedure ................................103
Diagnosis Procedure .............................................103
DTC P0720 VEHICLE SPEED SENSOR A/T
(REVOLUTION SENSOR) ...............................
105
Description .............................................................105
CONSULT-II Reference Value in Data Monitor
Mode ......................................................................
105
On Board Diagnosis Logic .....................................105
Possible Cause ......................................................105
DTC Confirmation Procedure ................................105
Wiring Diagram - AT - VSSA/T ..............................106
Diagnosis Procedure .............................................107
DTC P0725 ENGINE SPEED SIGNAL ............109
Description .............................................................109
CONSULT-II Reference Value in Data Monitor
Mode ......................................................................
109
On Board Diagnosis Logic .....................................109
Possible Cause ......................................................109
DTC Confirmation Procedure ................................109
Diagnosis Procedure .............................................109
DTC P0740 TORQUE CONVERTER CLUTCH
SOLENOID VALVE ..........................................
111
Description .............................................................111
CONSULT-II Reference Value in Data Monitor
Mode ......................................................................
111
On Board Diagnosis Logic .....................................111
Possible Cause ......................................................111
DTC Confirmation Procedure ................................111
Diagnosis Procedure .............................................111
DTC P0744 A/T TCC S/V FUNCTION (LOCK-
UP) ...................................................................
113
Description ............................................................113
CONSULT-II Reference Value in Data Monitor
Mode .....................................................................
113
On Board Diagnosis Logic ....................................113
Possible Cause .....................................................113
DTC Confirmation Procedure ................................113
Diagnosis Procedure .............................................114
DTC P0745 LINE PRESSURE SOLENOID
VALVE ..............................................................
115
Description ............................................................115
CONSULT-II Reference Value in Data Monitor
Mode .....................................................................
115
On Board Diagnosis Logic ....................................115
Possible Cause .....................................................115
DTC Confirmation Procedure ................................115
Diagnosis Procedure .............................................115
DTC P1705 THROTTLE POSITION SENSOR ..117
Description ............................................................117
CONSULT-II Reference Value in Data Monitor
Mode .....................................................................
117
On Board Diagnosis Logic ....................................117
Possible Cause .....................................................117
DTC Confirmation Procedure ................................117
Diagnosis Procedure .............................................117
DTC P1710 A/T FLUID TEMPERATURE SEN-
SOR CIRCUIT ...................................................
119
Description ............................................................119
CONSULT-II Reference Value in Data Monitor
Mode .....................................................................
119
On Board Diagnosis Logic ....................................119
Possible Cause .....................................................119
DTC Confirmation Procedure ................................119
Wiring Diagram - AT - FTS ...................................120
Diagnosis Procedure .............................................120
Component Inspection ..........................................122
DTC P1721 VEHICLE SPEED SENSOR MTR ..124
Description ............................................................124
CONSULT-II Reference Value in Data Monitor
Mode .....................................................................
124
On Board Diagnosis Logic ....................................124
Possible Cause .....................................................124
DTC Confirmation Procedure ................................124
Diagnosis Procedure .............................................124
DTC P1730 A/T INTERLOCK ...........................126
Description ............................................................126
On Board Diagnosis Logic ....................................126
Possible Cause .....................................................126
DTC Confirmation Procedure ................................126
Judgement of A/T Interlock ...................................126
Diagnosis Procedure .............................................127
DTC P1731 A/T 1ST ENGINE BRAKING ........128
Description ............................................................128
CONSULT-II Reference Value in Data Monitor
Mode .....................................................................
128
Page 79 of 3061
PRECAUTIONS
AT-9
< SERVICE INFORMATION >
D
E
F
G
H
I
J
K
L
MA
B
AT
N
O
P
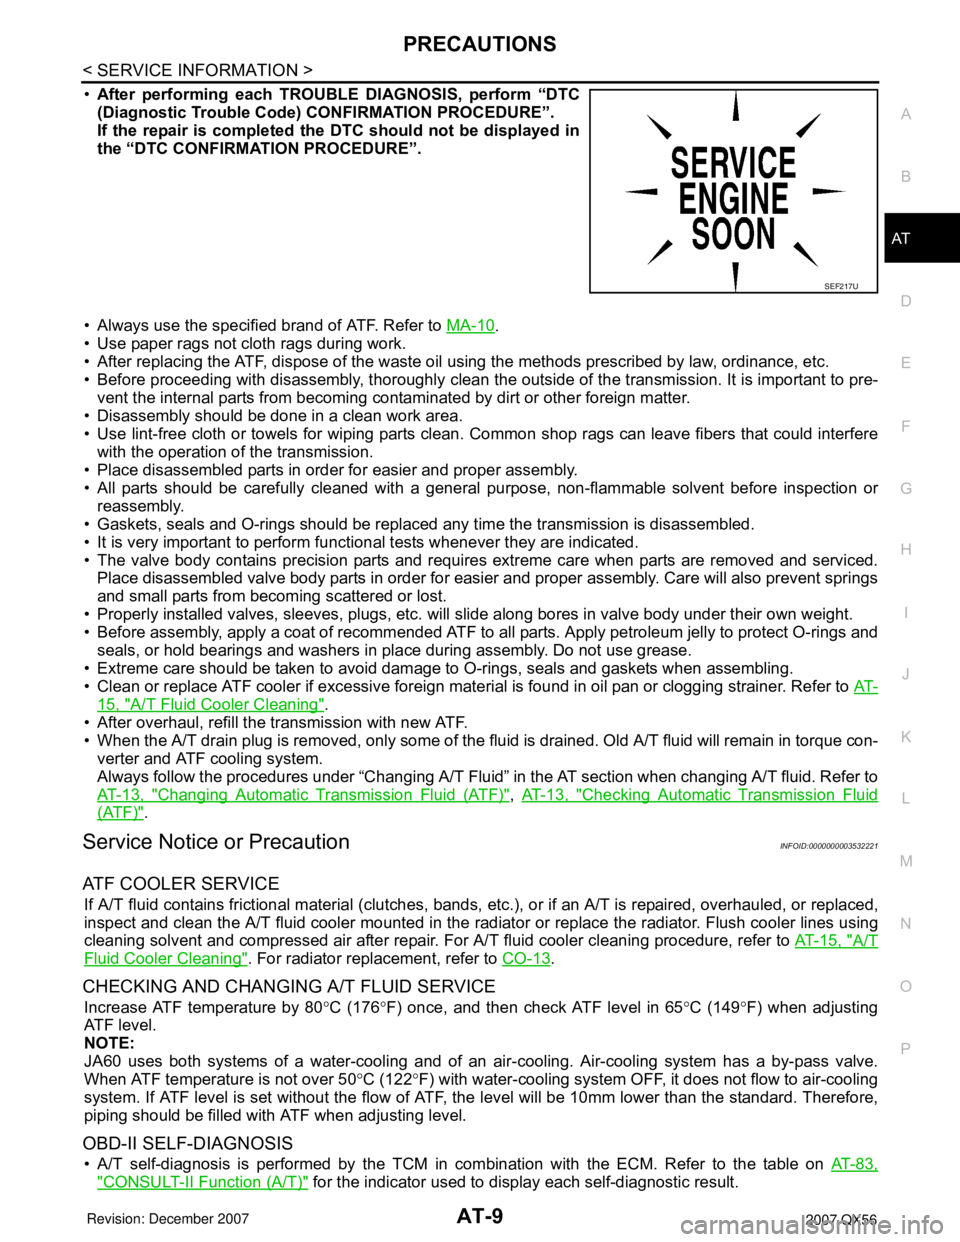
•After performing each TROUBLE DIAGNOSIS, perform “DTC
(Diagnostic Trouble Code) CONFIRMATION PROCEDURE”.
If the repair is completed the DTC should not be displayed in
the “DTC CONFIRMATION PROCEDURE”.
• Always use the specified brand of ATF. Refer to MA-10
.
• Use paper rags not cloth rags during work.
• After replacing the ATF, dispose of the waste oil using the methods prescribed by law, ordinance, etc.
• Before proceeding with disassembly, thoroughly clean the outside of the transmission. It is important to pre-
vent the internal parts from becoming contaminated by dirt or other foreign matter.
• Disassembly should be done in a clean work area.
• Use lint-free cloth or towels for wiping parts clean. Common shop rags can leave fibers that could interfere
with the operation of the transmission.
• Place disassembled parts in order for easier and proper assembly.
• All parts should be carefully cleaned with a general purpose, non-flammable solvent before inspection or
reassembly.
• Gaskets, seals and O-rings should be replaced any time the transmission is disassembled.
• It is very important to perform functional tests whenever they are indicated.
• The valve body contains precision parts and requires extreme care when parts are removed and serviced.
Place disassembled valve body parts in order for easier and proper assembly. Care will also prevent springs
and small parts from becoming scattered or lost.
• Properly installed valves, sleeves, plugs, etc. will slide along bores in valve body under their own weight.
• Before assembly, apply a coat of recommended ATF to all parts. Apply petroleum jelly to protect O-rings and
seals, or hold bearings and washers in place during assembly. Do not use grease.
• Extreme care should be taken to avoid damage to O-rings, seals and gaskets when assembling.
• Clean or replace ATF cooler if excessive foreign material is found in oil pan or clogging strainer. Refer to AT-
15, "A/T Fluid Cooler Cleaning".
• After overhaul, refill the transmission with new ATF.
• When the A/T drain plug is removed, only some of the fluid is drained. Old A/T fluid will remain in torque con-
verter and ATF cooling system.
Always follow the procedures under “Changing A/T Fluid” in the AT section when changing A/T fluid. Refer to
AT-13, "
Changing Automatic Transmission Fluid (ATF)", AT-13, "Checking Automatic Transmission Fluid
(ATF)".
Service Notice or PrecautionINFOID:0000000003532221
ATF COOLER SERVICE
If A/T fluid contains frictional material (clutches, bands, etc.), or if an A/T is repaired, overhauled, or replaced,
inspect and clean the A/T fluid cooler mounted in the radiator or replace the radiator. Flush cooler lines using
cleaning solvent and compressed air after repair. For A/T fluid cooler cleaning procedure, refer to AT-15, "
A/T
Fluid Cooler Cleaning". For radiator replacement, refer to CO-13.
CHECKING AND CHANGING A/T FLUID SERVICE
Increase ATF temperature by 80°C (176°F) once, and then check ATF level in 65°C (149°F) when adjusting
ATF level.
NOTE:
JA60 uses both systems of a water-cooling and of an air-cooling. Air-cooling system has a by-pass valve.
When ATF temperature is not over 50°C (122°F) with water-cooling system OFF, it does not flow to air-cooling
system. If ATF level is set without the flow of ATF, the level will be 10mm lower than the standard. Therefore,
piping should be filled with ATF when adjusting level.
OBD-II SELF-DIAGNOSIS
• A/T self-diagnosis is performed by the TCM in combination with the ECM. Refer to the table on AT-83,
"CONSULT-II Function (A/T)" for the indicator used to display each self-diagnostic result.
SEF217U
Page 89 of 3061
A/T CONTROL SYSTEM
AT-19
< SERVICE INFORMATION >
D
E
F
G
H
I
J
K
L
MA
B
AT
N
O
P
A/T CONTROL SYSTEM
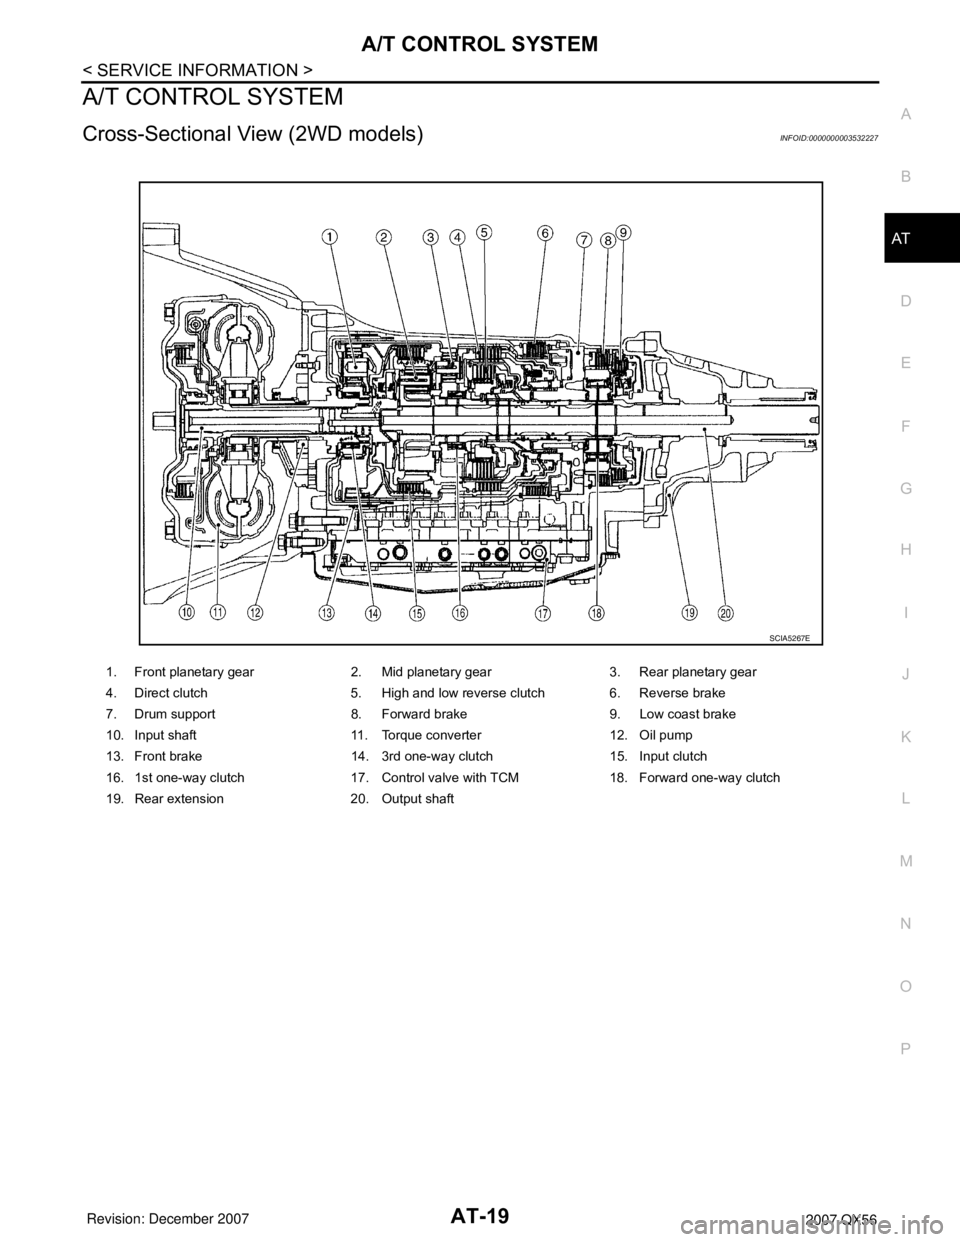
Cross-Sectional View (2WD models)INFOID:0000000003532227
1. Front planetary gear 2. Mid planetary gear 3. Rear planetary gear
4. Direct clutch 5. High and low reverse clutch 6. Reverse brake
7. Drum support 8. Forward brake 9. Low coast brake
10. Input shaft 11. Torque converter 12. Oil pump
13. Front brake 14. 3rd one-way clutch 15. Input clutch
16. 1st one-way clutch 17. Control valve with TCM 18. Forward one-way clutch
19. Rear extension 20. Output shaft
SCIA5267E
Page 90 of 3061
AT-20
< SERVICE INFORMATION >
A/T CONTROL SYSTEM
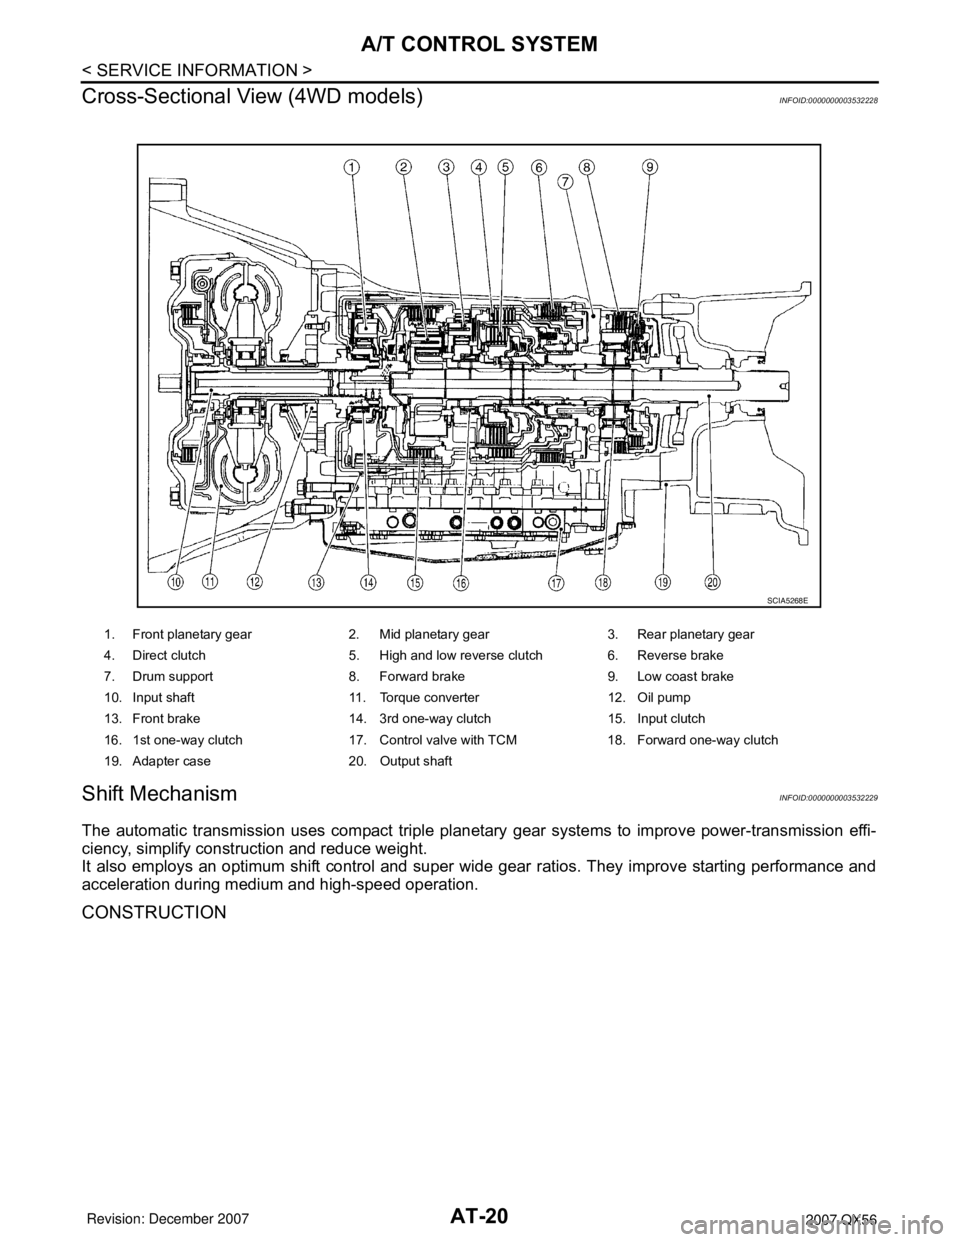
Cross-Sectional View (4WD models)
INFOID:0000000003532228
Shift MechanismINFOID:0000000003532229
The automatic transmission uses compact triple planetary gear systems to improve power-transmission effi-
ciency, simplify construction and reduce weight.
It also employs an optimum shift control and super wide gear ratios. They improve starting performance and
acceleration during medium and high-speed operation.
CONSTRUCTION
1. Front planetary gear 2. Mid planetary gear 3. Rear planetary gear
4. Direct clutch 5. High and low reverse clutch 6. Reverse brake
7. Drum support 8. Forward brake 9. Low coast brake
10. Input shaft 11. Torque converter 12. Oil pump
13. Front brake 14. 3rd one-way clutch 15. Input clutch
16. 1st one-way clutch 17. Control valve with TCM 18. Forward one-way clutch
19. Adapter case 20. Output shaft
SCIA5268E
Page 93 of 3061

A/T CONTROL SYSTEM
AT-23
< SERVICE INFORMATION >
D
E
F
G
H
I
J
K
L
MA
B
AT
N
O
P
Since both the forward brake and the reverse brake are released, torque from the input shaft drive is not trans-
mitted to the output shaft.
“P” Position
• The same as for the “N” position, both the forward brake and the reverse brake are released, so torque from
the input shaft drive is not transmitted to the output shaft.
• The parking pawl linked with the select lever meshes with the parking gear and fastens the output shaft
mechanically.
“D”, “4”, “3”, “2” Positions 1st Gear
• The forward brake and the forward one-way clutch regulate reverse rotation of the mid sun gear.
• The 1st one-way clutch regulates reverse rotation of the rear sun gear.
• The 3rd one-way clutch regulates reverse rotation of the front sun gear.
• During deceleration, the mid sun gear turns forward, so the forward one-way clutch idles and the engine
brake is not activated.
1. Front brake 2. Input clutch 3. Direct clutch
4. High and low reverse clutch 5. Reverse brake 6. Forward brake
7. Low coast brake 8. 1st one-way clutch 9. Forward one-way clutch
10. 3rd one-way clutch 11. Front sun gear 12. Input shaft
13. Mid internal gear 14. Front internal gear 15. Rear carrier
16. Rear sun gear 17. Mid sun gear 18. Front carrier
19. Mid carrier 20. Rear internal gear 21. Output shaft
22. Parking gear 23. Parking pawl
PCIA0003J
Page 102 of 3061
AT-32
< SERVICE INFORMATION >
A/T CONTROL SYSTEM
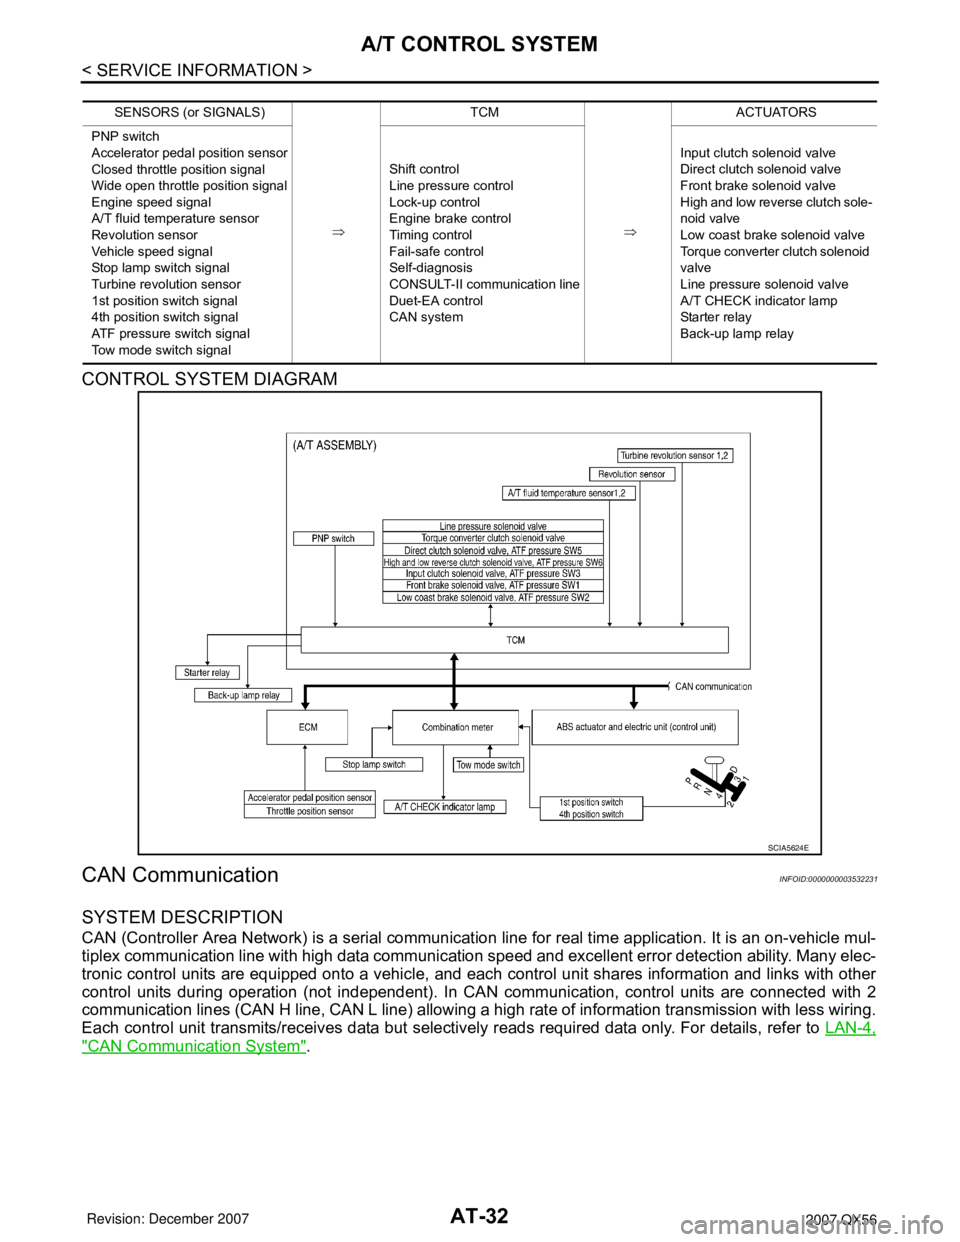
CONTROL SYSTEM DIAGRAM
CAN CommunicationINFOID:0000000003532231
SYSTEM DESCRIPTION
CAN (Controller Area Network) is a serial communication line for real time application. It is an on-vehicle mul-
tiplex communication line with high data communication speed and excellent error detection ability. Many elec-
tronic control units are equipped onto a vehicle, and each control unit shares information and links with other
control units during operation (not independent). In CAN communication, control units are connected with 2
communication lines (CAN H line, CAN L line) allowing a high rate of information transmission with less wiring.
Each control unit transmits/receives data but selectively reads required data only. For details, refer to LAN-4,
"CAN Communication System".
SENSORS (or SIGNALS)
⇒TCM
⇒ACTUATORS
PNP switch
Accelerator pedal position sensor
Closed throttle position signal
Wide open throttle position signal
Engine speed signal
A/T fluid temperature sensor
Revolution sensor
Vehicle speed signal
Stop lamp switch signal
Turbine revolution sensor
1st position switch signal
4th position switch signal
ATF pressure switch signal
Tow mode switch signalShift control
Line pressure control
Lock-up control
Engine brake control
Timing control
Fail-safe control
Self-diagnosis
CONSULT-II communication line
Duet-EA control
CAN systemInput clutch solenoid valve
Direct clutch solenoid valve
Front brake solenoid valve
High and low reverse clutch sole-
noid valve
Low coast brake solenoid valve
Torque converter clutch solenoid
valve
Line pressure solenoid valve
A/T CHECK indicator lamp
Starter relay
Back-up lamp relay
SCIA5624E
Page 103 of 3061

A/T CONTROL SYSTEM
AT-33
< SERVICE INFORMATION >
D
E
F
G
H
I
J
K
L
MA
B
AT
N
O
P
Input/Output Signal of TCMINFOID:0000000003532232
*1: Spare for vehicle speed sensor·A/T (revolution sensor)
*2: Spare for accelerator pedal position signal
*3: If these input and output signals are different, the TCM triggers the fail-safe function.
*4: CAN communications
Line Pressure ControlINFOID:0000000003532233
• When an input torque signal equivalent to the engine drive force is sent from the ECM to the TCM, the TCM
controls the line pressure solenoid.
Control itemLine
pressure
controlVehicle
speed
controlShift
controlLock-up
controlEngine
brake
controlFail-safe
function
(*3)Self-diag-
nostics
function
InputAccelerator pedal position signal
(*4)XXXXXXX
Vehicle speed sensor A/T
(revolution sensor)XXXX XX
Vehicle speed sensor MTR
(*1) (*4)XXXX X
Closed throttle position signal
(*4)(*2) X (*2) X X (*2) X X
Wide open throttle position signal
(*4)(*2) X (*2) X (*2) X X
Turbine revolution sensor 1 X X X X X
Turbine revolution sensor 2
(for 4th speed only)XXXXX
Engine speed signals
(*4)XX
PNP switch XXXXXXX
A/T fluid temperature sensors 1, 2 X X X X X X X
ASCDOperation signal
(*4)XXXX
Overdrive cancel sig-
nal
(*4)XXX
TCM power supply voltage signal X X X X X X
Out-
putDirect clutch solenoid (ATF pressure
switch 5)XX XX
Input clutch solenoid (ATF pressure
switch 3)XX XX
High and low reverse clutch sole-
noid (ATF pressure switch 6)XX XX
Front brake solenoid (ATF pressure
switch 1)XX XX
Low coast brake solenoid (ATF
pressure switch 2)XX XXX
Line pressure solenoid X X X X X X X
TCC solenoid X X X
Starter relayXX
Page 105 of 3061
A/T CONTROL SYSTEM
AT-35
< SERVICE INFORMATION >
D
E
F
G
H
I
J
K
L
MA
B
AT
N
O
P
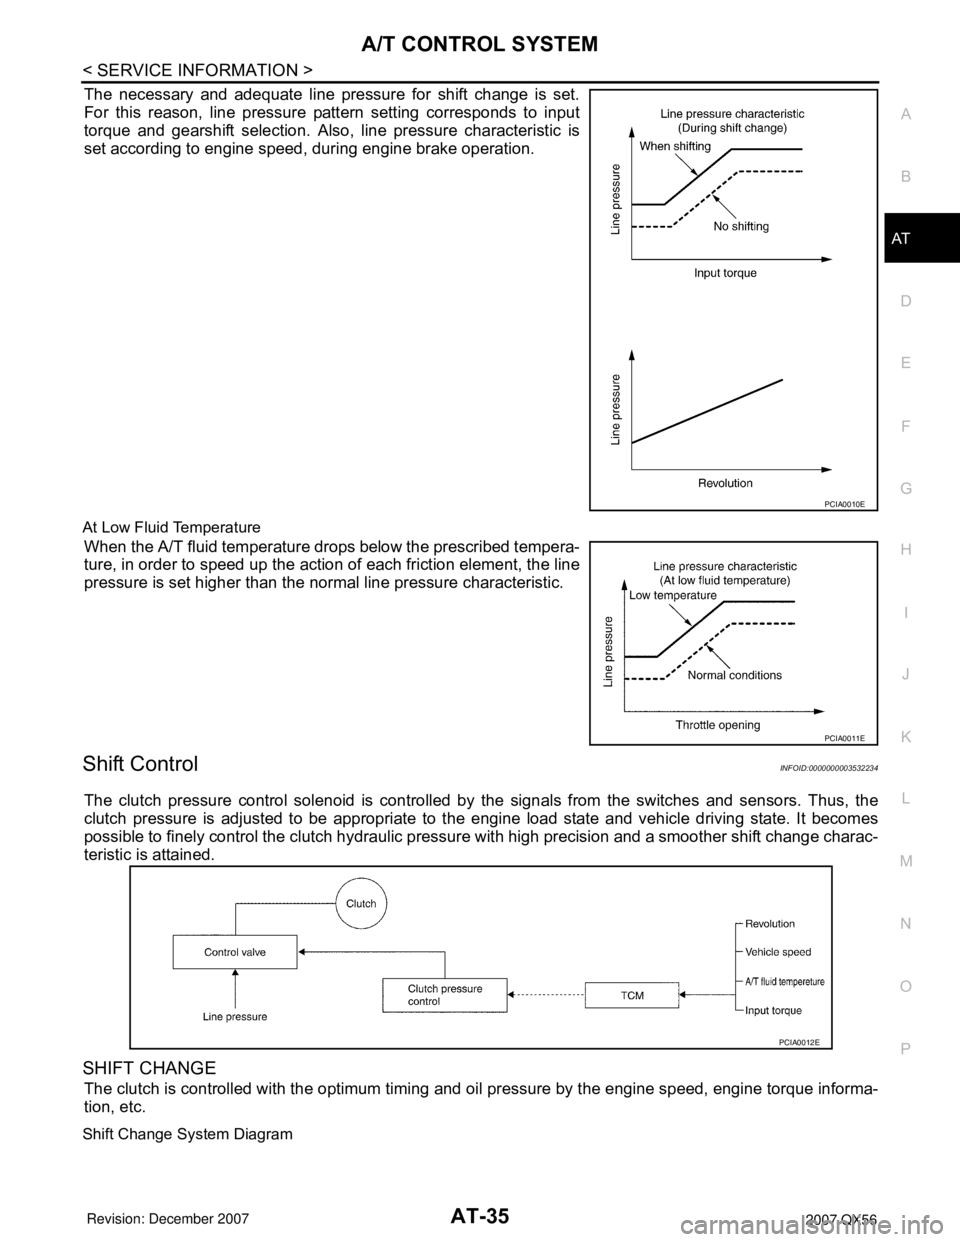
The necessary and adequate line pressure for shift change is set.
For this reason, line pressure pattern setting corresponds to input
torque and gearshift selection. Also, line pressure characteristic is
set according to engine speed, during engine brake operation.
At Low Fluid Temperature
When the A/T fluid temperature drops below the prescribed tempera-
ture, in order to speed up the action of each friction element, the line
pressure is set higher than the normal line pressure characteristic.
Shift ControlINFOID:0000000003532234
The clutch pressure control solenoid is controlled by the signals from the switches and sensors. Thus, the
clutch pressure is adjusted to be appropriate to the engine load state and vehicle driving state. It becomes
possible to finely control the clutch hydraulic pressure with high precision and a smoother shift change charac-
teristic is attained.
SHIFT CHANGE
The clutch is controlled with the optimum timing and oil pressure by the engine speed, engine torque informa-
tion, etc.
Shift Change System Diagram
PCIA0010E
PCIA0011E
PCIA0012E
Page 106 of 3061
AT-36
< SERVICE INFORMATION >
A/T CONTROL SYSTEM
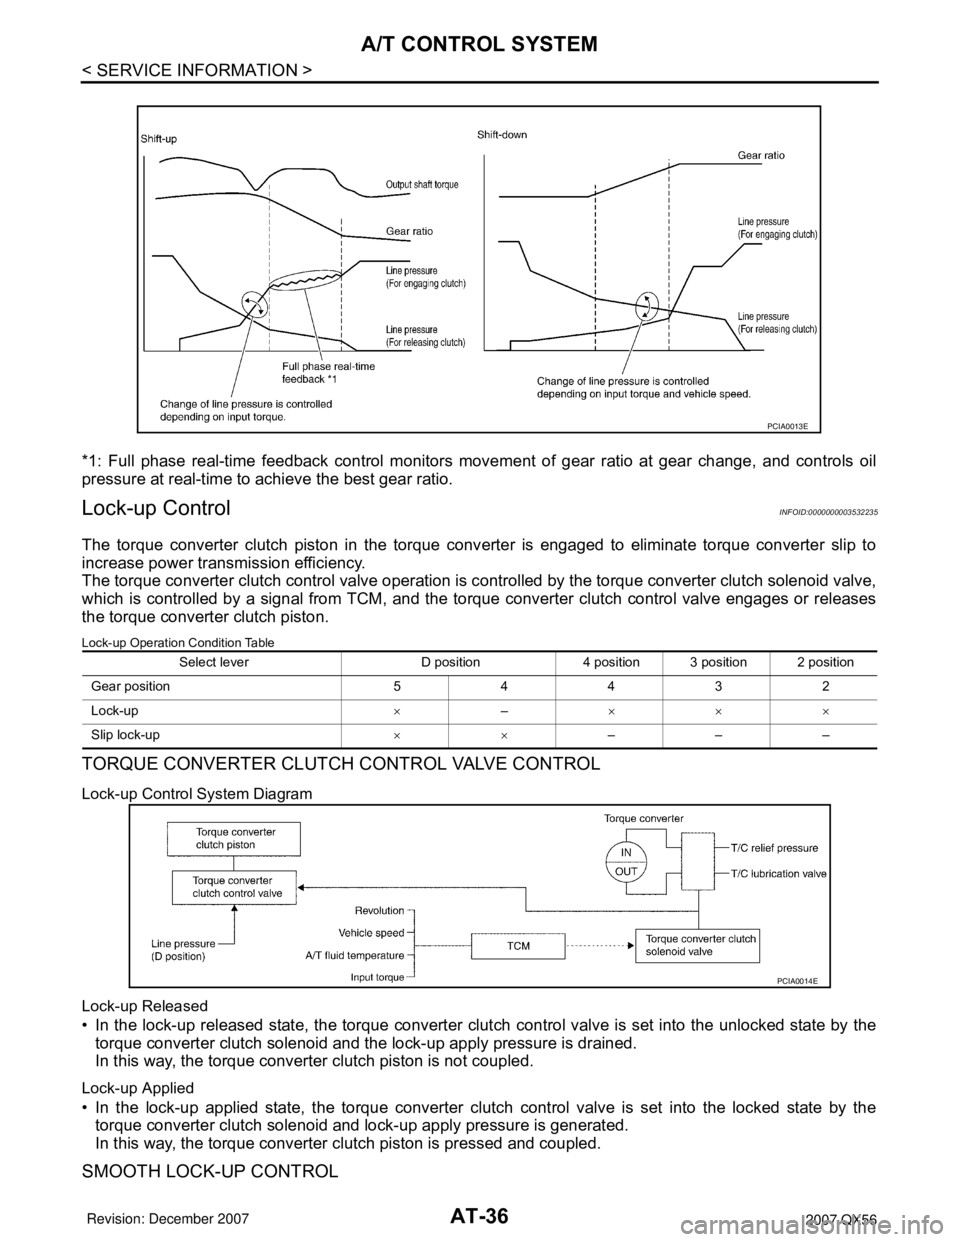
*1: Full phase real-time feedback control monitors movement of gear ratio at gear change, and controls oil
pressure at real-time to achieve the best gear ratio.
Lock-up ControlINFOID:0000000003532235
The torque converter clutch piston in the torque converter is engaged to eliminate torque converter slip to
increase power transmission efficiency.
The torque converter clutch control valve operation is controlled by the torque converter clutch solenoid valve,
which is controlled by a signal from TCM, and the torque converter clutch control valve engages or releases
the torque converter clutch piston.
Lock-up Operation Condition Table
TORQUE CONVERTER CLUTCH CONTROL VALVE CONTROL
Lock-up Control System Diagram
Lock-up Released
• In the lock-up released state, the torque converter clutch control valve is set into the unlocked state by the
torque converter clutch solenoid and the lock-up apply pressure is drained.
In this way, the torque converter clutch piston is not coupled.
Lock-up Applied
• In the lock-up applied state, the torque converter clutch control valve is set into the locked state by the
torque converter clutch solenoid and lock-up apply pressure is generated.
In this way, the torque converter clutch piston is pressed and coupled.
SMOOTH LOCK-UP CONTROL
PCIA0013E
Select lever D position 4 position 3 position 2 position
Gear position 5 4 4 3 2
Lock-up×–×××
Slip lock-up××–––
PCIA0014E
Page 107 of 3061
A/T CONTROL SYSTEM
AT-37
< SERVICE INFORMATION >
D
E
F
G
H
I
J
K
L
MA
B
AT
N
O
P
When shifting from the lock-up released state to the lock-up applied state, the current output to the torque con-
verter clutch solenoid is controlled with the TCM. In this way, when shifting to the lock-up applied state, the
torque converter clutch is temporarily set to the half-clutched state to reduce the shock.
Half-clutched State
• The current output from the TCM to the torque converter clutch solenoid is varied to gradually increase the
torque converter clutch solenoid pressure.
In this way, the lock-up apply pressure gradually rises and while the torque converter clutch piston is put into
half-clutched status, the torque converter clutch piston operating pressure is increased and the coupling is
completed smoothly.
Slip Lock-up Control
• In the slip region, the torque converter clutch solenoid current is controlled with the TCM to put it into the
half-clutched state. This absorbs the engine torque fluctuation and lock-up operates from low speed.
This raises the fuel efficiency for 4th and 5th gears at both low speed and when the accelerator has a low
degree of opening.
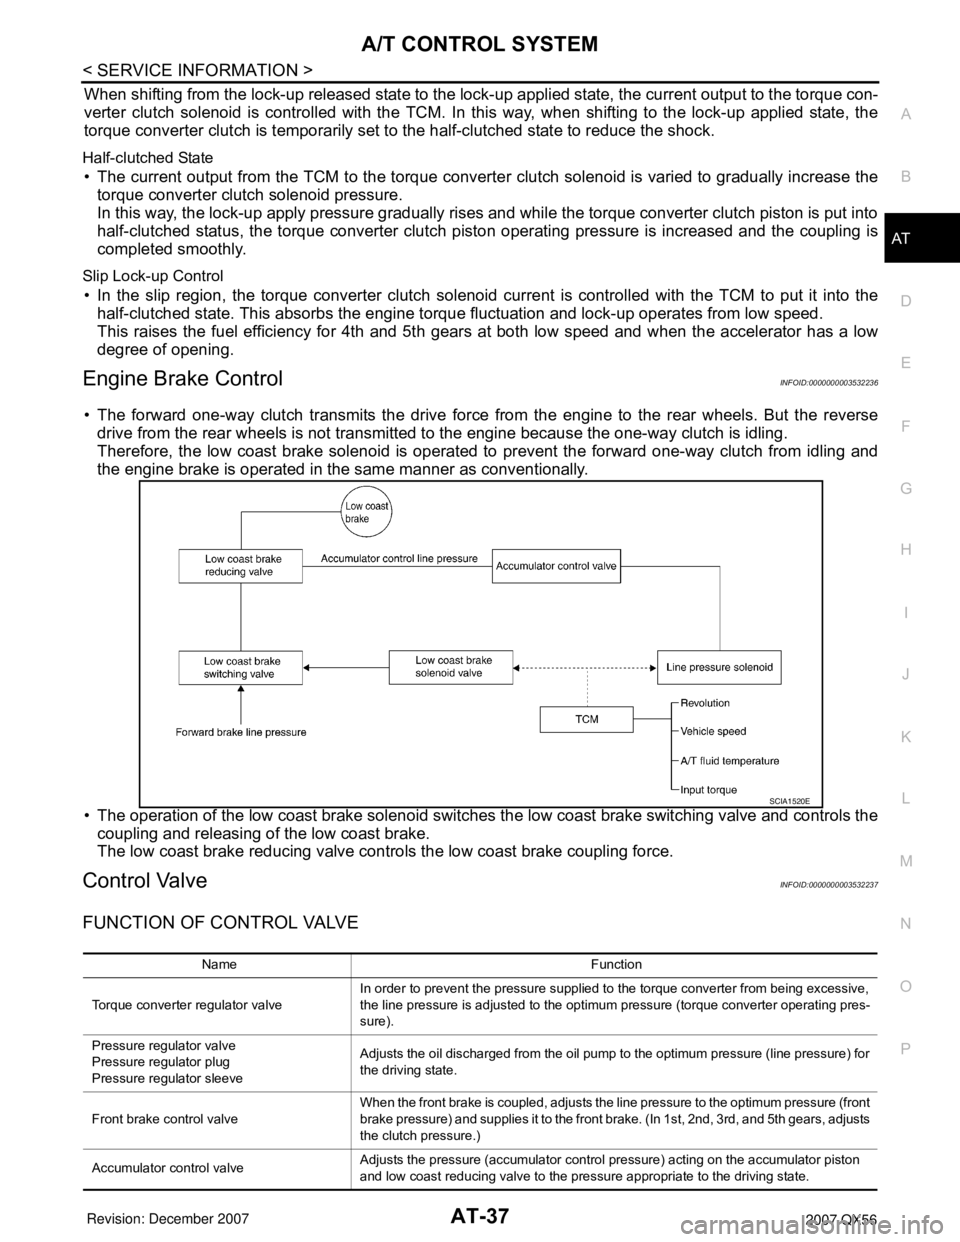
Engine Brake ControlINFOID:0000000003532236
• The forward one-way clutch transmits the drive force from the engine to the rear wheels. But the reverse
drive from the rear wheels is not transmitted to the engine because the one-way clutch is idling.
Therefore, the low coast brake solenoid is operated to prevent the forward one-way clutch from idling and
the engine brake is operated in the same manner as conventionally.
• The operation of the low coast brake solenoid switches the low coast brake switching valve and controls the
coupling and releasing of the low coast brake.
The low coast brake reducing valve controls the low coast brake coupling force.
Control ValveINFOID:0000000003532237
FUNCTION OF CONTROL VALVE
SCIA1520E
Name Function
Torque converter regulator valveIn order to prevent the pressure supplied to the torque converter from being excessive,
the line pressure is adjusted to the optimum pressure (torque converter operating pres-
sure).
Pressure regulator valve
Pressure regulator plug
Pressure regulator sleeveAdjusts the oil discharged from the oil pump to the optimum pressure (line pressure) for
the driving state.
Front brake control valveWhen the front brake is coupled, adjusts the line pressure to the optimum pressure (front
brake pressure) and supplies it to the front brake. (In 1st, 2nd, 3rd, and 5th gears, adjusts
the clutch pressure.)
Accumulator control valveAdjusts the pressure (accumulator control pressure) acting on the accumulator piston
and low coast reducing valve to the pressure appropriate to the driving state.