rear panel INFINITI QX56 2011 Factory Workshop Manual
[x] Cancel search | Manufacturer: INFINITI, Model Year: 2011, Model line: QX56, Model: INFINITI QX56 2011Pages: 5598, PDF Size: 94.53 MB
Page 3406 of 5598
IP-16
< REMOVAL AND INSTALLATION >
INSTRUMENT PANEL ASSEMBLY
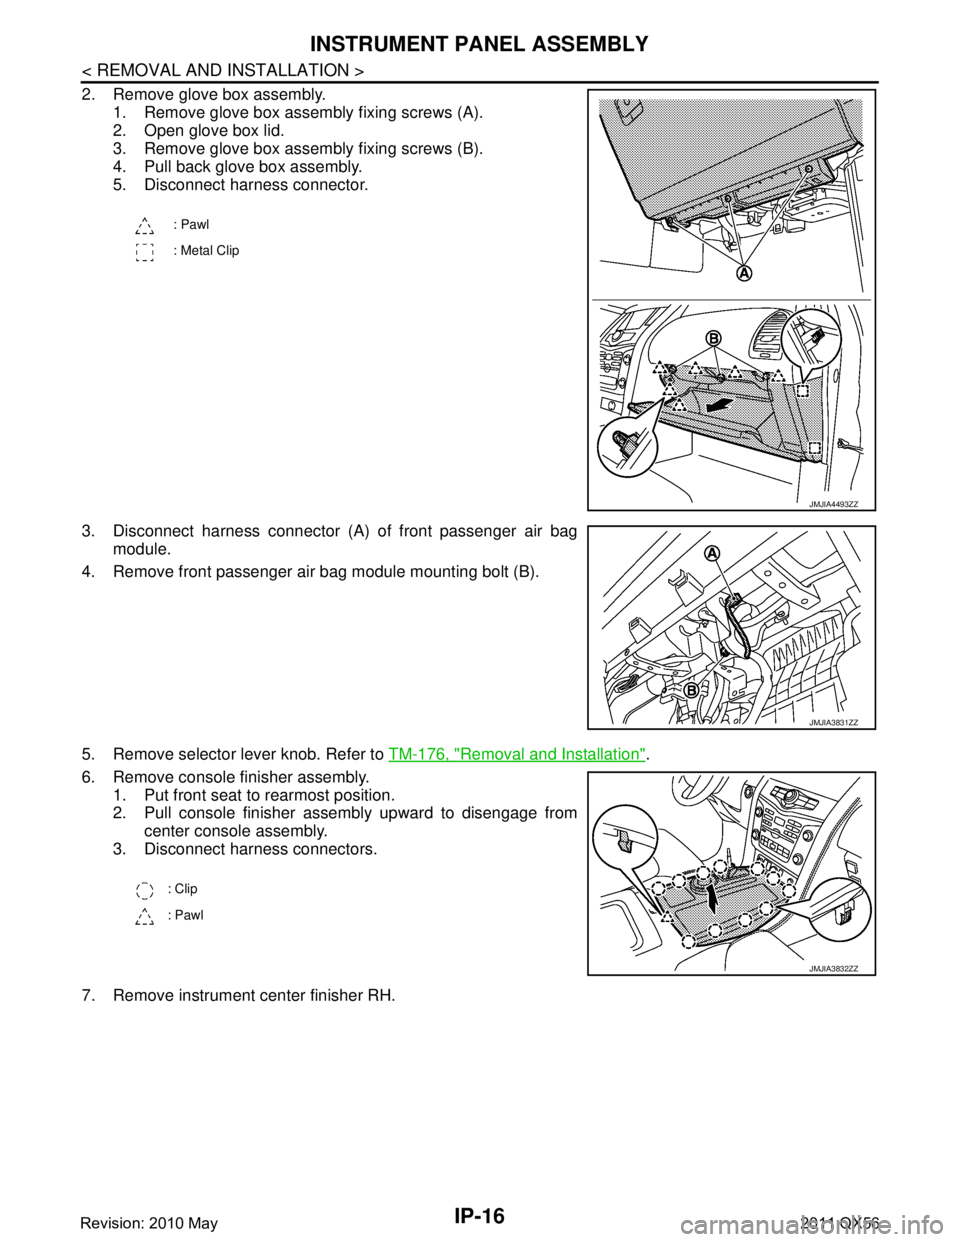
2. Remove glove box assembly.1. Remove glove box assembly fixing screws (A).
2. Open glove box lid.
3. Remove glove box assembly fixing screws (B).
4. Pull back glove box assembly.
5. Disconnect harness connector.
3. Disconnect harness connector (A) of front passenger air bag module.
4. Remove front passenger air bag module mounting bolt (B).
5. Remove selector lever knob. Refer to TM-176, "
Removal and Installation".
6. Remove console finisher assembly. 1. Put front seat to rearmost position.
2. Pull console finisher assembly upward to disengage from
center console assembly.
3. Disconnect harness connectors.
7. Remove instrument center finisher RH.
: Pawl
: Metal Clip
JMJIA4493ZZ
JMJIA3831ZZ
: Clip
: Pawl
JMJIA3832ZZ
Revision: 2010 May2011 QX56
Page 3408 of 5598
IP-18
< REMOVAL AND INSTALLATION >
INSTRUMENT PANEL ASSEMBLY
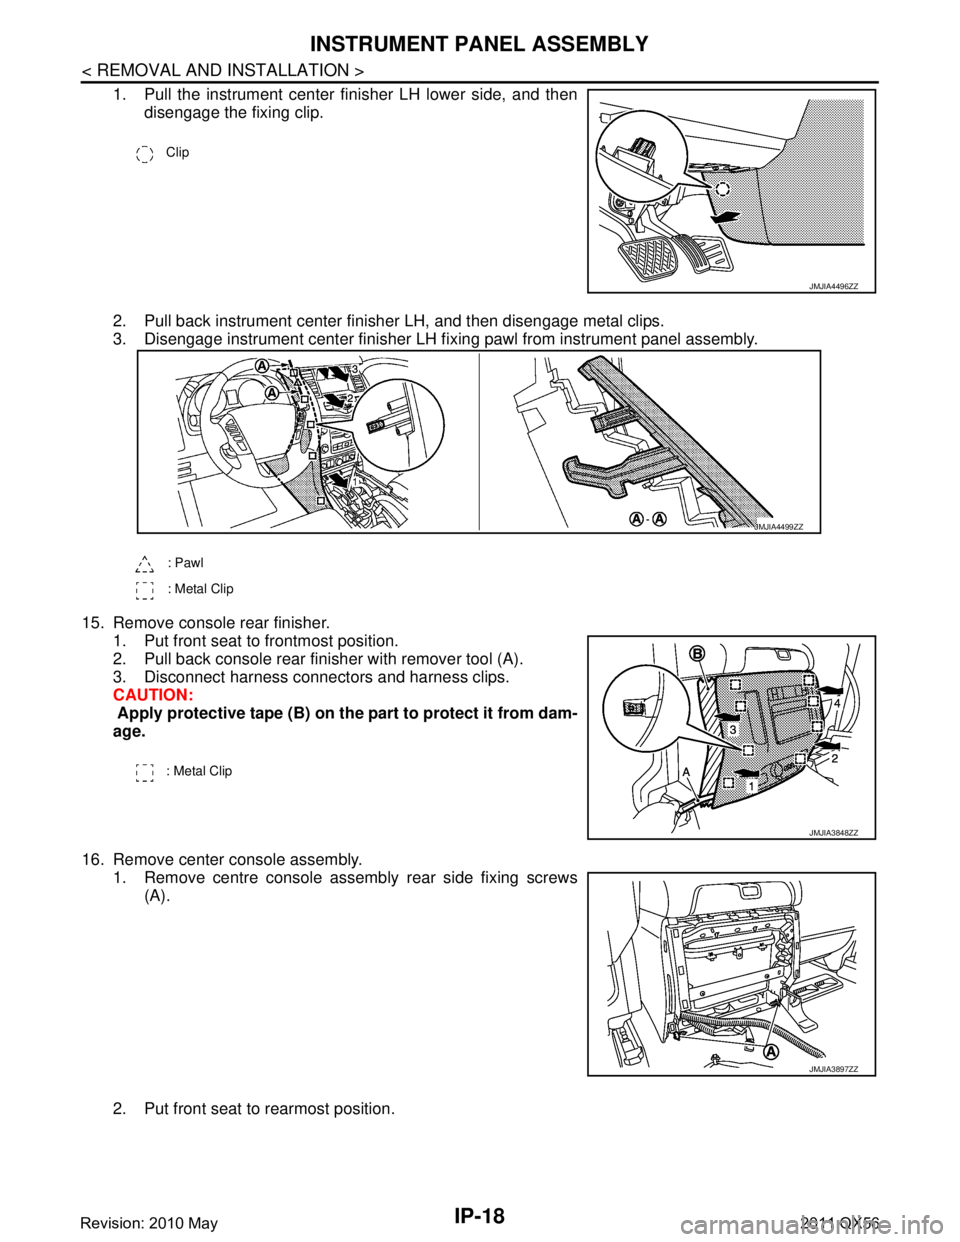
1. Pull the instrument center finisher LH lower side, and thendisengage the fixing clip.
2. Pull back instrument center finisher LH, and then disengage metal clips.
3. Disengage instrument center finisher LH fi xing pawl from instrument panel assembly.
15. Remove console rear finisher. 1. Put front seat to frontmost position.
2. Pull back console rear finisher with remover tool (A).
3. Disconnect harness connectors and harness clips.
CAUTION:
Apply protective tape (B) on the part to protect it from dam-
age.
16. Remove center console assembly. 1. Remove centre console assembly rear side fixing screws(A).
2. Put front seat to rearmost position.
Clip
JMJIA4496ZZ
: Pawl
: Metal Clip
JMJIA4499ZZ
: Metal Clip
JMJIA3848ZZ
JMJIA3897ZZ
Revision: 2010 May2011 QX56
Page 3415 of 5598
CENTER CONSOLE ASSEMBLYIP-25
< REMOVAL AND INSTALLATION >
C
DE
F
G H
I
K L
M A
B
IP
N
O P
Removal and InstallationINFOID:0000000006113100
CAUTION:
When removing, always use a remover tool that is made of plastic.
REMOVAL
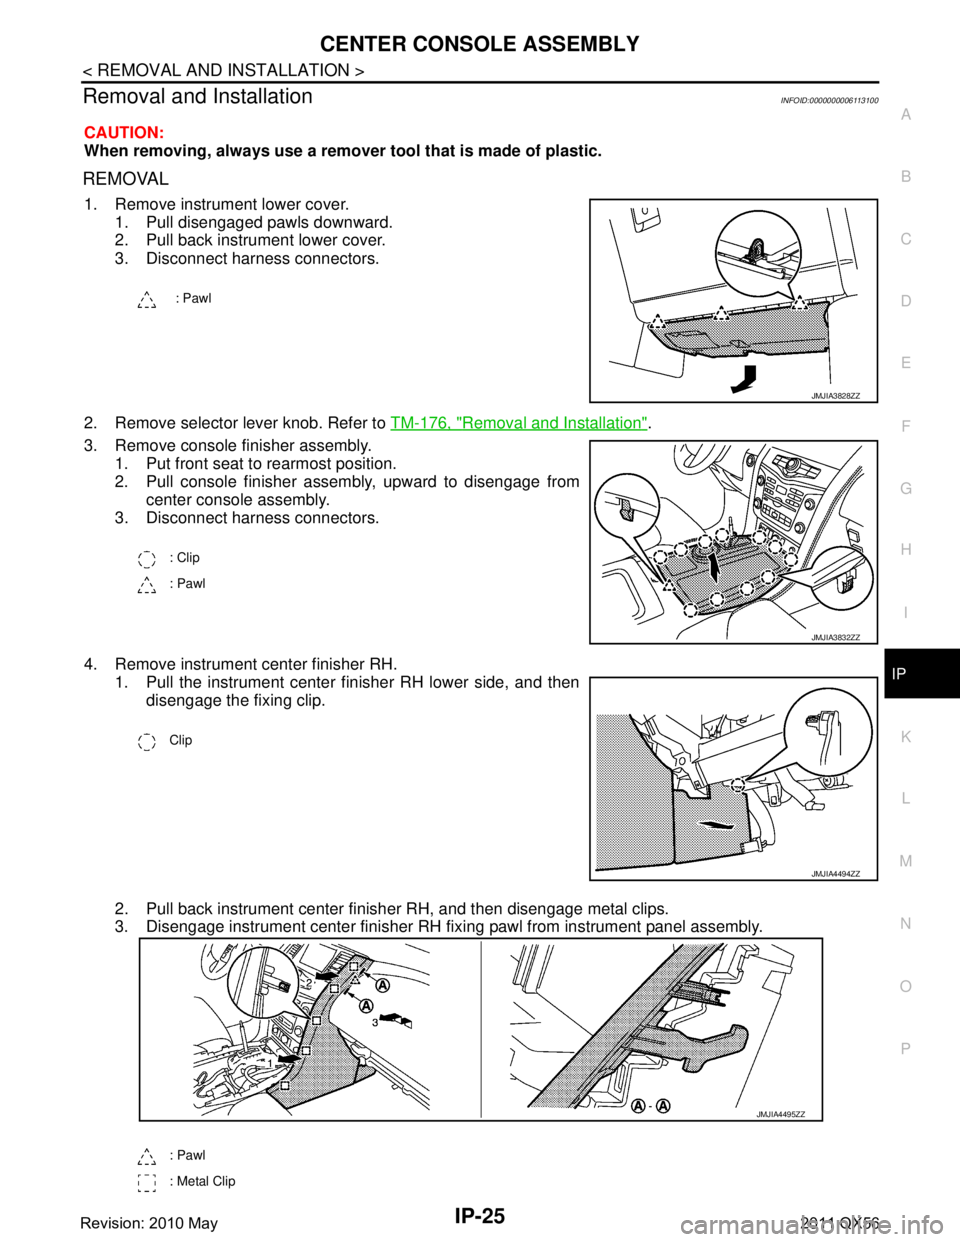
1. Remove instrument lower cover.
1. Pull disengaged pawls downward.
2. Pull back instrument lower cover.
3. Disconnect harness connectors.
2. Remove selector lever knob. Refer to TM-176, "
Removal and Installation".
3. Remove console finisher assembly. 1. Put front seat to rearmost position.
2. Pull console finisher assembly, upward to disengage from center console assembly.
3. Disconnect harness connectors.
4. Remove instrument center finisher RH. 1. Pull the instrument center finisher RH lower side, and then disengage the fixing clip.
2. Pull back instrument center finisher RH, and then disengage metal clips.
3. Disengage instrument center finisher RH fixi ng pawl from instrument panel assembly.
: Pawl
JMJIA3828ZZ
: Clip
: Pawl
JMJIA3832ZZ
Clip
JMJIA4494ZZ
: Pawl
: Metal Clip
JMJIA4495ZZ
Revision: 2010 May2011 QX56
Page 3416 of 5598
IP-26
< REMOVAL AND INSTALLATION >
CENTER CONSOLE ASSEMBLY
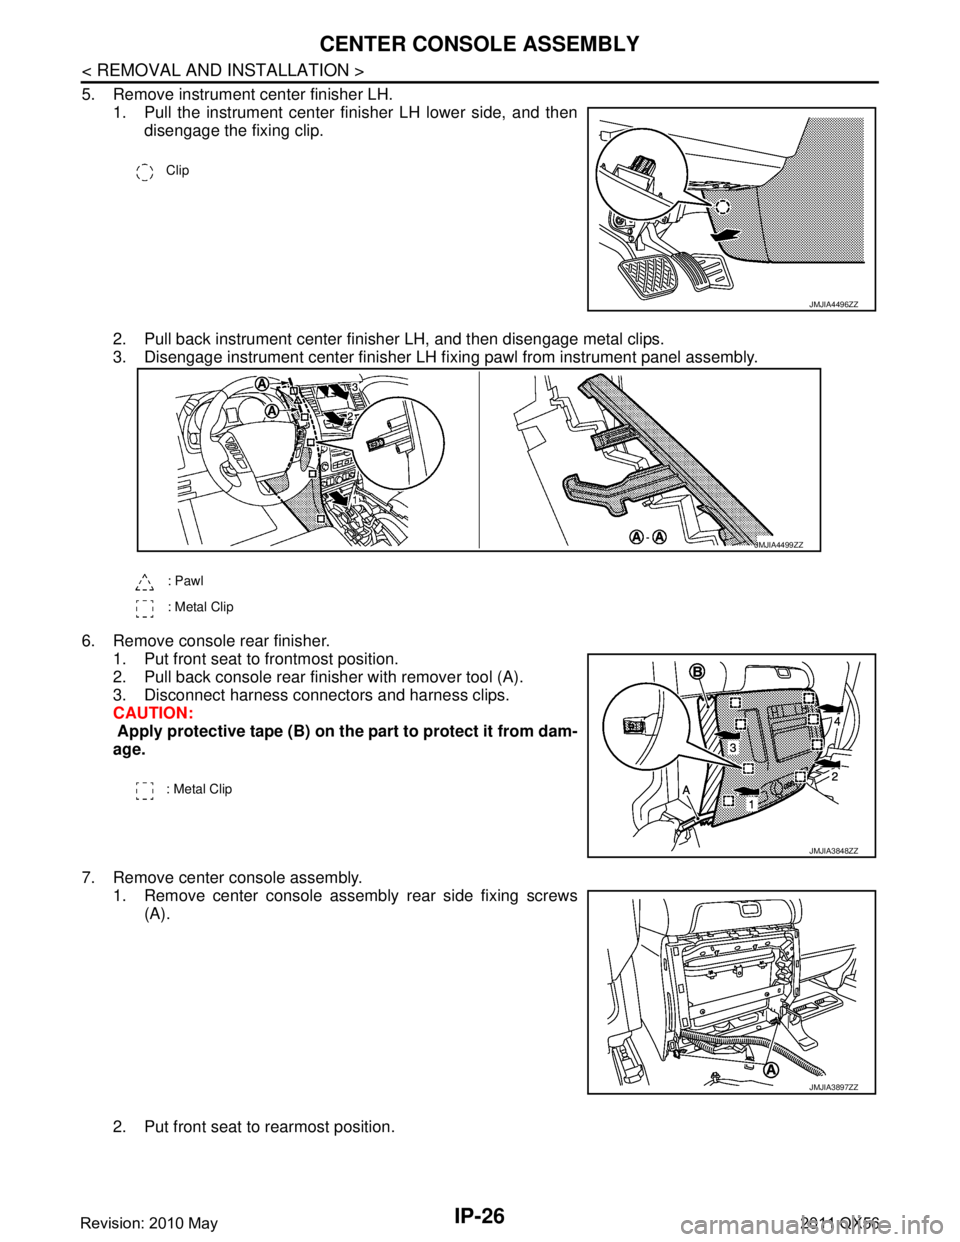
5. Remove instrument center finisher LH.1. Pull the instrument center finisher LH lower side, and thendisengage the fixing clip.
2. Pull back instrument center finisher LH, and then disengage metal clips.
3. Disengage instrument center finisher LH fi xing pawl from instrument panel assembly.
6. Remove console rear finisher. 1. Put front seat to frontmost position.
2. Pull back console rear finisher with remover tool (A).
3. Disconnect harness connectors and harness clips.
CAUTION:
Apply protective tape (B) on the part to protect it from dam-
age.
7. Remove center console assembly. 1. Remove center console assembly rear side fixing screws
(A).
2. Put front seat to rearmost position.
Clip
JMJIA4496ZZ
: Pawl
: Metal Clip
JMJIA4499ZZ
: Metal Clip
JMJIA3848ZZ
JMJIA3897ZZ
Revision: 2010 May2011 QX56
Page 3836 of 5598
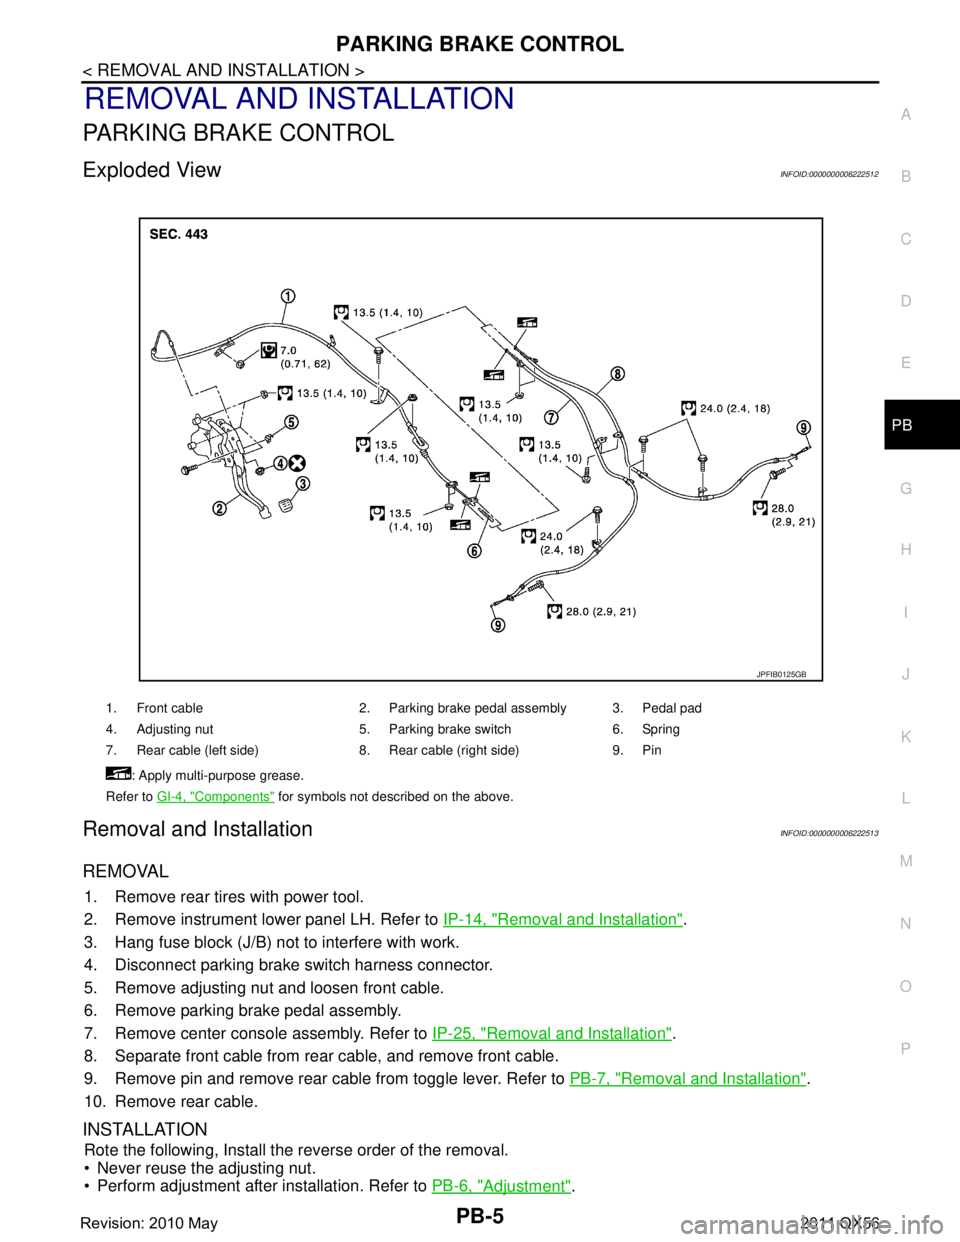
PARKING BRAKE CONTROLPB-5
< REMOVAL AND INSTALLATION >
C
DE
G H
I
J
K L
M A
B
PB
N
O P
REMOVAL AND INSTALLATION
PARKING BRAKE CONTROL
Exploded ViewINFOID:0000000006222512
Removal and InstallationINFOID:0000000006222513
REMOVAL
1. Remove rear tires with power tool.
2. Remove instrument lower panel LH. Refer to IP-14, "
Removal and Installation".
3. Hang fuse block (J/B) not to interfere with work.
4. Disconnect parking brake switch harness connector.
5. Remove adjusting nut and loosen front cable.
6. Remove parking brake pedal assembly.
7. Remove center console assembly. Refer to IP-25, "
Removal and Installation".
8. Separate front cable from rear cable, and remove front cable.
9. Remove pin and remove rear cable from toggle lever. Refer to PB-7, "
Removal and Installation".
10. Remove rear cable.
INSTALLATION
Rote the following, Install the reverse order of the removal.
Never reuse the adjusting nut.
Perform adjustment after installation. Refer to PB-6, "
Adjustment".
1. Front cable 2. Parking brake pedal assembly 3. Pedal pad
4. Adjusting nut 5. Parking brake switch 6. Spring
7. Rear cable (left side) 8. Rear cable (right side) 9. Pin
: Apply multi-purpose grease.
Refer to GI-4, "
Components" for symbols not described on the above.
JPFIB0125GB
Revision: 2010 May2011 QX56
Page 4253 of 5598

SUNROOF UNIT ASSEMBLYRF-39
< REMOVAL AND INSTALLATION >
C
DE
F
G H
I
J
L
M A
B
RF
N
O P
5. Remove grip bracket.
6. Remove sunroof bracket bolts.
7. Remove nuts from the front end and side rail, and then remove sunroof unit assembly from roof panel.
8. Remove sunroof unit assembly through the passenger compartment while being careful not to damage the seats and trim.
INSTALLATION
1. Temporarily tighten the mounting nuts to the side rail of sunroof unit assembly.
2. Temporarily tighten the mounting nuts to the front end of sunroof unit assembly.
3. Temporarily tighten the mounting bolts to the sunroof brackets (LH,RH).
4. Tighten the installation points diagonally excluding the installation points of the sunroof brackets around the roof opening.
5. Tighten the mounting nuts to the front end and side rail.
6. Tighten the sunroof bracket bolts of the vehicl e side, and then tighten the bolt of the rail side.
7. Install the glass lid. NOTE:
After installation, perform fitting adjustment. Refer to RF-33, "
Adjustment".
8. Connect drain hoses.
9. Install headlining. Refer to INT-29, "
Removal and Installation".
Disassembly and AssemblyINFOID:0000000006141252
DISASSEMBLY
1. Remove sunshade stopper mounting from the rear end of sunroof frame.
2. Remove rear drain assembly from sunroof guide assembly.
3. Remove sunshade from the rear end of sunroof frame.
ASSEMBLY
Assemble in the reverse order of disassembly.
Revision: 2010 May2011 QX56
Page 5395 of 5598

DUCT AND GRILLEVTL-9
< REMOVAL AND INSTALLATION >
C
DE
F
G H
J
K L
M A
B
VTL
N
O P
REAR
1. Front defroster nozzle 2. Side defroster nozzle LH 3. Side ventilator duct
4. Side ventilator grille LH 5. Front defroster grille LH 6. Instrument panel
7. A/C unit assembly 8. Foot duct LH 9. Foot grille LH
10. Floor duct 1 LH 11. Floor duct 2 LH 12. Floor duct 3 LH
13. Floor grille LH 14. Floor grille RH 15. Floor duct 3 RH
16. Floor duct 2 RH 17. Floor duct 1 RH 18. Foot duct RH
19. Foot grill RH 20. Cluster lid D 21. Center ventilator grille LH
22. Center ventilator grille RH 23. Upper ventilator grille 24. Side ventilator grille LH
25. Front defroster grille RH 26. Upper ventilator duct 27. Side ventilator nozzle RH : Clip
: Pawl
: Metal clip
1. Roof duct RH 2. Rear ventilator outlet grille A RH 3. Rear ventilator base RH
4. Rear ventilator garnish A RH 5. Rear ventilator outlet grille B RH 6. Rear ventilator grille RH
7. Rear ventilator garnish B RH 8. Rear A/C unit assembly 9. Rear ventilator duct lower
10. Luggage side finisher RH 11. Rear ventilator garnish A LH 12. Rear ventilator base LH
13. Rear ventilator outlet grille A LH 14. Rear ventilator garnish B LH 15. Rear ventilator grille LH
JMIIA0643ZZ
Revision: 2010 May2011 QX56
Page 5396 of 5598

VTL-10
< REMOVAL AND INSTALLATION >
DUCT AND GRILLE
CENTER VENTILAT O R G R I L L E
CENTER VENTILATOR GRILLE : Removal and InstallationINFOID:0000000006276287
REMOVAL
1. Remove cluster lid D. Refer to IP-14, "Removal and Installation".
2. Remove center ventilator grille from cluster lid D.
INSTALLATION
Install in the reverse order of removal.
SIDE VENTILATOR GRILLE
SIDE VENTILATOR GRILLE : Removal and InstallationINFOID:0000000006276288
REMOVAL
1. Remove instrument panel assembly. Refer to IP-14, "Removal and Installation".
2. Remove fixing screw, and then remove side ventilator grille from instrument panel.
INSTALLATION
Install in the reverse order of removal.
FRONT DEFROSTER GRILLE
FRONT DEFROSTER GRILLE : Removal and InstallationINFOID:0000000006276289
REMOVAL
Remove front defroster grilles, using remover tools.
INSTALLATION
Install in the reverse order of removal.
UPPER VENTILATOR GRILLE
UPPER VENTILATOR GRILLE : Removal and InstallationINFOID:0000000006276290
REMOVAL
Remove upper ventilator grille, using remover tools.
INSTALLATION
Install in the reverse order of removal.
SIDE VENTILATOR DUCT
SIDE VENTILATOR DUCT : Removal and InstallationINFOID:0000000006276291
REMOVAL
1. Remove instrument panel assembly. Refer to IP-14, "Removal and Installation".
2. Remove fixing screws, and then remove side ventilator duct from instrument panel.
INSTALLATION
Install in the reverse order of removal.
UPPER VENTILATOR DUCT
UPPER VENTILATOR DUCT : Removal and InstallationINFOID:0000000006276292
REMOVAL
1. Remove instrument panel assembly. Refer to IP-14, "Removal and Installation".
16. Rear ventilator outlet grille B LH 17. Roof duct LH Roof duct center
19. Rear ventilator duct upper
Revision: 2010 May2011 QX56
Page 5398 of 5598

VTL-12
< REMOVAL AND INSTALLATION >
DUCT AND GRILLE
Install in the reverse order of removal.
REAR FLOOR GRILLE
REAR FLOOR GRILLE : Removal and InstallationINFOID:0000000006276298
REMOVAL
Disengage fixing metal clips, and then remove rear floor grille.
INSTALLATION
Install in the reverse order of removal.
FOOT DUCT
FOOT DUCT : Removal and InstallationINFOID:0000000006276299
REMOVAL
1. Remove steering member. Refer to HA-42, "HEATER & COOLING UNIT ASSEMBLY : Removal and
Installation".
2. Remove fixing screws, and then remove foot duct.
INSTALLATION
Install in the reverse order of removal.
FOOT GRILLE
FOOT GRILLE : Removal and InstallationINFOID:0000000006276300
REMOVAL
Driver side
1. Remove instrument lower panel RH. Refer to IP-14, "Removal and Installation".
2. Remove fixing screws, and then remove foot grille.
Passenger side
1. Remove instrument lower cover. Refer to IP-14, "Removal and Installation".
2. Remove fixing screws and clip, and then remove foot grille.
INSTALLATION
Install in the reverse order of removal.
REAR VENTILATOR DUCT LOWER
REAR VENTILATOR DUCT LOWER : Removal and InstallationINFOID:0000000006276301
REMOVAL
1. Remove luggage side lower finisher RH. Refer to INT-36, "LUGGAGE SIDE LOWER FINISHER :
Removal and Installation".
2. Remove mounting bolts, and then remove rear ventilator duct lower.
INSTALLATION
Install in the reverse order of removal.
REAR VENTILATOR DUCT UPPER
REAR VENTILATOR DUCT UPPER : Removal and InstallationINFOID:0000000006276302
REMOVAL
1. Remove back pillar garnish RH. Refer to INT-37, "BACK PILLAR GARNISH : Removal and Installation".
2. Remove mounting bolt, and then remove rear ventilator grille upper.
INSTALLATION
Install in the reverse order of removal.
Revision: 2010 May2011 QX56