vacuum ISUZU KB P190 2007 Workshop Repair Manual
[x] Cancel search | Manufacturer: ISUZU, Model Year: 2007, Model line: KB P190, Model: ISUZU KB P190 2007Pages: 6020, PDF Size: 70.23 MB
Page 1390 of 6020
6A-30 ENGINE MECHANICAL (4JK1/4JJ1)
RTW 66ASH003001
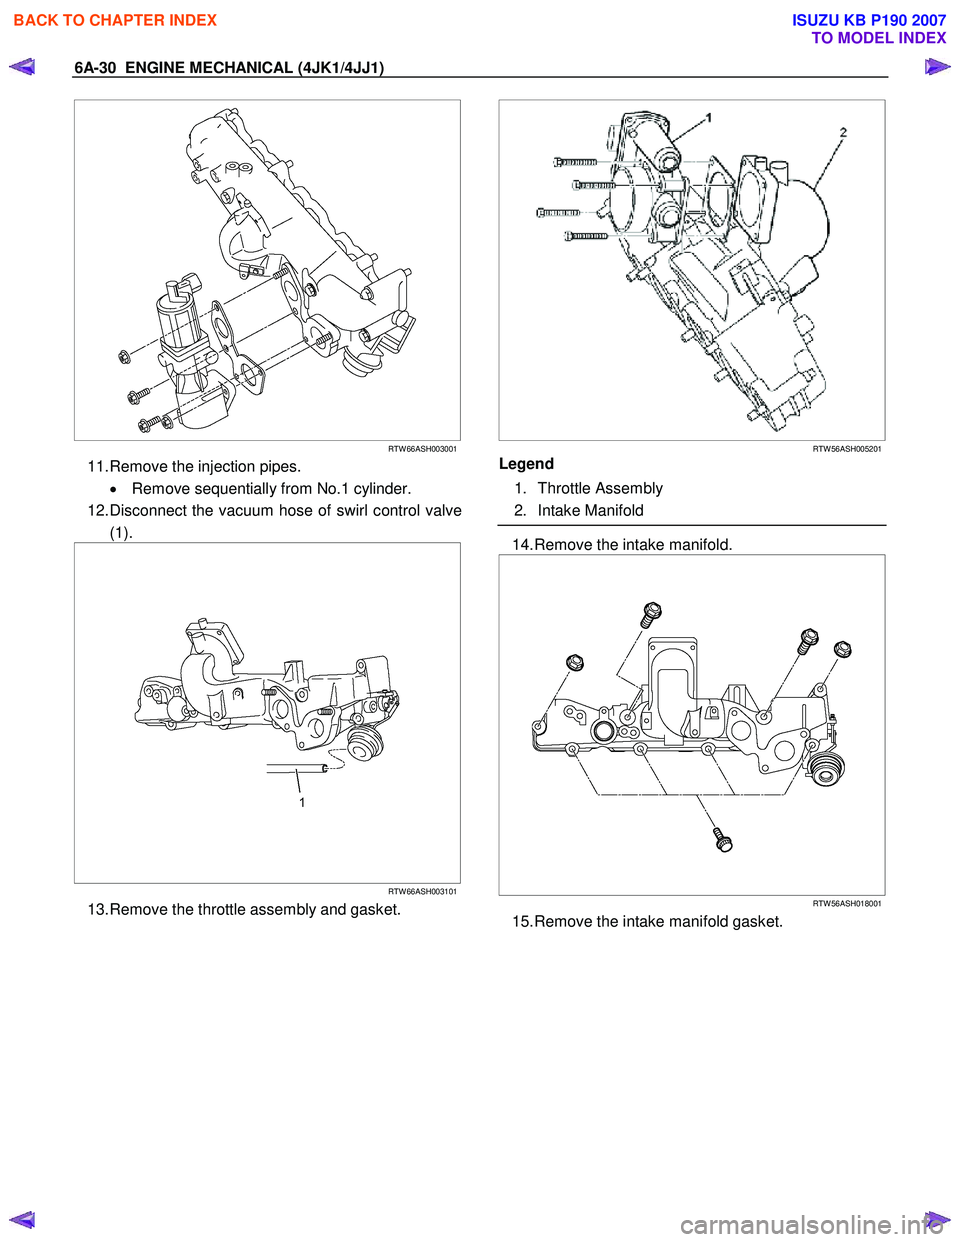
11. Remove the injection pipes.
• Remove sequentially from No.1 cylinder.
12. Disconnect the vacuum hose of swirl control valve (1).
RTW 66ASH003101
13. Remove the throttle assembly and gasket.
RTW 56ASH005201
Legend
1. Throttle Assembly
2. Intake Manifold
14. Remove the intake manifold.
RTW 56ASH018001
15. Remove the intake manifold gasket.
BACK TO CHAPTER INDEX
TO MODEL INDEX
ISUZU KB P190 2007
Page 1391 of 6020

ENGINE MECHANICAL (4JK1/4JJ1) 6A-31
Installation
1. Install the intake manifold gasket.
2. Install the intake manifold. • Tighten the nuts and bolts in the orde
r
described in the drawing.
Tightening torque: 25 N ⋅
⋅⋅
⋅
m (2.5 kg ⋅
⋅⋅
⋅
m / 18 lb ft)
RTW 56ASH018001
3. Install the throttle assembly and gasket.
• Tighten the bolts to the specified torque.
Tightening torque: 10 N ⋅
⋅⋅
⋅
m (1.0 kg ⋅
⋅⋅
⋅
m / 87 lb in)
4. Install the vacuum hose of swirl control valve.
5. Install the injection pipe (fuel rail - fuel injector). • It installs sequentially from No. 4 cylinder.
Tightening torque: 29 N ⋅
⋅⋅
⋅
m (3.0 kg ⋅
⋅⋅
⋅
m / 22 lb ft)
6. Install the EGR valve. • Tighten the nuts to the specified torque.
Tightening torque: 27 N ⋅
⋅⋅
⋅
m (2.8 kg ⋅
⋅⋅
⋅
m / 20 lb ft)
7. Install the engine oil level guide tube.
Tighten the nuts to the specified torque.
Tightening torque: 25 N ⋅
⋅⋅
⋅
m (2.5 kg ⋅
⋅⋅
⋅
m / 18 lb ft)
8. Install the intercooler (High output).
9. Connect the connector of other parts. • Fuel Injector
• Throttle Assembly
• EGR Valve
• Glow Plug
• Barometric Sensor
• A/C Compressor Connector
10. Install the leak-off hose.
RTW 56ASH024301
Legend
1. Injector Leek-off Hose
11. Install the intake air duct.
Tightening torque: 25 N ⋅
⋅⋅
⋅
m (2.5 kg ⋅
⋅⋅
⋅
m / 18 lb ft)
12.Install the A/C compressor bracket. Tightening torque: 25 N ⋅
⋅⋅
⋅
m (2.5 kg ⋅
⋅⋅
⋅
m / 18 lb ft)
13.Install the A/C compressor and A/C compresso
r
connector.
Tightening torque: 44 N ⋅
⋅⋅
⋅
m (4.5 kg ⋅
⋅⋅
⋅
m / 33 lb ft)
14.Install the A/C belt.
Check the A/C belt tension.
Depress the A/C belt mid-portion with 98 N (10 kg
/
22 lb) force.
Standard deflection: 7.6 - 9.2 mm (0.29 - 0.36 in)
RTW 510SH000201
15. Install the engine cover.
BACK TO CHAPTER INDEX
TO MODEL INDEX
ISUZU KB P190 2007
Page 1402 of 6020

6A-42 ENGINE MECHANICAL (4JK1/4JJ1)
Removal
1. Drain the engine coolant.
2. Remove the engine cover.
3. Remove the intercooler. • Disconnect the BARO sensor harness
connector (2).
• Remove the two intake hoses.
• Remove the intercooler (1).
RTW 76ASH000501
4. Disconnect the vacuum hose from the
turbocharger actuator.
5. Remove the air intake duct from the turbocharge
r
and the air cleaner.
6. Remove the front exhaust pipe.
RTW 56ASH018301
Legend
1. Gasket
2. Front Exhaust Pipe (4 ×2 High Ride Suspention,
4 ×4)
3. Gasket
4. Front Exhaust Pipe (4 ×2 Except High Ride
Suspention)
7. Remove the heat protector of the turbocharger.
• Remove the mud cover of front RH fender skirt
(4×4 only).
• Loosen the bolt of Turbocharger bracket.
8. Remove the catalyst converter.
9. Remove the turbocharger bracket.
10. Remove the oil feed and return pipe.
11. Remove the water feed and return pipe from the turbocharger.
RTW 76ASH001001
12. Remove the turbocharger from the exhaust
manifold.
BACK TO CHAPTER INDEX
TO MODEL INDEX
ISUZU KB P190 2007
Page 1403 of 6020
ENGINE MECHANICAL (4JK1/4JJ1) 6A-43
Inspection
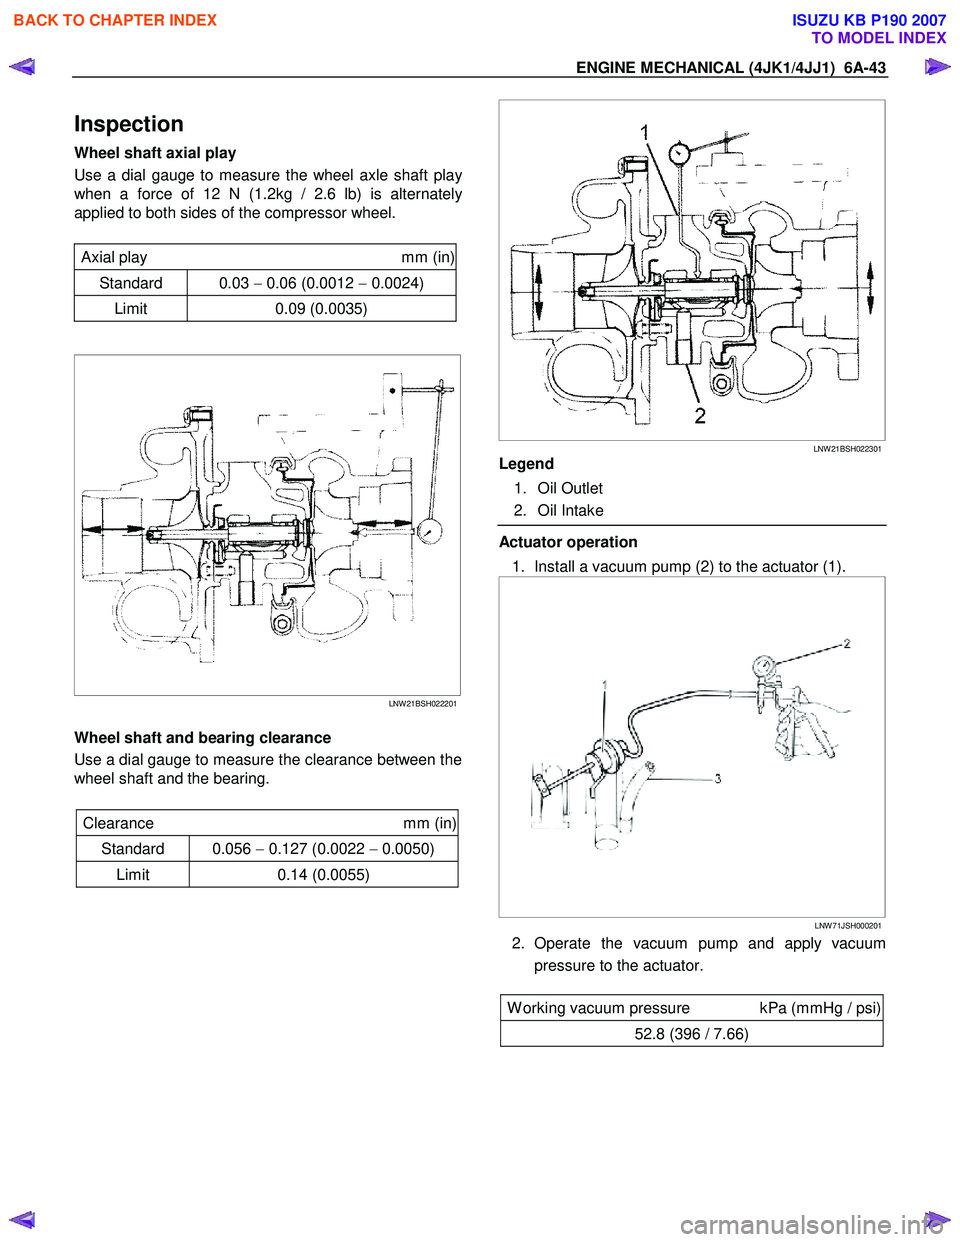
Wheel shaft axial play
Use a dial gauge to measure the wheel axle shaft pla
y
when a force of 12 N (1.2kg / 2.6 lb) is alternately
applied to both sides of the compressor wheel.
Axial play mm (in)
Standard 0.03 − 0.06 (0.0012 − 0.0024)
Limit 0.09 (0.0035)
LNW 21BSH022201
Wheel shaft and bearing clearance
Use a dial gauge to measure the clearance between the
wheel shaft and the bearing.
Clearance mm (in)
Standard 0.056 − 0.127 (0.0022 − 0.0050)
Limit 0.14 (0.0055)
LNW 21BSH022301
Legend
1. Oil Outlet
2. Oil Intake
Actuator operation
1. Install a vacuum pump (2) to the actuator (1).
LNW 71JSH000201
2. Operate the vacuum pump and apply vacuum
pressure to the actuator.
W orking vacuum pressure kPa (mmHg / psi)
52.8 (396 / 7.66)
BACK TO CHAPTER INDEX
TO MODEL INDEX
ISUZU KB P190 2007
Page 1404 of 6020

6A-44 ENGINE MECHANICAL (4JK1/4JJ1)
3. Place a vernier caliper on the end of the control
rod of actuator. Release the vacuum pressure and
check the control rod moves. Measure the length
of the control rod moving.
Standard length mm (in)
12 (0.48)
Installation
1. Install the gasket and the turbocharger to the
exhaust manifold. Temporarily tighten nuts.
2. Install the oil feed and return pipe and temporaril
y
tighten.
3. Tighten the turbocharger nuts to the specified torque.
Tightening torque: 27 N ⋅
⋅⋅
⋅
m (2.8 kg ⋅
⋅⋅
⋅
m / 20 lb ft)
4. Tighten the oil feed and return pipe bolts and nuts to the specified torque.
Tightening torque (Turbocharger side): 10 N ⋅
⋅⋅
⋅
m (1.0 kg ⋅
⋅⋅
⋅
m / 87 lb in)
Tightening torque (Crank case side): 25 N ⋅
⋅⋅
⋅
m (2.5 kg ⋅
⋅⋅
⋅
m / 18 lb ft)
5. Install the water feed and return pipe to the turbocharger.
Tightening torque: 25 N ⋅
⋅⋅
⋅
m (2.5 kg ⋅
⋅⋅
⋅
m / 18 lb ft)
6. Install the heat protector to the turbocharger. Tightening torque: 10 N ⋅
⋅⋅
⋅
m (1.0 kg ⋅
⋅⋅
⋅
m / 18 lb ft)
7. Install the turbocharger bracket.
8. Install the catalyst converter.
Tighten the nuts to the specified torque.
Tightening torque: 27 N ⋅
⋅⋅
⋅
m (2.8 kg ⋅
⋅⋅
⋅
m / 20 lb ft)
9. Install the mud cover of front RH fender skirt (4 ×4
only).
10. Install the front exhaust pipe.
Tighten the nuts to the specified torque.
Tightening torque
Exhaust Manifold Side: 67 N⋅
⋅⋅
⋅m (6.8 kg⋅
⋅⋅
⋅m / 49 lb ft)
Exhaust Pipe Side: 43 N
⋅
⋅⋅
⋅
m (4.4 kg ⋅
⋅⋅
⋅
m / 32lb ft)
11. Install the intercooler. • Install the intercooler.
• Install the two intake hoses.
• Connect the BARO sensor harness connector.
12. Install the intake duct between the turbocharge
r
and the air cleaner.
Tightening torque: 6 N ⋅
⋅⋅
⋅
m (0.6 kg ⋅
⋅⋅
⋅
m / 52 lb in)
13.Replenish the coolant.
BACK TO CHAPTER INDEX
TO MODEL INDEX
ISUZU KB P190 2007
Page 1410 of 6020
6A-50 ENGINE MECHANICAL (4JK1/4JJ1)
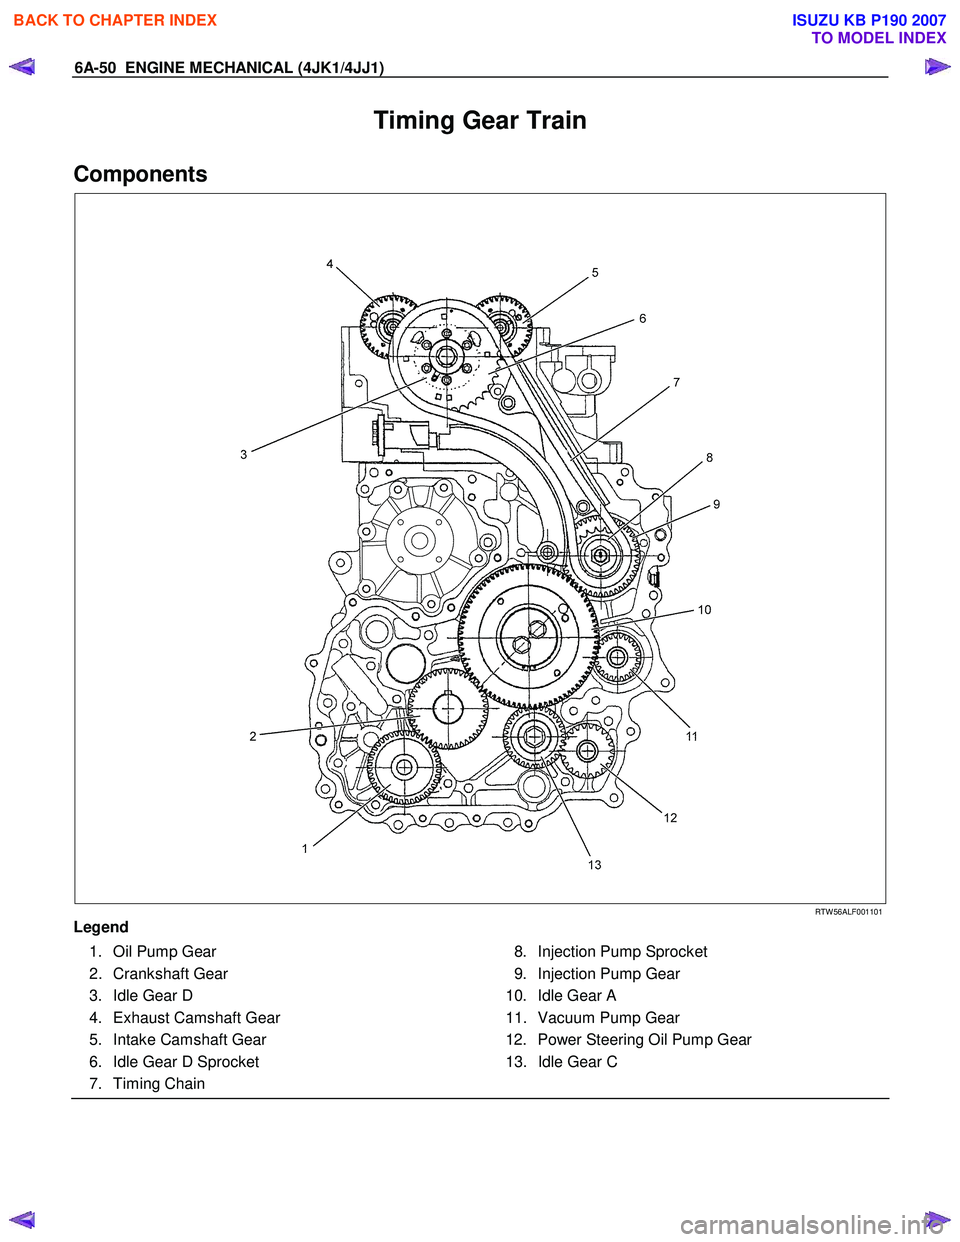
Timing Gear Train
Components
RTW 56ALF001101
Legend 1. Oil Pump Gear
2. Crankshaft Gear
3. Idle Gear D
4. Exhaust Camshaft Gear
5. Intake Camshaft Gear
6. Idle Gear D Sprocket
7. Timing Chain 8. Injection Pump Sprocket
9. Injection Pump Gear
10. Idle Gear A
11. Vacuum Pump Gear
12. Power Steering Oil Pump Gear
13. Idle Gear C
BACK TO CHAPTER INDEX
TO MODEL INDEX
ISUZU KB P190 2007
Page 1412 of 6020
6A-52 ENGINE MECHANICAL (4JK1/4JJ1)
LTW 56ASH000101
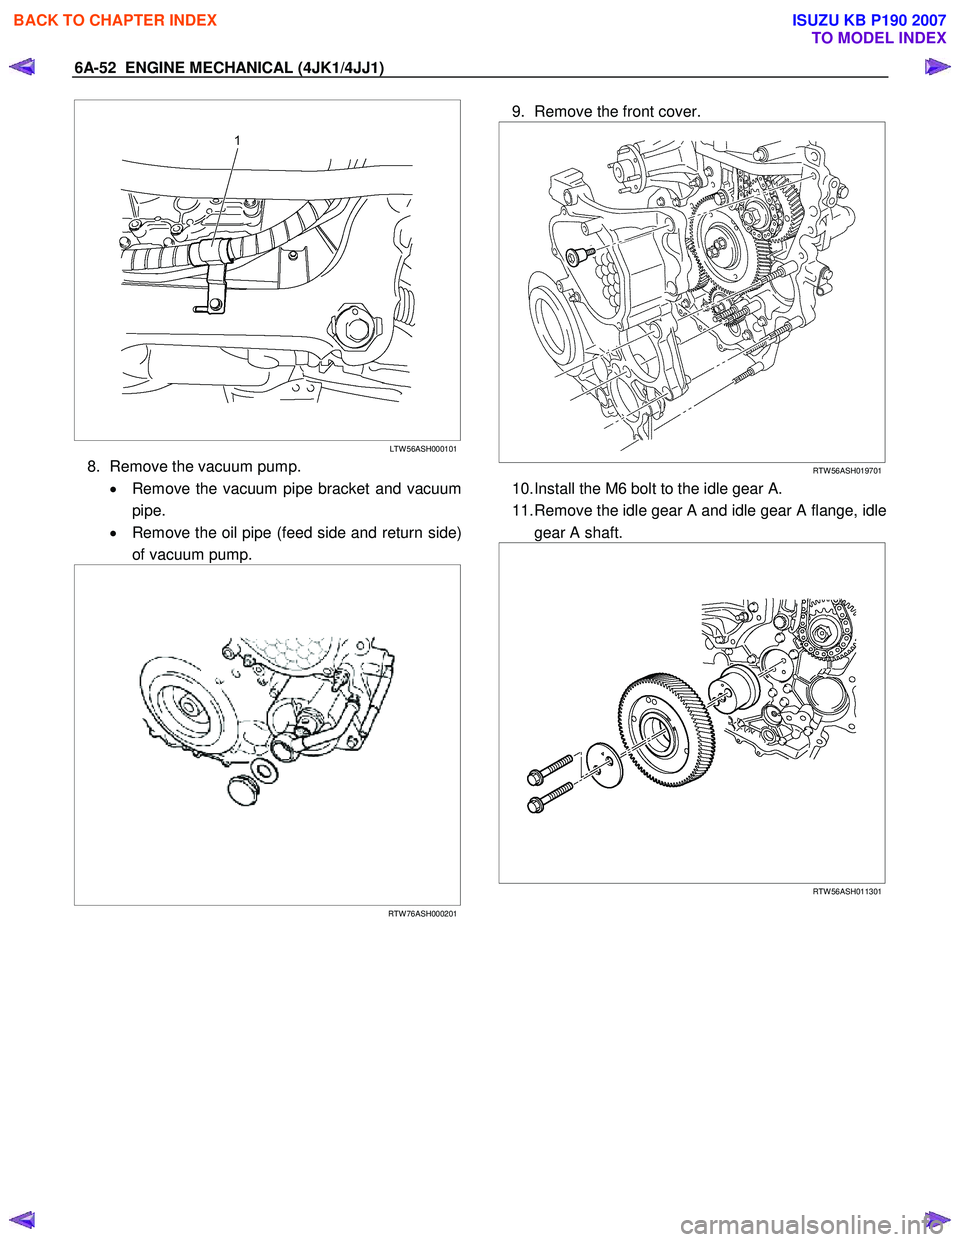
8. Remove the vacuum pump.
• Remove the vacuum pipe bracket and vacuum
pipe.
• Remove the oil pipe (feed side and return side)
of vacuum pump.
RTW 76ASH000201
9. Remove the front cover.
RTW 56ASH019701
10. Install the M6 bolt to the idle gear A.
11. Remove the idle gear A and idle gear A flange, idle gear A shaft.
RTW 56ASH011301
BACK TO CHAPTER INDEX
TO MODEL INDEX
ISUZU KB P190 2007
Page 1417 of 6020

ENGINE MECHANICAL (4JK1/4JJ1) 6A-57
6. Remove the M6 bolt from the idle gear A.
7. Install the gear case cover. • Apply the liquid gasket (ThreeBond TB-1207B
or equivalent).
RTW 56ASH020101
Legend
1. Apply the liquid gasket
• Install the gasket in slot of the gear case cover.
• Tighten the bolts to the specified torque.
Tightening torque: 8 N ⋅
⋅⋅
⋅
m (0.8 kg ⋅
⋅⋅
⋅
m / 69 lb in)
RTW 56ASH012101
8. Install the vacuum pump.
Tightening torque: 25 N ⋅
⋅⋅
⋅
m (2.5 kg ⋅
⋅⋅
⋅
m / 18 lb ft)
• Install the oil pipe (feed side and return side) o
f
vacuum pump.
• Install the vacuum pipe bracket and vacuum
pipe.
9. Install the power steering pump. • Tighten the nuts to the specified torque.
Tightening torque: 25 N ⋅
⋅⋅
⋅
m (2.5 kg ⋅
⋅⋅
⋅
m / 18 lb ft)
• Connect the bracket (1) of power steering oil
hose.
LTW 56ASH000101
10. Install the crank pulley.
Tightening torque: 294 N ⋅
⋅⋅
⋅
m (30.0 kg ⋅
⋅⋅
⋅
m / 217 lb ft)
11. Install the A/C compressor drive belt and fan belt.
Refer to drive belt tension check procedure fo
r
Heating and air conditioning and Engine cooling in
this manual.
12. Install the cooling fan.
13. Install the fan guide.
14. Install the radiator upper hose.
15. Replenish the engine coolant.
BACK TO CHAPTER INDEX
TO MODEL INDEX
ISUZU KB P190 2007
Page 1437 of 6020
ENGINE MECHANICAL (4JK1/4JJ1) 6A-77
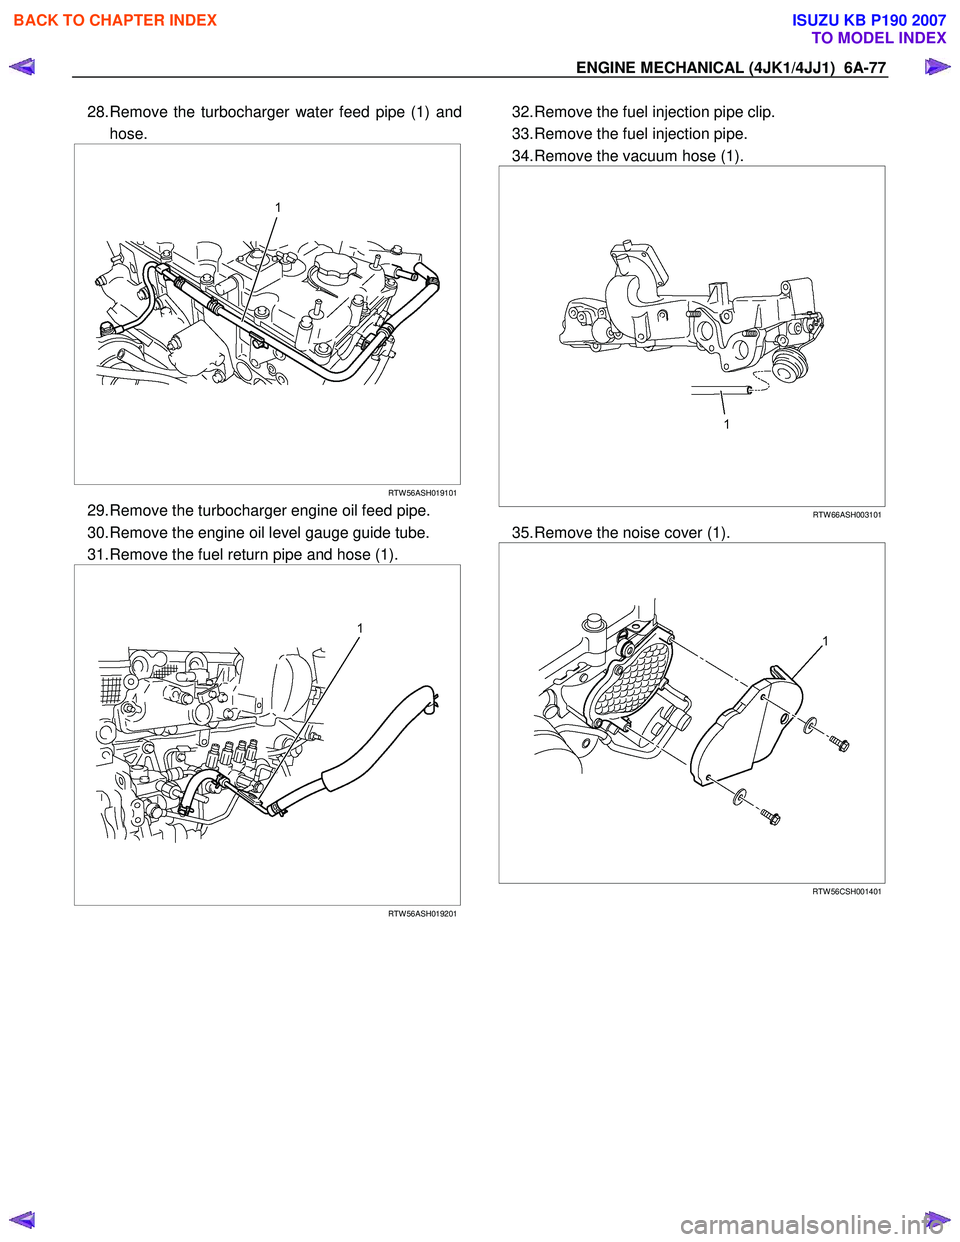
28. Remove the turbocharger water feed pipe (1) and
hose.
RTW 56ASH019101
29. Remove the turbocharger engine oil feed pipe.
30. Remove the engine oil level gauge guide tube.
31. Remove the fuel return pipe and hose (1).
RTW 56ASH019201
32. Remove the fuel injection pipe clip.
33. Remove the fuel injection pipe.
34. Remove the vacuum hose (1).
RTW 66ASH003101
35. Remove the noise cover (1).
RTW 56CSH001401
BACK TO CHAPTER INDEX
TO MODEL INDEX
ISUZU KB P190 2007
Page 1451 of 6020
ENGINE MECHANICAL (4JK1/4JJ1) 6A-91
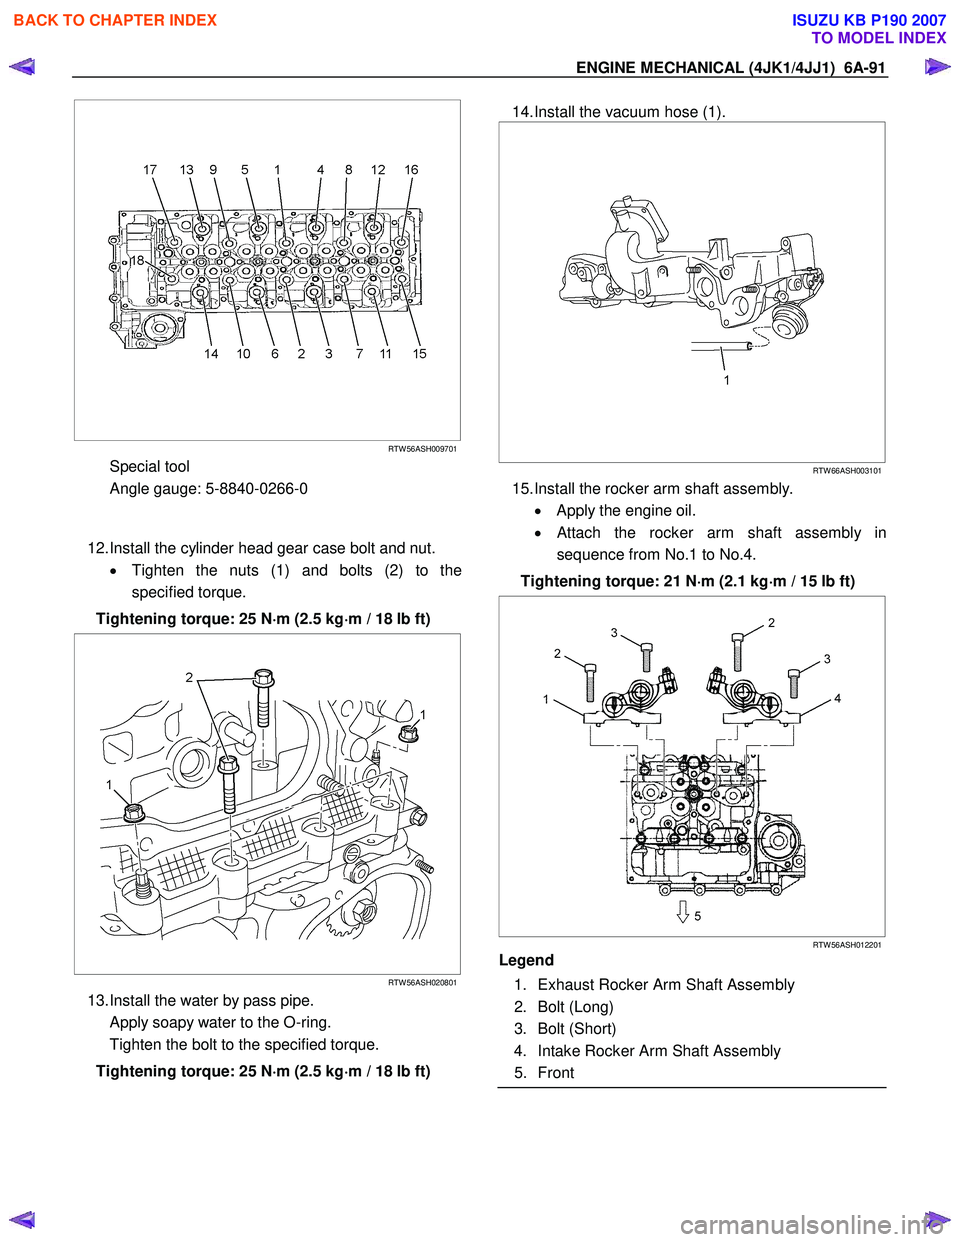
RTW 56ASH009701
Special tool
Angle gauge: 5-8840-0266-0
12. Install the cylinder head gear case bolt and nut.
• Tighten the nuts (1) and bolts (2) to the
specified torque.
Tightening torque: 25 N ⋅
⋅⋅
⋅
m (2.5 kg ⋅
⋅⋅
⋅
m / 18 lb ft)
RTW 56ASH020801
13. Install the water by pass pipe.
Apply soapy water to the O-ring.
Tighten the bolt to the specified torque.
Tightening torque: 25 N ⋅
⋅⋅
⋅
m (2.5 kg ⋅
⋅⋅
⋅
m / 18 lb ft)
14. Install the vacuum hose (1).
RTW 66ASH003101
15. Install the rocker arm shaft assembly.
• Apply the engine oil.
• Attach the rocker arm shaft assembly in
sequence from No.1 to No.4.
Tightening torque: 21 N ⋅
⋅⋅
⋅
m (2.1 kg ⋅
⋅⋅
⋅
m / 15 lb ft)
RTW 56ASH012201
Legend
1. Exhaust Rocker Arm Shaft Assembly
2. Bolt (Long)
3. Bolt (Short)
4. Intake Rocker Arm Shaft Assembly
5. Front
BACK TO CHAPTER INDEX
TO MODEL INDEX
ISUZU KB P190 2007