engine ISUZU KB P190 2007 Workshop Repair Manual
[x] Cancel search | Manufacturer: ISUZU, Model Year: 2007, Model line: KB P190, Model: ISUZU KB P190 2007Pages: 6020, PDF Size: 70.23 MB
Page 2725 of 6020
Engine Mechanical – V6 Page 6A1–246
General Thread Repair
NOTE
The use of a cutting type fluid such as WD 40® or
equivalent is recommended when performing the
drilling, counter boring and tapping procedures
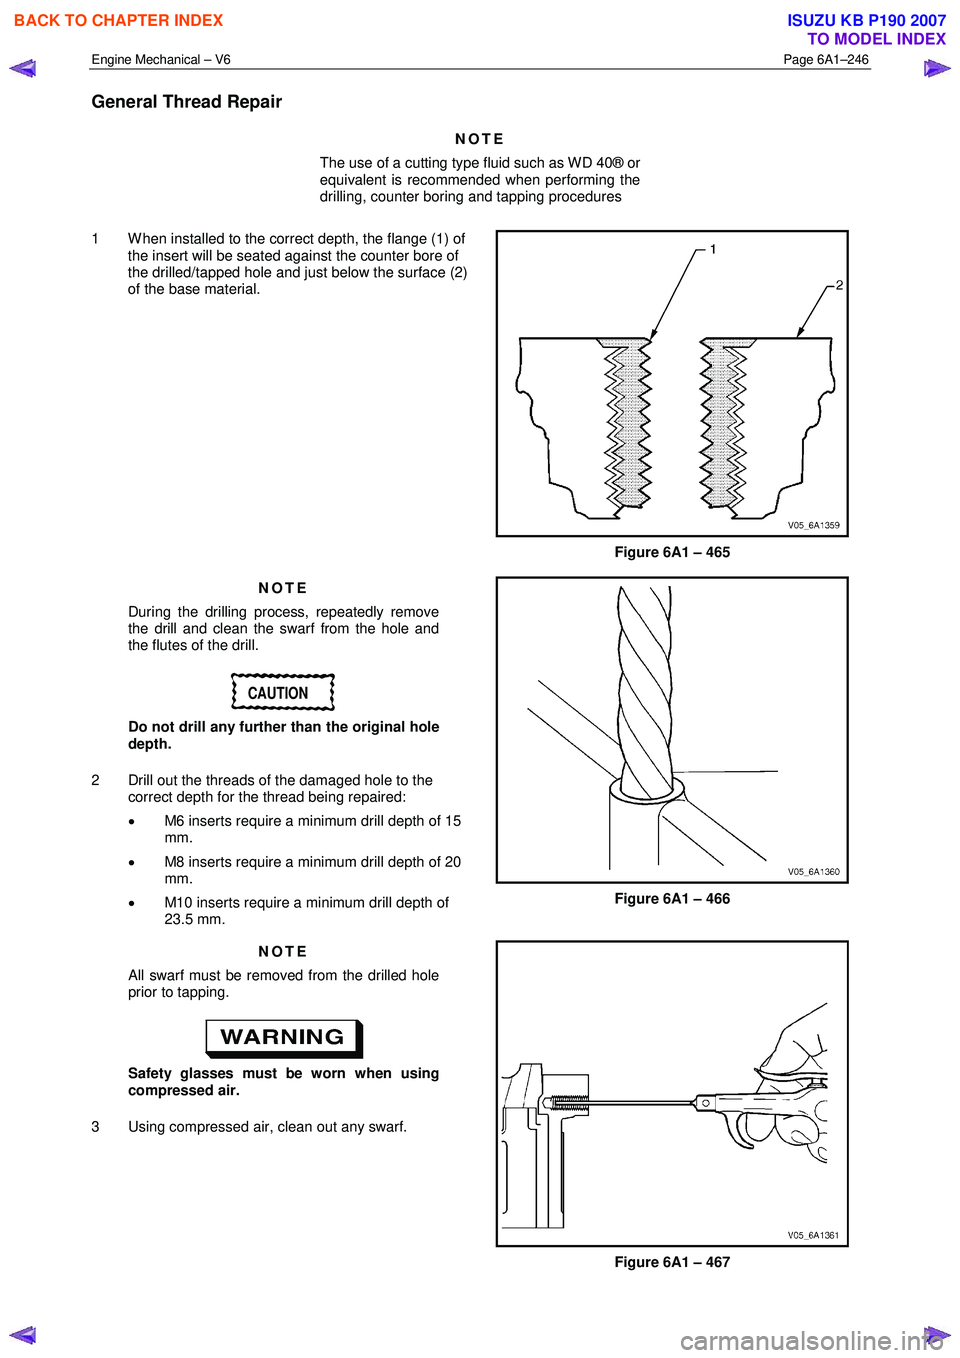
1 W hen installed to the correct depth, the flange (1) of the insert will be seated against the counter bore of
the drilled/tapped hole and just below the surface (2)
of the base material.
Figure 6A1 – 465
NOTE
During the drilling process, repeatedly remove
the drill and clean the swarf from the hole and
the flutes of the drill.
CAUTION
Do not drill any further than the original hole
depth.
2 Drill out the threads of the damaged hole to the correct depth for the thread being repaired:
• M6 inserts require a minimum drill depth of 15
mm.
• M8 inserts require a minimum drill depth of 20
mm.
• M10 inserts require a minimum drill depth of
23.5 mm.
Figure 6A1 – 466
NOTE
All swarf must be removed from the drilled hole
prior to tapping.
Safety glasses must be worn when using
compressed air.
3 Using compressed air, clean out any swarf.
Figure 6A1 – 467
BACK TO CHAPTER INDEX
TO MODEL INDEX
ISUZU KB P190 2007
Page 2726 of 6020
Engine Mechanical – V6 Page 6A1–247
NOTE
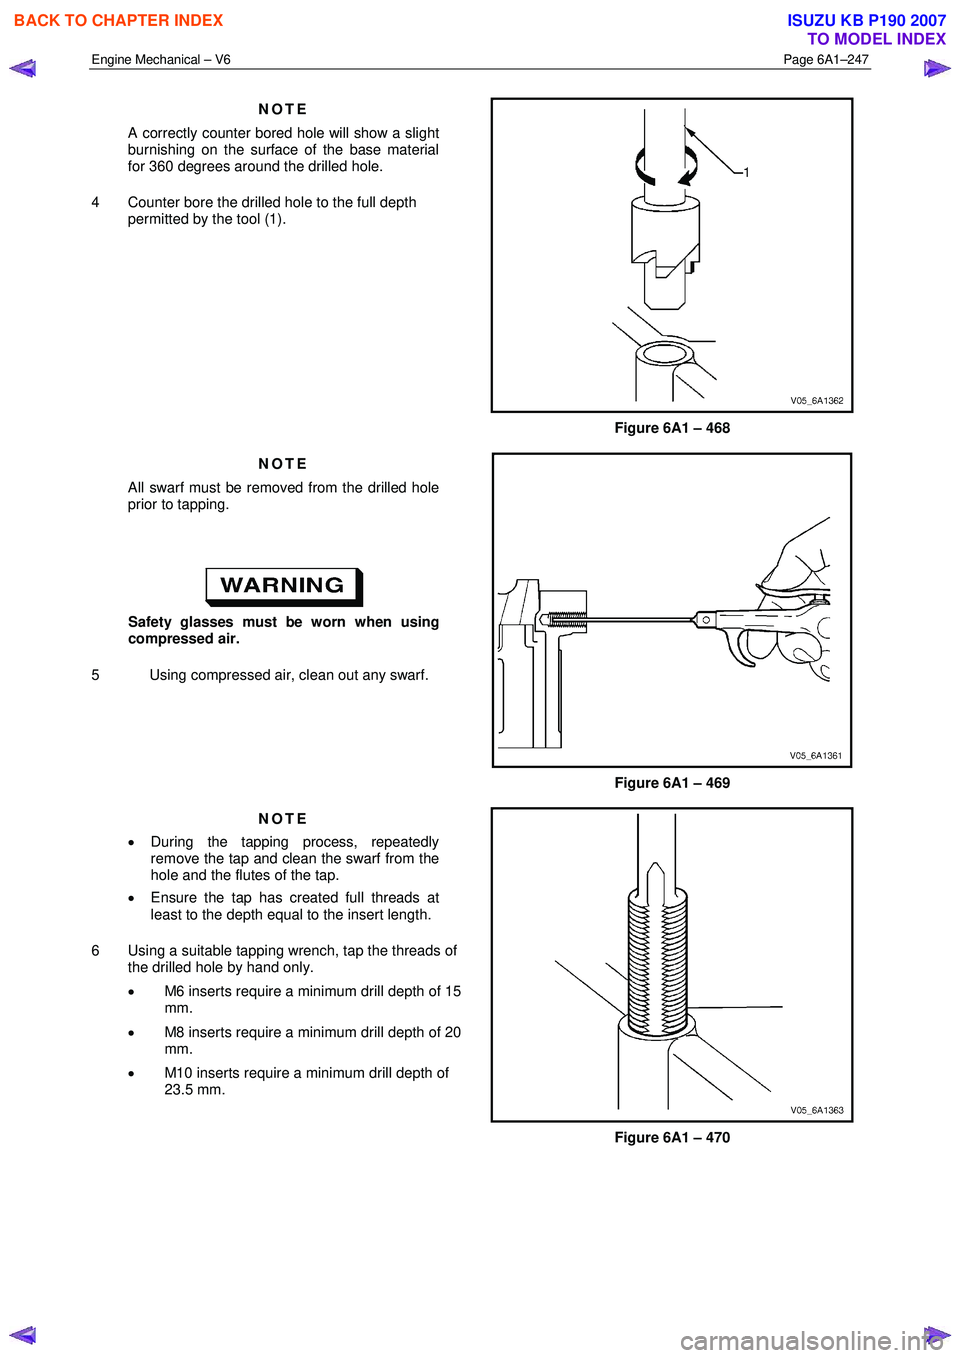
A correctly counter bored hole will show a slight
burnishing on the surface of the base material
for 360 degrees around the drilled hole.
4 Counter bore the drilled hole to the full depth permitted by the tool (1).
Figure 6A1 – 468
NOTE
All swarf must be removed from the drilled hole
prior to tapping.
Safety glasses must be worn when using
compressed air.
5 Using compressed air, clean out any swarf.
Figure 6A1 – 469
NOTE
• During the tapping process, repeatedly
remove the tap and clean the swarf from the
hole and the flutes of the tap.
• Ensure the tap has created full threads at
least to the depth equal to the insert length.
6 Using a suitable tapping wrench, tap the threads of the drilled hole by hand only.
• M6 inserts require a minimum drill depth of 15
mm.
• M8 inserts require a minimum drill depth of 20
mm.
• M10 inserts require a minimum drill depth of
23.5 mm.
Figure 6A1 – 470
BACK TO CHAPTER INDEX
TO MODEL INDEX
ISUZU KB P190 2007
Page 2727 of 6020
Engine Mechanical – V6 Page 6A1–248
NOTE
All swarf must be removed from the tapped hole
prior to insert installation.
Safety glasses must be worn when using
compressed air.
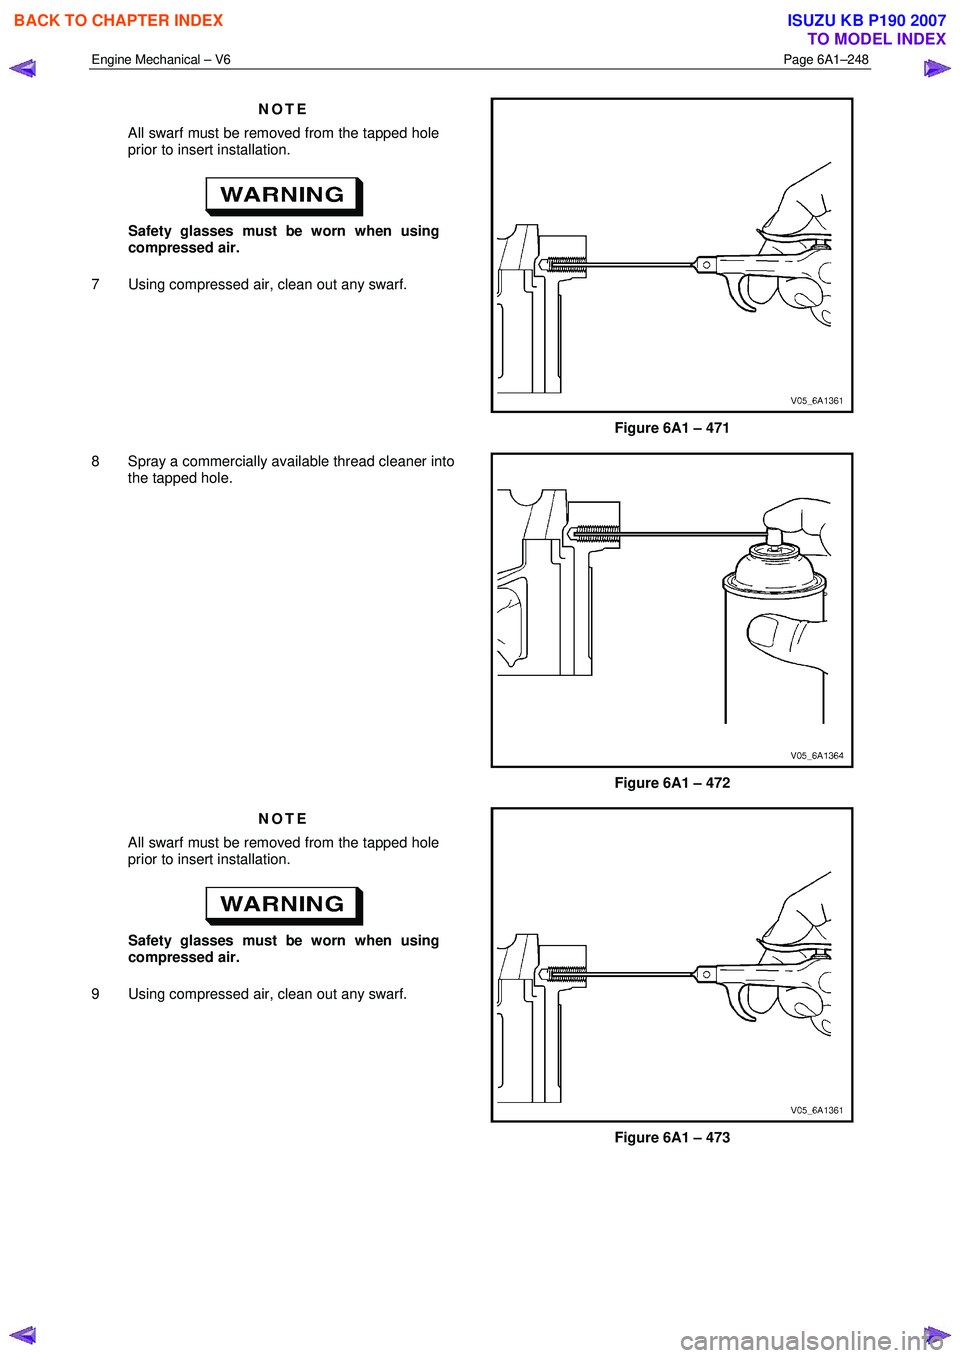
7 Using compressed air, clean out any swarf.
Figure 6A1 – 471
8 Spray a commercially available thread cleaner into the tapped hole.
Figure 6A1 – 472
NOTE
All swarf must be removed from the tapped hole
prior to insert installation.
Safety glasses must be worn when using
compressed air.
9 Using compressed air, clean out any swarf.
Figure 6A1 – 473
BACK TO CHAPTER INDEX
TO MODEL INDEX
ISUZU KB P190 2007
Page 2728 of 6020
Engine Mechanical – V6 Page 6A1–249
NOTE
Do not allow oil or other foreign material to
contact the outside diameter (OD) of the insert.
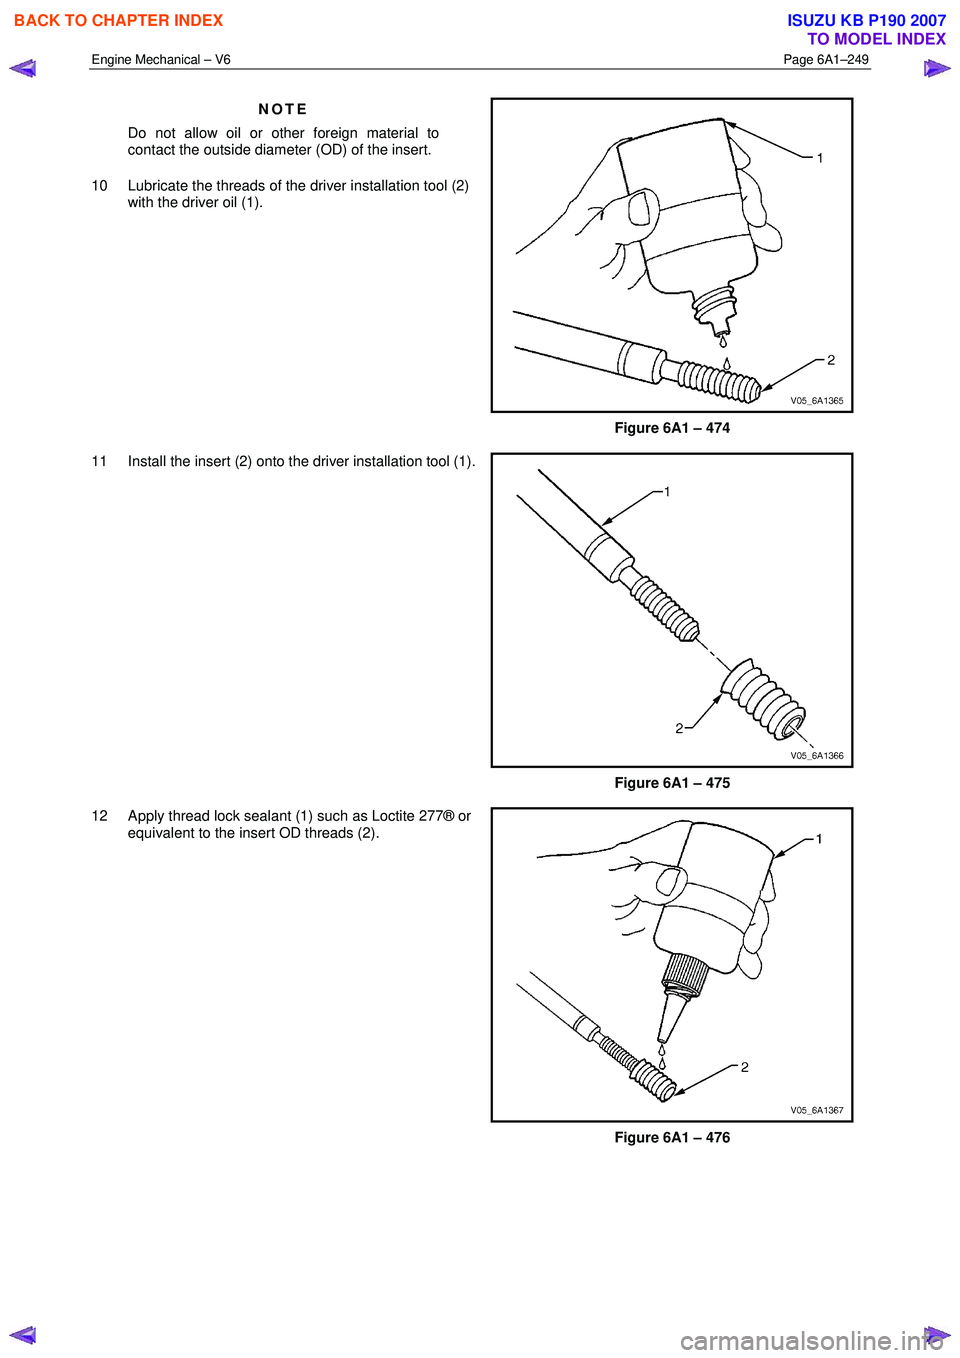
10 Lubricate the threads of the driver installation tool (2) with the driver oil (1).
Figure 6A1 – 474
11 Install the insert (2) onto the driver installation tool (1).
Figure 6A1 – 475
12 Apply thread lock sealant (1) such as Loctite 277® or equivalent to the insert OD threads (2).
Figure 6A1 – 476
BACK TO CHAPTER INDEX
TO MODEL INDEX
ISUZU KB P190 2007
Page 2729 of 6020
Engine Mechanical – V6 Page 6A1–250
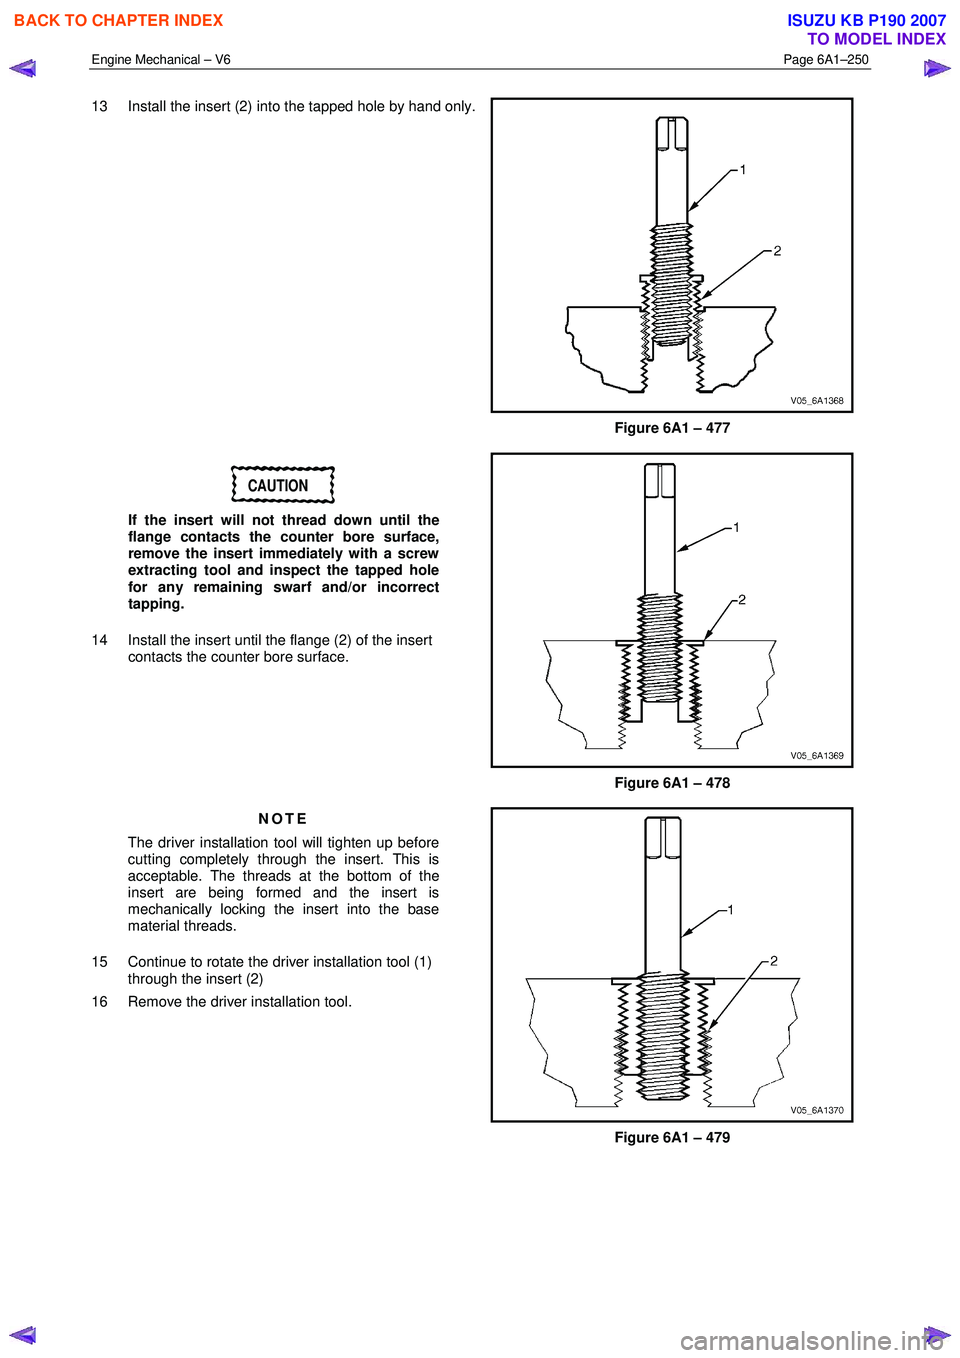
13 Install the insert (2) into the tapped hole by hand only.
Figure 6A1 – 477
CAUTION
If the insert will not thread down until the
flange contacts the counter bore surface,
remove the insert immediately with a screw
extracting tool and inspect the tapped hole
for any remaining swarf and/or incorrect
tapping.
14 Install the insert until the flange (2) of the insert contacts the counter bore surface.
Figure 6A1 – 478
NOTE
The driver installation tool will tighten up before
cutting completely through the insert. This is
acceptable. The threads at the bottom of the
insert are being formed and the insert is
mechanically locking the insert into the base
material threads.
15 Continue to rotate the driver installation tool (1) through the insert (2)
16 Remove the driver installation tool.
Figure 6A1 – 479
BACK TO CHAPTER INDEX
TO MODEL INDEX
ISUZU KB P190 2007
Page 2730 of 6020

Engine Mechanical – V6 Page 6A1–251
17 Inspect the insert for correct installation into the
tapped hole. A correctly installed insert (1) will be
either flush or slightly below flush with the surface of
the base material (2).
Figure 6A1 – 480
18 Any installed insert that restricts or blocks an oil or engine coolant passage (3) will need to have the oil or
engine coolant passage drilled out (4) to the original
size of the oil or engine coolant passage. After drilling
the restriction or blockage, clean out any swarf and
thread the installation driver tool through the insert
again to remove any burrs caused by the drilling of
the oil or engine coolant passage.
Figure 6A1 – 481
Main Bearing Cap Bolt Hole Thread Repair
The crankshaft main bearing bolt hole thread repair tools
are in Tool No. J 42385-2000 and J 42385-700 which
consist of the following:
• Drill (1) for outboard holes J 42385-702
• Tap (2) for outboard holes J 42385-703
• Installation driver (3) for outboard holes J 42385-704
• Bushing (4) for outboard holes J 42385-726
• Alignment pin (5) for outboard holes J 42385-727
• Bolts (6) for outboard holes J 42385-728
• Drill (7) for inboard holes J 42385-720
• Tap (8) for inboard holes J 42385-721
• Installation driver (9) for inboard holes J 42385-722
• Bushing (10) J 42385-713
• Alignment pin (11) J 42385-308
• Bolts (12) J 42385-734
• Fixture plate (13) J 42385-712
Figure 6A1 – 482
BACK TO CHAPTER INDEX
TO MODEL INDEX
ISUZU KB P190 2007
Page 2731 of 6020
Engine Mechanical – V6 Page 6A1–252
NOTE
• Ensure the fixture plate is installed during the
machining and installation processes of the
insert.
• The use of a cutting type fluid such as
WD 40® or equivalent is recommended when
performing the drilling, counter boring and
tapping procedures.
• When installed to the correct depth, the flange
of the insert will be seated against the counter
bore of the drilled/tapped hole.
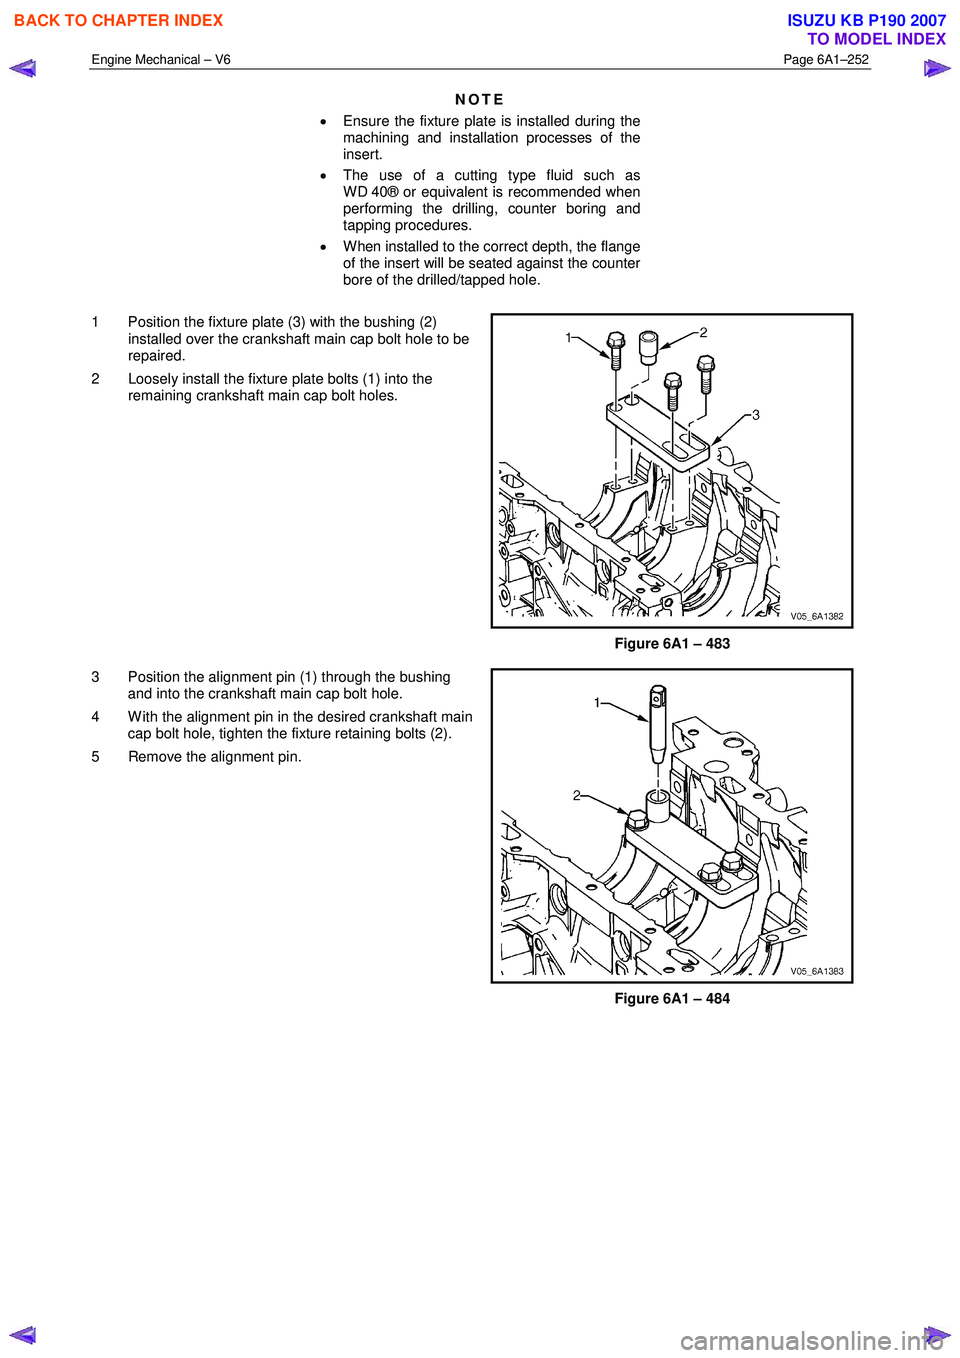
1 Position the fixture plate (3) with the bushing (2) installed over the crankshaft main cap bolt hole to be
repaired.
2 Loosely install the fixture plate bolts (1) into the remaining crankshaft main cap bolt holes.
Figure 6A1 – 483
3 Position the alignment pin (1) through the bushing and into the crankshaft main cap bolt hole.
4 W ith the alignment pin in the desired crankshaft main cap bolt hole, tighten the fixture retaining bolts (2).
5 Remove the alignment pin.
Figure 6A1 – 484
BACK TO CHAPTER INDEX
TO MODEL INDEX
ISUZU KB P190 2007
Page 2732 of 6020
Engine Mechanical – V6 Page 6A1–253
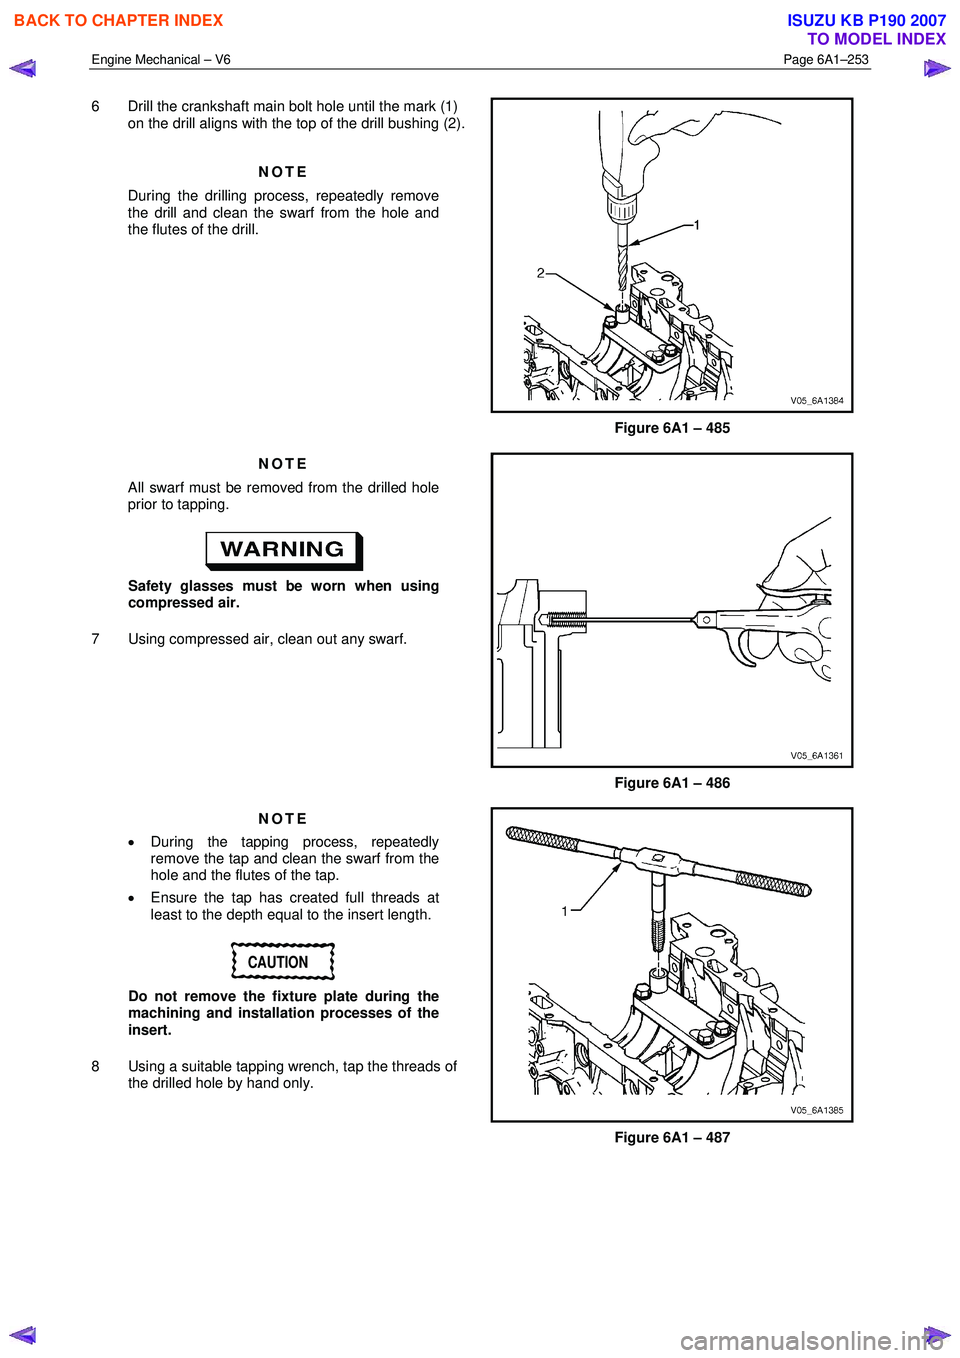
6 Drill the crankshaft main bolt hole until the mark (1)
on the drill aligns with the top of the drill bushing (2).
NOTE
During the drilling process, repeatedly remove
the drill and clean the swarf from the hole and
the flutes of the drill.
Figure 6A1 – 485
NOTE
All swarf must be removed from the drilled hole
prior to tapping.
Safety glasses must be worn when using
compressed air.
7 Using compressed air, clean out any swarf.
Figure 6A1 – 486
NOTE
• During the tapping process, repeatedly
remove the tap and clean the swarf from the
hole and the flutes of the tap.
• Ensure the tap has created full threads at
least to the depth equal to the insert length.
CAUTION
Do not remove the fixture plate during the
machining and installation processes of the
insert.
8 Using a suitable tapping wrench, tap the threads of the drilled hole by hand only.
Figure 6A1 – 487
BACK TO CHAPTER INDEX
TO MODEL INDEX
ISUZU KB P190 2007
Page 2733 of 6020
Engine Mechanical – V6 Page 6A1–254
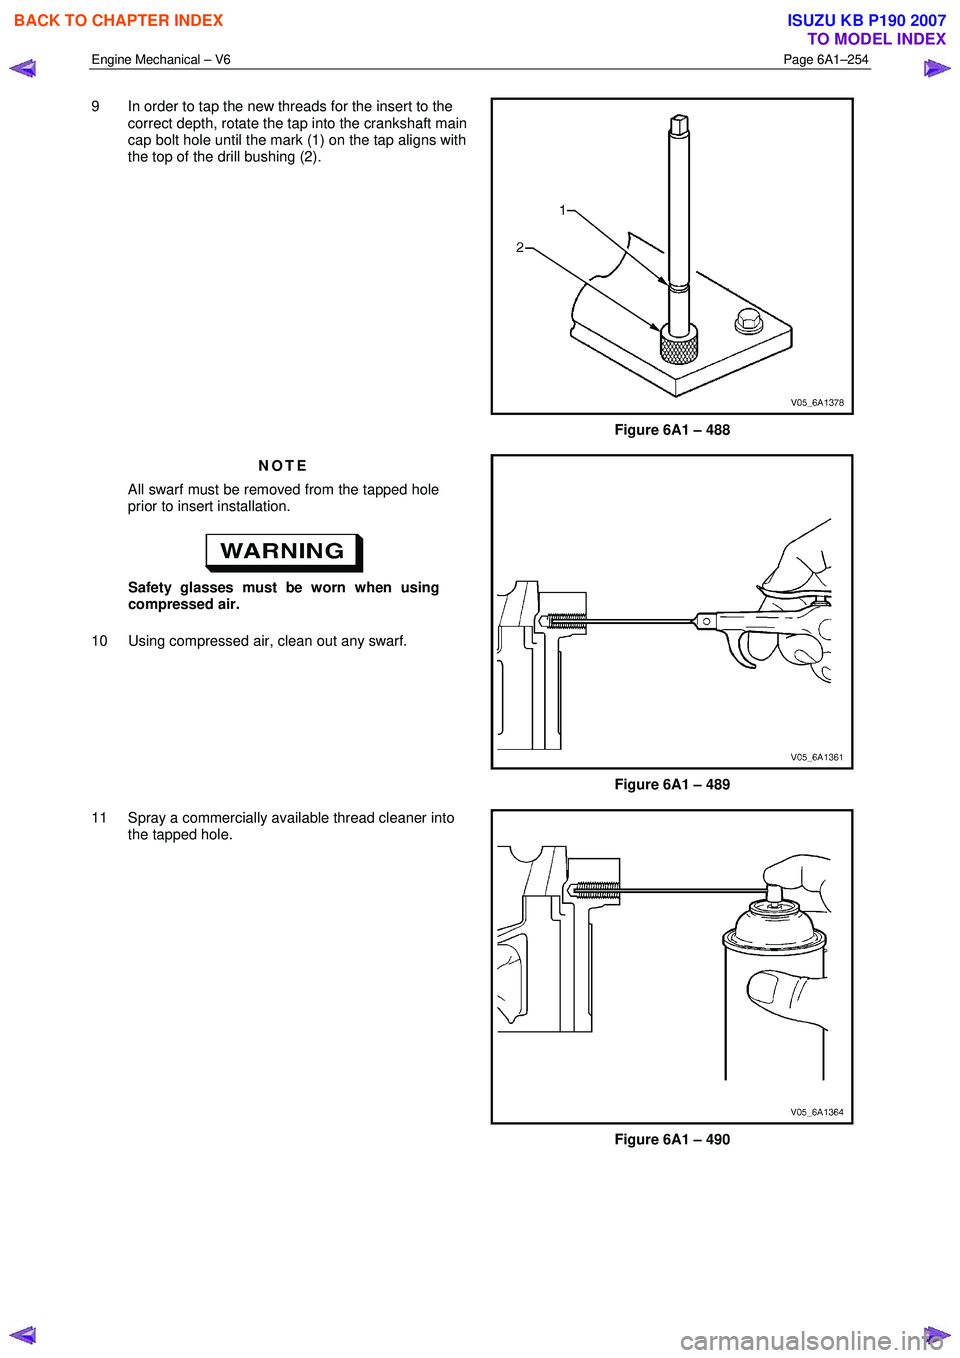
9 In order to tap the new threads for the insert to the
correct depth, rotate the tap into the crankshaft main
cap bolt hole until the mark (1) on the tap aligns with
the top of the drill bushing (2).
Figure 6A1 – 488
NOTE
All swarf must be removed from the tapped hole
prior to insert installation.
Safety glasses must be worn when using
compressed air.
10 Using compressed air, clean out any swarf.
Figure 6A1 – 489
11 Spray a commercially available thread cleaner into the tapped hole.
Figure 6A1 – 490
BACK TO CHAPTER INDEX
TO MODEL INDEX
ISUZU KB P190 2007
Page 2734 of 6020
Engine Mechanical – V6 Page 6A1–255
NOTE
All swarf must be removed from the tapped hole
prior to insert installation.
Safety glasses must be worn when using
compressed air.
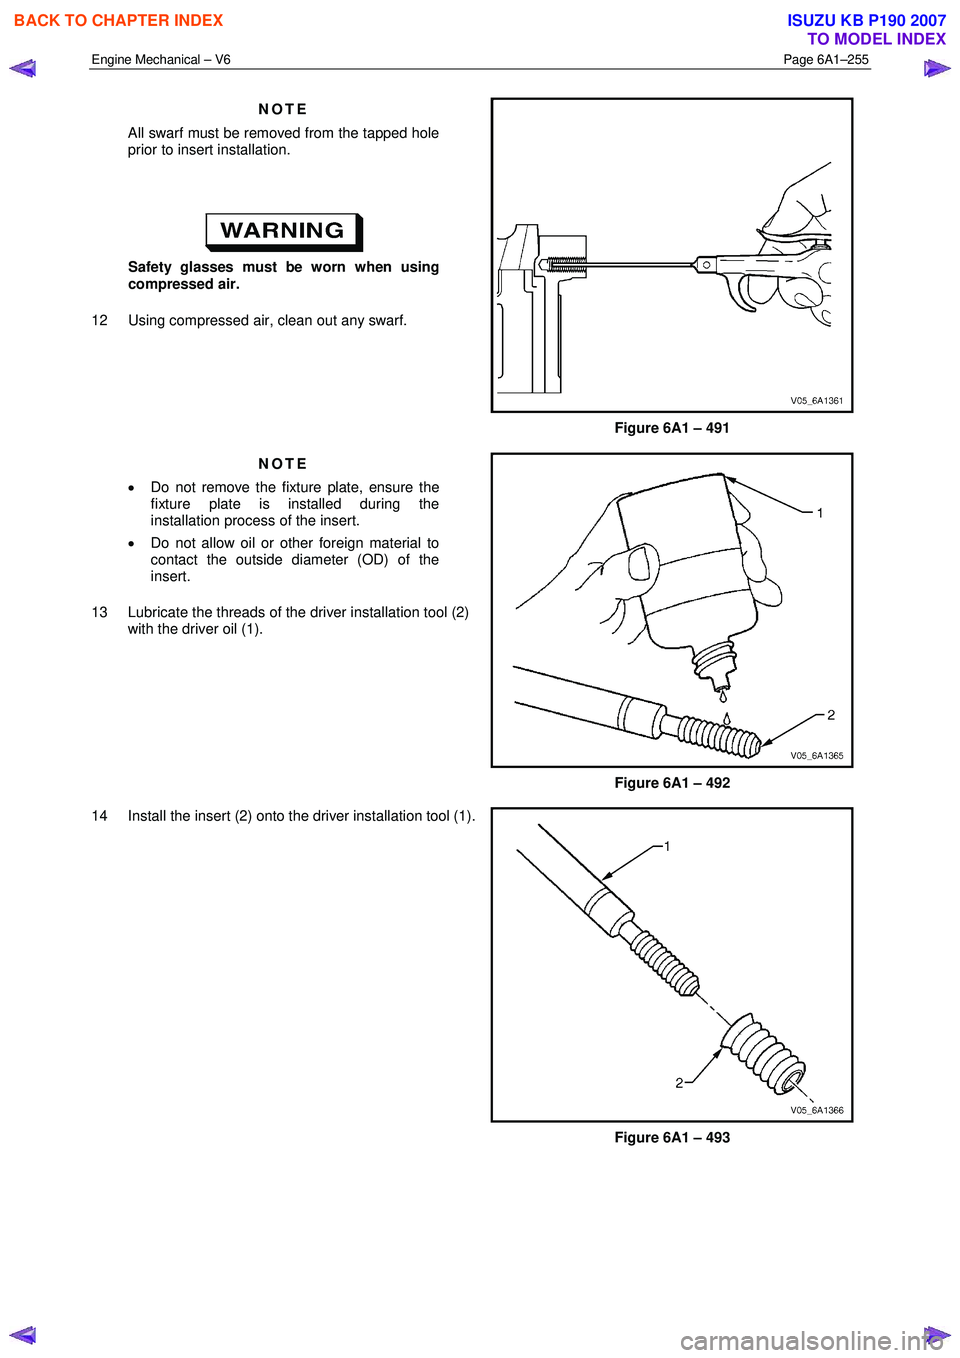
12 Using compressed air, clean out any swarf.
Figure 6A1 – 491
NOTE
• Do not remove the fixture plate, ensure the
fixture plate is installed during the
installation process of the insert.
• Do not allow oil or other foreign material to
contact the outside diameter (OD) of the
insert.
13 Lubricate the threads of the driver installation tool (2) with the driver oil (1).
Figure 6A1 – 492
14 Install the insert (2) onto the driver installation tool (1).
Figure 6A1 – 493
BACK TO CHAPTER INDEX
TO MODEL INDEX
ISUZU KB P190 2007