ECO mode ISUZU KB P190 2007 Workshop User Guide
[x] Cancel search | Manufacturer: ISUZU, Model Year: 2007, Model line: KB P190, Model: ISUZU KB P190 2007Pages: 6020, PDF Size: 70.23 MB
Page 68 of 6020
1-34 HEATER AND AIR CONDITIONING
REFRIGERANT RECYCLING
Recycle the refrigerant recovered by ACR4 or equivalent.
For the details of the actual operation, follow the steps in the
ACR
4 Manufacturer's Instructions.
ACR4 (115V 60Hz) :5-8840-0629-0 (J-39500-A)
ACR4 (220-240V 50/60Hz)
: 5-8840-0630-0 (J-39500-220A)
ACR
4 (220-240V 50/60Hz Australian model)
: 5-8840-0631-0 (J-39500-220ANZ)
F06R300014
EVACUATION OF THE REFRIGERANT
SYSTEM
NOTE:
Explained below is a method using a vacuum pump. Refer
to the ACR
4 (or equivalent) Manufacturer's Instructions
when evacuating the system with ACR4 (or equivalent).
Air and moisture in the refrigerant will cause problems in the air
conditioning system.
Therefore, before charging the refrigerant, be sure to evacuate
air and moisture thoroughly from the system.
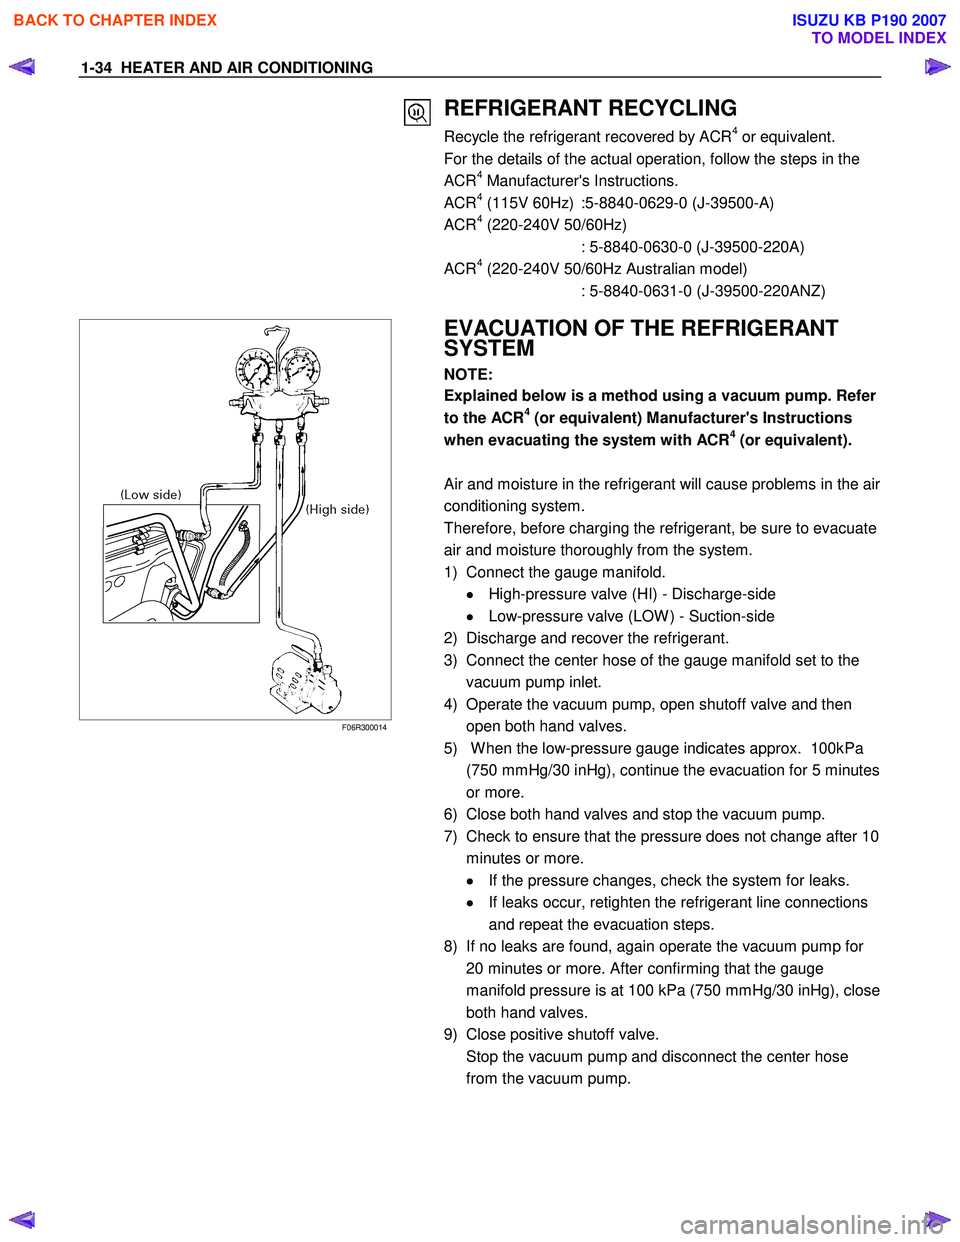
1) Connect the gauge manifold. •
••
•
High-pressure valve (HI) - Discharge-side
•
••
•
Low-pressure valve (LOW ) - Suction-side
2) Discharge and recover the refrigerant.
3) Connect the center hose of the gauge manifold set to the vacuum pump inlet.
4) Operate the vacuum pump, open shutoff valve and then open both hand valves.
5) W hen the low-pressure gauge indicates approx. 100kPa (750 mmHg/30 inHg), continue the evacuation for 5 minutes
or more.
6) Close both hand valves and stop the vacuum pump.
7) Check to ensure that the pressure does not change after 10
minutes or more. •
••
•
If the pressure changes, check the system for leaks.
•
••
•
If leaks occur, retighten the refrigerant line connections
and repeat the evacuation steps.
8) If no leaks are found, again operate the vacuum pump for 20 minutes or more. After confirming that the gauge
manifold pressure is at 100 kPa (750 mmHg/30 inHg), close
both hand valves.
9) Close positive shutoff valve.
Stop the vacuum pump and disconnect the center hose from the vacuum pump.
BACK TO CHAPTER INDEX
TO MODEL INDEX
ISUZU KB P190 2007
Page 69 of 6020
HEATER AND AIR CONDITIONING 1-35
CHARGING THE REFRIGERANT SYSTEM
There are various methods of charging refrigerant into the air
conditioning system.
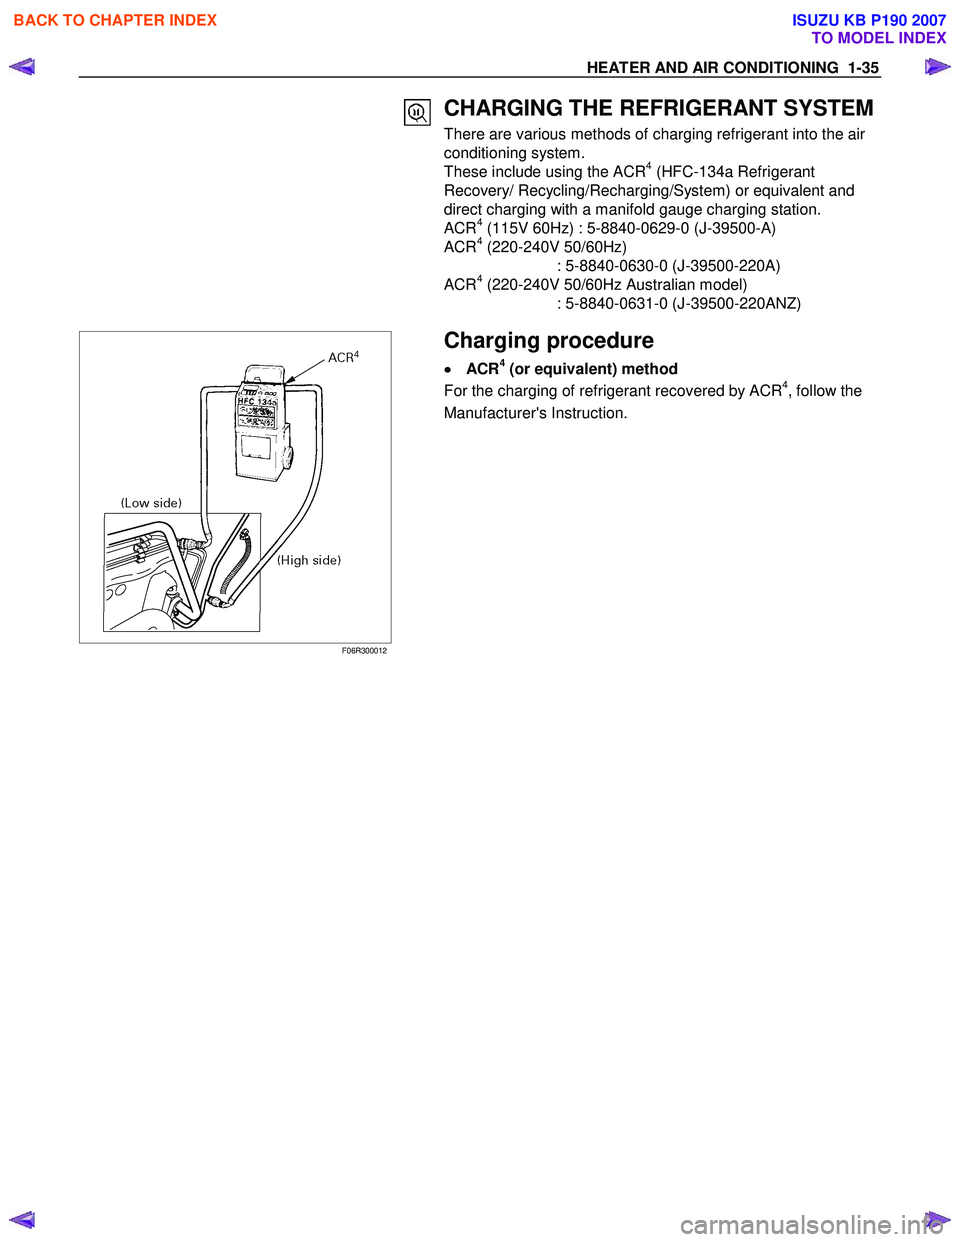
These include using the ACR
4 (HFC-134a Refrigerant
Recovery/ Recycling/Recharging/System) or equivalent and
direct charging with a manifold gauge charging station.
ACR
4 (115V 60Hz) : 5-8840-0629-0 (J-39500-A)
ACR4 (220-240V 50/60Hz)
: 5-8840-0630-0 (J-39500-220A)
ACR
4 (220-240V 50/60Hz Australian model)
: 5-8840-0631-0 (J-39500-220ANZ)
F06R300012
Charging procedure
•
••
•
ACR4 (or equivalent) method
For the charging of refrigerant recovered by ACR4, follow the
Manufacturer's Instruction.
BACK TO CHAPTER INDEX
TO MODEL INDEX
ISUZU KB P190 2007
Page 71 of 6020
HEATER AND AIR CONDITIONING 1-37
refrigerant container.
1) Make sure the evacuation process is correctly completed.
2) Connect the center-hose of the manifold gauge to the refrigerant container. •
••
•
Turn the charge valve handle counterclockwise to purge
to the charging line and purge any air exiting in the
center-hose of the manifold gauge.
3) Open the low-pressure hand valve and charge the refrigerant about 200 g (0.44 lbs.). •
••
•
Make sure the high-pressure hand valve is closed.
•
••
•
Avoid charging the refrigerant by turning the refrigerant
container upside down.
4) Close the low-pressure hand valve of the manifold gauge. •
••
•
Check to ensure that the degree of pressure does not
change.
5) Check the refrigerant leaks by using a HFC-134a leak detector. •
••
•
If a leak occurs, repair the leak connection, and start all
over again from the first step of evacuation.
6) If no leaks are found, open the low-pressure hand valve of the manifold gauge. Then continue charging refrigerant to
the system. •
••
•
W hen charging the system becomes difficult:
(1) Run the engine at Idling and close the all vehicle doors.
(2) A/C switch is "ON".
(3) Set the fan control knob (fan switch) to its highest position.
(4) Set air source selector lever to “RECIRC”
WARNING
BE ABSOLUTELY SURE NOT TO OPEN THE HIGH-
PRESSURE HAND VALVE. SHOULD THE HIGH-
PRESSURE HAND VALVE BE OPENED, THE HIGH-
PRESSURE REFRIGERANT GAS WOULD FLOW
BACKWARD, AND THIS MAY CAUSE THE REFRIGERANT
CONTAINER TO BURST.
7) W hen the refrigerant container is emptied, use the following procedure to replace it with a new refrigerant container.
(1) Close the low-pressure hand valve.
(2) Raise the needle upward and remove the charge valve.
(3) Reinstall the charge valve to the new refrigerant container.
(4) Purge any air existing in the center hose of the manifold gauge.
BACK TO CHAPTER INDEX
TO MODEL INDEX
ISUZU KB P190 2007
Page 73 of 6020
HEATER AND AIR CONDITIONING 1-39
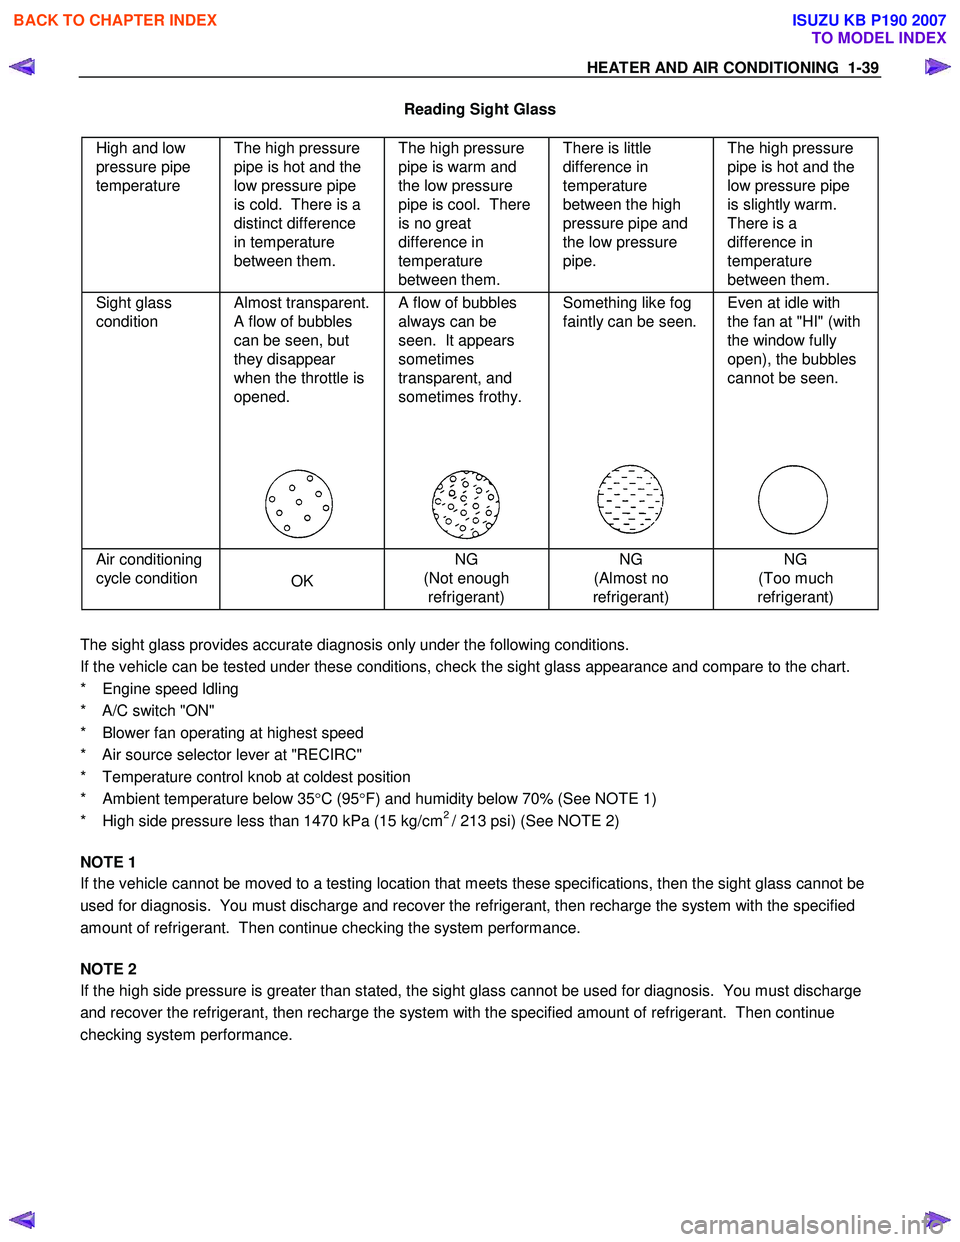
Reading Sight Glass
High and low
pressure pipe
temperature The high pressure
pipe is hot and the
low pressure pipe
is cold. There is a
distinct difference
in temperature
between them. The high pressure
pipe is warm and
the low pressure
pipe is cool. There
is no great
difference in
temperature
between them. There is little
difference in
temperature
between the high
pressure pipe and
the low pressure
pipe. The high pressure
pipe is hot and the
low pressure pipe
is slightly warm.
There is a
difference in
temperature
between them.
Sight glass
condition Almost transparent.
A flow of bubbles
can be seen, but
they disappear
when the throttle is
opened.
A flow of bubbles
always can be
seen. It appears
sometimes
transparent, and
sometimes frothy.
Something like fog
faintly can be seen.
Even at idle with
the fan at "HI" (with
the window fully
open), the bubbles
cannot be seen.
Air conditioning
cycle condition
OK NG
(Not enough refrigerant) NG
(Almost no
refrigerant) NG
(Too much
refrigerant)
The sight glass provides accurate diagnosis only under the following conditions.
If the vehicle can be tested under these conditions, check the sight glass appearance and compare to the chart.
* Engine speed Idling
* A/C switch "ON"
* Blower fan operating at highest speed
* Air source selector lever at "RECIRC"
* Temperature control knob at coldest position
* Ambient temperature below 35 °C (95 °F) and humidity below 70% (See NOTE 1)
* High side pressure less than 1470 kPa (15 kg/cm
2 / 213 psi) (See NOTE 2)
NOTE 1
If the vehicle cannot be moved to a testing location that meets these specifications, then the sight glass cannot be
used for diagnosis. You must discharge and recover the refrigerant, then recharge the system with the specified
amount of refrigerant. Then continue checking the system performance.
NOTE 2
If the high side pressure is greater than stated, the sight glass cannot be used for diagnosis. You must discharge
and recover the refrigerant, then recharge the system with the specified amount of refrigerant. Then continue
checking system performance.
BACK TO CHAPTER INDEX
TO MODEL INDEX
ISUZU KB P190 2007
Page 87 of 6020
HEATER AND AIR CONDITIONING 1-53
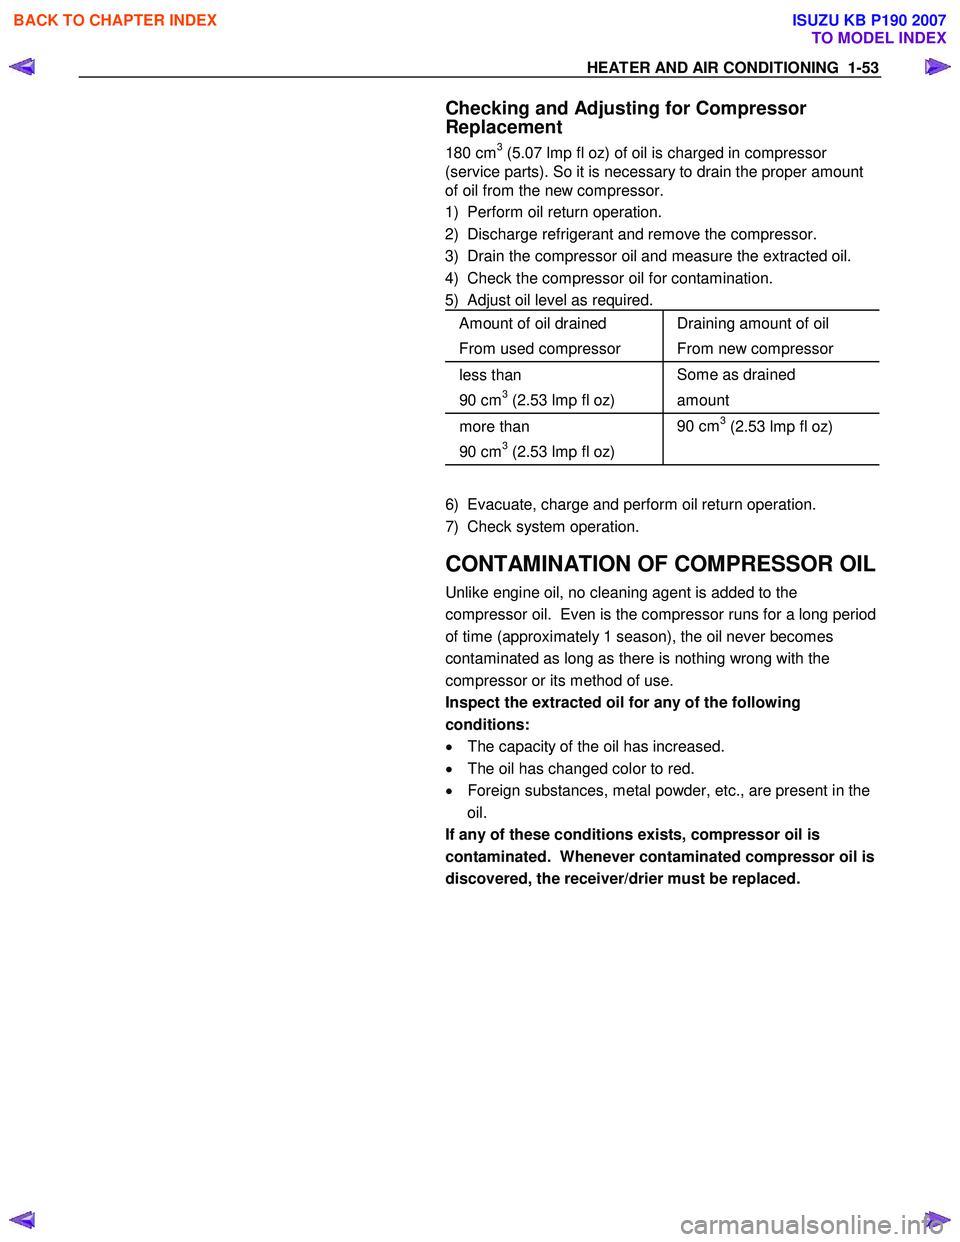
Checking and Adjusting for Compressor
Replacement
180 cm3 (5.07 lmp fl oz) of oil is charged in compressor
(service parts). So it is necessary to drain the proper amount
of oil from the new compressor.
1) Perform oil return operation.
2) Discharge refrigerant and remove the compressor.
3) Drain the compressor oil and measure the extracted oil.
4) Check the compressor oil for contamination.
5) Adjust oil level as required.
Amount of oil drained
From used compressor Draining amount of oil
From new compressor
less than
90 cm
3 (2.53 lmp fl oz) Some as drained
amount
more than
90 cm
3 (2.53 lmp fl oz) 90 cm
3 (2.53 lmp fl oz)
6) Evacuate, charge and perform oil return operation.
7) Check system operation.
CONTAMINATION OF COMPRESSOR OIL
Unlike engine oil, no cleaning agent is added to the
compressor oil. Even is the compressor runs for a long period
of time (approximately 1 season), the oil never becomes
contaminated as long as there is nothing wrong with the
compressor or its method of use.
Inspect the extracted oil for any of the following
conditions:
• The capacity of the oil has increased.
• The oil has changed color to red.
• Foreign substances, metal powder, etc., are present in the
oil.
If any of these conditions exists, compressor oil is
contaminated. Whenever contaminated compressor oil is
discovered, the receiver/drier must be replaced.
BACK TO CHAPTER INDEX
TO MODEL INDEX
ISUZU KB P190 2007
Page 123 of 6020
HEATER AND AIR CONDITIONING 1-89
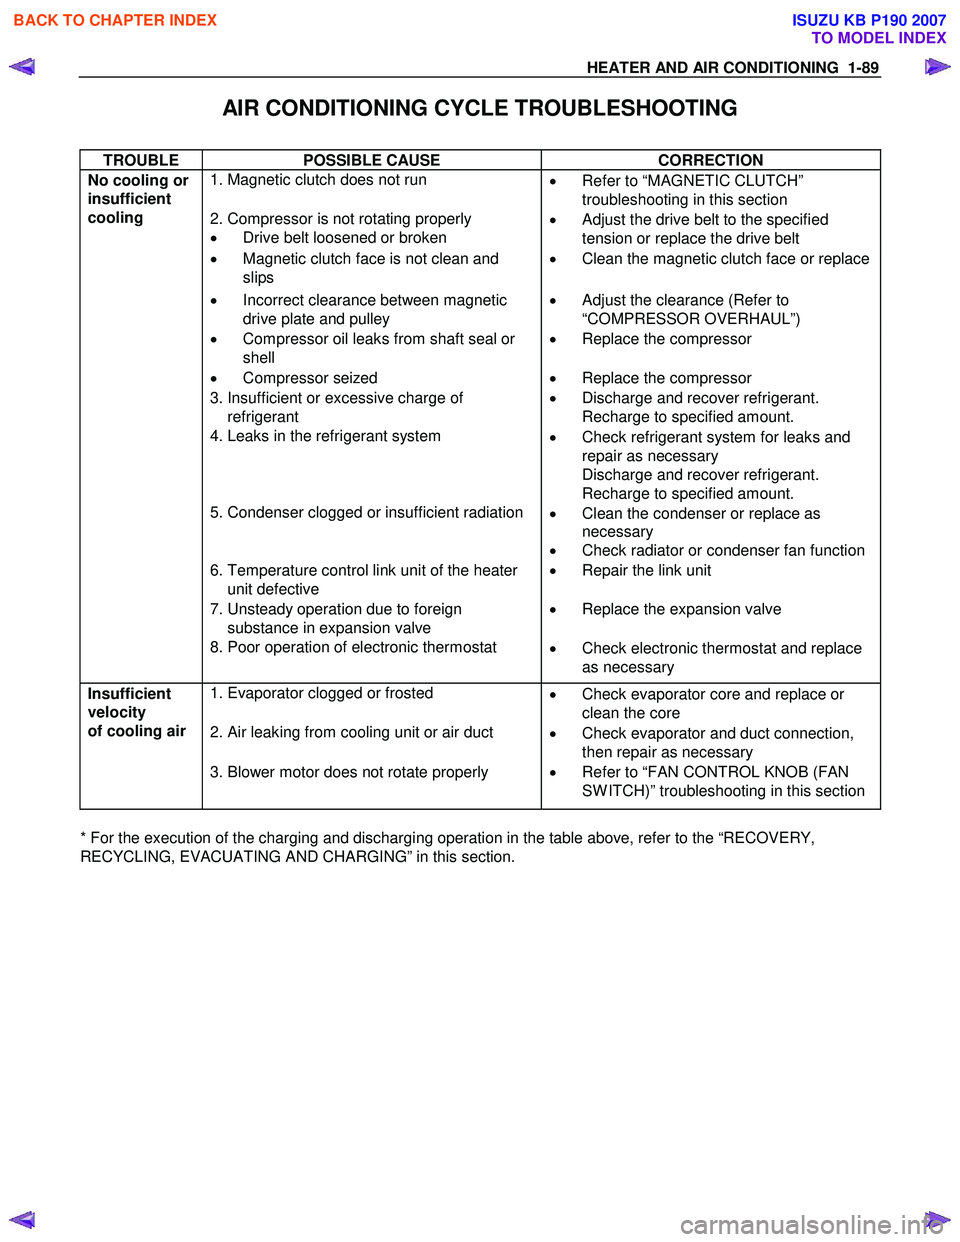
AIR CONDITIONING CYCLE TROUBLESHOOTING
TROUBLE POSSIBLE CAUSE CORRECTION
1. Magnetic clutch does not run
•
Refer to “MAGNETIC CLUTCH”
troubleshooting in this section
2. Compressor is not rotating properly
• Drive belt loosened or broken •
Adjust the drive belt to the specified
tension or replace the drive belt
• Magnetic clutch face is not clean and
slips •
Clean the magnetic clutch face or replace
• Incorrect clearance between magnetic
drive plate and pulley •
Adjust the clearance (Refer to
“COMPRESSOR OVERHAUL”)
• Compressor oil leaks from shaft seal or
shell •
Replace the compressor
• Compressor seized • Replace the compressor
3. Insufficient or excessive charge of
refrigerant •
Discharge and recover refrigerant.
Recharge to specified amount.
4. Leaks in the refrigerant system
•
Check refrigerant system for leaks and
repair as necessary
Discharge and recover refrigerant.
Recharge to specified amount.
5. Condenser clogged or insufficient radiation
•
Clean the condenser or replace as
necessary
• Check radiator or condenser fan function
6. Temperature control link unit of the heater
unit defective •
Repair the link unit
7. Unsteady operation due to foreign
substance in expansion valve •
Replace the expansion valve
No cooling or
insufficient
cooling
8. Poor operation of electronic thermostat
•
Check electronic thermostat and replace
as necessary
1. Evaporator clogged or frosted
•
Check evaporator core and replace or
clean the core
2. Air leaking from cooling unit or air duct
•
Check evaporator and duct connection,
then repair as necessary
Insufficient
velocity
of cooling air
3. Blower motor does not rotate properly
• Refer to “FAN CONTROL KNOB (FAN
SW ITCH)” troubleshooting in this section
* For the execution of the charging and discharging operation in the table above, refer to the “RECOVERY,
RECYCLING, EVACUATING AND CHARGING” in this section.
BACK TO CHAPTER INDEX
TO MODEL INDEX
ISUZU KB P190 2007
Page 125 of 6020
HEATER AND AIR CONDITIONING 1-91
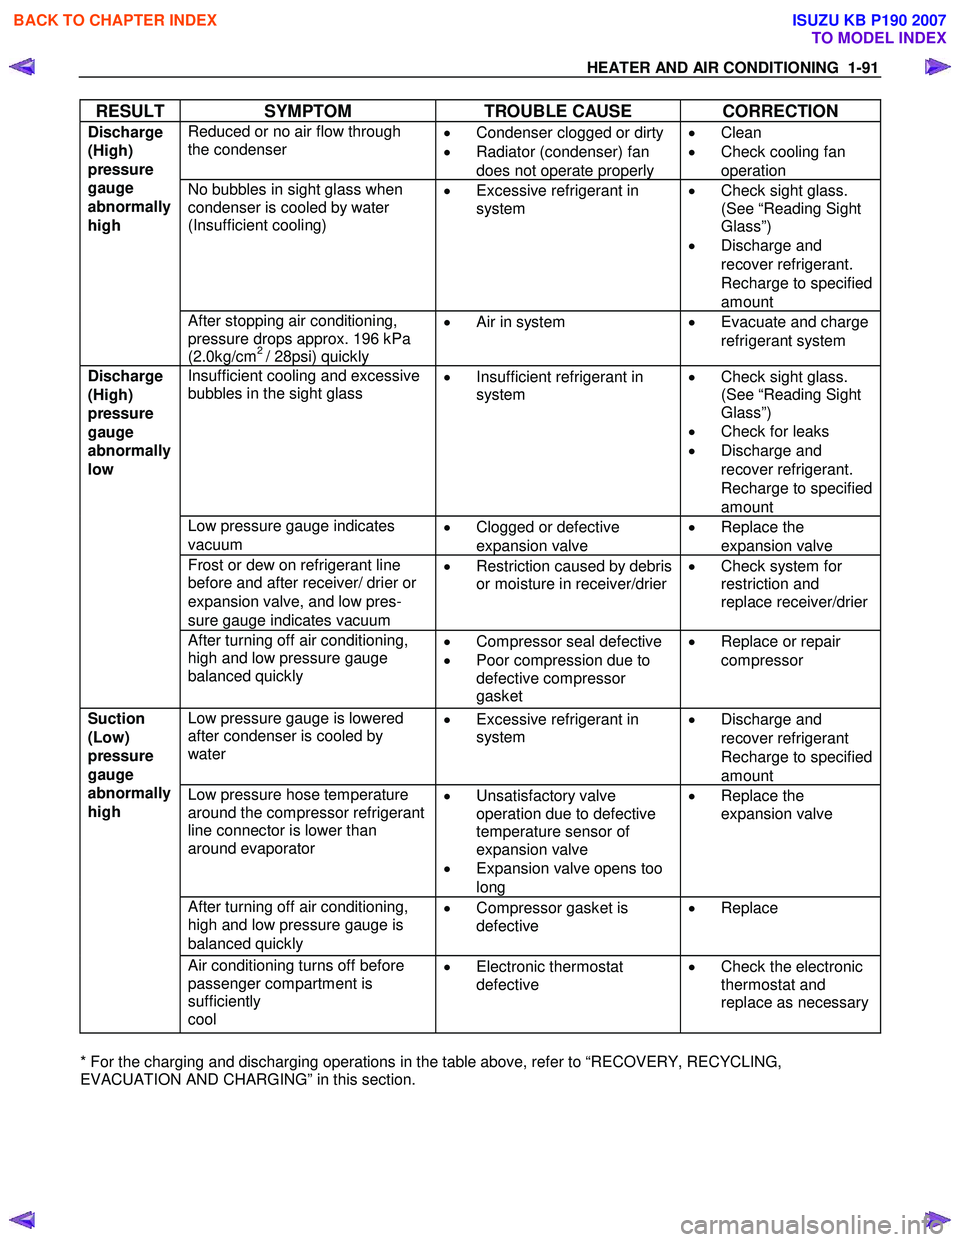
RESULT SYMPTOM TROUBLE CAUSE CORRECTION
Reduced or no air flow through
the condenser
•
Condenser clogged or dirty
• Radiator (condenser) fan
does not operate properly •
Clean
• Check cooling fan
operation
No bubbles in sight glass when
condenser is cooled by water
(Insufficient cooling)
•
Excessive refrigerant in
system
•
Check sight glass.
(See “Reading Sight
Glass”)
• Discharge and
recover refrigerant.
Recharge to specified
amount
Discharge
(High)
pressure
gauge
abnormally
high
After stopping air conditioning,
pressure drops approx. 196 kPa
(2.0kg/cm
2 / 28psi) quickly •
Air in system
•
Evacuate and charge
refrigerant system
Insufficient cooling and excessive
bubbles in the sight glass
•
Insufficient refrigerant in
system
•
Check sight glass.
(See “Reading Sight
Glass”)
• Check for leaks
• Discharge and
recover refrigerant.
Recharge to specified
amount
Low pressure gauge indicates
vacuum •
Clogged or defective
expansion valve •
Replace the
expansion valve
Frost or dew on refrigerant line
before and after receiver/ drier or
expansion valve, and low pres-
sure gauge indicates vacuum •
Restriction caused by debris
or moisture in receiver/drier
•
Check system for
restriction and
replace receiver/drier
Discharge
(High)
pressure
gauge
abnormally
low
After turning off air conditioning,
high and low pressure gauge
balanced quickly
•
Compressor seal defective
• Poor compression due to
defective compressor
gasket •
Replace or repair
compressor
Low pressure gauge is lowered
after condenser is cooled by
water
•
Excessive refrigerant in
system
•
Discharge and
recover refrigerant
Recharge to specified
amount
Low pressure hose temperature
around the compressor refrigerant
line connector is lower than
around evaporator
•
Unsatisfactory valve
operation due to defective
temperature sensor of
expansion valve
• Expansion valve opens too
long •
Replace the
expansion valve
After turning off air conditioning,
high and low pressure gauge is
balanced quickly •
Compressor gasket is
defective
•
Replace
Suction
(Low)
pressure
gauge
abnormally
high
Air conditioning turns off before
passenger compartment is
sufficiently
cool •
Electronic thermostat
defective
•
Check the electronic
thermostat and
replace as necessary
* For the charging and discharging operations in the table above, refer to “RECOVERY, RECYCLING,
EVACUATION AND CHARGING” in this section.
BACK TO CHAPTER INDEX
TO MODEL INDEX
ISUZU KB P190 2007
Page 126 of 6020
1-92 HEATER AND AIR CONDITIONING
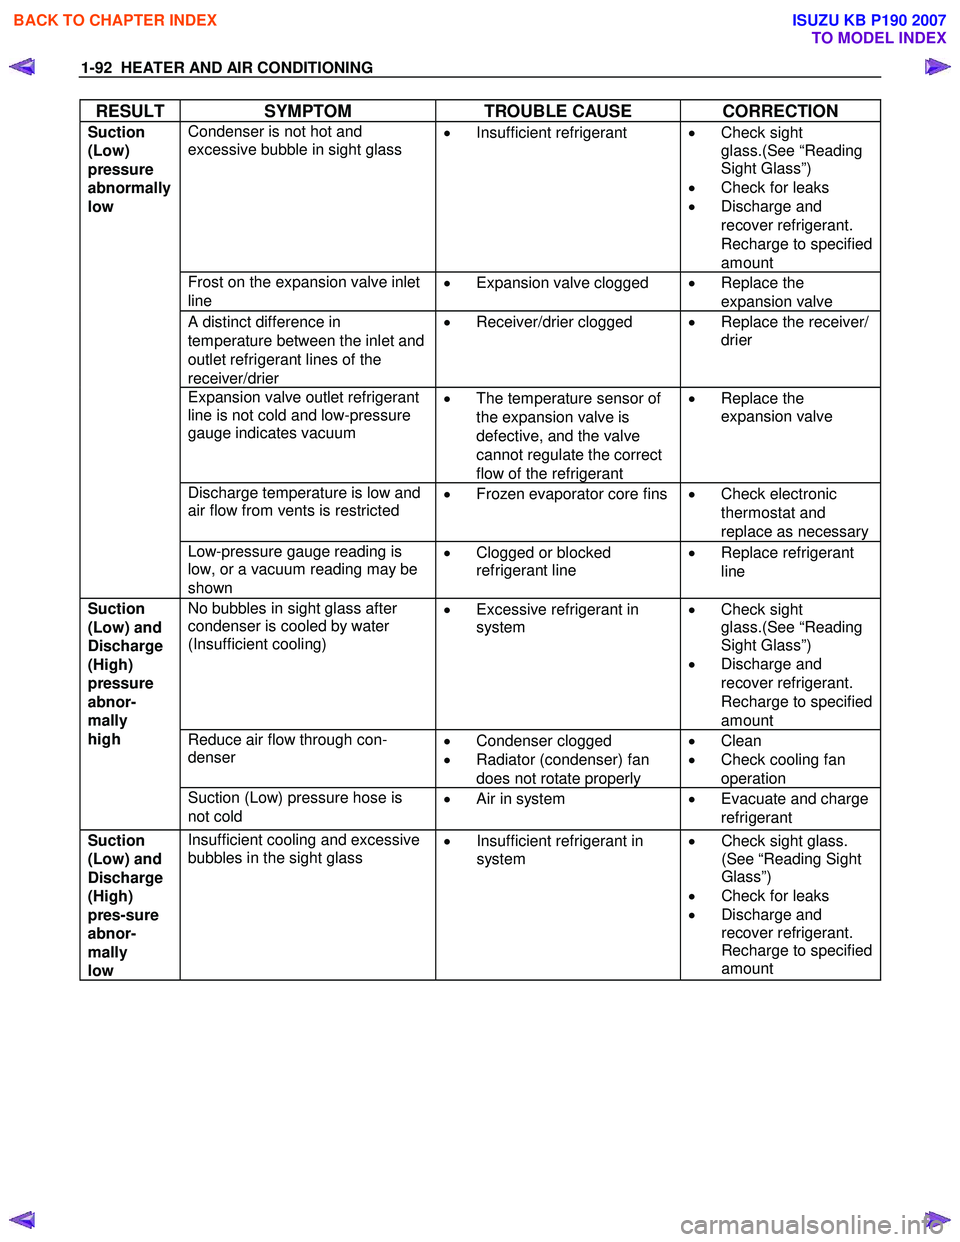
RESULT SYMPTOM TROUBLE CAUSE CORRECTION
Condenser is not hot and
excessive bubble in sight glass
•
Insufficient refrigerant
•
Check sight
glass.(See “Reading
Sight Glass”)
• Check for leaks
• Discharge and
recover refrigerant.
Recharge to specified
amount
Frost on the expansion valve inlet
line •
Expansion valve clogged
•
Replace the
expansion valve
A distinct difference in
temperature between the inlet and
outlet refrigerant lines of the
receiver/drier •
Receiver/drier clogged
•
Replace the receiver/
drier
Expansion valve outlet refrigerant
line is not cold and low-pressure
gauge indicates vacuum
•
The temperature sensor of
the expansion valve is
defective, and the valve
cannot regulate the correct
flow of the refrigerant •
Replace the
expansion valve
Discharge temperature is low and
air flow from vents is restricted
•
Frozen evaporator core fins
•
Check electronic
thermostat and
replace as necessary
Suction
(Low)
pressure
abnormally
low
Low-pressure gauge reading is
low, or a vacuum reading may be
shown •
Clogged or blocked
refrigerant line
•
Replace refrigerant
line
No bubbles in sight glass after
condenser is cooled by water
(Insufficient cooling)
•
Excessive refrigerant in
system
•
Check sight
glass.(See “Reading
Sight Glass”)
• Discharge and
recover refrigerant.
Recharge to specified
amount
Reduce air flow through con-
denser
•
Condenser clogged
• Radiator (condenser) fan
does not rotate properly •
Clean
• Check cooling fan
operation
Suction
(Low) and
Discharge
(High)
pressure
abnor-
mally
high
Suction (Low) pressure hose is
not cold •
Air in system • Evacuate and charge
refrigerant
Suction
(Low) and
Discharge
(High)
pres-sure
abnor-
mally
low Insufficient cooling and excessive
bubbles in the sight glass •
Insufficient refrigerant in
system
•
Check sight glass.
(See “Reading Sight
Glass”)
• Check for leaks
• Discharge and
recover refrigerant.
Recharge to specified
amount
BACK TO CHAPTER INDEX
TO MODEL INDEX
ISUZU KB P190 2007
Page 198 of 6020
SHEET METAL 2B-1
SECTION 2B
SHEET METAL
This section includes items of front end sheet metal that are attached by bolts, screws or clips and related
accessory components.
Anticorrosion materials have been applied to the interior surfaces of some metal panels to provide rust resistance.
W hen servicing these panels, areas on which this material has been disturbed, should be properly recoated with
service-type anticorrosion material.
TABLE OF CONTENTS
PAGE
Engine Hood Assembly (A type) ...................................................................................... 2B- 2
Engine Hood Assembly (B type) ..................................................................................... 2B- 8
Engine Hood Lock (A type) .............................................................................................. 2B- 11
Engine Hood Lock (B type) .............................................................................................. 2B- 13
Front Fender Panel (A type) ............................................................................................. 2B- 15
Front Fender Panel (B type) ............................................................................................. 2B- 18
Radiator Grille (A type) ..................................................................................................... 2 B- 21
Radiator Grille (B type) .................................................................................................... 2B - 22
Rear Body...................................................................................................................... ..... 2B- 23
Body Mounting .................................................................................................................. 2B- 26
Body Dimensions .............................................................................................................. 2B - 32
BACK TO CHAPTER INDEX
TO MODEL INDEX
ISUZU KB P190 2007
Page 268 of 6020
POWER-ASSISTED STEERING SYSTEM 3B-7
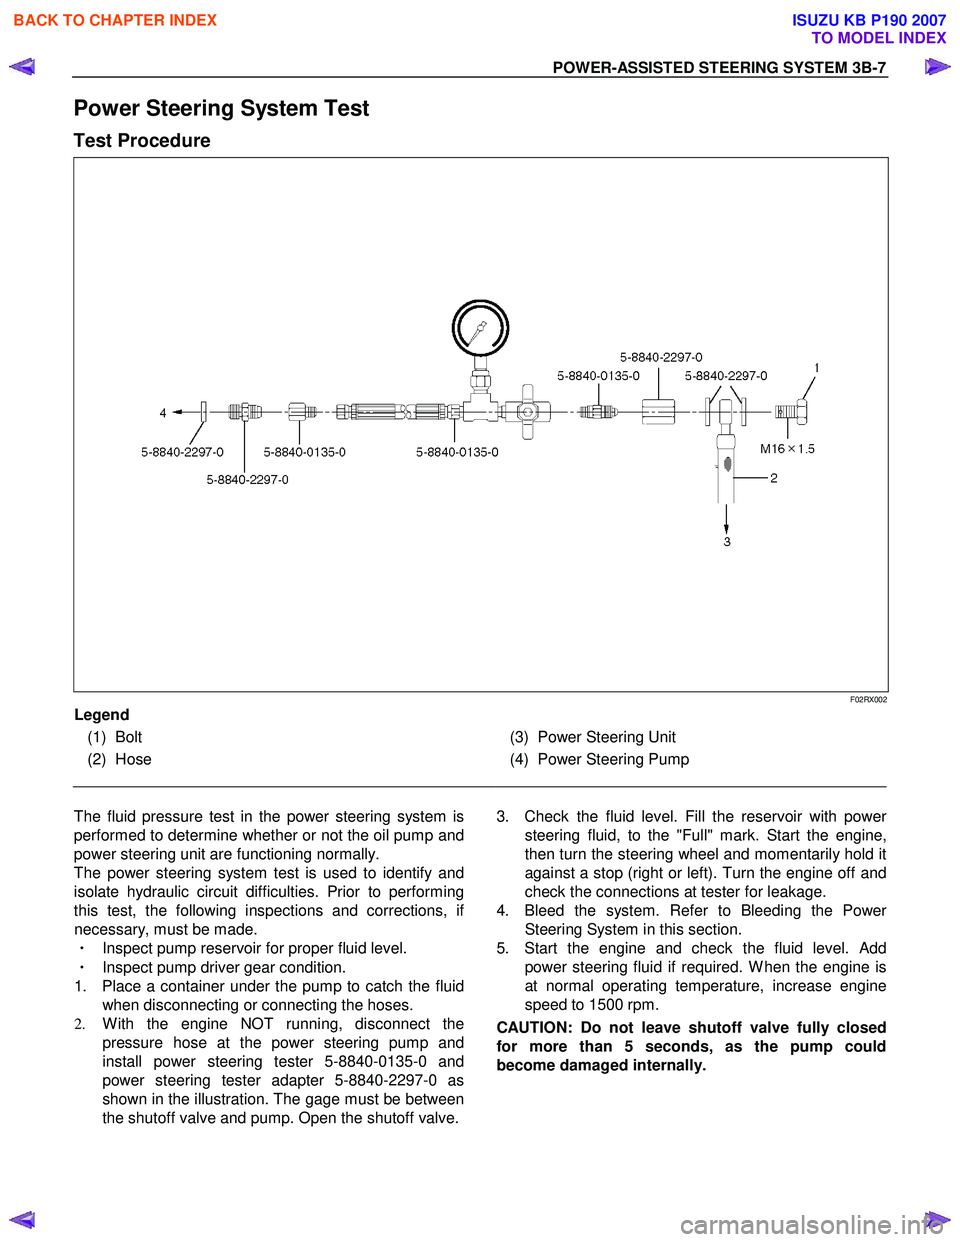
Power Steering System Test
Test Procedure
F02RX002
Legend
(1) Bolt
(2) Hose
(3) Power Steering Unit
(4) Power Steering Pump
The fluid pressure test in the power steering system is
performed to determine whether or not the oil pump and
power steering unit are functioning normally.
The power steering system test is used to identify and
isolate hydraulic circuit difficulties. Prior to performing
this test, the following inspections and corrections, i
f
necessary, must be made.
・ Inspect pump reservoir for proper fluid level.
・ Inspect pump driver gear condition.
1. Place a container under the pump to catch the fluid when disconnecting or connecting the hoses.
2. W ith the engine NOT running, disconnect the
pressure hose at the power steering pump and
install power steering tester 5-8840-0135-0 and
power steering tester adapter 5-8840-2297-0 as
shown in the illustration. The gage must be between
the shutoff valve and pump. Open the shutoff valve.
3. Check the fluid level. Fill the reservoir with powe
r
steering fluid, to the "Full" mark. Start the engine,
then turn the steering wheel and momentarily hold it
against a stop (right or left). Turn the engine off and
check the connections at tester for leakage.
4. Bleed the system. Refer to Bleeding the Powe
r
Steering System in this section.
5. Start the engine and check the fluid level. Add power steering fluid if required. W hen the engine is
at normal operating temperature, increase engine
speed to 1500 rpm.
CAUTION: Do not leave shutoff valve fully closed
for more than 5 seconds, as the pump could
become damaged internally.
BACK TO CHAPTER INDEX
TO MODEL INDEX
ISUZU KB P190 2007