ECO mode ISUZU KB P190 2007 Workshop Manual PDF
[x] Cancel search | Manufacturer: ISUZU, Model Year: 2007, Model line: KB P190, Model: ISUZU KB P190 2007Pages: 6020, PDF Size: 70.23 MB
Page 756 of 6020

BRAKES 5C-57
REASSEMBLY
RTW 75CMF000801
Reassembly Steps
▲ 1. Secondary piston
▲ 2. Primary piston
▲ 3. Guide assembly
▲ 4. Cylinder body
▲ 5. Stopper bolt and gasket
▲ 6. Snap ring
▲ 7. Grommet
▲
8. Reservoir tank
▲ 9. Pin
▲ 10. Filter
▲ 11. Diaphragm
▲ 12. Cap
▲ 13. Front seal
1. Secondary Piston
Lubricate the piston cups on the secondary piston assemblies
with brake fluid.
Note:
Be sure to use a new piston.
BACK TO CHAPTER INDEX
TO MODEL INDEX
ISUZU KB P190 2007
Page 757 of 6020

5C-58 BRAKES
RTW 75CSH002301
2. Primary Piston
Lubricate the piston cup on the primary piston assemblies with
brake fluid (1).
Note:
Be sure to use a new piston.
3. Guide Assembly
Lubricate the O-ring of guide assembly with brake fluid (2) and
the cup of guide assembly with rubber grease (3) (0.2 ~ 0.3g).
RTW 75CSH002001
4. Cylinder Body
Install the secondary piston and the primary piston to the
cylinder body.
Note:
The secondary piston long hole and the cylinder body stoppe
r
bolt hole must be aligned at installation.
5. Stopper Bolt and Gasket
Install the stopper bolt to the cylinder body (the piston long hole
must be aligned with the cylinder body installation hole).
Tighten the bolts to the specified torque.
Torque N ⋅m (kgf ⋅m/lb ⋅in)
2 - 3 (0.2 - 0.3 / 17 - 26)
6. Snap Ring
Press down on the primary piston and install the snap ring to
the cylinder body groove.
Note:
Be sure to use new snap ring.
7. Grommet
1. Install the grommets to the reservoir tank.
Note:
Be sure to use are new grommets.
2. Install the reservoir tank to the cylinder body.
8. Reservoir Tank
9. Pin
BACK TO CHAPTER INDEX
TO MODEL INDEX
ISUZU KB P190 2007
Page 799 of 6020
6 – 14 TROUBLESHOOTING
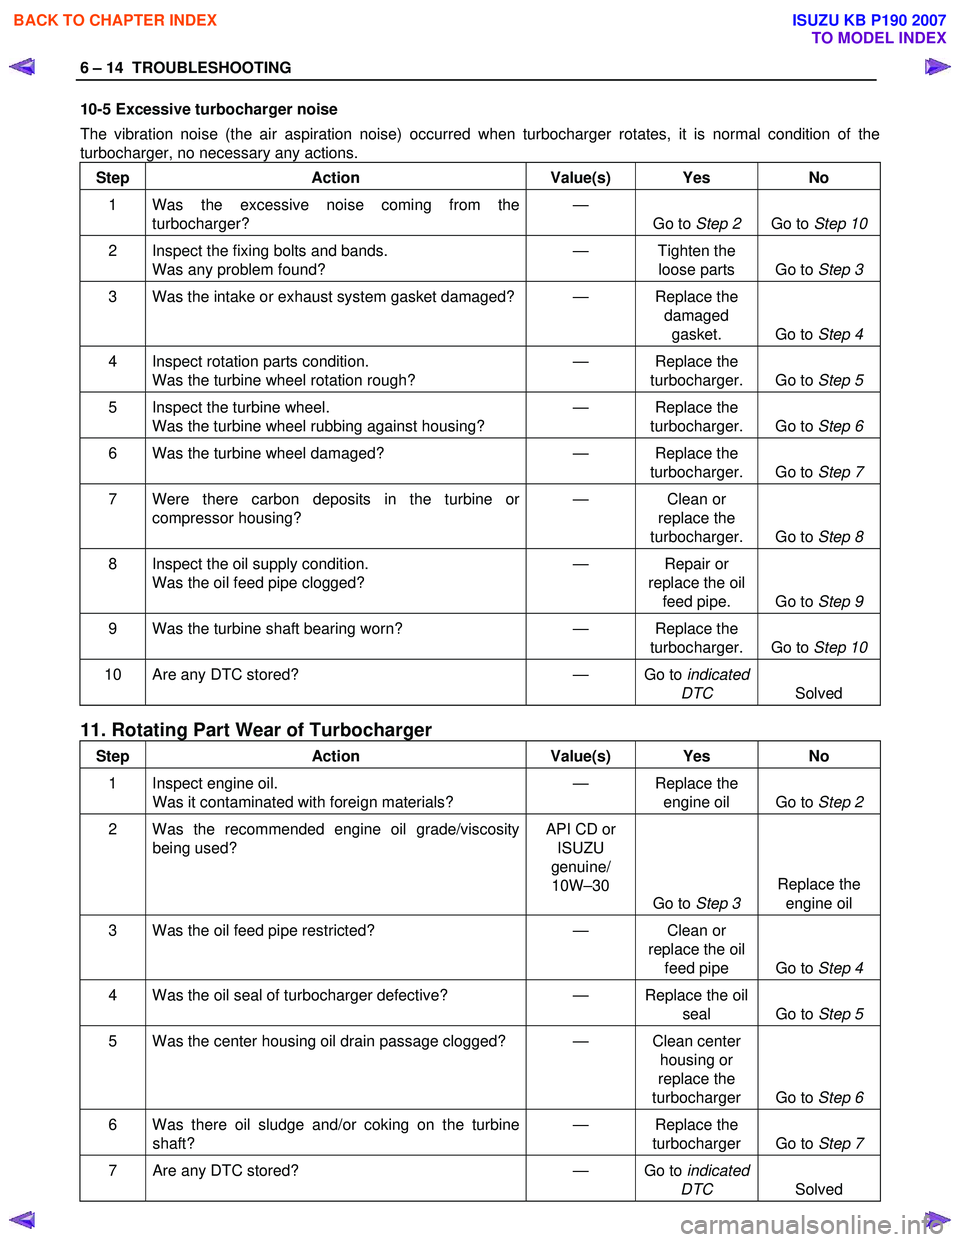
10-5 Excessive turbocharger noise
The vibration noise (the air aspiration noise) occurred when turbocharger rotates, it is normal condition of the
turbocharger, no necessary any actions.
Step Action Value(s) Yes No
1 Was the excessive noise coming from the turbocharger? —
Go to Step 2 Go to Step 10
2 Inspect the fixing bolts and bands.
Was any problem found? —
Tighten the
loose parts Go to Step 3
3 Was the intake or exhaust system gasket damaged? — Replace the
damaged gasket. Go to Step 4
4 Inspect rotation parts condition.
Was the turbine wheel rotation rough? —
Replace the
turbocharger. Go to Step 5
5 Inspect the turbine wheel.
Was the turbine wheel rubbing against housing? —
Replace the
turbocharger. Go to Step 6
6 Was the turbine wheel damaged? — Replace the
turbocharger. Go to Step 7
7 Were there carbon deposits in the turbine or
compressor housing? —
Clean or
replace the
turbocharger. Go to Step 8
8 Inspect the oil supply condition.
Was the oil feed pipe clogged? —
Repair or
replace the oil feed pipe. Go to Step 9
9 Was the turbine shaft bearing worn? — Replace the
turbocharger. Go to Step 10
10 Are any DTC stored? — Go to indicated
DTC Solved
11. Rotating Part Wear of Turbocharger
Step Action Value(s) Yes No
1 Inspect engine oil.
Was it contaminated with foreign materials? —
Replace the
engine oil Go to Step 2
2 Was the recommended engine oil grade/viscosity
being used? API CD or
ISUZU
genuine/ 10W –30
Go to Step 3 Replace the
engine oil
3 Was the oil feed pipe restricted? — Clean or
replace the oil feed pipe Go to Step 4
4 Was the oil seal of turbocharger defective? — Replace the oil
seal Go to Step 5
5 Was the center housing oil drain passage clogged? — Clean center
housing or
replace the
turbocharger Go to Step 6
6 Was there oil sludge and/or coking on the turbine
shaft? —
Replace the
turbocharger Go to Step 7
7 Are any DTC stored? — Go to indicated
DTC Solved
BACK TO CHAPTER INDEX
TO MODEL INDEX
ISUZU KB P190 2007
Page 806 of 6020
SECTION 6A
ENGINE MECHANICAL
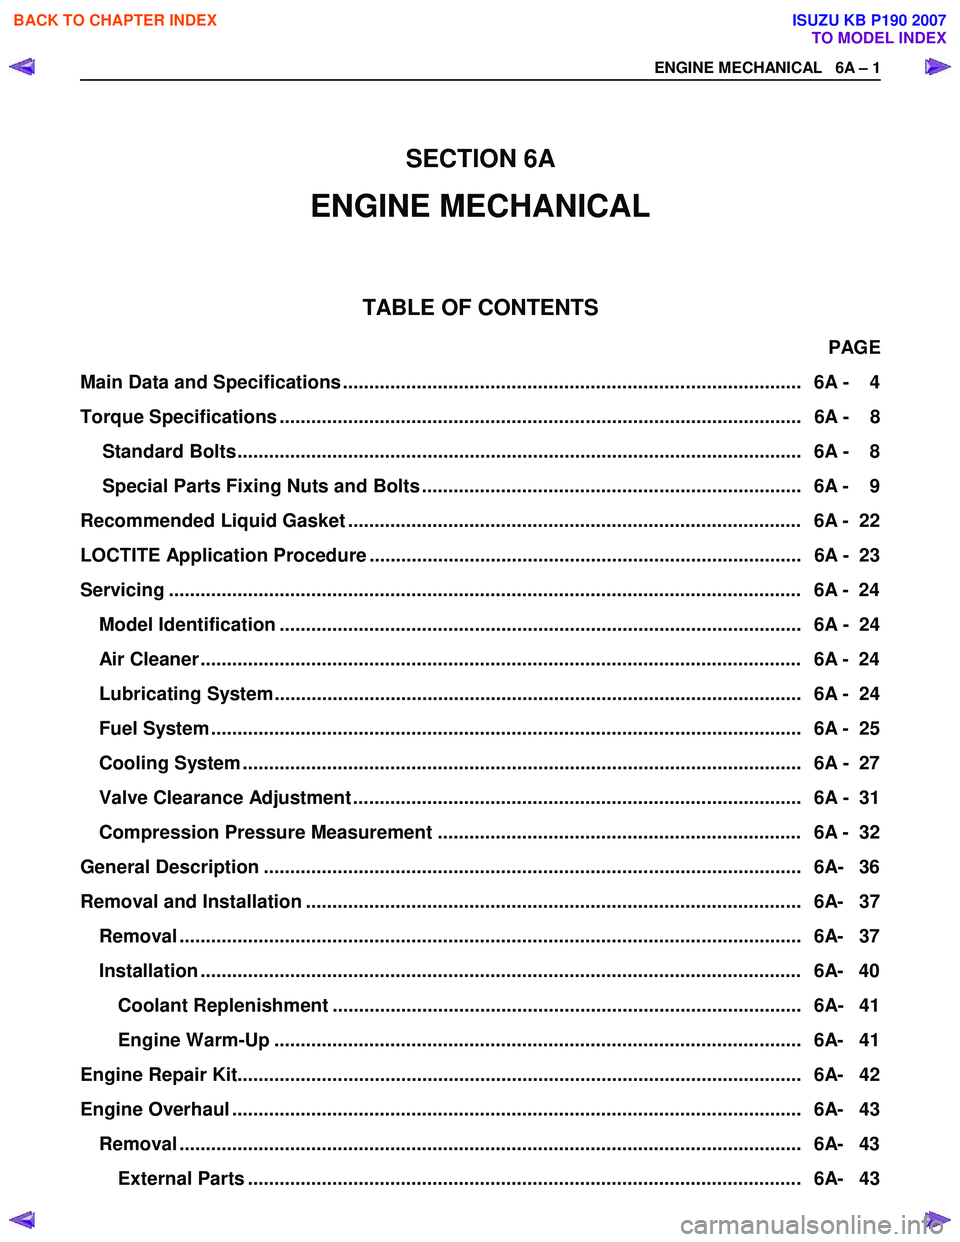
TABLE OF CONTENTS
PAGE
4 8
Standard Bolts ........................................................................................................... 6A - 8
Special Parts Fixing Nuts and Bolts ........................................................................ 6A - 9
Recommended Liquid Gasket ...................................................................................... 6A - 22
LOCTITE Application Procedure .................................................................................. 6A - 23
Servicing ...................................................................................................................... .. 6A - 24
Model Identification ................................................................................................... 6A - 24
Air Cleaner .................................................................................................................. 6 A - 24
Lubricating System.................................................................................................... 6A - 24
Fuel System ................................................................................................................ 6A - 25
Cooling System .......................................................................................................... 6A - 2 7
Valve Clearance Adjustment ..................................................................................... 6A - 31
Compression Pressure Measurement ..................................................................... 6A - 32
General Description ...................................................................................................... 6A- 3 6
Removal and Installation .............................................................................................. 6A- 37 Removal ...................................................................................................................... 6 A- 37
Installation .................................................................................................................. 6A- 40
Coolant Replenishment ......................................................................................... 6A- 41
Engine Warm-Up .................................................................................................... 6A- 41
Engine Repair Kit........................................................................................................... 6A - 42
Engine Overhaul ............................................................................................................ 6A- 43
Removal ...................................................................................................................... 6 A- 43
External Parts ......................................................................................................... 6A- 43
E N GINE MECHA NICA L 6A – 1
Main Dat a and Specif ications ....................................................................................... 6A -
Torque Specif ications ................................................................................................... 6A -
BACK TO CHAPTER INDEX
TO MODEL INDEX
ISUZU KB P190 2007
Page 827 of 6020

6A – 22 ENGINE MECHANICAL
RECOMMENDED LIQUID GASKET
Type Brand Name Manufacturer Remarks
RTV*
Silicon Base ThreeBond 1207B
ThreeBond 1207C Three Bond
Three Bond
W ater Base
ThreeBond 1141E
ThreeBond 1215 Three Bond
Three Bond
Solvent
ThreeBond 1104
Belco Bond 4
Belco Bond 401
Belco Bond 402 Three Bond
Isuzu
Isuzu
Isuzu
Anaerobic
LOCTITE 515
LOCTITE 518
LOCTITE 262 Loctite
Loctite
Loctite Recommended for
transaxle repairs
* RTV : Room Temperature Vulcanizer
Note:
1. It is very important that the liquid gaskets listed above or their exact equivalent be used on the vehicle.
2. Be careful to use the specified amount of liquid gasket. Follow the manufacturer’s instructions at all times.
3. Be absolutely sure to remove all lubricants and moisture from the connecting surfaces before applying the liquid gasket.
The connecting surfaces must be perfectly dry.
4. LOCTITE 515 and LOCTITE 518 harden upon contact with a metal surface. Do not apply LOCTITE 515 or LOCTITE 518 between two metal surfaces having a clearance of
greater than 0.25 mm (0.01 in). Poor adhesion will result.
BACK TO CHAPTER INDEX
TO MODEL INDEX
ISUZU KB P190 2007
Page 830 of 6020
ENGINE MECHANICAL 6A – 25
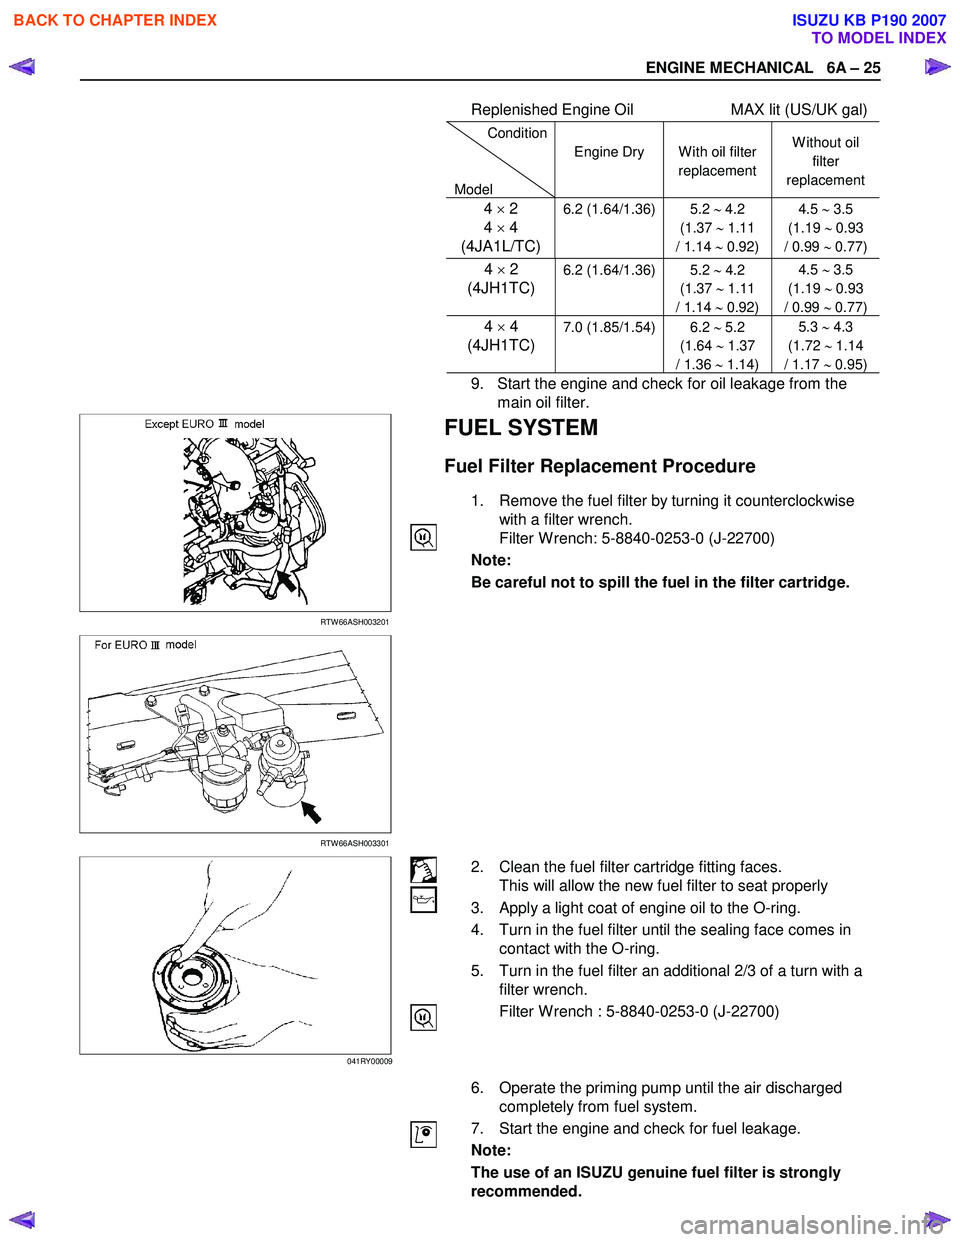
Replenished Engine Oil MAX lit (US/UK gal)
Condition
Model Engine Dry
W ith oil filter
replacement W ithout oil
filter
replacement
4 × 2
4 × 4
(4JA1L/TC)6.2 (1.64/1.36) 5.2 ∼ 4.2
(1.37 ∼ 1.11
/ 1.14 ∼ 0.92) 4.5
∼ 3.5
(1.19 ∼ 0.93
/ 0.99 ∼ 0.77)
4 × 2
(4JH1TC)
6.2 (1.64/1.36) 5.2
∼ 4.2
(1.37 ∼ 1.11
/ 1.14 ∼ 0.92) 4.5
∼ 3.5
(1.19 ∼ 0.93
/ 0.99 ∼ 0.77)
4 × 4
(4JH1TC) 7.0 (1.85/1.54) 6.2 ∼ 5.2
(1.64 ∼ 1.37
/ 1.36 ∼ 1.14) 5.3
∼ 4.3
(1.72 ∼ 1.14
/ 1.17 ∼ 0.95)
9. Start the engine and check for oil leakage from the
main oil filter.
RTW 66ASH003201
FUEL SYSTEM
Fuel Filter Replacement Procedure
1. Remove the fuel filter by turning it counterclockwise with a filter wrench.
Filter W rench: 5-8840-0253-0 (J-22700)
Note:
Be careful not to spill the fuel in the filter cartridge.
RTW 66ASH003301
2. Clean the fuel filter cartridge fitting faces. This will allow the new fuel filter to seat properly
3. Apply a light coat of engine oil to the O-ring.
4. Turn in the fuel filter until the sealing face comes in contact with the O-ring.
5. Turn in the fuel filter an additional 2/3 of a turn with a filter wrench.
Filter W rench : 5-8840-0253-0 (J-22700)
6. Operate the priming pump until the air discharged completely from fuel system.
7. Start the engine and check for fuel leakage.
Note:
The use of an ISUZU genuine fuel filter is strongly
recommended.
041RY00009
BACK TO CHAPTER INDEX
TO MODEL INDEX
ISUZU KB P190 2007
Page 832 of 6020
ENGINE MECHANICAL 6A – 27
111R300001
COOLING SYSTEM
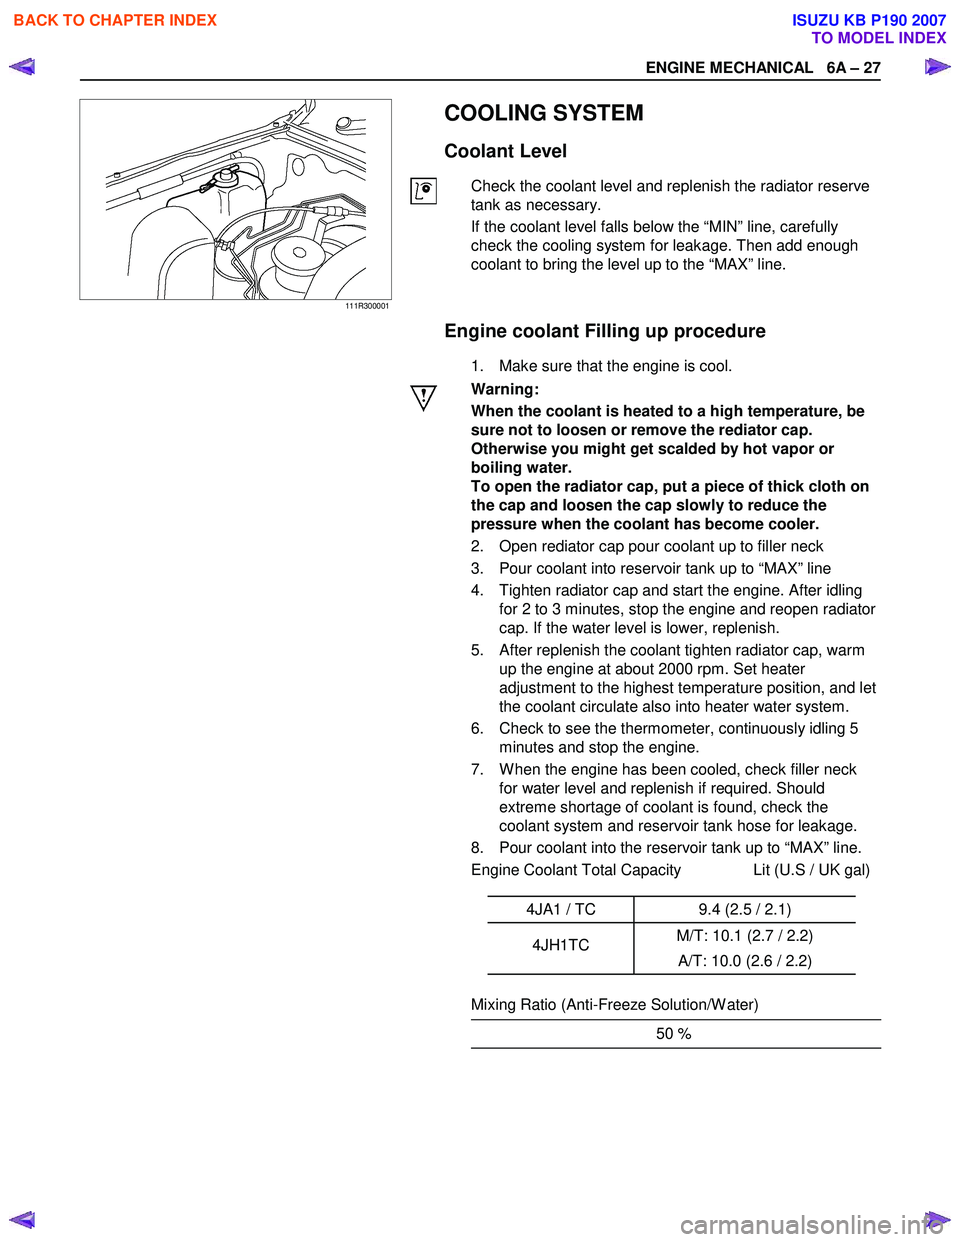
Coolant Level
Check the coolant level and replenish the radiator reserve
tank as necessary.
If the coolant level falls below the “MIN” line, carefully
check the cooling system for leakage. Then add enough
coolant to bring the level up to the “MAX” line.
Engine coolant Filling up procedure
1. Make sure that the engine is cool.
Warning:
When the coolant is heated to a high temperature, be
sure not to loosen or remove the rediator cap.
Otherwise you might get scalded by hot vapor or
boiling water.
To open the radiator cap, put a piece of thick cloth on
the cap and loosen the cap slowly to reduce the
pressure when the coolant has become cooler.
2. Open rediator cap pour coolant up to filler neck
3. Pour coolant into reservoir tank up to “MAX” line
4. Tighten radiator cap and start the engine. After idling for 2 to 3 minutes, stop the engine and reopen radiator
cap. If the water level is lower, replenish.
5. After replenish the coolant tighten radiator cap, warm up the engine at about 2000 rpm. Set heater
adjustment to the highest temperature position, and let
the coolant circulate also into heater water system.
6. Check to see the thermometer, continuously idling 5 minutes and stop the engine.
7. W hen the engine has been cooled, check filler neck for water level and replenish if required. Should
extreme shortage of coolant is found, check the
coolant system and reservoir tank hose for leakage.
8. Pour coolant into the reservoir tank up to “MAX” line.
Engine Coolant Total Capacity Lit (U.S / UK gal)
4JA1 / TC 9.4 (2.5 / 2.1)
4JH1TC M/T: 10.1 (2.7 / 2.2)
A/T: 10.0 (2.6 / 2.2)
Mixing Ratio (Anti-Freeze Solution/W ater)
50 %
BACK TO CHAPTER INDEX
TO MODEL INDEX
ISUZU KB P190 2007
Page 841 of 6020
6A – 36 ENGINE MECHANICAL
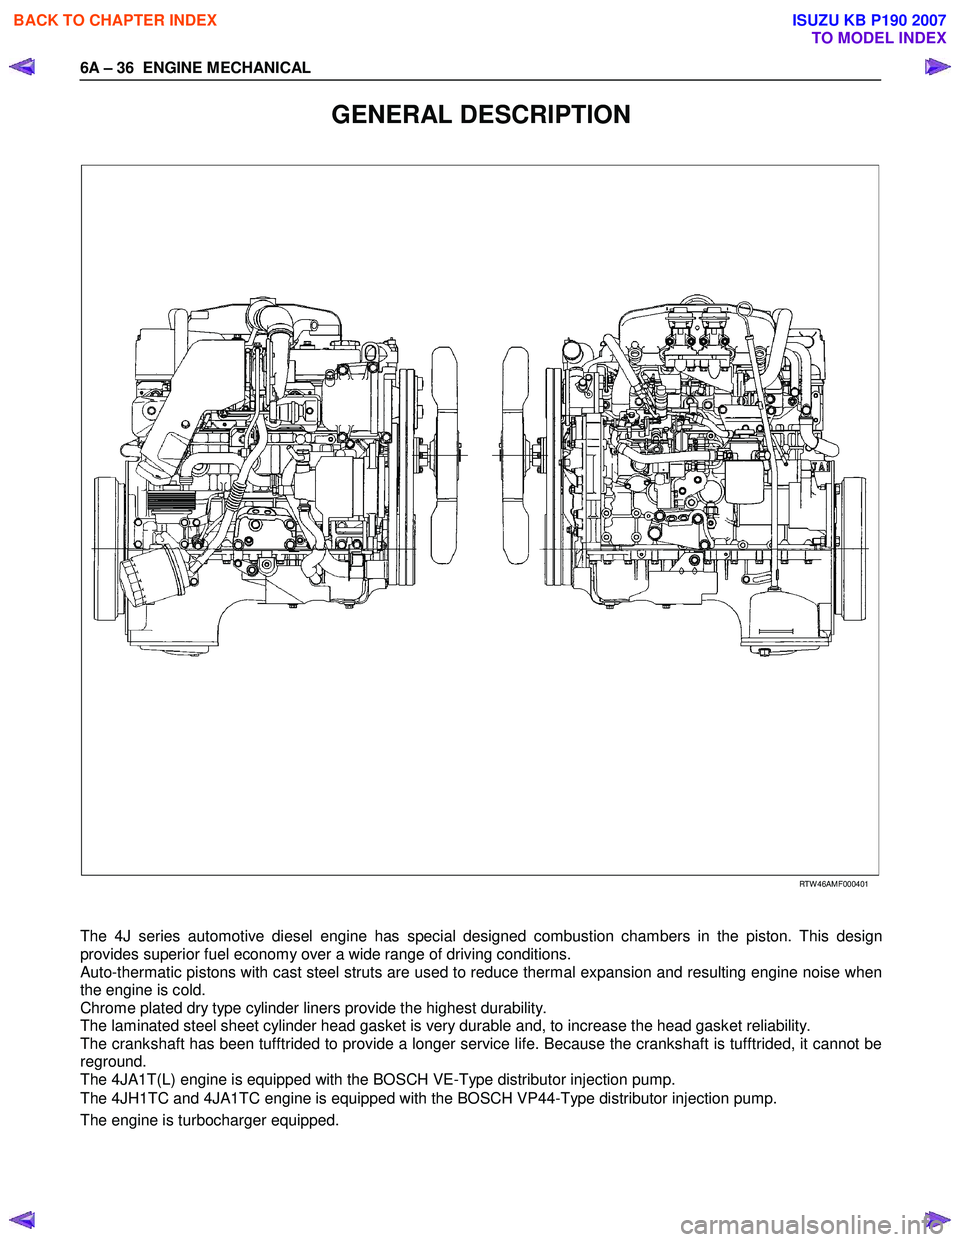
GENERAL DESCRIPTION
RTW 46AMF000401
The 4J series automotive diesel engine has special designed combustion chambers in the piston. This design
provides superior fuel economy over a wide range of driving conditions.
Auto-thermatic pistons with cast steel struts are used to reduce thermal expansion and resulting engine noise when
the engine is cold.
Chrome plated dry type cylinder liners provide the highest durability.
The laminated steel sheet cylinder head gasket is very durable and, to increase the head gasket reliability.
The crankshaft has been tufftrided to provide a longer service life. Because the crankshaft is tufftrided, it cannot be
reground.
The 4JA1T(L) engine is equipped with the BOSCH VE-Type distributor injection pump.
The 4JH1TC and 4JA1TC engine is equipped with the BOSCH VP44-Type distributor injection pump.
The engine is turbocharger equipped.
BACK TO CHAPTER INDEX
TO MODEL INDEX
ISUZU KB P190 2007
Page 846 of 6020
ENGINE MECHANICAL 6A – 41
Coolant Replenishment
Warning:
When the coolant is heated to a high temperature, be
sure not to loosen or remove the rediator cap.
Otherwise you might get scalded by hot vapor or
boiling water.
To open the radiator cap, put a piece of thick cloth on
the cap and loosen the cap slowly to reduce the
pressure when the coolant has become cooler.
1. Open rediator cap pour coolant up to filler neck
2. Pour coolant into reservoir tank up to "MAX" line
3. Tighten radiator cap and start the engine. After idling for 2 to 3 minutes, stop the engine and reopen radiator
cap. If the water level is lower, replenish.
4. After replenish the coolant tighten radiator cap, warm up the engine at about 2000 rpm. Set heater
adjustment to the highest temperature position, and let
the coolant circulate also into heater water system.
5. Check to see the thermometer, continuously idling 5 minutes and stop the engine.
6. W hen the engine has been cooled, check filler neck for water level and replenish if required. Should extreme
shortage of coolant is found, check the coolant system
and reservoir tank hose for leakage.
7. Pour coolant into the reservoir tank up to "MAX" line.
Coolant Capacity lit (US/UK gal)
4JA1 / TC 9.4 (2.5 / 2.1)
4JH1TC M/T: 10.1 (2.7 / 2.2)
A/T: 10.0 (2.6 / 2.2)
Engine Warm-Up
After completing the required maintenance procedures,
start the engine and allow it to idle until it is warm.
Check the following:
1. Engine idling speed.
2. Engine noise level.
3. Engine lubricating system and cooling system. Carefully check for oil and coolant leakage.
4. Clutch engagement.
5. Transmission operation.
6. Indicator warning light operation.
BACK TO CHAPTER INDEX
TO MODEL INDEX
ISUZU KB P190 2007
Page 910 of 6020

ENGINE MECHANICAL 6A – 105
5. Crankshaft Thrust Bearing
Apply an ample coat of engine oil to the thrust bearings
before installation.
Install the thrust bearings to the crankshaft center journal.
The thrust bearing oil grooves must be facing the sliding
faces.
6. Crankshaft Bearing Cap With Lower Bearing
Before the crankshaft bearing installation, select the
appropriate bearings in accordance with the description in
CRANK BEARING SELECTION of INSPECTION AND
REPAIR.
1. Apply the recommended liquid gasket or its equivalent to the No. 5 crankshaft bearing cap cylinder body fitting
surfaces at the points shown in the illustration.
NOTE:
Be sure that the bearing cap fitting surface is
completely free of oil before applying the liquid
gasket. Three bond 1207B Do not allow the liquid
gasket to obstruct the cylinder thread holes and
bearings.
ThreeBond 1207B is a fast-drying liquid gasket.
Tighten the bearing caps immediately after applying
the gasket.
2. Install the bearing caps with the bearing cap head
arrow mark facing the front of the engine.The bearing
cap numbers must be facing up.
3. Apply engine oil to the crankshaft bearing cap bolts.
4. Tighten the crankshaft bearing cap bolts to the
specified torque a little at time in the sequence shown
in the illustration.
Crankshaft Bearing Cap Torque N·m(kg·m/lbft)
167 (17/123)
5. Check to see the crankshaft turns smoothly by rotating it manually.
015LX115
015LX127
015LX128
015LX129
BACK TO CHAPTER INDEX
TO MODEL INDEX
ISUZU KB P190 2007