relay ISUZU KB P190 2007 Workshop Manual PDF
[x] Cancel search | Manufacturer: ISUZU, Model Year: 2007, Model line: KB P190, Model: ISUZU KB P190 2007Pages: 6020, PDF Size: 70.23 MB
Page 1256 of 6020
6E-222 Engine Control System (4JH1)
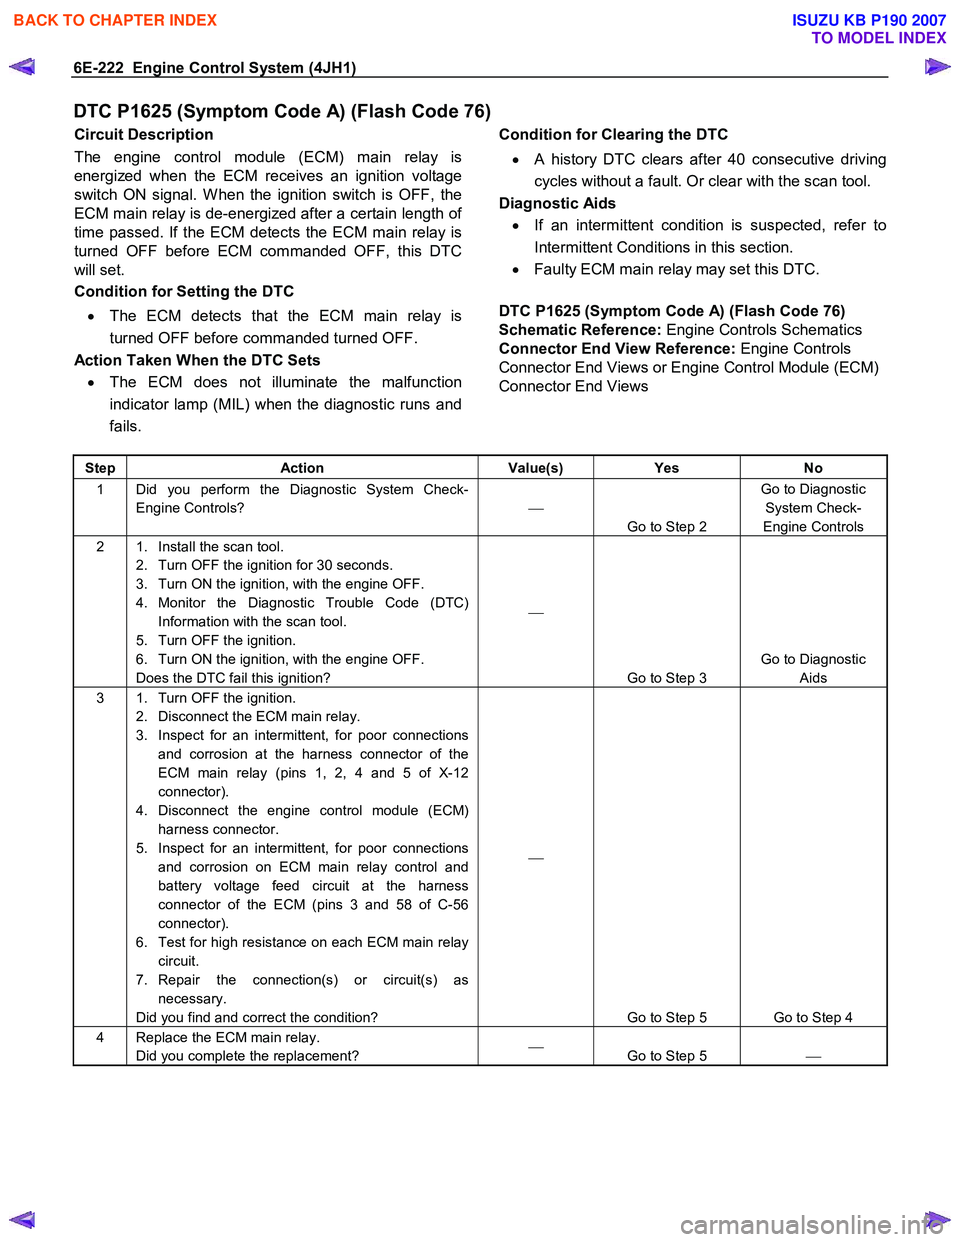
DTC P1625 (Symptom Code A) (Flash Code 76)
Circuit Description
The engine control module (ECM) main relay is
energized when the ECM receives an ignition voltage
switch ON signal. W hen the ignition switch is OFF, the
ECM main relay is de-energized after a certain length o
f
time passed. If the ECM detects the ECM main relay is
turned OFF before ECM commanded OFF, this DTC
will set.
Condition for Setting the DTC
• The ECM detects that the ECM main relay is
turned OFF before commanded turned OFF.
Action Taken When the DTC Sets • The ECM does not illuminate the malfunction
indicator lamp (MIL) when the diagnostic runs and
fails.
Condition for Clearing the DTC
• A history DTC clears after 40 consecutive driving
cycles without a fault. Or clear with the scan tool.
Diagnostic Aids
• If an intermittent condition is suspected, refer to
Intermittent Conditions in this section.
• Faulty ECM main relay may set this DTC.
DTC P1625 (Symptom Code A) (Flash Code 76)
Schematic Reference: Engine Controls Schematics
Connector End View Reference: Engine Controls
Connector End Views or Engine Control Module (ECM)
Connector End Views
Step Action Value(s) Yes No
1 Did you perform the Diagnostic System Check-
Engine Controls?
Go to Step 2 Go to Diagnostic
System Check-
Engine Controls
2 1. Install the scan tool. 2. Turn OFF the ignition for 30 seconds.
3. Turn ON the ignition, with the engine OFF.
4. Monitor the Diagnostic Trouble Code (DTC) Information with the scan tool.
5. Turn OFF the ignition.
6. Turn ON the ignition, with the engine OFF.
Does the DTC fail this ignition?
Go to Step 3 Go to Diagnostic
Aids
3 1. Turn OFF the ignition. 2. Disconnect the ECM main relay.
3. Inspect for an intermittent, for poor connections and corrosion at the harness connector of the
ECM main relay (pins 1, 2, 4 and 5 of X-12
connector).
4. Disconnect the engine control module (ECM) harness connector.
5. Inspect for an intermittent, for poor connections and corrosion on ECM main relay control and
battery voltage feed circuit at the harness
connector of the ECM (pins 3 and 58 of C-56
connector).
6. Test for high resistance on each ECM main relay circuit.
7. Repair the connection(s) or circuit(s) as necessary.
Did you find and correct the condition?
Go to Step 5 Go to Step 4
4 Replace the ECM main relay. Did you complete the replacement?
Go to Step 5
BACK TO CHAPTER INDEX
TO MODEL INDEX
ISUZU KB P190 2007
Page 1257 of 6020
Engine Control System (4JH1) 6E-223
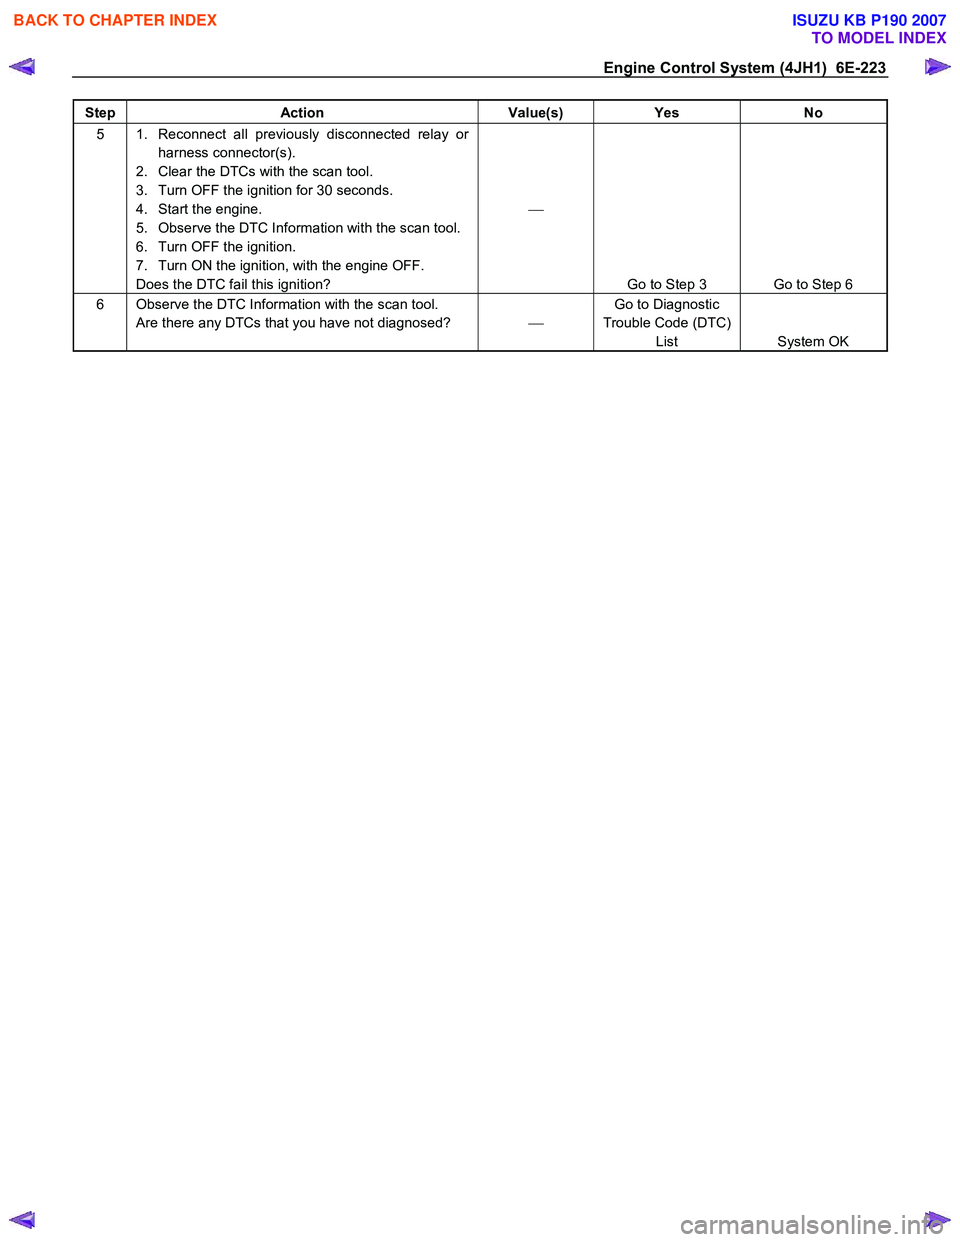
Step Action Value(s) Yes No
5 1. Reconnect all previously disconnected relay or
harness connector(s).
2. Clear the DTCs with the scan tool.
3. Turn OFF the ignition for 30 seconds.
4. Start the engine.
5. Observe the DTC Information with the scan tool.
6. Turn OFF the ignition.
7. Turn ON the ignition, with the engine OFF.
Does the DTC fail this ignition?
Go to Step 3 Go to Step 6
6 Observe the DTC Information with the scan tool. Are there any DTCs that you have not diagnosed? Go to Diagnostic
Trouble Code (DTC) List System OK
BACK TO CHAPTER INDEX
TO MODEL INDEX
ISUZU KB P190 2007
Page 1258 of 6020
6E-224 Engine Control System (4JH1)
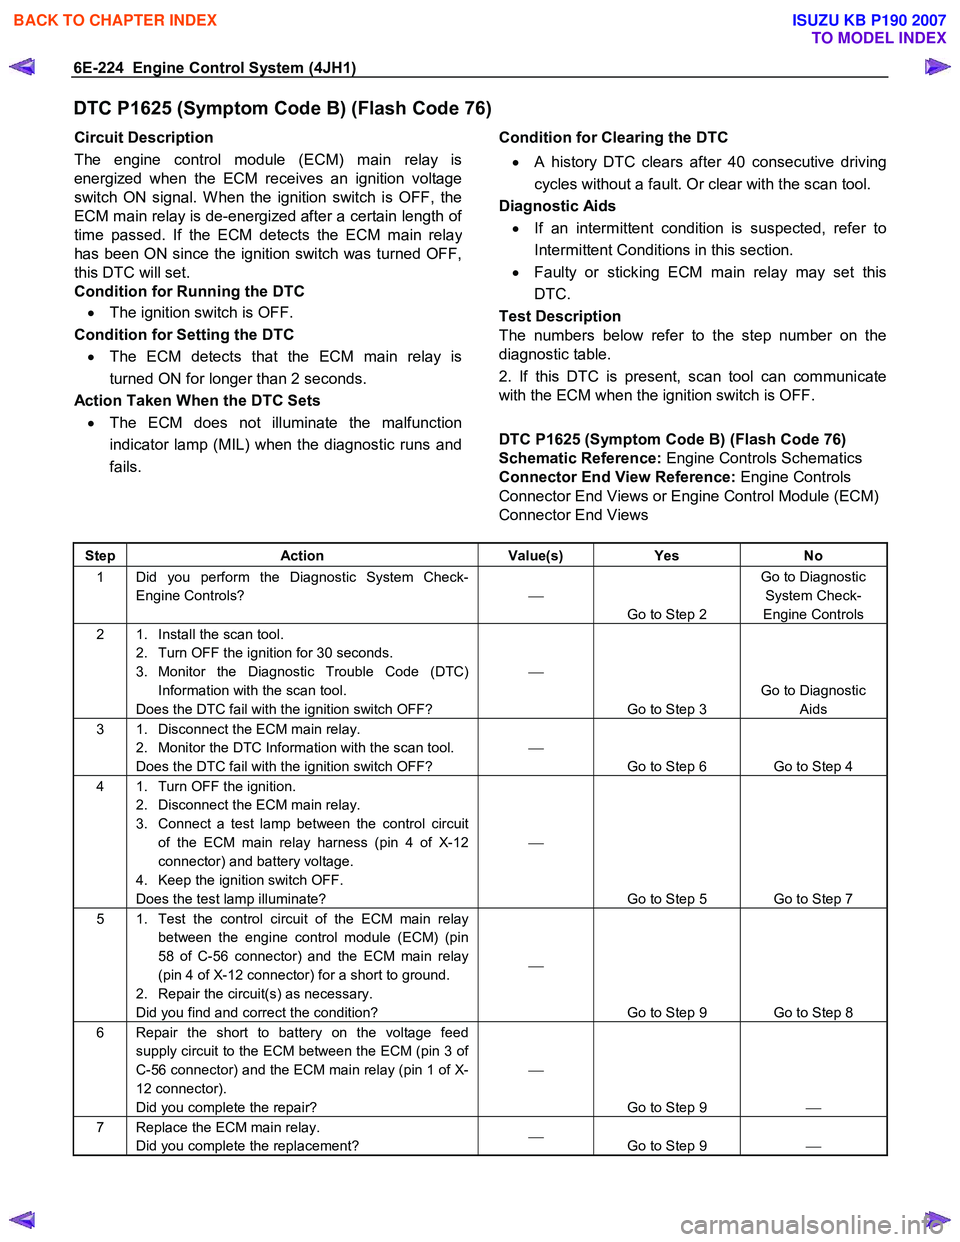
DTC P1625 (Symptom Code B) (Flash Code 76)
Circuit Description
The engine control module (ECM) main relay is
energized when the ECM receives an ignition voltage
switch ON signal. W hen the ignition switch is OFF, the
ECM main relay is de-energized after a certain length o
f
time passed. If the ECM detects the ECM main relay
has been ON since the ignition switch was turned OFF,
this DTC will set.
Condition for Running the DTC
• The ignition switch is OFF.
Condition for Setting the DTC • The ECM detects that the ECM main relay is
turned ON for longer than 2 seconds.
Action Taken When the DTC Sets • The ECM does not illuminate the malfunction
indicator lamp (MIL) when the diagnostic runs and
fails.
Condition for Clearing the DTC
• A history DTC clears after 40 consecutive driving
cycles without a fault. Or clear with the scan tool.
Diagnostic Aids
• If an intermittent condition is suspected, refer to
Intermittent Conditions in this section.
• Faulty or sticking ECM main relay may set this
DTC.
Test Description
The numbers below refer to the step number on the
diagnostic table.
2. If this DTC is present, scan tool can communicate
with the ECM when the ignition switch is OFF.
DTC P1625 (Symptom Code B) (Flash Code 76)
Schematic Reference: Engine Controls Schematics
Connector End View Reference: Engine Controls
Connector End Views or Engine Control Module (ECM)
Connector End Views
Step Action Value(s) Yes No
1 Did you perform the Diagnostic System Check-
Engine Controls?
Go to Step 2 Go to Diagnostic
System Check-
Engine Controls
2 1. Install the scan tool. 2. Turn OFF the ignition for 30 seconds.
3. Monitor the Diagnostic Trouble Code (DTC) Information with the scan tool.
Does the DTC fail with the ignition switch OFF?
Go to Step 3 Go to Diagnostic
Aids
3 1. Disconnect the ECM main relay. 2. Monitor the DTC Information with the scan tool.
Does the DTC fail with the ignition switch OFF?
Go to Step 6 Go to Step 4
4 1. Turn OFF the ignition. 2. Disconnect the ECM main relay.
3. Connect a test lamp between the control circuit of the ECM main relay harness (pin 4 of X-12
connector) and battery voltage.
4. Keep the ignition switch OFF.
Does the test lamp illuminate?
Go to Step 5 Go to Step 7
5 1. Test the control circuit of the ECM main relay between the engine control module (ECM) (pin
58 of C-56 connector) and the ECM main relay
(pin 4 of X-12 connector) for a short to ground.
2. Repair the circuit(s) as necessary.
Did you find and correct the condition?
Go to Step 9 Go to Step 8
6 Repair the short to battery on the voltage feed supply circuit to the ECM between the ECM (pin 3 of
C-56 connector) and the ECM main relay (pin 1 of X-
12 connector).
Did you complete the repair?
Go to Step 9
7 Replace the ECM main relay.
Did you complete the replacement?
Go to Step 9
BACK TO CHAPTER INDEX
TO MODEL INDEX
ISUZU KB P190 2007
Page 1259 of 6020
Engine Control System (4JH1) 6E-225
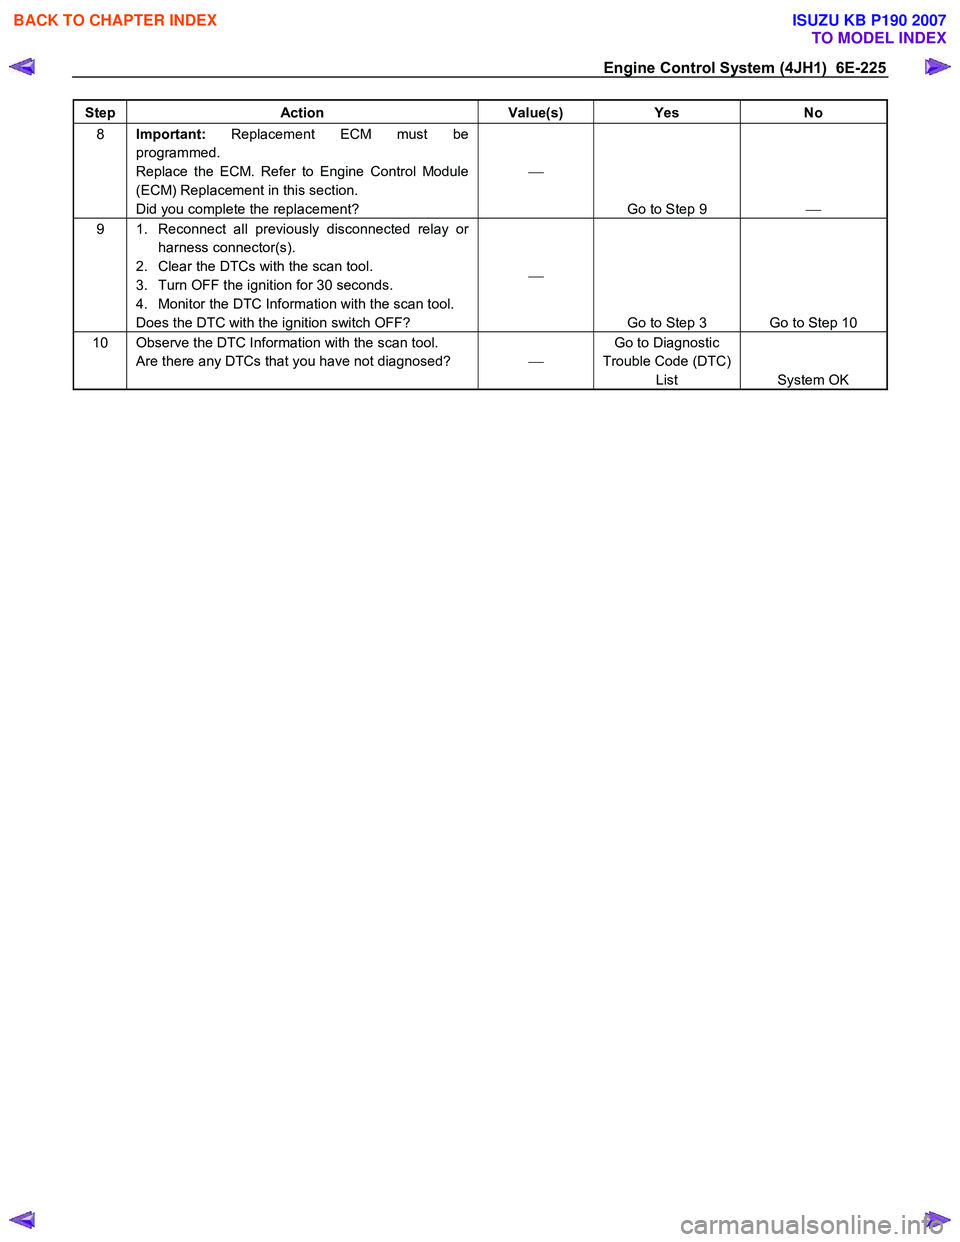
Step Action Value(s) Yes No
8 Important: Replacement ECM must be
programmed.
Replace the ECM. Refer to Engine Control Module
(ECM) Replacement in this section.
Did you complete the replacement?
Go to Step 9
9 1. Reconnect all previously disconnected relay or
harness connector(s).
2. Clear the DTCs with the scan tool.
3. Turn OFF the ignition for 30 seconds.
4. Monitor the DTC Information with the scan tool.
Does the DTC with the ignition switch OFF?
Go to Step 3 Go to Step 10
10 Observe the DTC Information with the scan tool. Are there any DTCs that you have not diagnosed? Go to Diagnostic
Trouble Code (DTC) List System OK
BACK TO CHAPTER INDEX
TO MODEL INDEX
ISUZU KB P190 2007
Page 1273 of 6020

Engine Control System (4JH1) 6E-239
Glow Control System Check
Description
The glow control system consists of the engine control
module (ECM), the glow relay and glow plugs. The glo
w
control system is operated when the engine coolant
temperature is low, which allows easier engine starting.
The ECM commands the glow relay ON for a certain
length of time at ignition switch is ON with engine OFF.
In after glow phase, the glow plugs remain energized fo
r
a certain period with engine run.
Glow Control Operation
•
The pre glow control system operates when the
engine coolant temperature is less than 30 °C
(86 °F).
• The after glow control system operates when the
engine coolant temperature is less than 60 °C
(140 °F).
Glow Control System Check
Schematic Reference: Engine Controls Schematics
Connector End View Reference: Engine Controls
Connector End Views
Step Action Value(s) Yes No
1 Did you perform the Diagnostic System Check-
Engine Controls?
Go to Step 2 Go to Diagnostic
System Check-
Engine Controls
2 1. Install the scan tool. 2. Turn OFF the ignition for 30 seconds.
3. Turn ON the ignition, with the engine OFF.
4. Monitor the Diagnostic Trouble Code (DTC) Information of the engine control system with the
scan tool and check whether following DTC(s) is
set: • P0115 (Symptom Code 1 & 2)
• P0380 (Symptom Code 4 & 8)
• P0381 (Symptom Code 4 & 8)
Are any of the above DTC(s) set?
Refer to Applicable DTC Go to Step 3
3 1. Turn OFF the ignition.
2. Make sure the metal bus bar that connects switched battery voltage supply terminal (E-49)
and all glow plugs is secured tightly.
3. Turn ON the ignition, with the engine OFF
4. Connect a test lamp between the metal bus bar (glow plug power supply E-49 terminal) and a
known good ground.
5. Perform the Glow Relay test with the scan tool.
6. Command the Glow Relay ON with the scan tool while observing the test lamp.
Does the test lamp turn ON only when commanded
ON with the scan tool?
Go to Step 4 Go to Step 5
4 1. Turn OFF the ignition. 2. Remove the metal bus bar from the glow plugs.
3. Measure resistance of each glow plug between the glow plug terminals and a known good
ground. Make sure to record all measurements
and take them quickly as to not allow engine
temperature changes between measurements.
Are the resistances within the specified value each
other? 1
Ω
System OK Go to Step 15
BACK TO CHAPTER INDEX
TO MODEL INDEX
ISUZU KB P190 2007
Page 1274 of 6020

6E-240 Engine Control System (4JH1)
Step Action Value(s) Yes No
5 1. Turn OFF the ignition.
2. Replace the glow relay with the starter relay or replace with a known good relay.
3. Turn ON the ignition, with the engine OFF.
4. Connect a test lamp between the metal bus bar (glow plug power supply E-49 connector) and a
known good ground.
5. Perform the Glow Relay test with the scan tool.
6. Command the Glow Relay ON with the scan tool while observing the test lamp.
Does the test lamp turn ON only when commanded
ON with the scan tool?
Go to Step 9 Go to Step 6
6 Inspect the Glow (60A) slow blow fuse (SBF-8) in the engine room fuse block.
Is the Glow (60A) slow blow fuse (SBF-8) open?
Go to Step 10 Go to Step 7
7 1. Turn OFF the ignition. 2. Remove the glow relay in the engine room relay block.
3. Connect a test lamp between the voltage feed circuit of the glow relay terminal (pin 4 of X-5
connector) and a known good ground.
4. Turn ON the ignition, with the engine OFF.
Does the test lamp illuminate?
Go to Step 8 Go to Step 11
8 1. Turn ON the ignition, with the engine OFF. 2. Connect a test lamp between the power supply circuit of glow plugs (pin 1 of X-5 connector) and
a known good ground.
Does the test lamp illuminate?
Go to Step 13 Go to Step 12
9 1. Turn OFF the ignition. 2. Inspect for an intermittent and for poor connections at the glow relay terminals (pins 1
and 4 of X-5 connector).
3. Repair the connection(s) as necessary.
Did you find and correct the condition?
Go to Step 16 Go to Step 14
10 1. Replace the Glow (60A) slow blow fuse (SBF-8). If the slow blow fuse continues to open, repair
the short to ground on a circuit fed by the slow
blow fuse or check for a shorted attached
component.
2. Repair the short to ground or replace the component as necessary.
Did you complete the repair?
Go to Step 16
11 Repair the open circuit in the battery voltage supply
circuit between the Glow (60A) slow blow fuse (SBF-
8) and the glow relay (pin 1 of X-5 connector).
Did you complete the repair?
Go to Step 16
12 Repair the open circuit in the switched battery
voltage supply circuit between the glow relay (pin 1
of X-5 connector) and the glow plugs (E-49
terminal).
Did you complete the repair?
Go to Step 16
BACK TO CHAPTER INDEX
TO MODEL INDEX
ISUZU KB P190 2007
Page 1275 of 6020

Engine Control System (4JH1) 6E-241
Step Action Value(s) Yes No
13 Important: The glow plugs may be burnt out if the
battery voltage supply circuit is shorted to a voltage
source.
Repair the short to battery or ignition voltage on the
switched battery voltage supply circuit between the
glow relay (pin 1 of X-5 connector) and the glow
plugs (E-49 terminal).
Did you complete the repair?
Go to Step 16
14 Replace the glow relay.
Did you complete the replacement?
Go to Step 16
15 Replace the appropriate glow plug.
Did you complete the replacement?
Go to Step 16
16 1. Reconnect all previously disconnected
components, relay, fuse or harness connector(s).
2. Turn OFF the ignition for 30 seconds.
3. Turn ON the ignition, with the engine OFF.
4. Connect a test lamp between the metal bus bar (glow plug power supply E-49 connector) and a
known good ground.
5. Perform the Glow Relay test with the scan tool.
6. Command the Glow Relay ON with the scan tool while observing the test lamp.
Does the test lamp turn ON only when commanded
ON with the scan tool?
Go to Step 4 Go to Step 2
BACK TO CHAPTER INDEX
TO MODEL INDEX
ISUZU KB P190 2007
Page 1276 of 6020

6E-242 Engine Control System (4JH1)
DTC A/C Compressor System Check
Description
W hen air conditioning (A/C) and blower fan are
selected, and if the system has a sufficient refrigerant
charge. A 12-volt signal is supplied to the A/C request
input of the Engine Control Module (ECM). The A/C
request signal may be temporarily canceled during
system operation by the electronic thermostat in the
evaporator to prevent the evaporator icing. Also, it is
cancelled when the pressure switch detected abnormal
pressure in the line. W hen the A/C request signal is
received by the ECM, the ECM supplies a ground from
the A/C compressor relay if the engine operating
conditions are within acceptable ranges. W ith the A/C
compressor relay energized, voltage is supplied to the
compressor clutch coil. The ECM will enable the
compressor clutch to engage whenever A/C has been
selected with the engine running and enable conditions
are met.
Condition for Running the A/C Compressor:
• The engine is running.
• The A/C switch is ON.
• The engine coolant temperature (ECT) is less than
105 °C(221 °F).
A/C Compressor System Check
Schematic Reference: Engine Controls Schematics
Connector End View Reference: Engine Controls
Connector End Views or Engine Control Module (ECM)
Connector End Views
Chart 1 of 2
Step Action Value(s) Yes No
1 Did you perform the Diagnostic System Check-
Engine Controls?
Go to Step 2 Go to Diagnostic
System Check – Engine Controls
2 1. Install the scan tool. 2. Turn OFF the ignition for 30 seconds.
3. Turn ON the ignition, with the engine OFF.
4. Monitor the Diagnostic Trouble Code (DTC) Information of the engine control system with the
scan tool and check whether following DTC(s) is
set: • P0115 (Symptom Code 1 & 2)
• P0645 (Symptom Code 4 & 8)
Are any of the above DTC(s) set?
Refer to Applicable DTC Go to Step 3
3 1. Turn ON the ignition, with the engine OFF.
2. Turn ON the blower motor switch.
Does the blower motor turn ON and operate
correctly?
Go to Step 4 Refer to Applicable
Diagnostic Chart in Heating & Air Conditioning Section
4 1. Turn OFF the blower motor switch. 2. Keep the A/C switch OFF.
Does the A/C Request Signal parameter indicate
OFF?
Go to Step 5 Go to Chart 2 of 2
with heater Step 1 OR
Go to Chart 2 of 2
without heater Step 1
5 1. Start the engine and let the engine idle. 2. Keep the blower motor switch OFF.
3. Keep the A/C switch OFF.
Does the A/C compressor clutch keep OFF
(disengage)?
Go to Step 6 Go to Step 11
6 1. Turn ON the blower motor switch. 2. Keep the A/C switch OFF.
Does the A/C compressor clutch keep OFF
(disengage)?
Go to Step 7 Go to Chart 2 of 2
with heater Step 7 OR
Go to Chart 2 of 2
without heater Step 4
BACK TO CHAPTER INDEX
TO MODEL INDEX
ISUZU KB P190 2007
Page 1277 of 6020
Engine Control System (4JH1) 6E-243
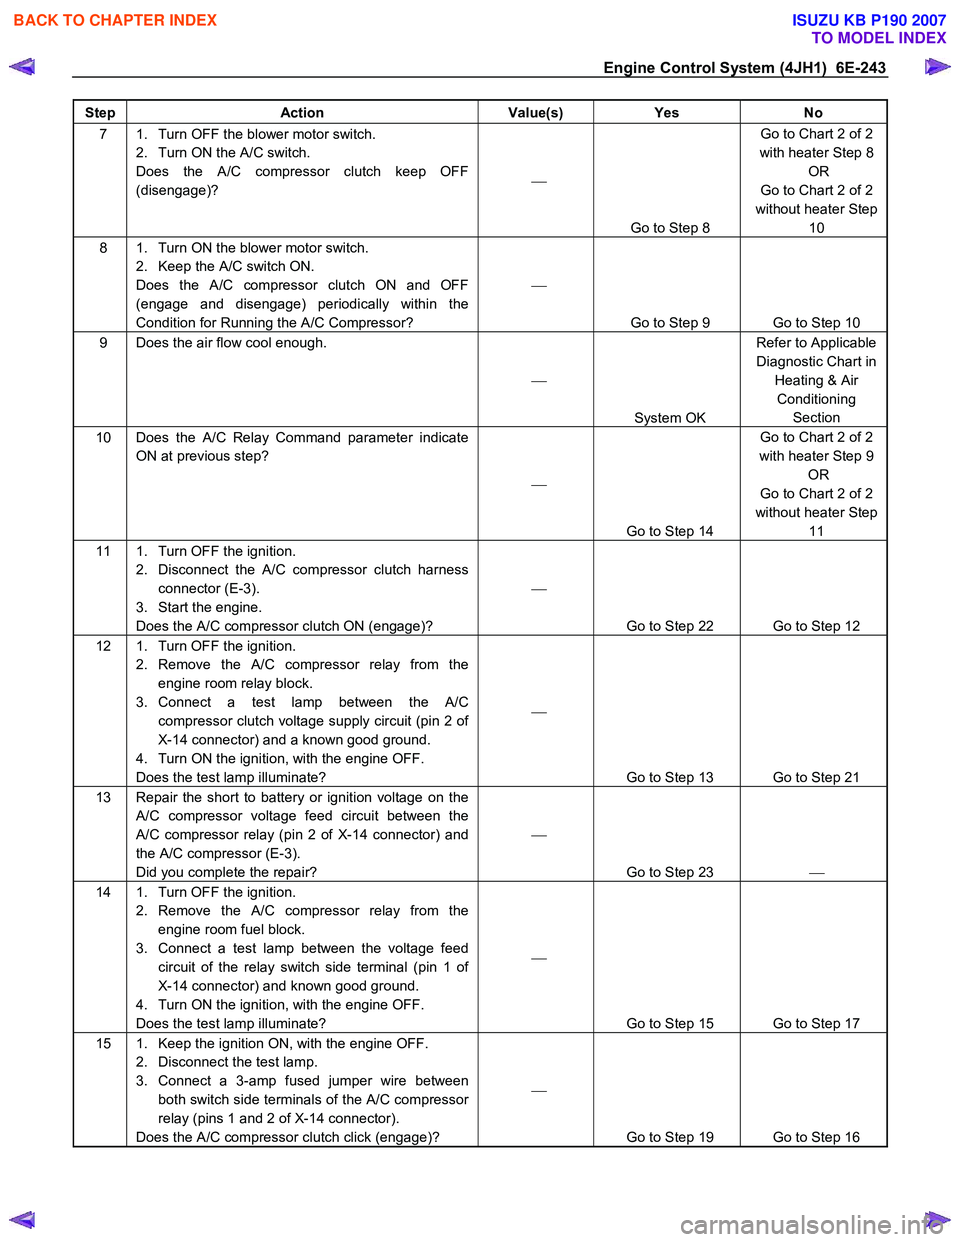
Step Action Value(s) Yes No
7 1. Turn OFF the blower motor switch.
2. Turn ON the A/C switch.
Does the A/C compressor clutch keep OFF
(disengage)?
Go to Step 8 Go to Chart 2 of 2
with heater Step 8 OR
Go to Chart 2 of 2
without heater Step 10
8 1. Turn ON the blower motor switch. 2. Keep the A/C switch ON.
Does the A/C compressor clutch ON and OFF
(engage and disengage) periodically within the
Condition for Running the A/C Compressor?
Go to Step 9 Go to Step 10
9 Does the air flow cool enough.
System OK Refer to Applicable
Diagnostic Chart in Heating & Air Conditioning Section
10 Does the A/C Relay Command parameter indicate ON at previous step?
Go to Step 14 Go to Chart 2 of 2
with heater Step 9 OR
Go to Chart 2 of 2
without heater Step 11
11 1. Turn OFF the ignition. 2. Disconnect the A/C compressor clutch harness connector (E-3).
3. Start the engine.
Does the A/C compressor clutch ON (engage)?
Go to Step 22 Go to Step 12
12 1. Turn OFF the ignition. 2. Remove the A/C compressor relay from the engine room relay block.
3. Connect a test lamp between the A/C compressor clutch voltage supply circuit (pin 2 of
X-14 connector) and a known good ground.
4. Turn ON the ignition, with the engine OFF.
Does the test lamp illuminate?
Go to Step 13 Go to Step 21
13 Repair the short to battery or ignition voltage on the A/C compressor voltage feed circuit between the
A/C compressor relay (pin 2 of X-14 connector) and
the A/C compressor (E-3).
Did you complete the repair?
Go to Step 23
14 1. Turn OFF the ignition.
2. Remove the A/C compressor relay from the engine room fuel block.
3. Connect a test lamp between the voltage feed circuit of the relay switch side terminal (pin 1 of
X-14 connector) and known good ground.
4. Turn ON the ignition, with the engine OFF.
Does the test lamp illuminate?
Go to Step 15 Go to Step 17
15 1. Keep the ignition ON, with the engine OFF. 2. Disconnect the test lamp.
3. Connect a 3-amp fused jumper wire between both switch side terminals of the A/C compressor
relay (pins 1 and 2 of X-14 connector).
Does the A/C compressor clutch click (engage)?
Go to Step 19 Go to Step 16
BACK TO CHAPTER INDEX
TO MODEL INDEX
ISUZU KB P190 2007
Page 1278 of 6020
6E-244 Engine Control System (4JH1)
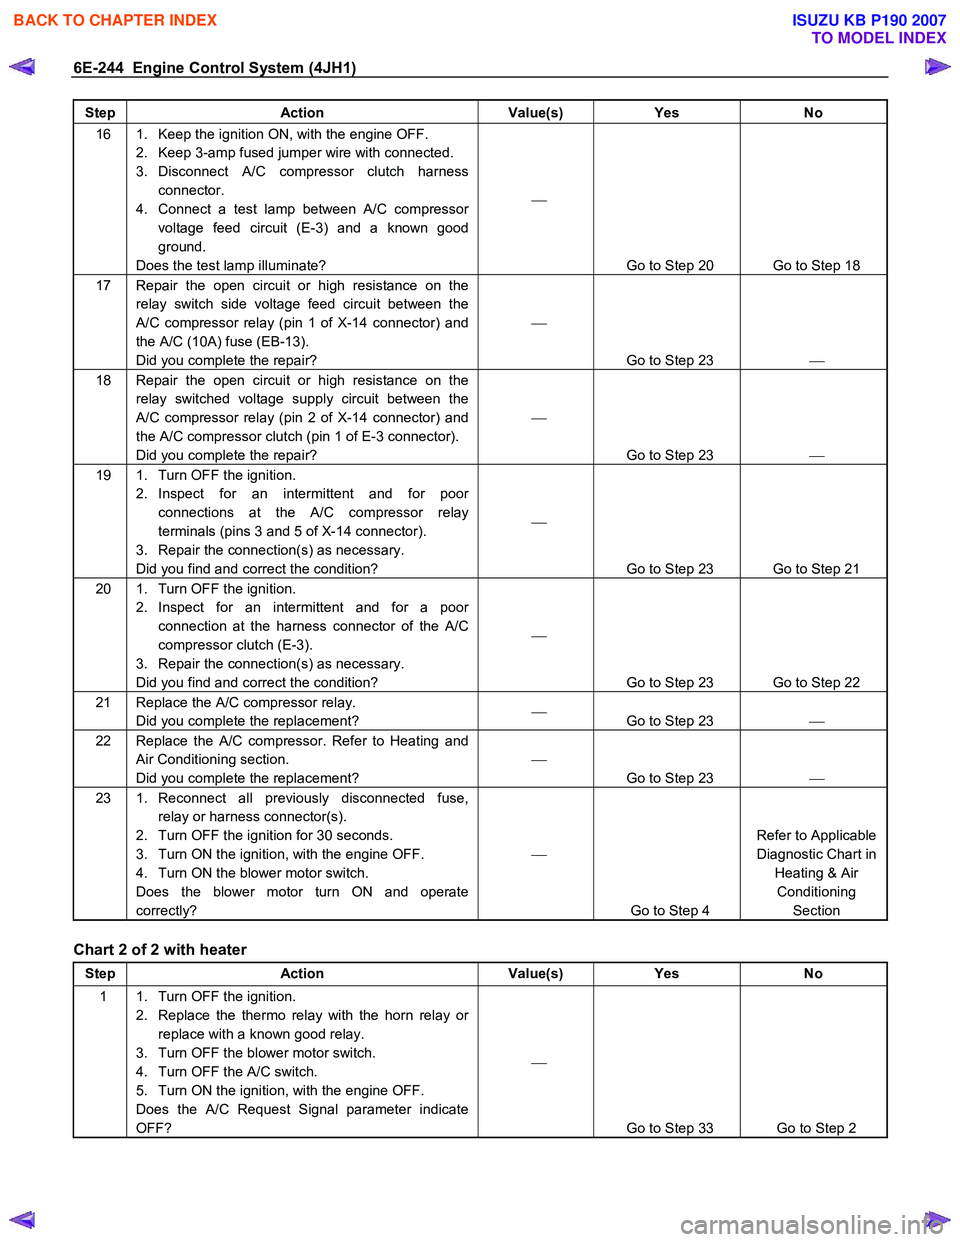
Step Action Value(s) Yes No
16 1. Keep the ignition ON, with the engine OFF.
2. Keep 3-amp fused jumper wire with connected.
3. Disconnect A/C compressor clutch harness connector.
4. Connect a test lamp between A/C compressor voltage feed circuit (E-3) and a known good
ground.
Does the test lamp illuminate?
Go to Step 20 Go to Step 18
17 Repair the open circuit or high resistance on the relay switch side voltage feed circuit between the
A/C compressor relay (pin 1 of X-14 connector) and
the A/C (10A) fuse (EB-13).
Did you complete the repair?
Go to Step 23
18 Repair the open circuit or high resistance on the
relay switched voltage supply circuit between the
A/C compressor relay (pin 2 of X-14 connector) and
the A/C compressor clutch (pin 1 of E-3 connector).
Did you complete the repair?
Go to Step 23
19 1. Turn OFF the ignition.
2. Inspect for an intermittent and for poor connections at the A/C compressor relay
terminals (pins 3 and 5 of X-14 connector).
3. Repair the connection(s) as necessary.
Did you find and correct the condition?
Go to Step 23 Go to Step 21
20 1. Turn OFF the ignition. 2. Inspect for an intermittent and for a poor connection at the harness connector of the A/C
compressor clutch (E-3).
3. Repair the connection(s) as necessary.
Did you find and correct the condition?
Go to Step 23 Go to Step 22
21 Replace the A/C compressor relay. Did you complete the replacement?
Go to Step 23
22 Replace the A/C compressor. Refer to Heating and
Air Conditioning section.
Did you complete the replacement?
Go to Step 23
23 1. Reconnect all previously disconnected fuse,
relay or harness connector(s).
2. Turn OFF the ignition for 30 seconds.
3. Turn ON the ignition, with the engine OFF.
4. Turn ON the blower motor switch.
Does the blower motor turn ON and operate
correctly?
Go to Step 4 Refer to Applicable
Diagnostic Chart in Heating & Air Conditioning Section
Chart 2 of 2 with heater
Step Action Value(s) Yes No
1 1. Turn OFF the ignition.
2. Replace the thermo relay with the horn relay or replace with a known good relay.
3. Turn OFF the blower motor switch.
4. Turn OFF the A/C switch.
5. Turn ON the ignition, with the engine OFF.
Does the A/C Request Signal parameter indicate
OFF?
Go to Step 33 Go to Step 2
BACK TO CHAPTER INDEX
TO MODEL INDEX
ISUZU KB P190 2007