relay ISUZU KB P190 2007 Workshop Owner's Manual
[x] Cancel search | Manufacturer: ISUZU, Model Year: 2007, Model line: KB P190, Model: ISUZU KB P190 2007Pages: 6020, PDF Size: 70.23 MB
Page 608 of 6020

BRAKE CONTROL SYSTEM 5A-15
No. Connector face No. Connector face
H-6
White
Engine room ~ INST P-7
Battery (ALT)
H-7
White
Engine room ~ INST P-10
SilverEngine ground
H-9
White
Engine room ~ Chassis P-11
SilverFuse & relay box
H-15
White
Engine room ~ Chassis
H-18
White
Engine room ~ INST
H-48
White
Engine room ~ INST
P-1
Silver
Battery (+)
P-2
Silver
Relay & Fuse box
P-5
Silver
Battery (-)
P-6
Silver
Body ground
BACK TO CHAPTER INDEX
TO MODEL INDEX
ISUZU KB P190 2007
Page 615 of 6020
5A-22 BRAKE CONTROL SYSTEM
System Components
Electronic Hydraulic Control Unit (EHCU), four W heel
Speed Sensors, two W arning Lamps, and G sensor.
Electronic Hydraulic Control Unit (EHCU)
The EHCU consists of ABS control circuits, fault
detector, and a fail-safe. It drives the EHCU according
to the signal from each sensor, cancelling ABS to return
to normal braking when a malfunction has occurred in
the ABS.
The EHCU has a self-diagnosing function which can
indicate faulty circuits during diagnosis.
The EHCU is mounted on the engine compartment rear
left side. It consists of a motor, solenoid valves and a
fail safe relay.
Solenoid Valves: Reduces or holds the caliper fluid
pressure for each front brake or both rear brakes
according to the signal sent from the EHCU.
Buffer chamber: Temporarily holds the brake fluid that
returns from the front and rear brake so that pressure of
front brake can be reduced smoothly.
Motor: Drives the pump according to the signal from
EHCU.
Fail safe Relay: W hen failure occurs in ABS.
The power supply to solenoid Valve is cut.
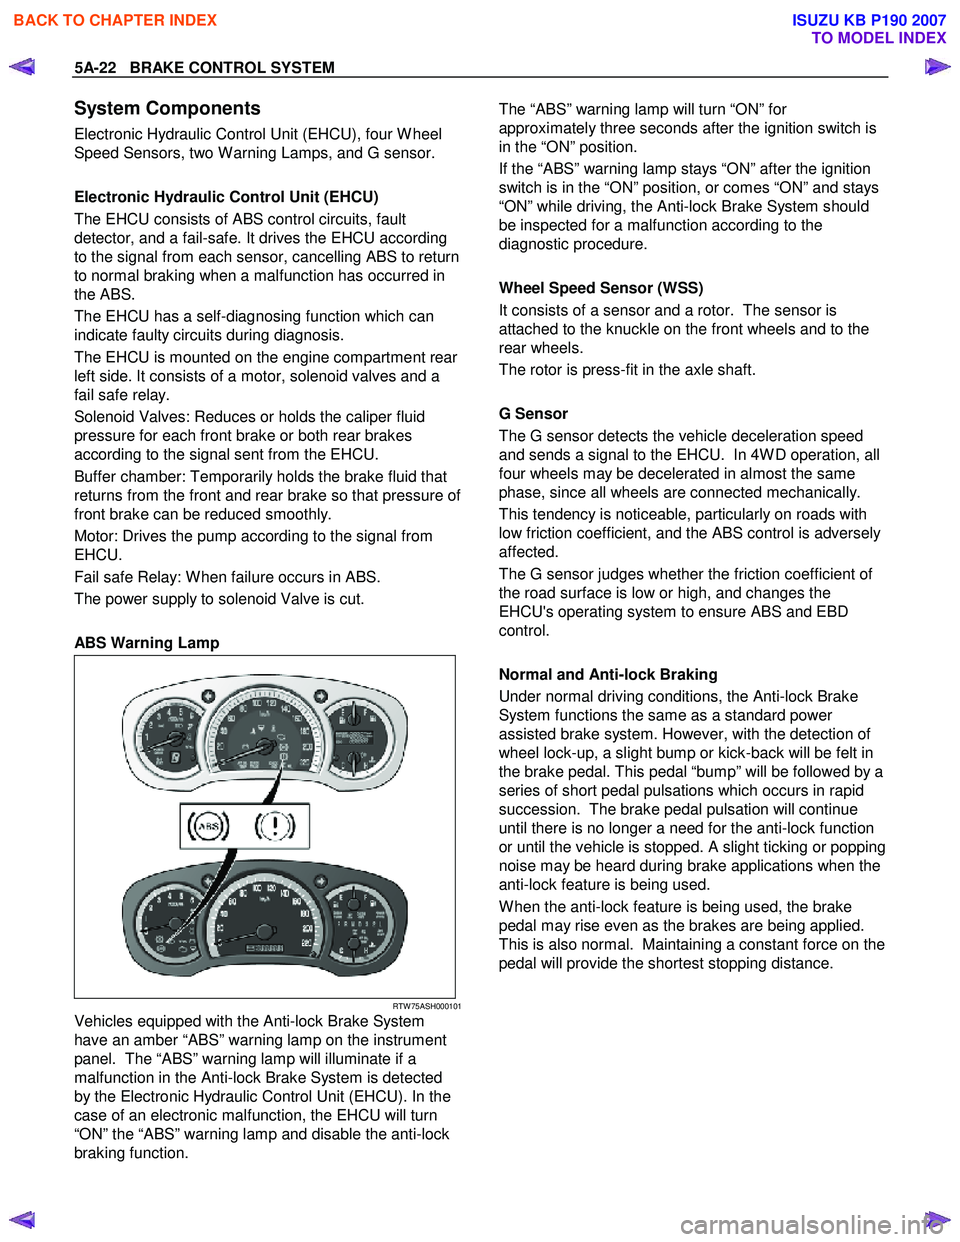
ABS Warning Lamp
RTW 75ASH000101
Vehicles equipped with the Anti-lock Brake System
have an amber “ABS” warning lamp on the instrument
panel. The “ABS” warning lamp will illuminate if a
malfunction in the Anti-lock Brake System is detected
by the Electronic Hydraulic Control Unit (EHCU). In the
case of an electronic malfunction, the EHCU will turn
“ON” the “ABS” warning lamp and disable the anti-lock
braking function.
The “ABS” warning lamp will turn “ON” for
approximately three seconds after the ignition switch is
in the “ON” position.
If the “ABS” warning lamp stays “ON” after the ignition
switch is in the “ON” position, or comes “ON” and stays
“ON” while driving, the Anti-lock Brake System should
be inspected for a malfunction according to the
diagnostic procedure.
Wheel Speed Sensor (WSS)
It consists of a sensor and a rotor. The sensor is
attached to the knuckle on the front wheels and to the
rear wheels.
The rotor is press-fit in the axle shaft.
G Sensor
The G sensor detects the vehicle deceleration speed
and sends a signal to the EHCU. In 4W D operation, all
four wheels may be decelerated in almost the same
phase, since all wheels are connected mechanically.
This tendency is noticeable, particularly on roads with
low friction coefficient, and the ABS control is adversely
affected.
The G sensor judges whether the friction coefficient of
the road surface is low or high, and changes the
EHCU's operating system to ensure ABS and EBD
control.
Normal and Anti-lock Braking
Under normal driving conditions, the Anti-lock Brake
System functions the same as a standard power
assisted brake system. However, with the detection of
wheel lock-up, a slight bump or kick-back will be felt in
the brake pedal. This pedal “bump” will be followed by a
series of short pedal pulsations which occurs in rapid
succession. The brake pedal pulsation will continue
until there is no longer a need for the anti-lock function
or until the vehicle is stopped. A slight ticking or popping
noise may be heard during brake applications when the
anti-lock feature is being used.
W hen the anti-lock feature is being used, the brake
pedal may rise even as the brakes are being applied.
This is also normal. Maintaining a constant force on the
pedal will provide the shortest stopping distance.
BACK TO CHAPTER INDEX
TO MODEL INDEX
ISUZU KB P190 2007
Page 622 of 6020
BRAKE CONTROL SYSTEM 5A-29
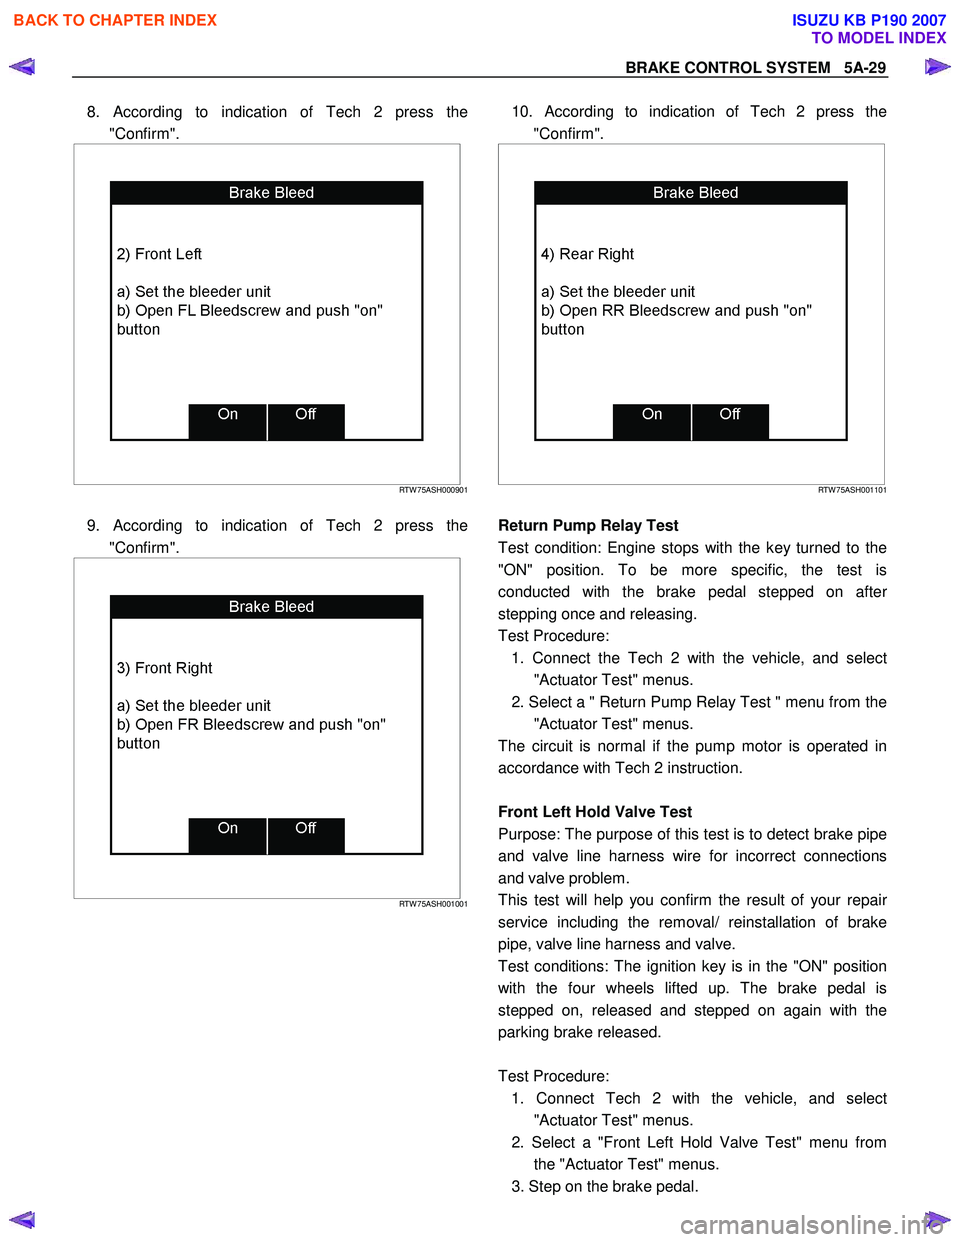
8. According to indication of Tech 2 press the
"Confirm".
RTW 75ASH000901
9. According to indication of Tech 2 press the
"Confirm".
RTW 75ASH001001
10. According to indication of Tech 2 press the
"Confirm".
RTW 75ASH001101
Return Pump Relay Test
Test condition: Engine stops with the key turned to the
"ON" position. To be more specific, the test is
conducted with the brake pedal stepped on afte
r
stepping once and releasing.
Test Procedure: 1. Connect the Tech 2 with the vehicle, and selec
t
"Actuator Test" menus.
2. Select a " Return Pump Relay Test " menu from the "Actuator Test" menus.
The circuit is normal if the pump motor is operated in
accordance with Tech 2 instruction.
Front Left Hold Valve Test
Purpose: The purpose of this test is to detect brake pipe
and valve line harness wire for incorrect connections
and valve problem.
This test will help you confirm the result of your repai
r
service including the removal/ reinstallation of brake
pipe, valve line harness and valve.
Test conditions: The ignition key is in the "ON" position
with the four wheels lifted up. The brake pedal is
stepped on, released and stepped on again with the
parking brake released.
Test Procedure: 1. Connect Tech 2 with the vehicle, and selec
t
"Actuator Test" menus.
2. Select a "Front Left Hold Valve Test" menu from the "Actuator Test" menus.
3. Step on the brake pedal.
BACK TO CHAPTER INDEX
TO MODEL INDEX
ISUZU KB P190 2007
Page 625 of 6020
5A-32 BRAKE CONTROL SYSTEM
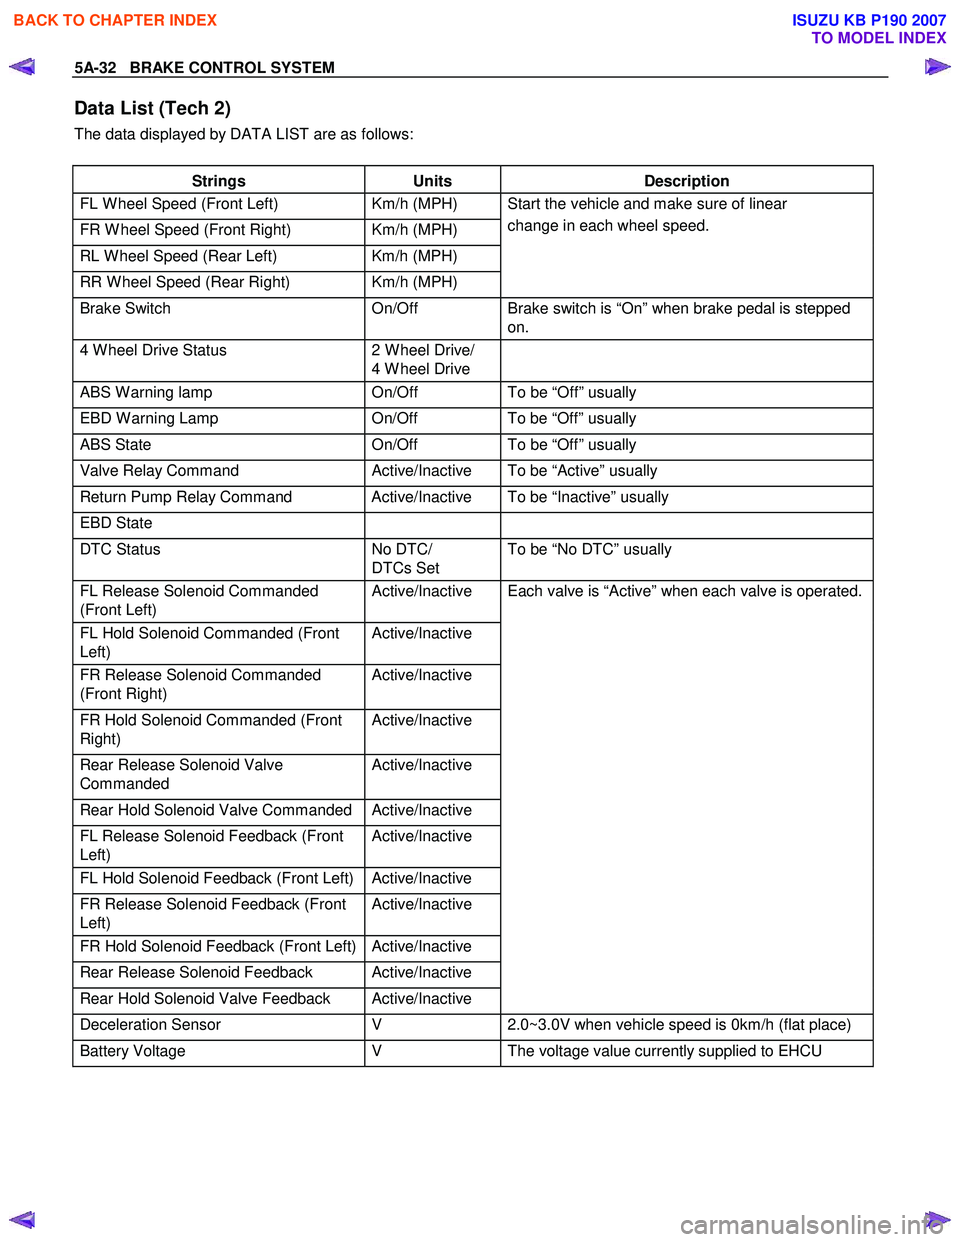
Data List (Tech 2)
The data displayed by DATA LIST are as follows:
Strings Units Description
FL W heel Speed (Front Left) Km/h (MPH)
FR W heel Speed (Front Right) Km/h (MPH)
RL W heel Speed (Rear Left) Km/h (MPH)
RR W heel Speed (Rear Right) Km/h (MPH) Start the vehicle and make sure of linear
change in each wheel speed.
Brake Switch On/Off Brake switch is “On” when brake pedal is stepped
on.
4 W heel Drive Status 2 W heel Drive/
4 W heel Drive
ABS W arning lamp
On/Off To be “Off” usually
EBD W arning Lamp On/Off To be “Off” usually
ABS State On/Off To be “Off” usually
Valve Relay Command Active/Inactive To be “Active” usually
Return Pump Relay Command Active/Inactive To be “Inactive” usually
EBD State
DTC Status No DTC/
DTCs Set To be “No DTC” usually
FL Release Solenoid Commanded
(Front Left) Active/Inactive
FL Hold Solenoid Commanded (Front
Left) Active/Inactive
FR Release Solenoid Commanded
(Front Right) Active/Inactive
FR Hold Solenoid Commanded (Front
Right) Active/Inactive
Rear Release Solenoid Valve
Commanded Active/Inactive
Rear Hold Solenoid Valve Commanded Active/Inactive
FL Release Solenoid Feedback (Front
Left) Active/Inactive
FL Hold Solenoid Feedback (Front Left) Active/Inactive
FR Release Solenoid Feedback (Front
Left) Active/Inactive
FR Hold Solenoid Feedback (Front Left) Active/Inactive
Rear Release Solenoid Feedback Active/Inactive
Rear Hold Solenoid Valve Feedback Active/Inactive Each valve is “Active” when each valve is operated.
Deceleration Sensor
V 2.0~3.0V when vehicle speed is 0km/h (flat place)
Battery Voltage V The voltage value currently supplied to EHCU
BACK TO CHAPTER INDEX
TO MODEL INDEX
ISUZU KB P190 2007
Page 626 of 6020
BRAKE CONTROL SYSTEM 5A-33
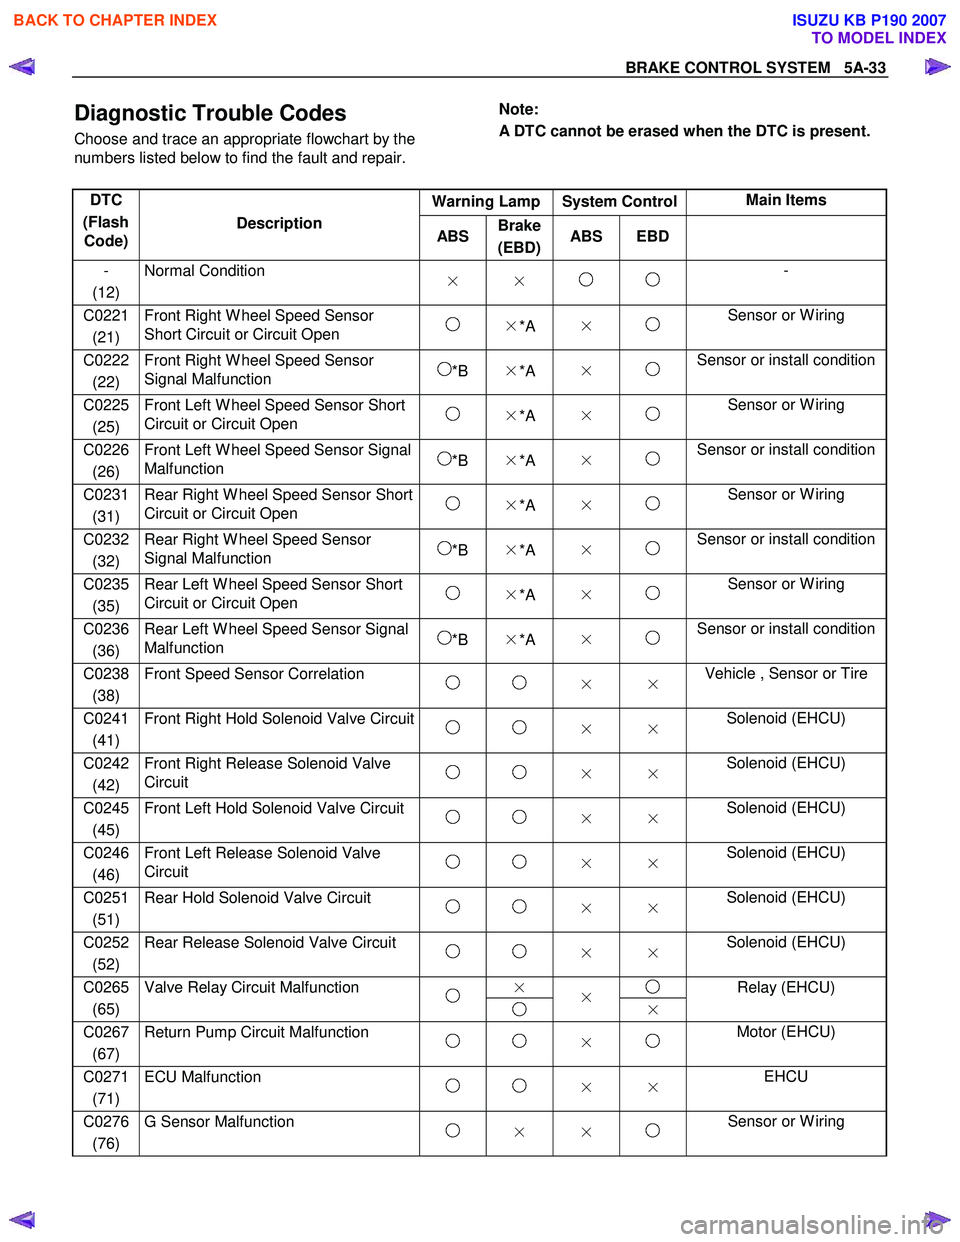
Diagnostic Trouble Codes
Choose and trace an appropriate flowchart by the
numbers listed below to find the fault and repair.
Note:
A DTC cannot be erased when the DTC is present.
Warning Lamp System Control Main Items
DTC
(Flash Code) Description
ABS Brake
(EBD) ABS EBD
-
(12) Normal Condition
× × -
C0221
(21) Front Right W heel Speed Sensor
Short Circuit or Circuit Open ×*A × Sensor or W iring
C0222
(22) Front Right W heel Speed Sensor
Signal Malfunction *B ×*A × Sensor or install condition
C0225
(25) Front Left W heel Speed Sensor Short
Circuit or Circuit Open ×*A × Sensor or W iring
C0226
(26) Front Left W heel Speed Sensor Signal
Malfunction *B ×*A × Sensor or install condition
C0231
(31) Rear Right W heel Speed Sensor Short
Circuit or Circuit Open ×*A × Sensor or W iring
C0232
(32) Rear Right W heel Speed Sensor
Signal Malfunction *B ×*A × Sensor or install condition
C0235
(35) Rear Left W heel Speed Sensor Short
Circuit or Circuit Open ×*A × Sensor or W iring
C0236
(36) Rear Left W heel Speed Sensor Signal
Malfunction *B ×*A × Sensor or install condition
C0238
(38) Front Speed Sensor Correlation
× × Vehicle , Sensor or Tire
C0241
(41) Front Right Hold Solenoid Valve Circuit
× × Solenoid (EHCU)
C0242
(42) Front Right Release Solenoid Valve
Circuit × × Solenoid (EHCU)
C0245
(45) Front Left Hold Solenoid Valve Circuit
× × Solenoid (EHCU)
C0246
(46) Front Left Release Solenoid Valve
Circuit × × Solenoid (EHCU)
C0251
(51) Rear Hold Solenoid Valve Circuit
× × Solenoid (EHCU)
C0252
(52) Rear Release Solenoid Valve Circuit
× × Solenoid (EHCU)
×
C0265
(65) Valve Relay Circuit Malfunction
×
× Relay (EHCU)
C0267
(67) Return Pump Circuit Malfunction
× Motor (EHCU)
C0271
(71) ECU Malfunction
× × EHCU
C0276
(76) G Sensor Malfunction
× × Sensor or W iring
BACK TO CHAPTER INDEX
TO MODEL INDEX
ISUZU KB P190 2007
Page 665 of 6020

5A-72 BRAKE CONTROL SYSTEM
DTC C0265 (Flash Code 65) Valve Relay Circuit Malfunction
RTW 75ALF000301
Step Action Value(s) Yes No
1 W ere the steps of the “Basic Diagnostic Flow Chart”
performed?
- Go to Step 2 Go to Basic
Diagnostic
Flow Chart
2 1. Ignition “OFF”.
2. Check the EHCU circuit for an open, short to ground, or short to voltage. Also, check the EHCU
ignition feed circuit for an open or short to ground
and the EHCU ground circuit for an open or short to
voltage.
3. If a problem is found, repair as necessary. W as a problem found? - Verify repair Go to Step 3
BACK TO CHAPTER INDEX
TO MODEL INDEX
ISUZU KB P190 2007
Page 788 of 6020
TROUBLESHOOTING 6 – 3
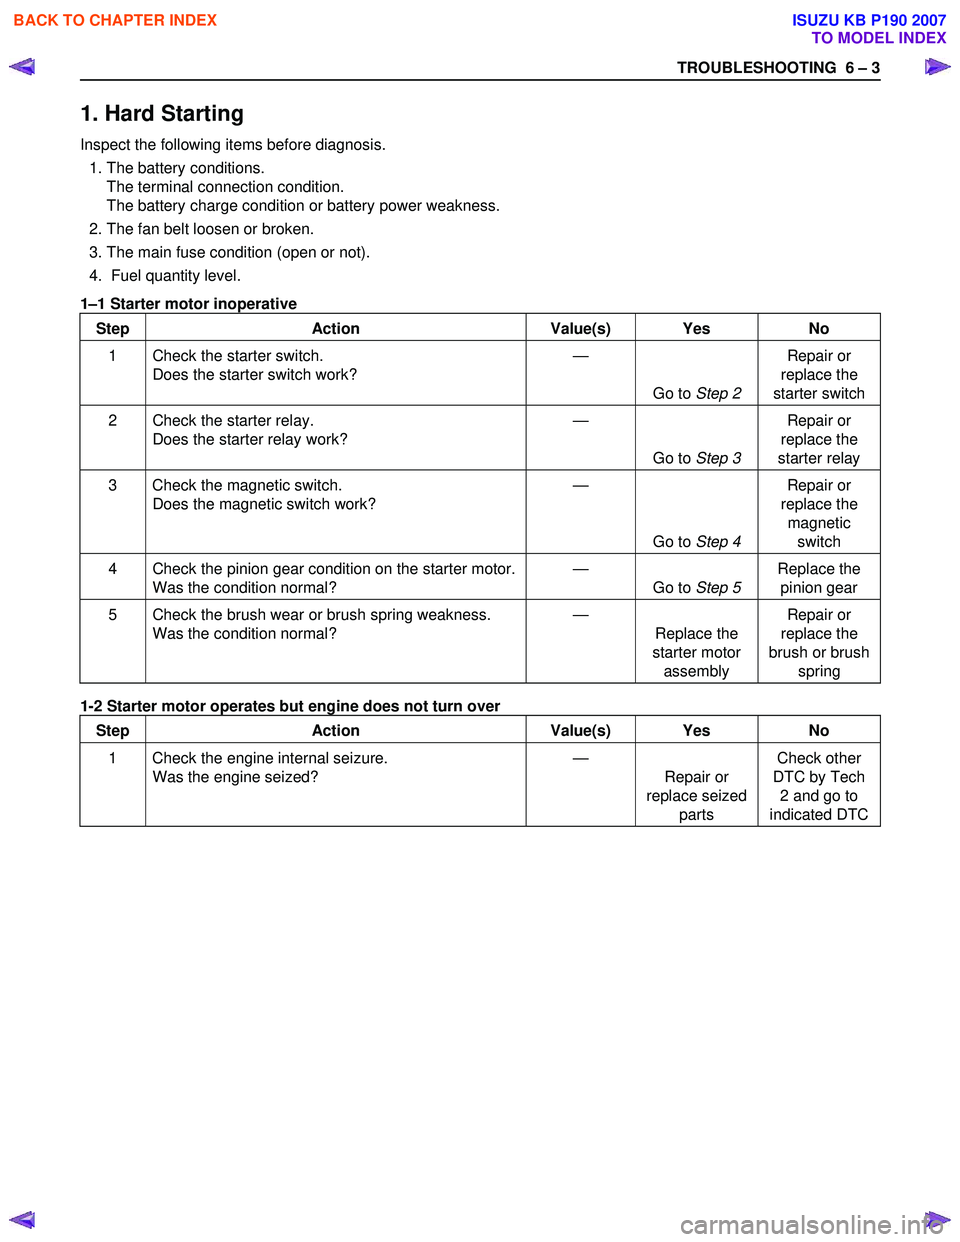
1. Hard Starting
Inspect the following items before diagnosis.
1. The battery conditions. The terminal connection condition.
The battery charge condition or battery power weakness.
2. The fan belt loosen or broken.
3. The main fuse condition (open or not).
4. Fuel quantity level.
1 –1 Starter motor inoperative
Step Action Value(s) Yes No
1 Check the starter switch. Does the starter switch work? —
Go to Step 2 Repair or
replace the
starter switch
2 Check the starter relay. Does the starter relay work? —
Go to Step 3 Repair or
replace the
starter relay
3 Check the magnetic switch. Does the magnetic switch work? —
Go to Step 4 Repair or
replace the magnetic switch
4 Check the pinion gear condition on the starter motor. Was the condition normal? —
Go to Step 5 Replace the
pinion gear
5 Check the brush wear or brush spring weakness. Was the condition normal? —
Replace the
starter motor assembly Repair or
replace the
brush or brush spring
1-2 Starter motor operates but engine does not turn over
Step Action Value(s) Yes No
1 Check the engine internal seizure. Was the engine seized? —
Repair or
replace seized parts Check other
DTC by Tech 2 and go to
indicated DTC
BACK TO CHAPTER INDEX
TO MODEL INDEX
ISUZU KB P190 2007
Page 1002 of 6020
SECTION 6D
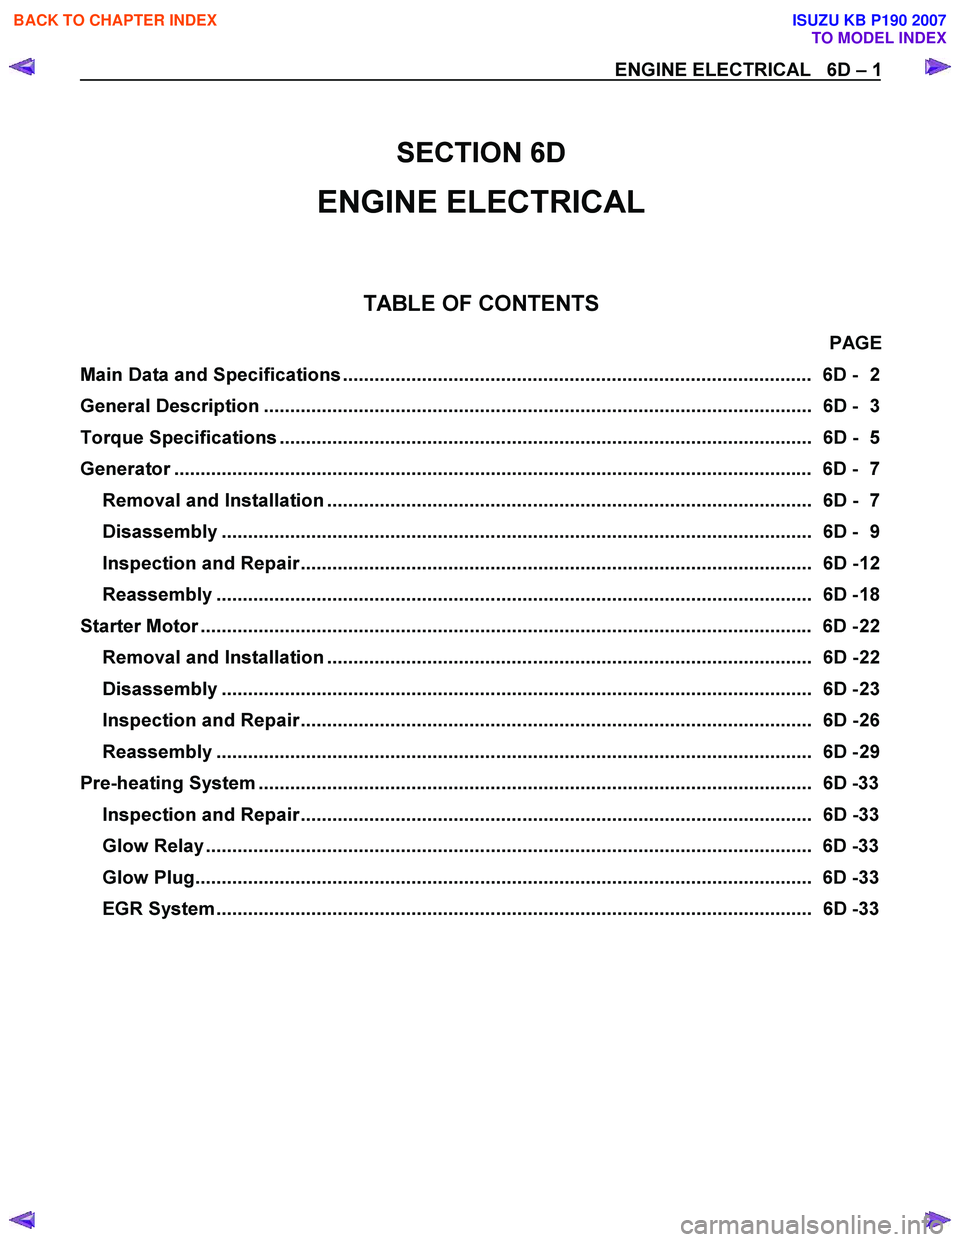
ENGINE ELECTRICAL
TABLE OF CONTENTS
PAGE
Main Data and Specifications ......................................................................................... 6D - 2
General Description ........................................................................................................ 6D - 3
Torque Specifications ..................................................................................................... 6D - 5
Generator ...................................................................................................................... ... 6D - 7
Removal and Installation ............................................................................................ 6D - 7
Disassembly ................................................................................................................ 6D - 9
Inspection and Repair ................................................................................................. 6D - 12
Reassembly ................................................................................................................. 6D - 18
Starter Motor .................................................................................................................. .. 6D - 22
Removal and Installation ............................................................................................ 6D - 22
Disassembly ................................................................................................................ 6D - 23
Inspection and Repair ................................................................................................. 6D - 26
Reassembly ................................................................................................................. 6D - 29
Pre-heating System ......................................................................................................... 6D -33
Inspection and Repair ................................................................................................. 6D -33
Glow Relay ................................................................................................................... 6D -33
Glow Plug..................................................................................................................... 6D -33
EGR System ................................................................................................................. 6D -33
ENGINE ELECTRICAL 6D – 1
BACK TO CHAPTER INDEX
TO MODEL INDEX
ISUZU KB P190 2007
Page 1034 of 6020
ENGINE ELECTRICAL 6D – 33
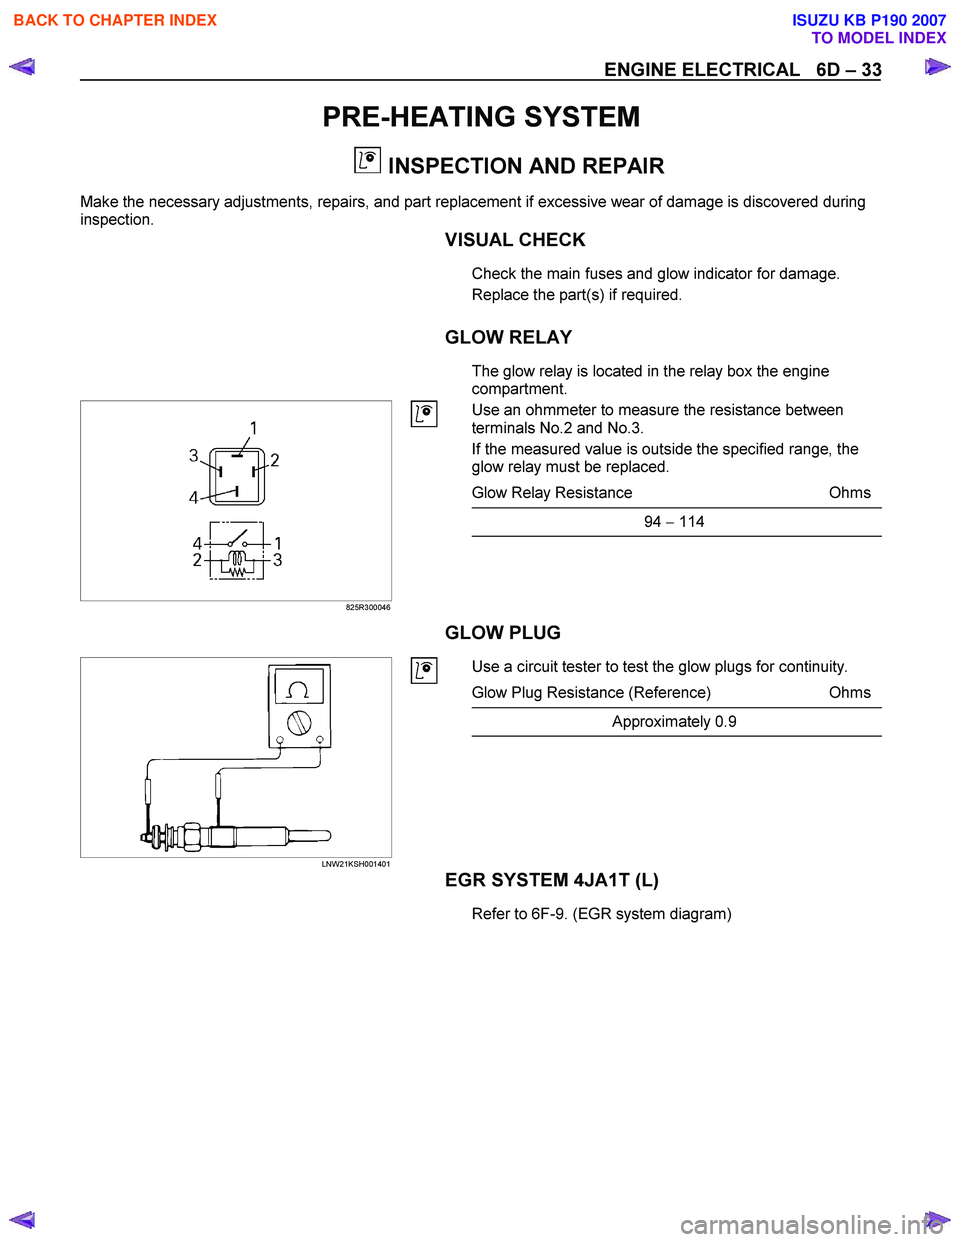
PRE-HEATING SYSTEM
INSPECTION AND REPAIR
Make the necessary adjustments, repairs, and part replacement if excessive wear of damage is discovered during
inspection.
VISUAL CHECK
Check the main fuses and glow indicator for damage.
Replace the part(s) if required.
GLOW RELAY
The glow relay is located in the relay box the engine
compartment.
825R300046
Use an ohmmeter to measure the resistance between
terminals No.2 and No.3.
If the measured value is outside the specified range, the
glow relay must be replaced.
Glow Relay Resistance Ohms
94 − 114
GLOW PLUG
LNW21KSH001401
Use a circuit tester to test the glow plugs for continuity.
Glow Plug Resistance (Reference) Ohms
Approximately 0.9
EGR SYSTEM 4JA1T (L)
Refer to 6F-9. (EGR system diagram)
BACK TO CHAPTER INDEX
TO MODEL INDEX
ISUZU KB P190 2007
Page 1052 of 6020

6E-18 Engine Control System (4JH1)
Component Locator
Engine Controls Component Views
3
4
1 2
6
45
Legend
1. Mass Air Flow (MAF) & Intake Air Temperature (IAT) Sensor Assembly
2. Throttle Cable
3. Air Cleaner Case
4. Battery
5. Relay & Fuse Box
6. EGR Cooler (Euro3) / EGR Pipe (Except Euro3)
BACK TO CHAPTER INDEX
TO MODEL INDEX
ISUZU KB P190 2007