ECO mode ISUZU KB P190 2007 Workshop Repair Manual
[x] Cancel search | Manufacturer: ISUZU, Model Year: 2007, Model line: KB P190, Model: ISUZU KB P190 2007Pages: 6020, PDF Size: 70.23 MB
Page 2718 of 6020
Engine Mechanical – V6 Page 6A1–239
Inspect
Visual Inspection
NOTE
The following procedure assumes the engine has
been disassembled and cleaned, as described
above.
1 Inspect the crankshaft bearing journals for damage or spun bearings. The crankshaft bearing journals are not repairable and if damage is found, the cylinder block assembly must be replaced.
2 Inspect the primary camshaft chain tensioner mounting surface on the engine block for burrs or any defects that would affect the sealing of the new primary camshaft chain tensioner gasket.
3 Inspect all sealing and mating surfaces for damage, repair or replace the cylinder block assembly if required.
4 Inspect all threaded and through holes for damage or excessive debris.
5 Inspect all bolts for damage, if damaged replace with new bolts only.
6 Inspect the cylinder walls for cracks or damage. The cylinder sleeves are not serviced separately, if the cylinders are damaged the cylinder block assembly must be replaced.
7 Inspect the engine block for cracks. Do not repair any cracks. If cracks are found, the cylinder block assembly must be replaced. Repair any damaged threaded holes, refer to 4.9 Thread Repair Specifications.
Measuring Cylinder Bore Diameter
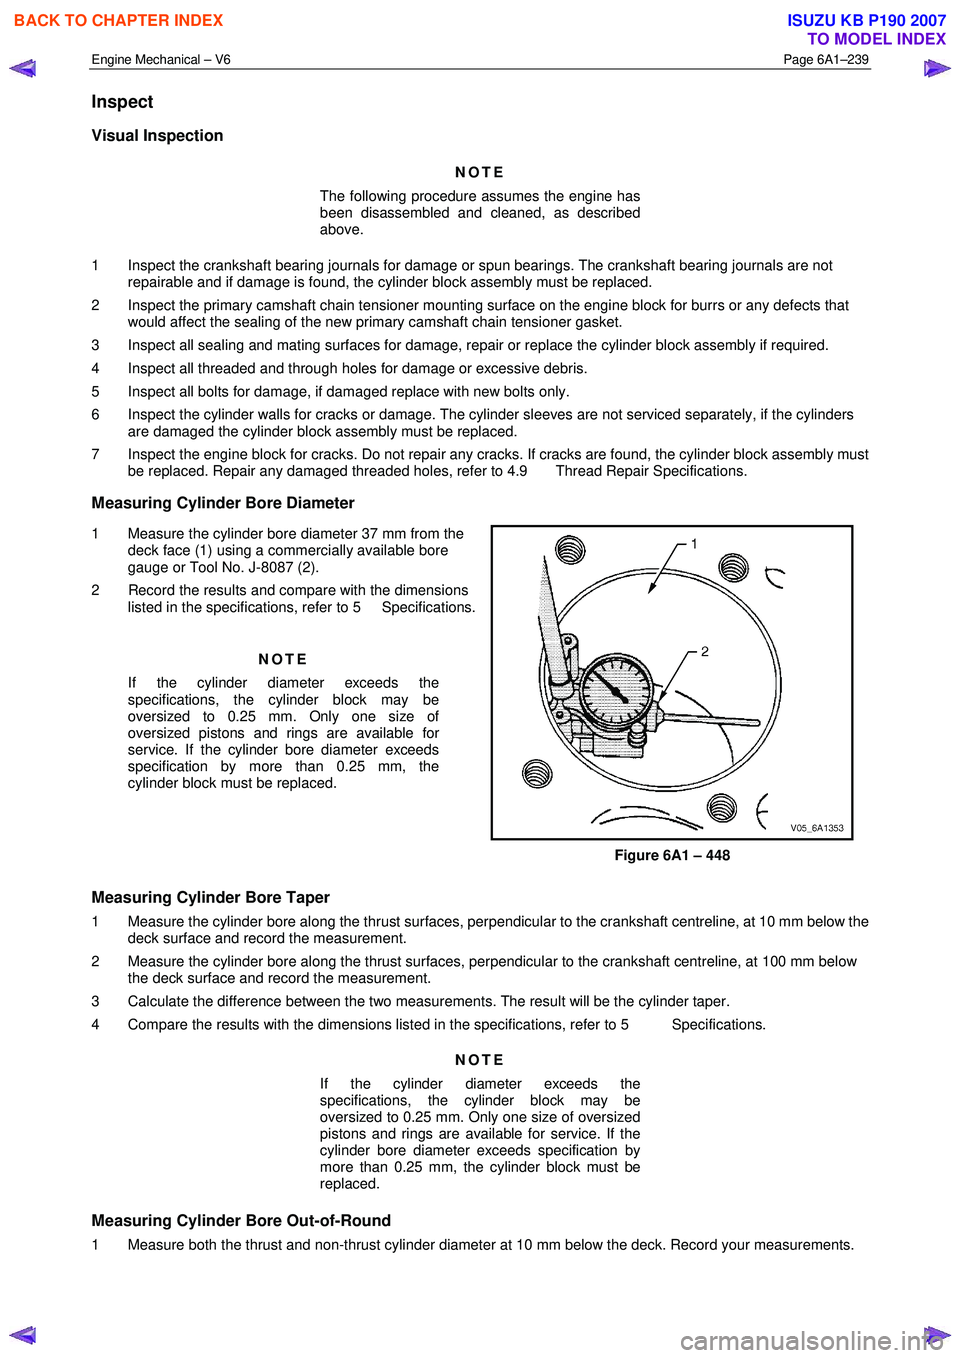
1 Measure the cylinder bore diameter 37 mm from the deck face (1) using a commercially available bore
gauge or Tool No. J-8087 (2).
2 Record the results and compare with the dimensions listed in the specifications, refer to 5 Specifications.
NOTE
If the cylinder diameter exceeds the
specifications, the cylinder block may be
oversized to 0.25 mm. Only one size of
oversized pistons and rings are available for
service. If the cylinder bore diameter exceeds
specification by more than 0.25 mm, the
cylinder block must be replaced.
Figure 6A1 – 448
Measuring Cylinder Bore Taper
1 Measure the cylinder bore along the thrust surfaces, perpendicular to the crankshaft centreline, at 10 mm below the deck surface and record the measurement.
2 Measure the cylinder bore along the thrust surfaces, perpendicular to the crankshaft centreline, at 100 mm below the deck surface and record the measurement.
3 Calculate the difference between the two measurements. The result will be the cylinder taper.
4 Compare the results with the dimensions listed in the specifications, refer to 5 Specifications.
NOTE
If the cylinder diameter exceeds the
specifications, the cylinder block may be
oversized to 0.25 mm. Only one size of oversized
pistons and rings are available for service. If the
cylinder bore diameter exceeds specification by
more than 0.25 mm, the cylinder block must be
replaced.
Measuring Cylinder Bore Out-of-Round
1 Measure both the thrust and non-thrust cylinder diameter at 10 mm below the deck. Record your measurements.
BACK TO CHAPTER INDEX
TO MODEL INDEX
ISUZU KB P190 2007
Page 2719 of 6020
Engine Mechanical – V6 Page 6A1–240
2 Calculate the difference between the two measurements. The result will indicate out-of-round at the upper end of
the cylinder.
3 Measure both the thrust and non-thrust cylinder diameter at 100 mm below the deck surface. Record your measurements.
4 Calculate the difference between the two measurements. The result will indicate out-of-round at the lower end of the cylinder.
5 Compare your results with the dimensions listed in the specifications, refer to 5 Specifications.
NOTE
If the cylinder diameter exceeds the
specifications, the cylinder block may be
oversized to 0.25 mm. Only one size of oversized
pistons and rings are available for service. If the
cylinder bore diameter exceeds specification by
more than 0.25 mm, the cylinder block must be
replaced.
Deck Flatness Inspection
1 Ensure the engine block decks are clean and free of gasket material.
2 Inspect the surface for any imperfections or scratches that could inhibit correct cylinder head gasket sealing.
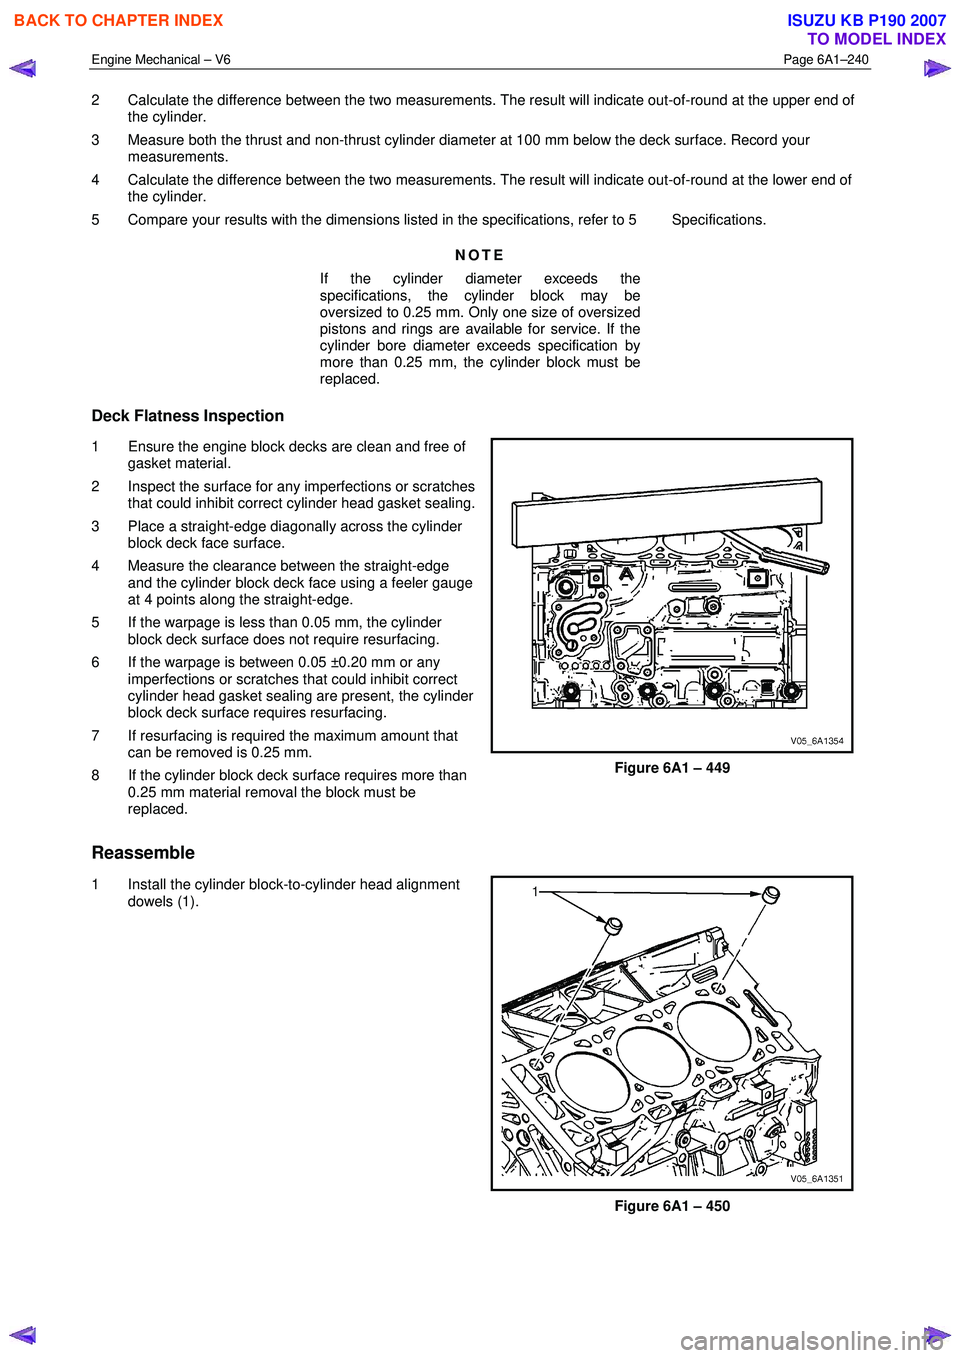
3 Place a straight-edge diagonally across the cylinder block deck face surface.
4 Measure the clearance between the straight-edge and the cylinder block deck face using a feeler gauge
at 4 points along the straight-edge.
5 If the warpage is less than 0.05 mm, the cylinder block deck surface does not require resurfacing.
6 If the warpage is between 0.05 ±0.20 mm or any imperfections or scratches that could inhibit correct
cylinder head gasket sealing are present, the cylinder
block deck surface requires resurfacing.
7 If resurfacing is required the maximum amount that can be removed is 0.25 mm.
8 If the cylinder block deck surface requires more than 0.25 mm material removal the block must be
replaced.
Figure 6A1 – 449
Reassemble
1 Install the cylinder block-to-cylinder head alignment
dowels (1).
Figure 6A1 – 450
BACK TO CHAPTER INDEX
TO MODEL INDEX
ISUZU KB P190 2007
Page 2723 of 6020
Engine Mechanical – V6 Page 6A1–244
11 Install the new right-hand front oil pan rail oil gallery
expansion plug (1).
Figure 6A1 – 460
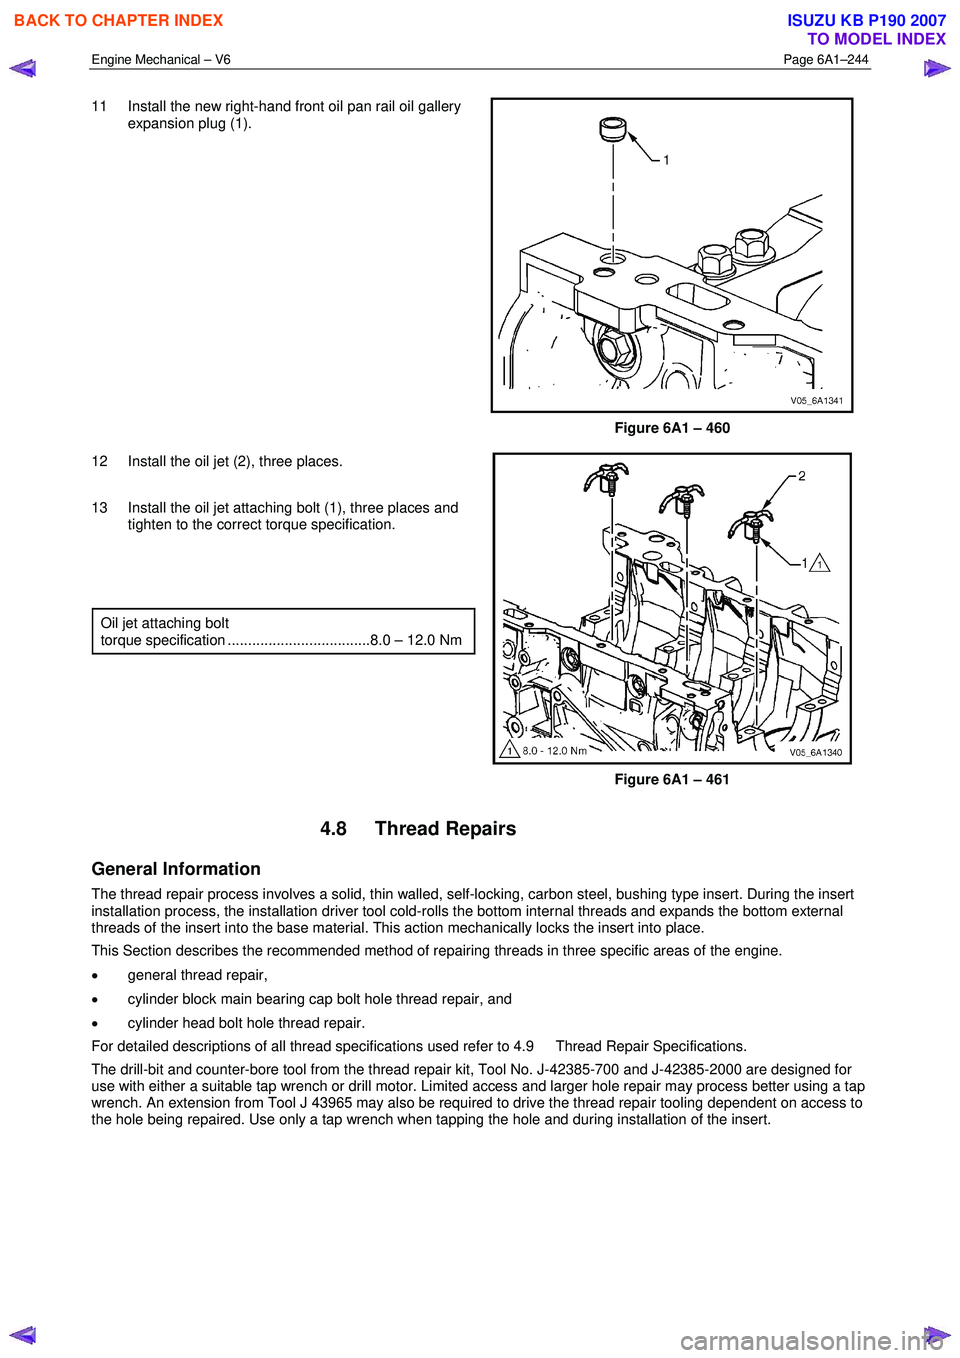
12 Install the oil jet (2), three places.
13 Install the oil jet attaching bolt (1), three places and tighten to the correct torque specification.
Oil jet attaching bolt
torque specification ...................................8.0 – 12.0 Nm
Figure 6A1 – 461
4.8 Thread Repairs
General Information
The thread repair process involves a solid, thin walled, self-locking, carbon steel, bushing type insert. During the insert
installation process, the installation driver tool cold-rolls the bottom internal threads and expands the bottom external
threads of the insert into the base material. This action mechanically locks the insert into place.
This Section describes the recommended method of repairing threads in three specific areas of the engine.
• general thread repair,
• cylinder block main bearing cap bolt hole thread repair, and
• cylinder head bolt hole thread repair.
For detailed descriptions of all thread specifications used refer to 4.9 Thread Repair Specifications.
The drill-bit and counter-bore tool from the thread repair kit, Tool No. J-42385-700 and J-42385-2000 are designed for
use with either a suitable tap wrench or drill motor. Limited access and larger hole repair may process better using a tap
wrench. An extension from Tool J 43965 may also be required to drive the thread repair tooling dependent on access to
the hole being repaired. Use only a tap wrench when tapping the hole and during installation of the insert.
BACK TO CHAPTER INDEX
TO MODEL INDEX
ISUZU KB P190 2007
Page 2725 of 6020
Engine Mechanical – V6 Page 6A1–246
General Thread Repair
NOTE
The use of a cutting type fluid such as WD 40® or
equivalent is recommended when performing the
drilling, counter boring and tapping procedures
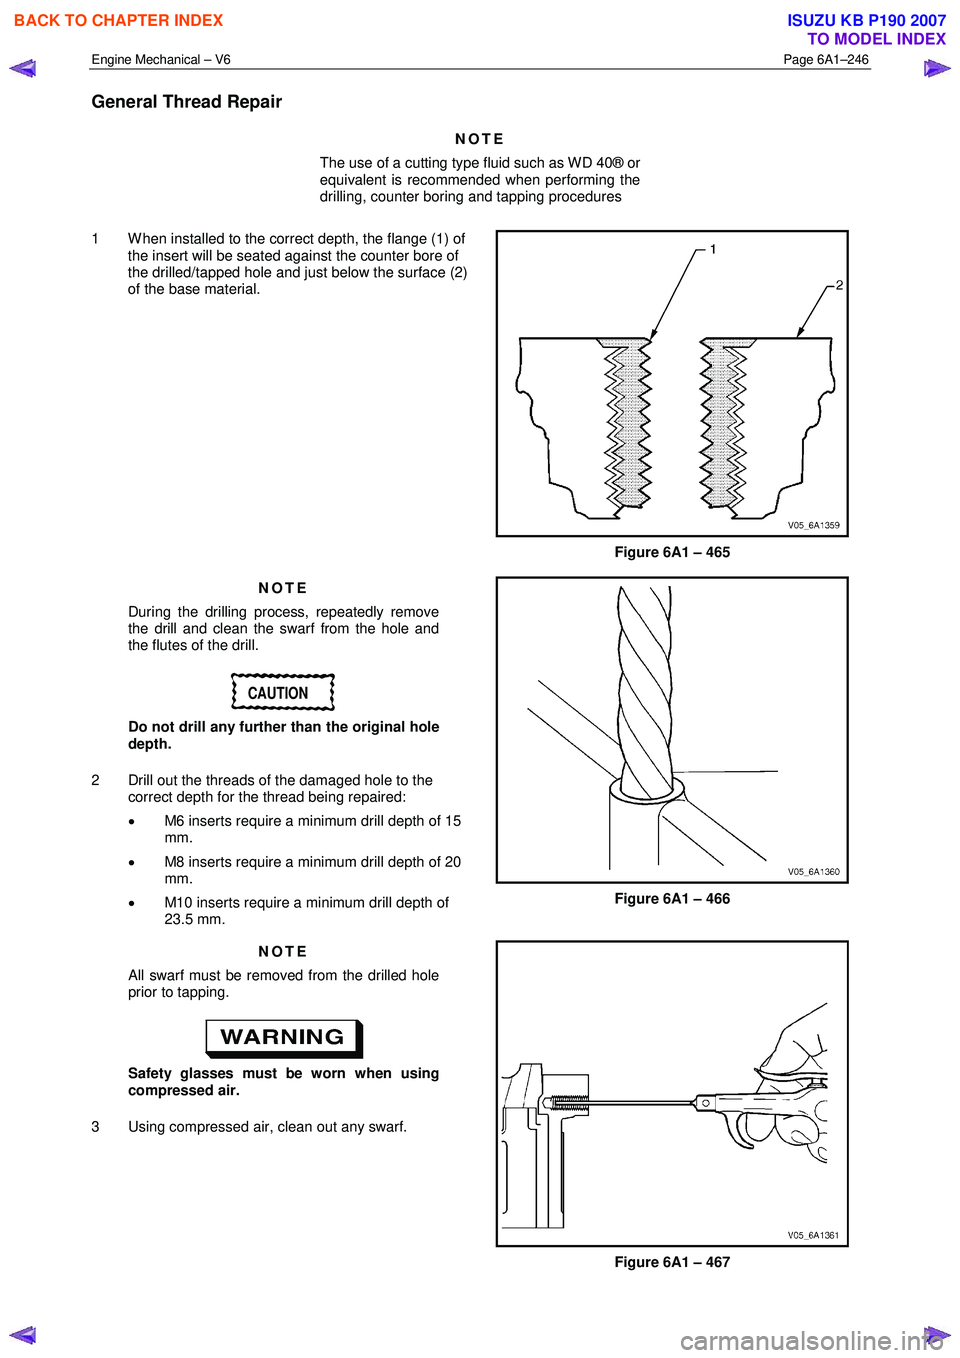
1 W hen installed to the correct depth, the flange (1) of the insert will be seated against the counter bore of
the drilled/tapped hole and just below the surface (2)
of the base material.
Figure 6A1 – 465
NOTE
During the drilling process, repeatedly remove
the drill and clean the swarf from the hole and
the flutes of the drill.
CAUTION
Do not drill any further than the original hole
depth.
2 Drill out the threads of the damaged hole to the correct depth for the thread being repaired:
• M6 inserts require a minimum drill depth of 15
mm.
• M8 inserts require a minimum drill depth of 20
mm.
• M10 inserts require a minimum drill depth of
23.5 mm.
Figure 6A1 – 466
NOTE
All swarf must be removed from the drilled hole
prior to tapping.
Safety glasses must be worn when using
compressed air.
3 Using compressed air, clean out any swarf.
Figure 6A1 – 467
BACK TO CHAPTER INDEX
TO MODEL INDEX
ISUZU KB P190 2007
Page 2731 of 6020
Engine Mechanical – V6 Page 6A1–252
NOTE
• Ensure the fixture plate is installed during the
machining and installation processes of the
insert.
• The use of a cutting type fluid such as
WD 40® or equivalent is recommended when
performing the drilling, counter boring and
tapping procedures.
• When installed to the correct depth, the flange
of the insert will be seated against the counter
bore of the drilled/tapped hole.
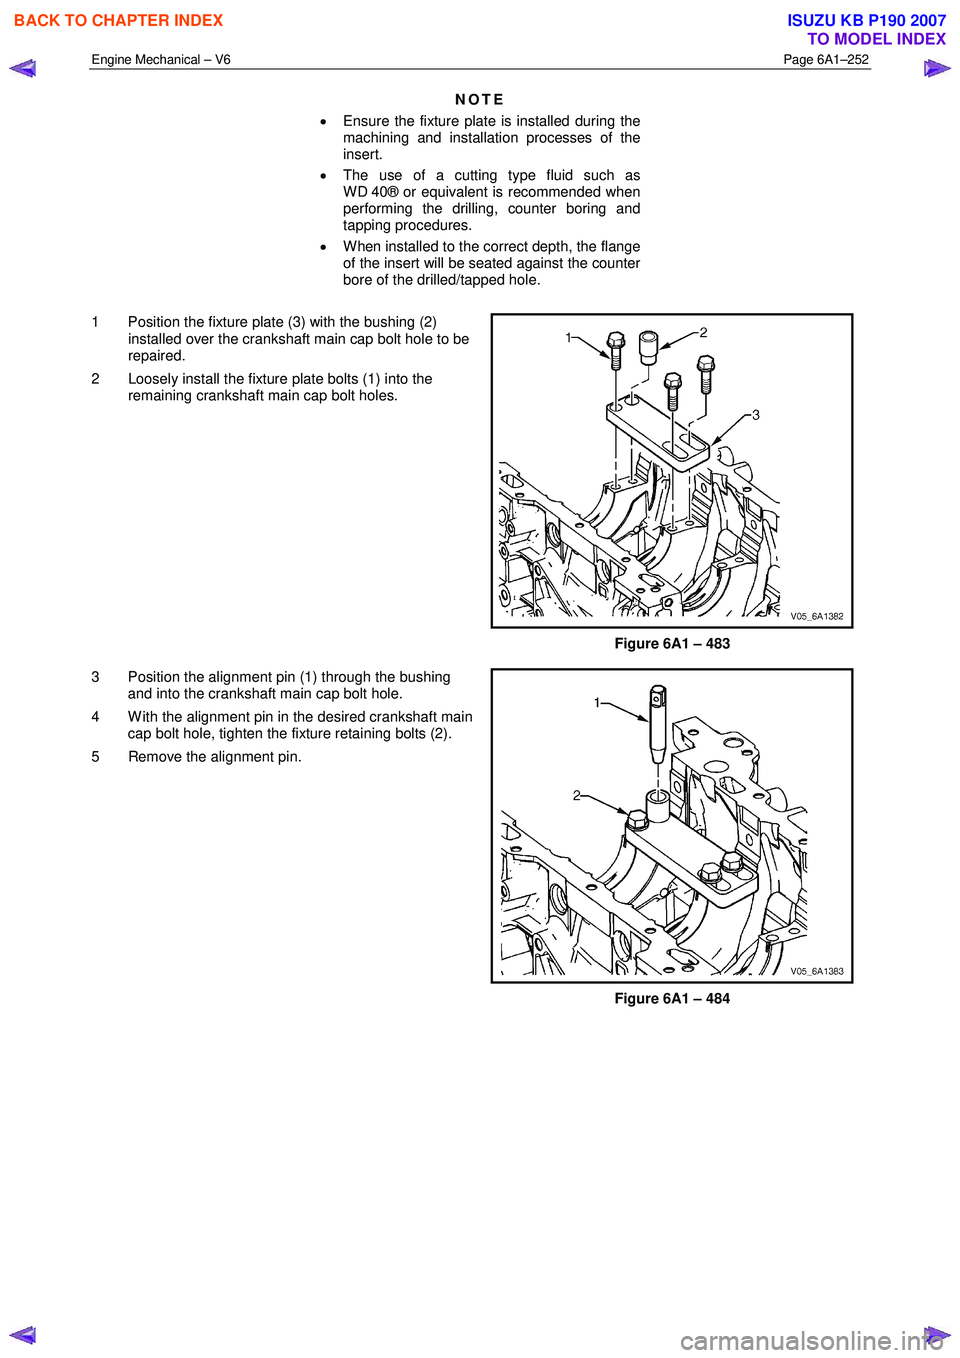
1 Position the fixture plate (3) with the bushing (2) installed over the crankshaft main cap bolt hole to be
repaired.
2 Loosely install the fixture plate bolts (1) into the remaining crankshaft main cap bolt holes.
Figure 6A1 – 483
3 Position the alignment pin (1) through the bushing and into the crankshaft main cap bolt hole.
4 W ith the alignment pin in the desired crankshaft main cap bolt hole, tighten the fixture retaining bolts (2).
5 Remove the alignment pin.
Figure 6A1 – 484
BACK TO CHAPTER INDEX
TO MODEL INDEX
ISUZU KB P190 2007
Page 2736 of 6020
Engine Mechanical – V6 Page 6A1–257
22 Remove the fixture plate bolts (1), bushing (2) and
fixture plate (3).
Figure 6A1 – 497
Cylinder Head Bolt Hole Thread Repair
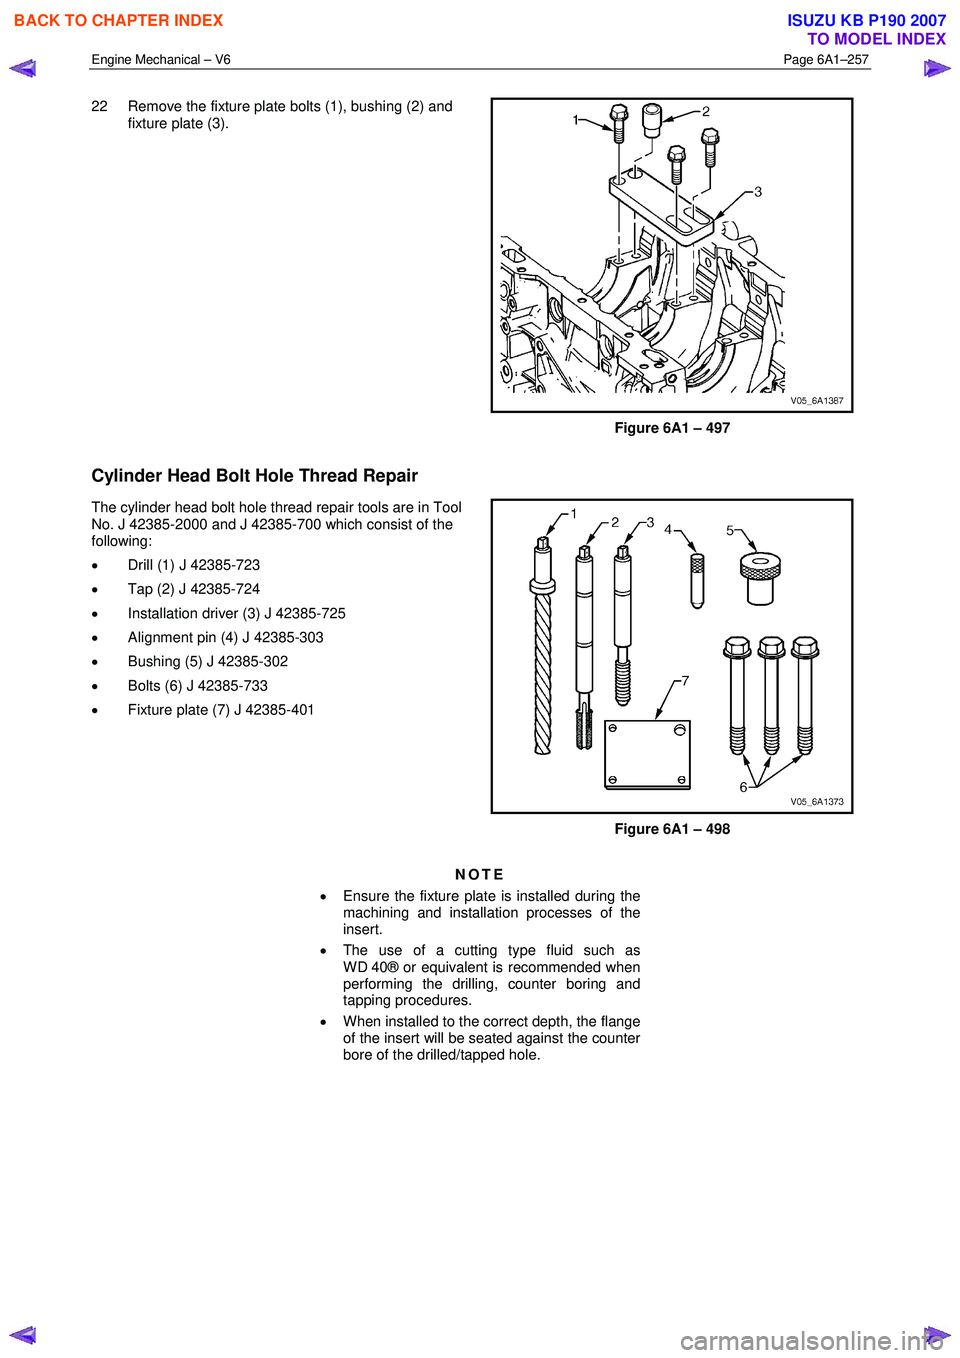
The cylinder head bolt hole thread repair tools are in Tool
No. J 42385-2000 and J 42385-700 which consist of the
following:
• Drill (1) J 42385-723
• Tap (2) J 42385-724
• Installation driver (3) J 42385-725
• Alignment pin (4) J 42385-303
• Bushing (5) J 42385-302
• Bolts (6) J 42385-733
• Fixture plate (7) J 42385-401
Figure 6A1 – 498
NOTE
• Ensure the fixture plate is installed during the
machining and installation processes of the
insert.
• The use of a cutting type fluid such as
WD 40® or equivalent is recommended when
performing the drilling, counter boring and
tapping procedures.
• When installed to the correct depth, the flange
of the insert will be seated against the counter
bore of the drilled/tapped hole.
BACK TO CHAPTER INDEX
TO MODEL INDEX
ISUZU KB P190 2007
Page 2767 of 6020

Engine Mechanical – V6 Page 6A1–288
5 Specifications
General
Engine Type.................................................................................................................... ..... V6
Bank Angle ..................................................................................................................... .... 60°
Displacement ............................................................................................ 3.6 litre (3,565 cm3)
Bore ........................................................................................................................... .... 94 mm
Stroke ......................................................................................................................... 85.6 mm
Compression Ratio ......................................................................................................... 10.2: 1
Cranking Speed at 40 °C .............................................................................................80 r.p.m.
Spark Plug Gap ............................................................................................................ 1.1 m m
Firing Order............................................................................................................. 1-2-3- 4-5-6
Cylinder Block
Cylinder Bore Diameter ........................................................................... 93.992 – 94.008 mm
Cylinder Out-of-Round – Production Maximum ........................................................ 0.013 mm
Crankshaft Main bearing bore Diameter .................................................. 72.867 – 72.881 mm
Cylinder Head Deck Surface Flatness ........................................................................ 0.05 mm
Crankshaft
Connecting Rod Journal Diameter ........................................................... 55.992 – 56.008 mm
Connecting Rod Journal Out-of-Round..................................................................... 0.005 mm
Connecting Rod Journal Taper ................................................................................ .0.005 mm
Connecting Rod Journal Width (Production)........................................................... 22.000 mm
Connecting Rod Journal Width (Service limit).......................................... 21.920 – 22.080 mm
Crankshaft End Play .................................................................................... 0.100 – 0.330 mm
Crankshaft Main Bearing Clearance ............................................................ 0.010 – 0.060 mm
Crankshaft Main Journal Diameter ......................................................... .67.992 – 68.008 mm
Crankshaft Main Journal Out-of-Round .................................................................... 0.005 mm
Crankshaft Main Journal Taper................................................................................ .0.005 mm
Crankshaft Main Journal Width, #2, 4 (Production) ....................................................... 24 mm
Crankshaft Main Journal Width, #2, 4 (Service)....................................... 23.900 – 24.100 mm
Crankshaft Main Journal Width, #3 (Production) .................................................... 24.400 mm
Crankshaft Main Journal Width, #3 (Service) .......................................... 24.360 – 24.440 mm
Crankshaft Main Journal Thrust Wall Runout .............................................. 0.000 – 0.040 mm
Crankshaft Main Journal Thrust Wall Square .............................................. 0.000 – 0.010 mm
Crankshaft Rear Flange Runout ............................................................................... 0.025 mm
Crankshaft Reluctor Ring Runout - Maximum........................................................... 1.500 mm
Crankshaft Thrust Bearing Clearance.......................................................... 0.076 – 0.305 mm
Crankshaft Thrust Surface Runout ........................................................................... 0.040 mm
Crankshaft Thrust Surface – Height Diameter ........................................................ 95.000 mm
Connecting Rod
Connecting Rod Length - Bore Centre-to-Centre.................................................. 150.400 mm
Connecting Rod Bore Diameter - Bearing End ........................................ 59.620 – 59.636 mm
Connecting Rod Bore Diameter - Pin End ............................................... 24.007 – 24.021 mm
Connecting Rod Width ........................................................................................... 21.775 mm
Connecting Rod Side Clearance.................................................................. 0.095 – 0.355 mm
Connecting Rod Bearing Clearance ............................................................ 0.010 – 0.070 mm
Piston
Piston Diameter ....................................................................................... 93.956 – 93.974 mm
Piston Pin Bore Diameter ........................................................................ 24.005 – 24.009 mm
Piston Ring Groove Width - First (Top) Compression Ring ......................... 1.220 – 1.240 mm
Piston Ring Groove Width - Second Compression Ring .............................. 1.510 – 1.530 mm
BACK TO CHAPTER INDEX
TO MODEL INDEX
ISUZU KB P190 2007
Page 2768 of 6020

Engine Mechanical – V6 Page 6A1–289
Piston Ring Groove Width - Oil Control Ring ............................................... 2.510 – 2.530 mm
Piston to Bore Clearance ............................................................................. 0.026 – 0.052 mm
Piston Pin
Piston Pin Diameter ..................................................................................23.997 - 24.000 mm
Piston Pin Length..................................................................................... 60.600 – 61.100 mm
Piston Pin Clearance to Connecting Rod Bore ............................................. 0.007 – 0.024mm
Piston Pin Clearance to Piston Pin Bore....................................................... 0.004 – 0.012mm
Piston Rings
Piston Ring to Groove Clearance:
• First (Top) Compression Ring............................................................... 0.030 – 0.065 mm
• Second Compression Ring ................................................................... 0.015 – 0.060 mm
• Oil Control Ring .................................................................................... 0.030 – 0.170 mm
Piston Ring End Gap:
• First (Top) Compression Ring............................................................... 0.150 – 0.300 mm
• Second Compression Ring ................................................................... 0.280 – 0.480 mm
• Oil Control Ring .................................................................................... 0.150 – 0.600 mm
Cylinder Head
Combustion Chamber Volume.................................................................................. 53.600 cc
Valve Guide Bore Diameter – Intake ........................................................... 6.000 – 6.020 mm
Valve Guide Bore Diameter – Exhaust ........................................................ 6.000 – 6.020 mm
Valve Guide Installed Height.................................................................... 14.050 – 14.550 mm
Stationary Hydraulic Lash Adjuster (SHLA) Bore Diameter ..................... 12.008 – 12.030 mm
Valve Seat Angle – Seating Surface ................................................................................... 45 °
Valve Seat Angle – Relief Surface ...................................................................................... 30 °
Valve Seat Angle – Undercut Surface ................................................................................ 60 °
Valve Seat Runout – Maximum ................................................................................ 0.050 mm
Valve Seat Width – Exhaust Seating Surface .............................................. 1.400 – 1.800 mm
Valve Seat Width – Exhaust Relief Surface ................................................. 0.700 – 0.900 mm
Valve Seat Width – Intake Seating Surface ................................................. 1.000 – 1.400 mm
Valve Seat Width – Intake Relief Surface .................................................... 0.500 – 0.700 mm
Engine Block Deck Surface Flatness .......................................................................... 0.05 mm
Exhaust Manifold Deck Surface Flatness ................................................................... 0.25 mm
Intake Manifold Deck Surface Flatness ...................................................................... 0.05 mm
Valve System
Face Angle..................................................................................................................... 44.25°
Face Runout ............................................................................................................. 0.038 m m
Valve Face Width – Exhaust..................................................................................... 2.750 mm
Valve Face Width – Intake ........................................................................................ 2.180 mm
Valve Head Diameter – Exhaust .............................................................. 30.470 – 30.730 mm
Valve Head Diameter – Intake ................................................................. 36.830 – 37.090 mm
Valve Installed Height .................................................................................. 35.26 – 36.69 mm
Valve Length – Exhaust .......................................................................................... 97.110 mm
Valve Length – Intake ........................................................................................... 101.230 mm
Valve Stem Diameter (standard).................................................................. 5.955 – 5.975 mm
Valve Stem Diameter (oversize) .................................................................. 6.013 – 6.033 mm
Valve Stem to Guide Clearance................................................................... 0.025 – 0.065 mm
Hydraulic Lash Adjuster Diameter ........................................................... 11.986 – 12.000 mm
Hydraulic Lash Adjuster to Bore Clearance ................................................. 0.037 – 0.041 mm
Rocker Arm/Camshaft Follower Ratio............................................................................. 1.68:1
Rocker Arm/Camshaft Follower Roller Diameter ..................................... 17.740 – 17.800 mm
Valve Spring Free Length ........................................................................ 42.500 – 45.500 mm
BACK TO CHAPTER INDEX
TO MODEL INDEX
ISUZU KB P190 2007
Page 2771 of 6020

Engine Mechanical – V6 Page 6A1–292
6 Torque Wrench Specifications
ATTENTION
�„
�„�„
�„
Fasteners must be replaced after loosening.
Fasteners either have micro encapsulated sealant applied or incorporate a mechanical thread lock and
should only be re-used once. If in doubt, replacement is recommended.
Oil Pan Drain Plug ................................................................................ 25.0 Nm
Oil Filter Adaptor Attaching Bolt ................................................ 20.0 – 26.0 Nm
Oil Level Indicator Tube Attaching Bolt........................................ 8.0 – 12.0 Nm
Accessory Drive Belt Idler Pulley Attaching Bolt................................... 50.0 Nm
Accessory Drive Belt Tensioner Attaching Bolt .................................... 50.0 Nm
Power Steering Reservoir Bracket Attaching Screw.............................. 9.0 Nm
Power Steering Pump Bracket Attaching Bolt ........................... 49.0 – 67.0 Nm
Upper Intake Manifold to Lower Intake Manifold Attaching Bolt ........... 23.0 Nm
Upper Intake Manifold to Cylinder Head Attaching Bolt........................ 23.0 Nm
Lower Intake Manifold to Cylinder Head Attaching Bolt........................ 23.0 Nm
Fuel Injector Wiring Harness Bracket Attaching bolt .............................. 9.0 Nm
Exhaust Manifold to Cylinder Head Attaching Bolt ..................... 17.0 - 23.0 Nm
Exhaust Manifold Heat Shield Attaching Bolt ............................... 8.0 - 12.0 Nm
Battery Harness Ground Terminal Attaching Nut ................................. 13.0 Nm
Camshaft Cover Attaching Bolt ................................................... 8.0 – 12.0 Nm
Engine Ground Connector Bolt............................................................. 10.0 Nm
Engine Wiring Harness Former Attaching Bolt .......................... 12.0 – 16.0 Nm
�„ Crankshaft Balancer Assembly Attaching Bolt:
Stage 1 ..................................................................................... 90.0 –110.0 Nm
Stage 2 ....................................................................................................... 150 °
Engine Front Cover Assembly Attaching Bolt ............................ 20.0 – 26.0 Nm
Camshaft Intermediate Driveshaft Sprocket Attaching Bolt ....... 58.0 – 72.0 Nm
Secondary Timing Chain Guide Attaching Bolt.......................... 20.0 – 26.0 Nm
Secondary Timing Chain Shoe Attaching Bolt ........................... 20.0 – 26.0 Nm
Secondary Timing Chain Tensioner Attaching Bolt ................... 20.0 – 26.0 Nm
Primary Timing Chain Upper Guide Attaching Bolt.................... 20.0 – 26.0 Nm
Primary Timing Chain Tensioner Attaching Bolt ........................ 20.0 – 26.0 Nm
Oil Pump Assembly Attaching Bolt ............................................ 20.0 – 26.0 Nm
Camshaft Sprocket Attaching Bolt ............................................. 49.0 – 67.0 Nm
Exhaust Camshaft Sprocket Attaching Bolt ............................... 49.0 – 67.0 Nm
Camshaft Bearing Cap Attaching Bolt ......................................... 8.0 – 12.0 Nm
Cylinder Head Threaded Plug .............................................................. 31.0 Nm
�„ Cylinder Head M11 Attaching Bolt:
Stage 1 ...................................................................................... 40.0 – 50.0 Nm
Stage 2 ....................................................................................................... 120 °
�„ Cylinder Head M8 Attaching Bolt:
Stage 1 ...................................................................................... 12.0 – 18.0 Nm
Stage 2 ......................................................................................................... 60 °
Engine Mount Bracket to Cylinder Block Attaching Bolt ............ 43.0 – 57.0 Nm
Engine Mount to Bracket Attaching Nut ..................................... 70.0 – 90.0 Nm
Engine Mount to Frame Attaching Nut....................................... 44.0 – 60.0 Nm
Engine Lift Bracket Attaching Bolt .......................................... 58.0 – 72.0.0 Nm
Knock Sensor Attaching Nut................................................................. 23.0 Nm
BACK TO CHAPTER INDEX
TO MODEL INDEX
ISUZU KB P190 2007
Page 2779 of 6020

Engine Mechanical – V6 Page 6A1–2
Page 6A1–2
Visual / Physical Inspection ................................................................................................... .............................31
Intermittent ................................................................................................................... ........................................31
2.3 Engine Misfire without In ternal Engine Noises .................................................................................. ...............32
2.4 Engine Misfire with Abnormal In ternal Lower Engine Noises...................................................................... ....34
2.5 Engine Misfire with Abno rmal Valve Train Noise ................................................................................. .............35
2.6 Engine Misfire with Coolant Consumption ........................................................................................ ................36
2.7 Engine Misfire with E xcessive Oil Consumption .................................................................................. ............37
2.8 Engine Noise on Start-up, but only Lasting a Few Seconds ....................................................................... .....38
2.9 Upper Engine Noise, Rega rdless of Engine Speed................................................................................. ..........39
2.10 Lower Engine Noise, Rega rdless of Engine Speed ................................................................................. .........40
2.11 Engine Noise Under Load ................................................................................................................................... 41
2.12 Engine Will Not Crank – Crankshaft Will Not Rotate ............................................................................. ...........42
2.13 Coolant in Com bustion Chamber .................................................................................................. .....................43
Definition ..................................................................................................................... .........................................43
2.14 Coolant in Engine Oil........................................................................................................................................... 44
Definition ..............................................................................................................................................................44
2.15 Engine Compression Test........................................................................................................ ...........................45
Preliminary Steps................................................................................................................................................. 45
Engine Cylinder Compression Test ............................................................................................... ....................45
Test Result Evaluation ......................................................................................................... ...............................45
2.16 Cylinder Leakage Test .......................................................................................................... ...............................46
2.17 Engine Oil Consumption Diagnosis ............................................................................................... ....................47
Definition ..................................................................................................................... .........................................47
2.18 Engine Oil Leak Diagnosis .................................................................................................................................. 48
Introduction ..........................................................................................................................................................48
Locating and Identifying the Leak .............................................................................................. ........................48
Visual Inspection .............................................................................................................. ...................................48
Powder Method .................................................................................................................. ..................................48
Black Light and Dye Method ............................................................................................................................... 48
Possible Causes for Engine Oil Leaks ........................................................................................... ....................49
2.19 Engine Oil Pressu re Diagnosis .................................................................................................. .........................50
2.20 Accessory Drive Belt Diagnosis ................................................................................................. ........................51
Tension Check .................................................................................................................. ...................................51
Inspect ........................................................................................................................ ..........................................52
Drive Belt Chirp .................................................................................................................................................... 53
Definition ..................................................................................................................... .....................................53
Diagnostic Aids................................................................................................................................................. 53
Test Description ............................................................................................................... ................................53
Diagnostic Table............................................................................................................... ................................54
Drive Belt Squeal .............................................................................................................. ...................................55
Definition ..................................................................................................................... .....................................55
Diagnostic Aids................................................................................................................................................. 55
Test Description ............................................................................................................... ................................55
Diagnostic Table............................................................................................................... ................................55
Drive Belt Whine .................................................................................................................................................. 57
Definition ..................................................................................................................... .....................................57
Diagnostic Aids................................................................................................................................................. 57
Test Description ............................................................................................................... ................................57
Diagnostic Table............................................................................................................... ................................57
Drive Belt Rumble .............................................................................................................. ..................................58
Definition ..................................................................................................................... .....................................58
Diagnostic Aids................................................................................................................................................. 58
Test Description ............................................................................................................... ................................58
Diagnostic Table............................................................................................................... ................................58
Drive Belt Vibration........................................................................................................... ...................................60
Definition ..................................................................................................................... .....................................60
Diagnostic Aids................................................................................................................................................. 60
Test Description ............................................................................................................... ................................60
Diagnostic Table............................................................................................................... ................................60
Drive Belt Falls Off ........................................................................................................... ....................................62
BACK TO CHAPTER INDEX
TO MODEL INDEX
ISUZU KB P190 2007