lock ISUZU TROOPER 1995 Workshop Manual
[x] Cancel search | Manufacturer: ISUZU, Model Year: 1995, Model line: TROOPER, Model: ISUZU TROOPER 1995Pages: 1928
Page 374 of 1928
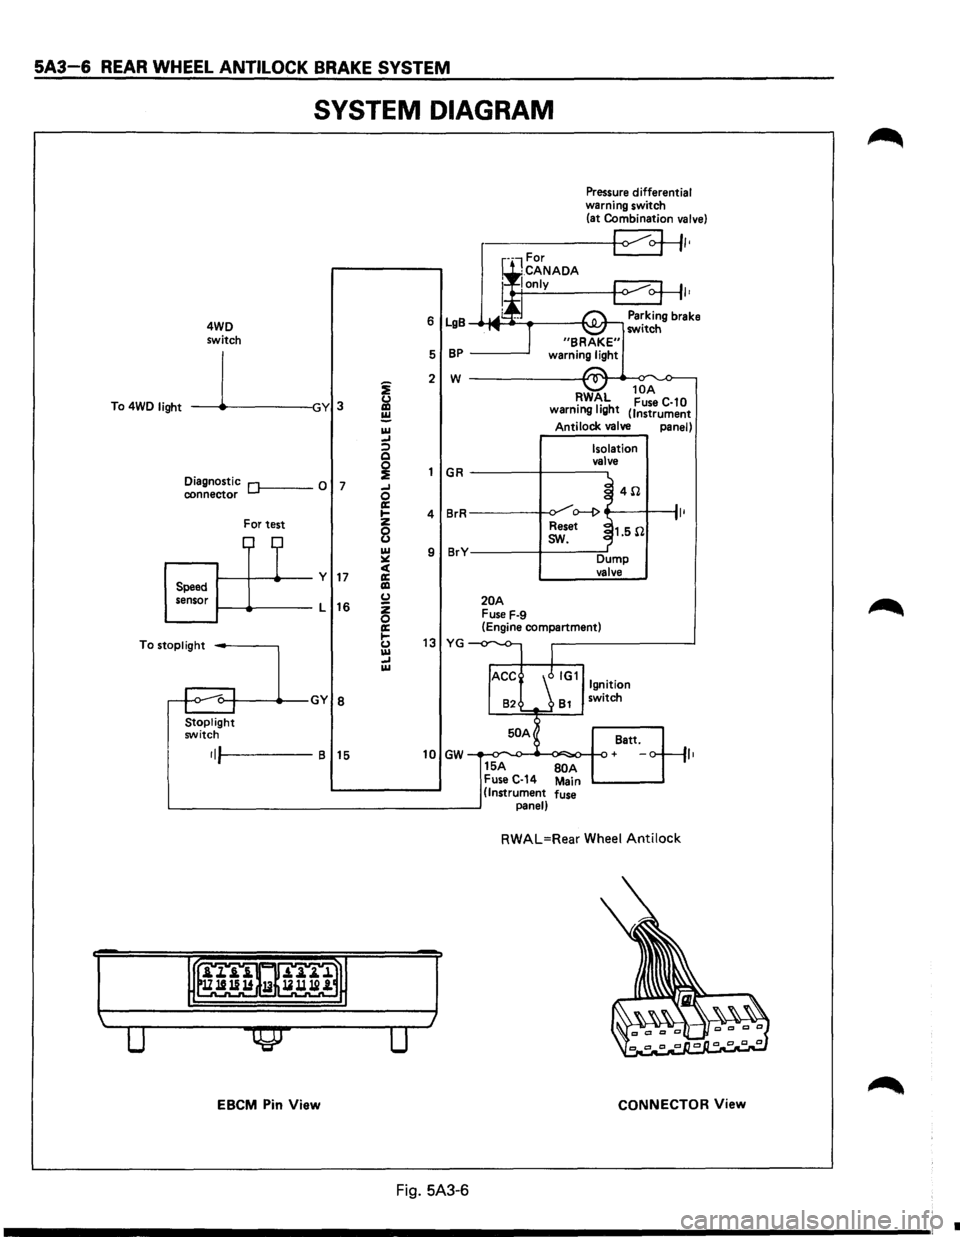
5A3-6 REAR WHEEL ANTILOCK BRAKE SYSTEM
SYSTEM DIAGRAM
4WD
switch
To 4WD
light -----11~-----lGY 3
Diagnostic Of------0 7 connector
For test
1-----11---+--y 17 Speed
sensor 1-----lt-----L
16
To
stoplight -----,
Stoplight switch
•IJI-----B 15
EBCM Pin View
i
&l ~ IU _, :;) Q
~ _, 0 a: .... z
8 IU ~ c( a: liD (.) z 0 a: 1-(.) IU _, IU
Pressure differential warning switch
(at Combination valve)
r-----+-<1 ~+II•
I•
6 LgB Parking brake _.-MI ____ ___,I'\.JI.Jr-, switch
5
BP -----'
2 w ------------~~._~
GR
4 BrR
9 BrY
20A Fuse F-9
RWAL 10
A •
1• h Fuse C-10
warnmg IQ t (Instrument
Antilock valve panel)
Isolation
valve
~ 4il .J o--1> ~
Reset ~1.5il
I
sw.
Dump valve
(Engine compartment)
13 YG -
82 81 switch
50 A
Batt.
10 GW + ,,
15A BOA Fuse C-14 Main (Instrument fuse panel)
RWAL=Rear Wheel Antilock
CONNECTOR View
Fig. 5A3-6
•
Page 375 of 1928
REAR WHEEL ANTILOCK BRAKE SYSTEM 5A3-7
REAR WHEEL ANTILOCK (RWAL) SYSTEM DIAGNOSTICS
DIAGNOSIS PROCEDURE
The RWAL system contains 13 diagnostic trouble
codes
for system troubleshooting. With the ignition
key turned
ON, momentarily grounding the RWAL
diagnostic lead
with the "Rr ABS" light on will cause the
light
to flash out a diagnostic trouble code if a failure
has been detected and is in memory.
Some RWAL
diagnostic trouble codes require a road test in order
to
be set into the EBCM memory.
RWAL diagnostic trouble codes are cleared from
the
EBCM memory every time the ignition key is
turned off. If a diagnostic trouble code is not present, a
test drive
must be performed to reproduce the failure
and reset the code into
memory:
TEST DRIVING
1. Conduct a visual check of the following items to
see if any abnormalities exist:
(a) Service brake mechanism/hydraulic system
(See BRAKE SERVICING SECTION).
(b) Fuses #2, #7, #14 and main fuse
(c) RWAL-related connector (check for loose pins
and rust)
(d) EBCM and valve ground (check for looseness
and rust)
NOTE:
Check
(c) and (d) should be done with ignition key
turned
OFF.
If any abnormality is found, perform repairs as
required.
2. Turn the ignition switch ON. As a self-check, the
"Rr ABS" light should come on for approximately
2 seconds, then go
off and remain off.
If the "Rr ABS" light remains on or comes back
on, check
for diagnostic trouble codes by
momentarily grounding the RWAL diagnostic
lead
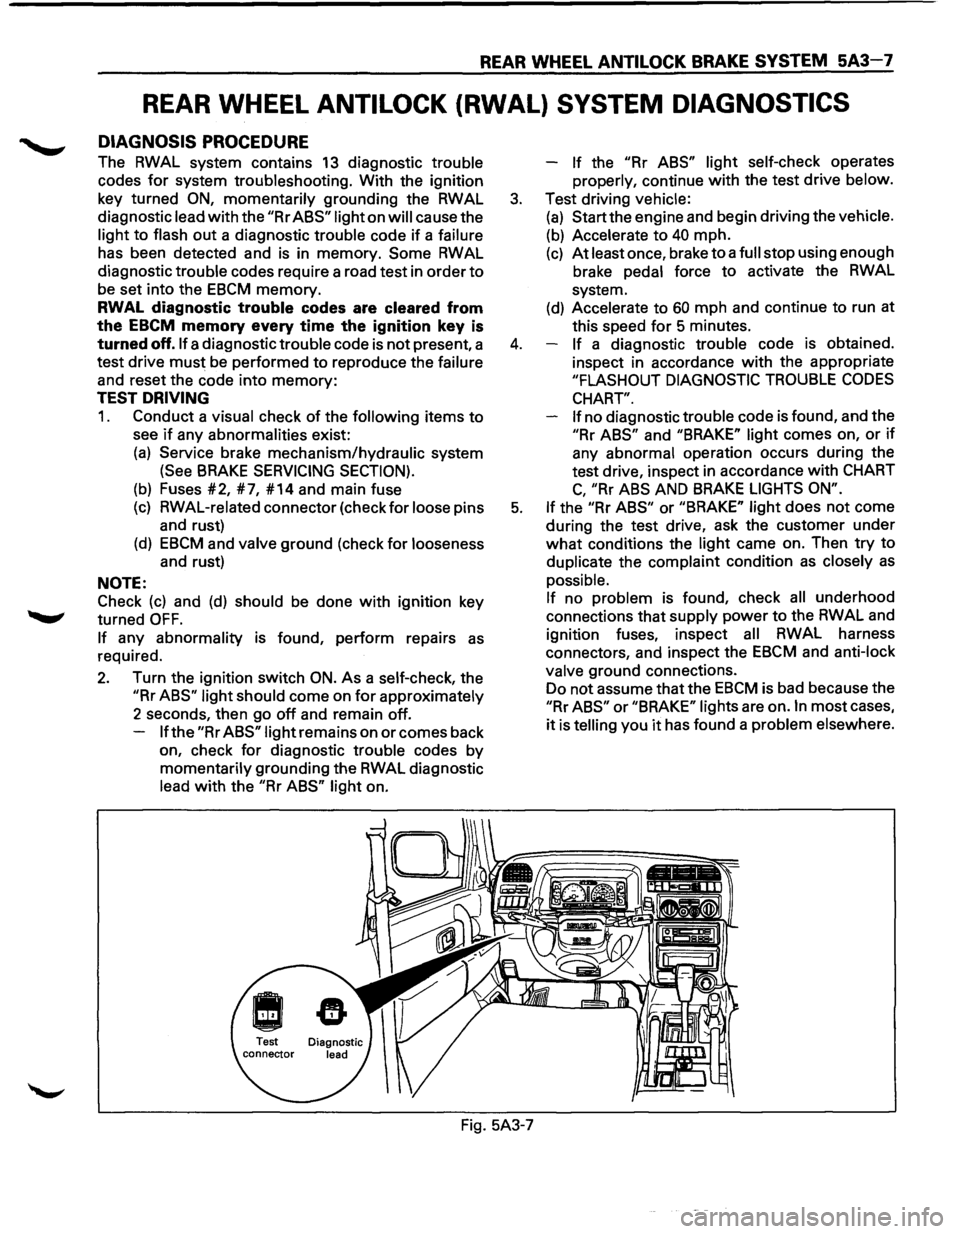
with the "Rr ABS" light on. -
If the "Rr
ABS" light self-check operates
properly, continue
with the test drive below.
3. Test driving vehicle:
(a) Start the engine and begin driving the vehicle.
(b) Accelerate to 40 mph.
(c) At least once, brake to a full stop using enough
brake pedal force
to activate the RWAL
system.
(d) Accelerate to 60 mph and continue to run at
this speed
for 5 minutes.
4. If a diagnostic trouble code is obtained.
inspect in accordance
with the appropriate
"FLASHOUT DIAGNOSTIC TROUBLE CODES
CHART".
If
no diagnostic trouble code is found, and the
"Rr ABS" and "BRAKE" light comes on, or if
any abnormal operation occurs during the
test drive, inspect in accordance
with CHART
C, "Rr ABS AND BRAKE LIGHTS ON".
5. If the "Rr ABS" or "BRAKE" light does not come
during the test drive, ask the customer under
what conditions the light came on. Then try to
duplicate the complaint condition
as closely as
possible.
If no problem is found, check all underhood
connections that supply power
to the RWAL and
ignition fuses, inspect
all RWAL harness
connectors, and inspect the
EBCM and anti-lock
valve ground connections.
Do not assume that the
EBCM is bad because the
"Rr ABS" or "BRAKE" lights are on. In most cases,
it is telling you it has found a problem elsewhere.
Fig. 5A3-7
Page 376 of 1928
5A3-8 REAR WHEEL ANTILOCK BRAKE SYSTEM
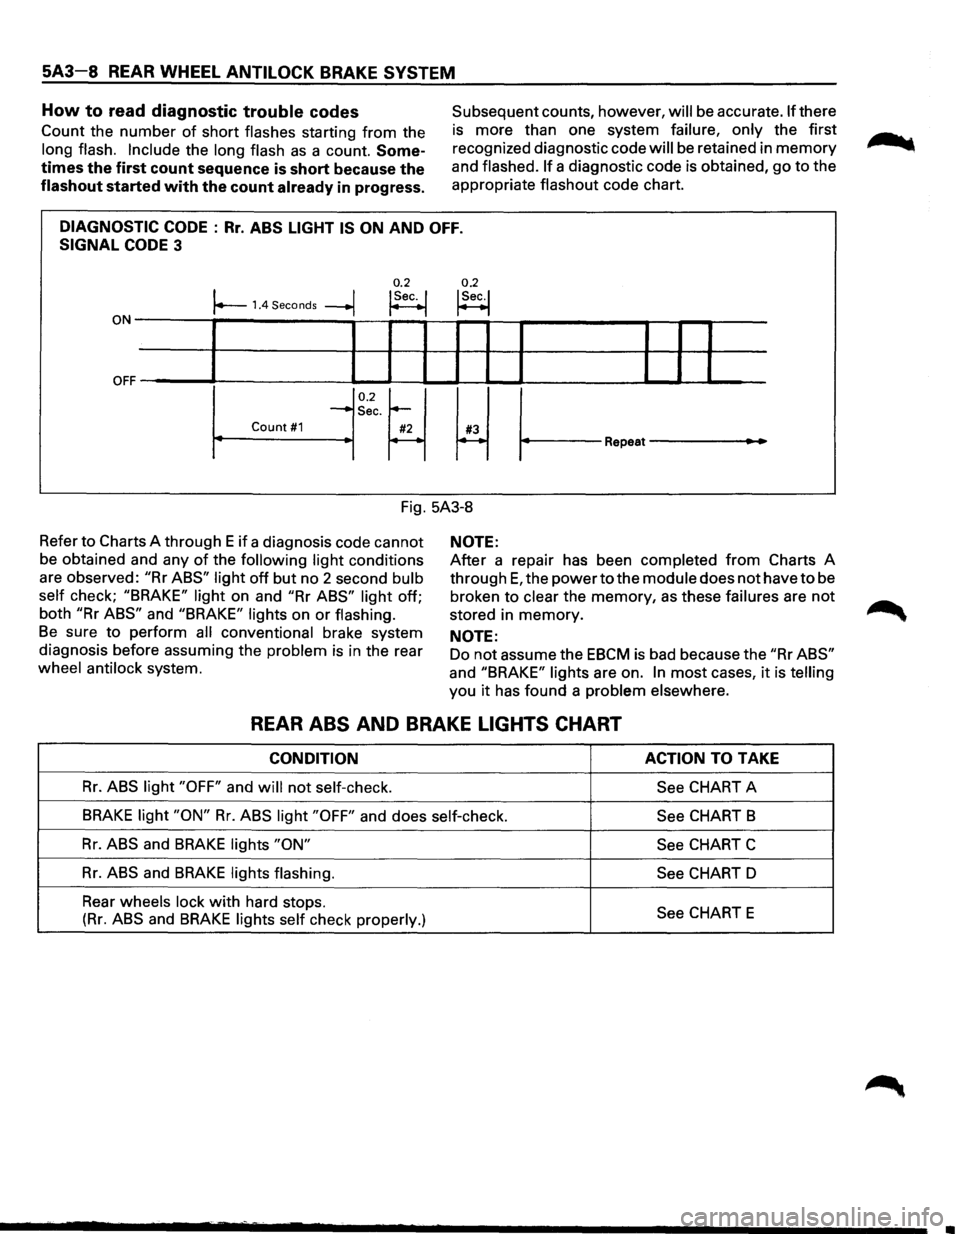
How to read diagnostic trouble codes
Count the number of short flashes starting from the
long flash. Include the long flash as a count. Some
times the first count sequence is short because the
flashout started with the count already in progress.
Subsequent counts, however, will be accurate. If there
is more than one system
failure, only the first
recognized diagnostic code
will be retained in memory
and flashed. If a diagnostic code is obtained, go to the
appropriate
flashout code chart.
DIAGNOSTIC CODE : Rr. ABS LIGHT IS ON AND OFF.
SIGNAL CODE 3
0.2 0.2 I I !Sec. I !Sec.! r--1.4 Seconds --+j ~ t--1
ON-------,~-----------,--~--~~~-r--?-----------~--r--r-----
OFF ~' ----L-1--'-----11 IL....-l.-1 ~I I ______..l__.__l ..____I
0.2~ ~ ~
-Sec.
Count #1 #2 #3 r----~ Repeat---
Fig. 5A3-8
Refer
to Charts A through E if a diagnosis code cannot
be obtained and any
of the following light conditions
are observed:
"Rr ABS" light off but no 2 second bulb
self
check; "BRAKE" light on and "Rr ABS" light off;
both
"Rr ABS" and "BRAKE" lights on or flashing.
Be sure to perform all conventional brake system
diagnosis before assuming the
problem is in the rear
wheel antilock system.
NOTE:
After a repair has been completed from Charts A
through
E, the power to the module does not have to be
broken to
clear the memory, as these failures are not
stored in memory.
NOTE:
Do not assume the EBCM is bad because the "Rr ABS"
and "BRAKE" lights are on. In most cases, it is telling
you it has found a problem elsewhere.
REAR ABS AND BRAKE LIGHTS CHART
CONDITION ACTION TO TAKE
Rr. ABS light "OFF" and will not self-check.
See CHART A
BRAKE light "ON" Rr. ABS light "OFF" and does self-check.
See CHART B
Rr. ABS and BRAKE lights "ON"
See CHART C
Rr. ABS and BRAKE lights flashing.
See CHART D
Rear
wheels lock with hard stops. See CHART E (Rr. ABS and BRAKE lights self check properly.)
Page 377 of 1928
REAR WHEEL ANTILOCK BRAKE SYSTEM 5A3-9
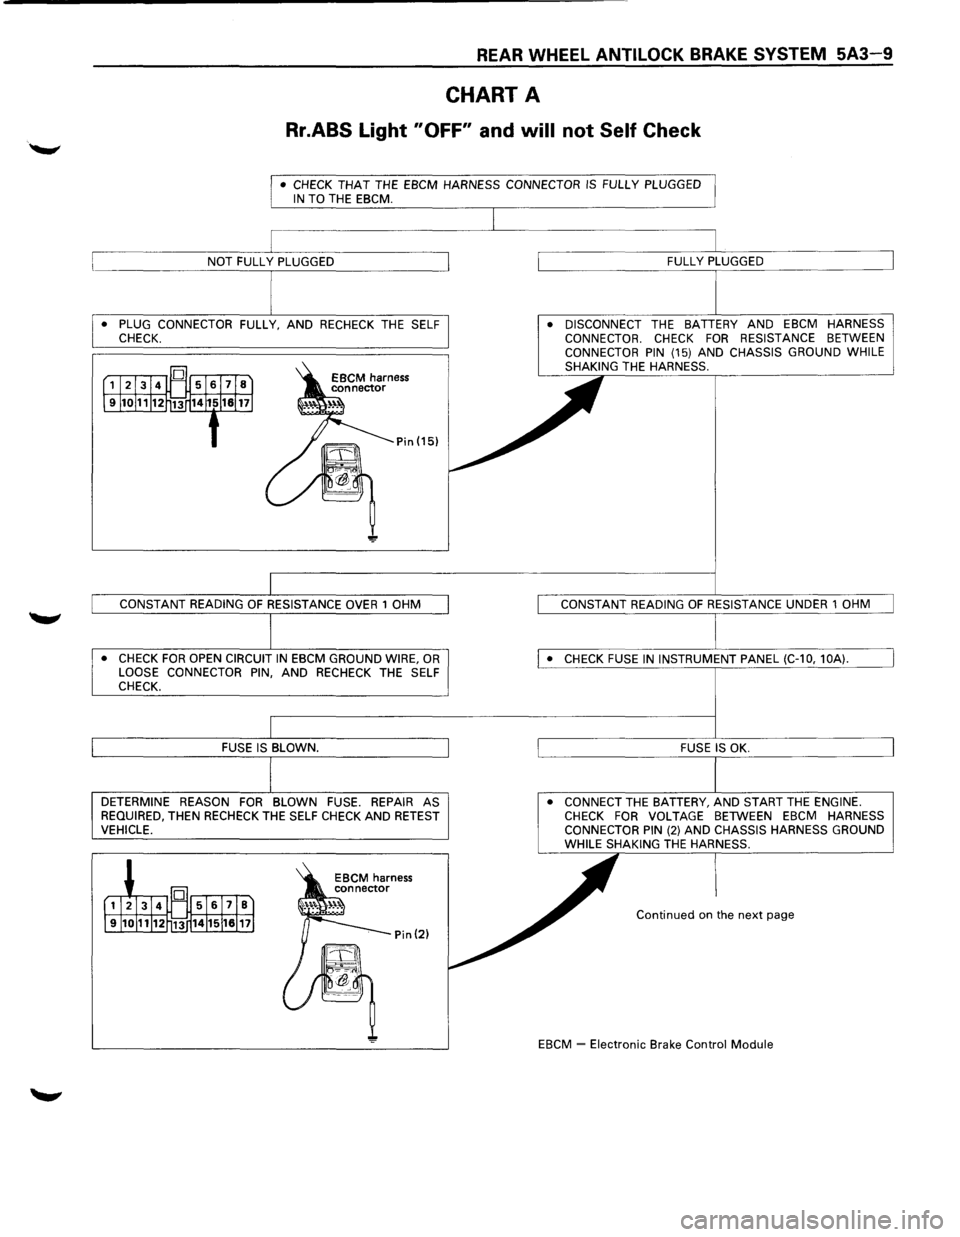
CHART A
Rr.ABS Light "OFF" and will not Self Check
• CHECK THAT THE EBCM HARNESS CONNECTOR IS FULLY PLUGGED IN TO THE EBCM.
• PLUG CONNECTOR FULLY, AND RECHECK THE SELF
CHECK.
• CHECK FOR OPEN CIRCUIT IN EBCM GROUND WIRE, OR LOOSE CONNECTOR PIN, AND RECHECK THE SELF
CHECK.
DETERMINE REASON FOR BLOWN FUSE. REPAIR AS
REQUIRED, THEN RECHECK THE SELF CHECK AND RETEST VEHICLE. •
DISCONNECT
THE BATTERY AND EBCM HARNESS
CONNECTOR. CHECK FOR RESISTANCE BETWEEN
CONNECTOR PIN (15) AND CHASSIS GROUND WHILE
SHAKING THE HARNESS.
• CONNECT THE BATTERY, AND START THE ENGINE. CHECK FOR VOLTAGE BETWEEN EBCM HARNESS
CONNECTOR PIN (2) AND CHASSIS HARNESS GROUND WHILE SHAKING THE HARNESS.
Continued on the next page
EBCM
~ Electronic Brake Control Module
Page 378 of 1928
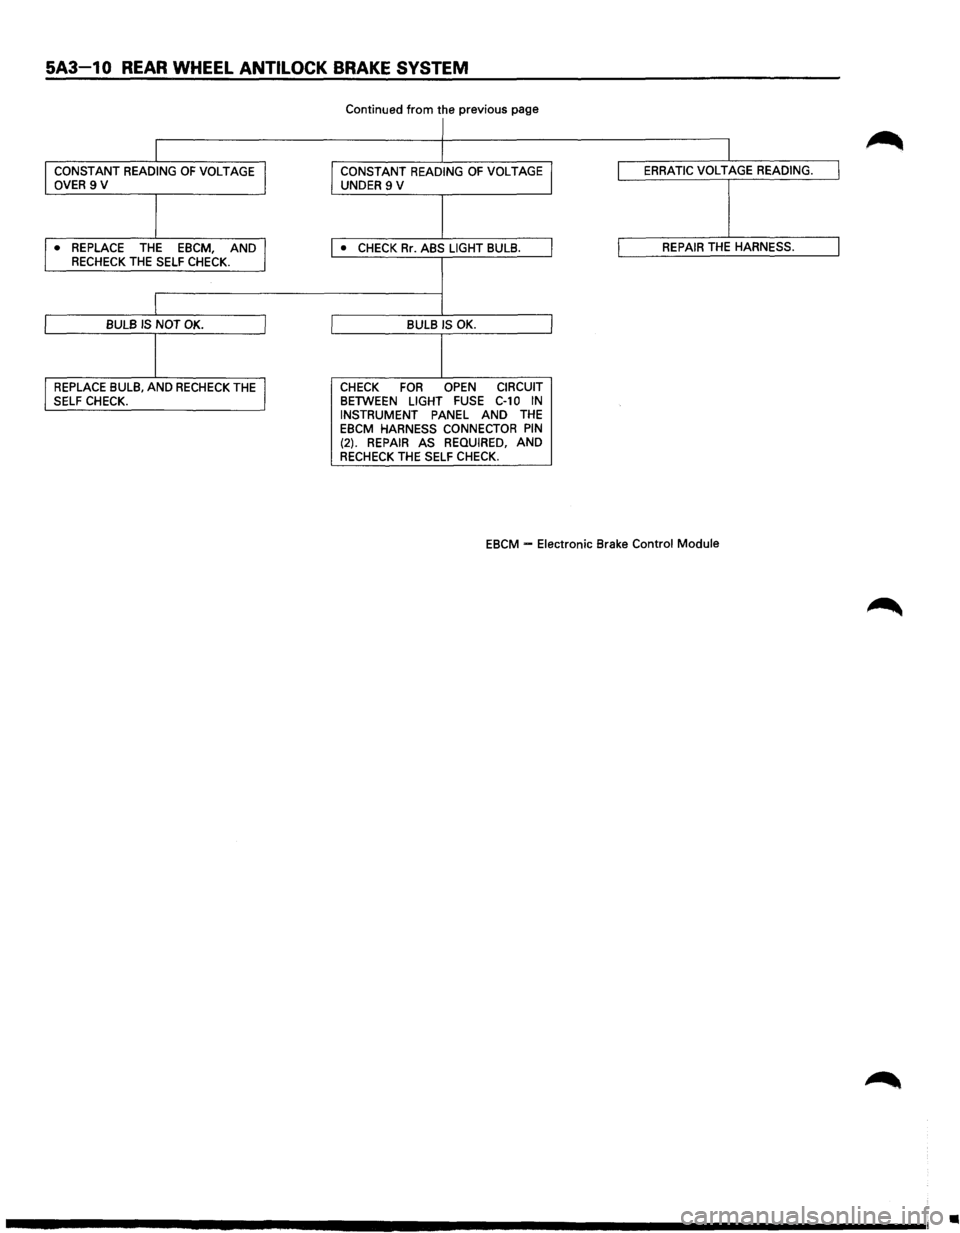
5A3-1 0 REAR WHEEL ANTI LOCK BRAKE SYSTEM
Continued from the previous page
I
I
I CONSTANT READING OF VOLTAGE J CONSTANT READING OF VOLTAGE I ERRATIC VOLTAGE READING. I OVER 9 V
UNDER 9 V
I ,. REPLACE THE EBCM, AND I • CHECK Rr. ABS LIGHT BULB. I REPAIR THE HARNESS. I RECHECK THE SELF CHECK.
I
I BULB IS NOT OK. I BULB IS OK.
1 I REPLACE BULB, AND RECHECK THE J CHECK FOR OPEN CIRCUIT
SELF CHECK. BETWEEN LIGHT FUSE C-10 IN INSTRUMENT PANEL AND THE EBCM HARNESS CONNECTOR PIN (2). REPAIR AS REQUIRED, AND RECHECK THE SELF CHECK.
EBCM
-Electronic Brake Control Module
•
Page 379 of 1928
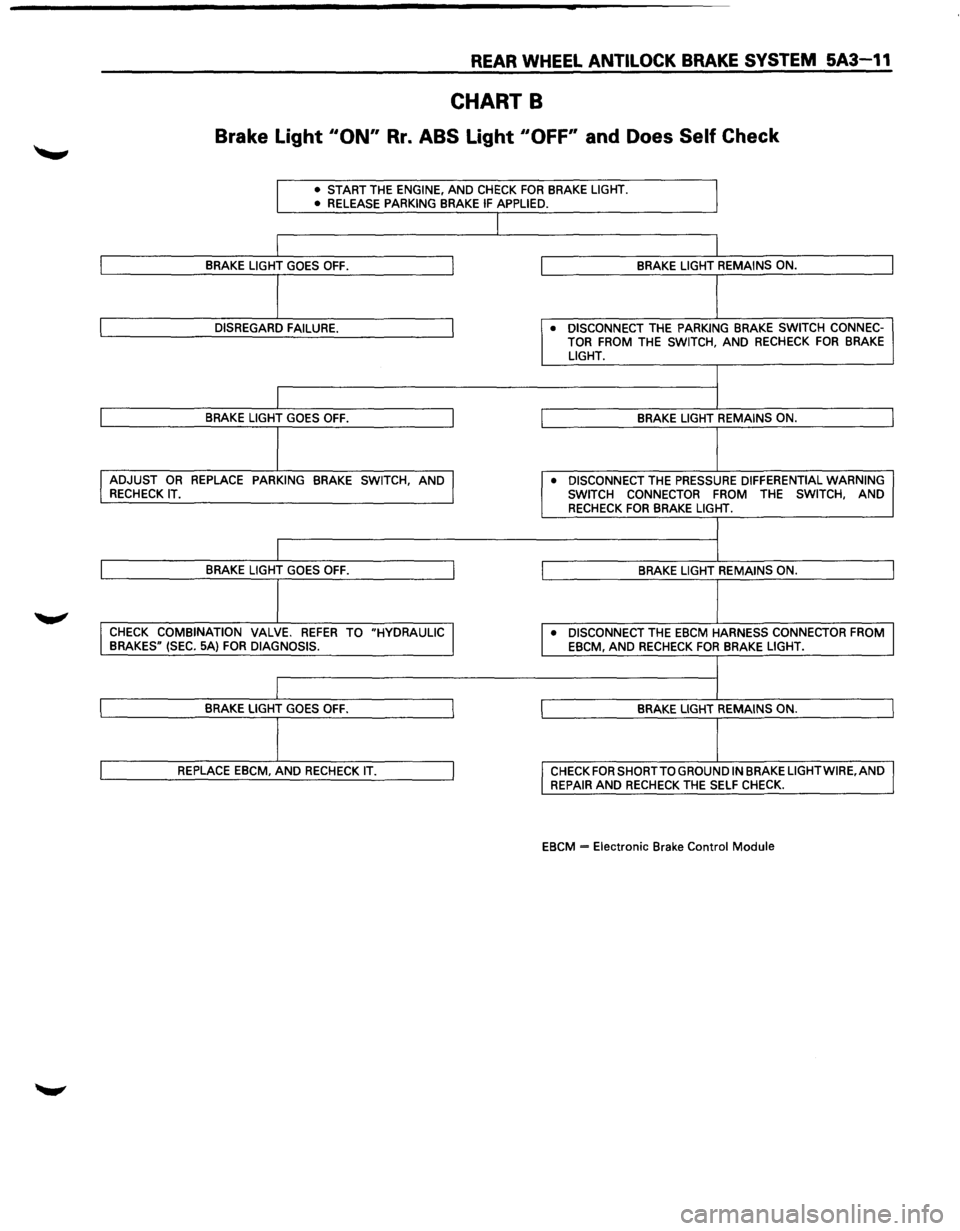
REAR WHEEL ANTILOCK BRAKE SYSTEM 5A3-11
CHART B
Brake Light 110N" Rr. ABS Light "OFF' and Does Self Check
• START THE ENGINE, AND CHECK FOR BRAKE LIGHT.
• RELEASE PARKING BRAKE IF APPLIED.
J
I
I BRAKE LIGHT GOES OFF. J BRAKE LIGHT REMAINS ON.
I
I DISREGARD FAILURE. J • DISCONNECT THE PARKING BRAKE SWITCH CONNEC-
TOR FROM THE SWITCH, AND RECHECK FOR BRAKE LIGHT.
I
I
I BRAKE LIGHT GOES OFF. I BRAKE LIGHT REMAINS ON.
I I ADJUST OR REPLACE PARKING BRAKE SWITCH, AND J • DISCONNECT THE PRESSURE DIFFERENTIAL WARNING RECHECK IT.
SWITCH CONNECTOR
FROM THE SWITCH, AND RECHECK FOR BRAKE LIGHT.
I
I
I BRAKE LIGHT GOES OFF. I BRAKE LIGHT REMAINS ON.
j
I CHECK COMBINATION VALVE. REFER TO "HYDRAULIC I • DISCONNECT THE EBCM HARNESS CONNECTOR FROM
BRAKES" (SEC. 5A) FOR DIAGNOSIS.
EBCM, AND RECHECK FOR BRAKE LIGHT.
I
I
I BRAKE LIGHT GOES OFF. I BRAKE LIGHT REMAINS ON.
I
I REPLACE EBCM, AND RECHECK IT. I CHECK FOR SHORT TO GROUND IN BRAKE LIGHTWIRE,AND
REPAIR AND RECHECK THE SELF CHECK.
EBCM
= Electronic Brake Control Module
Page 380 of 1928
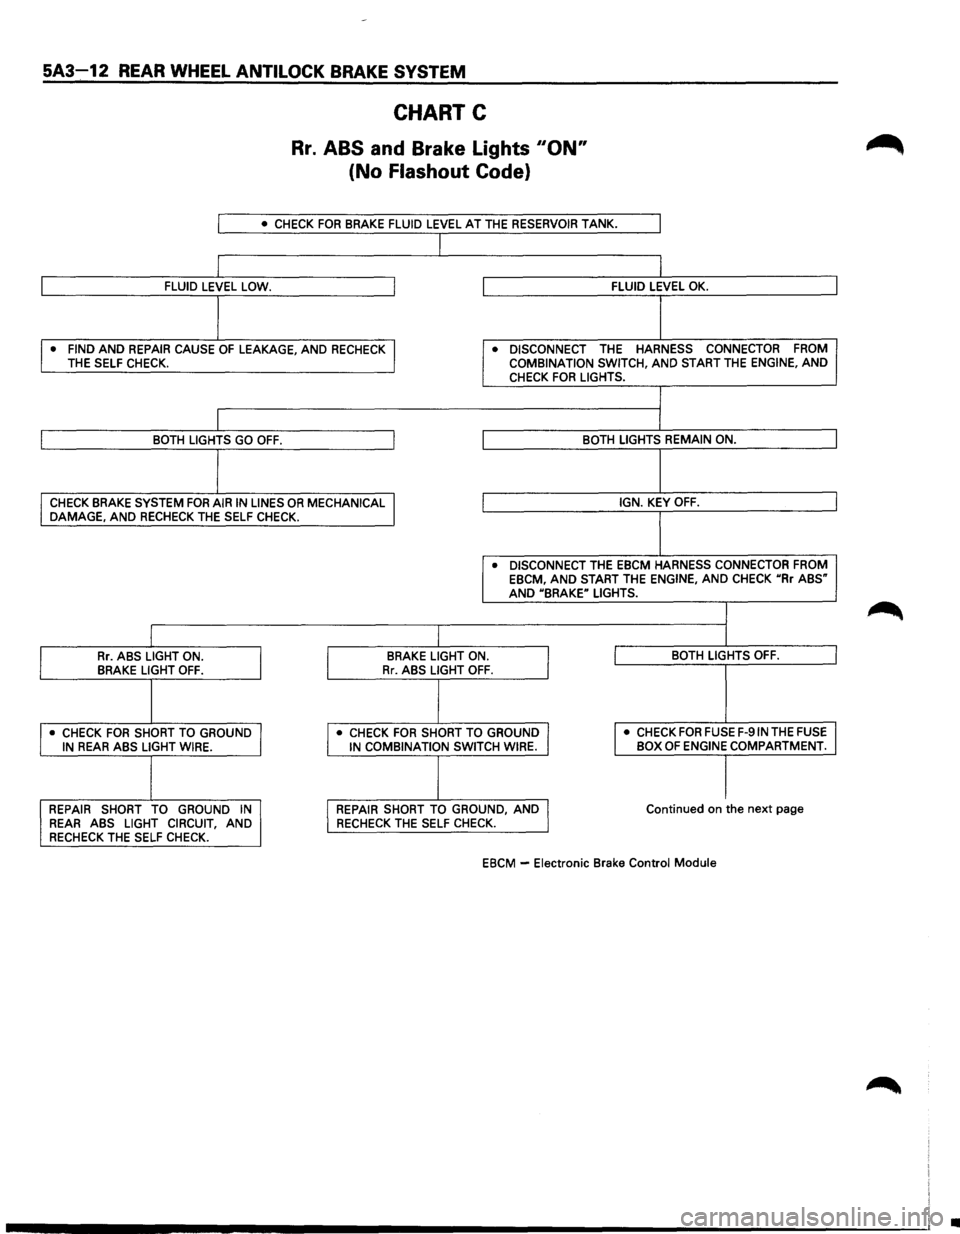
5A3~12 REAR WHEEL ANTILOCK BRAKE SYSTEM
CHART C
Rr. ABS and Brake Lights 110N"
(No Flashout Code}
I • CHECK FOR BRAKE FLUID LEVEL AT THE RESERVOIR TANK.
I
I FLUID LEVEL LOW. I FLUID LEVEL OK.
I
• FIND AND REPAIR CAUSE OF LEAKAGE, AND RECHECK I • DISCONNECT THE HARNESS CONNECTOR FROM THE
SELF CHECK. COMBINATION SWITCH, AND START THE ENGINE, AND CHECK FOR LIGHTS.
I BOTH LIGHTS GO OFF. I BOTH LIGHTS REMAIN ON.
I
CHECK BRAKE SYSTEM FOR AIR IN LINES OR MECHANICAL I IGN. KEY OFF. DAMAGE, AND RECHECK THE SELF CHECK.
• DISCONNECT THE EBCM HARNESS CONNECTOR FROM EBCM, AND START THE ENGINE, AND CHECK uRr ABS" AND UBRAKE" LIGHTS.
I Rr. ABS LIGHT ON.
I
BRAKE LIGHT ON.
I I BOTH LIGHTS OFF. BRAKE LIGHT OFF. Rr. ABS LIGHT OFF.
I • CHECK FOR SHORT TO GROUND I • CHECK FOR SHORT TO GROUND I I
• CHECK FOR FUSE F-91N THE FUSE IN REAR ABS LIGHT WIRE. IN COMBINATION SWITCH WIRE. BOX OF ENGINE COMPARTMENT.
I I REPAIR
SHORT TO GROUND IN I REPAIR SHORT TO GROUND, AND J Continued on the next page REAR ABS LIGHT CIRCUIT, AND RECHECK THE SELF
CHECK.
RECHECK THE SELF CHECK.
EBCM -
Electronic Brake Control Module
•
Page 381 of 1928
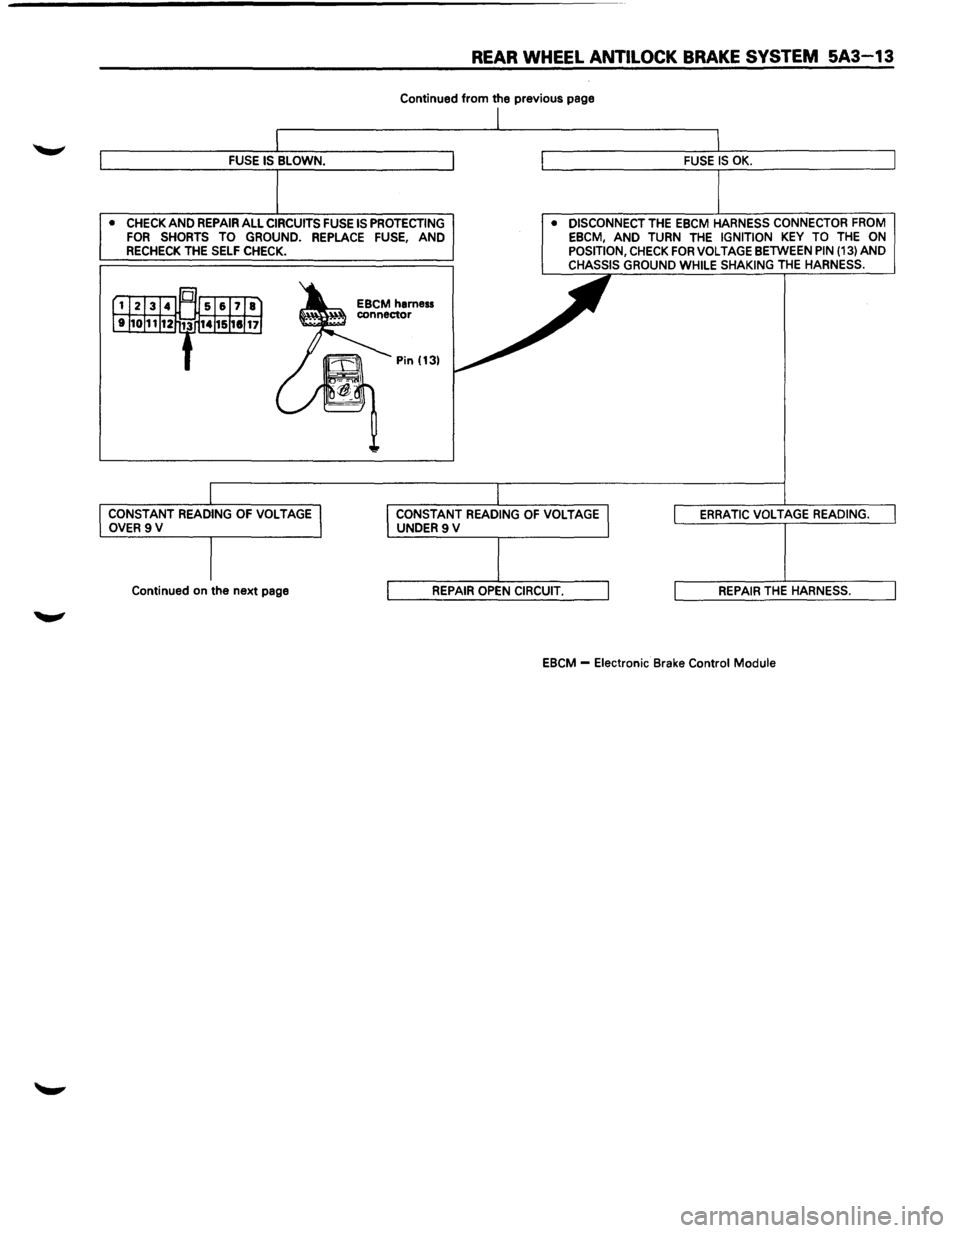
REAR WHEEL ANTILOCK BRAKE SYSTEM 5A3-13
Continued from the previous page
• CHECK AND REPAIR ALL CIRCUITS FUSE IS PROTECTING FOR SHORTS TO GROUND. REPLACE FUSE, AND RECHECK THE SELF CHECK. •
DISCONNECT
THE EBCM HARNESS CONNECTOR FROM
EBCM, AND TURN THE IGNITION KEY TO THE ON POSITION, CHECK FOR VOLTAGE BETWEEN PIN (13) AND CHASSIS GROUND WHILE SHAKING THE HARNESS.
CONSTANT READING OF VOLTAGE OVER 9V CONSTANT READING OF VOLTAGE UNDER9V
Continued on the next page
EBCM -
Electronic Brake Control Module
Page 382 of 1928
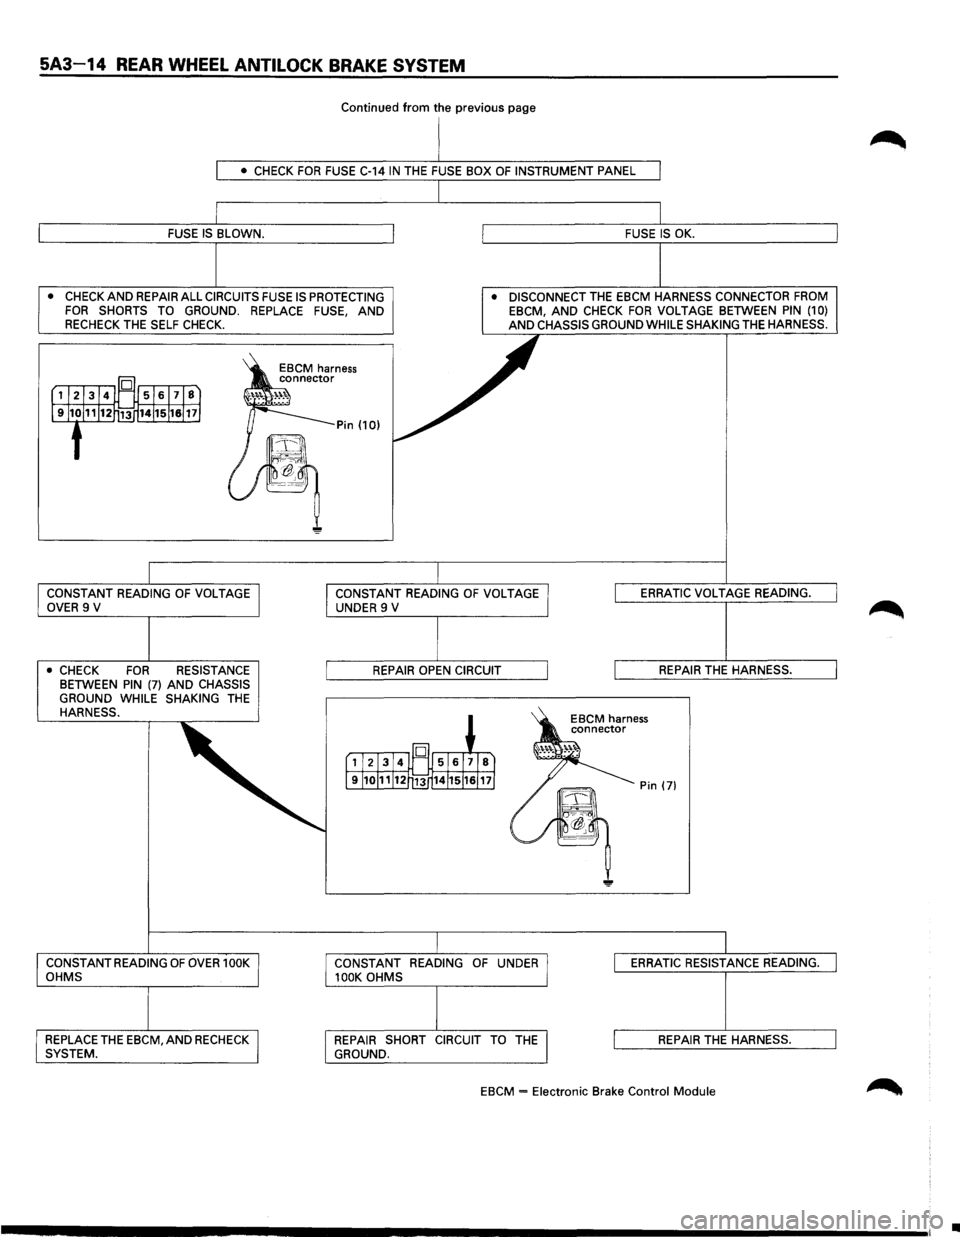
5A3-14 REAR WHEEL ANTILOCK BRAKE SYSTEM
Continued from the previous page
• CHECK FOR FUSE C-14 IN THE FUSE BOX OF INSTRUMENT PANEL
FUSE IS BLOWN. FUSE IS OK.
•
CHECK AND REPAIR ALL CIRCUITS FUSE IS PROTECTING FOR SHORTS TO GROUND. REPLACE FUSE, AND RECHECK THE SELF CHECK.
• DISCONNECT THE EBCM HARNESS CONNECTOR FROM EBCM, AND CHECK FOR VOLT AGE BETWEEN PIN (1 0) AND CHASSIS GROUND WHILE SHAKING THE HARNESS.
CONSTANT READING
OF VOLTAGE OVER 9 V
• CHECK FOR RESISTANCE BETWEEN PIN (7) AND CHASSIS
GROUND WHILE SHAKING THE HARNESS.
CONSTANT READING
OF OVER 1 OOK OHMS
REPLACE THE EBCM, AND RECHECK SYSTEM. CONSTANT
READING
OF VOLTAGE UNDER 9 V
REPAIR OPEN CIRCUIT
CONSTANT
READING OF UNDER 100K OHMS
REPAIR SHORT CIRCUIT TO
THE GROUND. ERRATIC
VOLTAGE
READING.
REPAIR THE HARNESS.
ERRATIC RESISTANCE READING.
REPAIR
THE HARNESS.
EBCM = Electronic Brake Control Module
•
Page 383 of 1928
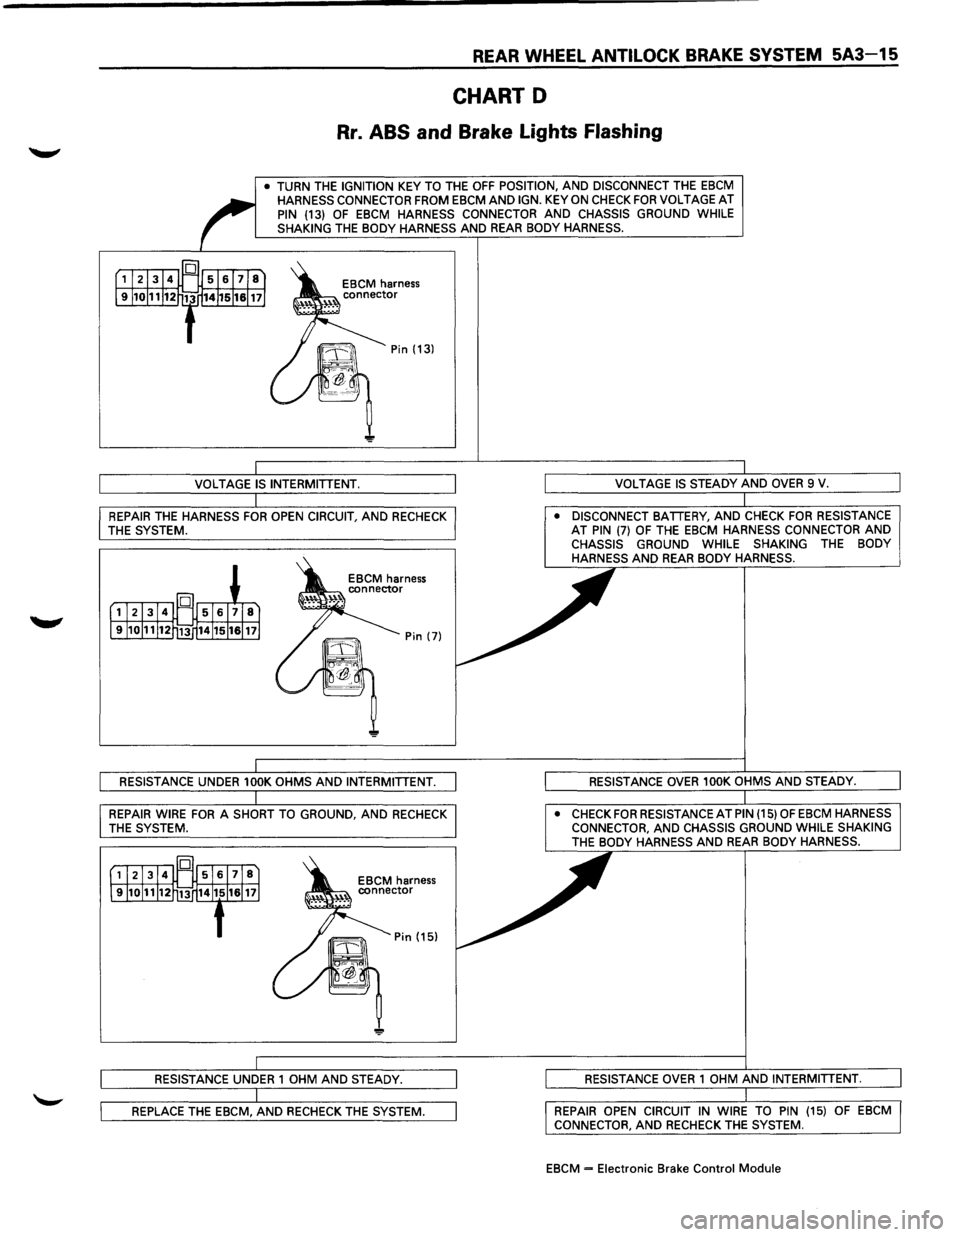
REAR WHEEL ANTILOCK BRAKE SYSTEM 5A3-15
CHART D
Rr. ABS and Brake Lights Flashing
• TURN THE IGNITION KEY TO THE OFF POSITION, AND DISCONNECT THE EBCM HARNESS CONNECTOR FROM EBCM AND IGN. KEY ON CHECK FOR VOLTAGE AT PIN {13) OF EBCM HARNESS CONNECTOR AND CHASSIS GROUND WHILE
SHAKING THE BODY HARNESS AND REAR BODY HARNESS.
REPAIR THE HARNESS FOR OPEN CIRCUIT, AND RECHECK • DISCONNECT BATTERY, AND CHECK FOR RESISTANCE AT PIN {7) OF THE EBCM HARNESS CONNECTOR AND CHASSIS GROUND WHILE SHAKING THE BODY
HARNESS AND REAR BODY HARNESS.
THE SYSTEM.
•
CHECK FOR RESISTANCE AT PIN {15) OF EBCM HARNESS
CONNECTOR, AND CHASSIS GROUND WHILE SHAKING THE BODY HARNESS AND REAR BODY HARNESS.
REPAIR OPEN CIRCUIT
IN WIRE TO PIN {15) CONNECTOR, AND RECHECK THE SYSTEM.
EBCM = Electronic Brake Control Module