oil ISUZU TROOPER 1995 Workshop Manual
[x] Cancel search | Manufacturer: ISUZU, Model Year: 1995, Model line: TROOPER, Model: ISUZU TROOPER 1995Pages: 1928
Page 533 of 1928
GENERAL ENGINE MECHANICAL 6A-17
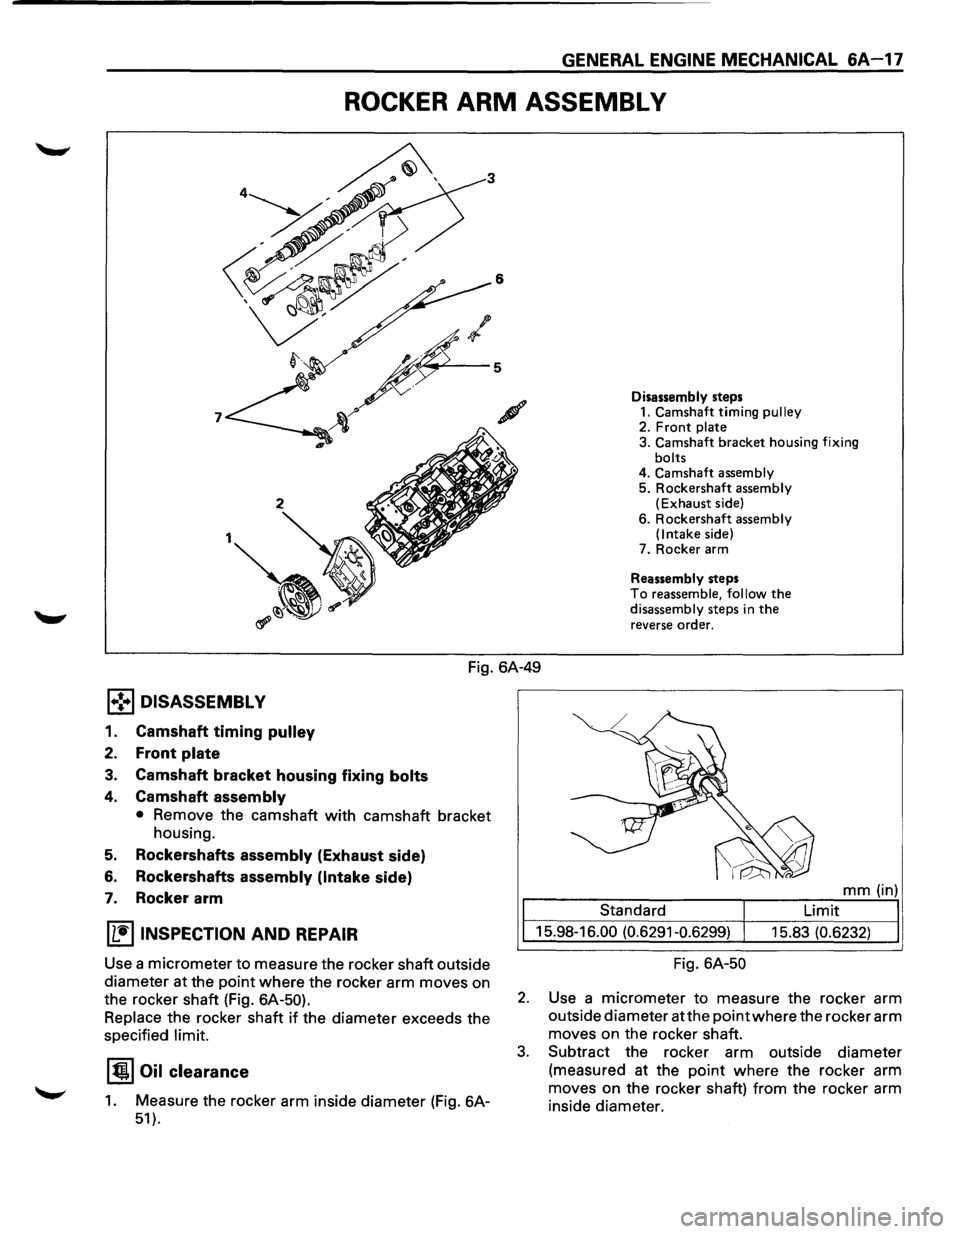
ROCKER ARM ASSEMBL V
Disassembly steps 1. Camshaft timing pulley 2. Front plate 3. Camshaft bracket housing fixing
bolts 4. Camshaft assembly 5. Rockershaft assembly (Exhaust side)
6.
Rockershaft assembly
(Intake side)
7. Rocker arm
Reassembly steps To reassemble, follow the disassembly steps in the reverse order.
Fig. 6A-49
l•!•l DISASSEMBL V
1. Camshaft timing pulley
2. Front plate
3. Camshaft bracket housing fixing bolts
4. Camshaft assembly
• Remove the camshaft with camshaft bracket
housing.
5. Rockershafts assembly (Exhaust side)
6. Rockershafts assembly (Intake side)
7. Rocker arm
~ INSPECTION AND REPAIR
Use a micrometer to measure the rocker shaft outside
diameter at the point
where the rocker arm moves on
the rocker shaft (Fig.
6A-50).
Replace
the rocker shaft if the diameter exceeds the
specified
limit.
1~1 Oil clearance
1. Measure the rocker arm inside diameter (Fig. 6A-
51 ).
mm (in)
Standard Limit
15.98-16.00 (0.6291-0.6299) 15.83 (0.6232)
Fig. 6A-50
2. Use a micrometer to measure the rocker arm
outside diameter at the
point where the rocker arm
moves on the rocker shaft.
3. Subtract the rocker arm outside diameter
(measured at the point where the rocker arm
moves on the rocker shaft)
from the rocker arm
inside diameter.
Page 534 of 1928
6A-18 GENERAL ENGINE MECHANICAL
Oil
Clearance
Standard
0.005-0.045
(0.0002-0.0018)
Fig. 6A-51
mm (in)
Limit
0.2 (0.0079)
Replace the rocker arm and/or rocker shaft if the
measured
oil clearance exceeds the specified limit.
1~1 Runout
1. Place the rocker shaft on V-blocks (Fig. 6A-52).
2. Set the dial indicator.
3. Slowly rotate the rocker shaft and measure the
run out.
If the run out is in excess of the specified limit, the
rocker shaft
must be replaced.
mm (in)
Limit o.2 (o.oo79)
I
Fig. 6A-52
Rocker arm
wcAUTION
' Visually inspect the rocker arm and replace them
if damage or abnormal wear is evident.
l•!•l REASSEMBLY
7. Rocker arm
l'e::r.l • Apply a light coat of engine oil to the rocker arm
shafts.
Rocker arm shafts are different, so care
should
be taken when reinstalling rocker shafts (Fig.
6A-55).
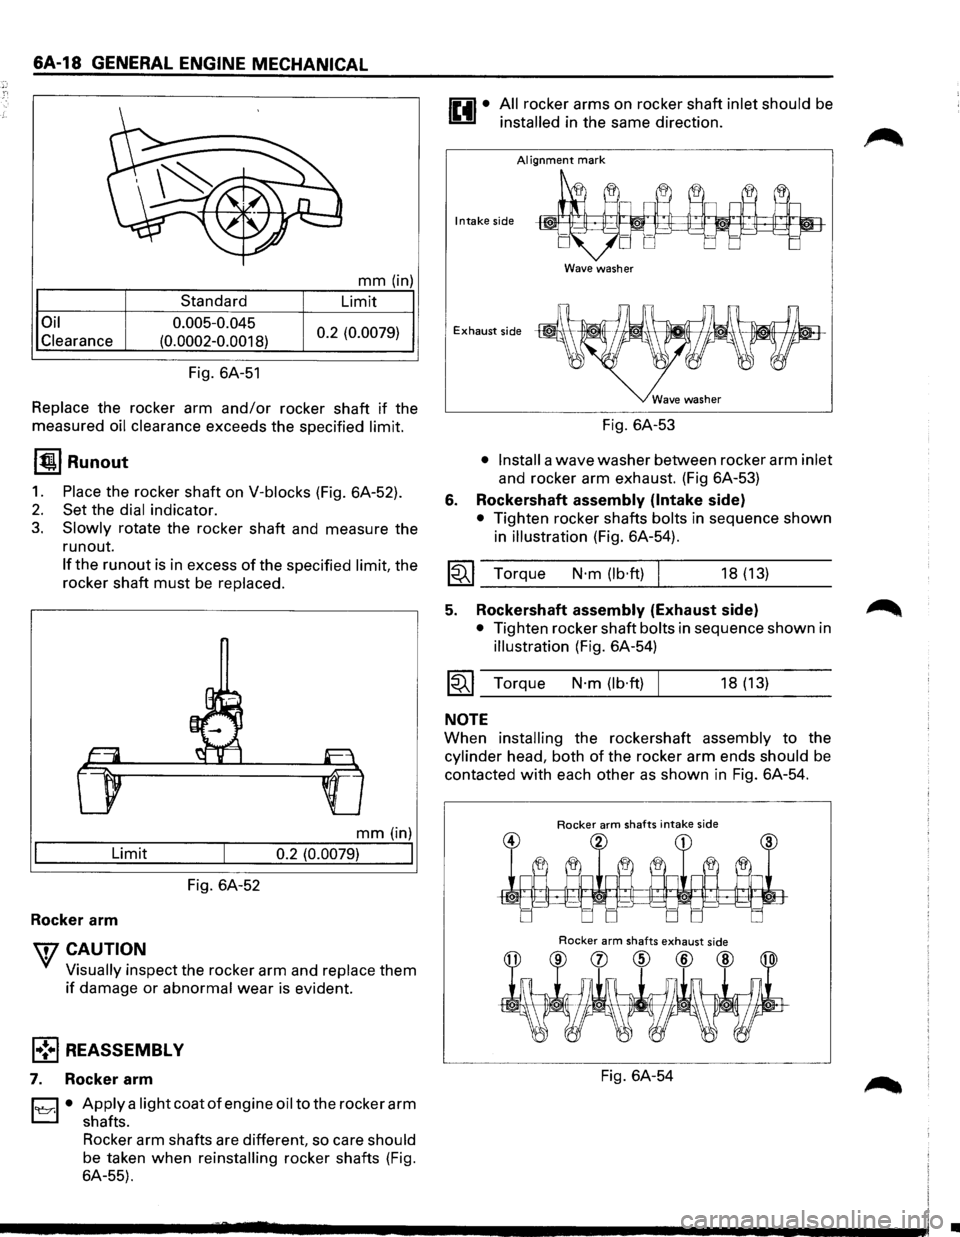
All rocker arms on rocker shaft inlet should be
installed in the same direction.
AI ignment mark
Intake side
Wave washer
Exhaust side
6.
Fig. 6A-53
• Install a wave washer between rocker arm inlet
and rocker arm exhaust. (Fig 6A-53)
Rockershaft assembly (Intake side)
• Tighten rocker shafts bolts in sequence shown
in
illustration (Fig. 6A-54).
I~I __ To_r_q_ue ___ N_·_m_(_lb_·ft_)~l ______ 18_(_1_3) ____ _
5. Rockershaft assembly (Exhaust side) ~
• Tighten rocker shaft bolts in sequence shown in
illustration (Fig. 6A-54)
~~~ Torque N·m (lb·ft) I 18 (13)
NOTE
When installing the rockershaft assembly to the
cylinder head, both of the rocker arm ends should be
contacted
with each other as shown in Fig. 6A-54.
Rocker arm shafts intake side
Rocker arm shafts exhaust side
Fig. 6A-54
•
Page 536 of 1928
6A-20 GENERAL ENGINE MECHANICAL
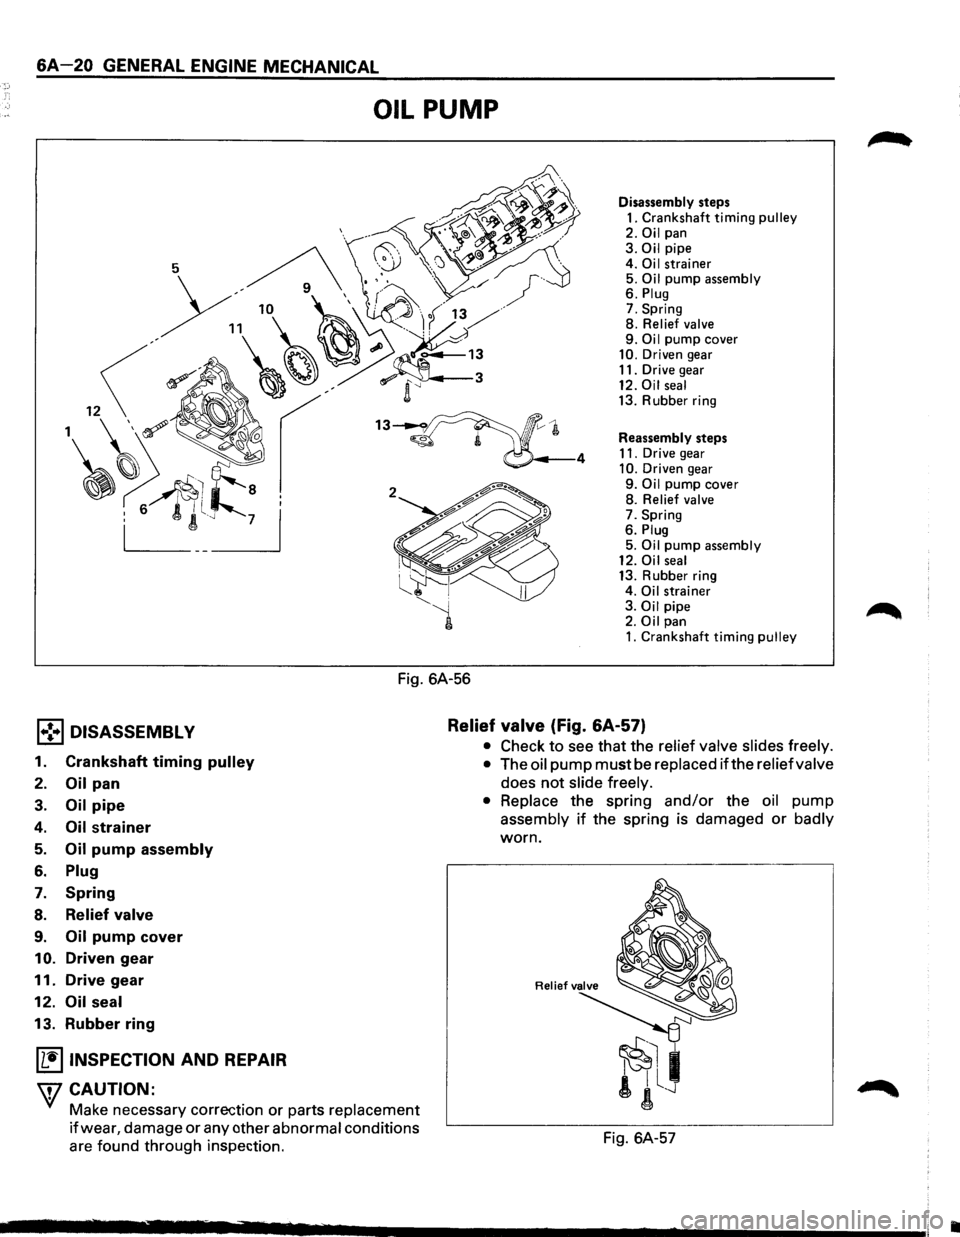
OIL PUMP
Fig. 6A-56
Disassembly steps 1. Crankshaft timing pulley 2. Oil pan 3. Oil pipe
4. Oi I strainer 5. Oil pump assembly 6. Plug 7. Spring
8. Relief valve 9. Oil pump cover 10. Driven gear 11. Drive gear 12. Oil seal 13. Rubber ring
Reassembly steps
11. Drive
gear 10. Driven gear 9. Oil pump cover
8. Relief valve 7. Spring
6. Plug 5. Oil pump assembly 12. Oil seal 13. Rubber ring
4. Oil strainer
3. Oil pipe 2. Oil pan 1. Crankshaft timing pulley
l•!•l DISASSEMBLY Relief
valve (Fig. 6A-57)
1. Crankshaft timing pulley
2. Oil pan
3. Oil pipe
4. Oil strainer
5. Oil pump assembly
6. Plug
7. Spring
8. Relief valve
9. Oil pump cover
10. Driven gear
11. Drive gear
12. Oil seal
13. Rubber ring
~ INSPECTION AND REPAIR
\fl CAUTION:
VI Make necessary correction or parts replacement
if wear, damage or any other abnormal conditions
are found through inspection.
• Check to see that the relief valve slides freely.
• The oil pump must be replaced ifthe relief valve
does
not slide freely.
• Replace the spring and/or the oil pump
assembly if the spring is damaged or badly
worn.
Fig. 6A-57
•
Page 537 of 1928
Body and gears
The pump assembly must be replaced if one or
more of the conditions below is discovered
during inspection.
• Badly worn or damaged driven gear guide.
• Badly worn driving gear drive face.
• Badly scratched or scored body sliding face or
driven gear.
• Badly worn or damaged gear teeth.
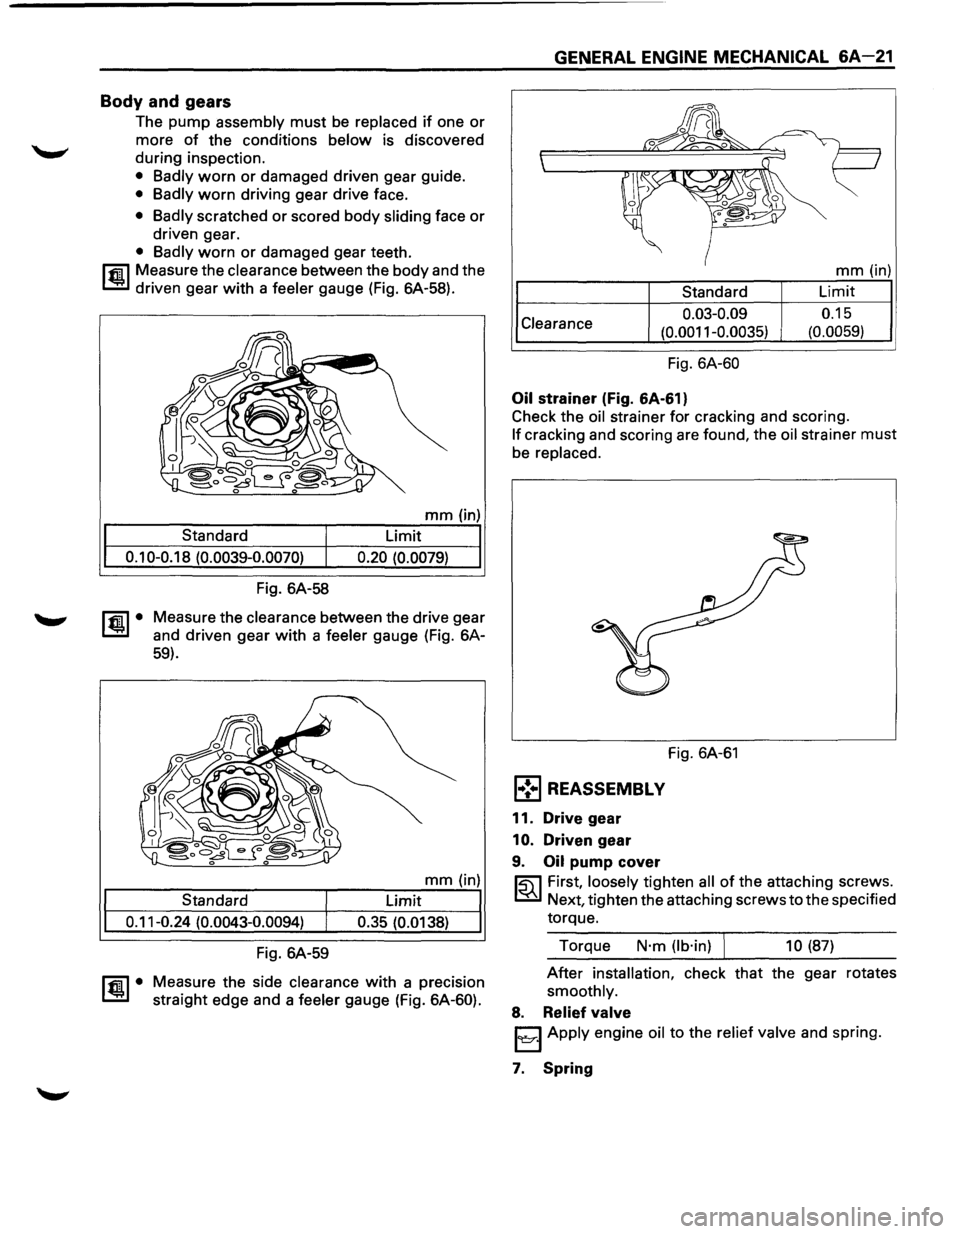
~ Measure the clearance between the body and the
I..!:.J driven gear with a feeler gauge (Fig. 6A-58).
mm (in)
Standard
Limit
0.10-0.18 (0.0039-0.0070) 0.20 (0.0079)
~·
Fig. 6A-58
Measure the
clearance between the drive gear
and driven gear
with a feeler gauge (Fig. 6A-
59).
mm (in)
Standard Limit
0.11-0.24
(0.0043-0.0094) 0.35 (0.0138)
Fig. 6A-59
ltm.l• Measure the side clearance with a precision
straight edge and a
feeler gauge (Fig. 6A-60).
GENERAL ENGINE MECHANICAL 6A-21
Clearance
Standard
0.03-0.09
(0.0011-0.0035)
Fig. 6A-60
Oil strainer (Fig. 6A-61)
mm (in)
Limit
0.15
(0.0059)
Check the
oil strainer for cracking and scoring.
If cracking and scoring are found, the oil strainer must
be replaced.
Fig. 6A-61
l•!•l REASSEMBLY
11. Drive gear
1
0. Driven gear
9. Oil pump cover
~ First, loosely tighten all of the attaching screws.
~ Next, tighten the attaching screws to the specified
torque.
Torque
N·m (lb·in) ) 10 (87)
After installation, check that the gear rotates
smoothly.
8. Relief valve
I~J Apply engine oil to the relief valve and spring.
7. Spring
Page 538 of 1928
.r Ti
6A-22 GENERAL ENGINE MECHANICAL
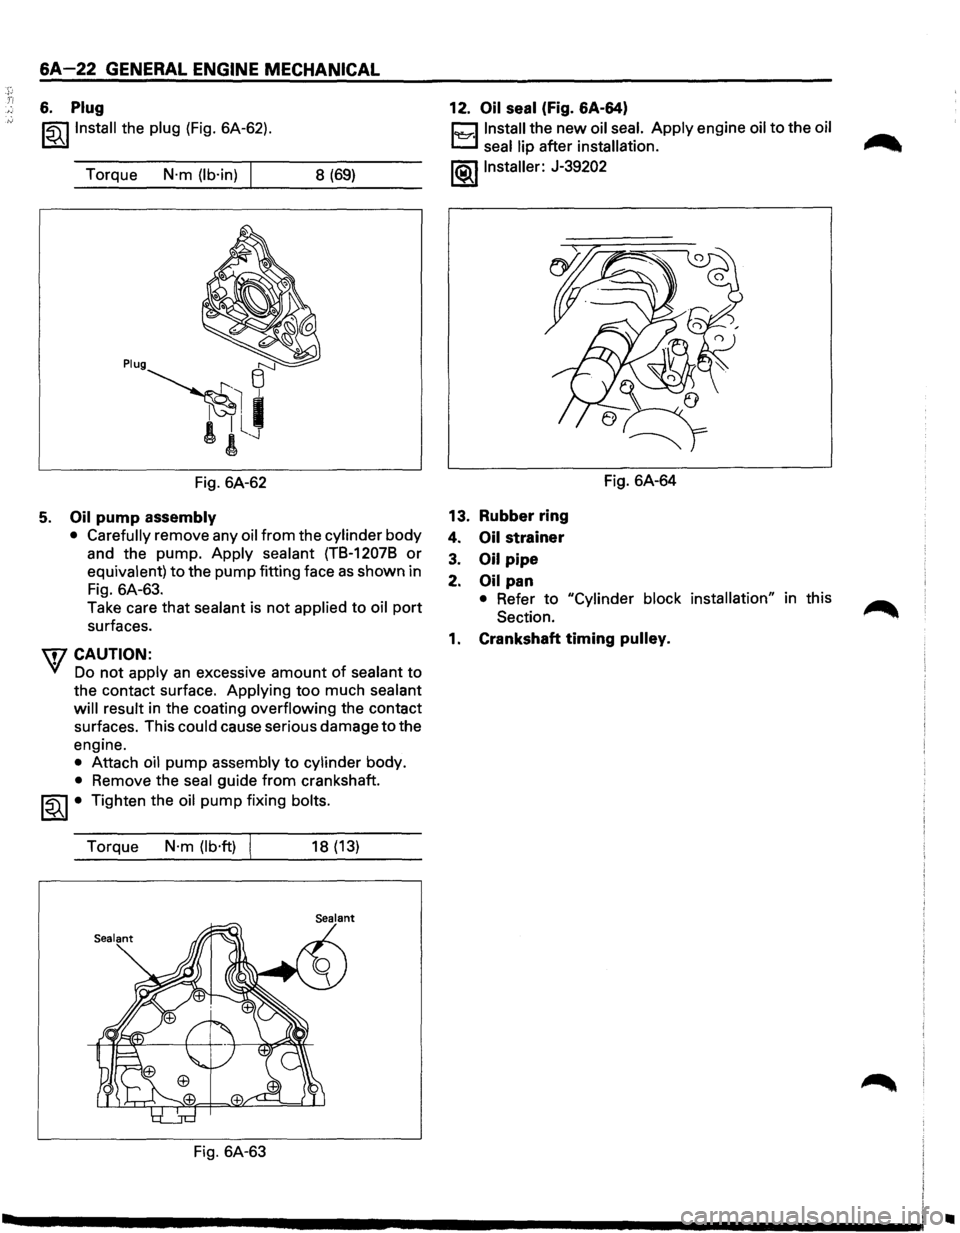
6. Plug
~~~Install the plug (Fig. 6A-62).
Torque
N·m (lb·in) 8 (69)
Fig. 6A-62
5. Oil pump assembly
• Carefully
remove any oil from the cylinder body
and the pump. Apply sealant (TB-12078 or
equivalent) to the pump fitting face as shown in
Fig. 6A-63.
Take care that sealant is
not applied to oil port
surfaces.
\fl CAUTION:
VI Do not apply an excessive amount of sealant to
the contact surface. Applying
too much sealant
will result in the coating overflowing the contact
surfaces. This could cause serious damage
to the
engine.
• Attach oil pump assembly to cylinder body.
• Remove the seal guide from crankshaft.
~~~ • Tighten the oil pump fixing bolts.
Torque
N·m (lb·ft) 18 (13)
Fig. 6A-63 12.
Oil
seal (Fig. 6A-64)
Cl Install the new oil seal. Apply engine oil to the oil
t..:::::::.l seal lip after installation.
~~~Installer: J-39202
13. Rubber ring
4. Oil strainer
3. Oil pipe
2. Oil pan Fig.
6A-64
• Refer to "Cylinder block installation" in this
Section.
1. Crankshaft timing pulley.
..
Page 539 of 1928
GENERAL ENGINE MECHANICAL 6A-23
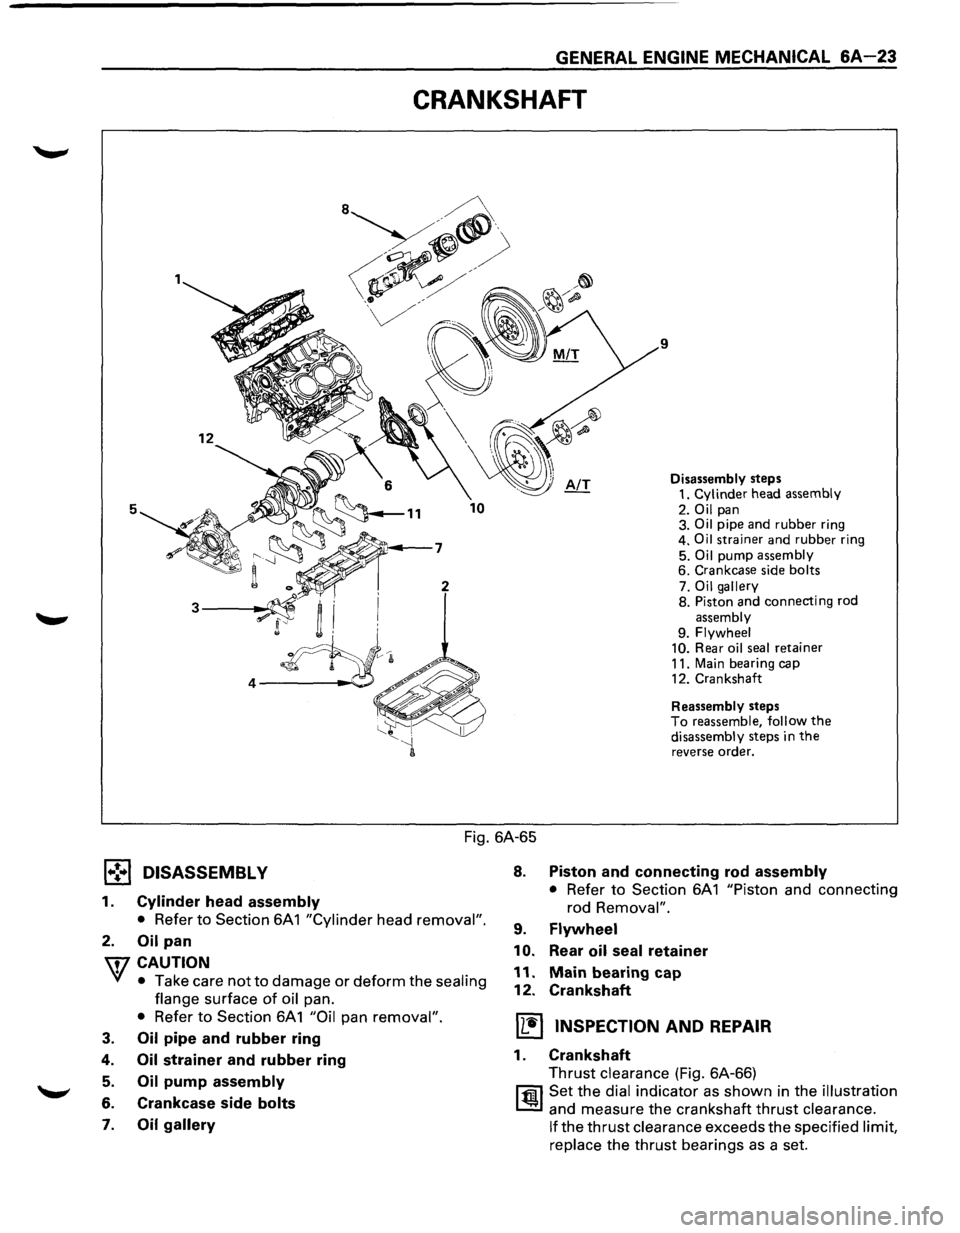
CRANKSHAFT
9
5
Disassembly steps
1. Cylinder head assembly
2. Oil pan
3. Oil pipe and rubber ring
4. Oil strainer and rubber ring
5.
Oil pump assembly 6. Crankcase side bolts
7. Oil gallery 8. Piston and connecting rod
assembly 9. Flywheel
10. Rear oil seal retainer 11. Main bearing cap
12. Crankshaft
Reassembly steps To reassemble, follow the disassembly steps in the reverse order.
Fig. 6A-65
1 .. !,.1 DISASSEMBL V
1. Cylinder head assembly
•
Refer to Section 6A1 "Cylinder head removal".
2. Oil pan
\i7 CAUTION
~ • Take care not to damage or deform the sealing
flange
surface of oil pan.
• Refer to Section 6A1 "Oil pan removal".
3. Oil pipe and rubber ring
4. Oil strainer and rubber ring
5. Oil pump assembly
6. Crankcase side bolts
7. Oil gallery
8. Piston and connecting rod assembly
•
Refer to Section 6A 1 "Piston and connecting
rod
Removal".
9. Flywheel
10.
Rear oil seal retainer
11. Main bearing cap
12. Crankshaft
IL•I INSPECTION AND REPAIR
1. Crankshaft
Thrust clearance (Fig. 6A-66)
l'fil Set the dial indicator as shown in the illustration
~ and measure the crankshaft thrust clearance.
If the thrust clearance exceeds the specified limit,
replace
the thrust bearings as a set.
Page 540 of 1928
6A-24 GENERAL ENGINE MECHANICAL
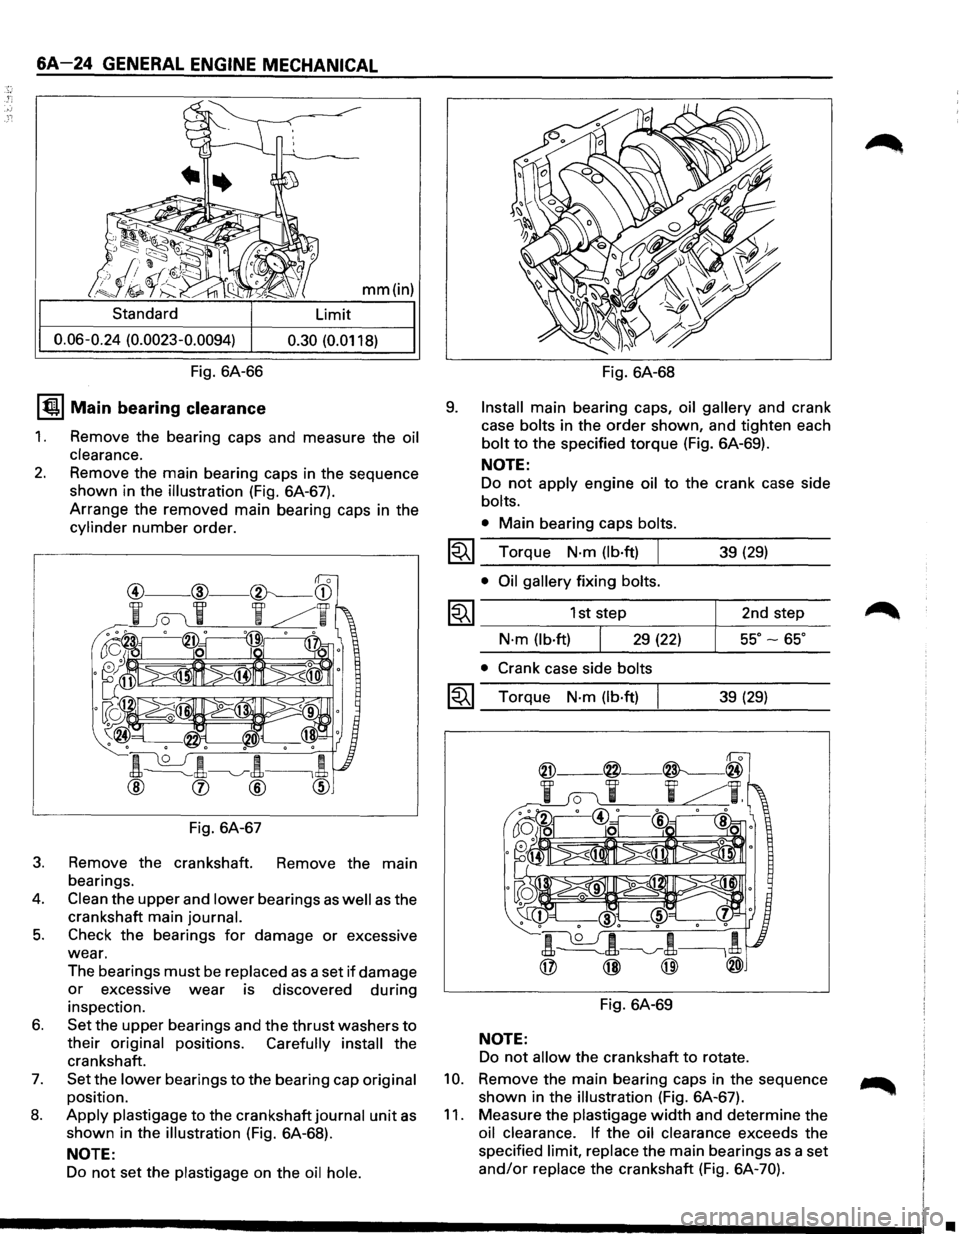
mm(in)
Standard Limit
0.06-0.24 (0.0023-0.0094) 0.30 (0.0118)
Fig. 6A-66 Fig. 6A-68
IQI Main bearing clearance
1. Remove the bearing caps and measure the oil
clearance.
2. Remove the main bearing caps in the sequence
shown in the
illustration (Fig. 6A-67).
Arrange the removed main bearing caps in the
cylinder number order.
Fig. 6A-67
3. Remove the crankshaft. Remove the main
bearings.
4. Clean the upper and lower bearings as well as the
crankshaft main
journal.
5. Check the bearings for damage or excessive
wear.
The bearings
must be replaced as a set if damage
or excessive wear is discovered during
inspection.
6. Set the upper bearings and the thrust washers to
their original positions. Carefully install the
crankshaft.
7. Set the lower bearings to the bearing cap original
position.
8. Apply plastigage to the crankshaft journal unit as
shown in the illustration (Fig. 6A-68).
NOTE:
Do not set the plastigage on the oil hole.
9. Install main bearing caps, oil gallery and crank
case
bolts in the order shown, and tighten each
bolt to the specified torque (Fig. 6A-69).
~
~
~
NOTE:
Do not apply engine oil to the crank case side
bolts.
•
Main bearing caps bolts.
Torque N·m (lb·ft) I 39 (29)
• Oil gallery fixing bolts.
1st step 2nd step
N·m (lb·ft) 29 (22) 55°-65°
• Crank case side bolts
Torque N·m (lb·ft) 39 (29)
Fig. 6A-69
NOTE:
Do not allow the crankshaft to rotate.
10. Remove the main bearing caps in the sequence
shown in the
illustration (Fig. 6A-67).
11. Measure the plastigage width and determine the
oil clearance. If the oil clearance exceeds the
specified
limit, replace the main bearings as a set
and/or replace the crankshaft (Fig. 6A-70).
•
Page 541 of 1928
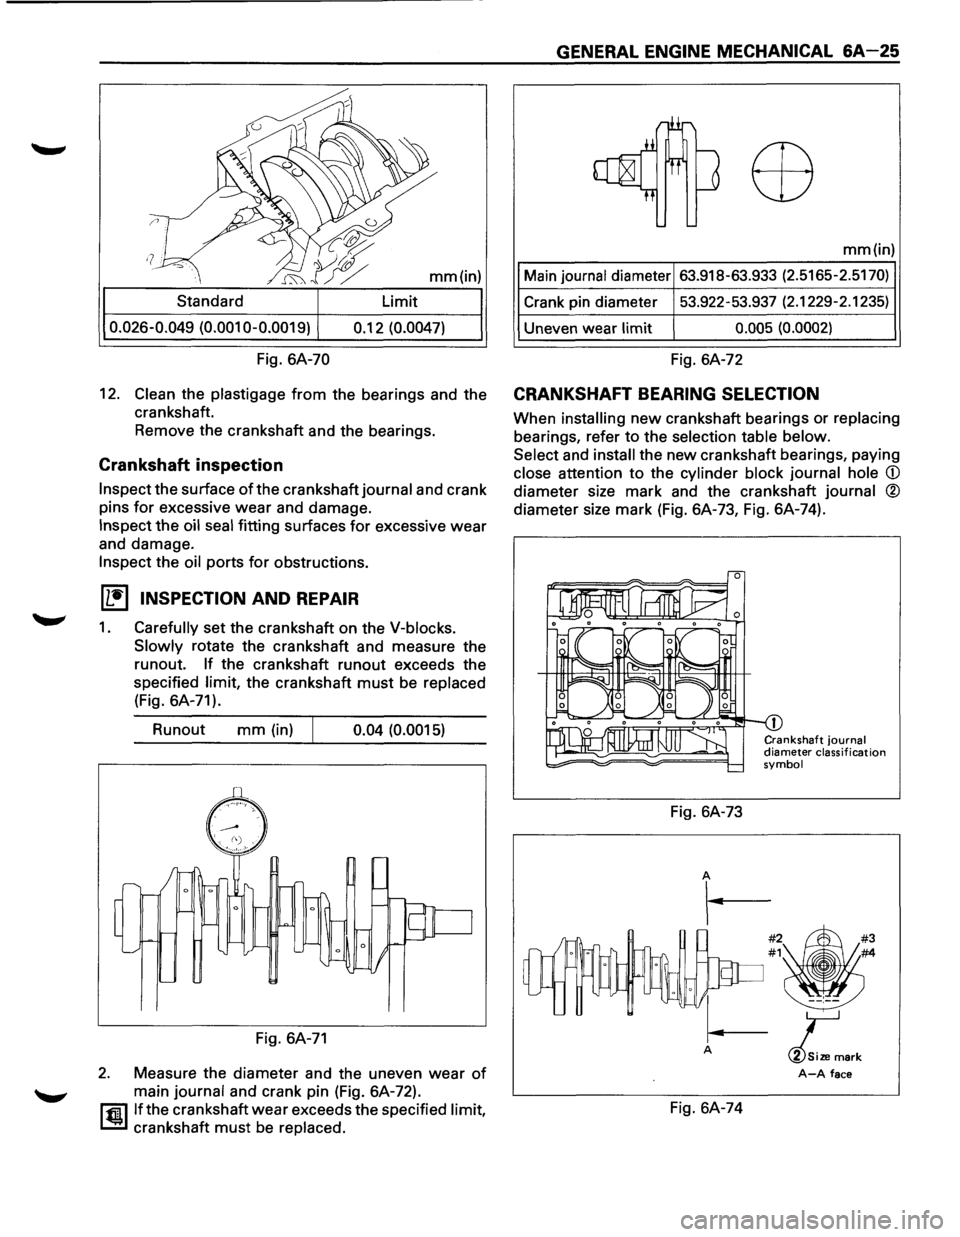
mm(in)
Standard Limit
0.026-0.049 (0.001 0-0.0019) 0.12 (0.0047)
Fig. 6A-70
12. Clean the plastigage from the bearings and the
crankshaft.
Remove the crankshaft and the bearings.
Crankshaft inspection
Inspect the surface ofthe crankshaft journal and crank
pins
for excessive wear and damage.
Inspect the oil seal fitting surfaces for excessive wear
and damage.
Inspect the oil ports for obstructions.
(L!] INSPECTION AND REPAIR
1. Carefully set the crankshaft on the V-blocks.
Slowly
rotate the crankshaft and measure the
runout.
If the crankshaft runout exceeds the
specified
limit, the crankshaft must be replaced
(Fig. 6A-71).
Runout
mm (in) 0.04 (0.0015)
Fig. 6A-71
2. Measure the diameter and the uneven wear of
main journal and crank pin (Fig. 6A-72).
l'fil If the crankshaft wear exceeds the specified limit,
~ crankshaft must be replaced.
GENERAL ENGINE MECHANICAL &A-25
mm(in)
Main
journal diameter 63.918-63.933 (2.5165-2.5170)
Crank pin diameter 53.922-53.937 (2.1229-2.1235)
Uneven wear
limit 0.005
(0.0002)
Fig. 6A-72
CRANKSHAFT BEARING SELECTION
When installing new crankshaft bearings or replacing
bearings, refer to the selection table below.
Select
and install the new crankshaft bearings, paying
close attention to the cylinder block journal hole
diameter size mark (Fig. 6A-73, Fig. 6A-74).
Fig. 6A-73
Crankshaft journal diameter classification symbol
1-----
#2~#3 #1 #4
~ --:--
A ;:.,,
A-A face
Fig. 6A-74
Page 542 of 1928
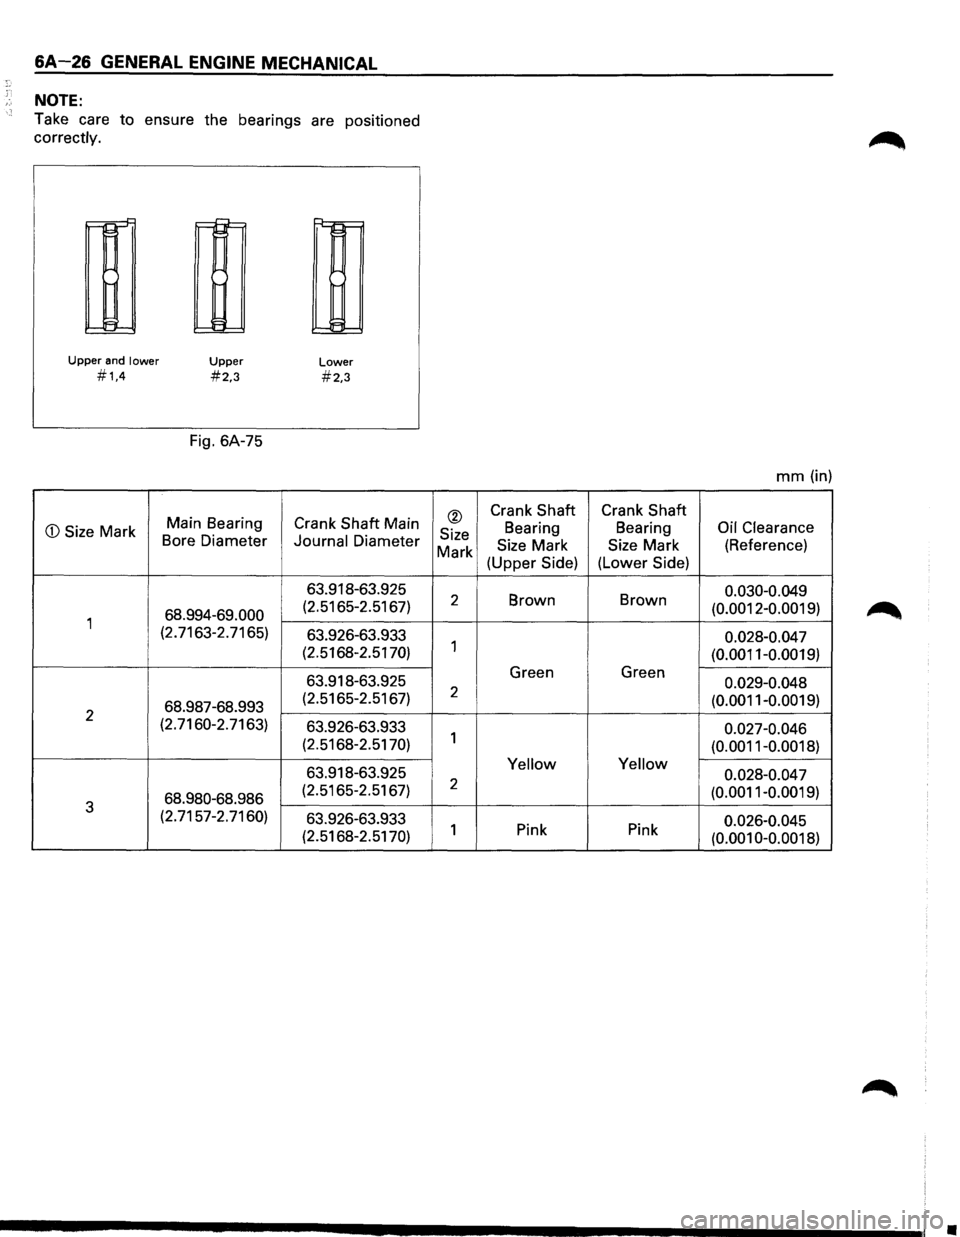
6A-26 GENERAL ENGINE MECHANICAL
NOTE:
Take care to ensure the bearings are positioned
correctly.
Upper and lower
#1,4
CD Size Mark
1
2
3
r-
1:=
II-
~
Upper
#2,3
Fig. 6A-75
Main Bearing
Bore Diameter
68.994-69.000
(2. 7163-2. 7165)
68.987-68.993
(2. 7160-2. 7163)
68.980-68.986
(2.7157-2.7160)
Lower
#2,3
Crank Shaft Main
Journal Diameter
63.918-63.925
(2.5165-2.5167)
63.926-63.933
(2.5168-2.5170)
63.918-63.925
(2.5165-2.5167)
63.926-63.933
(2.5168-2.5170)
63.918-63.925
(2.5165-2.5167)
63.926-63.933
(2.5168-2.5170)
mm (in)
® Crank Shaft Crank Shaft
Size Bearing Bearing
Oil
Clearance
Mark Size
Mark Size Mark (Reference)
(Upper Side) (Lower Side)
2 Brown
Brown
0.030-0.049
(0.0012-0.0019)
0.028-0.047
1 (0.0011-0.0019)
Green Green 0.029-0.048 2 (0.0011-0.0019) 0.027-0.046
1 (0.0011-0.0018)
Yellow Yellow 0.028-0.047 2 (0.0011-0.0019) 0.026-0.045
1 Pink Pink (0.001 0-0.0018)
•
Page 543 of 1928
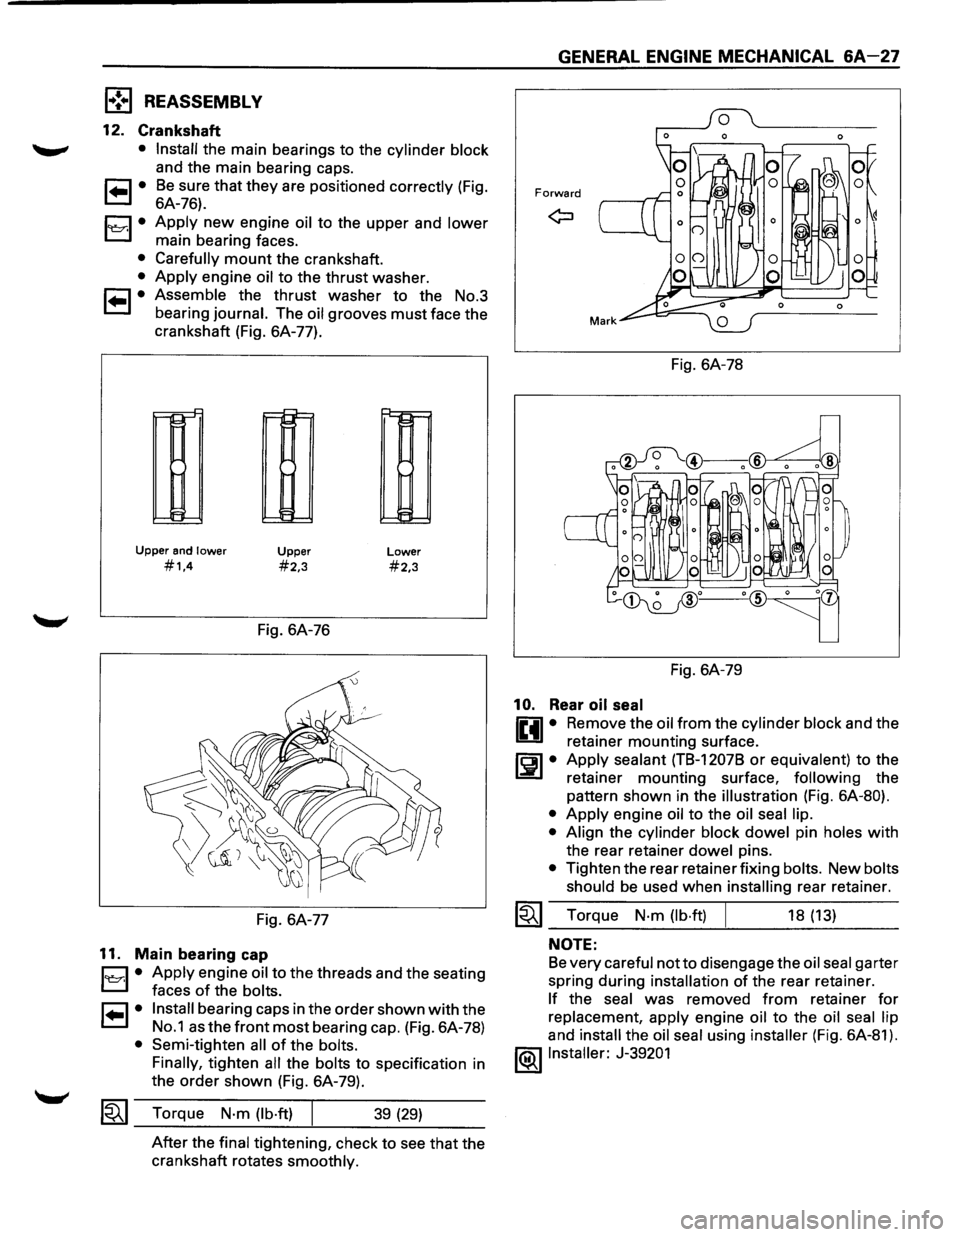
l•!•l REASSEMBL V
12. Crankshaft
• Install the main bearings to the cylinder block
and the main bearing caps.
1 .. 1• Be sure that they are positioned correctly (Fig.
6A-76).
1~1· Apply new engine oil to the upper and lower
main bearing faces.
• Carefully mount the crankshaft.
• Apply engine oil to the thrust washer.
1 .. 1• Assemble the thrust washer to the No.3
bearing
journal. The oil grooves must face the
crankshaft (Fig. 6A-77).
Upper and lower
#1.4
~
~
IH
t=
Upper
#2,3
Fig. 6A-76
Fig. 6A-77
11. Main bearing cap
Lower
#2,3
B • Apply engine oil to the
threads and the seating
' faces
of the bolts.
r=1 • Install bearing caps in the order shown with the
L:::.l No.1 as the front most bearing cap. (Fig. 6A-78)
• Semi-tighten all of the bolts.
Finally,
tighten all the bolts to specification in
the
order shown (Fig. 6A-79).
1~1 Torque N·m (lb·ft) 39 (29)
After the final tightening, check to see that the
crankshaft rotates
smoothly.
GENERAL ENGINE MECHANICAL 6A-27
Forward
Fig. 6A-78
Fig. 6A-79
10. Rear oil seal
liill • Re~ove the oil_from the cylinder block and the
U retainer mounting surface.
rEil • Apply sealant (TB-1207B or equivalen_t) to the
1.:::!!.1 retainer mounting surface, follow~ng the
pattern shown in the
illustration (Fig. 6A-80).
• Apply engine oil to the oil seal lip.
• Align
the cylinder block dowel pin holes with
the rear retainer dowel pins.
• Tighten the rear retainer fixing bolts. New bolts
should
be used when installing rear retainer.
~~~ Torque N·m (lb·ft) 18 (13)
NOTE:
Be very careful notto disengage the oil seal garter
spring during
installation of the rear retainer.
If the seal was removed from retainer for
replacement, apply engine oil to the oil seal lip
and install the oil seal using installer (Fig. 6A-81).
l®llnstaller: J-39201