fuel ISUZU TROOPER 1995 Workshop Manual
[x] Cancel search | Manufacturer: ISUZU, Model Year: 1995, Model line: TROOPER, Model: ISUZU TROOPER 1995Pages: 1928
Page 1504 of 1928
8-314 CHASSIS ELECTRICAL
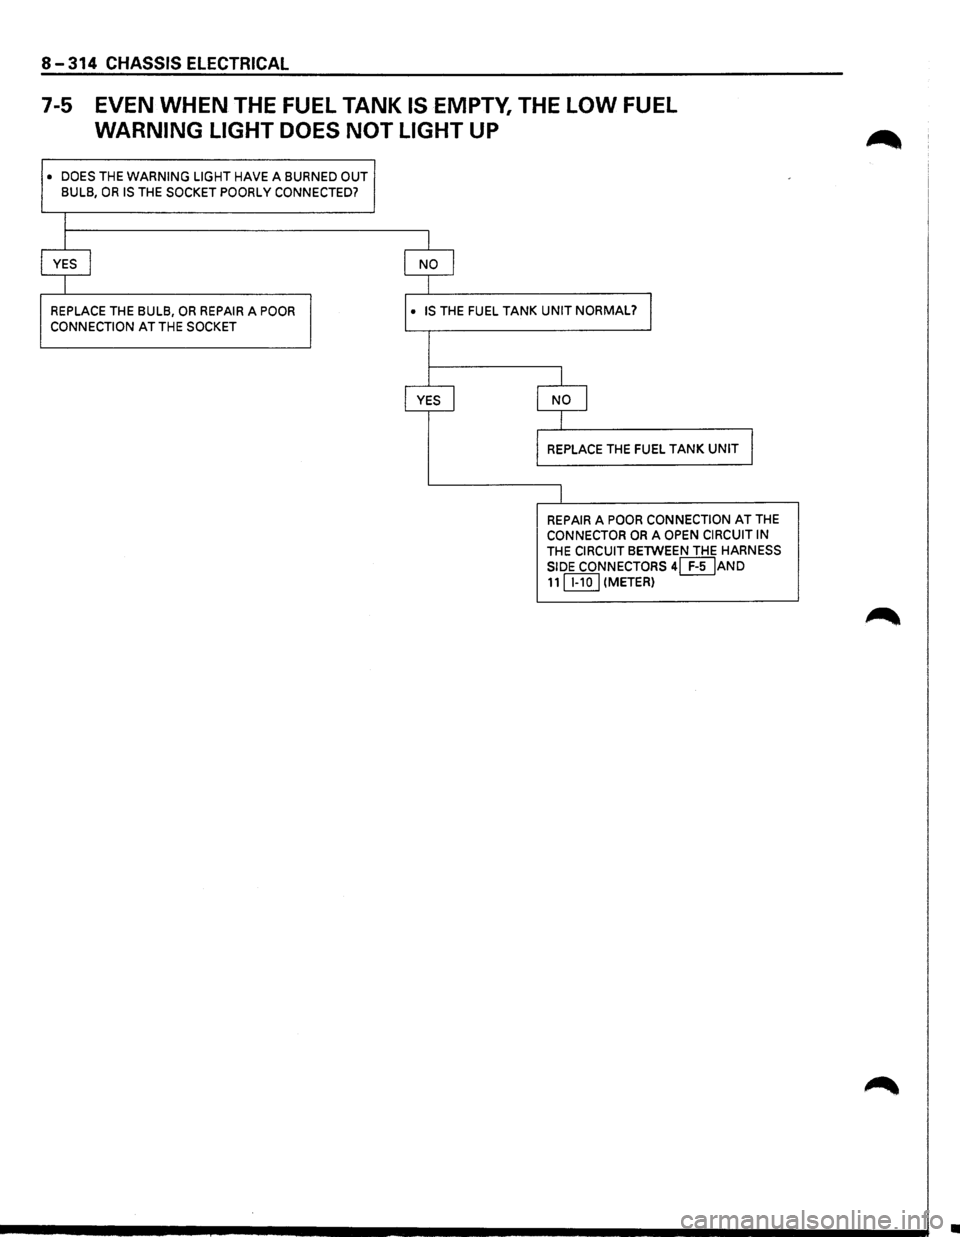
7-5 EVEN WHEN THE FUEL TANK IS EMPTY, THE LOW FUEL
WARNING LIGHT DOES NOT LIGHT UP
• DOES THE WARNING LIGHT HAVE A BURNED OUT
BULB, OR IS THE SOCKET POORLY CONNECTED?
I
I
YES I
I
REPLACE THE BULB, OR REPAIR A POOR
CONNECTION
AT THE SOCKET
I NO I
I· IS THE FUEL TANK UNIT NORMAL? I
I YES I
J
NO I
I
REPLACE THE FUEL TANK UNIT I
I
REPAIR A POOR CONNECTION AT THE CONNECTOR OR A OPEN CIRCUIT IN
THE CIRCUIT BETWEEN THE HARNESS
SIDE CONNECTORS
4[}IJAND 11 IT.IQJ (METER)
•
Page 1506 of 1928
8-316 CHASSIS ELECTRICAL
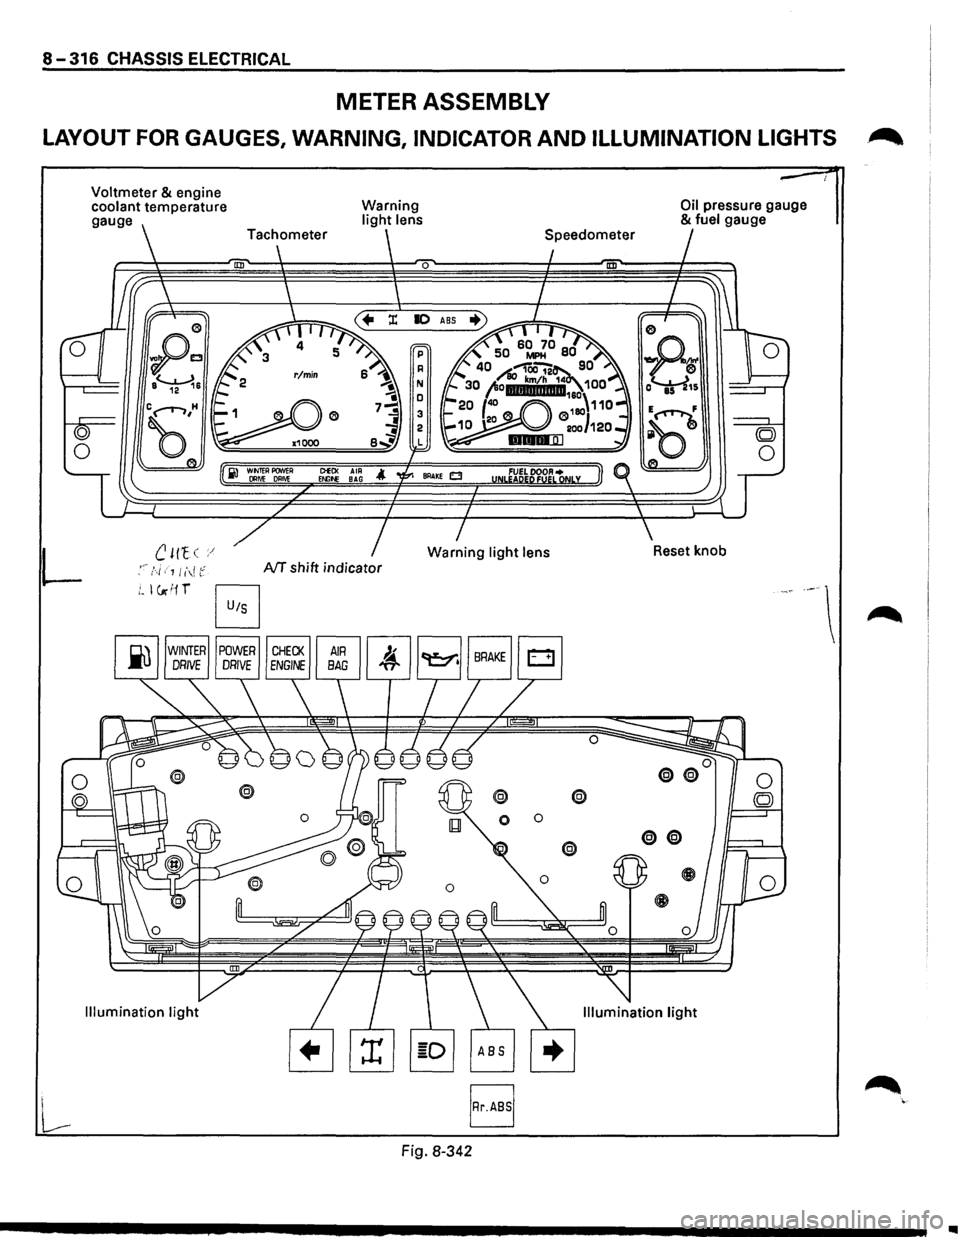
METER ASSEMBLY
LAYOUT FOR GAUGES, WARNING, INDICATOR AND ILLUMINATION LIGHTS .~
L
Voltmeter & engine
coolant temperature
gauge
B
Warning light lens
0
ClEO< AIR Et.llf>E BAG
NT shift indicator
Fig. 8-342
@ @
0 0
Oil pressure gauge & fuel gauge
..
Page 1507 of 1928
CHASSIS ELECTRICAL 8-317
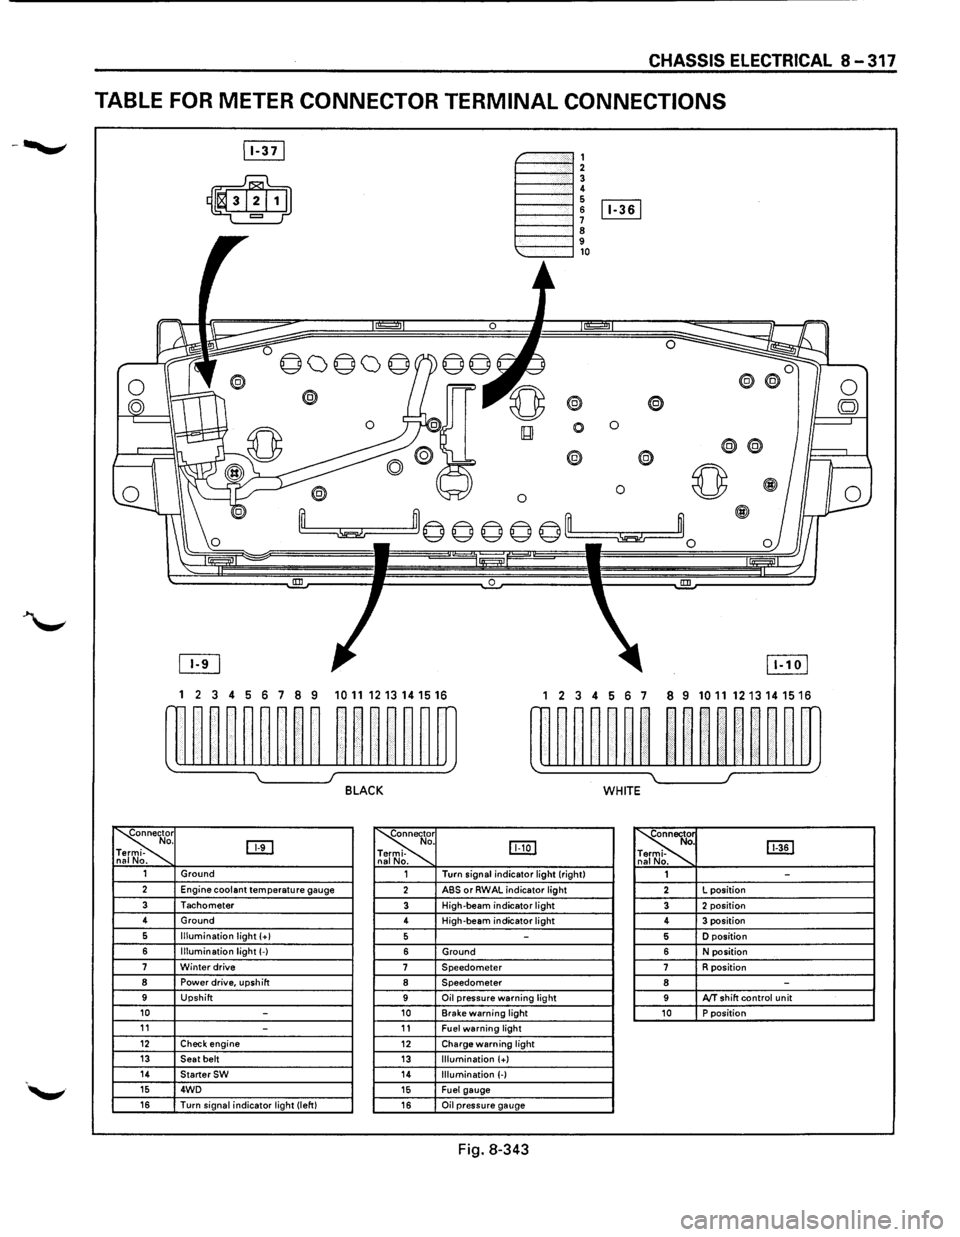
TABLE FOR METER CONNECTOR TERMINAL CONNECTIONS
~-""""""', 1----""'12 1----""'1! 6 1----l 6 [Iill
1----""'1 ~ 9 1---""'l,o
®
0 0
0
® @
0 0 ~
~m© © © © ©'--m ~~0
0 !III
1 2 3 4 5 6 7 8 9 1011 1213141516 1 2 3 4 56 7 8 9 10111213141516
w~~~~~~~~ ~~~~~~m rn~~~~~~ ~~nn~~m
~ I J BLACK WHITE
~r o. DTI -na No. ~
. IJJ:Q] -
. ~ [ill] . -. 1 Ground 1 Turn
signal indicator light (right)
1 -2 Engine coolant temperature gauge 2 ABS or RWAL indicator light 2 L
position
3 Tachometer 3 High-beam indicator light 3 2 position 4
Ground
4 High-beam
indicator light 4 3 position 6 Illumination light (+I 5 -5 D position
6 Illumination light(-) 6 Ground 6 N position 7 Winter drive 7 Speedometer 7 R position 8 Power drive, upshift 8 Speedometer 8 -9 Upshift 9 Oil pressure warning light 9 AfT shift control unit 10 -10 Brake warning light 10 P position 11 -11 Fuel warning light 12 Check engine 12 Charge warning light 13 Seat belt 13 Illumination (+) 14 StarterSW 14 Illumination (-) 15 4WD 15 Fuel gauge 16 Turn signal indicator light (left) 16 Oil pressure gauge
Fig. 8-343
Page 1516 of 1928
8-326 CHASSIS ELECTRICAL
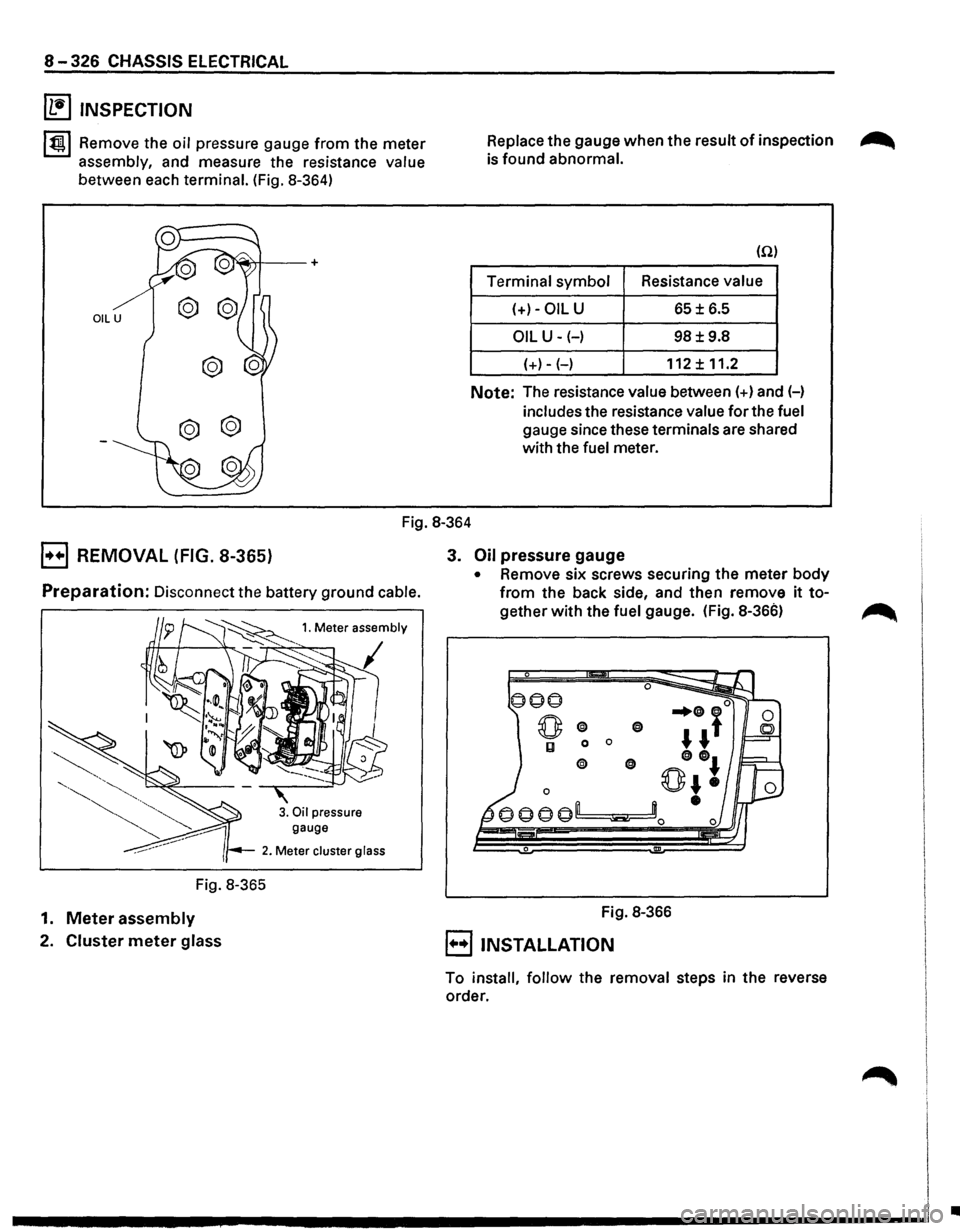
~ INSPECTION
l~l Remove the oil pressure gauge from the meter
assembly, and measure the resistance value
between each terminal. (Fig. 8-364)
Replace the gauge when the result of inspection ~
is found abnormal.
(Q)
Terminal symbol Resistance value
(+)-OIL U 65± 6.5
OIL U-(-) 98±9.8
{+)-{-) 112± 11.2
Note: The resistance value between {+)and(-)
includes the resistance value for the fuel
gauge since these terminals are shared
with the
fuel meter.
Fig. 8-364
B REMOVAL (FIG. 8-365)
Preparation: Disconnect the battery ground cable.
gauge
2. Meter cluster glass
Fig. 8-365
1.
Meter assembly
2. Cluster meter glass
3. Oil pressure gauge
• Remove six screws securing the meter body
from the back side, and then remove it to
gether with the fuel gauge. (Fig. 8-366)
Fig. 8-366
E) INSTALLATION
To install, follow the removal steps in the reverse
order.
•
Page 1517 of 1928
CHASSIS ELECTRICAL 8 -327
FUEL GAUGE
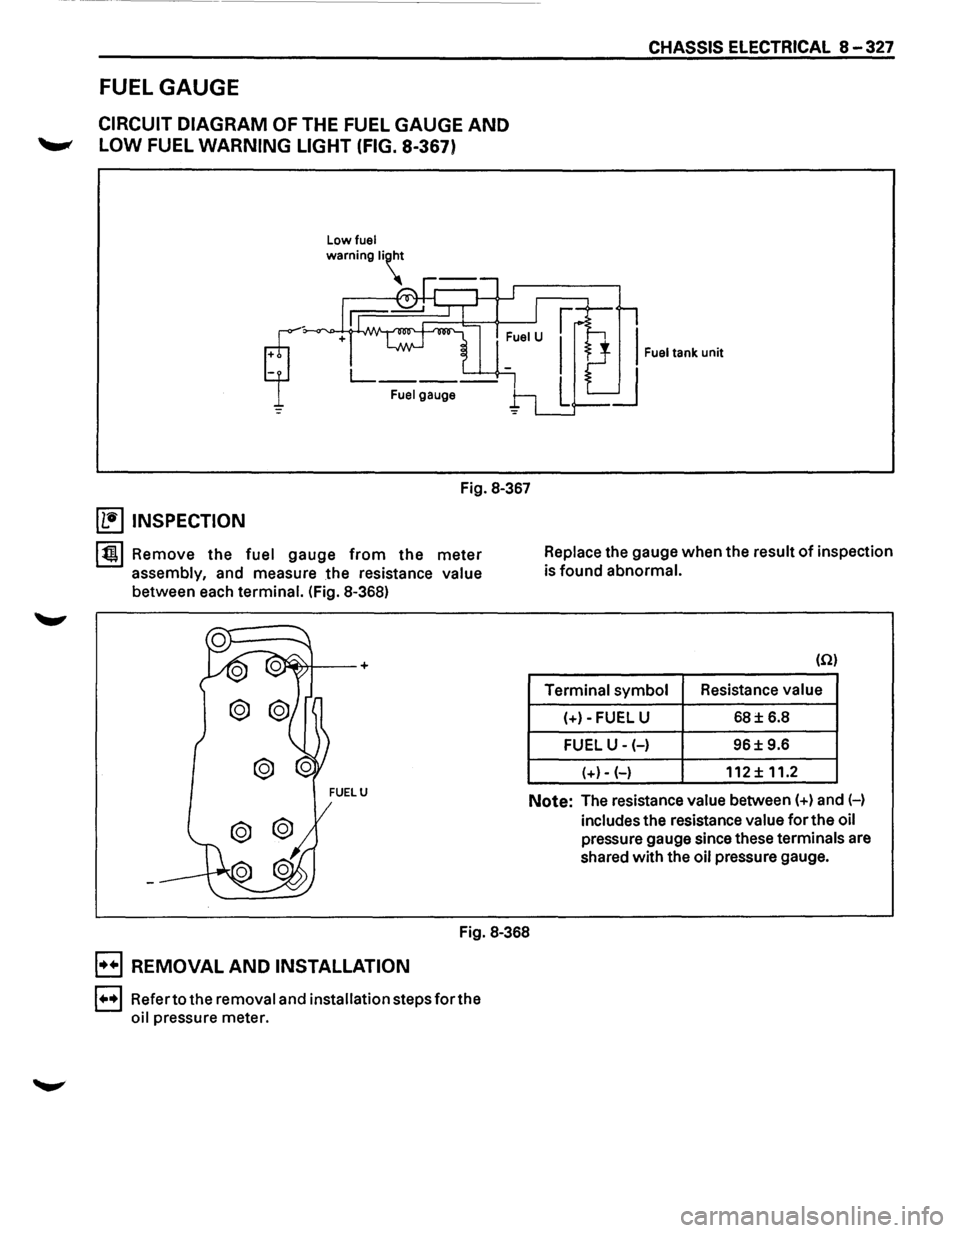
CIRCUIT DIAGRAM OF THE FUEL GAUGE AND
'--"' LOW FUEL WARNING LIGHT (FIG. 8-367)
Low fuel
Fuel gauge
Fig. 8-367
~ INSPECTION
lt!tl Remove the fuel gauge from the meter
assembly, and measure the resistance value
between each terminal. (Fig. 8-368) Replace
the gauge when the result
of inspection
is found abnormal.
(Q)
Terminal symbol Resistance
value
(+)-FUEL U
68± 6.8
FUEL U-(-) 96± 9.6
(+)- (-)
112 ± 11.2
Note: The resistance value between(+) and H
includes the resistance value
for the oil
pressure gauge since these terminals are
shared with the
oil pressure gauge.
Fig. 8-368
B REMOVAL AND INSTALLATION
1•,.1 Refer to the removal and installation steps for the
oil pressure meter.
Page 1521 of 1928
![ISUZU TROOPER 1995 Workshop Manual OIL PRESSURE UNIT
(1!] INSPECTION
Measure the resistance value ofthe oil pressure unit
with the circuit tester. (Fig. 8-377)
Replace the
unit when the result of inspection is found
abnorm](/img/61/57183/w960_57183-1520.png "ISUZU TROOPER 1995 Workshop Manual OIL PRESSURE UNIT
(1!] INSPECTION
Measure the resistance value ofthe oil pressure unit
with the circuit tester. (Fig. 8-377)
Replace the
unit when the result of inspection is found
abnorm")
OIL PRESSURE UNIT
(1!] INSPECTION
Measure the resistance value ofthe oil pressure unit
with the circuit tester. (Fig. 8-377)
Replace the
unit when the result of inspection is found
abnormal.
Pressure
(kPa)
Resistance value (Q)
Fig. 8-377
OIL PRESSURE SWITCH
(1!] INSPECTION
98 981
81 30
I~~ Check the continuity between the switch termi
nal and the body ground with the engine at idle.
(Fig. 8-378)
Replace the switch when the result
of inspection
is
found abnormal.
Fig. 8-378
CHASSIS ELECTRICAL 8-331
(1!] CIRCUIT INSPECTION (FIG. 8-379)
Fig. 8-379
1. Start the engine.
2. When disconnecting the oil pressure switch con
nector then connecting the harness side connec
tor to the ground, check to see if the oil pressure
warning light lights up.
When the
light will not light up, check the circuit
between the meter and the oil pressure switch,
and repair
an open circuit if necessary.
FUEL TANK UNIT
The tank unit varies the internal resistance according
to the float position (fluid level) to operate the fuel
meter needle.
It is also designed
to warn the driver of low fuel level
by illuminating the fuel warning light. (Fig. 8-380)
Fig. 8-380
Page 1522 of 1928
![ISUZU TROOPER 1995 Workshop Manual 8-332 CHASSIS ELECTRICAL
i1!]1NSPECTION
~1.
£ ·= 01 ~ N ~ !:!i E
E
E E
0 M (I) ..., ... ...
Check the resistance between the connector
terminals 1 [E[I and 2 [E[J while shifting
the fl](/img/61/57183/w960_57183-1521.png "ISUZU TROOPER 1995 Workshop Manual 8-332 CHASSIS ELECTRICAL
i1!]1NSPECTION
~1.
£ ·= 01 ~ N ~ !:!i E
E
E E
0 M (I) ..., ... ...
Check the resistance between the connector
terminals 1 [E[I and 2 [E[J while shifting
the fl")
8-332 CHASSIS ELECTRICAL
i1!]1NSPECTION
~1.
£ ·= 0'1 ~ N ~ !:!i E
E
E E
0 M (I) ..., ... ...
Check the resistance between the connector
terminals 1 [E[I and 2 [E[J while shifting
the float from "E" to "F" point.
When
the resistance shows no change, or
deflects largely from the specified value, re
place the fuel tank unit. (Fig. 8-381)
F
E .:: E~ ...... ...,::;
X
E
NOTE:
When the resistance value at E point is checked,
connect
the terminal 2 ~ to the battery (+) ter
minal and 1 [E[] to the battery (-) terminal under
the condition that ambient temperature is between
20°C and 30°C (68°F and 86°F).
.. ,
I I I
·-·
Float position Resistance value (Q)
F point 17 ± 0.8
1/2 point 45± 1.5
E
point 120±5
Fig. 8-381
2. Check the resistance value between the fuel tank 1++1 REMOVAL (FIG. 8-383) unit connector terminals 1 ~and 4 [£:[].
(Fig. 8-382) Preparation: Disconnect the battery ground cable.
Replace the fuel tank unit when the result of
inspection is found abnormal.
Float
position Terminal No. Resistance
value (Q)
X point Undercover (Light up point 1-4 35.9-18 of low fuel Fig.
8-383 warning light)
Fig. 8-382
Ill
Page 1523 of 1928
1. Fuel tank
• Refer to fuel tank removal steps in Section 6C
"ENGINE FUEL."
2. Fuel tank unit
• Disconnect the connectors.
• Remove the five screws.
B INSTALLATION
To install, follow the removal steps in the reverse
order.
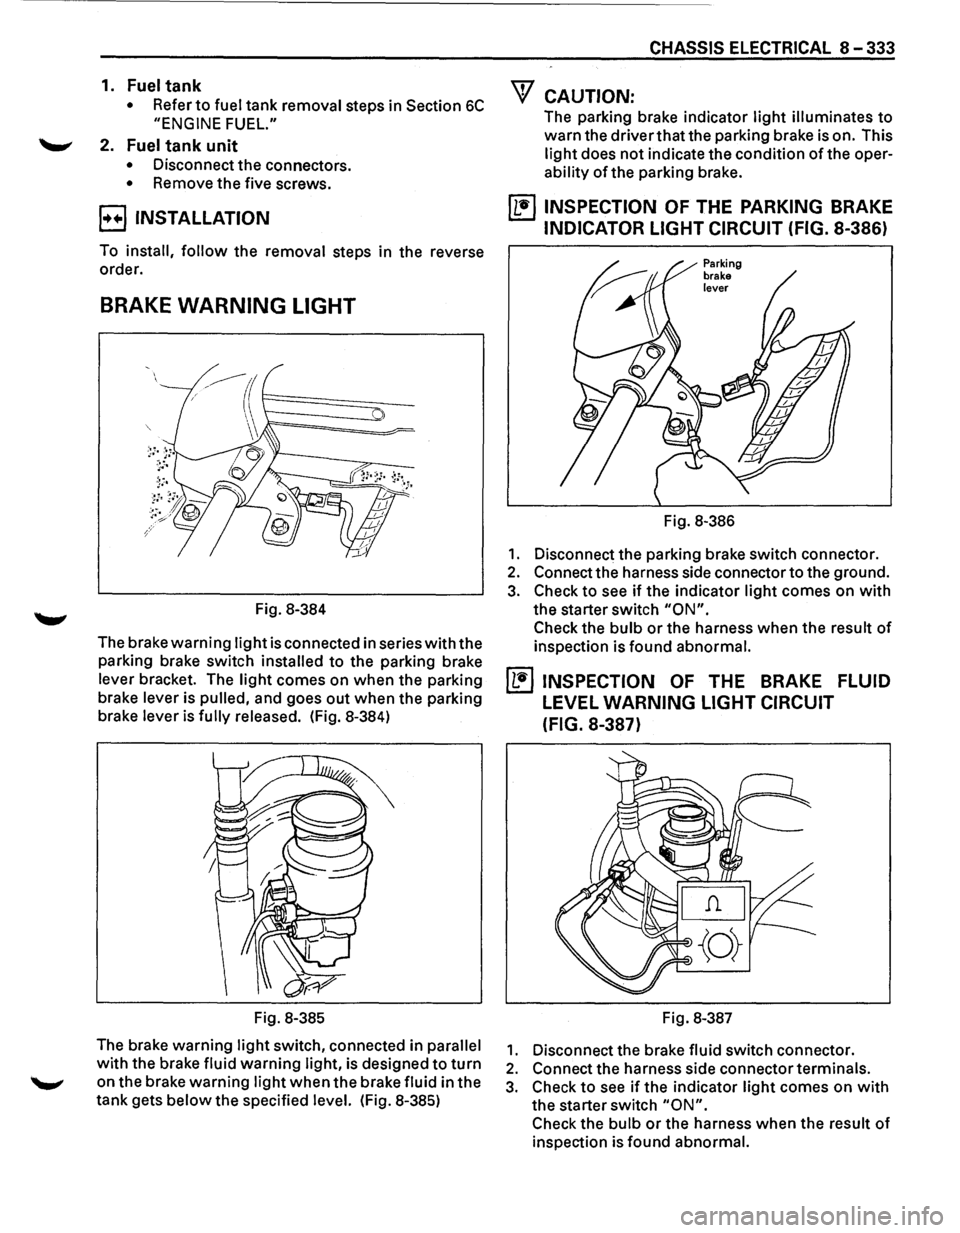
BRAKE WARNING LIGHT
Fig. 8-384
The brake
warning light is connected in series with the
parking brake switch
installed to the parking brake
lever bracket. The
light comes on when the parking
brake lever is
pulled, and goes out when the parking
brake lever is
fully released. (Fig. 8-384)
Fig. 8-385
The brake warning
light switch, connected in parallel
with the brake fluid warning light, is designed to turn
on the brake warning light when the brake fluid in the
tank gets
below the specified level. (Fig. 8-385)
CHASSIS ELECTRICAL 8-333
"f CAUTION:
The parking brake indicator light illuminates to
warn the driver that the parking brake is on. This
light does not indicate the condition of the oper
ability of the parking brake.
~ INSPECTION OF THE PARKING BRAKE
INDICATOR LIGHT CIRCUIT (FIG. 8-386)
Fig. 8-386
1. Disconnect the parking brake switch connector.
2. Connect the harness side connector to the ground.
3. Check to see if the indicator light comes on with
the starter switch "ON".
Check the bulb or the harness when the result of
inspection is found abnormal.
~ INSPECTION OF THE BRAKE FLUID
LEVEL WARNING LIGHT CIRCUIT
(FIG.
8-387)
Fig. 8-387
1. Disconnect the brake fluid switch connector.
2. Connect the harness side connector terminals.
3. Check to see if the indicator light comes on with
the starter switch "ON".
Check the bulb or the harness when the result of
inspection is found abnormal.
Page 1759 of 1928
BODY 10-1
SECTION 10
BODY
\V CAUTION : When fasteners are removed, always reinstall them at the same location from which they
were removed. If a fastener needs to be replaced, use the correct part number fastener for
that application. If the correct part number fastener is not available, a fastener of equal size
and strength (or stronger)
may be used. Fasteners must be used when installing fasteners
that require it. If the above conditions are not followed, parts of system damage could result.
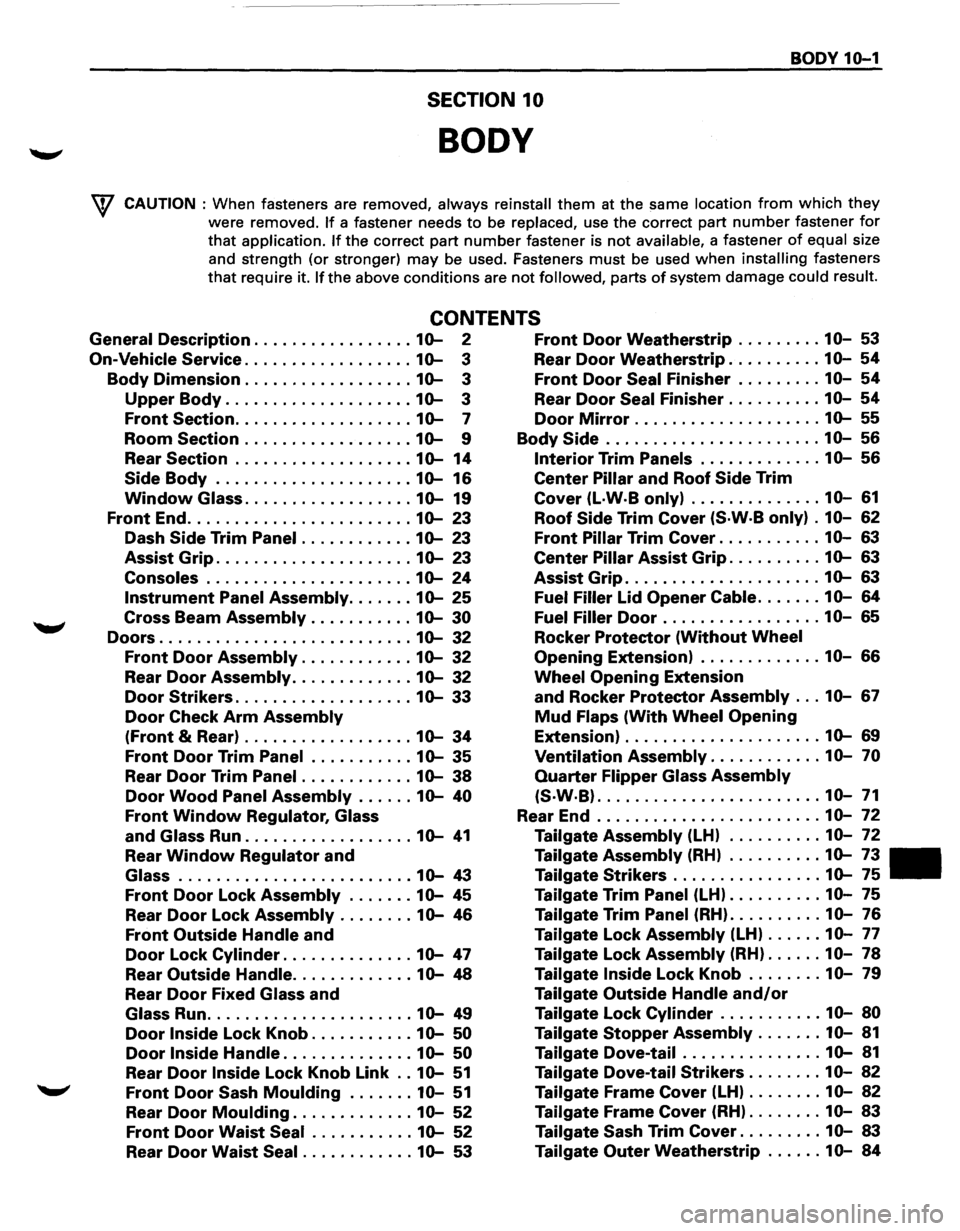
CONTENTS
General Description ................. 10-2 Front Door Weatherstrip ......... 10-53
On-Vehicle Service .................. 10-3 Rear Door Weatherstrip .......... 10-54
Body Dimension .................. 10-3 Front Door Seal Finisher ......... 10-54
Upper Body .................... 10-3 Rear Door Seal Finisher .......... 10-54
Front Section ................... 10-7 Door Mirror .................... 10-55
Room Section .................. 10-9 Body Side ....................... 10-56
Rear Section ................... 10-14 Interior Trim Panels ............. 10-56
Side Body ..................... 10-16 Center Pillar and Roof Side Trim
Window Glass .................. 10-19 Cover (L·W·B only) .............. 10-61
Front End ........................ 10-23 Roof Side Trim Cover (S·W·B only) . 10-62
Dash Side Trim Panel ............ 10-23 Front Pillar Trim Cover ........... 10-63
Assist Grip ..................... 10-23 Center Pillar Assist Grip .......... 10-63
Consoles ...................... 10-24 Assist Grip ..................... 10-63
Instrument Panel Assembly ....... 10-25 Fuel Filler lid Opener Cable ....... 10-64
Cross Beam Assembly ........... 10-30 Fuel Filler Door ................. 10-65
Doors ........................... 10-32 Rocker Protector (Without Wheel
Front Door Assembly ............ 10-32 Opening Extension) ............. 10-66
Rear Door Assembly ............. 10-32 Wheel Opening Extension
Door Strikers ................... 10-33 and Rocker Protector Assembly ... 10-67
Door Check Arm Assembly Mud Flaps (With Wheel Opening
(Front & Rear) .................. 10-34 Extension) ..................... 10-69
Front Door Trim Panel ........... 10-35 Ventilation Assembly ............ 10-70
Rear Door Trim Panel ............ 10-38 Quarter Flipper Glass Assembly
Door Wood Panel Assembly ...... 10-40 (S·W·B) ........................ 10-71
Front Window Regulator, Glass Rear End ........................ 10-72
and Glass Run .................. 10-41 Tailgate Assembly (LH) .......... 10-72
Rear Window Regulator and Tailgate Assembly (RH) .......... 10-73
Glass ......................... 10-43 Tailgate Strikers ................ 10-75
Front Door Lock Assembly ....... 10-45 Tailgate Trim Panel (LH) .......... 10-75
Rear Door Lock Assembly ........ 10-46 Tailgate Trim Panel (RH) .......... 10-76
Front Outside Handle and Tailgate Lock Assembly (LH) ...... 10-77
Door Lock Cylinder .............. 10-47 Tailgate Lock Assembly (RH) ...... 10-78
Rear Outside Handle ............. 10-48 Tailgate Inside Lock Knob ........ 10-79
Rear Door Fixed Glass and Tailgate Outside Handle and/or
Glass Run ...................... 10-49 Tailgate Lock Cylinder ........... 10-80
Door Inside Lock Knob ........... 10-50 Tailgate Stopper Assembly ....... 10-81
Door Inside Handle .............. 10-50 Tailgate Dove-tail ............... 10-81
Rear Door Inside Lock Knob Link .. 10-51 Tailgate Dove-tail Strikers ........ 10-82
Front Door Sash Moulding ....... 10-51 Tailgate Frame Cover (LH) ........ 10-82
Rear Door Moulding ............. 10-52 Tailgate Frame Cover (RH) ........ 10-83
Front Door Waist Seal ........... 10-52 Tailgate Sash Trim Cover ......... 10-83
Rear Door Waist Seal ............ 10-53 Tailgate Outer Weatherstrip ...... 10-84
Page 1782 of 1928
10-24 BODY
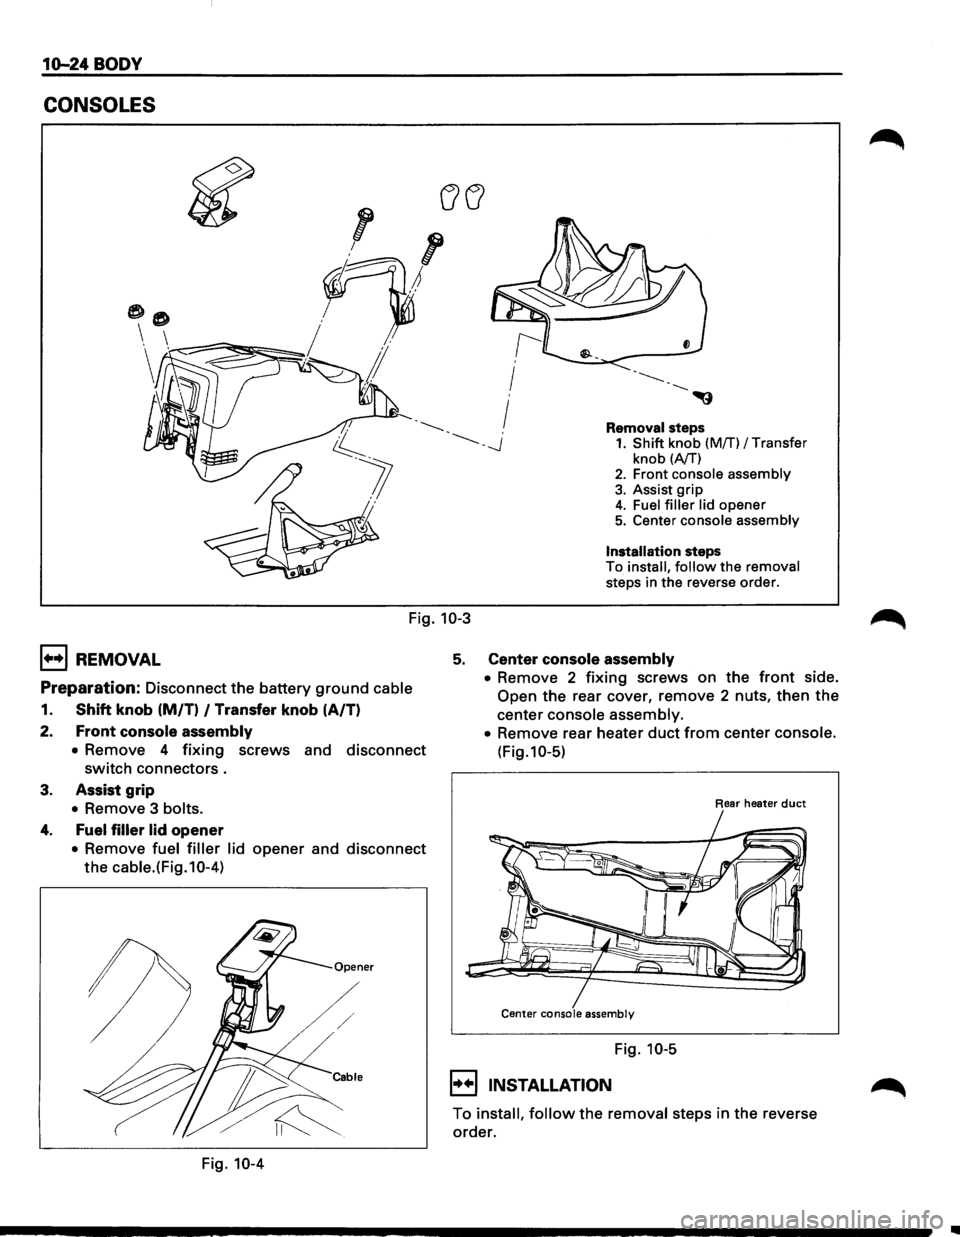
CONSOLES
Removal steps 1. Shift knob (Mff) I Transfer
knob (A/T) 2. Front console assembly
3. Assist grip 4. Fuel filler lid opener 5. Center console assembly
Installation steps
To install, follow the removal
steps in the reverse order.
Fig. 10-3
1+•1 REMOVAL
Preparation: Disconnect the battery ground cable
1. Shift knob (M/T) I Transfer knob (A/T)
2.
Front console assembly
• Remove 4 fixing screws and disconnect
switch connectors.
3. Assist grip
• Remove 3 bolts.
4. Fuel filler lid opener
• Remove fuel filler lid opener and disconnect
the cable.(Fig.10-4)
Fig. 10-4
5. Center console assembly
• Remove 2 fixing screws on the front side.
Open the rear cover, remove 2 nuts, then the
center console assembly.
•
Remove rear heater duct from center console.
(Fig.10-5)
Rear heater duct
Center console assembly
Fig. 10-5
I••IINSTALLATION
To install, follow the removal steps in the reverse
order.