light ISUZU TROOPER 1995 Workshop Manual
[x] Cancel search | Manufacturer: ISUZU, Model Year: 1995, Model line: TROOPER, Model: ISUZU TROOPER 1995Pages: 1928
Page 1272 of 1928
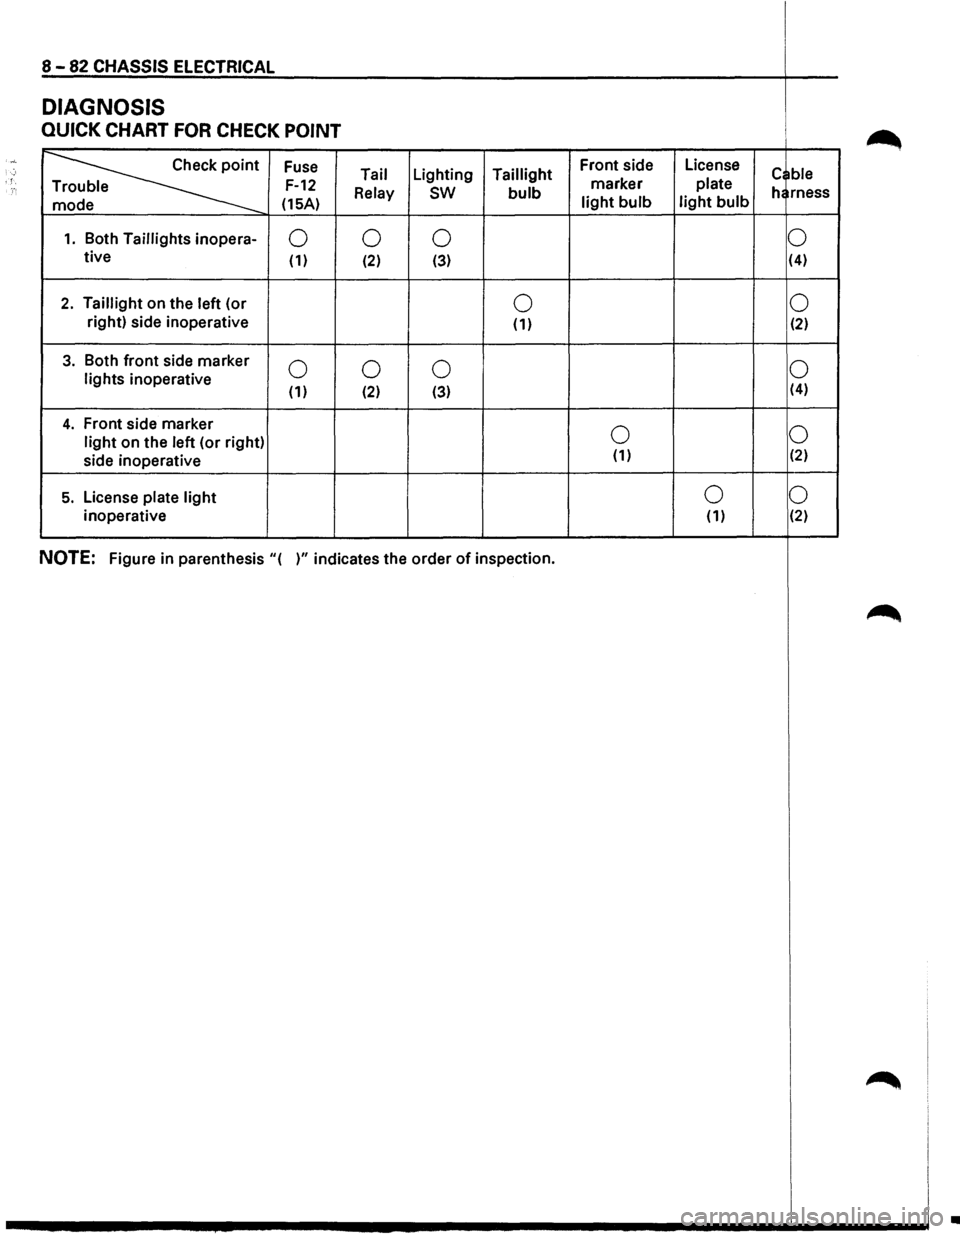
8 -82 CHASSIS ELECTRICAL
DIAGNOSIS
QUICK CHART FOR CHECK POINT
·~··
~
Fuse Front
side License ; Tail Lighting
Taillight
marker plate c ble '. F-12 e
Relay sw bulb he rness
e (15A) light bulb light bulb
1. Both Taillights inopera-0
0
0 0 tive (1) (2) (3) (4)
2. Taillight
on the left (or 0 0 right)
side inoperative
(1) (2)
3. Both front side marker 0 0
0 0 lights inoperative (1) (2) (3) (4)
4. Front
side marker 0 0 light on
the left (or right)
side inoperative (1) (2)
5. License plate light 0
0
inoperative (1) (2)
NOTE: Figure
in parenthesis "( )" indicates the order of inspection.
~
~
•
Page 1273 of 1928
CHASSIS ELECTRICAL 8 -83
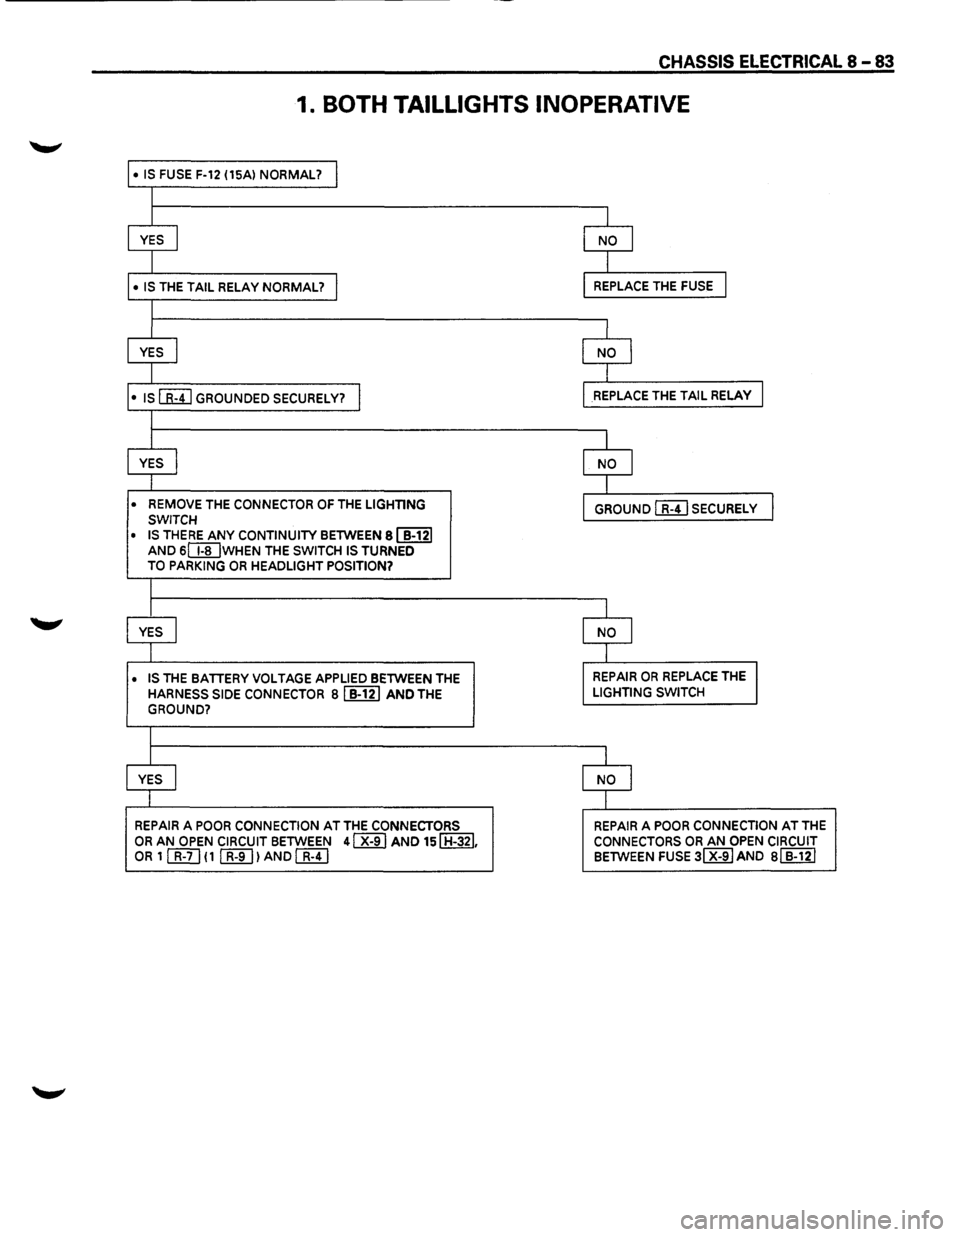
1. BOTH TAILLIGHTS INOPERATIVE
• IS FUSE F-12 (15Al NORMAL? I
I
I
I
YES I NO I
I I
• IS THE TAIL RELAY NORMAL? I REPLACE THE FUSE I
I
I
I
YES I NO I
I I
•
IS[&!] GROUNDED SECURELY? I REPLACE THE TAIL RELAY I
I
I
l
YES I NO I
I I
• REMOVE
THE CONNECTOR OF THE LIGHTING GROUND I R-41 SECURELY I SWITCH
• IS THERE ANY CONTINUITY BETWEEN 81 B-121
AND SIT[] WHEN THE SWITCH IS TURNED
TO PARKING OR HEADLIGHT POSITION?
l
I I
YES I NO I
I I
• IS
THE BATTERY VOLTAGE APPLIED BETWEEN THE REPAIR OR REPLACE THE I
HARNESS SIDE CONNECTOR Bl B-121 AND THE LIGHTING SWITCH
GROUND?
I
I I
YES
I NO I
I I
REPAIR
A POOR CONNECTION AT THE CONNECTORS REPAIR A POOR CONNECTION AT THE
OR AN OPEN CIRCUIT BETWEEN 41 X-91 AND 151 H-321. CONNECTORS OR AN OPEN CIRCUIT OR 1 [friJ ( 1 (K[]) AND[&!] BETWEEN FUSE 31 X-9IAND Bl B-121
Page 1274 of 1928
8 -84 CHASSIS ELECTRICAL
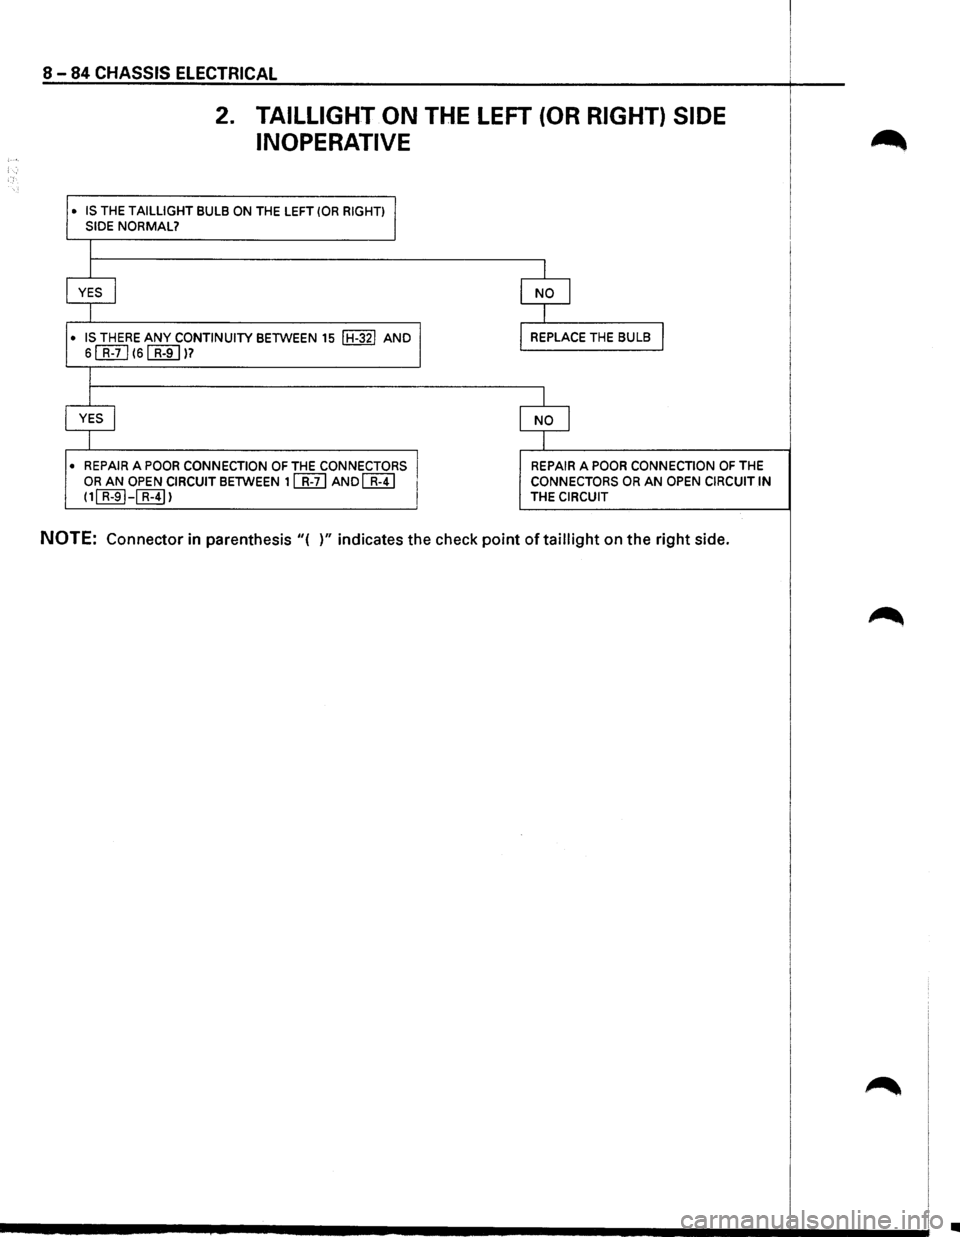
2. TAILLIGHT ON THE LEFT (OR RIGHT) SIDE
INOPERATIVE
• IS THE TAILLIGHT BULB ON THE LEFT (OR RIGHT) I SIDE NORMAL?
I
j
YES I
I
• IS THERE ANY CONTINUITY BETWEEN 15 IH-32! AND
6 []]] 161 R-9 I )7
I
I
YES I
I
• REPAIR A POOR CONNECTION OF THE CONNECTORS I OR AN OPEN CIRCUIT BETWEEN 11 R-71 AND c::&!] 1
11[]]]-~1 I
I
NO I
I
REPLACE THE BULB I
I
NO I
I
REPAIR A POOR CONNECTION OF THE
CONNECTORS OR AN OPEN CIRCUIT IN THE CIRCUIT
NOTE: Connector in parenthesis "( )" indicates the check point oftaillight on the right side.
•
Page 1275 of 1928
CHASSIS ELECTRICAL 8-85
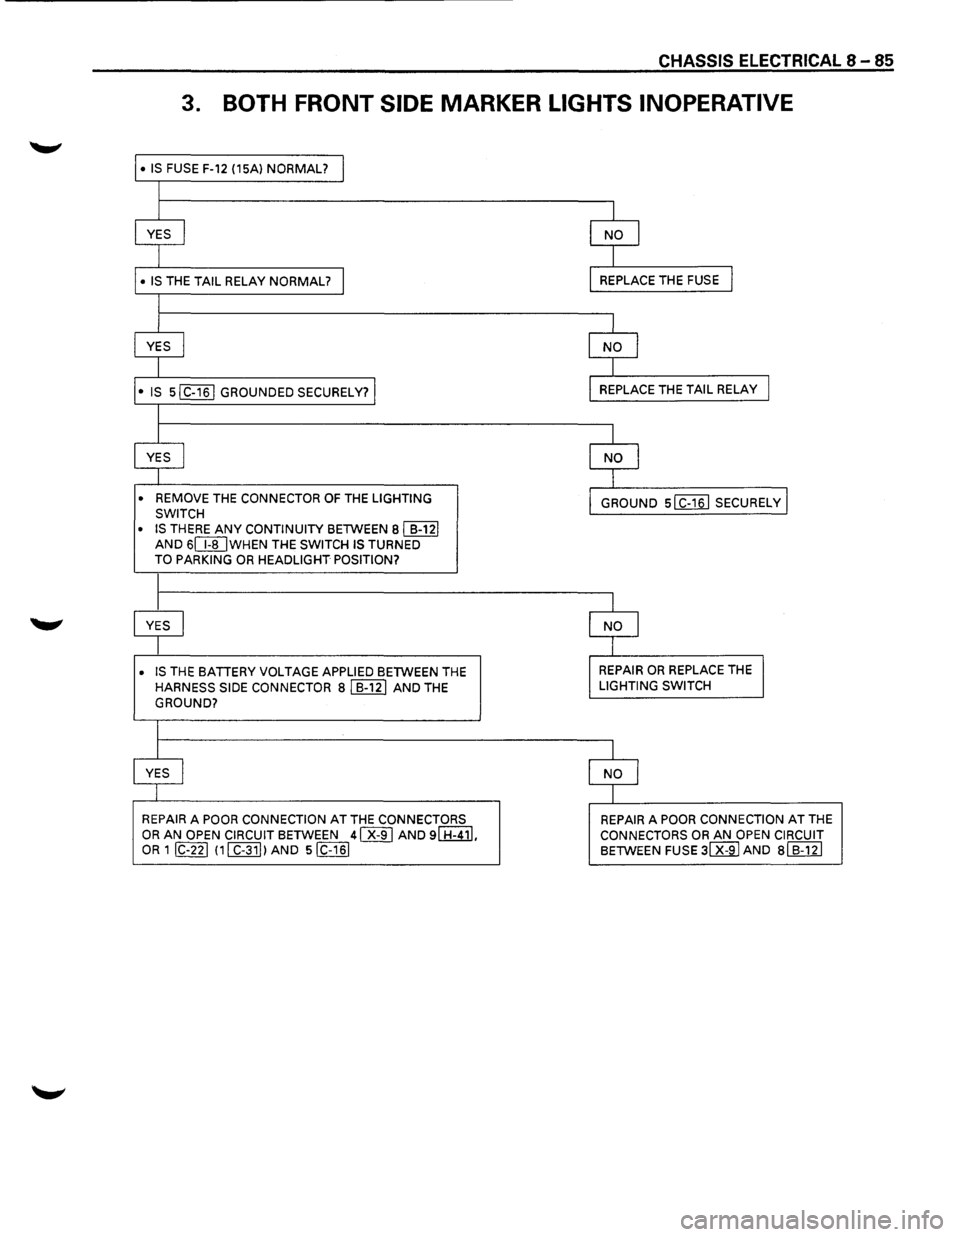
3. BOTH FRONT SIDE MARKER LIGHTS INOPERATIVE
• IS FUSE F-12 (15Al NORMAL? I
l
I I
YES I NO I
I I
• IS THE TAIL RELAY NORMAL? I REPLACE THE FUSE I
l
I I
YES I NO I
I I
• IS sl C-161 GROUNDED SECURELY? I REPLACE THE TAIL RELAY I
I
I
I
YES I NO I
I I
• REMOVE THE CONNECTOR OF THE LIGHTING
GROUND slc-16l SECURELY I SWITCH
• IS
THERE ANY CONTINUITY BETWEEN Bl B-121 AND 6CI[JWHEN THE SWITCH IS TURNED TO PARKING OR HEADLIGHT POSITION?
I
I I
YES I NO I
I I
• IS THE BATTERY VOLTAGE APPLIED BETWEEN THE REPAIR OR REPLACE THE I
HARNESS SIDE CONNECTOR Bl B-121 AND THE LIGHTING SWITCH
GROUND?
I
I
I
YES I NO 1
I I
REPAIR A POOR CONNECTION AT THE CONNECTORS REPAIR A POOR CONNECTION AT THE
OR AN OPEN CIRCUIT BETWEEN 41 X-91 AND 91 H-411, CONNECTORS OR AN OPEN CIRCUIT OR 1 IC-221 111 C-311 lAND siC-161 BETWEEN FUSE 31 X-91 AND al B-121
Page 1276 of 1928
8-86 CHASSIS ELECTRICAL
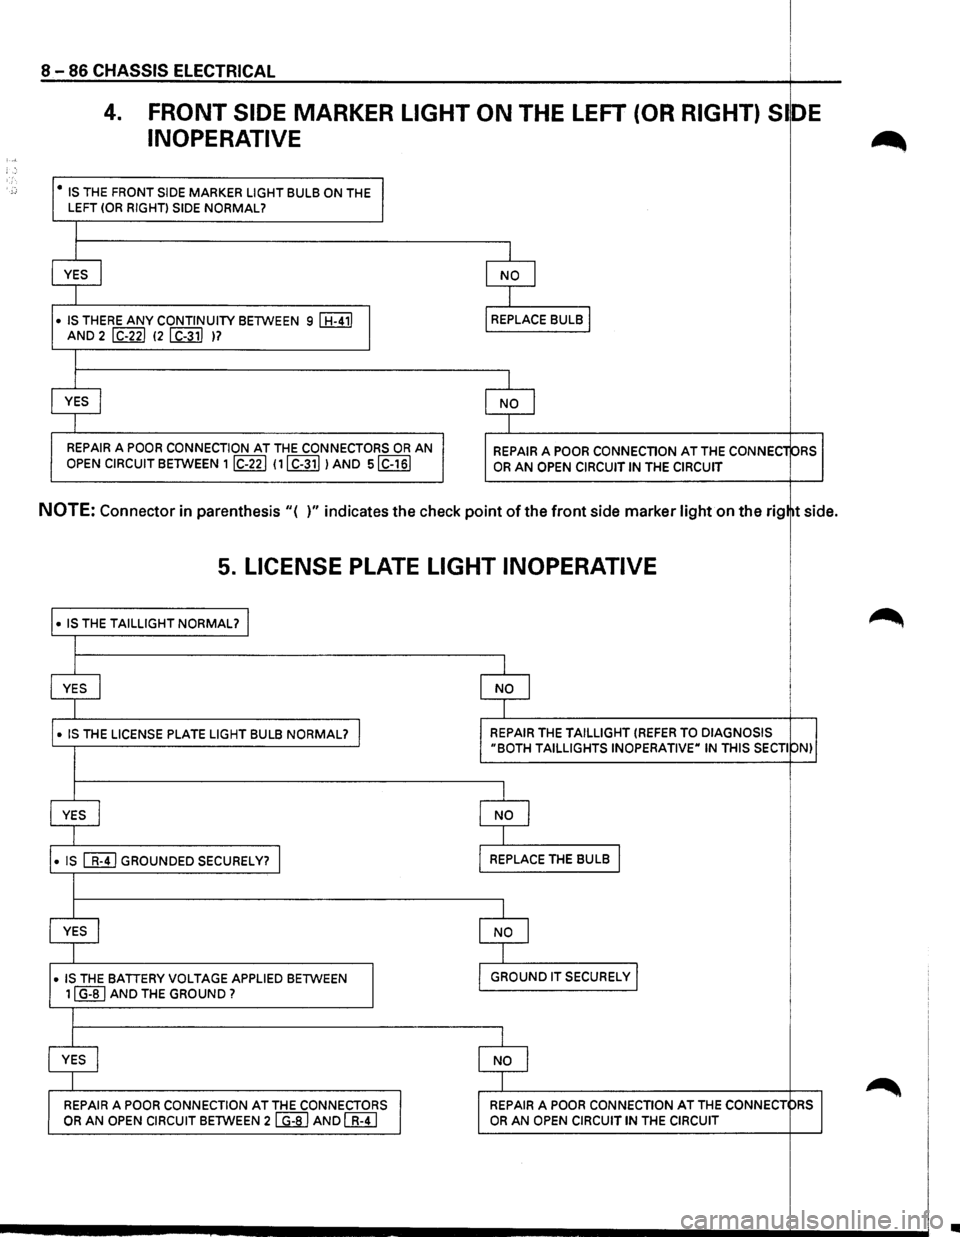
4. FRONT SIDE MARKER LIGHT ON THE LEFT (OR RIGHT) Sl DE
INOPERATIVE ~ :,, '.
;:: • IS THE FRONT SIDE MARKER LIGHT BULB ON THE I LEFT (OR RIGHT) SIDE NORMAL?
I
YES
I NO I
I
• IS THERE ANY CONTINUITY BETWEEN 9 I H-411
I
REPLACE BULB I
AND 2 I C-221 (2 I C-311 )?
I
YES
I NO I
I
REPAIR
A POOR CONNECTION AT THE CONNECTORS OR AN REPAIR A POOR CONNECTION AT THE CONNEC1 ORS
OPEN CIRCUIT BETWEEN 1 IC-221 111 C-311 I AND siC-161 OR AN OPEN CIRCUIT IN THE CIRCUIT
NOTE: Connector in parenthesis "( )" indicates the check point of the front side marker light on the rig tside.
5. LICENSE PLATE LIGHT INOPERATIVE
• IS THE TAILLIGHT NORMAL? I ~
I
YES I I NO I
I
•
IS THE LICENSE PLATE LIGHT BULB NORMAL? I I REPAIR THE TAILLIGHT (REFER TO DIAGNOSIS "BOTH TAILLIGHTS INOPERATIVE" IN THIS SECTI ON) I
I
YES j I NO l
I
• IS [[!]GROUNDED SECURELY? I I REPLACE
THE BULB I
I
YES I
I NO I
I
• IS THE BATTERY VOLTAGE APPLIED BETWEEN
I
I GROUND IT SECURELY I
I 11 G-BI AND THE GROUND? I
I
I YES I
I NO
I ~ I REPAIR A POOR CONNECTION AT THE CONNECTORS I I REPAIR A POOR
CONNECTION AT THE CONNECT pRS OR AN OPEN
CIRCUIT BETWEEN 2 I G-81 AND [fl;TI OR AN OPEN CIRCUIT IN THE CIRCUIT
•
Page 1277 of 1928
LIGHTING SWITCH
Refer to "HEADLIGHT AND FOG LIGHT" in this
~ section.
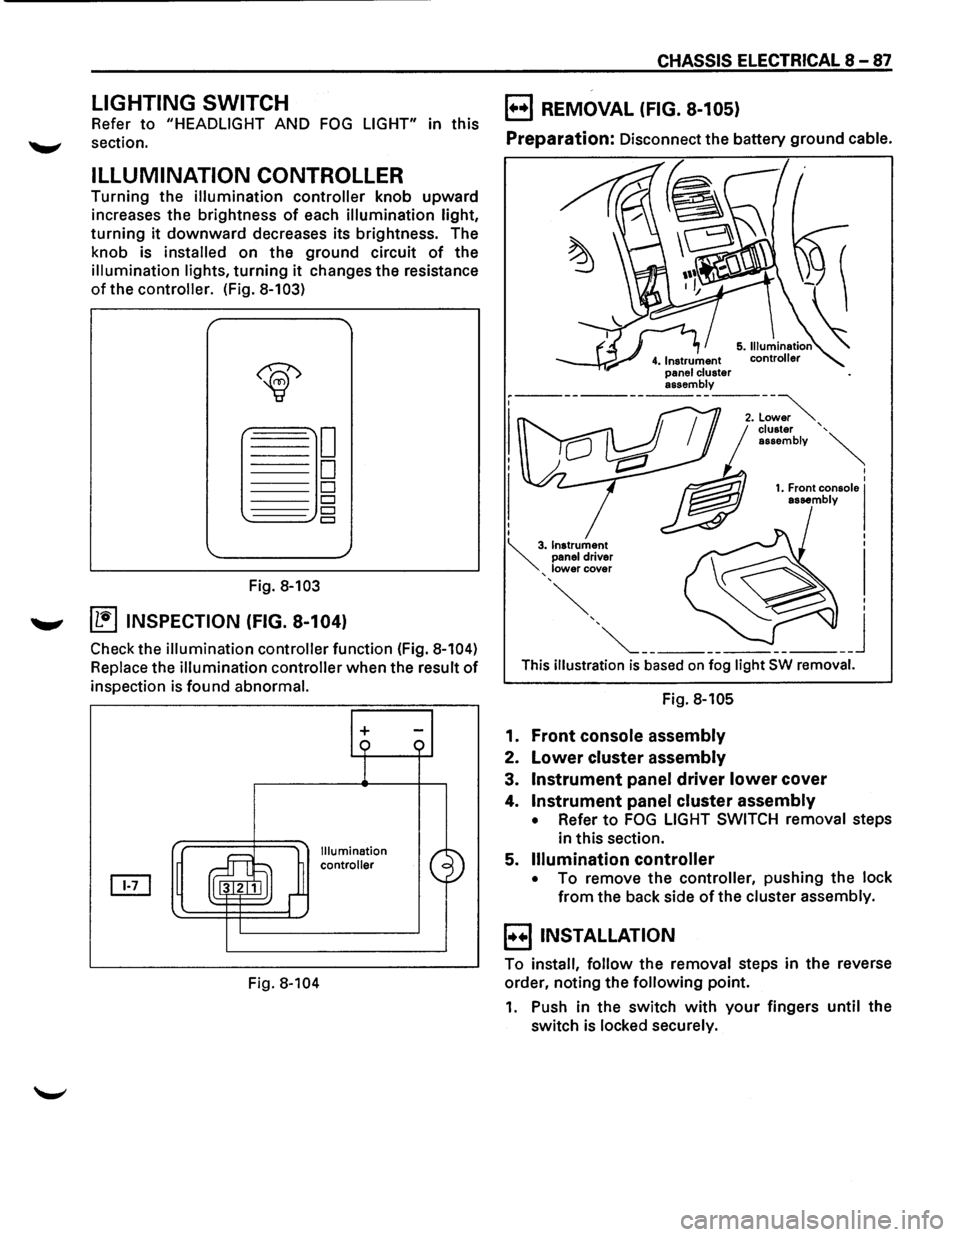
ILLUMINATION CONTROLLER
Turning the illumination controller knob upward
increases the brightness
of each illumination light,
turning it downward decreases its brightness. The
knob is
installed on the ground circuit of the
illumination lights, turning it changes the resistance
of the controller. (Fig. 8-103)
Fig. 8-103
....._., ~ INSPECTION (FIG. 8-104)
Check the illumination controller function (Fig. 8-104)
Replace the illumination controller when the result of
inspection is found abnormal.
Fig.
8-104
+
Illumination
controller
CHASSIS ELECTRICAL 8-87
B REMOVAL (FIG. 8-105)
Preparation: Disconnect the battery ground cable.
This illustration is based on fog light SW removal.
Fig. 8-105
1. Front console assembly
2. Lower cluster assembly
3. Instrument panel driver lower cover
4. Instrument panel cluster assembly
• Refer to FOG LIGHT SWITCH removal steps
in this section.
5.
Illumination controller
• To remove the controller, pushing the lock
from the back side of the cluster assembly.
B INSTALLATION
To install, follow the removal steps in the reverse
order, noting the
following point.
1. Push in the switch with your fingers until the
switch is locked securely.
Page 1278 of 1928
8 -88 CHASSIS ELECTRICAL
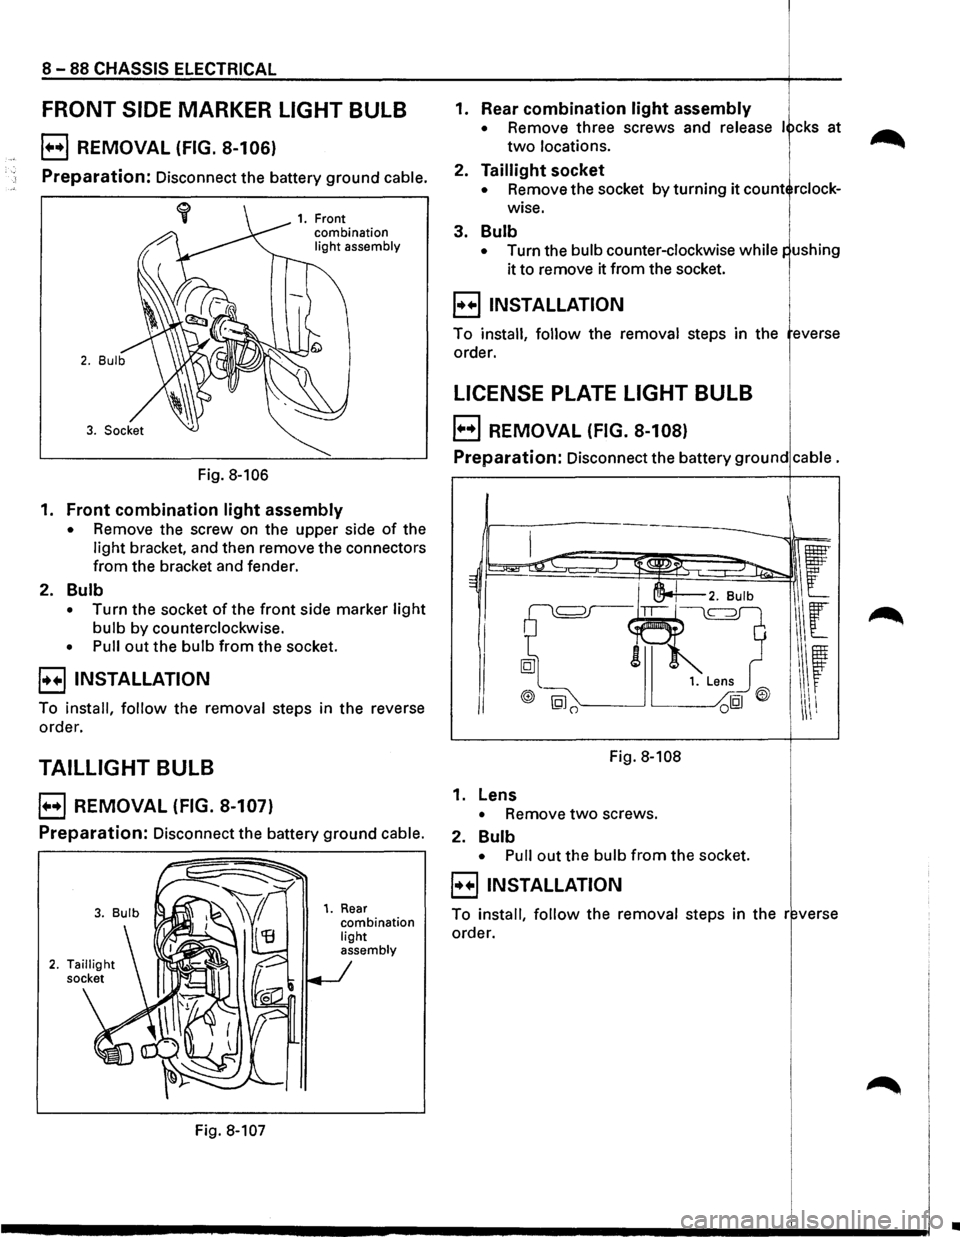
FRONT SIDE MARKER LIGHT BULB
E) REMOVAL (FIG. 8-106)
Preparation: Disconnect the battery ground cable.
Fig. 8-106
1. Front
combination
light assembly
1. Front combination light assembly
• Remove the screw on the upper side of the
light bracket, and then remove the connectors
from the bracket and fender.
2. Bulb
• Turn the socket of the front side marker light
bulb by counterclockwise.
• Pull out the bulb from the socket.
8 INSTALLATION
To install, follow the removal steps in the reverse
order.
TAILLIGHT BULB
EJ REMOVAL (FIG. 8-107)
Preparation: Disconnect the battery ground cable.
Fig. 8-107
1. Rear combination light
assembly
1. Rear combination light assembly
• Remove three screws and release I cks at
two locations.
2. Taillight socket
• Remove the socket by turning it count rclock
wise.
3. Bulb
• Turn the bulb counter-clockwise while
it to remove it from the socket.
8 INSTALLATION i
To install, follow the removal steps in the everse
order.
LICENSE PLATE LIGHT BULB 1.
E) REMOVAL (FIG. 8-108)
Preparation: Disconnect the battery ground cable.
Fig. 8-108
1. Lens
• Remove two screws.
2.
Bulb
• Pull out the bulb from the socket.
8 INSTALLATION
To install, follow the removal steps in the r verse
order.
..
Page 1279 of 1928
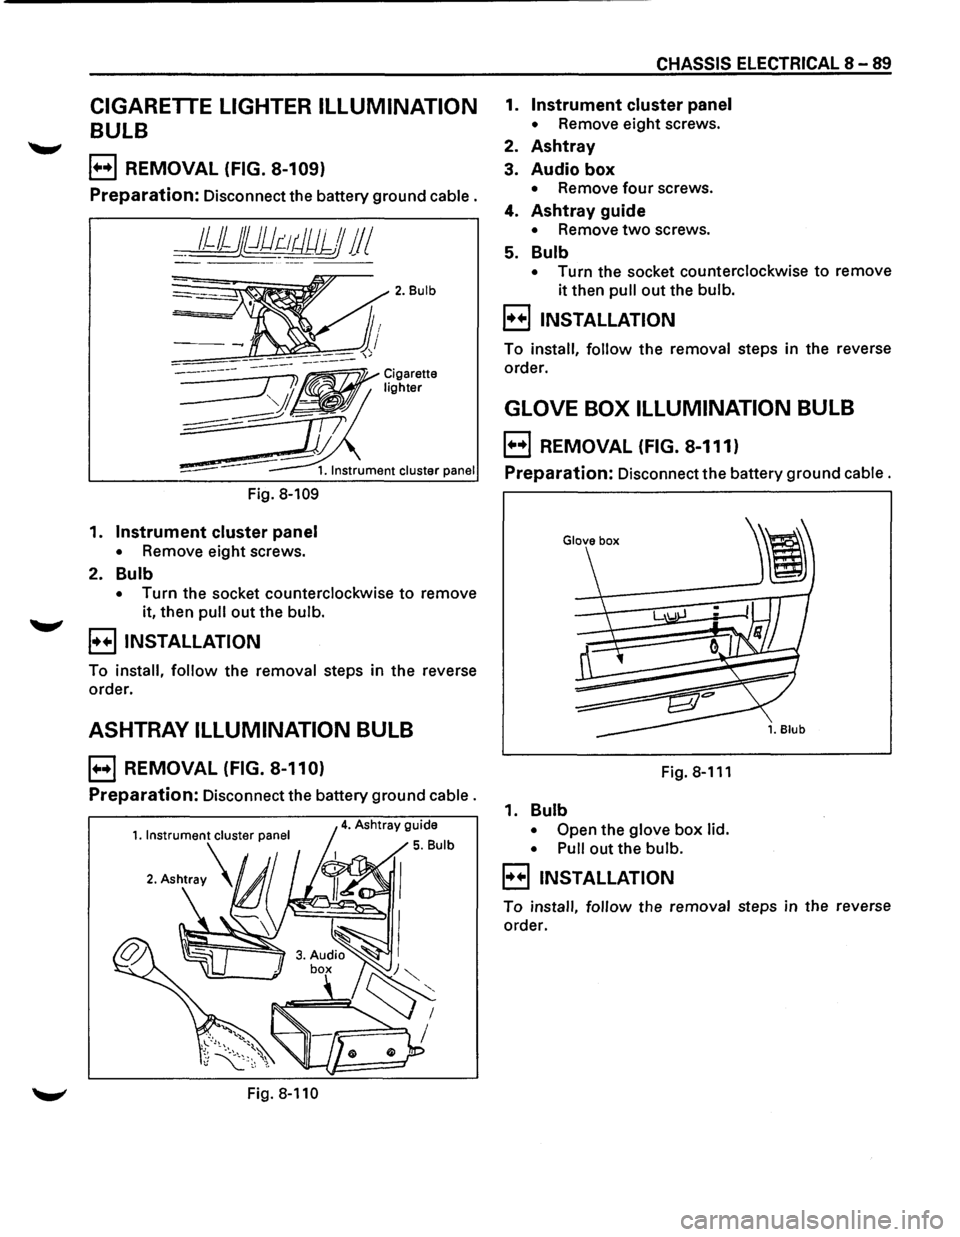
CIGARETTE LIGHTER ILLUMINATION
BULB
E) REMOVAL (FIG. 8-109)
Preparation: Disconnect the battery ground cable.
__ 1JJjj})dr:-~tJUJJJ 11 I
Fig. 8-109
1. Instrument cluster panel
• Remove eight screws.
2. Bulb
2. Bulb
• Turn the socket counterclockwise to remove
it, then
pull out the bulb.
B INSTALLATION
To install, follow the removal steps in the reverse
order.
ASHTRAY ILLUMINATION BULB
E) REMOVAL (FIG. 8-110)
Preparation: Disconnect the battery ground cable.
Fig. 8-110
CHASSIS ELECTRICAL 8-89
1. Instrument cluster panel
• Remove eight screws.
2. Ashtray
3. Audio box
• Remove four screws.
4. Ashtray guide
• Remove two screws.
5. Bulb
• Turn the socket counterclockwise to remove
it then pull out the bulb.
B INSTALLATION
To install, follow the removal steps in the reverse
order.
GLOVE BOX ILLUMINATION BULB
E) REMOVAL (FIG. 8-111)
Preparation: Disconnect the battery ground cable.
Fig.8-111
1. Bulb
• Open the glove box lid.
• Pull
out the bulb.
B INSTALLATION
To install, follow the removal steps in the reverse
order.
Page 1282 of 1928
I
8 -92 CHASSIS ELECTRICAL I
STOPLIGHT AND REAR DEFOGGER I
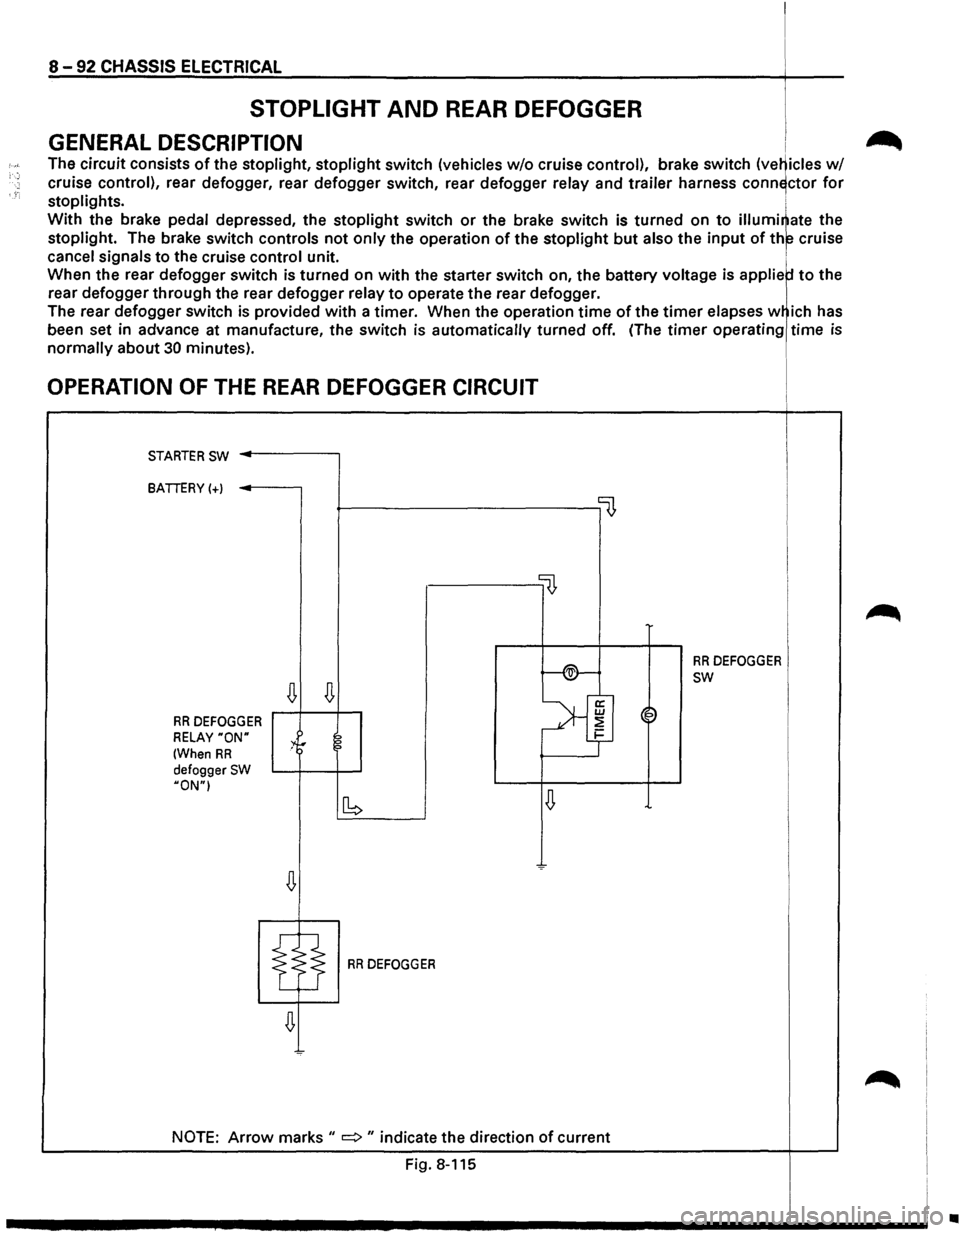
GENERAL DESCRIPTION i .-_
The circuit consists of the stoplight, stoplight switch (vehicles w/o cruise control), brake switch (ve~icles w/
cruise control), rear defogger, rear defogger switch, rear defogger relay and trailer harness conn~ctor for
stoplights. i
With the brake pedal depressed, the stoplight switch or the brake switch is turned on to illumi~ate the
stoplight. The brake switch controls not only the operation of the stoplight but also the input of th~ cruise
cancel signals to the cruise control unit. 1
When the rear defogger switch is turned on with the starter switch on, the battery voltage is applie to the
rear
defogger through the rear defogger relay to operate the rear defogger.
The rear
defogger switch is provided with a timer. When the operation time of the timer elapses w ich has
been set in advance at manufacture,
the switch is automatically turned off. (The timer operating time is
normally about 30 minutes).
OPERATION OF THE REAR DEFOGGER CIRCUIT
STARTER SW ..------,
BATTERY(+)
~----------------0
llJ,
f-®-
RR DEFOGGER
~
SW
~
>'f RR DEFOGGER ~~
RELAY "ON" :4r 2 1-
(When RR ?
defogger SW HON"I
~ [b
RR DEFOGGER
NOTE: Arrow marks II => II indicate the direction of current
Fig. 8-115
~
•
Page 1283 of 1928
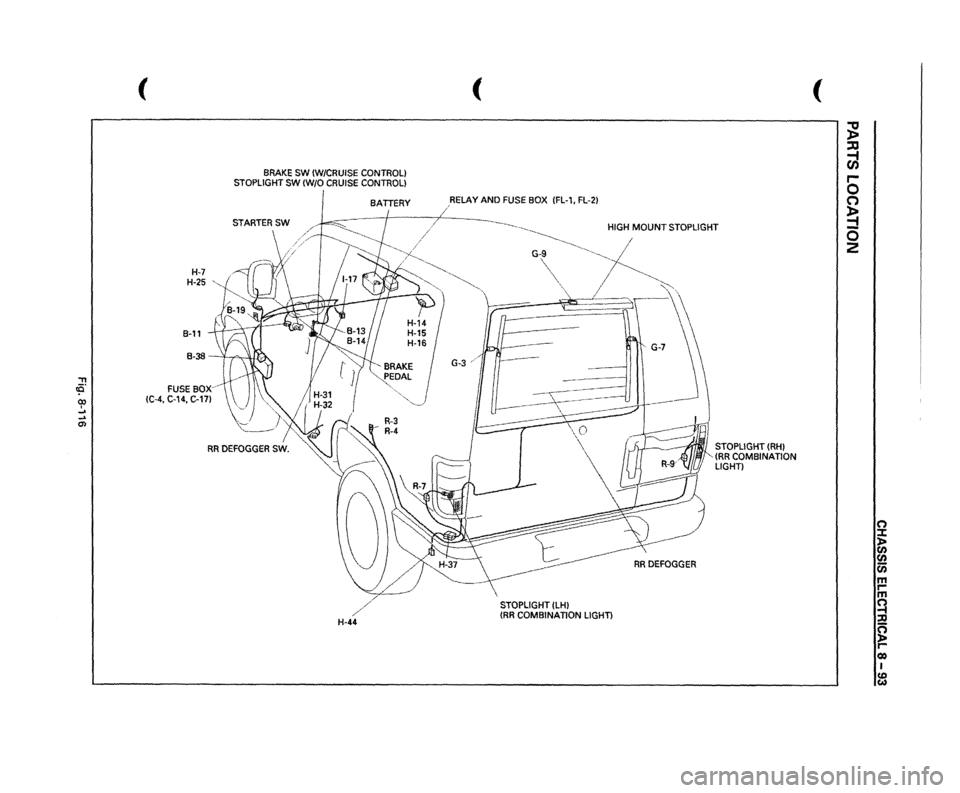
"T1 tO. 00 I _. ... 0>
(
H-7 H-25
,,
B-11
BRAKE
SW
(W/CRUISE
CONTROL)
STOPLIGHT
SW
(W/0
CRUISE
CONTROL) BATTERY
B-38
-
'I ,....., , lUI,).,.
FUSE
sox~
!C-4,
C-14,
C-17l
/
H-44
(
,RELAY
AND
FUSE
BOX
IFL-1,
FL-21
/
~----._
HIGH
MOUNT
STOPLIGHT
~-----
~
G-,~,
~-~------
-~,
I
"~
'
RRDEFOGGER
STOPLIGHT
(LHI
{RR
COMBINATION
LIGHT)
STOPLIGHT
(RHI
(RR
COMBINATION
LIGHT)
(
;g ::xJ ~ r-0 (') ~ -0 2
(') ::t l> en
en en m rm ~ ::Jl ~ Cl) I CD w