brake ISUZU TROOPER 1995 Workshop Manual
[x] Cancel search | Manufacturer: ISUZU, Model Year: 1995, Model line: TROOPER, Model: ISUZU TROOPER 1995Pages: 1928
Page 1287 of 1928
CHASSIS ELECTRICAL 8 -97
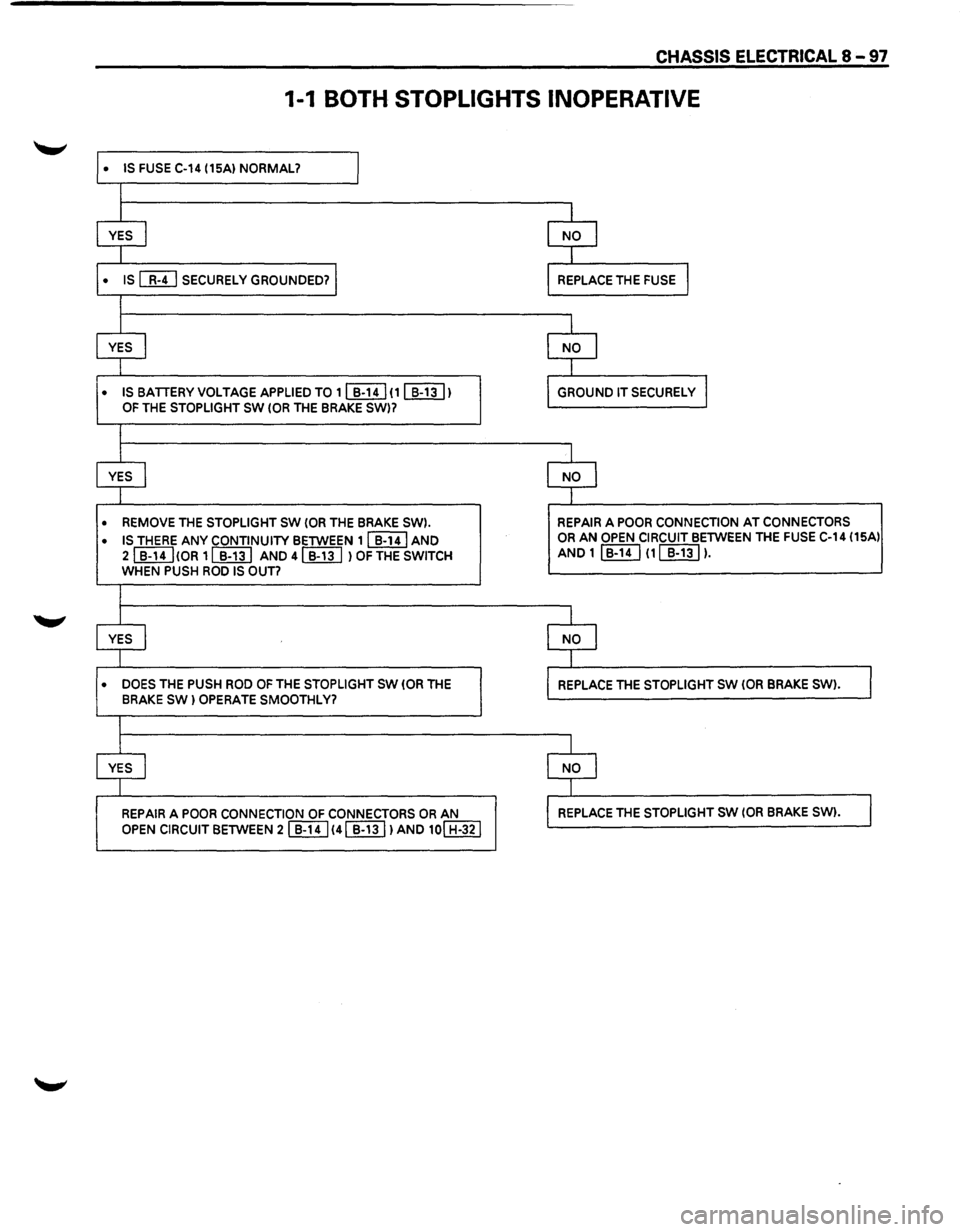
1-1 BOTH STOPLIGHTS INOPERATIVE
• IS FUSE C-14 (15A) NORMAL? I
l
l l
YES I NO l
I I
• IS [MJ SECURELY GROUNDED? I REPLACE THE FUSE l
I
I I
YES I NO I
I 1
• IS BATTERY VOLTAGE APPLIED TO 1 ~ (1 [[ill) GROUND IT SECURELY I OF THE STOPLIGHT SW (OR THE BRAKE SW)7
I
I I
YES I NO l
I I
• REMOVE THE STOPLIGHT SW (OR THE BRAKE SW). REPAIR A POOR CONNECTION AT CONNECTORS
• IS THERE ANY CONTINUITY BETWEEN 11 B-141 AND OR AN OPEN CIRCUIT BETWEEN THE FUSE C-14 (15Al
21 B-14I!OR 11 B-131 AND
4 ~ l OF THE SWITCH AND 1 I B-14 I (1 ~ ).
WHEN PUSH ROO IS OUT?
I
I I
YES I NO I
I T
• DOES THE PUSH ROD OF THE STOPLIGHT SW (OR THE REPLACE THE STOPLIGHT SW (OR BRAKE SW) . 1 BRAKE SW) OPERATE SMOOTHLY?
I
I I
YES I NO I
J -1
REPAIR A POOR CONNECTION OF CONNECTORS OR AN REPLACE THE STOPLIGHT SW (OR BRAKE SW). I OPEN CIRCUIT BETWEEN 21]}!] 141 B-131 lAND 10! H-321
Page 1288 of 1928
8 -98 CHASSIS ELECTRICAL
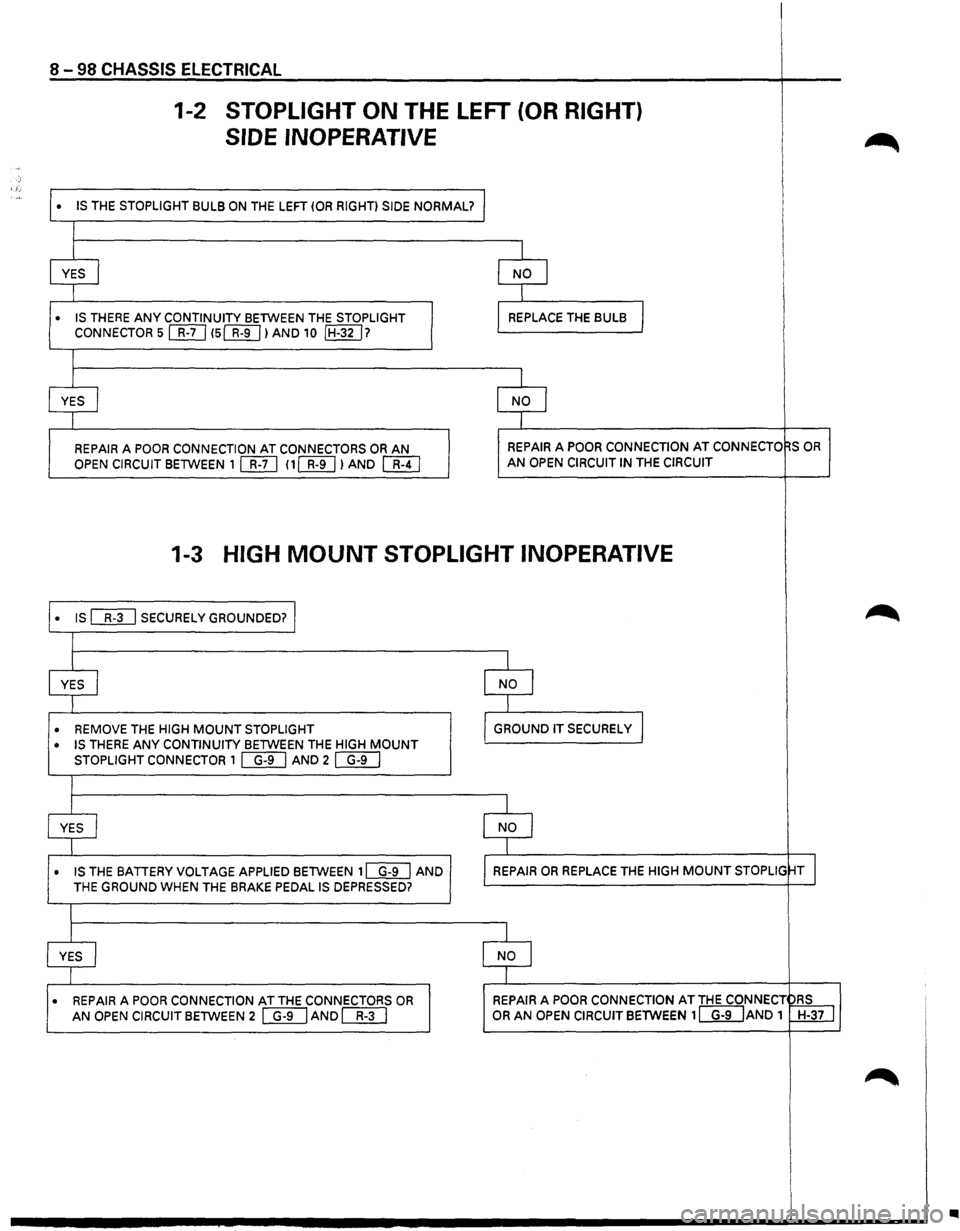
1-2 STOPLIGHT ON THE LEFT (OR RIGHT)
SIDE INOPERATIVE
~
--
' "• IS THE STOPLIGHT BULB ON THE LEFT (OR RIGHT) SIDE NORMAL? l •
I
I
I
YES
j NO I
I I
• IS THERE ANY CONTINUITY BETWEEN
THE STOPLIGHT REPLACE THE BULB I CONNECTOR 5 []}] 15(]]] I AND 10 IH-32 I?
I
I I
YES
I NO I
J I
REPAIR A POOR CONNECTION AT CONNECTORS OR AN REPAIR A POOR CONNECTION AT CONNECTO qs OR
OPEN CIRCUIT BETWEEN 1 [[[) 11[[[) I AND []I) AN OPEN CIRCUIT IN THE CIRCUIT
1-3 HIGH MOUNT STOPLIGHT INOPERATIVE
• IS ["ill SECURELy GROUNDED? I .~
I
I I
YES
I NO I
I I
• REMOVE THE HIGH MOUNT STOPLIGHT
GROUND IT SECURELY I
• IS THERE ANY CONTINUITY BETWEEN THE HIGH MOUNT
STOPLIGHT CONNECTOR 1 []TI AND 2 ~
I
I I
YES
j NO I
I I
• IS THE BATIERY VOLTAGE
APPLIED BETWEEN 1W] AND REPAIR OR REPLACE THE HIGH MOUNT STOPLIG ~T I THE GROUND WHEN THE BRAKE PEDAL IS DEPRESSED?
I
I I
YES j NO I
I 1
• REPAIR A POOR CONNECTION AT THE CONNECTORS OR REPAIR A POOR CONNECTION AT THE CONNECT DRS
AN OPEN
CIRCUIT BETWEEN 2 ~AND []I] OR AN OPEN CIRCUIT BETWEEN 1 [§TIANO 1 W±ill
~
•
Page 1291 of 1928
STARTER SWITCH
Refer to "START AND CHARGING" in this section.
'-' STOPLIGHT SWITCH (FOR VEHICLES
W/0 CRUISE CONTROL)
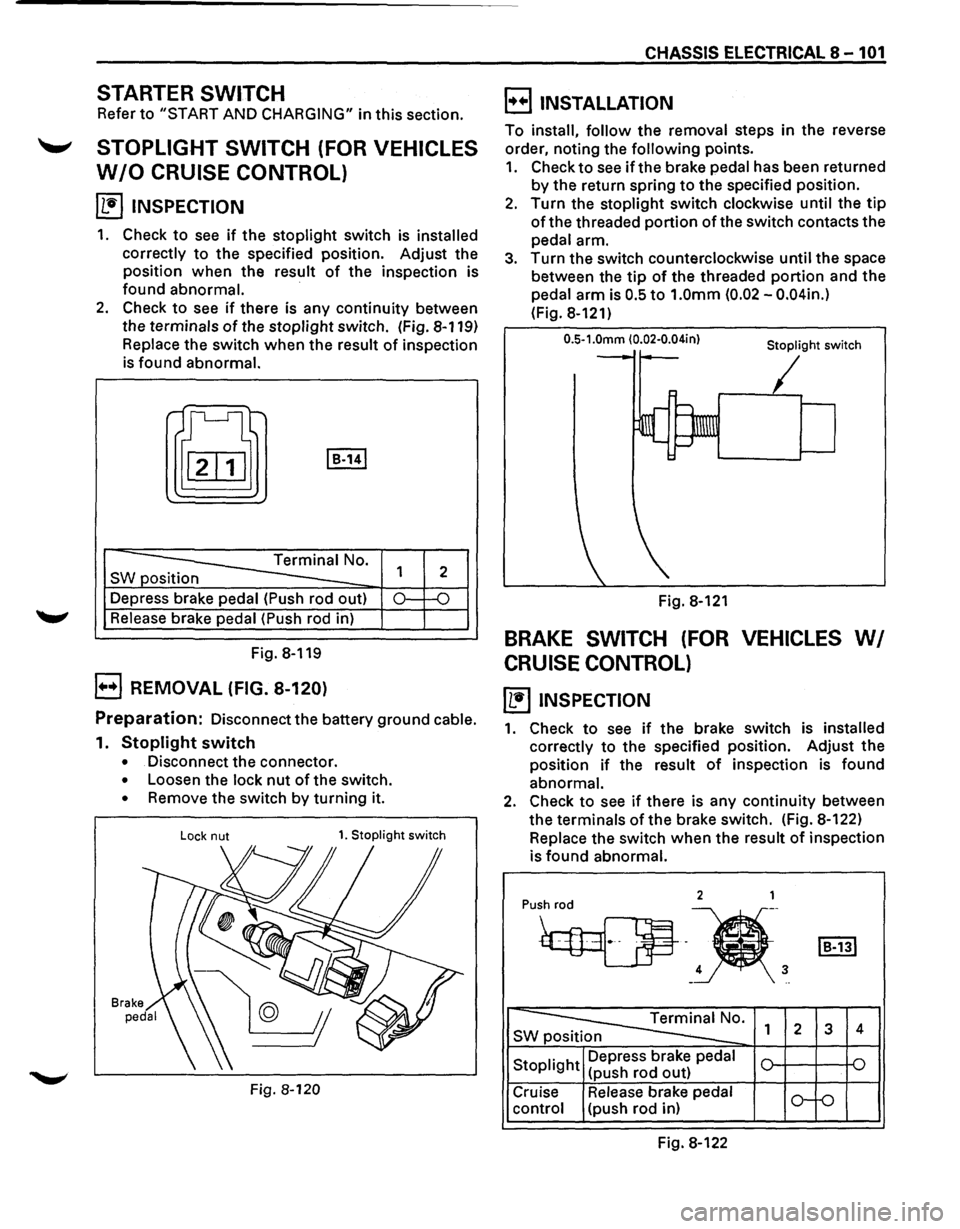
~ INSPECTION
1. Check to see if the stoplight switch is installed
correctly
to the specified position. Adjust the
position when the result
of the inspection is
found abnormal.
·
2. Check to see if there is any continuity between
the terminals
of the stoplight switch. (Fig. 8-119)
Replace the switch when the result of inspection
is found abnormal.
t[J I B-141
-----==== Terminal No.
SW position
--Depress brake pedal (Push rod out)
Release brake pedal (Push rod in)
Fig. 8-119
B REMOVAL (FIG. 8-120)
1
2
0.: -o
Preparation: Disconnect the battery ground cable.
1. Stoplight switch
• Disconnect the connector.
• Loosen the lock nut of the switch.
• Remove the switch by turning it.
Lock nut 1. Stoplight switch
Fig. 8-120
CHASSIS ELECTRICAL 8-101
B INSTALLATION
To install, follow the removal steps in the reverse
order, noting the
following points.
1. Check to see if the brake pedal has been returned
by the return spring to the specified position.
2. Turn the stoplight switch clockwise until the tip
of the threaded portion of the switch contacts the
pedal arm.
3. Turn the switch counterclockwise until the space
between the
tip of the threaded portion and the
pedal arm is
0.5 to 1.0mm (0.02 -0.04in.)
(Fig. 8-121)
0.5-1.0mm (0.02·0.04in} Stoplight switch
Fig. 8-121
BRAKE SWITCH (FOR VEHICLES WI
CRUISE CONTROL)
~ INSPECTION
1. Check to see if the brake switch is installed
correctly
to the specified position. Adjust the
position
if the result of inspection is found
abnormal.
2. Check to see if there is any continuity between
the terminals
of the brake switch. (Fig. 8-122)
Replace the switch
when the result of inspection
is
found abnormal.
2 1
Pu•h
4 3 -..
~0. SWp 1 2 3 4
Stoplight Depress
brake pedal
(push rod out)
Cruise Release brake pedal
o-f-o control (push rod in)
Fig. 8-122
Page 1292 of 1928
8-102 CHASSIS ELECTRICAL
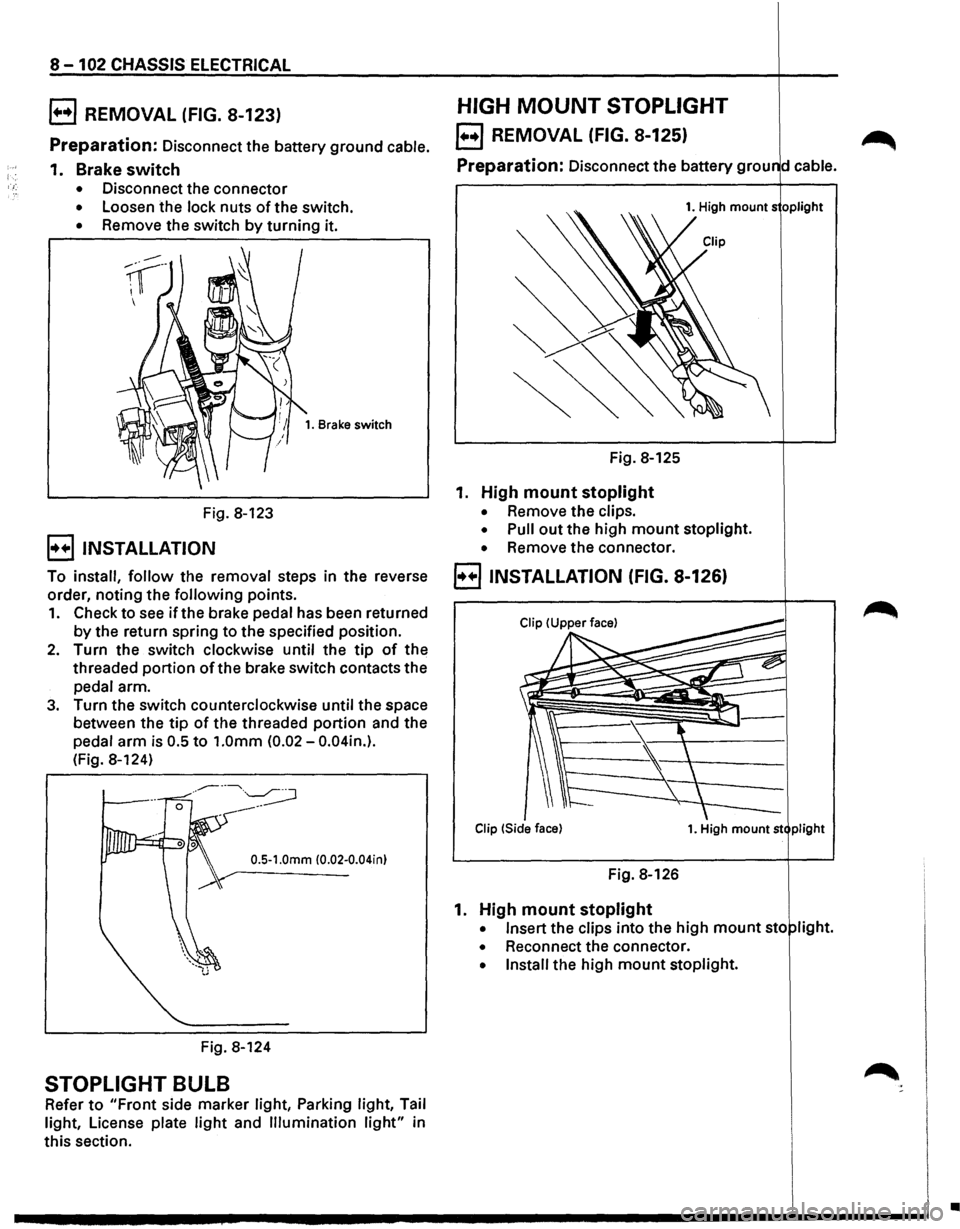
B REMOVAL (FIG. 8-123)
Preparation: Disconnect the battery ground cable.
1. Brake switch
• Disconnect the connector
• Loosen the lock nuts of the switch.
• Remove the switch by turning it.
Fig. 8-123
B INSTALLATION
1. Brake switch
To install, follow the removal steps in the reverse
order, noting the
following points.
1. Check to see if the brake pedal has been returned
by the return spring to the specified position.
2. Turn the switch clockwise until the tip of the
threaded
portion ofthe brake switch contacts the
pedal arm.
3. Turn the switch counterclockwise until the space
between the
tip of the threaded portion and the
pedal
arm is 0.5 to 1.0mm (0.02-0.04in.).
(Fig. 8-124)
0.5-1.0mm (0.02-0.04in)
Fig. 8-124
STOPLIGHT BULB
Refer to "Front side marker light, Parking light, Tail
light, License plate
light and Illumination light" in
this section.
HIGH MOUNT STOPLIGHT
EJ REMOVAL (FIG. 8-125) ~
Preparation: Disconnect the battery grou d cable.
1. High mounts oplight
Fig. 8-125
1. High mount stoplight
• Remove the clips.
• Pull out the high mount stoplight.
• Remove the connector.
B INSTALLATION (FIG. 8-126)
Clip !Side face) 1. High mount st plight
Fig. 8-126
1. High mount stoplight
• Insert the clips into the high mount sto light.
• Reconnect the connector.
• Install the high mount stoplight.
•
Page 1362 of 1928
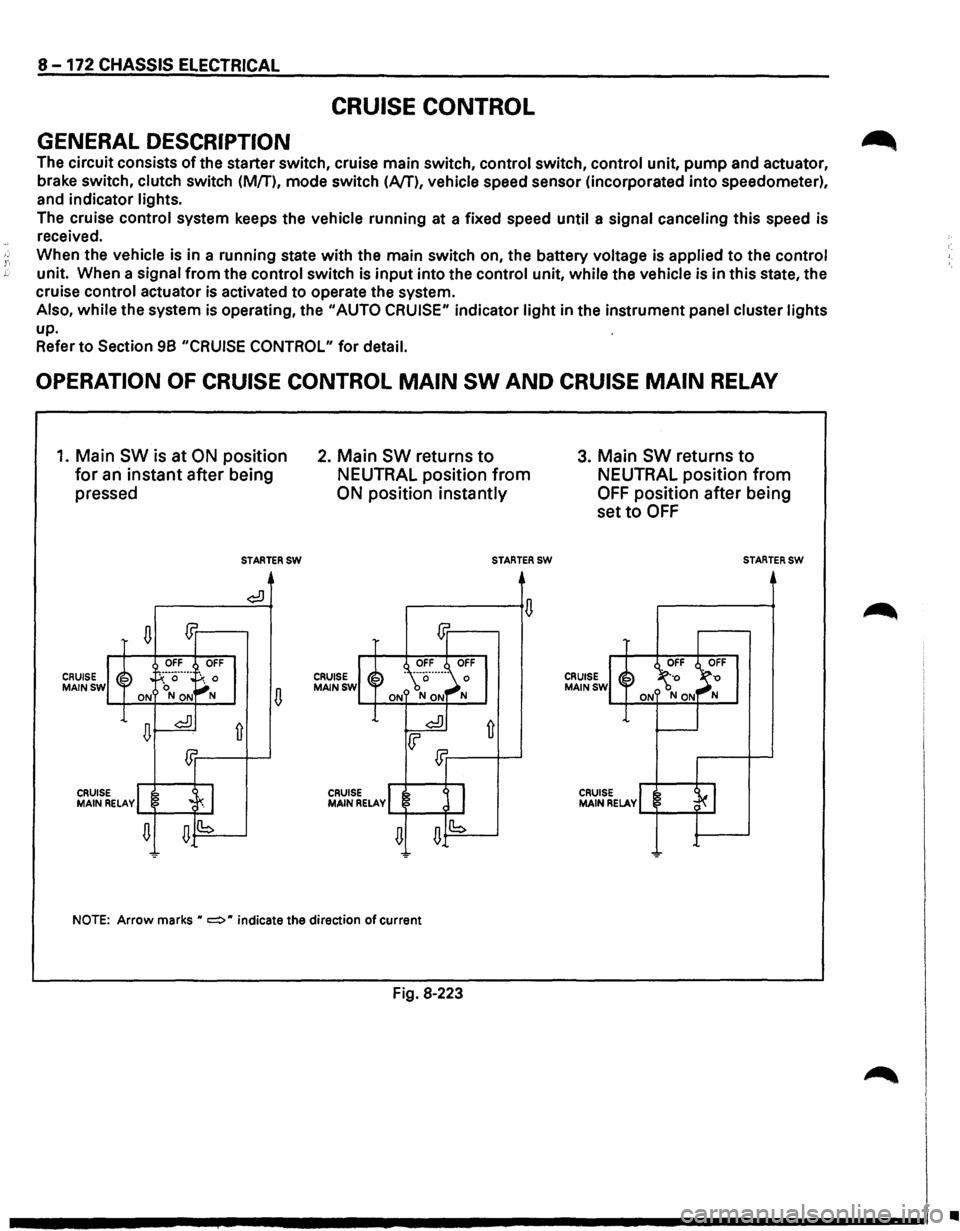
8 -172 CHASSIS ELECTRICAL
CRUISE CONTROL
GENERAL DESCRIPTION
The circuit consists of the starter switch, cruise main switch, control switch, control unit, pump and actuator,
brake switch, clutch switch (M/T),
mode switch (Nf), vehicle speed sensor (incorporated into speedometer),
and indicator lights.
The cruise
control system keeps the vehicle running at a fixed speed until a signal canceling this speed is
received.
When the vehicle is in a running state with the main switch on, the battery voltage is applied to the control
unit. When a signal from the control switch is input into the control unit, while the vehicle is in this state, the
cruise control actuator is activated
to operate the system.
Also,
while the system is operating, the "AUTO CRUISE" indicator light in the instrument panel cluster lights
up.
Refer
to Section 98 "CRUISE CONTROL" for detail.
OPERATION OF CRUISE CONTROL MAIN SW AND CRUISE MAIN RELAY
1. Main SW is at ON position
for an instant after being
pressed
CRUISE MAINSW
n m
OFF OFF
~~ . !-':··a··---
~: 0 ON NON
n~
£Jr
CRUIS MAIN ~ELAvl .c~ I
n n(b
-
STARTERSW
¢:!)
fi
2. Main SW returns to
NEUTRAL position from
ON position instantly
CRUISE MAINSW
CRUISE MAIN RELAY
STARTERSW
NOTE: Arrow marks H c:::::> H indicate the direction of current
Fig. 8·223
3. Main SW returns to
NEUTRAL position from
OFF position after being
set
to OFF
CRUISE MAINSW
CRUISE MAIN RELAY
STARTERSW
..
Page 1363 of 1928
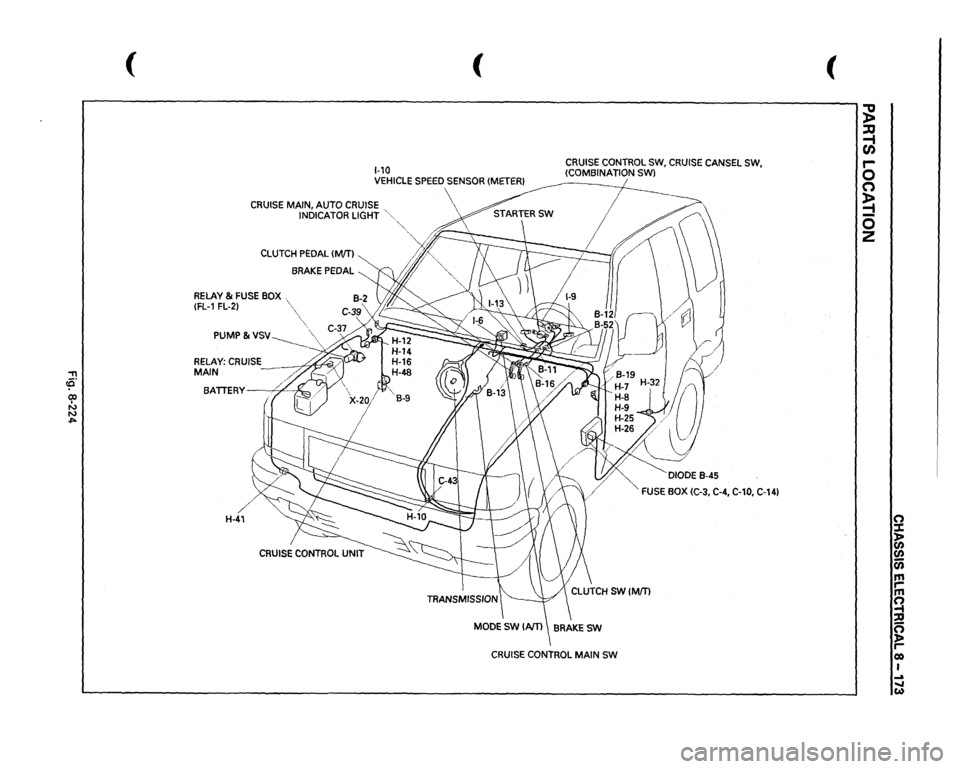
"TI ~· 00 I N N .,..
(
(
1-10 VEHICLE
SPEED
SENSOR
(METER!
CRUISE
CONTROL
SW,
CRUISE
CANSEL
SW,
(COMBINATION SWl
CRUISE
MAIN, AUTO
CRUISE
INDICATOR
LIGHT
'"
CLUTCH
PEDAL
(MfTI
BRAKE
PEDAL
RELAY
& FUSE
BOX
(FL-1
FL-2) PUMP
& VSV-------__
BATTERY
. '/
)",...
H-41
CRUISE
CONTROL
UNIT
·""·
'~~/{' /l/
'
4/
·,,_
DIODE
B-45
FUSE
BOX
(C-3,
C-4,
C-10,
C-14)
CRUISE
CONTROL
MAIN
SW
(
~ ::u ~ r-0 (") ~ 0 z
0 ::t > (/) (/) a; m ,.. m !l ::D 0 )> reo I ... ..... w
Page 1368 of 1928
8 -178 CHASSIS ELECTRICAL
ANTI-LOCK BRAKE SYSTEM (ABS)
GENERAL DESCRIPTION
The circuit consists of the starter switch, stoplight switch (vehicle w/o cruise control), brake switch (vehicle
with cruise control), hydraulic unit, electronic brake control module, wheel speed sensor, G sensor, ABS and
4WD indicator, 4WD switch and data link connector.
When the service brake is applied while in the running mode,
the EBCM (Electronic Brake Control Module)
judges
which wheel is about to lock by using the wheel rotation speed signals sent from the four ABS speed
sensors at the
front and rear wheels. And the brake fluid pressure applied to the four wheels is controlled by
a hydraulic unit to prevent the wheels from locking.
Based on the wheel rotation speed signals
input from the ABS sensor, the EBCM sends out signals to the
solenoid valve in the hydraulic unit
to increase, maintain or decrease the brake fluid pressure. The solenoid
valve uses this signal
to control the fluid pressure which is applied to the calipers of the disk brakes of the
front wheels. (The system also controls at the same time the fluid pressure applied to the rear wheels.)
• EBCM (Electronic brake control module)
The EBCM uses the signals sent from the speed sensor to control the operation of the hydraulic unit.
When any malfunction occurs in the ABS, the
EBCM activates the fail-safe fuction while turning on the
ABS warning light.
• Hydraulic unit
The hydraulic unit consists of the motor, plunger pump, solenoid valve, and fluid pressure control
valves. The exterior
of the unit has a relay box consisting of the motor relay and valve relay. Three
solenoid valves, the
two of which are provided at the front wheels and the one at the rear wheels, control
the fluid pressure
of these wheels.
• Speed sensor
The speed sensor consists of the sensor and the rotor. It sends the EBCM the AC voltage generated by
the rotation of the rotor as the vehicle speed signal. ~
• G-sensor
The G-sensor, installed inside the center console, sends out signals to the EBCM by detecting the
decelerating speed
of the vehicle.
• ABS warning light
The ABS warning light in the instrument panel, lights up when any malfunction occurs in the ABS. It also
lights up
with the starter key at the "ON" position, as a self-check.
Refer
to Section 5A4, "ANTI-LOCK BRAKE SYSTEM" for detail.
II
Page 1369 of 1928
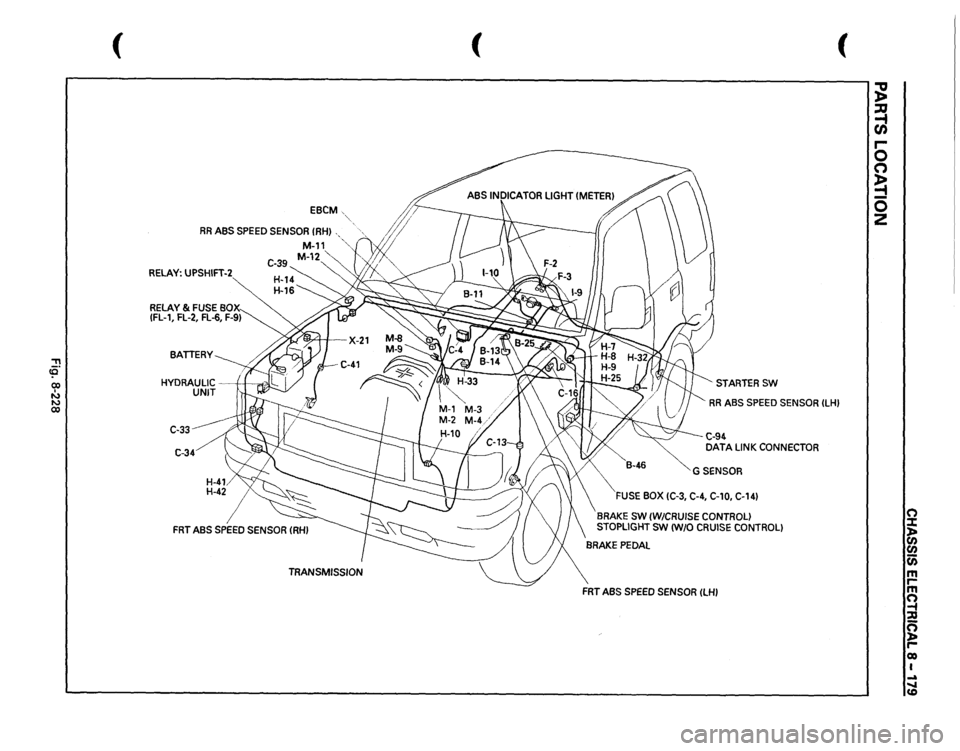
::!! (Q 00 I N N 00
(
EBCM
RR
ABS
SPEED
SENSOR
(RHI
RELAY:
UPSHIFT-2
C-33 C-34
(
(
STARTERSW RR
ABS
SPEED
SENSOR
ILHI
C-94 DATA
LINK
CONNECTOR
GSENSOR
FUSE
BOX
(C-3,
C-4,
C-10,
C-141
BRAKE
SW
(W/CRUISE
CONTROL)
STOPLIGHT
SW
IW/0
CRUISE
CONTROL)
FRT
ABS
SPEED
SENSOR
ILHI
~ :a -t CJ) r-0 (") ~ 0 z
(") :::t ln en (i) m rm ~ :;g n ~ r-eo I ..a ..... CD
Page 1375 of 1928
CHASSIS ELECTRICAL 8-185
REAR WHEEL ANTI-LOCK BRAKE SYSTEM (RWAL)
GENERAL DESCRIPTION
The circuit consists of the starter switch, stoplight switch (vehicle w/o cruise control), brake switch (vehicle
w/cruise control). RWAL controller, RWAL speed sensor, RWAL valve, brake differential switch, 4WD switch,
parking brake
SW, indicator light (RWAL, 4WD, BRAKE), and test connector.
In this system, when the service brake is applied the RWAL controller judges the wheel rotation difference
signals which have been sent from the RWAL speed sensor at the rear axle differential. The anti-lock valves
control
the brake fluid pressure which is applied to the rear wheels to prevent the wheels from locking.
When starting the engine, the RWAL indicator in the instrument panel lights up at the same time as the brake
indicator
to inform the driver that the system is operating normally. (The light goes off after two seconds.)
Refer
to Section 5A3, "RWAL (REAR WHEEL ANTI-LOCK BRAKE SYSTEM)" for detail.
Page 1377 of 1928
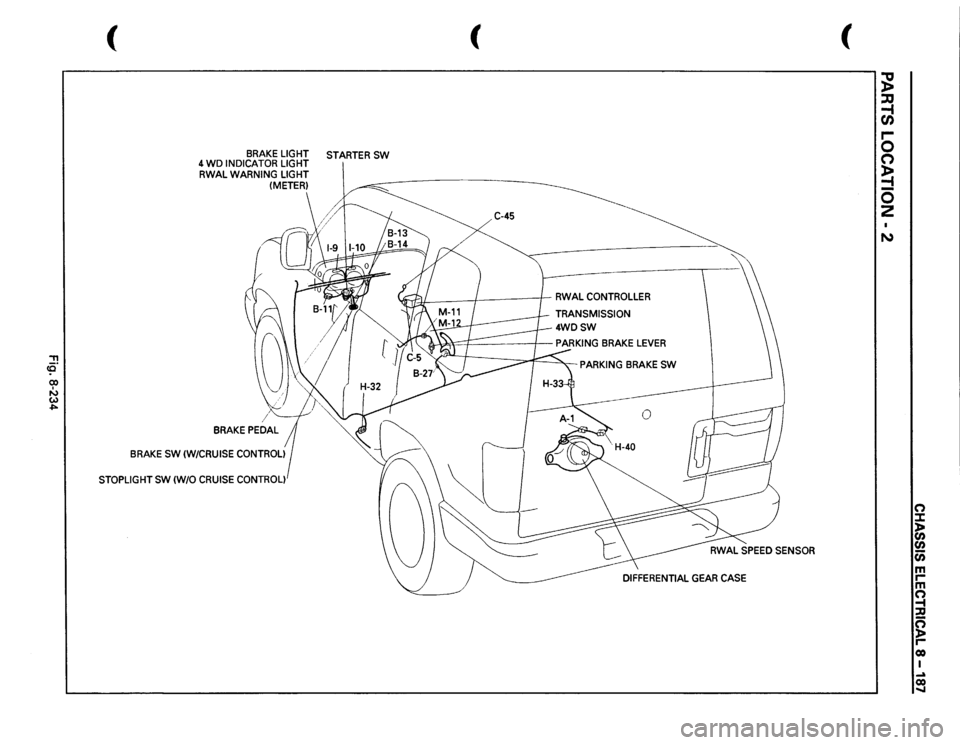
::!! (Q 00 I ....., w ..,..
(
BRAKE
LIGHT
STARTER
SW
4 WD
INDICATOR
LIGHT
RWAL
WARNING
LIGHT (METER)
BRAKE
SW
(W/CRUISE
CONTROL)
STOPLIGHT
SW
(W/0
CRUISE
CONTROL)
(
C-45
JfJI:
/
I
RWAL
CONTROLLER
TRANSMISSION
4WDSW
PARKING
BRAKE
SW
(
;g ::JJ -1 en .... 0 0 ~ -0 2 N
n :I: l> en en c;; m rm n -t :a g reo I ~ co .....