fuel ISUZU TROOPER 1995 Owner's Manual
[x] Cancel search | Manufacturer: ISUZU, Model Year: 1995, Model line: TROOPER, Model: ISUZU TROOPER 1995Pages: 1928
Page 512 of 1928
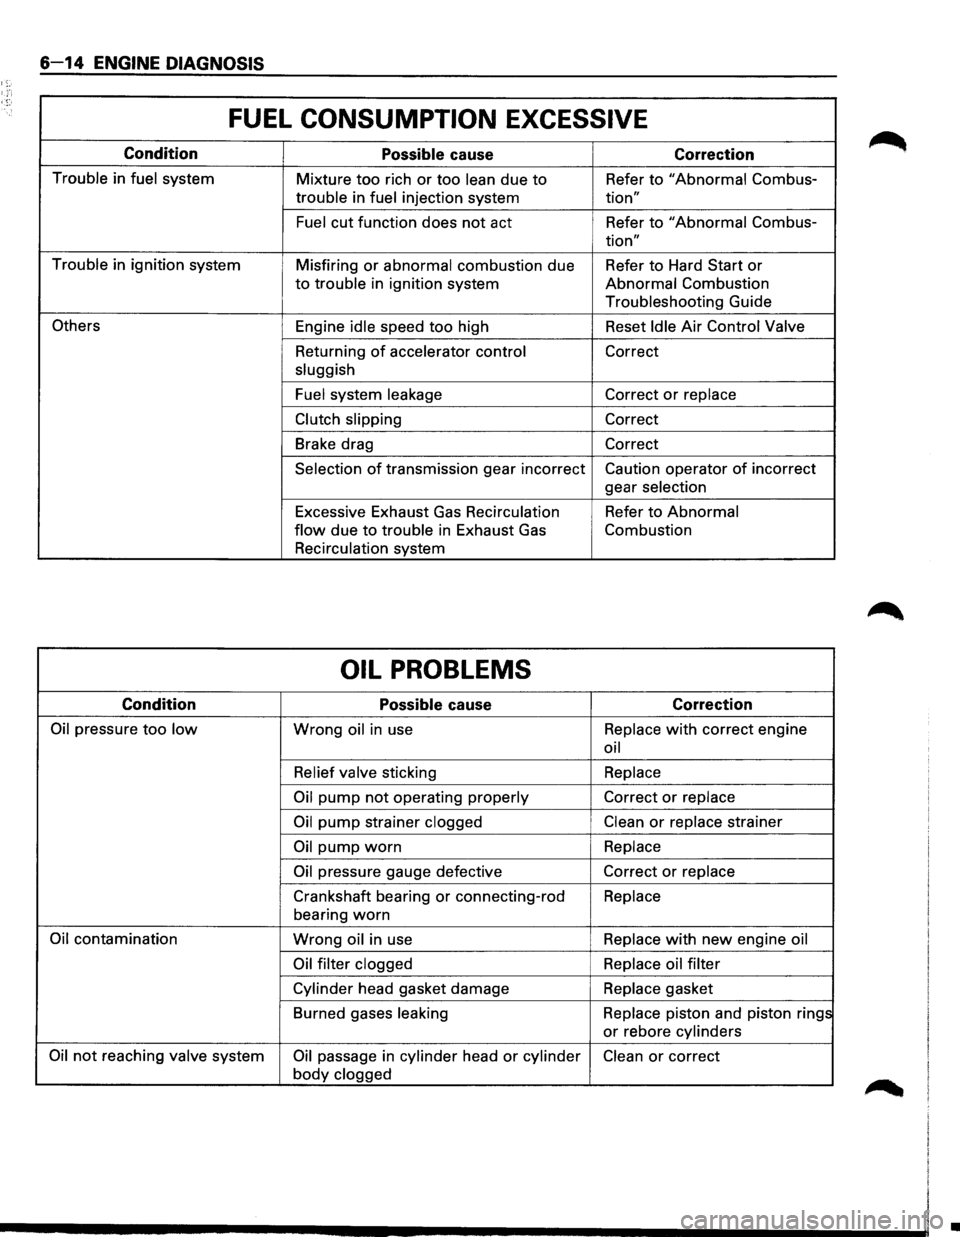
6-14 ENGINE DIAGNOSIS
1;:-
FUEL CONSUMPTION EXCESSIVE
Condition
Possible cause Correction
Trouble in fuel system
Mixture too rich or too lean due to Refer to "Abnormal Combus-
trouble in fuel injection system tion"
Fuel cut function does not act Refer to "Abnormal Combus-
tion"
Trouble in ignition system
Misfiring or abnormal combustion due Refer to Hard Start or
to trouble in ignition system Abnormal Combustion
Troubleshooting Guide
Others Engine idle speed too high Reset Idle Air Control Valve
Returning
of accelerator control Correct
sluggish
Fuel system leakage
Correct or replace
Clutch slipping Correct
Brake drag Correct
Selection of transmission gear incorrect Caution operator of incorrect
gear selection
Excessive Exhaust
Gas Recirculation Refer to Abnormal
flow due to trouble in Exhaust Gas Combustion
Recirculation system
OIL PROBLEMS
Condition
Possible cause Correction
Oil pressure too low Wrong oil in use Replace with correct
engine
oil
Relief valve sticking Replace
Oil pump not operating
properly Correct or replace
Oil pump strainer clogged Clean or replace strainer
Oil pump worn Replace
Oil pressure gauge defective Correct or replace
Crankshaft bearing or connecting-rod Replace
bearing
worn
Oil contamination Wrong oil in use Replace with new engine
oil
Oil filter clogged Replace oil filter
Cylinder head gasket damage Replace
gasket
Burned gases leaking Replace piston and piston rings
or rebore cylinders
Oil not reaching valve system Oil passage in cylinder head or cylinder Clean or correct
body clogged
•
Page 513 of 1928
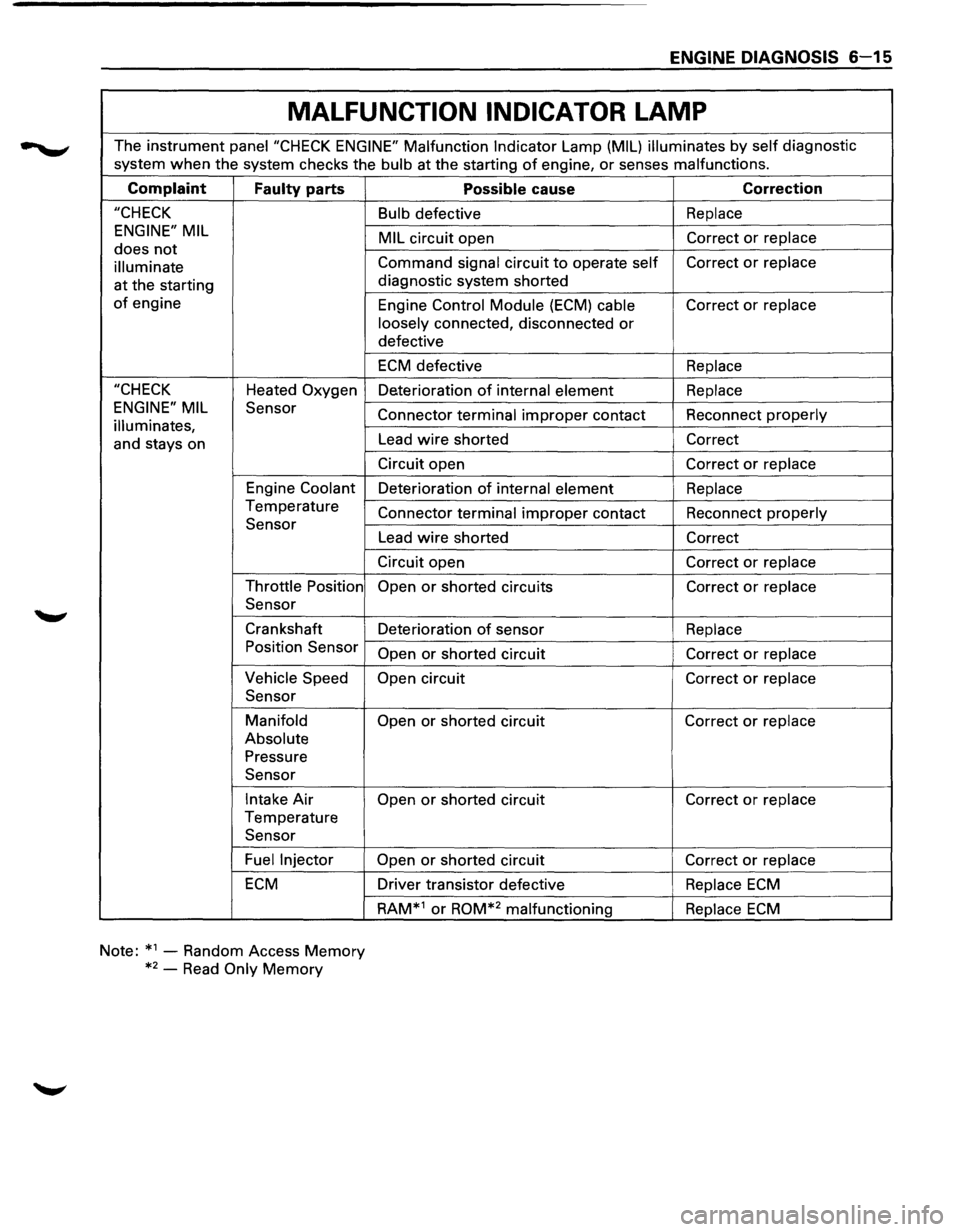
ENGINE DIAGNOSIS 6-15
MALFUNCTION INDICATOR LAMP
The instrument panei"CHECK ENGINE" Malfunction Indicator Lamp (MIL) illuminates by self diagnostic
system
when the system checks the bulb at the starting of engine, or senses malfunctions.
Complaint
Faulty parts
"CHECK
ENGINE" MIL
does not
illuminate
at the starting
of engine
"CHECK Heated Oxygen
ENGINE" MIL Sensor
illuminates,
and stays on
Engine
Coolant
Temperature Sensor
Throttle Position
Sensor
Crankshaft Position Sensor
Vehicle Speed
Sensor
Manifold
Absolute
Pressure Sensor
Intake Air
Temperature Sensor
Fuel Injector
ECM
Note: *1
-Random Access Memory
*2
-Read Only Memory
Possible cause Correction
Bulb defective Replace
MIL
circuit open Correct or replace
Command signal
circuit to operate self Correct or replace
diagnostic system shorted
Engine
Control Module (ECM) cable Correct or replace
loosely
connected, disconnected or
defective
ECM defective Replace
Deterioration of internal element Replace
Connector terminal improper contact Reconnect properly
Lead wire shorted Correct
Circuit
open Correct or replace
Deterioration of internal element Replace
Connector terminal improper contact Reconnect properly
Lead wire shorted Correct
Circuit
open Correct or replace
Open
or shorted circuits Correct or replace
Deterioration of sensor Replace
Open
or shorted circuit Correct or replace
Open
circuit Correct or replace
Open
or shorted circuit Correct or replace
Open
or shorted circuit Correct or replace
Open
or shorted circuit Correct or replace
Driver transistor defective Replace ECM
RAM*1 or ROM*2 malfunctioning Replace ECM
Page 561 of 1928
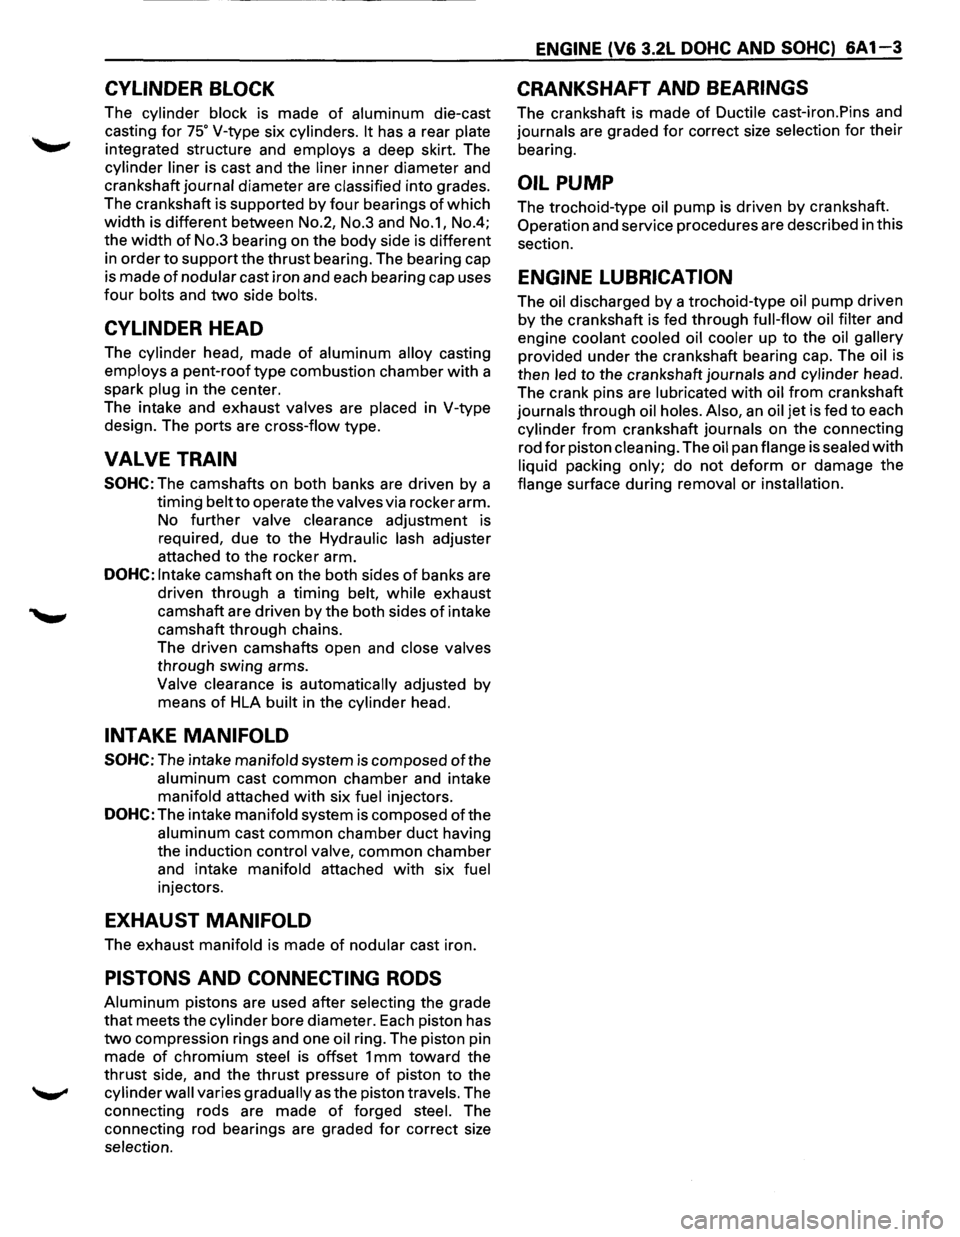
CYLINDER BLOCK
The cylinder block is made of aluminum die-cast
casting
for 75° V-type six cylinders. It has a rear plate
integrated structure and employs a deep skirt. The
cylinder liner is cast and the liner inner diameter and
crankshaft
journal diameter are classified into grades.
The crankshaft is supported by four bearings
of which
width is different between No.2, No.3 and No.1, No.4;
the
width of No.3 bearing on the body side is different
in order
to support the thrust bearing. The bearing cap
is made
of nodular cast iron and each bearing cap uses
four bolts and two side bolts.
CYLINDER HEAD
The cylinder head, made of aluminum alloy casting
employs a pent-roof type combustion chamber with a
spark
plug in the center.
The intake and exhaust
valves are placed in V-type
design. The ports are cross-flow type.
VALVE TRAIN
SOHC: The camshafts on both banks are driven by a
timing
belt to operate the valves via rocker arm.
No
further valve clearance adjustment is
required, due
to the Hydraulic lash adjuster
attachedtotherockerarm.
DOHC: Intake camshaft on the both sides of banks are
driven through a
timing belt, while exhaust
camshaft are driven by the both sides
of intake
camshaft through chains.
The driven camshafts open and
close valves
through swing arms.
Valve clearance is automatically adjusted by
means
of HLA built in the cylinder head.
INTAKE MANIFOLD
SOHC: The intake manifold system is composed ofthe
aluminum cast common chamber and intake
manifold attached with six fuel injectors.
DOHC: The intake manifold system is composed of the
aluminum cast common chamber duct having
the induction
control valve, common chamber
and intake
manifold attached with six fuel
injectors.
EXHAUST MANIFOLD
The exhaust manifold is made of nodular cast iron.
PISTONS AND CONNECTING RODS
Aluminum pistons are used after selecting the grade
that meets the cylinder bore diameter. Each piston has
two compression rings and one oil ring. The piston pin
made
of chromium steel is offset 1 mm toward the
thrust side, and the thrust pressure
of piston to the
cylinder wall varies gradually as the piston travels. The
connecting rods are made
of forged steel. The
connecting rod bearings are graded
for correct size
selection.
ENGINE (V6 3.2L DOHC AND SOHC) 6A1-3
CRANKSHAFT AND BEARINGS
The crankshaft is made of Ductile cast-iron.Pins and
journals are graded for correct size selection for their
bearing.
OIL PUMP
The trochoid-type oil pump is driven by crankshaft.
Operation and service procedures are described in this
section.
ENGINE LUBRICATION
The oil discharged by a trochoid-type oil pump driven
by the crankshaft is fed through full-flow oil filter and
engine
coolant cooled oil cooler up to the oil gallery
provided under the crankshaft bearing cap. The oil is
then
led to the crankshaft journals and cylinder head.
The crank pins are
lubricated with oil from crankshaft
journals through oil holes. Also, an oil jet is fed to each
cylinder from crankshaft journals on the connecting
rod
for piston cleaning. The oil pan flange is sealed with
liquid packing only; do not deform or damage the
flange surface during removal or installation.
Page 563 of 1928
4. Exhaust Gas Recirculation pipe and valve
• Tighten each fixing bolt to the specified torque.
Valve fixing bolt
1«1 Torque N·m (lb·in) 8 (69)
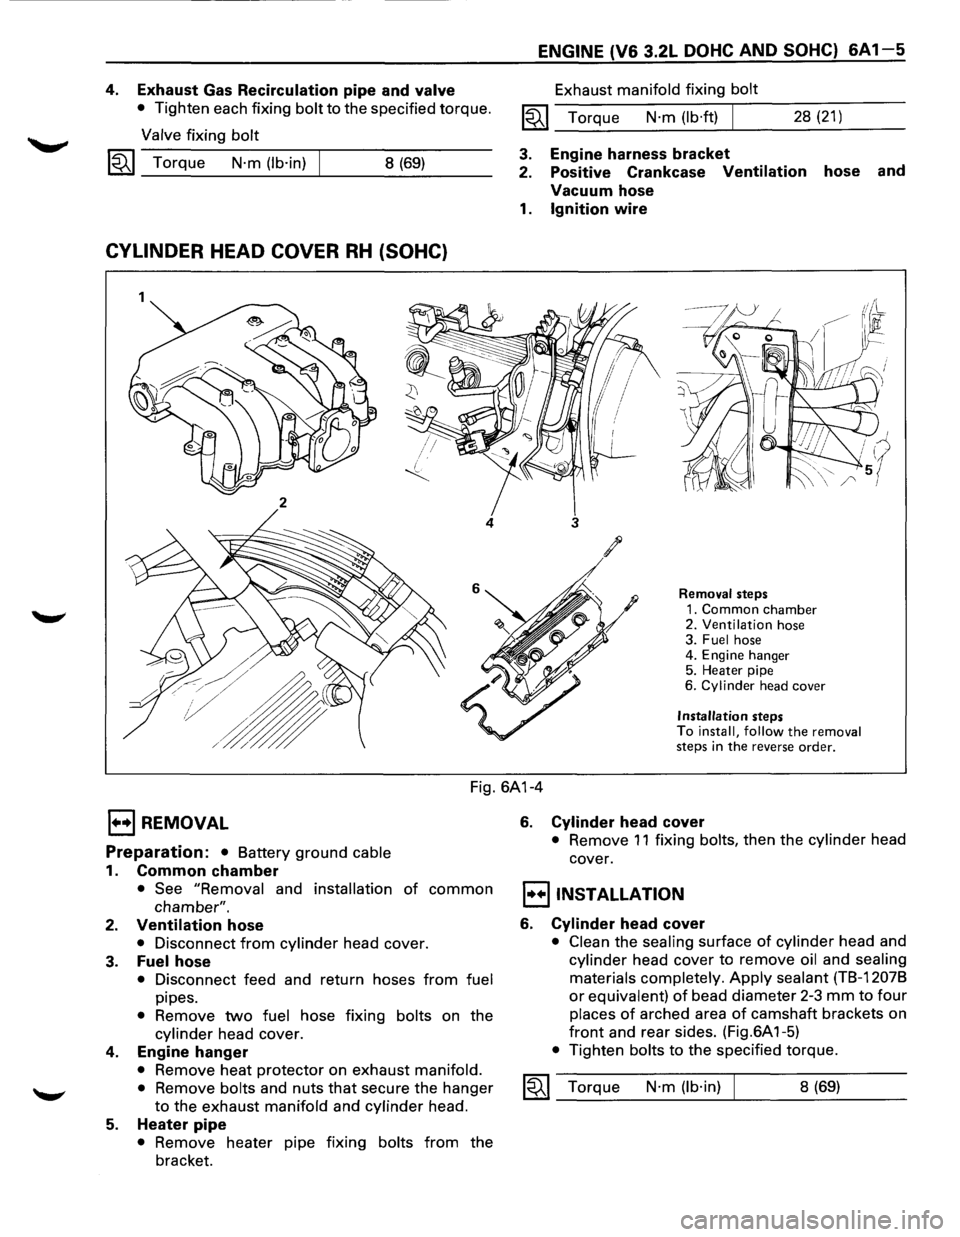
CYLINDER HEAD COVER RH (SOHC)
1
2
4
ENGINE (V6 3.2L DOHC AND SOHC) 6A1-5
Exhaust manifold fixing bolt
1«1 Torque N·m (lb·ft) I 28 (21)
3. Engine harness bracket
2. Positive Crankcase
Ventilation hose and
Vacuum hose
1. Ignition wire
3
Removal steps
1. Common chamber 2. Ventilation hose
3. Fuel hose
4. Engine hanger
5. Heater pipe
6.
Cylinder head cover
Installation steps
To install, follow the removal
steps in the reverse order.
Fig. 6A1-4
EJ REMOVAL
Preparation: • Battery ground cable
1. Common chamber
• See "Removal and installation of common
chamber".
2. Ventilation hose
• Disconnect from cylinder head cover.
3. Fuel hose
• Disconnect feed and return hoses from fuel
pipes.
• Remove two fuel hose fixing bolts on the
cylinder head cover.
4. Engine hanger
• Remove heat protector on exhaust manifold.
•
Remove bolts and nuts that secure the hanger
to the exhaust manifold and cylinder head.
5. Heater pipe
• Remove heater pipe fixing bolts from the
bracket.
6. Cylinder head cover
• Remove 11 fixing bolts, then the cylinder head
cover.
I•+IINSTALLATION
6. Cylinder head cover
• Clean the sealing surface of cylinder head and
cylinder head cover to remove oil and sealing
materials completely.
Apply sealant (TB-12078
or equivalent) of bead diameter 2-3 mm to four
places of arched area of camshaft brackets on
front and rear sides. (Fig.6A 1-5)
• Tighten bolts to the specified torque.
1«1 Torque N·m (lb·in) 8 (69)
Page 564 of 1928
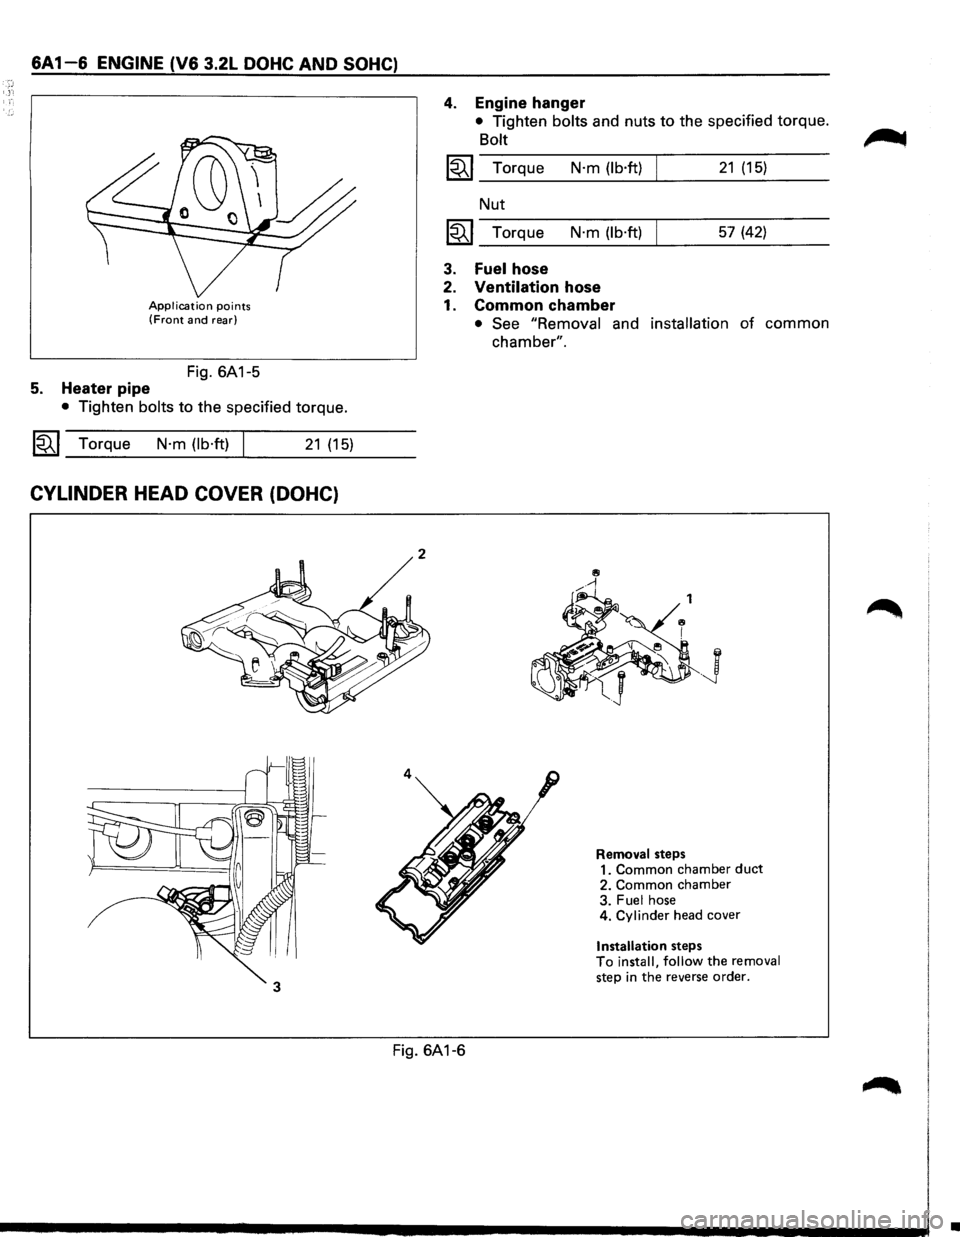
6A1-6 ENGINE (V6 3.2L DOHC AND SOHC)
Application points (Front and rear)
Fig. 6A1-5
5. Heater pipe
• Tighten bolts to the specified torque.
~~~ Torque N·m (lb·ft) I 21 (15)
CYLINDER HEAD COVER (DOHC)
2
4
4. Engine hanger
• Tighten bolts and nuts to the specified torque.
Bolt
~~~ Torque N·m (lb·ft) 21 (15)
Nut
~~~ Torque N·m (lb·ft) 57 (42)
3. Fuel hose
2. Ventilation hose
1. Common chamber
• See "Removal and installation of common
chamber".
.J
Removal steps
1. Common chamber duct 2. Common chamber
3. Fuel hose
4. Cylinder head cover
Installation steps To install, follow the removal step in the reverse order.
Fig. 6A1-6
•
Page 565 of 1928
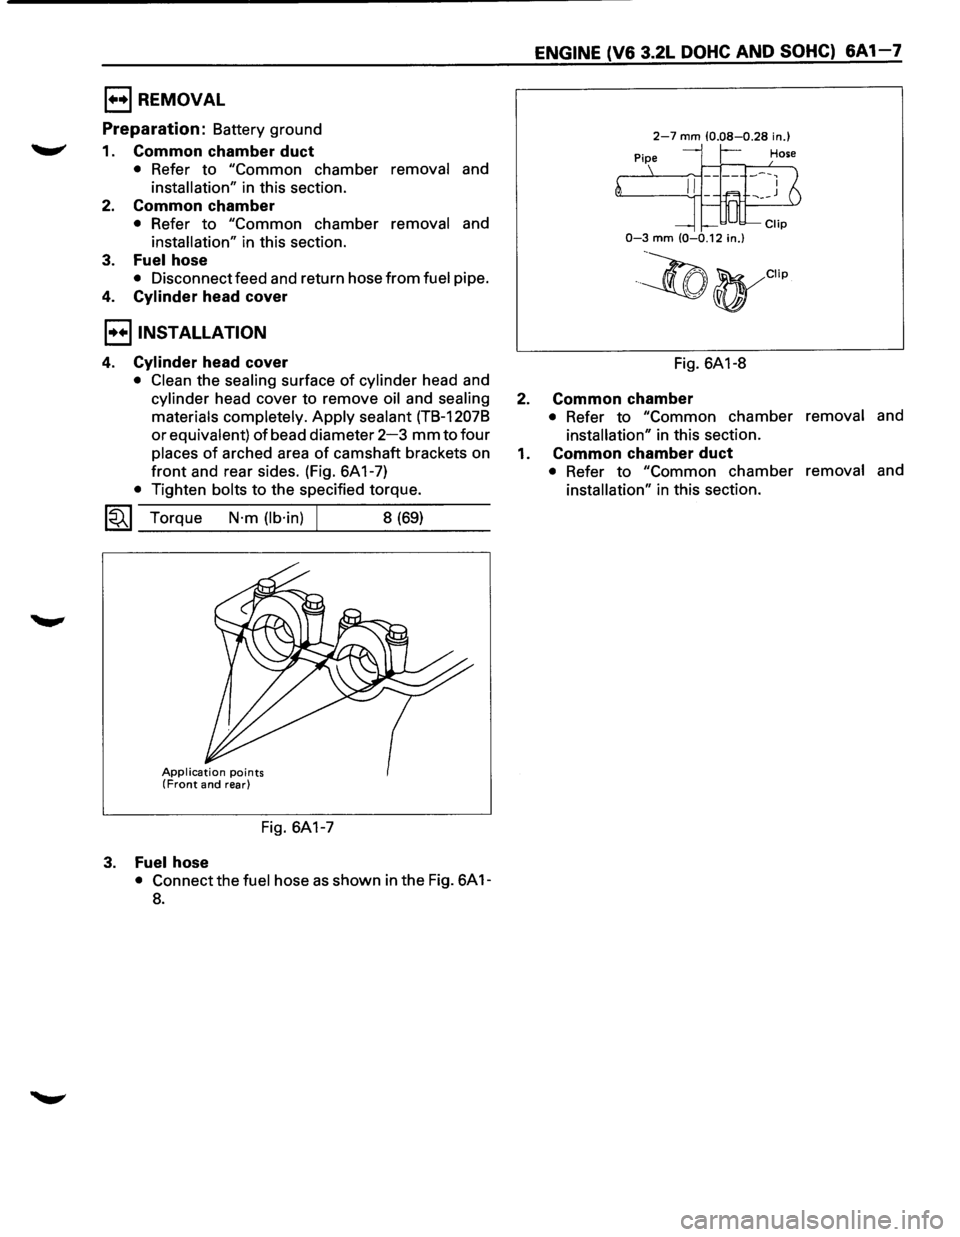
E) REMOVAL
Preparation: Battery ground
1. Common chamber duct
• Refer to "Common chamber removal and
installation" in this section.
2. Common chamber
• Refer to "Common chamber removal and
installation" in this section.
3. Fuel hose
• Disconnect feed and return hose from fuel pipe.
4. Cylinder head cover
I••IINSTALLATION
4. Cylinder head cover
• Clean the sealing surface of cylinder head and
cylinder head cover to remove oil and sealing
materials completely.
Apply sealant (TB-12078
or equivalent) of bead diameter 2-3 mm to four
places of arched area of camshaft brackets on
front and rear sides. (Fig. 6A 1-7)
• Tighten bolts to the specified torque.
1«1 Torque N·m (lb·in) 8 (69)
Application points (Front and rear)
Fig. 6A1-7
3. Fuel hose
• Connect the fuel hose as shown in the Fig. 6A 1-
8.
ENGINE (V6 3.2L DOHC AND SOHC) 6A 1-7
2-7 mm (0.08-0.28 in.)
r-
0-3 mm (0-0.12 in.)
·~(t)yCIIp
Fig. 6A1-8
2. Common chamber
• Refer to "Common chamber removal and
installation" in this section.
1. Common chamber duct
• Refer to "Common chamber removal and
installation" in this section.
Page 566 of 1928
6A1-8 ENGINE (V6 3.2L DOHC AND SOHC)
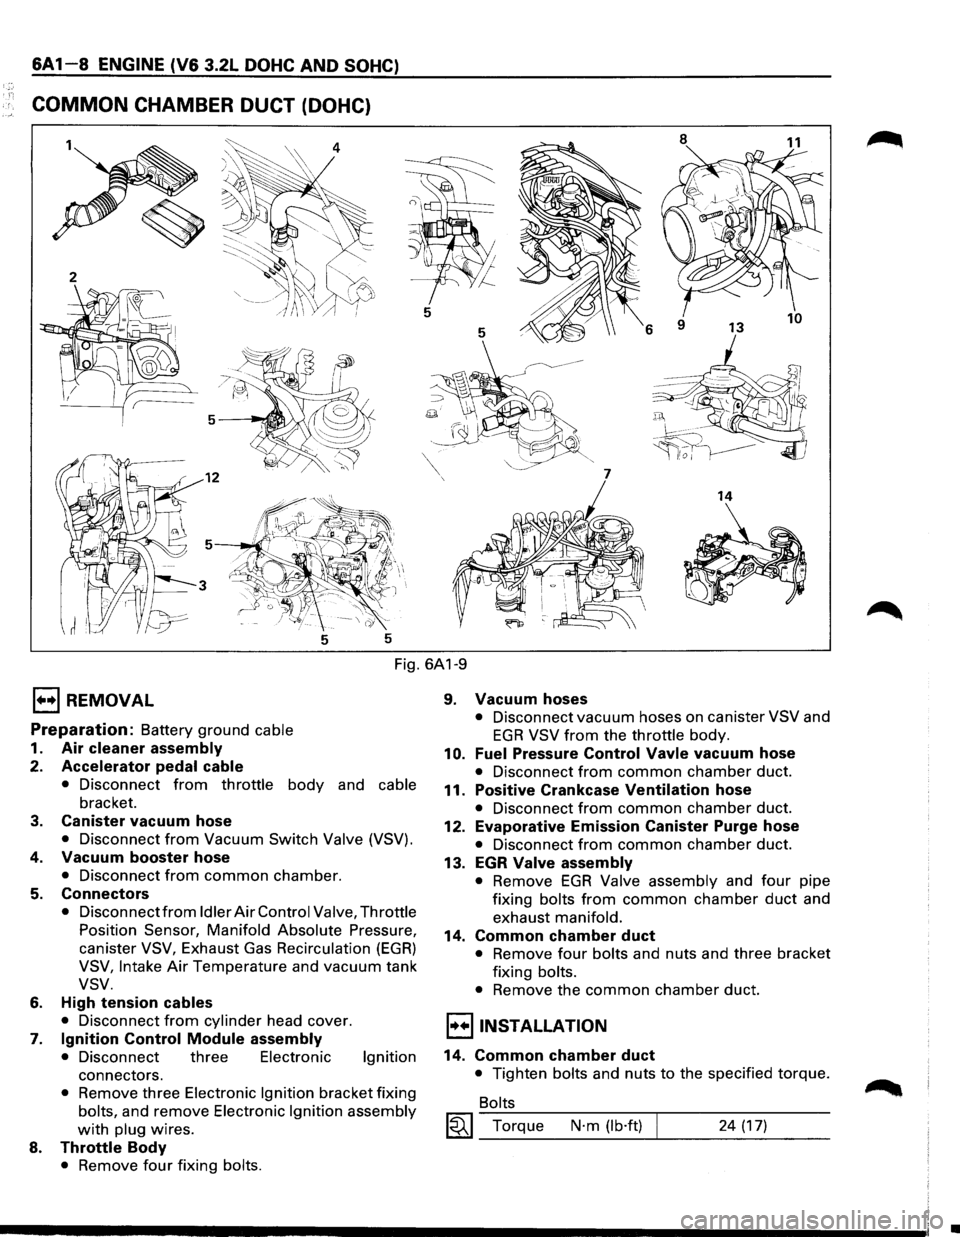
COMMON CHAMBER DUCT (DOHC)
8
11
5
5
6
7
14
5 5
Fig. 6A1-9
E) REMOVAL
Preparation: Battery ground cable
1. Air cleaner assembly
2. Accelerator pedal cable
• Disconnect from throttle body and cable
bracket.
3. Canister vacuum hose
• Disconnect from Vacuum Switch Valve (VSV).
4. Vacuum booster hose
• Disconnect from common chamber.
5. Connectors
• Disconnect from Idler Air Control Valve, Throttle
Position Sensor, Manifold Absolute Pressure,
canister VSV, Exhaust Gas Recirculation (EGR)
VSV, Intake Air Temperature and vacuum tank
vsv.
6. High tension cables
• Disconnect from cylinder head cover.
7. Ignition Control Module assembly
• Disconnect three Electronic Ignition
connectors.
• Remove three Electronic Ignition bracket fixing
bolts, and remove Electronic Ignition assembly
with plug wires.
8. Throttle Body
• Remove four fixing bolts.
9. Vacuum hoses
• Disconnect vacuum hoses on canister VSV and
EGR VSV from the throttle body.
10. Fuel Pressure Control Vavle vacuum hose
• Disconnect from common chamber duct.
11. Positive Crankcase Ventilation hose
• Disconnect from common chamber duct.
12. Evaporative Emission Canister Purge hose
• Disconnect from common chamber duct.
13. EGR Valve assembly
• Remove EGR Valve assembly and four pipe
fixing bolts from common chamber duct and
exhaust manifold.
14. Common chamber duct
• Remove four bolts and nuts and three bracket
fixing bolts.
• Remove the common chamber duct.
l·u·IINSTALLATION
14. Common chamber duct
• Tighten bolts and nuts to the specified torque.
Bolts
~~~ Torque N·m (lb·ft) 24 (17)
•
Page 567 of 1928
Nuts
~~~ Torque N·m (lb·ft) 24 (17)
13. Exhaust Gas Recirculation Valve assembly
• Tighten bolts to the specified torque.
Exhaust Gas Recirculation
Valve Side
~~~ Torque N·m (lb·in) I 8 (69)
Exhaust Manifold Side
~~~ Torque N·m (lb·ft) 28 (21)
12. Evaporative Emission Canister Purge hose
11. Positive Crankcase Vantilatlon hose
10. Fuel Pressure Control Valve vacuum hose
8. Throttle body
• Tighten bolts to the specified torque.
~~~ Torque N·m (lb·ft) I 19 (14)
9. Vacuum hose
• Connect vacuum hoses on canister Vacuum
Switching Valve
and Exhaust Gas Recirculation
Vacuum Switching Valve to the throttle body.
7. Ignition Control Module assembly
• Tighten bolts to the specified torque and
connect connector.
~~~ Torque N·m (lb·ft)
6. High tension cables
5. Connectors
• Connect each connector.
4. Vacuum booster hose
3. Canister vacuum hose
2. Accelerator Pedal cable
19 (14)
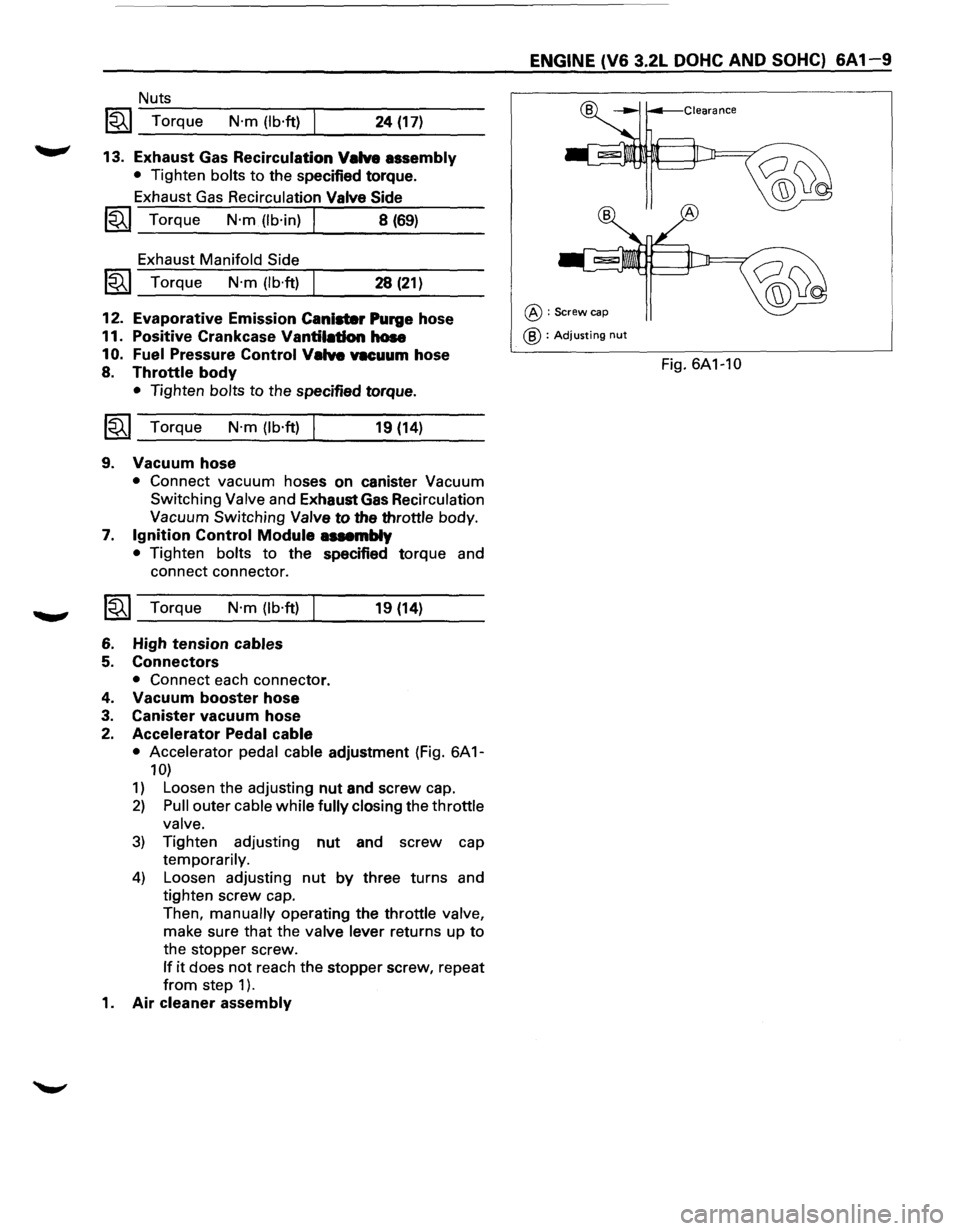
• Accelerator pedal cable adjustment (Fig. 6A 1-
10)
1) Loosen the adjusting nut and screw cap.
2) Pull outer cable while fully closing the throttle
valve.
3) Tighten adjusting nut and screw cap
temporarily.
4) Loosen adjusting nut by three turns and
tighten screw cap.
Then,
manually operating the throttle valve,
make sure that the valve lever returns up to
the stopper screw.
If it does not reach the stopper screw, repeat
from step 1 ).
1. Air cleaner assembly
ENGINE (V6 3.2L DOHC AND SOHC) 6A 1-9
@:Screw cap
@ : Adjusting nut
Fig. 6A1-10
Page 568 of 1928
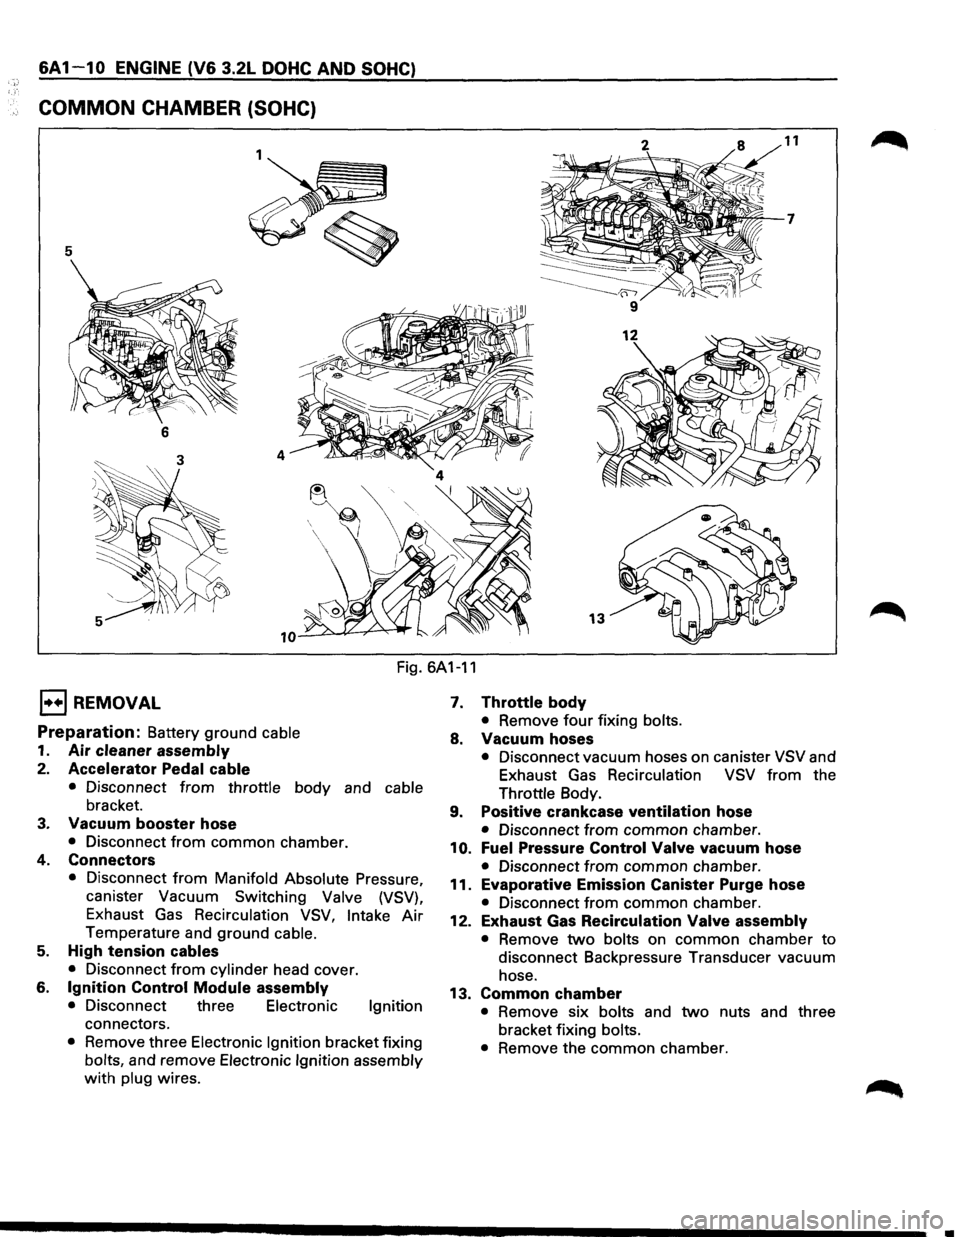
6A 1 1 0 ENGINE (V6 3.2L DOHC AND SOHC)
COMMON CHAMBER (SOHC)
5
6
13
Fig. 6A1-11
1••1 REMOVAL
Preparation: Battery ground cable
1. Air cleaner assembly
2. Accelerator Pedal cable
• Disconnect from throttle body and cable
bracket.
3. Vacuum booster hose
• Disconnect from common chamber.
4. Connectors
• Disconnect from Manifold Absolute Pressure,
canister Vacuum Switching
Valve (VSV),
Exhaust Gas Recirculation VSV, Intake Air
Temperature and ground cable.
5. High tension cables
• Disconnect from cylinder head cover.
6. Ignition Control Module assembly
• Disconnect three Electronic Ignition
connectors.
• Remove three Electronic Ignition bracket fixing
bolts, and remove Electronic Ignition assembly
with plug wires.
7. Throttle body
• Remove four fixing bolts.
8. Vacuum hoses
• Disconnect vacuum hoses on canister VSV and
Exhaust Gas
Recirculation VSV from the
Throttle Body.
9. Positive crankcase ventilation hose
• Disconnect from common chamber.
10. Fuel Pressure Control Valve vacuum hose
• Disconnect from common chamber.
11. Evaporative Emission Canister Purge hose
• Disconnect from common chamber.
12. Exhaust Gas Recirculation Valve assembly
• Remove two bolts on common chamber to
disconnect Backpressure Transducer vacuum
hose.
13. Common chamber
• Remove six bolts and two nuts and three
bracket fixing
bolts.
•
Remove the common chamber.
Page 569 of 1928
I••IINSTALLATION
13. Common chamber
~ • Tighten bolts and nuts to the specified torque.
~
Bolts
1~1 Torque N·m (lb·ft) 24 (17)
Nut
~~~ Torque N·m (lb·ft) 24 (17)
12. Exhaust Gas Recirculation Valve assembly
• Tighten bolts to the specified torque.
~~~ Torque N·m (lb·in) I 9 (78)
11. Evaporative Emission Canister Purge hose
9. Positive Crankcase Ventilation hose
1
0. Fuel Pressure Control Valve vacuum hose
7. Throttle body
• Tighten bolts to the specified torque.
~~~ Torque N·m (lb·ft) I 22 (16)
8. Vacuum hose
6.
~
5.
4.
3.
2.
• Connect vacuum hoses on canister Vacuum
Switching Valve and Exhaust
Gas Recirculation
Vacuum Switching Valve to the Throttle Body.
Ignition Control Module assembly
• Tighten bolts to the specified torque and
connect connector.
Torque
N·m (lb·ft)
High tension cables
Connectors
22 (16)
• Connect each connector without fail.
Vacuum booster hose
Accelerator Pedal cable
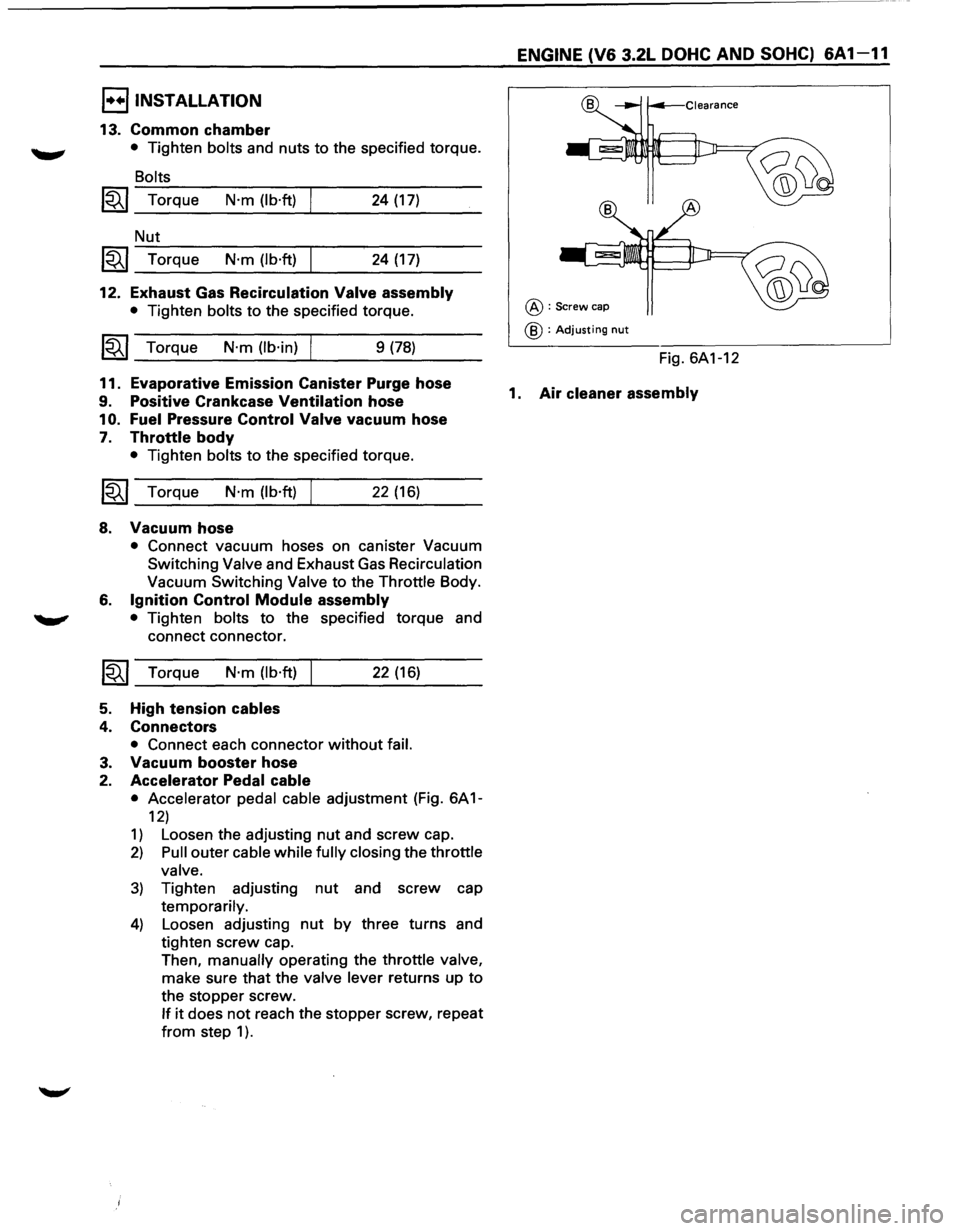
• Accelerator pedal cable adjustment (Fig. 6A 1-
12)
1) Loosen the adjusting nut and screw cap.
2) Pull outer cable while fully closing the throttle
valve.
3) Tighten adjusting nut and screw cap
temporarily.
4) Loosen adjusting nut by three turns and
tighten screw cap.
Then, manually operating the throttle valve,
make sure that the valve lever returns up to
the stopper screw.
If it does not reach the stopper screw, repeat
from step 1 ).
ENGINE (V6 3.2L DOHC AND SOHC) 6A1-11
@:Screw cap
@ :Adjusting nut
Fig. 6A1-12
1. Air cleaner assembly