torque ISUZU TROOPER 1995 Owner's Manual
[x] Cancel search | Manufacturer: ISUZU, Model Year: 1995, Model line: TROOPER, Model: ISUZU TROOPER 1995Pages: 1928
Page 94 of 1928
![ISUZU TROOPER 1995 Owners Manual 1 D-6 COMPRESSOR OVERHAUL
Fig. 1 D-7
Fig. 1D-8
Fig. 1
D-9
Fig. 1D-10
(L!] INSPECTION AND REPAIR
Drive Plate
If the frictional surface shows signs of damage due
to excessive heat, the driv](/img/61/57183/w960_57183-93.png "ISUZU TROOPER 1995 Owners Manual 1 D-6 COMPRESSOR OVERHAUL
Fig. 1 D-7
Fig. 1D-8
Fig. 1
D-9
Fig. 1D-10
(L!] INSPECTION AND REPAIR
Drive Plate
If the frictional surface shows signs of damage due
to excessive heat, the driv")
1 D-6 COMPRESSOR OVERHAUL
Fig. 1 D-7
Fig. 1D-8
Fig. 1
D-9
Fig. 1D-10
(L!] INSPECTION AND REPAIR
Drive Plate
If the frictional surface shows signs of damage due
to excessive heat, the drive plate and pulley should
be replaced.
Pulley Assembly
Check the appearance of the pulley assembly. If the
frictional surface
of the pulley shows signs of
excessive grooving due to slippage, both the pulley
and drive plate should be replaced. The frictional
surfaces
of the pulley assembly should be cleaned
with a suitable solvent before reinstallation.
Coil
Check coil for loose connector or cracked insul
ation.
I••! INSTALLATION
7. Field coil
Align the located portion of the field coil and
compressor (Fig. 1
D-11 ).
Tighten the mounting screw to the specified
torque.
Torque
N·m (lb·in) 5 (44)
Fig. 1D-11
•
Page 95 of 1928
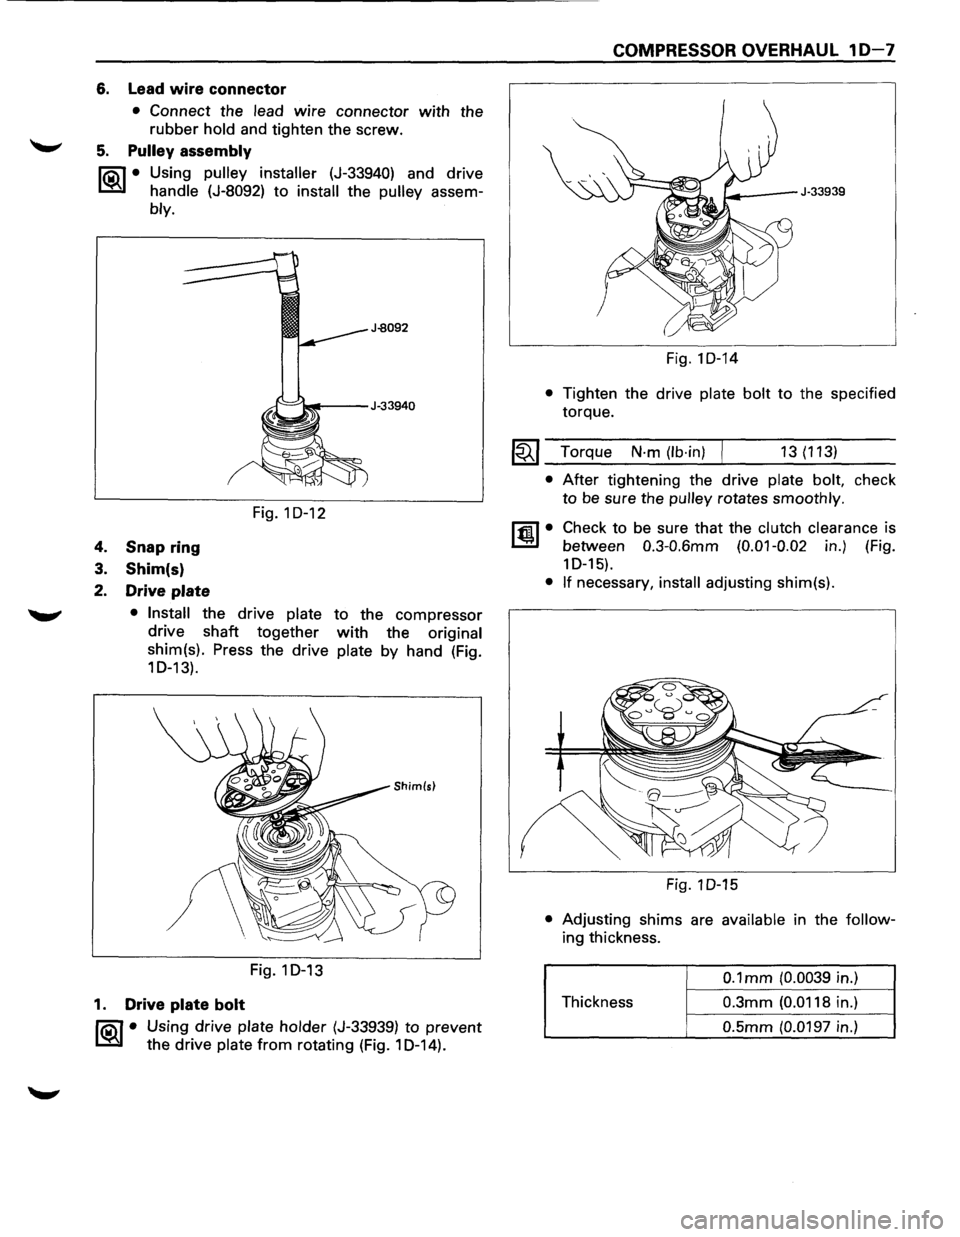
6. Lead wire connector
• Connect the lead wire connector with the
rubber hold and tighten the screw.
5. Pulley assembly
liQ\1 • Using pulley installer (J-33940) and drive
~ handle (J-8092) to install the pulley assem-
bly.
4. Snap ring
3. Shim(s)
2. Drive plate
Fig. 1 D-12
• Install the drive plate to the compressor
drive shaft
together with the original
shim(s). Press the drive
plate by hand (Fig.
10-13).
Fig.1D-13
1. Drive plate bolt
liQ\1 • Using drive plate holder (J-33939) to prevent
~ the drive plate from rotating (Fig. 1 D-14).
COMPRESSOR OVERHAUL 10-7
Fig.1D-14
• Tighten the drive plate bolt to the specified
torque.
~~~ Torque N·m (lb·in) 13(113)
• After tightening the drive plate bolt, check
to be sure the pulley rotates smoothly.
ltm.l• Check to be sure that the clutch clearance is
between
0.3-0.6mm (0.01-0.02 in.) (Fig.
1 D-15).
• If necessary, install adjusting shim(s).
Fig. 1 D-15
• Adjusting shims are available in the follow
ing thickness.
0.1 mm (0.0039 in.)
Thickness
0.3mm (0.0118 in.)
0.5mm (0.0197 in.)
Page 96 of 1928
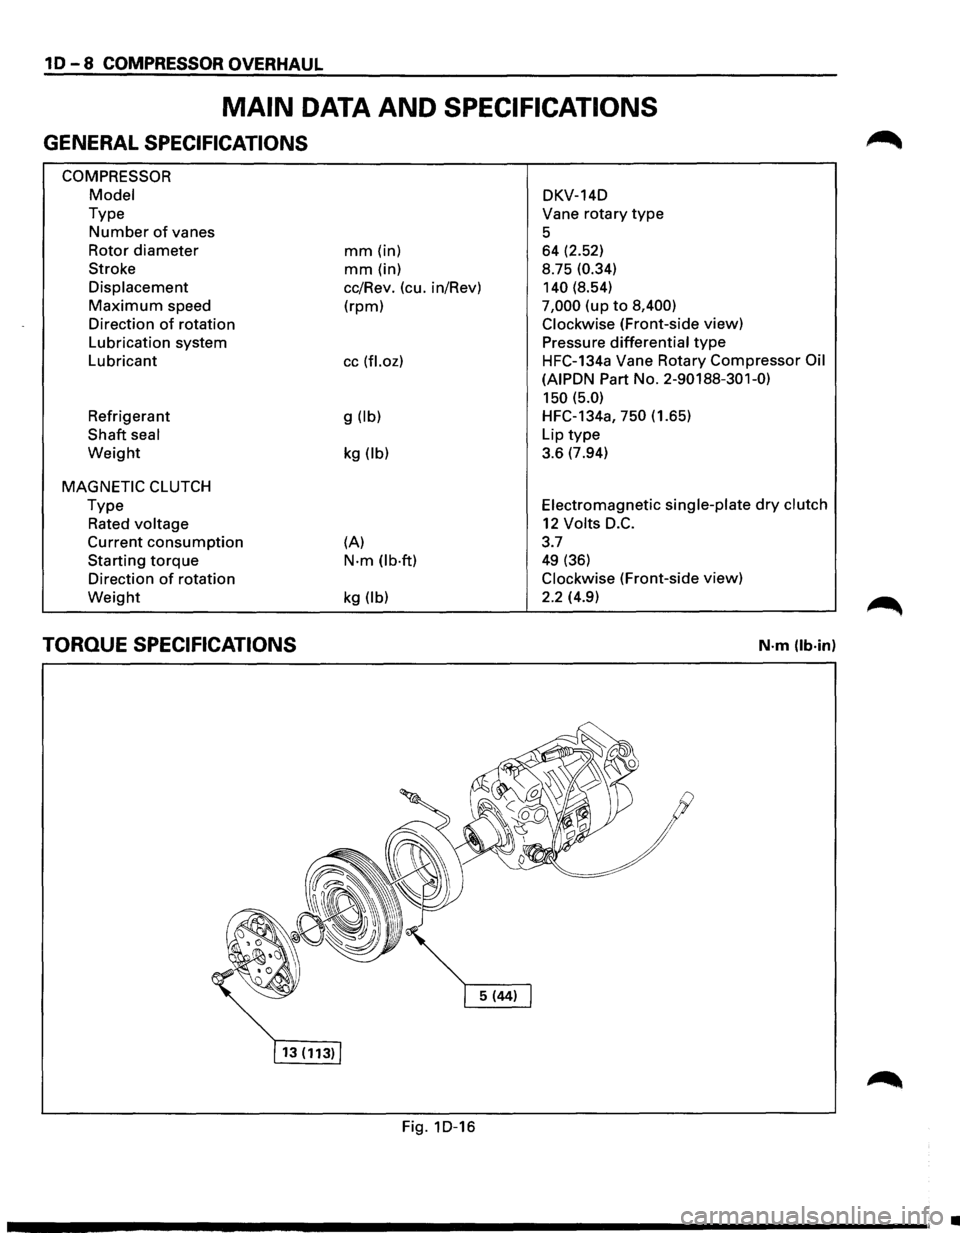
10-8 COMPRESSOR OVERHAUL
MAIN DATA AND SPECIFICATIONS
GENERAL SPECIFICATIONS
COMPRESSOR
Model
Type
Number of vanes
Rotor
diameter
Stroke
Displacement
Maximum speed
Direction
of rotation
Lubrication system
Lubricant
Refrigerant
Shaft seal
Weight
MAGNETIC CLUTCH
Type
Rated voltage
Current consumption
Starting torque
Direction of rotation
Weight
TORQUE SPECIFICATIONS
mm (in)
mm (in)
cc/Rev. (cu. in/Rev)
(rpm)
cc (fl.oz)
g (lb)
kg (lb)
(A)
N·m (lb·ft)
kg (lb)
Fig. 1D-16 DKV-14D
Vane
rotary type
5 64 (2.52)
8.75
(0.34)
140
(8.54)
7,000 (up to 8,400)
Clockwise
(Front-side view)
Pressure
differential type
HFC-134a Vane Rotary Compressor Oil
(AIPDN
Part No. 2-90188-301-0)
150 (5.0)
HFC-134a, 750 (1.65)
Lip
type
3.6 (7.94)
Electromagnetic single-plate dry clutch
12 Volts D.C.
3.7
49 (36)
Clockwise (Front-side view)
2.2 (4.9)
N·m (lb·in)
•
Page 99 of 1928
FRAME 2A-1
FRAME, BUMPERS AND SHEET METAL
CONTENTS
Frame . . . . . . . . . . . . . . . . . . . . . . . . . . . . . . . . . . . . . . . . . . . . . . . . . . . . . . . . . . . . . . . . . . . . . . . . Section 2A
Bumpers . . . . . . . . . . . . . . . . . . . . . . . . . . . . . . . . . . . . . . . . . . . . . . . . . . . . . . . . . . . . . . . . . . . . . Section
28
Sheet Metal . . . . . . . . . . . . . . . . . . . . . . . . . . . . . . . . . . . . . . . . . . . . . . . . . . . . . . . . . . . . . . . . . . Section 2C
SECTION 2A
FRAME
NOTE:
Fasteners are important attaching parts in that they could affect the performance of vital components and
systems,
and/or could result in major repair expense. They must be replaced with one of the same part number or
with an equivalent part if replacement becomes necessary. Do not use a replacement part of lesser or substitute
design. Torque
values must be used as specified during reassembly to assure proper retention of these parts.
Refer to Torque
Value Chart in the general information of Section "OA".
CONTENTS
General Description ................................................................... 2A-1
Frame Dimensions .................................................................... 2A-2
GENERAL DESCRIPTION
Proper frame alignment is important to assure normal
vehicle life
and performance of many other parts of the
vehicle. If
the vehicle has
been involved in a fire, collision or has
been
overloaded, it is necessary to check the frame
alignment.
•
Page 103 of 1928
BUMPERS 28-1
SECTION 28
BUMPERS
NOTE:
Fasteners are important attaching parts in that they could affect the performance of vital components and
systems,
and/or could result in major repair expense. They must be replaced with one ofthe same part number
or with an equivalent part if replacement becomes necessary. Do not use a replacement part of lesser or
substitute design. Torque values must be used as specified during reassembly to assure proper retention of
these parts. Refer to Torque Value Chart in the general information of Section "OA".
CONTENTS
General Description ................................ 2B-1 Front Bumper ....................................... 2B-2
On-Vehicle Service ................................. 2B-2
Rear Bumper ........................................ 2B-4
GENERAL DESCRIPTION
This section describes how to remove and install front
and rear bumpers. Each bumper is installed with two
fixing bolts used on either side to fasten backbar to
the frame, a slider is used to fasten the bumper fascia
tothe fender panel. The bumpers can be removed by
taking them out forward or backward after removing
the two fixing bolts on either side.
Page 105 of 1928
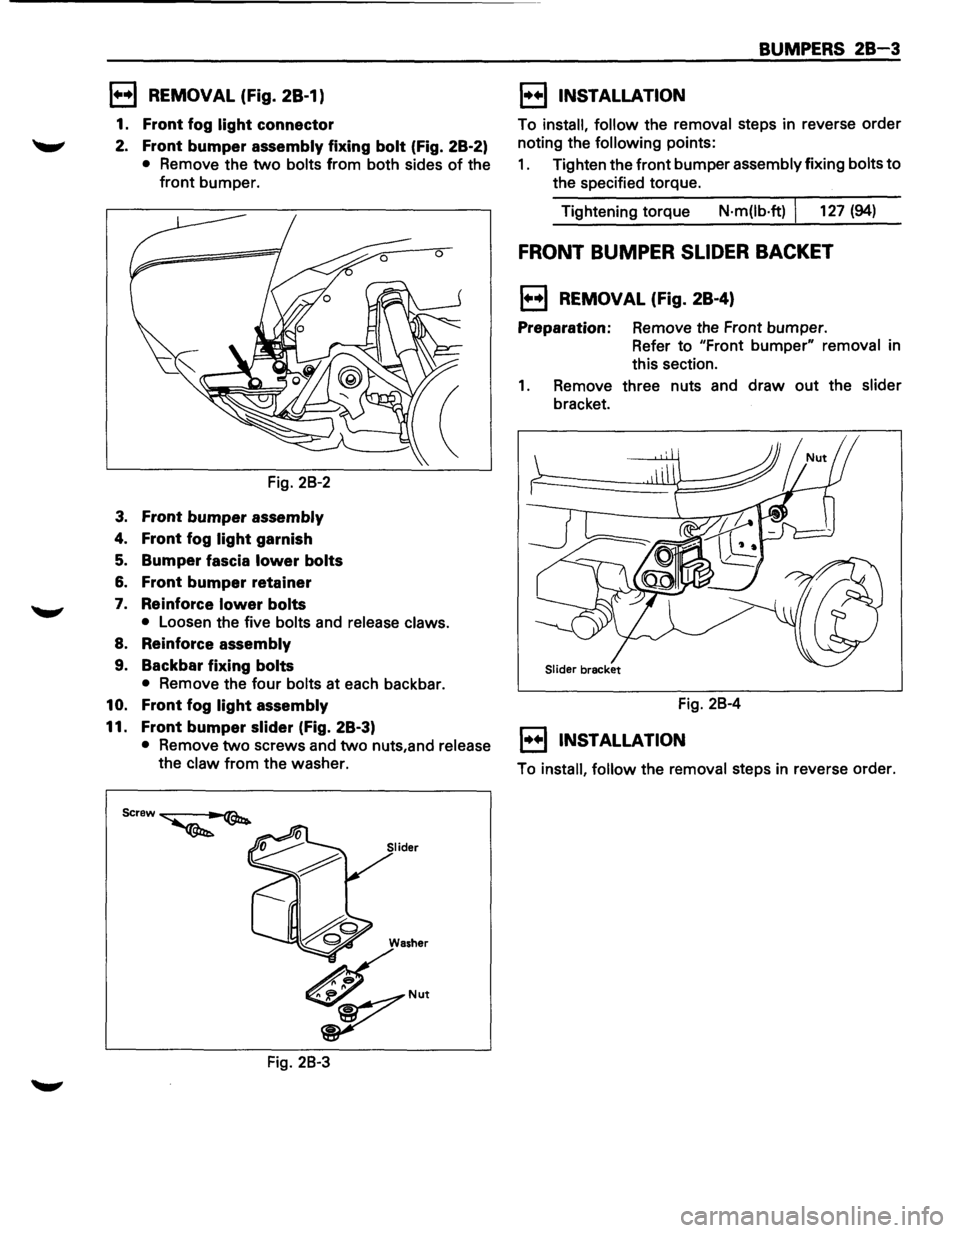
1••1 REMOVAL (Fig. 28-1)
1. Front fog light connector
2. Front bumper assembly fixing bolt (Fig. 28-2)
• Remove the two bolts from both sides of the
front bumper.
Fig. 28-2
3. Front bumper assembly
4. Front fog light garnish
5. Bumper fascia lower bolts
6. Front bumper retainer
7. Reinforce lower bolts
• Loosen the five bolts and release claws.
8. Reinforce assembly
9. Backbar fixing bolts
• Remove the four bolts at each backbar.
10. Front fog light assembly
11. Front bumper slider (fig. 28-3)
• Remove two screws and two nuts,and release
the claw from the washer.
Fig. 28-3
BUMPERS 28-3
1••1 INSTALLATION
To install, follow the removal steps in reverse order
noting the
following points:
1. Tighten the front bumper assembly fixing bolts to
the specified torque.
Tightening torque
N·m(lb·ft) I 127 (94)
FRONT BUMPER SLIDER BACKET
1••1 REMOVAL (Fig. 28-4)
Preparation: Remove the Front bumper.
Refer to "Front
bumper" removal in
this section.
1. Remove three nuts and draw out the slider
bracket.
Fig. 28-4
1••1 INSTALLATION
To install, follow the removal steps in reverse order.
Page 107 of 1928
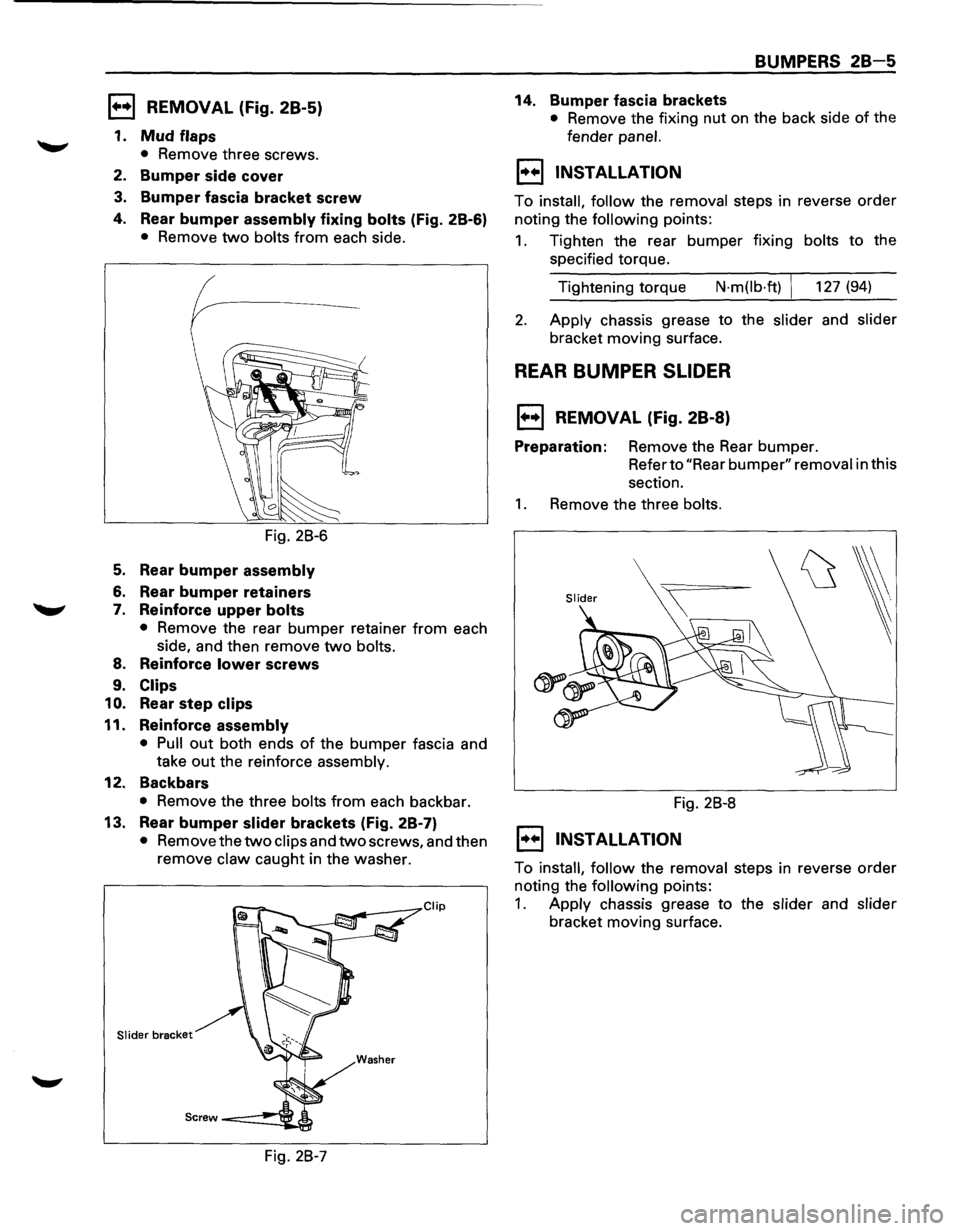
1••1 REMOVAL (Fig. 28-5)
1. Mud flaps
• Remove three screws.
2. Bumper side cover
3. Bumper fascia bracket screw
4. Rear bumper assembly fixing bolts (Fig. 2B-6)
• Remove two bolts from each side.
Fig. 28-6
5. Rear bumper assembly
6. Rear bumper retainers
7. Reinforce upper bolts
• Remove the rear bumper retainer from each
side, and then remove
two bolts.
8. Reinforce lower screws
9. Clips
10.
Rear step clips
11. Reinforce assembly
• Pull out both ends of the bumper fascia and
take
out the reinforce assembly.
12. Backbars
• Remove the three bolts from each backbar.
13. Rear bumper slider brackets (Fig. 2B-7)
• Remove the two clips and two screws, and then
remove
claw caught in the washer.
Slider bracket
Fig. 28-7
BUMPERS 28-5
14. Bumper fascia brackets
• Remove the fixing nut on the back side of the
fender
panel.
1••1 INSTALLATION
To install, follow the removal steps in reverse order
noting the
following points:
1. Tighten the rear bumper fixing bolts to the
specified torque.
Tightening torque
N·m(lb·ft) 127 (94)
2. Apply chassis grease to the slider and slider
bracket moving surface.
REAR BUMPER SLIDER
1••1 REMOVAL (Fig. 28-8)
Preparation: Remove the Rear bumper.
Refer to
"Rear bumper" removal in this
section.
1. Remove the three bolts.
Fig. 28-8
1••1 INSTALLATION
To install, follow the removal steps in reverse order
noting the
following points:
1. Apply chassis grease to the slider and slider
bracket moving surface.
Page 109 of 1928
SHEET METAL 2C-1
SECTION 2C
SHEET METAL
NOTE:
Fasteners are important attaching parts in that they could affect the performance of vital components and
systems,
and/or could result in major repair expense. They must be replaced with one of the same part number or
with an equivalent part if replacement becomes necessary. Do not use a replacement part of lesser quality or
substitute design. Torque values must be used as specified during reassembly to assure proper retention of these
parts. Refer
to Torque Value Chart in the general information of Section "OA".
CONTENTS
General Description . . . . . . . . . . . . . . . . . . . . 2C-1
On-Vehicle Service . . . . . . . . . . . . . . . . . . . . 2C-2
Cowl Cover . . . . . . . . . . . . . . . . . . . . . . . . . 2C-2
Engine Hood . . . . . . . . . . . . . . . . . . . . . . . . 2C-3
Engine Hood Hinge . . . . . . . . . . . . . . . . . . 2C-4
Engine Hood Lock .................... 2C-5
Radiator Grill and Front end
Lower Panel
....................... 2C-6
Front Fender Panel ................... 2C-7
Body Mounting ...................... 2C-9
GENERAL DESCRIPTION
This section includes items of front end sheet metal
that are attached by bolts, screws
or clips and related
accessory components.
Anti-corrosion materials have been applied to the
interior surfaces
of some metal panels to provide rust resistance.
When servicing these panels, areas on
which this material has been disturbed should
be
properly recoated with service-type anti-corrosion
material.
Page 111 of 1928
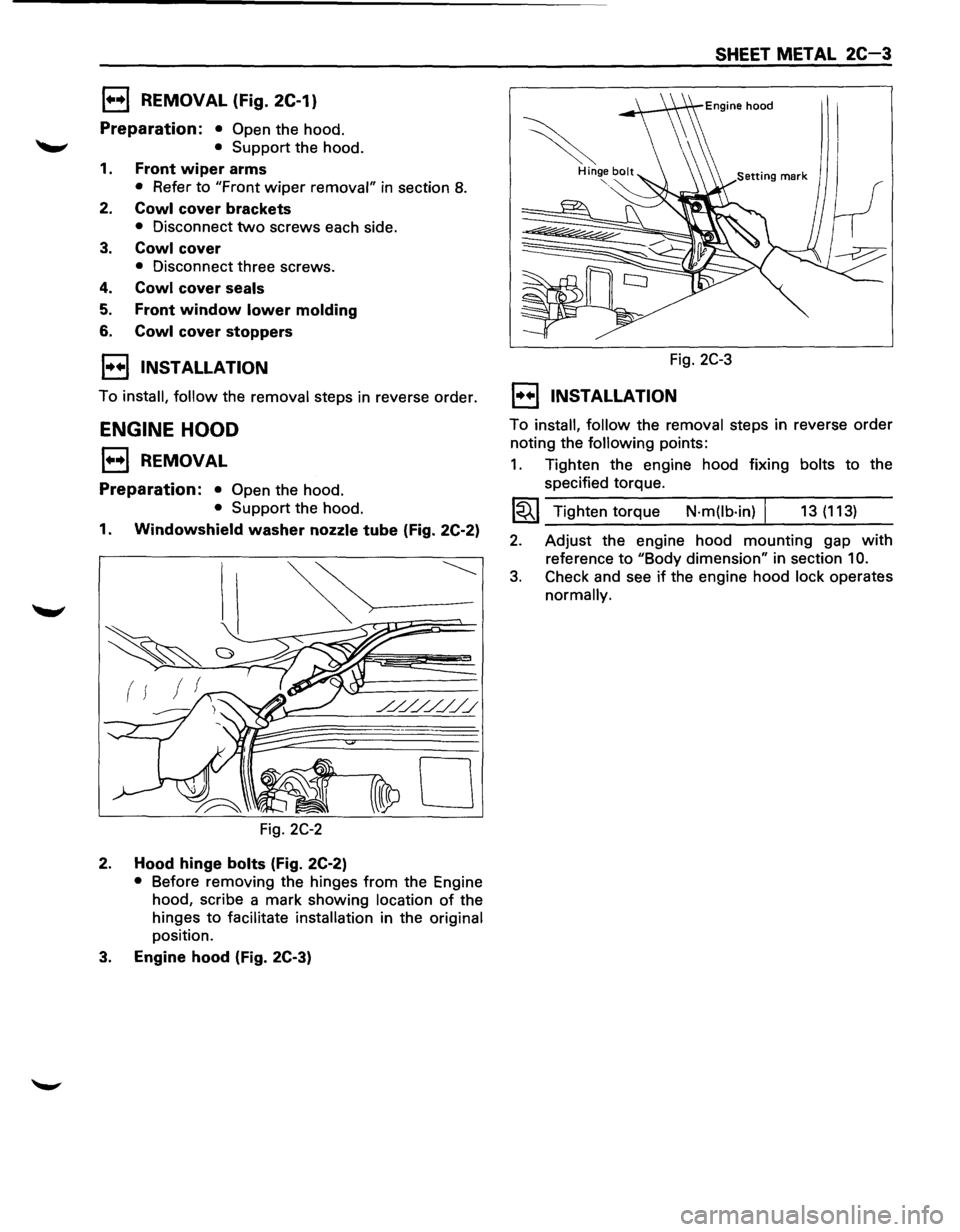
1••1 REMOVAL (Fig. 2C-1)
Preparation: • Open the hood.
'-"' • Support the hood.
1. Front wiper arms
• Refer to "Front wiper removal" in section 8.
2. Cowl cover brackets
• Disconnect two screws each side.
3. Cowl cover
• Disconnect three screws.
4. Cowl cover seals
5. Front window lower molding
6. Cowl cover stoppers
I•• I INSTALLATION
To install, follow the removal steps in reverse order.
ENGINE HOOD
1••1 REMOVAL
Preparation: • Open the hood.
• Support the hood.
1. Windowshield washer nozzle tube (Fig. 2C-2)
( f
0
Fig. 2C-2
2. Hood hinge bolts (Fig. 2C-2)
• Before removing the hinges from the Engine
hood, scribe a mark showing
location of the
hinges
to facilitate installation in the original
position.
3. Engine hood (Fig. 2C-3)
SHEET METAL 2C-3
Fig. 2C-3
1••1 INSTALLATION
To install, follow the removal steps in reverse order
noting the following points:
1. Tighten the engine hood fixing bolts to the
specified torque.
1~1 Tighten torque N·m(lb·in) I 13 (113)
2. Adjust the engine hood mounting gap with
reference to "Body dimension" in section 10.
3. Check and see if the engine hood lock operates
normally.
Page 112 of 1928
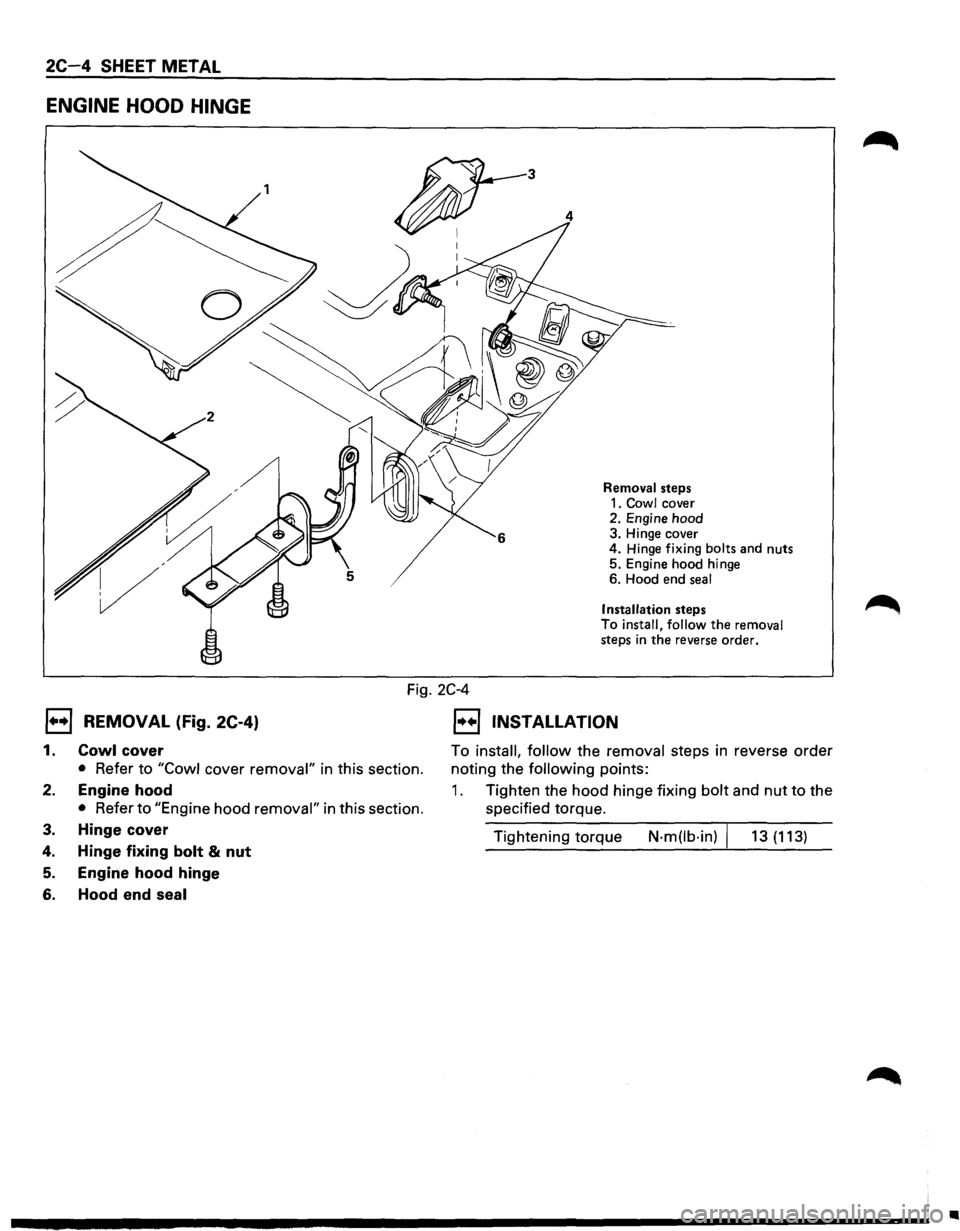
2C-4 SHEET METAL
ENGINE HOOD HINGE
3
4
Removal steps
1. Cowl cover
2. Engine hood
3. Hinge cover
4. Hinge
fixing bolts and nuts
5. Engine hood hinge
6. Hood end
seal
Installation steps To install, follow the removal steps in the reverse order.
Fig. 2C-4
1••1 REMOVAL (fig. 2C-4)
1. Cowl cover
• Refer to "Cowl cover removal" in this section.
2. Engine hood
• Refer to "Engine hood removal" in this section.
3. Hinge cover
4. Hinge fixing bolt & nut
5. Engine hood hinge
6. Hood end seal
1••1 INSTALLATION
To install, follow the removal steps in reverse order
noting the following points:
1. Tighten the hood hinge fixing bolt and nut to the
specified torque.
Tightening torque
N·m(lb·in) I 13 (113)
•