torque ISUZU TROOPER 1995 Repair Manual
[x] Cancel search | Manufacturer: ISUZU, Model Year: 1995, Model line: TROOPER, Model: ISUZU TROOPER 1995Pages: 1928
Page 185 of 1928
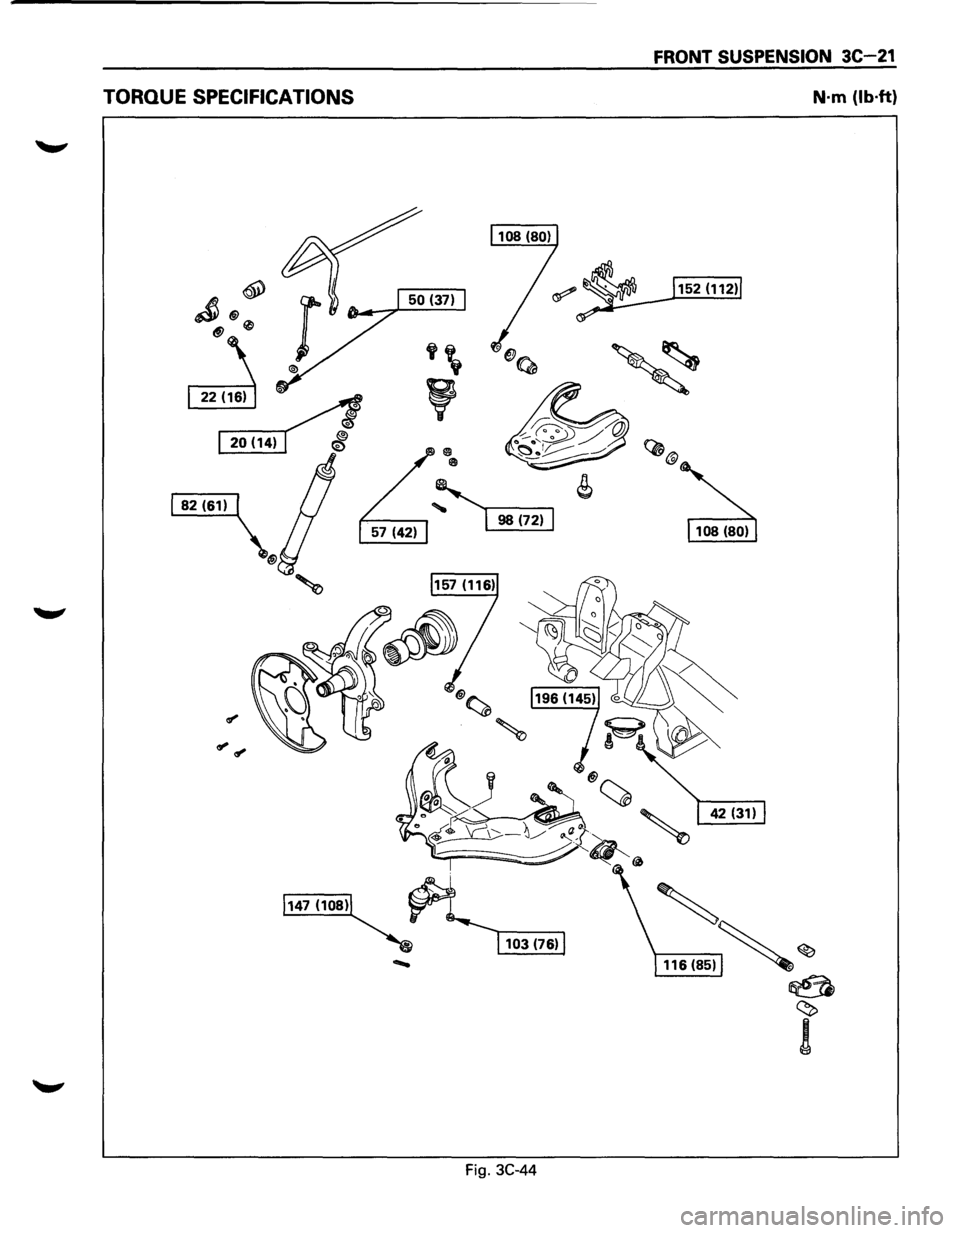
TORQUE SPECIFICATIONS
Fig. 3C-44
FRONT SUSPENSION 3C-21
N·m (lb·ft)
' 116(85)~ ~
~
~
!
Page 187 of 1928
REAR SUSPENSION 30-1
SECTION 30
REAR SUSPENSION
WCAUTION:
VI When fasteners are removed, always reinstall them at the same location from which they were removed. If a
fastener needs to be
replaced, use the correct part number fastener for that application. If the correct part
number fastener is
not available, a fastener of equal size and strength (or stronger) may be used. Fasteners
that are
not reused, and those requiring thread locking compound, will be called out. The correct torque
value must be used when installing fasteners that require it. If the above conditions are not followed, parts or
system damage could result.
CONTENTS
General Description . . . . . . . . . . . . . . . . . . . . 3D-2
On-Vehicle Service .................... 3D-3
Coil Spring . .
. . . . . . . . . . . . . . . . . . . . . . . 3D· 3
Shock
Absorber . . . . . . . . . . . . • . . . . . . . . 3D-5
Trailing Link . .
. . . . . . . . . . . . . . . . . . . . . . 3D-6
Center
Link . . • . . . . . . . . . . • . . . . . . . . . . . 3D-8
Lateral Rod ......................... 3D-1 0
Stabilizer Bar ........................ 3D-11
Main Data and Specifications ............ 3D-12
General Specifications ................ 3D-12
Torque Specifications
................ 30-13
Special Tools .......................... 3D-13
Page 190 of 1928
30-4 REAR SUSPENSION
I••IINSTALLATION
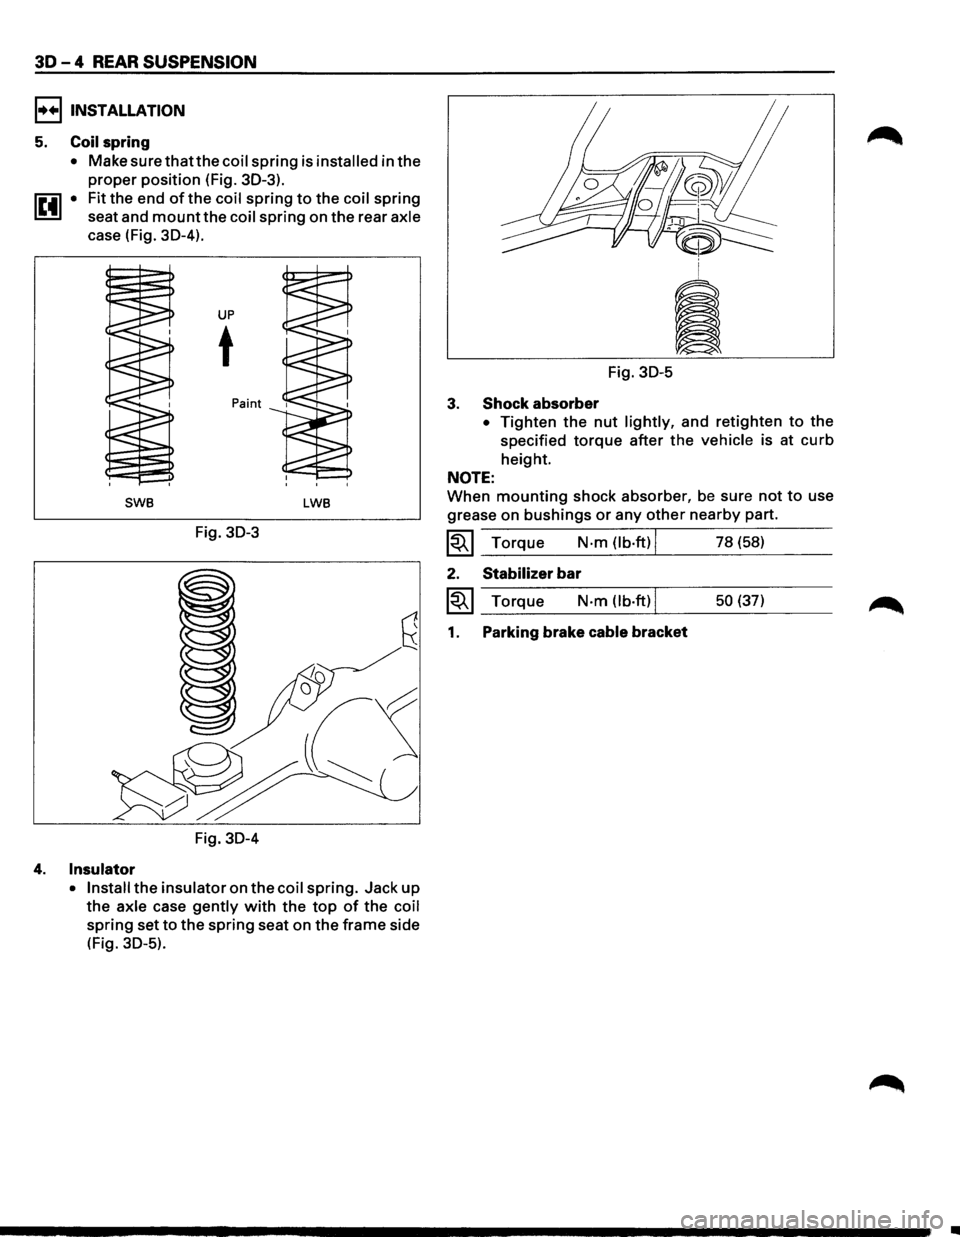
5. Coil spring
• Make surethatthecoil spring is installed in the
proper position (Fig. 30-3).
1~41 • Fit the end of the coil spring to the coil spring
seat and
mount the coil spring on the rear axle
case (Fig. 30-4).
UP
t
Paint
SWB LWB
Fig. 30-3
Fig. 30-4
4. Insulator
• Install the insulator on the coil spring. Jack up
the axle case gently with the top of the coil
spring set to the spring seat on the frame side
(Fig.
30-5).
Fig. 30-5
3. Shock absorber
• Tighten the nut lightly, and retighten to the
specified
torque after the vehicle is at curb
height.
NOTE:
When mounting shock absorber, be sure not to use
grease on
bushings or any other nearby part.
~~~ Torque N·m (lb.ft) I 78 (58)
2. Stabilizer bar
~~~ Torque N·m (lb·ft) I 50 (37)
1. Parking brake cable bracket
•
Page 191 of 1928
SHOCK ABSORBER
REAR SUSPENSION 30-5
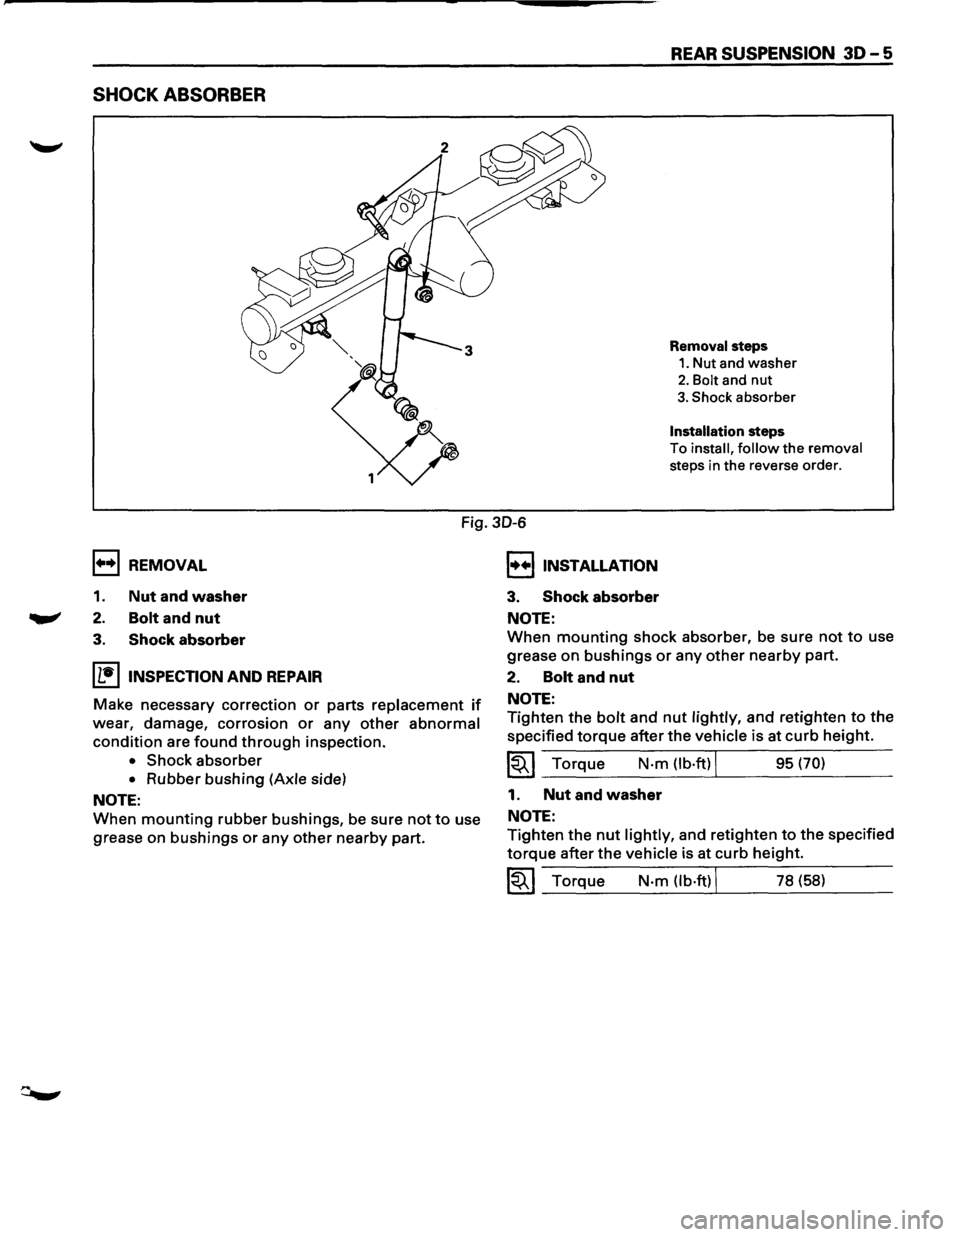
Removal steps
1. Nut and washer
2. Bolt and nut
3. Shock absorber
Installation steps
To
install, follow the removal
steps in the reverse order.
1++1 REMOVAL
1. Nut and washer
2. Bolt and nut
Fig. 30-6
I••IINSTALLATION
3. Shock absorber
NOTE:
3. Shock absorber
IL•IINSPECTION AND REPAIR
Make necessary correction or parts replacement if
wear, damage, corrosion or any other abnormal
condition are found through inspection.
• Shock absorber
• Rubber bushing (Axle side)
NOTE:
When mounting rubber bushings, be sure not to use
grease
on bushings or any other nearby part.
When mounting shock absorber, be sure not to use
grease
on bushings or any other nearby part.
2. Bolt and nut
NOTE:
Tighten the bolt and nut lightly, and retighten to the
specified torque after the vehicle is at curb height.
~~~ Torque N·m (lb·ftl J 95 (70)
1. Nut and washer
NOTE:
Tighten the nut lightly, and retighten to the specified
torque after the vehicle is at curb height.
~~~ Torque N·m (lb·ftl J 78 (58)
Page 193 of 1928
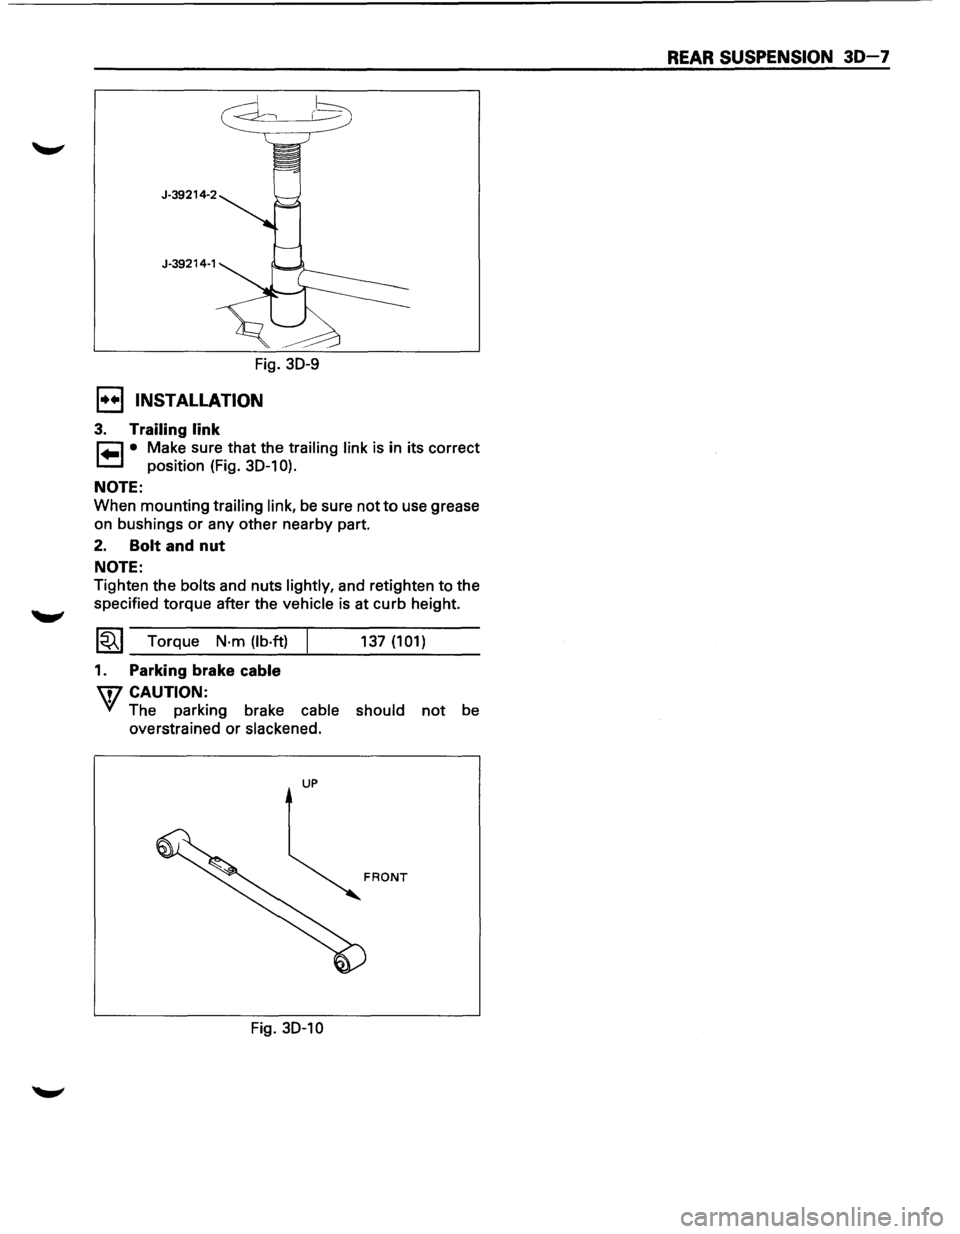
J-39214-2 J-39214-1
Fig. 30-9
1••1 INSTALLATION
3. Trailing link
~ • Make sure that the trailing link is in its correct
1.=.1 position (Fig. 30-1 0).
NOTE:
When mounting trailing link, be sure not to use grease
on bushings or any other nearby part.
2. Bolt and nut
NOTE:
Tighten the bolts and nuts lightly, and retighten to the
specified torque after the
vehicle is at curb height.
1~1 Torque N·m (lb·ft)
1. Parking brake cable
W CAUTION:
137 (101)
VI The parking brake cable should not be
overstrained or
slackened.
UP
Fig. 30-10
REAR SUSPENSION 30-7
Page 195 of 1928
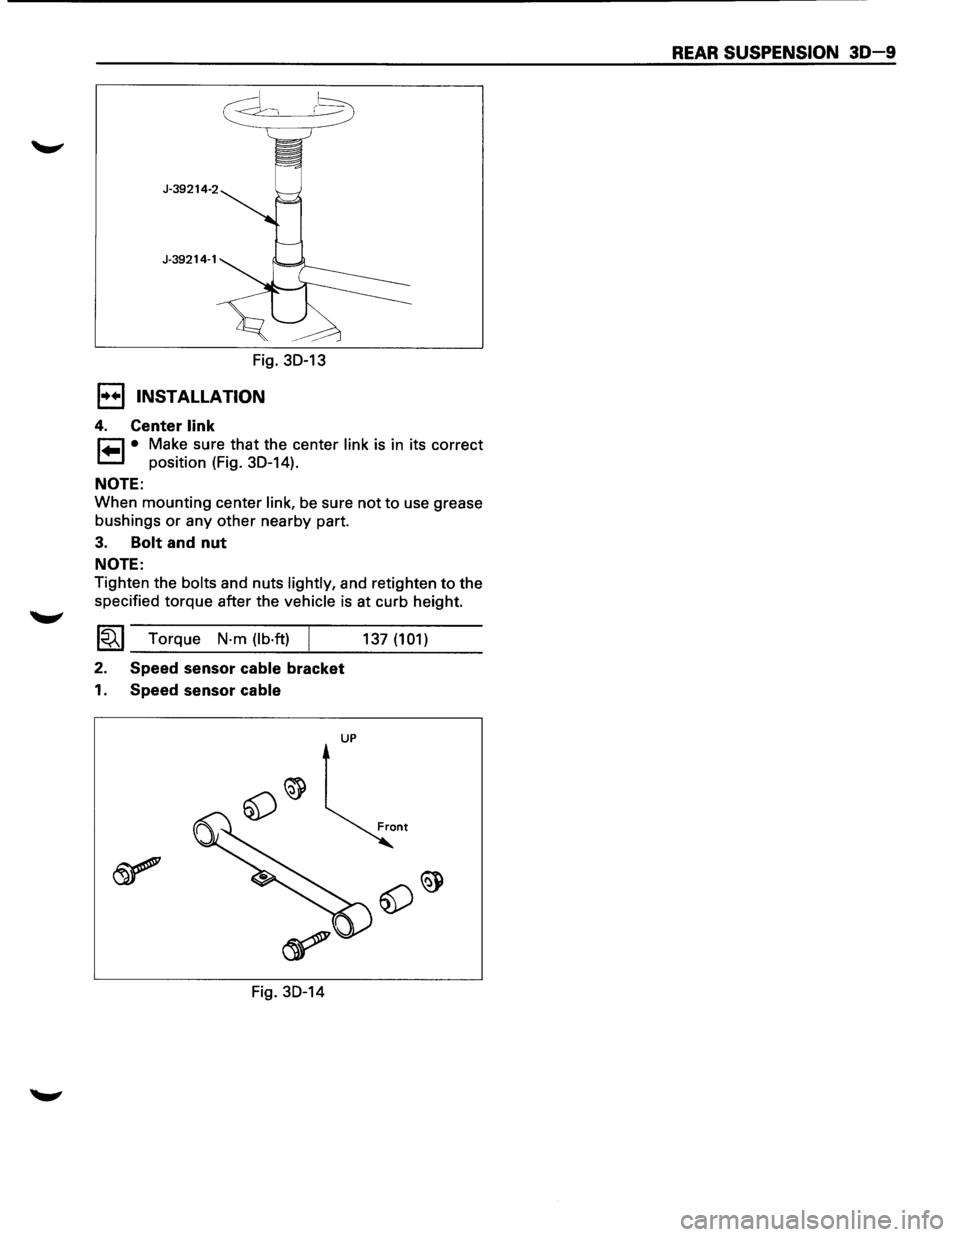
r-:::::1 )--~
Fig. 30-13
I•+ I INSTALLATION
4. Center link
r=l • Make sure that the center link is in its correct
1.=.1 position (Fig. 30-14).
NOTE:
When mounting center link, be sure not to use grease
bushings
or any other nearby part.
3. Bolt and nut
NOTE:
Tighten the bolts and nuts lightly, and retighten to the
specified torque after the
vehicle is at curb height.
~~~ Torque N·m (lb·ft) /
2. Speed sensor cable bracket
1. Speed sensor cable
UP
Fig. 30-14 137
(101)
REAR SUSPENSION 30-9
Page 197 of 1928
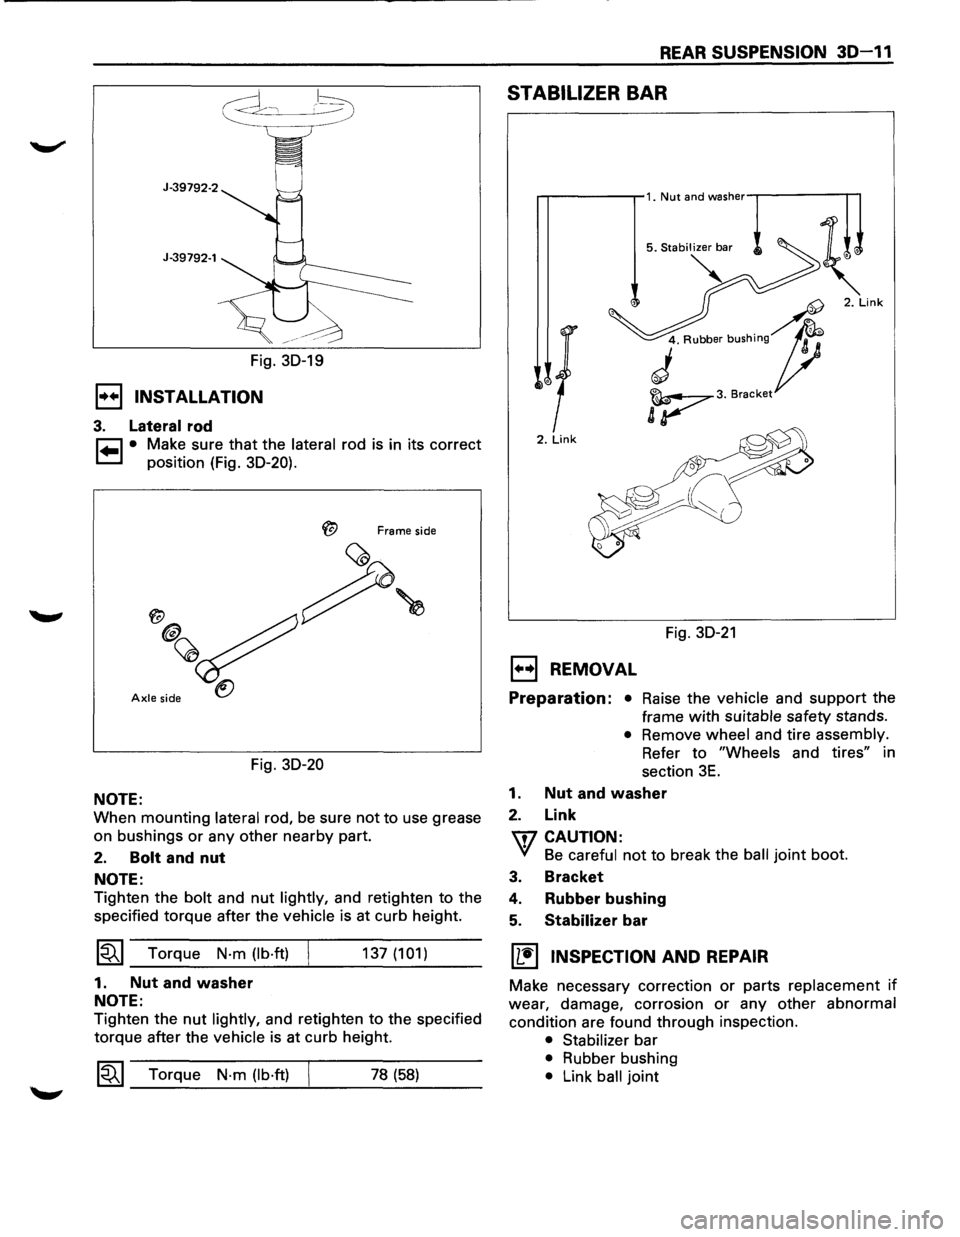
J-39792-1
Fig. 30-19
1•+1 INSTALLATION
3. Lateral rod
~ • Make sure that the lateral rod is in its correct
~ position (Fig. 30-20).
Frame side
Axle side
Fig. 30-20
NOTE:
When mounting lateral rod, be sure not to use grease
on bushings
or any other nearby part.
2. Bolt and nut
NOTE:
Tighten the bolt and nut lightly, and retighten to the
specified torque after the
vehicle is at curb height.
~~~ Torque N·m (lb·ft)
1. Nut and washer
NOTE:
137 (101)
Tighten the nut lightly, and retighten to the specified
torque after the
vehicle is at curb height.
1~1 Torque N·m (lb·ft) 78 (58)
REAR SUSPENSION 30-11
STABILIZER BAR
2. Link
Fig. 30-21
EJ REMOVAL
Preparation: • Raise the vehicle and support the
frame
with suitable safety stands.
• Remove wheel and tire assembly.
Refer
to "Wheels and tires" in
section
3E.
1. Nut and washer
2. Link
\fl CAUTION:
VI Be careful not to break the ball joint boot.
3. Bracket
4. Rubber bushing
5. Stabilizer bar
[!] INSPECTION AND REPAIR
Make necessary correction or parts replacement if
wear, damage, corrosion or any other abnormal
condition are found through inspection.
• Stabilizer bar
• Rubber bushing
• Link ball joint
Page 198 of 1928
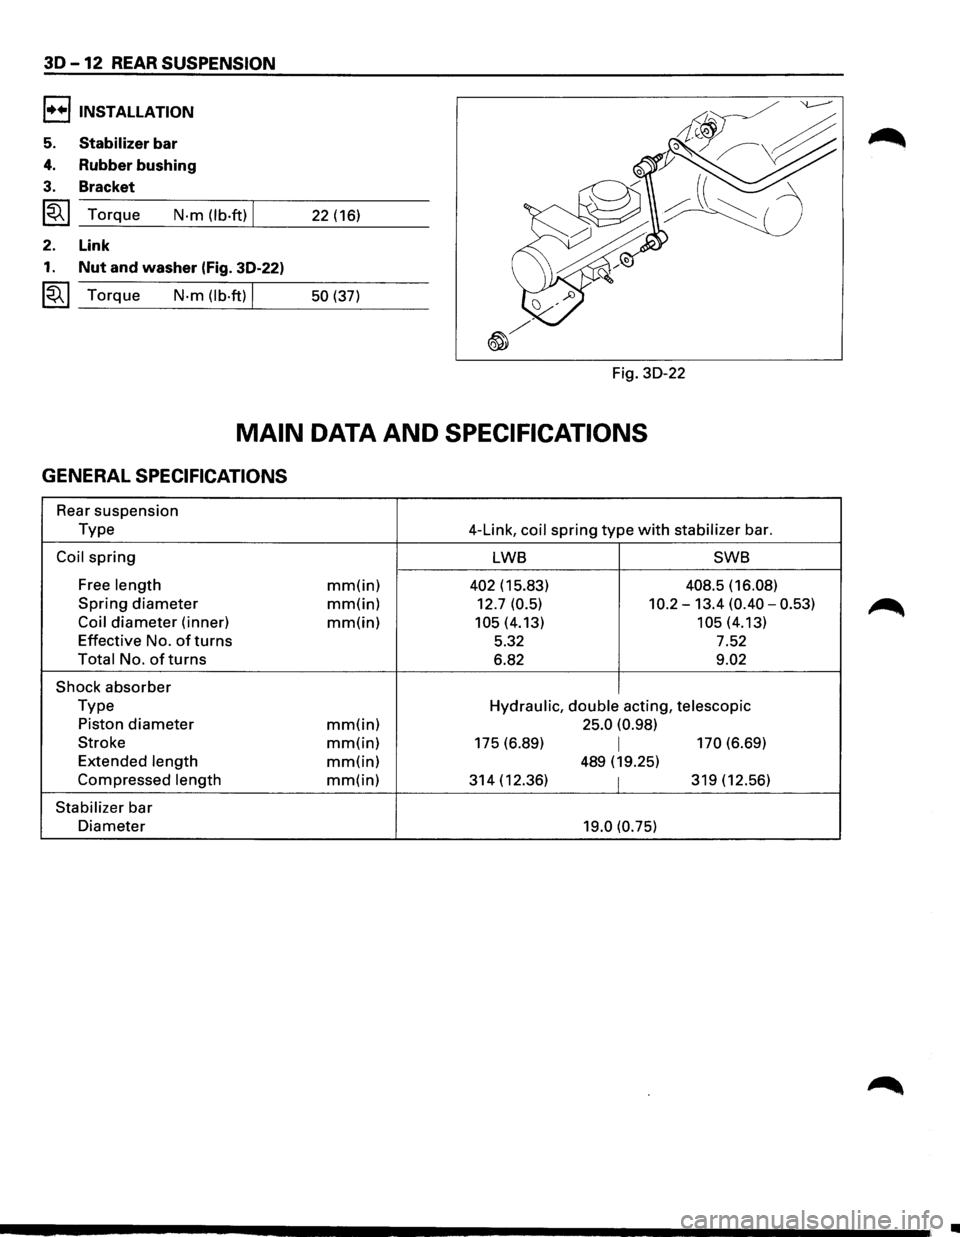
3D -12 REAR SUSPENSION
l+•liNSTALLATION
5. Stabilizer bar
4. Rubber bushing
3. Bracket
~~~ Torque N·m (lb.ft) I 22 (16)
2. Link
1. Nut and washer (Fig. 30-22)
~~~ Torque N-m (lb·ft) I 50 (37)
Fig.
30-22
MAIN DATA AND SPECIFICATIONS
GENERAL SPECIFICATIONS
Rear suspension
Type 4-Link, coil spring type with stabilizer bar.
Coil spring LWB SWB
Free
length mm(in) 402 (15.83) 408.5 (16.08)
Spring diameter mm(in) 12.7 (0.5) 10.2-13.4 (0.40-0.53)
Coil diameter (inner) mm(in) 105 (4.13) 105(4.13)
Effective No.
of turns 5.32 7.52
Total No. of turns 6.82 9.02
Shock absorber
Type Hydraulic, double acting, telescopic
Piston diameter mm(in) 25.0
(0.98)
Stroke
mm(in) 175 (6.89) I 170 (6.69)
Extended
length mm(in) 489 (19.25)
Compressed length mm(in) 314 (12.36) I 319 (12.56)
Stabilizer bar
Diameter 19.0 (0.75)
•
Page 199 of 1928
REAR SUSPENSION 30-13
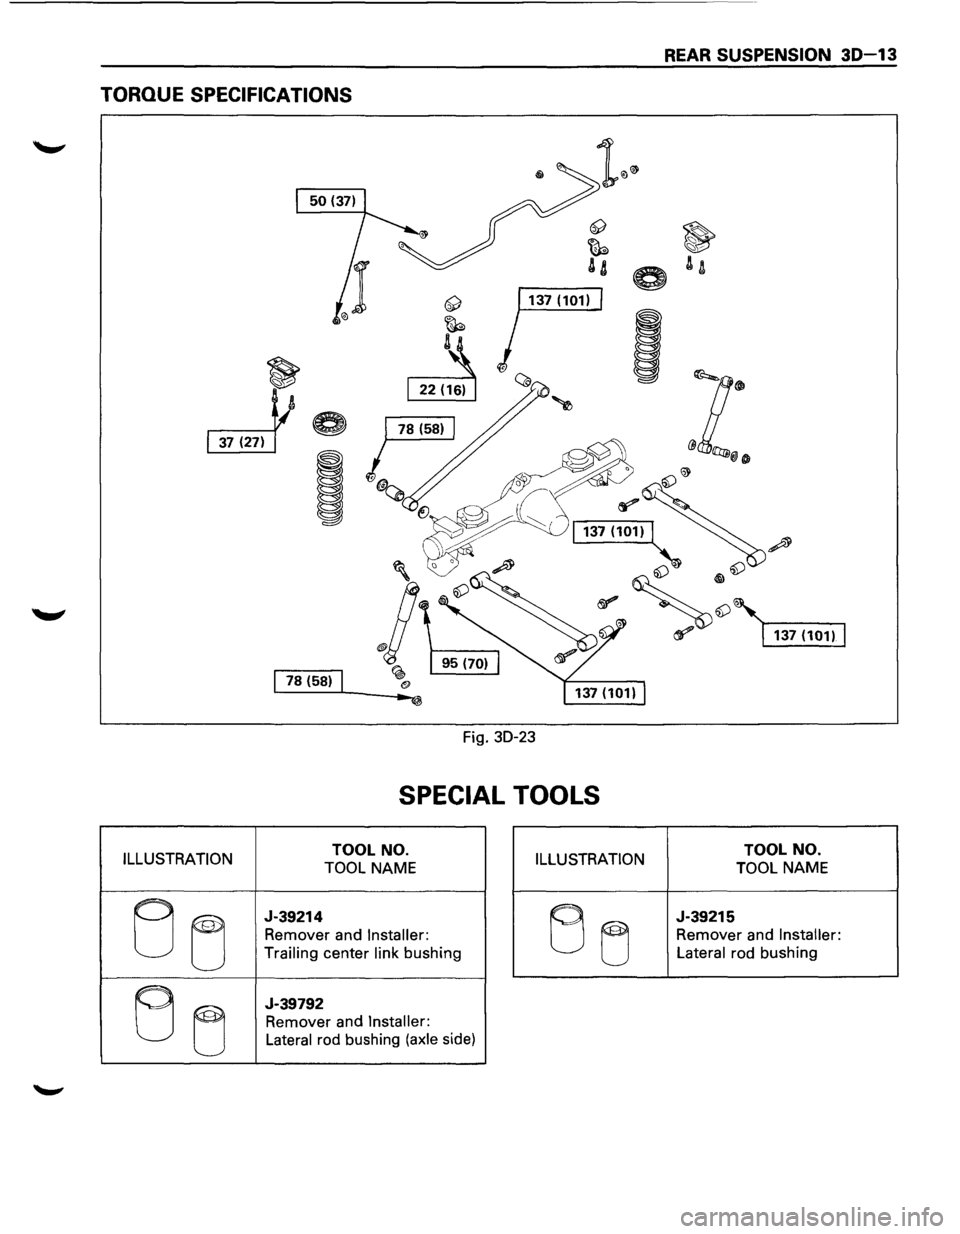
TORQUE SPECIFICATIONS
1 1s (sa) 1
Fig. 30-23
SPECIAL TOOLS
ILLUSTRATION TOOL NO.
TOOL NAME ILLUSTRATION TOOL NO.
TOOL NAME
EJ ~
J-39214
Remover and Installer:
Trailing
center link bushing B u
J-39215
Remover and Installer:
Lateral
rod bushing
B u
J-39792
Remover and Installer:
Lateral
rod bushing (axle side)
Page 201 of 1928
WHEELS AND TIRES 3E-1
SECTION 3E
WHEELS AND TIRES
W CAUTION:
When fasteners are removed, always reinstall them at the same location from which they were removed.
If a fastener needs to be replaced, use the correct part number fastener for that application. If the correct
part
number fastener is not available, a fastener of equal size and strength (or stronger) may be used.
Fasteners
that are not reused, and those requiring thread locking compound, will be called out. The correct
torque value must be used when installing fasteners that require it. If the above conditions are not
followed, parts or system damage could result.
CONTENTS
General Description . . . . . . . . . . . . . . . . . . . . . . . . . . . . . . . 3 E -1 Unit Repair .......................................... 3E-7
Diagnosis ........................................... 3E-2 Tires ............................................... 3E-7
Irregular and Premature Wear ................ 3E-2 Wheels ............................................ 3E-7
Inflation of Tires ................................. 3 E- 3 General Balance Procedure ................... 3E-8
Diagnosis List. . . . . . . . . . . . . . . . . . . . . . . . . . . . . . . . . . . . 3 E- 3 Balancing Wheel and Tire ...................... 3E-8
On-Vehicle Service ................................ 3E-6 Main Data and Specifications .................... 3E-9
Wheels ............................................ 3E-6 General Specifications ......................... 3E-9
Torque Specifications .......................... 3E-9
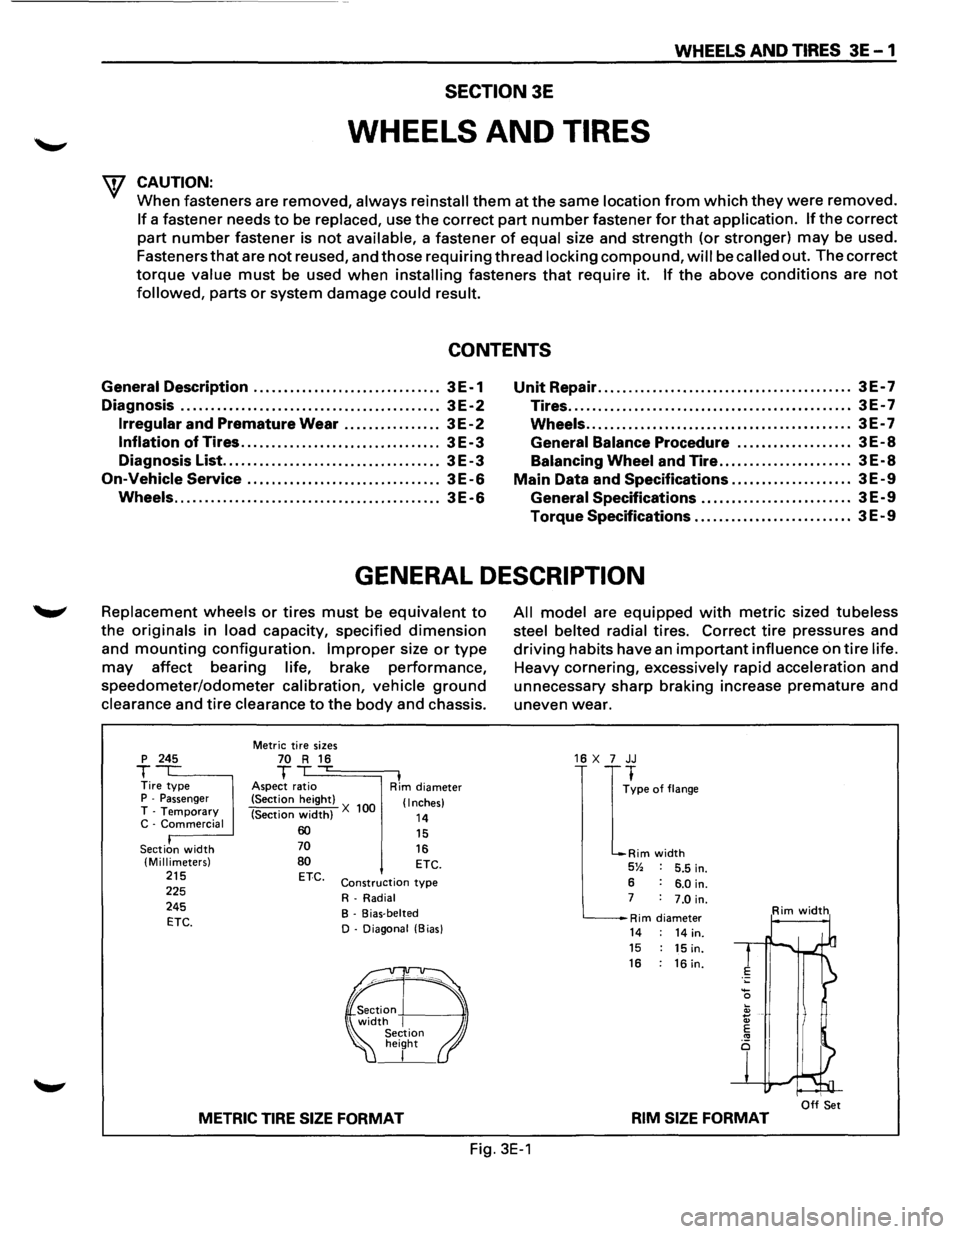
GENERAL DESCRIPTION
Replacement wheels or tires must be equivalent to
the originals in load capacity, specified dimension
and mounting configuration. Improper size or type
may affect bearing life, brake performance,
speedometer/odometer calibration, vehicle ground
clearance and tire clearance to the body and chassis.
p 245
T Tire type P -Passenger T -Temporary C -Commercial
Section
width (Millimeters) 215 225
245
ETC.
Metric tire sizes 70 R 16 T ,...
Aspect ratio I Rim diameter
(Section height)
(Section
width) X 100 (Inches)
14 60 70
80 ETC.
15
16 ETC.
Construction type
R-Radial
B - Bias-belted
D - Diagonal (Bias)
METRIC TIRE SIZE FORMAT
All model are equipped with metric sized tubeless
steel belted radial
tires. Correct tire pressures and
driving habits have an important influence on tire life.
Heavy cornering, excessively rapid acceleration and
unnecessary sharp braking increase
premature and
uneven wear.
16 X 7 JJ
I
~pe of flange
Rim width 5% 5.5 in.
6 6.0 in. 7 7.0 in.
Rim diameter Rim width
14 14 in. 15 15 in. 16 : 16 in.
I Off Set RIM SIZE FORMAT
Fig. 3E-1