tailgate ISUZU TROOPER 1995 Owner's Guide
[x] Cancel search | Manufacturer: ISUZU, Model Year: 1995, Model line: TROOPER, Model: ISUZU TROOPER 1995Pages: 1928
Page 1835 of 1928
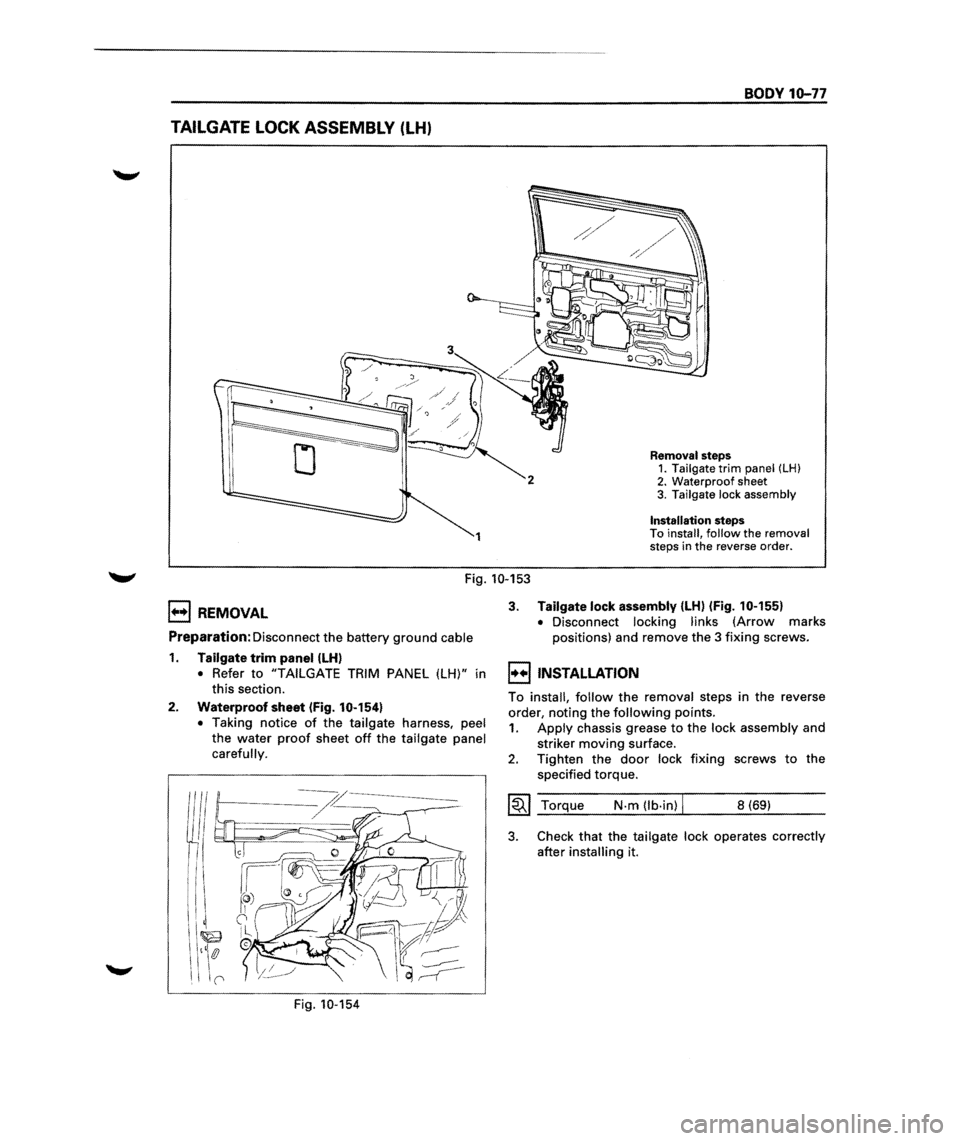
TAILGATE LOCK ASSEMBLY (LH)
1
BODY 10-77
Removal steps 1. Tailgate trim panel (LH) 2. Waterproof sheet
3. Tailgate lock assembly
Installation steps To install, follow the removal
steps in the reverse order.
Fig. 10-153
E) REMOVAL
Preparation: Disconnect the battery ground cable
1. Tailgate trim panel (LH)
• Refer to "TAILGATE TRIM PANEL (LH)" in
this section.
2. Waterproof sheet (Fig. 10-154)
•
Taking notice of the tailgate harness, peel
the water
proof sheet off the tailgate panel
carefully.
Fig. 10-154
3. Tailgate lock assembly {LH) (Fig. 10-155)
•
Disconnect locking links (Arrow marks
positions) and remove the
3 fixing screws.
l••liNSTALLATION
To install, follow the removal steps in the reverse
order, noting the
following points.
1. Apply chassis grease to the lock assembly and
striker
moving surface.
2. Tighten the door lock fixing screws to the
specified torque.
~~~ Torque N·m (lb·in) I 8 (69)
3. Check that the tailgate lock operates correctly
after
installing it.
j
j
j
j
j
j
j
j
j
j
j
j
j
j
j
j
j
j
j
j
j j
j
j
j
j
j
j
j
j
j
j
j
j
j
j
j
j
j
j
j
j
j
j
j j
j
j
j
j
j
j
j
j
j
j
j
j
j
j
j
j
j j
j
j j j
j
j
Page 1836 of 1928
10-78 BODY
To actuator
To inside lock knob I
l
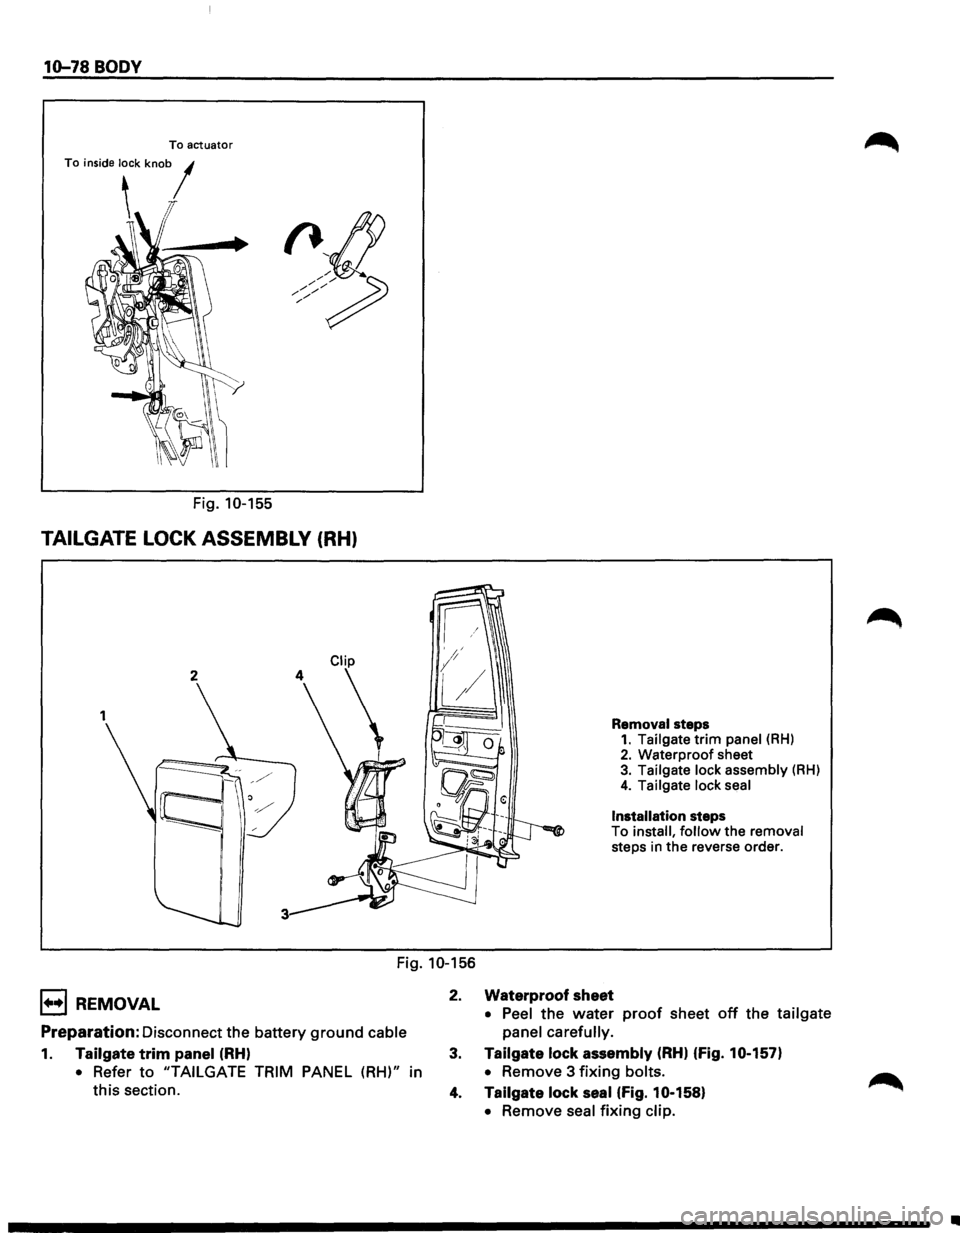
Fig. 10-155
TAILGATE LOCK ASSEMBLY (RH)
2
Removal steps 1. Tailgate trim panel (RH) 2. Waterproof sheet 3. Tailgate lock assembly (RH)
4. Tailgate lock seal
Installation steps
To install, follow the removal
steps in
the reverse order.
Fig. 10-156
1••1 REMOVAL
Preparation: Disconnect the battery ground cable
1. Tailgate trim panel (RH)
• Refer to "TAILGATE TRIM PANEL (RH)" in
this section. 2.
Waterproof sheet
• Peel
the water proof sheet off the tailgate
panel carefully.
3. Tailgate lock assembly (RH) (fig. 10-157)
•
Remove 3 fixing bolts.
4. Tailgate lock seal (fig. 10-158)
•
Remove seal fixing clip.
•
Page 1837 of 1928
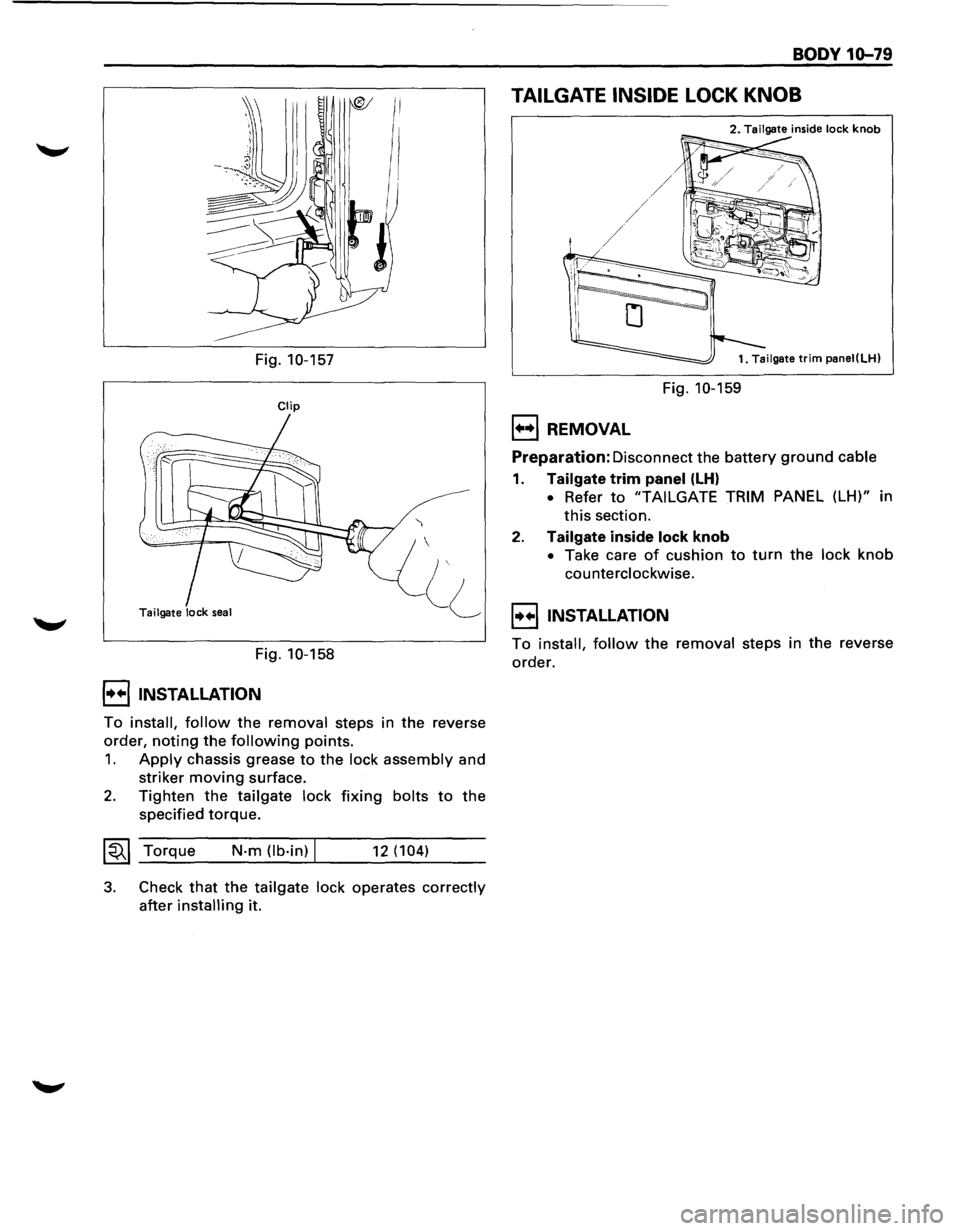
Fig. 10-157
Clip
Tailgate lock seal
Fig. 10-158
I••! INSTALLATION
')
To install, follow the removal steps in the reverse
order,
noting the following points.
1. Apply chassis grease to the lock assembly and
striker
moving surface.
2. Tighten the tailgate lock fixing bolts to the
specified torque.
~~~ Torque N·m (lb·in) I 12 (104)
3. Check that the tailgate lock operates correctly
after installing it.
BODY 10-79
TAILGATE INSIDE LOCK KNOB
2. Tailgate inside lock knob
Fig. 10-159
1•+1 REMOVAL
Preparation: Disconnect the battery ground cable
1. Tailgate trim panel (LH)
• Refer to "TAIL GATE TRIM PANEL (LH)" in
this section.
2. Tailgate inside lock knob
• Take care of cushion to turn the lock knob
counterclockwise.
I••IINSTALLATION
To install, follow the removal steps in the reverse
order.
Page 1838 of 1928
10-80 BODY
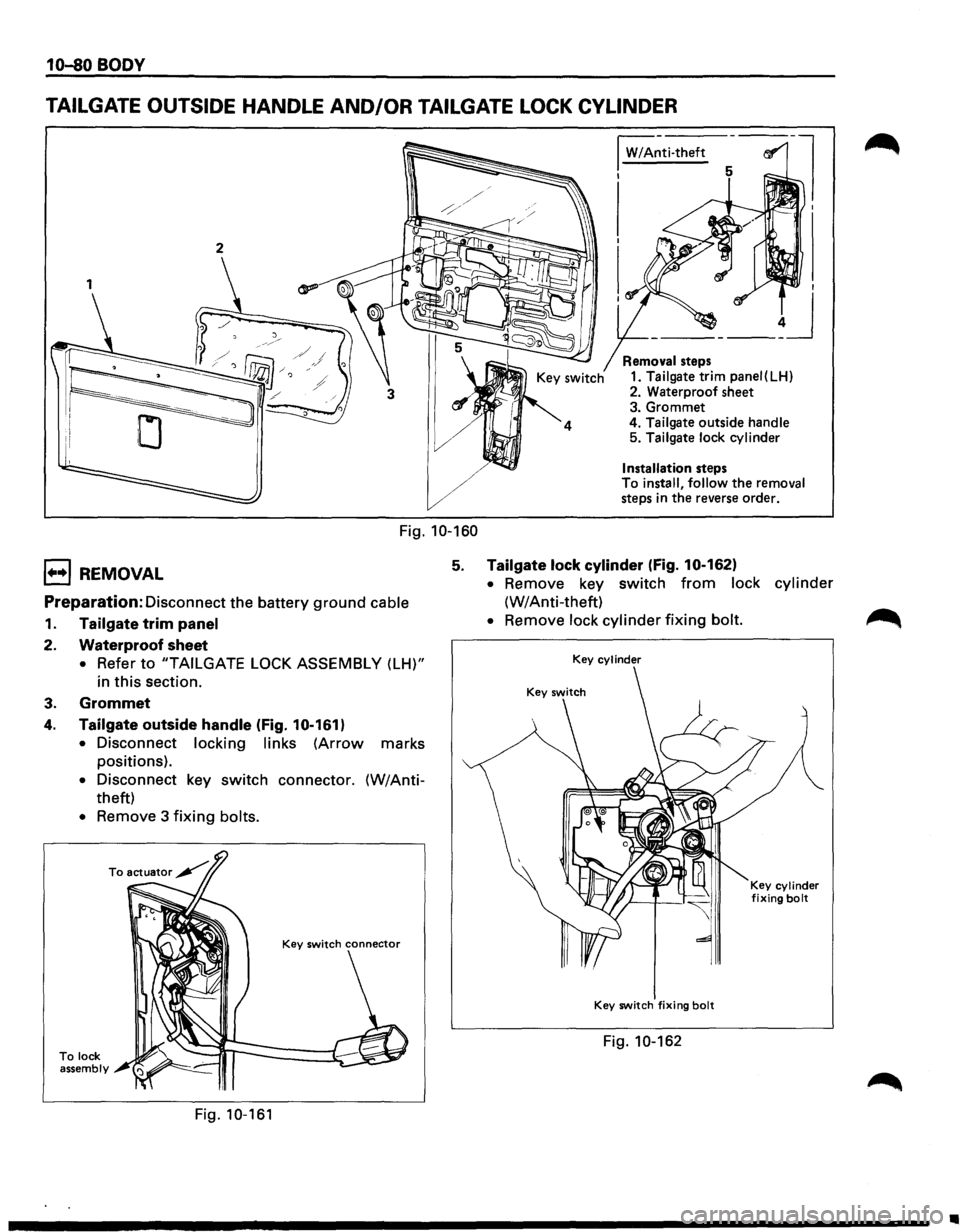
TAILGATE OUTSIDE HANDLE AND/OR TAILGATE LOCK CYLINDER
1
Fig. 10-160
I W/A~ti-theft
I
Removal steps
1. Tailgate trim panei(LH)
2. Waterproof sheet
3. Grommet
4.
Tailgate outside handle 5. Tailgate lock cylinder
Installation steps
To install, follow the removal
steps in the reverse order.
1••1 REMOVAL 5. Tailgate lock cylinder (fig. 10-162)
Preparation: Disconnect the battery ground cable
1. Tailgate trim panel
2. Waterproof sheet
• Refer to "TAILGATE LOCK ASSEMBLY (LH)"
in
this section.
3. Grommet
4. Tailgate outside handle (Fig. 10-161)
•
Disconnect locking links (Arrow marks
positions).
• Disconnect key switch connector. (W/Anti
theft)
• Remove 3 fixing bolts.
To lock assembly
Fig. 10-161
• Remove key switch from lock cylinder
(W/Anti-theft)
• Remove lock cylinder fixing bolt.
Key cylinder
Key switch fixing bolt
Fig. 10-162
Key cylinder fixing bolt
..
Page 1839 of 1928
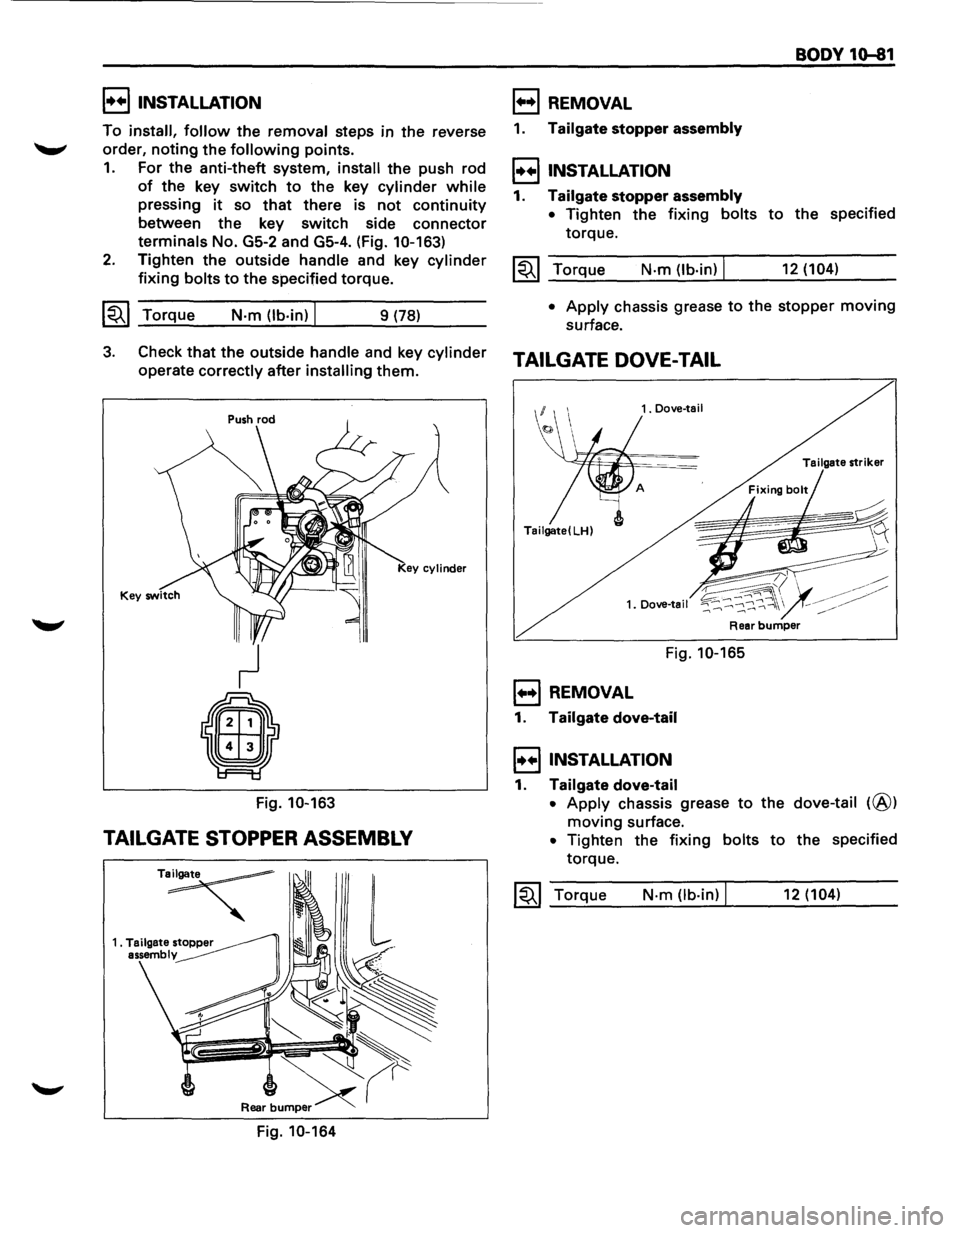
I••IINSTALLATION
To install, follow the removal steps in the reverse
order,
noting the following points.
1. For the anti-theft system, install the push rod
of the key switch to the key cylinder while
pressing it so that there is not continuity
between the key switch side connector
terminals No. GS-2 and GS-4. (Fig. 10-163)
2. Tighten the outside handle and key cylinder
fixing bolts to the specified torque.
~~~ Torque N·m (lb·in) I 9 (78)
B REMOVAL
1. Tailgate stopper assembly
I••! INSTALLATION
1. Tailgate stopper assembly
• Tighten the fixing bolts
torque.
~~~ Torque N·m (lb·in) I
BODY 10-81
to the specified
12 (104)
•
Apply chassis grease to the stopper moving
surface.
3. Check that the outside handle and key cylinder TAILGATE DOVE-TAIL
operate correctly after installing them.
Fig.
10-163
TAILGATE STOPPER ASSEMBLY
T~
Fig. 10-164
1. Dove-tail
Tailgate
striker
Tailgate( LH)
1. Dove-tail
Fig. 10-165
1••1 REMOVAL
1. Tailgate dove-tail
I••IINSTALLATION
1. Tailgate dove-tail
• Apply chassis grease to the dove-tail (@)
moving surface.
• Tighten the fixing bolts to the specified
torque.
~~~ Torque N·m Ob·in) I 12 (104)
Page 1840 of 1928
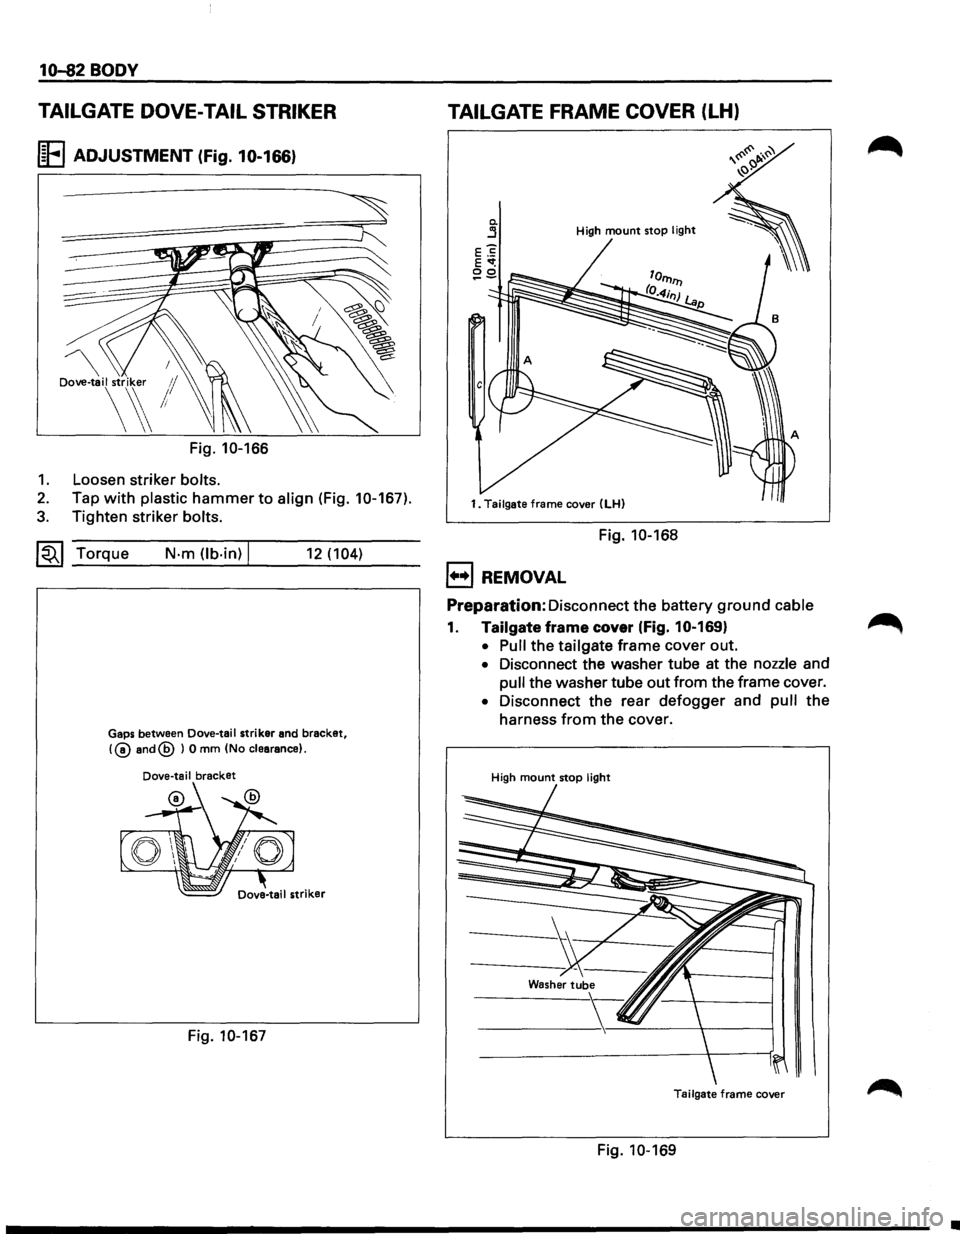
10-82 BODY
TAILGATE DOVE-TAIL STRIKER
I~FI ADJUSTMENT (Fig. 10-166)
Dove-tail striker 1/
\~!
Fig. 10-166
1. Loosen striker bolts.
2. Tap with plastic hammer to align (Fig. 10-167).
3. Tighten striker bolts.
~~~ Torque N·m (lb.in) I 12 (104)
Gaps between Dove-tail striker and bracket,
!@and@ ) 0 mm (No clearance).
Dove-tail bracket
Fig. 10-167
TAILGATE FRAME COVER (LH)
0. j High mount stop light
1. Tailgate frame cover (LH)
Fig. 10-168
1+•1 REMOVAL
Preparation:
Disconnect the battery ground cable
1. Tailgate frame cover (Fig. 10-169}
• Pull the tailgate frame cover out.
• Disconnect the washer tube at the nozzle and
pull the washer tube out from the frame cover.
• Disconnect the rear defogger and pull the
harness
from the cover.
High mount stop light
Tailgate frame cover
Fig. 10-169
•
Page 1841 of 1928
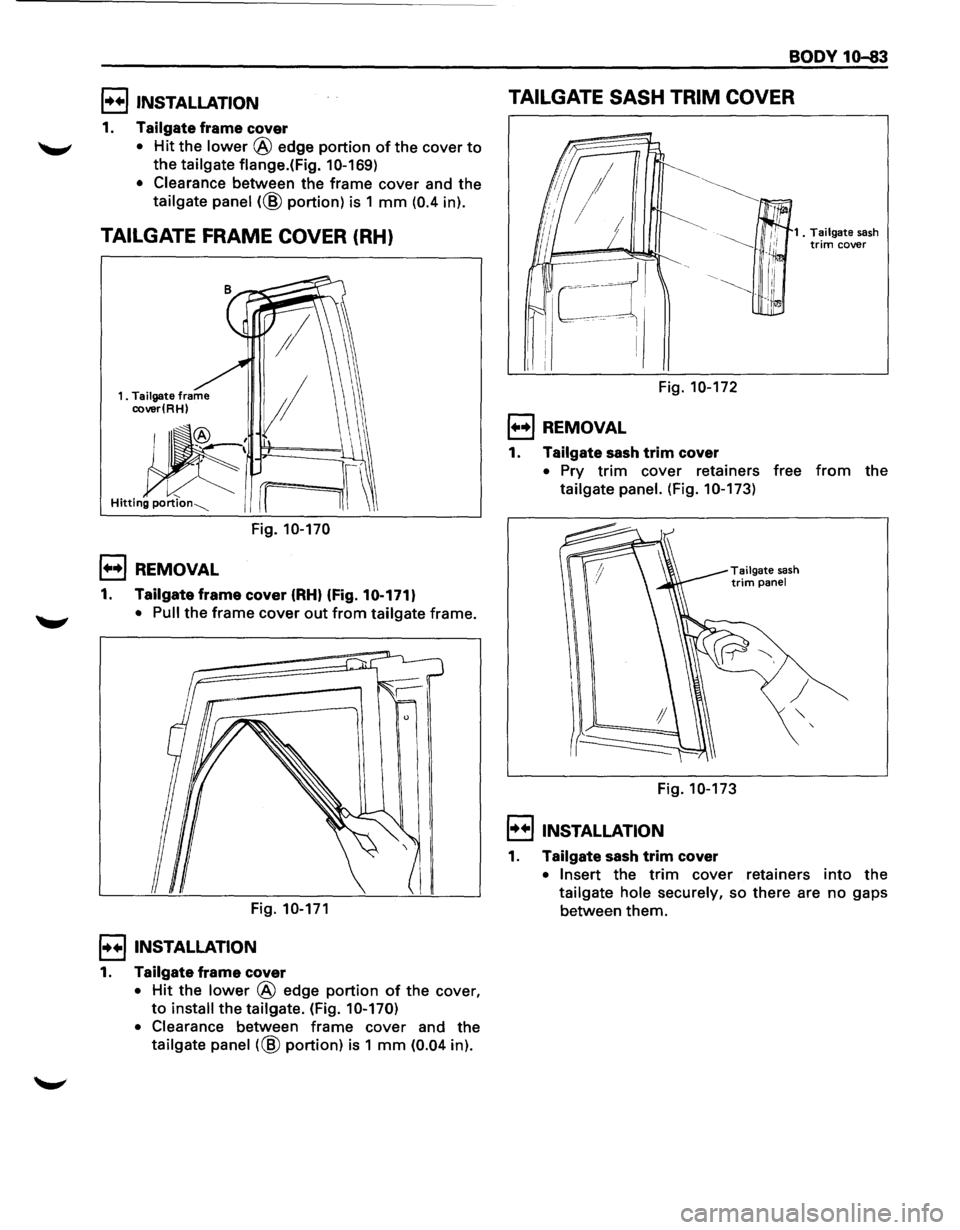
l••liNSTALLATION
1. Tailgate frame cover
"-"' • Hit the lower @ edge portion of the cover to
the tailgate flange.( Fig. 1 0-169)
• Clearance
between the frame cover and the
tailgate panel (@ portion) is 1 mm (0.4 in).
TAILGATE FRAME COVER (RH)
Fig. 10-170
l••l REMOVAL
1. Tailgate frame cover (RH) (Fig.10-171)
• Pull the frame cover out from tailgate frame.
Fig.
10-171
I••! INSTALLATION
1. Tailgate frame cover
• Hit the lower @ edge portion of the cover,
to install the tailgate. (Fig. 10-170)
• Clearance
between frame cover and the
tailgate panel (@ portion) is 1 mm (0.04 in).
BODY 10-83
TAILGATE SASH TRIM COVER
Fig. 10-172
l••l REMOVAL
1. Tailgate sash trim cover
1 . Tailgate sash trim cover
• Pry trim cover retainers free from the
tailgate panel. (Fig. 10-173)
Tai I gate sash trim panel
Fig. 10-173
I••! INSTALLATION
1. Tailgate sash trim cover
• Insert the trim cover retainers into the
tailgate hole securely, so there are no gaps
between
them.
Page 1842 of 1928
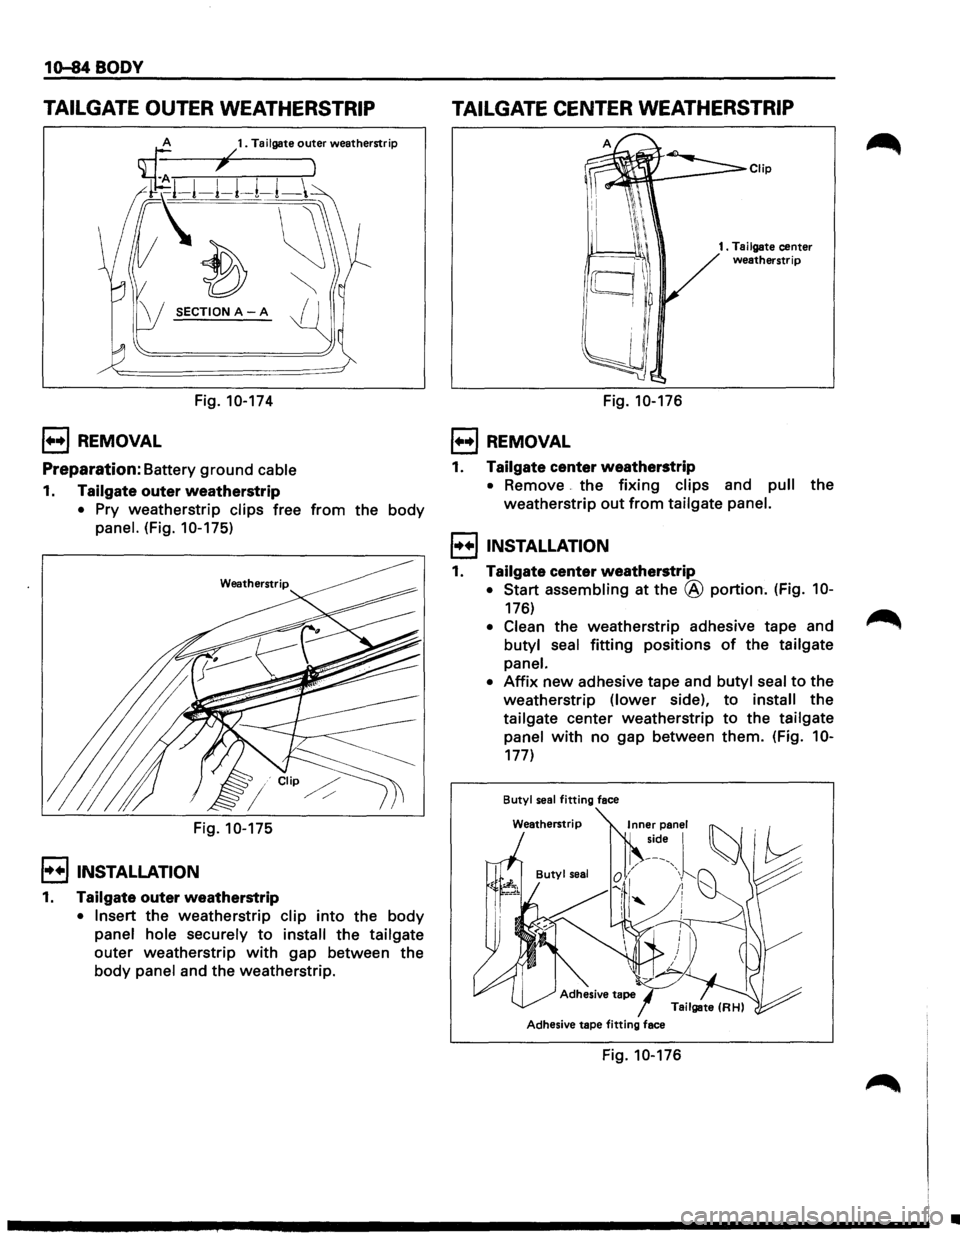
1o-84 BODY
TAILGATE OUTER WEATHERSTRIP
SECTION A-A
Fig. 10-174
l••l REMOVAL
Preparation: Battery ground cable
1. Tailgate outer weatherstrip
• Pry weatherstrip clips free from the body
panel. (Fig. 10-175)
Fig. 10-175
l••IINSTALLATION
1. Tailgate outer weatherstrip
• Insert the weatherstrip clip into the body
panel hole securely to install the tailgate
outer weatherstrip with gap between the
body panel and the weatherstrip.
TAILGATE CENTER WEATHERSTRIP
Fig. 10-176
1••1 REMOVAL
1. Tailgate center weatherstrip
1 . Tailgate center weatherstrip
• Remove the fixing clips and pull the
weatherstrip
out from tailgate panel.
l•+IINSTALLATION
1. Tailgate center weatherstrip
• Start assembling at the @ portion. (Fig. 10-
176)
• Clean the weatherstrip adhesive tape and
butyl seal
fitting positions of the tailgate
panel.
•
Affix new adhesive tape and butyl seal to the
weatherstrip
(lower side), to install the
tailgate center weatherstrip
to the tailgate
panel
with no gap between them. (Fig. 10-
177)
Butyl seal fitting face
Adhesive
tape/ Tailgate (RH)
Adhesive
tape fitting face
Fig. 10-176
•
Page 1843 of 1928
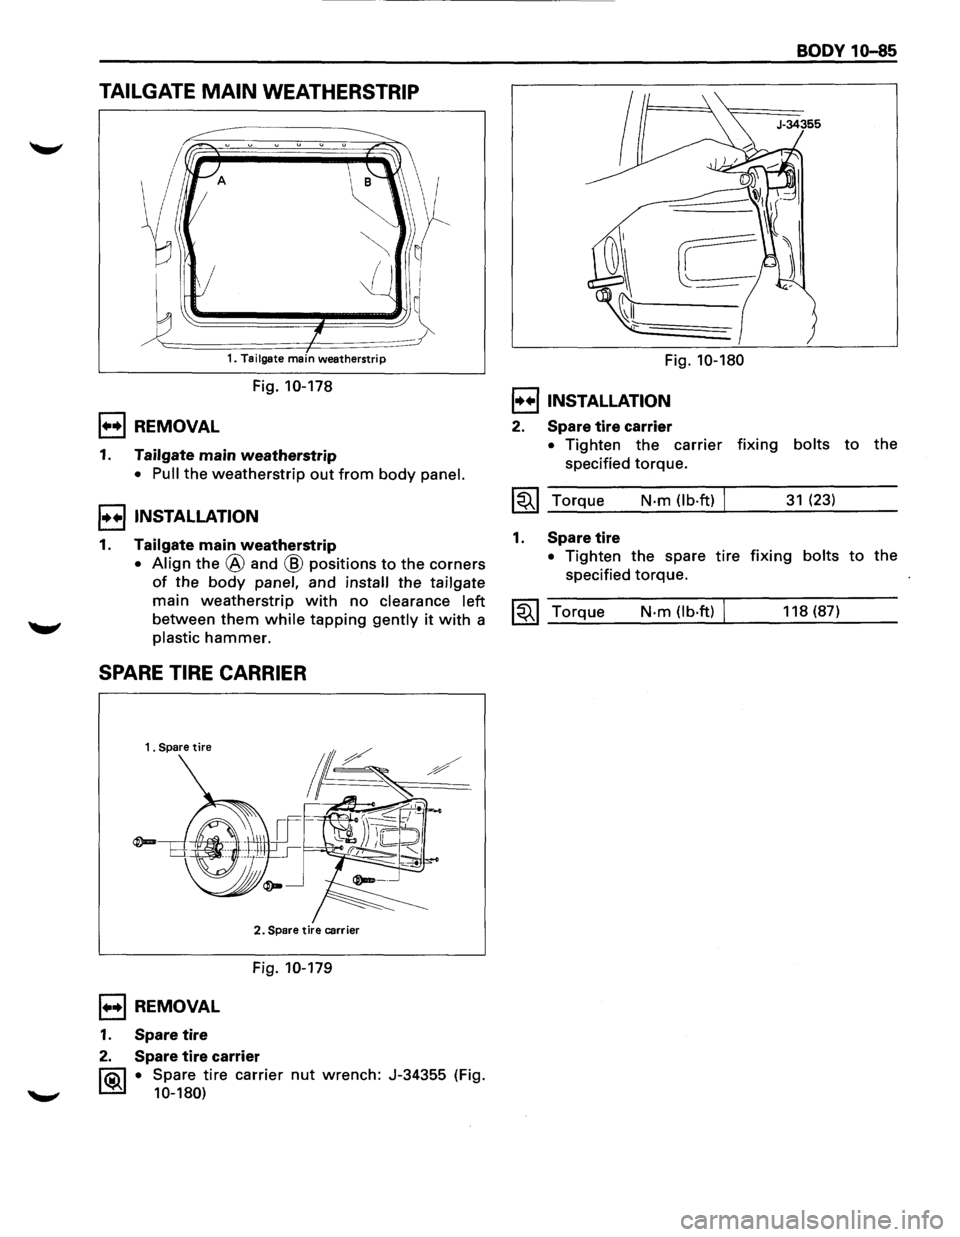
TAILGATE MAIN WEATHERSTRIP
~~~~~
A
~
1====1=-~ 1. Tailgate main weatherstrip
Fig. 10-178
1••1 REMOVAL
1. Tailgate main weatherstrip
• Pull the weatherstrip out from body panel.
I••IINSTALLATION
1. Tailgate main weatherstrip
• Align the @ and @ positions to the corners
of ~he body panel, and install the tailgate
mam weatherstrip with no clearance left
between them while tapping gently it with a
plastic hammer.
SPARE TIRE CARRIER
1 . Spare tire
2. Spare tire carrier
Fig. 10-179
1••1 REMOVAL
1. Spare tire
2. Spare tire carrier
~ • Spare tire carrier nut wrench: J-34355 (Fig.
10-180)
Fig. 10-180
I••IINSTALLATION
2. Spare tire carri,er
BODY 10-85
• Tighten the carrier fixing bolts to the
specified torque.
~~~ Torque N-m (lb-ft) I 31 (23)
1. Spare tire
• Tighten the spare tire fixing bolts to the
specified torque.
~~~ Torque N-m (lb·ft) I 118 (87)
Page 1890 of 1928
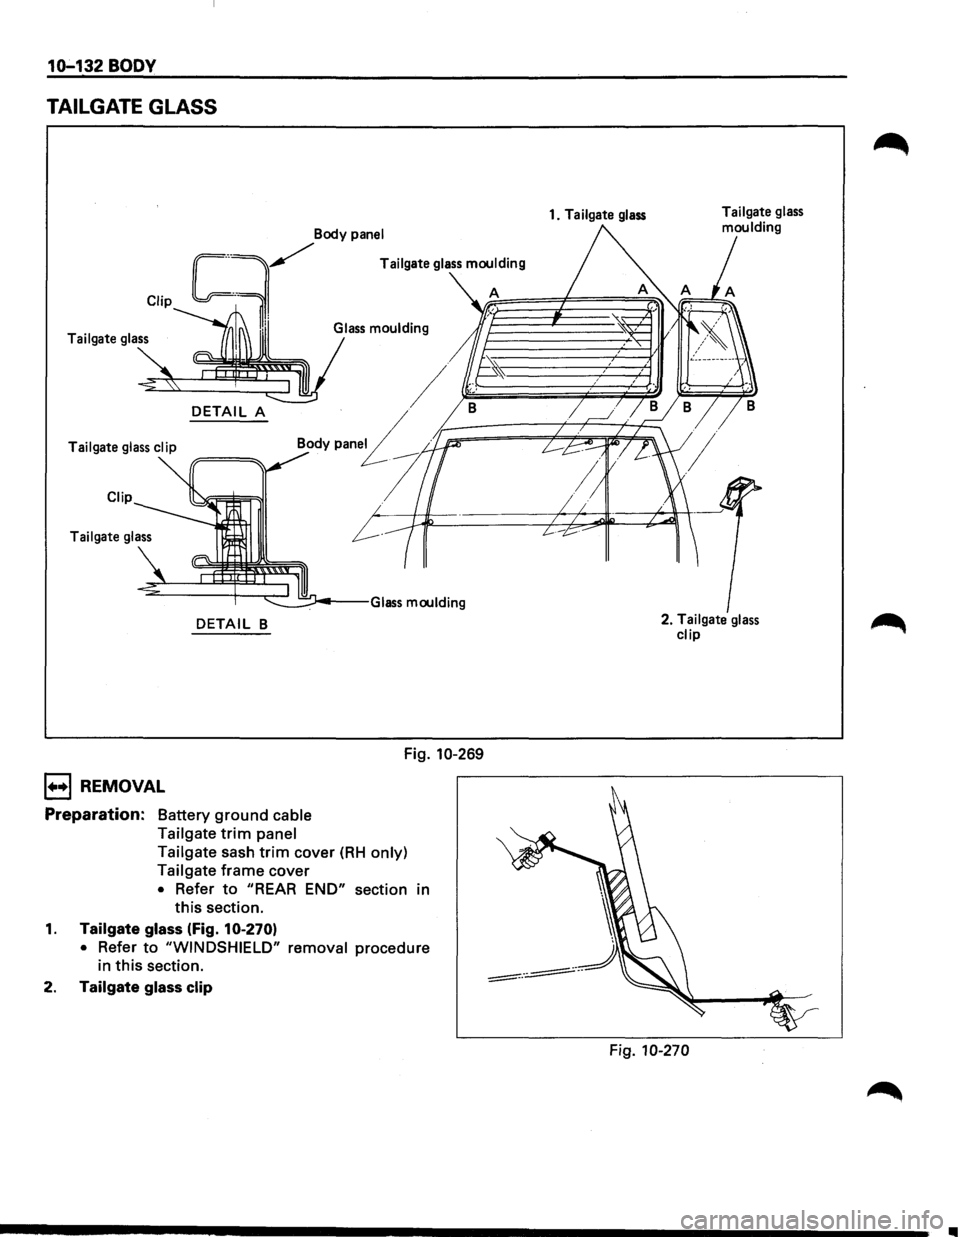
10-132 BODY
TAILGATE GLASS
Clip
~Body P"'el
Tailgate glass
DETAIL A
Body pen£ Tailgate glass clip
Clip
Tailgate glass
DETAIL B
1••1 REMOVAL
Preparation: Battery ground cable
Tailgate
trim panel Fig.
10-269
Tailgate sash
trim cover (RH only)
Tailgate
frame cover
• Refer to "REAR END" section in
this section.
1. Tailgate glass (Fig. 10-270)
• Refer to "WINDSHIELD" removal procedure
in
this section.
2. Tailgate glass clip
1. Tailgate glass
2. Tailgate glass
clip
Fig. 10-270
Ill