brake ISUZU TROOPER 1995 Repair Manual
[x] Cancel search | Manufacturer: ISUZU, Model Year: 1995, Model line: TROOPER, Model: ISUZU TROOPER 1995Pages: 1928
Page 342 of 1928
SA-22 HYDRAULIC BRAKES
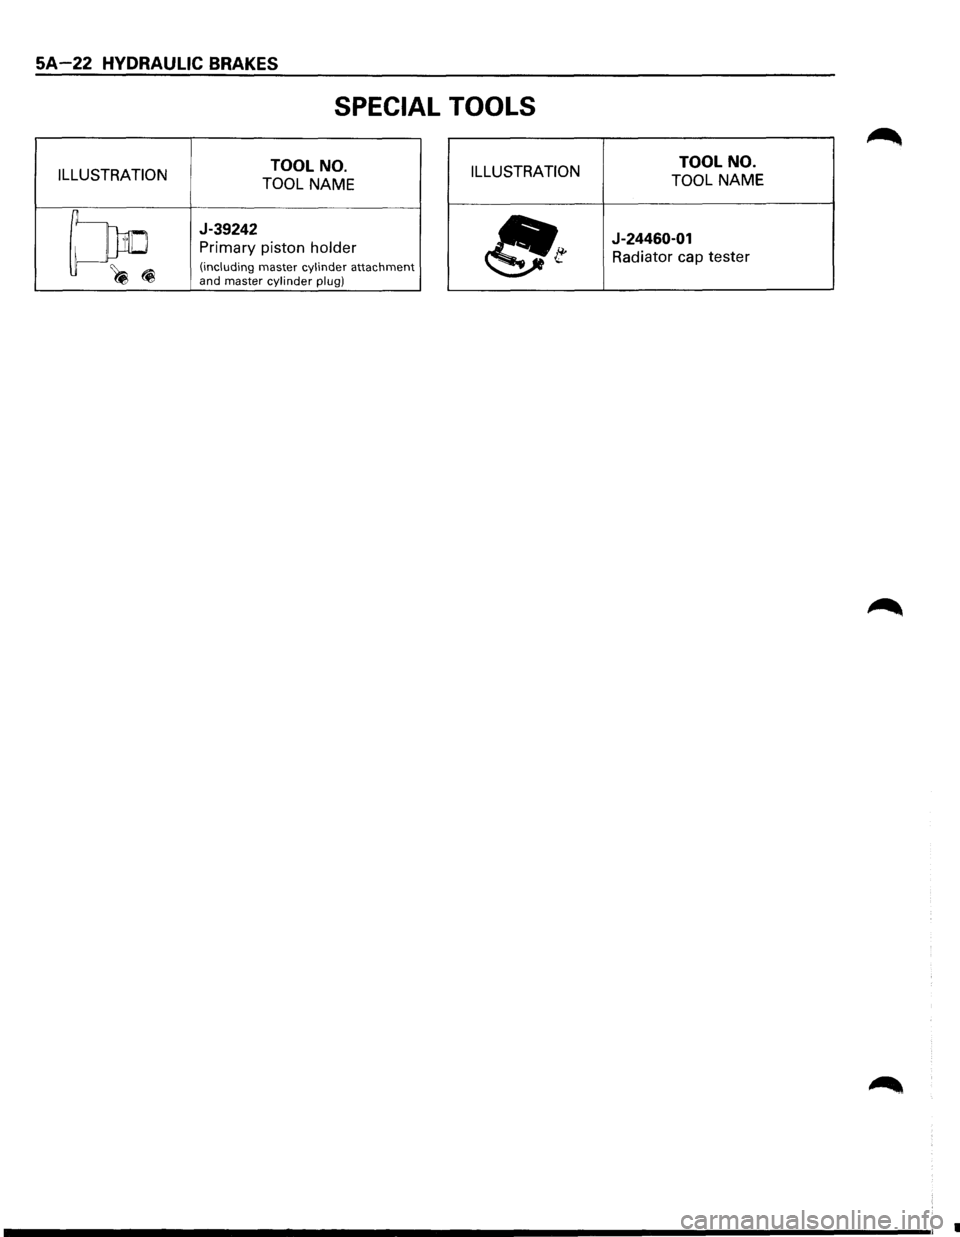
SPECIAL TOOLS
ILLUSTRATION TOOL
NO.
TOOL NAME ILLUSTRATION TOOL
NO.
TOOL NAME
~
J-39242
Primary piston holder
(including master cylinder attachment ~(i and master cylinder plug) ~t
J-24460-01
Radiator cap tester
•
Page 343 of 1928
BRAKE BOOSTER SYSTEM 5A 1-1
SECTION 5A1
BRAKE BOOSTER SYSTEM
W CAUTION:
• Fasteners are an important attaching part in that they could affect performance of vital parts and systems,
and/or could result in major repair expense. They must be replaced with one of the same part number or with
an equivalent part if replacement becomes necessary. Do not use replacement parts of lesser quality or
substitute design. Torque values must be used as specified during reassembly to assure proper retention of
these parts.
CONTENTS
General Description . . . . . . . . . . . . . . . . . . . SA 1-1 Vacuum Booster .................... SA1-6
Diagnosis ..................... See Section SA Main Data and Specifications ........... SA1-6
On-Vehicle Service ................... SA1-2 General Specifications ............... SA1-6
Vacuum Booster Assembly ........... SA1-2 Torque Specifications ................ SA1-6
Exterior Components ................ SA1-4 Special Tools ......................... SA1-7
Unit Repair .......................... SA1-6
GENERAL DESCRIPTION
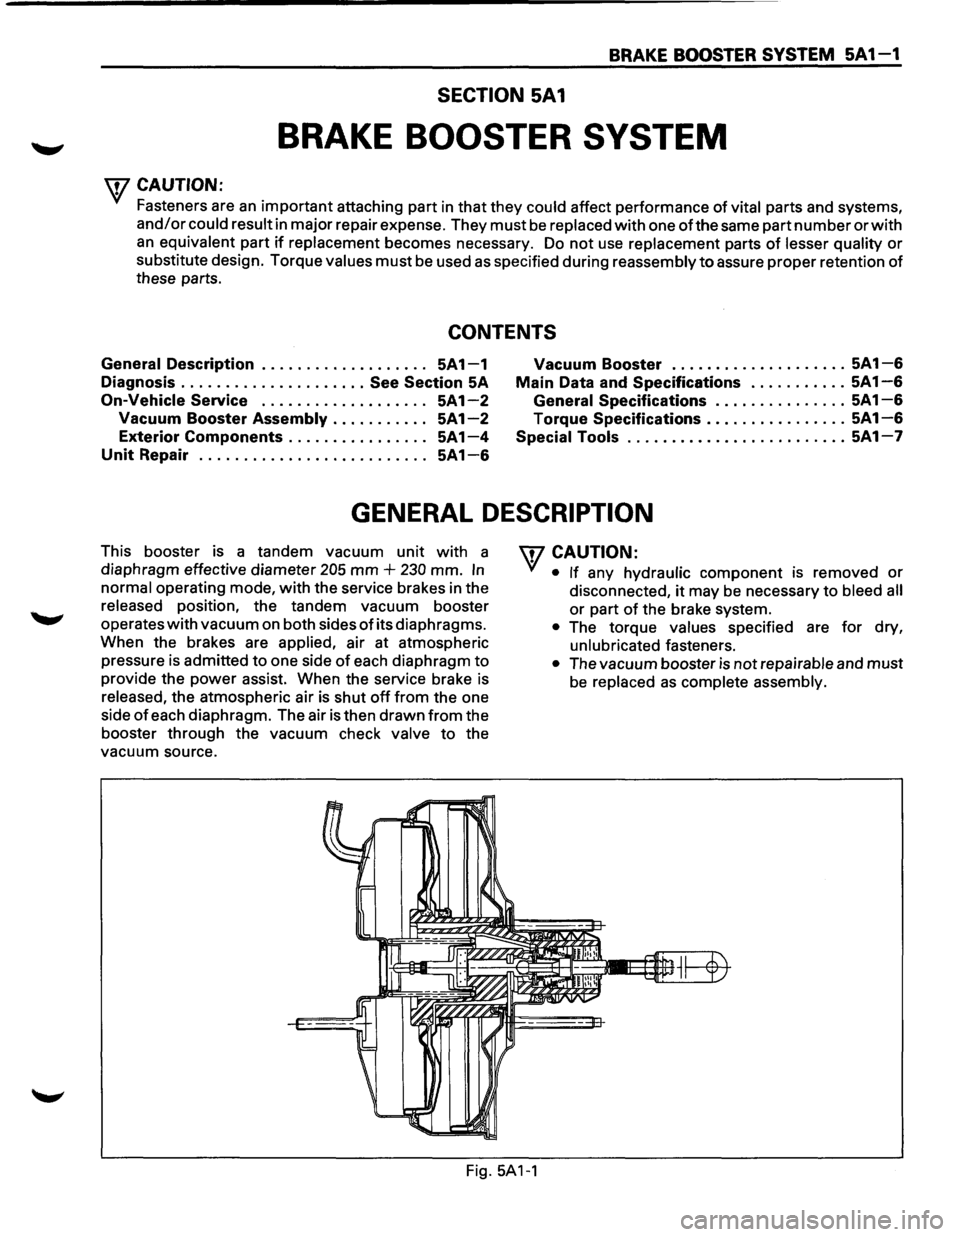
This booster is a tandem vacuum unit with a
diaphragm effective diameter
205 mm + 230 mm. In
normal operating mode, with the service brakes in the
released position, the tandem vacuum booster
operates
with vacuum on both sides of its diaphragms.
When the brakes are
applied, air at atmospheric
pressure is admitted
to one side of each diaphragm to
provide the power assist. When the service brake is
released, the atmospheric air is shut off from the one
side
of each diaphragm. The air is then drawn from the
booster through the vacuum check
valve to the
vacuum source.
W CAUTION:
• If any hydraulic component IS removed or
disconnected, it may be necessary to bleed all
or part of the brake system.
Fig.
5A1-1
• The torque values specified are for dry,
unlubricated fasteners.
• The vacuum booster is not repairable and must
be replaced as complete assembly.
Page 344 of 1928
SA 1-2 BRAKE BOOSTER SYSTEM
ON-VEHICLE SERVICE
VACUUM BOOSTER ASSEMBLY
4
7
'
I ,
l_
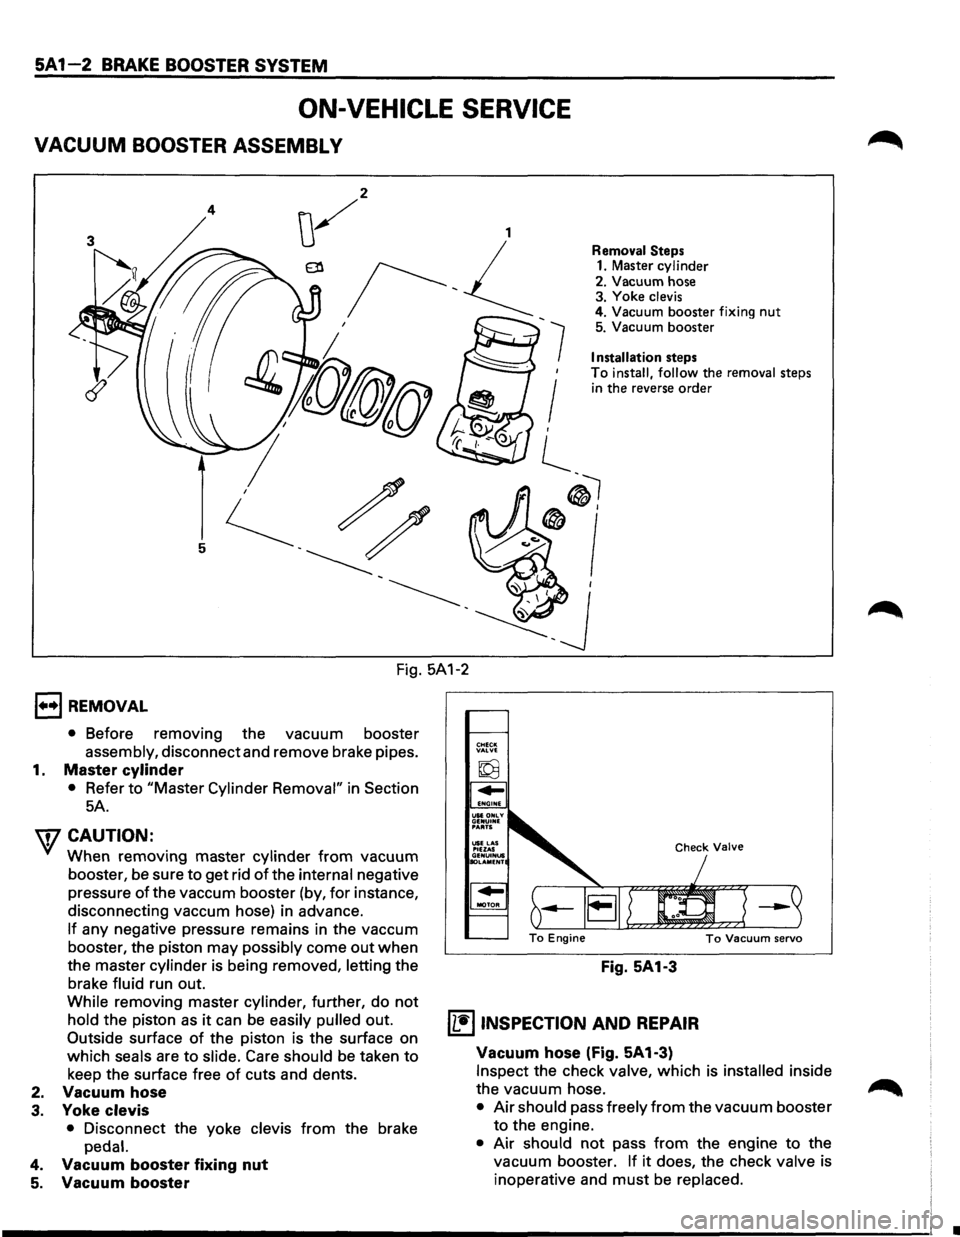
Removal Steps 1. Master cylinder
2. Vacuum hose
3. Yoke clevis 4. Vacuum booster fixing nut 5. Vacuum booster
Installation steps
To install, follow the removal steps in the reverse order
®I
®'
Fig. 5A1-2
1••1 REMOVAL
• Before removing the vacuum booster
assembly, disconnect and remove brake pipes.
1. Master cylinder
• Refer to "Master Cylinder Removal" in Section
5A.
'\fCAUTION:
When removing master cylinder from vacuum
booster, be sure to get rid
of the internal negative
pressure
of the vaccum booster (by, for instance,
disconnecting vaccum hose) in advance.
If any negative pressure remains in the vaccum
booster, the piston may
possibly come out when
the master cylinder is being removed, letting the
brake
fluid run out.
While removing master cylinder, further, do not
hold the piston as it can be easily pulled out.
Outside surface of the piston is the surface on
which
seals are to slide. Care should be taken to
keep the surface free of cuts and dents.
2. Vacuum hose
3. Yoke clevis
• Disconnect the yoke clevis from the brake
pedal.
4. Vacuum booster fixing nut
5. Vacuum booster
Fig. 5A1-3
~ INSPECTION AND REPAIR
Vacuum hose (Fig. 5A1-3)
Inspect the check valve, which is installed inside
the vacuum hose.
• Air should pass freely from the vacuum booster
to the engine.
• Air should not pass from the engine to the
vacuum booster.
If it does, the check valve is
inoperative and
must be replaced.
•
Page 345 of 1928
l·u·IINSTALLATION
5. Vacuum booster
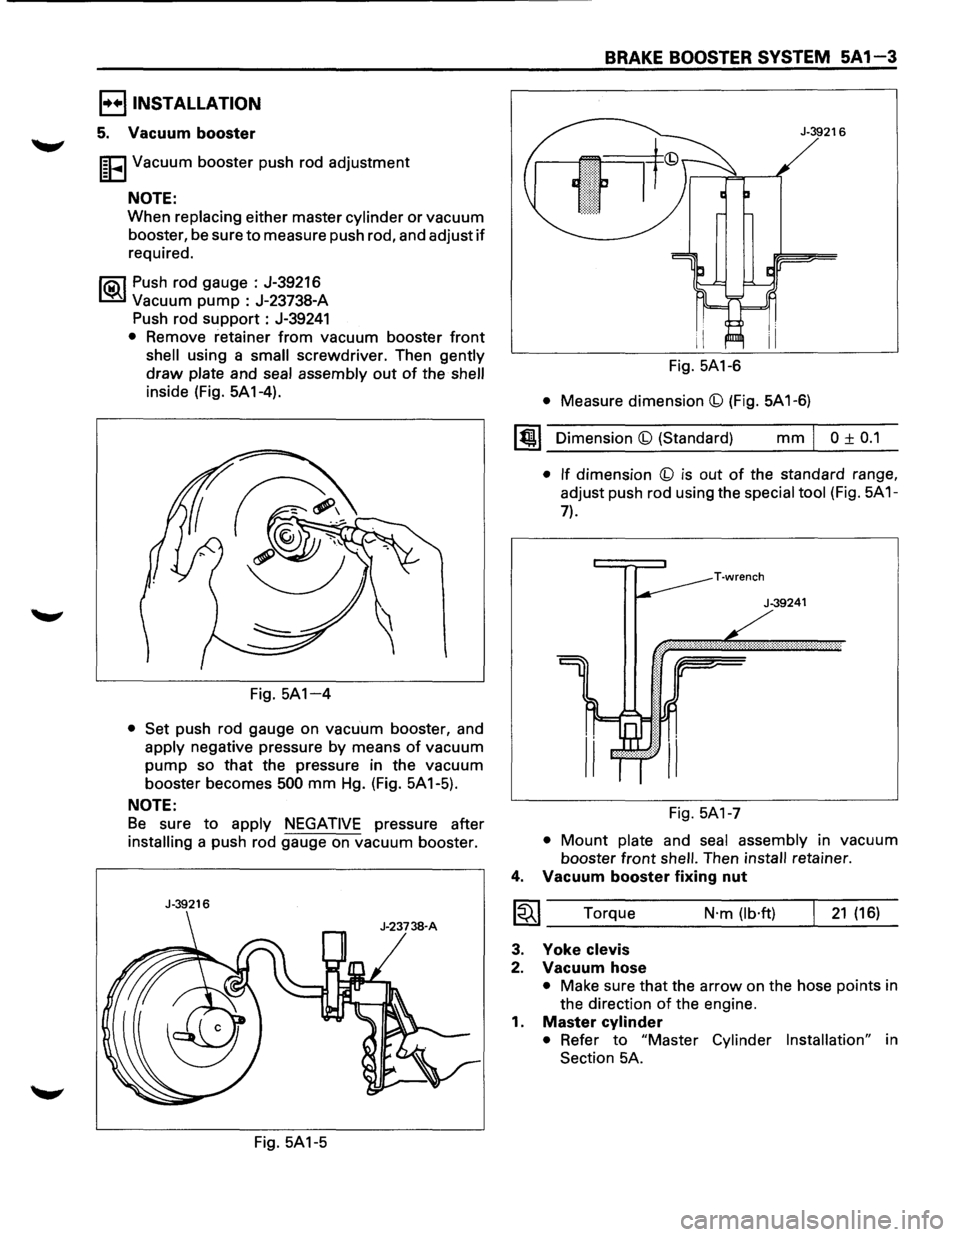
I~EI Vacuum booster push rod adjustment
NOTE:
When replacing either master cylinder or vacuum
booster, be sure
to measure push rod, and adjust if
required.
~ Push rod gauge : J-39216
~ Vacuum pump : J-23738-A
Push rod
support: J-39241
• Remove retainer from vacuum booster front
shell using a small screwdriver. Then gently
draw plate and seal assembly out of the shell
inside (Fig. 5A1-4).
Fig.
5A1-4
• Set push rod gauge on vacuum booster, and
apply negative pressure by means of vacuum
pump so that the pressure in the vacuum
booster becomes
500 mm Hg. (Fig. 5A1-5).
NOTE:
Be sure to apply NEGATIVE pressure after
installing a push rod gauge on vacuum booster.
J-39216
Fig. 5A1-5
BRAKE BOOSTER SYSTEM 5A1-3
Fig. 5A1-6
• Measure dimension (b) (Fig. 5A 1-6)
~~~ Dimension (b) (Standard) mm I 0 ± 0.1
• If dimension (b) is out of the standard range,
adjust push rod using the
special tool (Fig. 5A 1-
7).
T·wrench
J-39241
Fig. 5A1-7
• Mount plate and seal assembly in vacuum
booster
front shell. Then install retainer.
4. Vacuum booster fixing nut
I~I ____ T_o_rq_u_e _______ N_·m __ (l_b·_ft_) __ ~_2_1_(_16_)_
3. Yoke clevis
2. Vacuum hose
• Make sure that the arrow on the hose points in
the direction
of the engine.
1.
Master cylinder
• Refer to "Master Cylinder Installation" in
Section 5A.
Page 346 of 1928
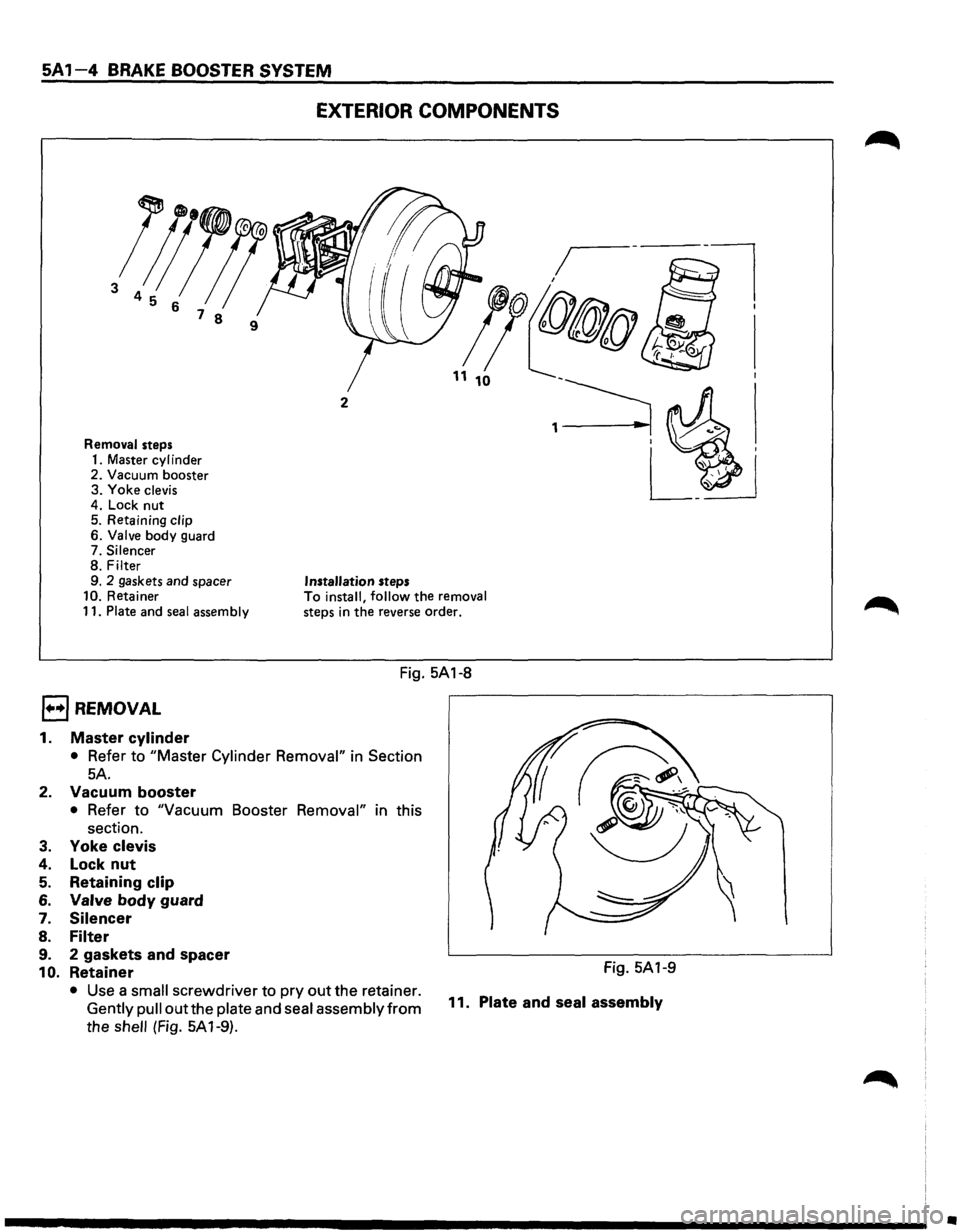
SA 1-4 EXTERI _ BRAKE BOOSTER SYSTEM OR COMPQ .• N,.=E~N~T_s ____ _
l;JJ!!
3 4 5 6 7
8 9
Removal steps. d
1 Master cylm er
2. Vacuum b.ooster
3. Yoke
clevis
4
: Lock n.ut .
5
Retainmg clip d
6: Valve body guar
7. Silencer
8. filter d spacer
9. 2 gas.kets an
10.
Retame~ seal assembly 11. Plate an
Installation s:~P.; the removal To install, fo o rse order. ·In the reve
steps
DREMOVAL
-----------FF:iigg. SA1-8-
1::1 1 • in
Section 1. Master cyl!.~::ter Cylinder Remova • Refer to
SA. t r I" in this
2 Vacuu "Vacuum m boos e Booster Remova · • Refer to
section.
Yoke
clevis 3. t Lock nu .
4. Retaining clop d
5. Valve body guar 6.
Silencer 7.
a. Filter d spacer
9 2 gaskets an tthe retainer.
1 0. Retainer a II screwdriver tol'::'a~~ssembly from • Use a sm II outthe plate an s Gently pu F' SA 1-9). the shell ( IQ.
11. Fig.
SA1-9
I assembly Plate and sea
•
Page 347 of 1928
[1!) INSPECTION AND REPAIR
Visual check:
'-"' Make necessary parts replacement if cuts, nicks,
excessive wear,
or other abnormal conditions are
found through inspection.
Check the following parts.
• Yoke clevis
• Valve
body guard
• Silencer
• Filter
• Plate
and seal assembly.
I••IINSTALLATION
11. Plate and seal assembly
1 0. Retainer
9. 2 gaskets and spacer
8. Filter
7. Silencer
6. Valve body guard
5. Retainer
4. Lock nut
20 (15) 1~1 Torque N·m (lb·ft) ----------1....---
3. Yoke clevis
2. Vacuum booster
• Refer to "Vacuum Booster Installation" in this
section.
'-"" 1. Master cylinder
• Refer to "Master Cylinder Installation" in
Section 5A.
• After installation, perform brake pedal check
and adjustment. Refer
to "Brake Pedal
Assembly" in Section 5A.
BRAKE BOOSTER SYSTEM 5A 1-5
Page 348 of 1928
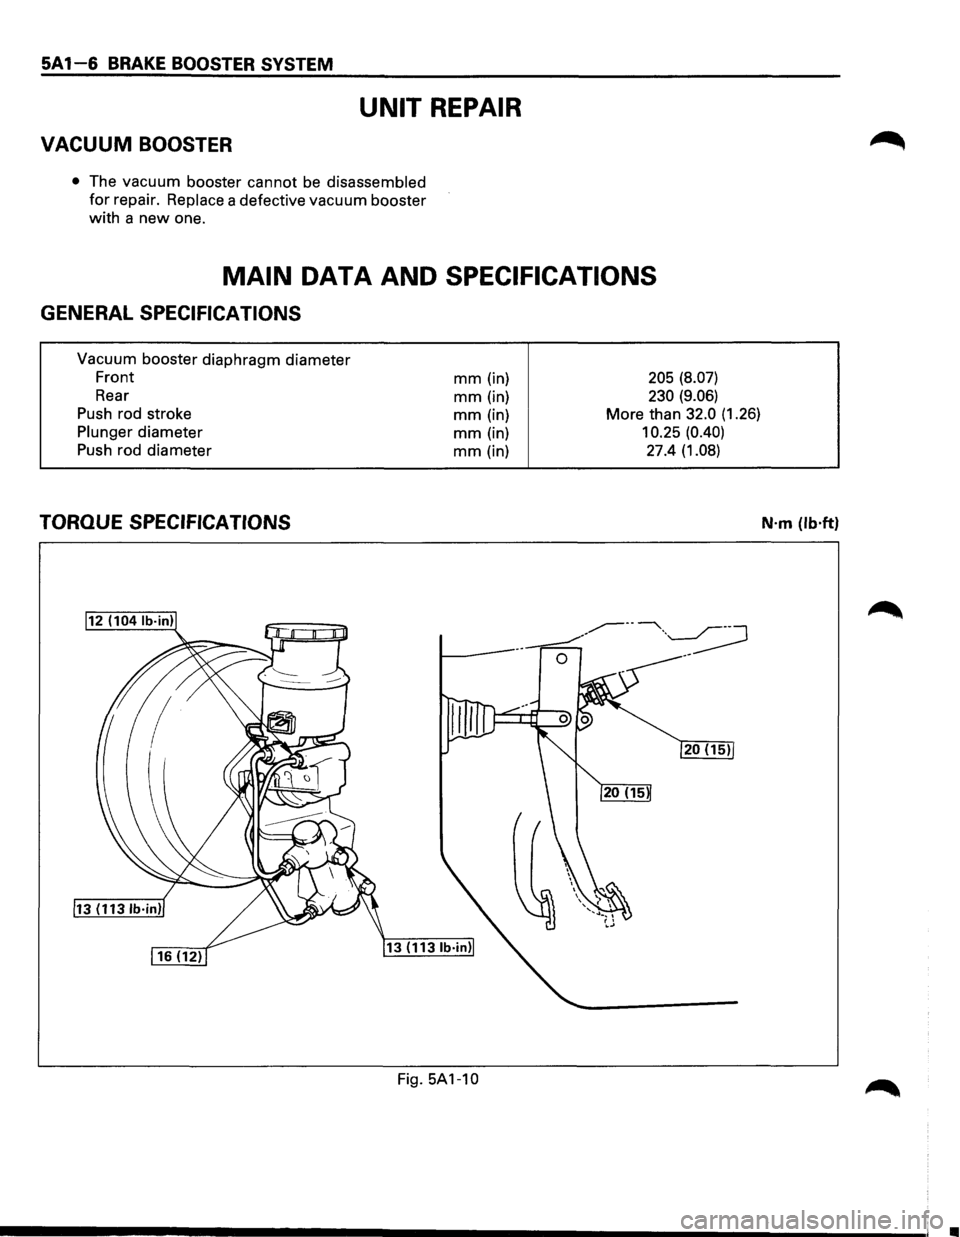
5A 1-6 BRAKE BOOSTER SYSTEM
UNIT REPAIR
VACUUM BOOSTER
• The vacuum booster cannot be disassembled
for repair. Replace a defective vacuum booster
with a new one.
MAIN DATA AND SPECIFICATIONS
GENERAL SPECIFICATIONS
Vacuum booster diaphragm diameter
Front
Rear
Push rod stroke
Plunger diameter
Push rod diameter
TORQUE SPECIFICATIONS
mm (in)
mm (in)
mm (in)
mm (in)
mm (in)
13 (1131b·in)
Fig. 5A1-10
205 (8.07)
230 (9.06)
More than 32.0 (1.26)
10.25 (0.40)
27.4 (1.08)
N·m (lb·ft)
.............................................. ----------------------------------~ .
Page 349 of 1928
BRAKE BOOSTER SYSTEM 5A 1-7
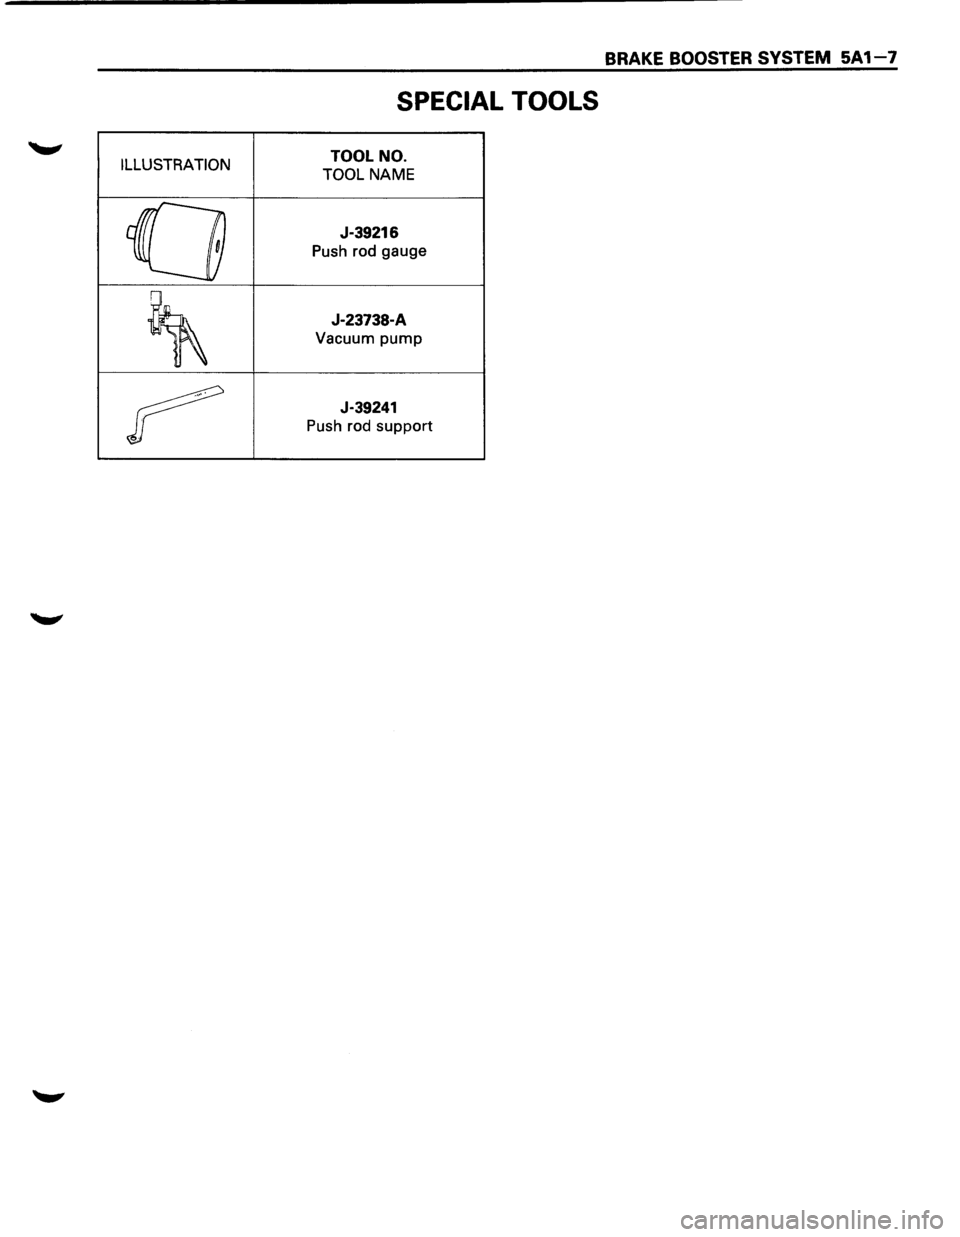
SPECIAL TOOLS
ILLUSTRATION TOOL NO.
TOOL
NAME
0
J-39216
Push rod gauge
~
J-23738-A
Vacuum pump
r
J-39241
Push rod support
Page 351 of 1928
DISC BRAKES 5A2-1
SECTION 5A2
DISC BRAKES
w CAUTION:
All brake attaching fasteners are an important attaching part in that they could affect performance of vital
parts and systems, and/or could result in major repair expense. They must be replaced with one of the same
part
number or with an equivalent part if replacement becomes necessary. Do not use replacement parts of
lesser quality or substitute design. Torque values must be used as specified during reassembly to assure
proper retention of these parts.
CONTENTS
General Description . . . . . . . . . . . . . . . . . . . . 5A2-1
Operation . . . . . . . . . . . . . . . . . . . . . . . . . . . . 5A2-1
Diagnosis
..................... See Section SA
On-Vehicle Service . . . . . . . . . . . . . . . . . . . . 5A2-2
Front Disc Brakes . . . . . . . . . . . . . . . . . . . . 5A2-2
Brake Pads
Inspection . .
. . . . . . . . . . . . 5A2-2
Brake Pads Replacement . . . . . . . . . . . 5A2-3
Servicing
the Rotor . . . . . . . . . . . . . . . . 5A2-4
Caliper Replacement . .
. . . . . . . . . . . . . 5A2-6
Rebuilding
the Caliper . . . . . . . . . . . . . 5A2-8 Rear
Disc Brakes .................... 5A2-1 0
Brake
Pads Inspection ............. 5A2-1 0
Brake Pads Replacement ........... 5A2-1 0
Servicing the Rotor ............... 5A2-12
Caliper Replacement .............. 5A2-14
Rebuilding the
Caliper ............. 5A2-17
Parking Brakes . . . . . . . . . . . . . . . .
See Section SC
Main Data and Specifications ........... 5A2-19
General Specifications ............... 5A2-19
Torque Specifications
............... 5A2-19
GENERAL DESCRIPTION
The disc brake assembly consists of a caliper, piston,
rotor, pad assembly and
support bracket. The caliper
assembly has a single bore and is mounted to the
support bracket with 2 mounting bolts. The support
bracket allows the caliper to move laterally against the
rotor. The
caliper is a one-piece casting with the
inboard side containing the piston bore. A square cut
rubber
seal is located in a groove in the piston bore
which provides the hydraulic seal between the piston
and the cylinder
wall.
NOTE:
• Replace all components included in repair kits
used
to service this caliper.
• Lubricate rubber parts with clean brake fluid to
ease assembly.
• If any hydraulic component is removed or
disconnected, it may be necessary to bleed all or
part of the brake system.
• Replace pads in axle sets only.
•
The torque values specified are for dry,
unlubricated fasteners.
• Perform service operation a clean bench free
from all mineral oil materials.
OPERATION
Hydraulic pressure, created by applying the brake
pedal, is converted by the caliper to a stopping force.
This force acts
equally against the piston and the
bottom of the caliper bore to move the piston outward
and to move (slide) the caliper inward resulting in a
clamping action on the rotor. This clamping action
forces the
linings against the rotor, creating friction to
stop the vehicle.
Page 352 of 1928
5A2-2 DISC BRAKES
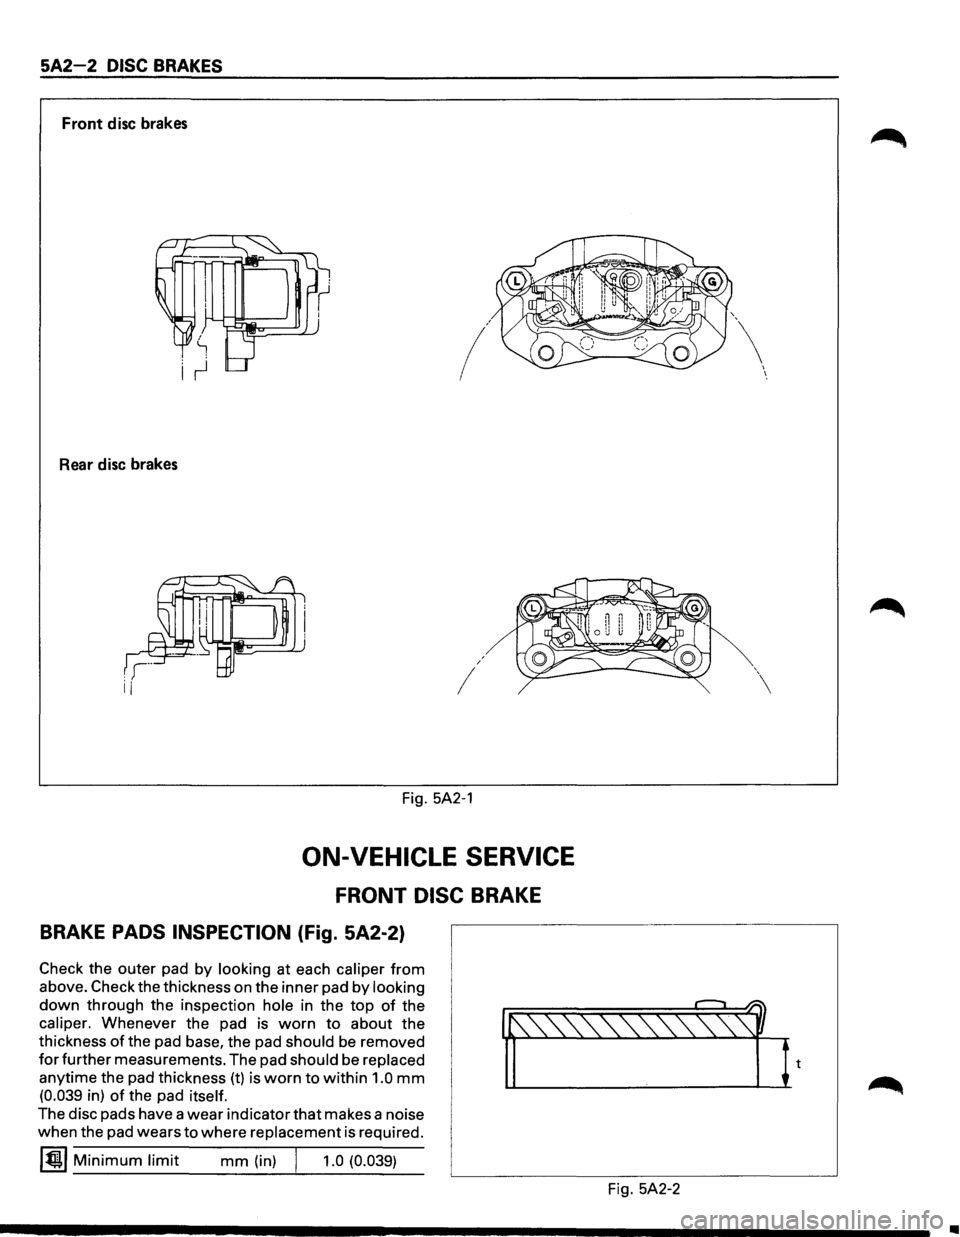
Front disc brakes
/
Rear disc brakes
I
I
Fig. 5A2-1
ON-VEHICLE SERVICE
FRONT DISC BRAKE
BRAKE PADS INSPECTION (Fig. 5A2-2)
Check the outer pad by looking at each caliper from
above. Check the thickness on the inner pad by looking
down through the inspection hole in the top of the
caliper. Whenever the pad is worn to about the
thickness
of the pad base, the pad should be removed
for further measurements. The pad should be replaced
anytime the pad thickness (t) is worn to within 1.0 mm
(0.039 in) of the pad itself.
The disc pads have a wear indicator that makes a noise
when the pad wears
to where replacement is required.
~~~ Minimum limit mm (in) j 1.0 (0.039)
Fig. 5A2-2
I I
•