warning ISUZU TROOPER 1995 Manual Online
[x] Cancel search | Manufacturer: ISUZU, Model Year: 1995, Model line: TROOPER, Model: ISUZU TROOPER 1995Pages: 1928
Page 1326 of 1928
8 -136 CHASSIS ELECTRICAL
MAP LIGHT SWITCH/BULB
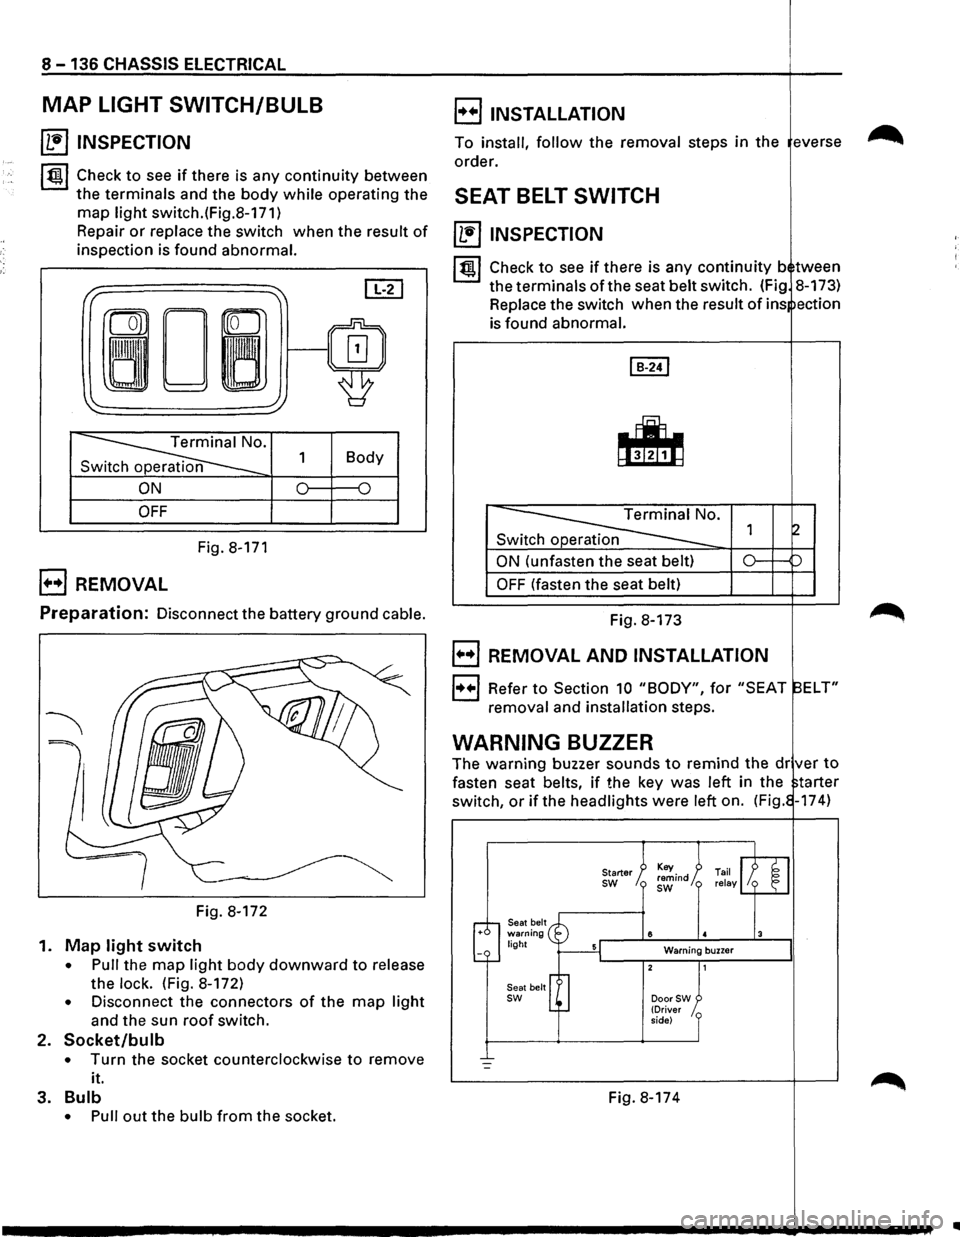
~ INSPECTION
~~~ Check to see if there is any continuity between
the terminals and the body while operating the
map light switch.(Fig.8-171)
Repair
or replace the switch when the result of
inspection is found abnormal.
I" ~ [IT]
ron
0~/~ ~
'
~· 1 Body
n
ON 0 {)
OFF
Fig. 8-171
B REMOVAL
E) INSTALLATION
To install, follow the removal steps in the everse
order.
SEAT BELT SWITCH
~ INSPECTION
I~ l Check to see if there is any continuity b tween
the terminals of the seat belt switch. (Fig 8-173)
Replace the switch when the
result of ins ection
is found abnormal.
Switch operation
ON (unfasten the seat belt)
OFF (fasten the seat belt)
Preparation: Disconnect the battery ground cable. Fig. 8-173
Fig. 8-172
1.
Map light switch
• Pull the map light body downward to release
the
lock. (Fig. 8-172)
• Disconnect the connectors of the map light
and the sun roof switch.
2. Socket/bulb
• Turn the socket counterclockwise to remove
it.
3.
Bulb
• Pull out the bulb from the socket.
B REMOVAL AND INSTALLATION
1++1 Refer to Section 10 "BODY", for "SEAT ELT"
removal and installation steps.
WARNING BUZZER
The warning buzzer sounds to remind the dr ver to
fasten seat belts, if the key was left in the tarter
switch,
or if the headlights were left on. (Fig. -174)
Seat belt warning light
Seat belt
sw
Starter sw
8
Warning buzzer
DoorSW (Driver
side)
Fig. 8-174
..
Page 1327 of 1928
CHASSIS ELECTRICAL 8-137
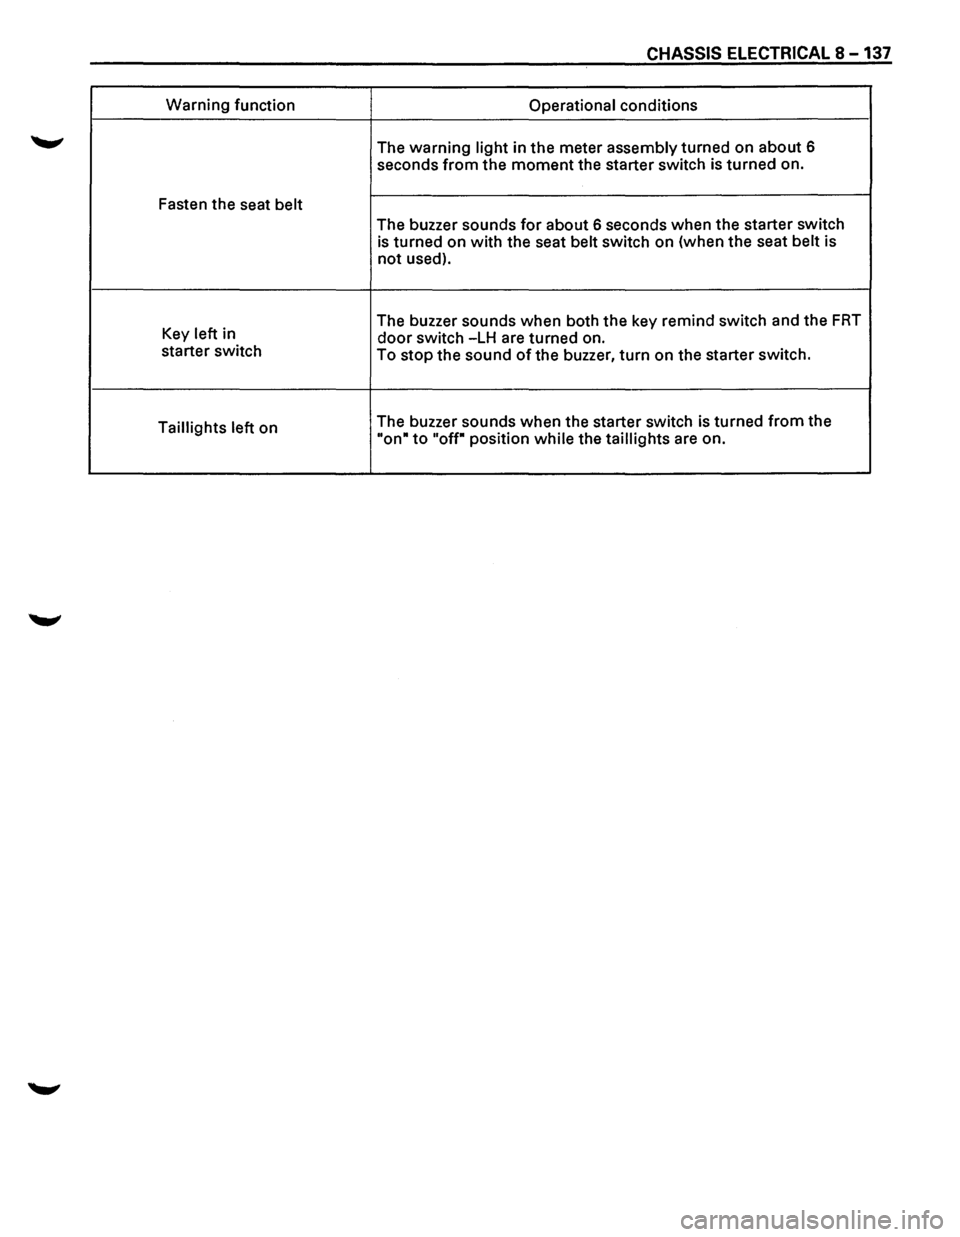
Warning function
Operational conditions
The
warning light in the meter assembly turned on about 6
seconds
from the moment the starter switch is turned on.
Fasten the seat
belt
The buzzer sounds for about 6 seconds when the starter switch
is turned on with the seat belt switch on (when the seat belt is
not used).
Key left in The
buzzer sounds when both the key remind switch and the
FRT
door switch -LH are turned on.
starter switch
To
stop the sound of the buzzer, turn on the starter switch.
Taillights left on The
buzzer sounds when the starter switch is turned
from the
"on• to "off" position while the taillights are on.
Page 1328 of 1928
8-138 CHASSIS ELECTRICAL
~ INSPECTION
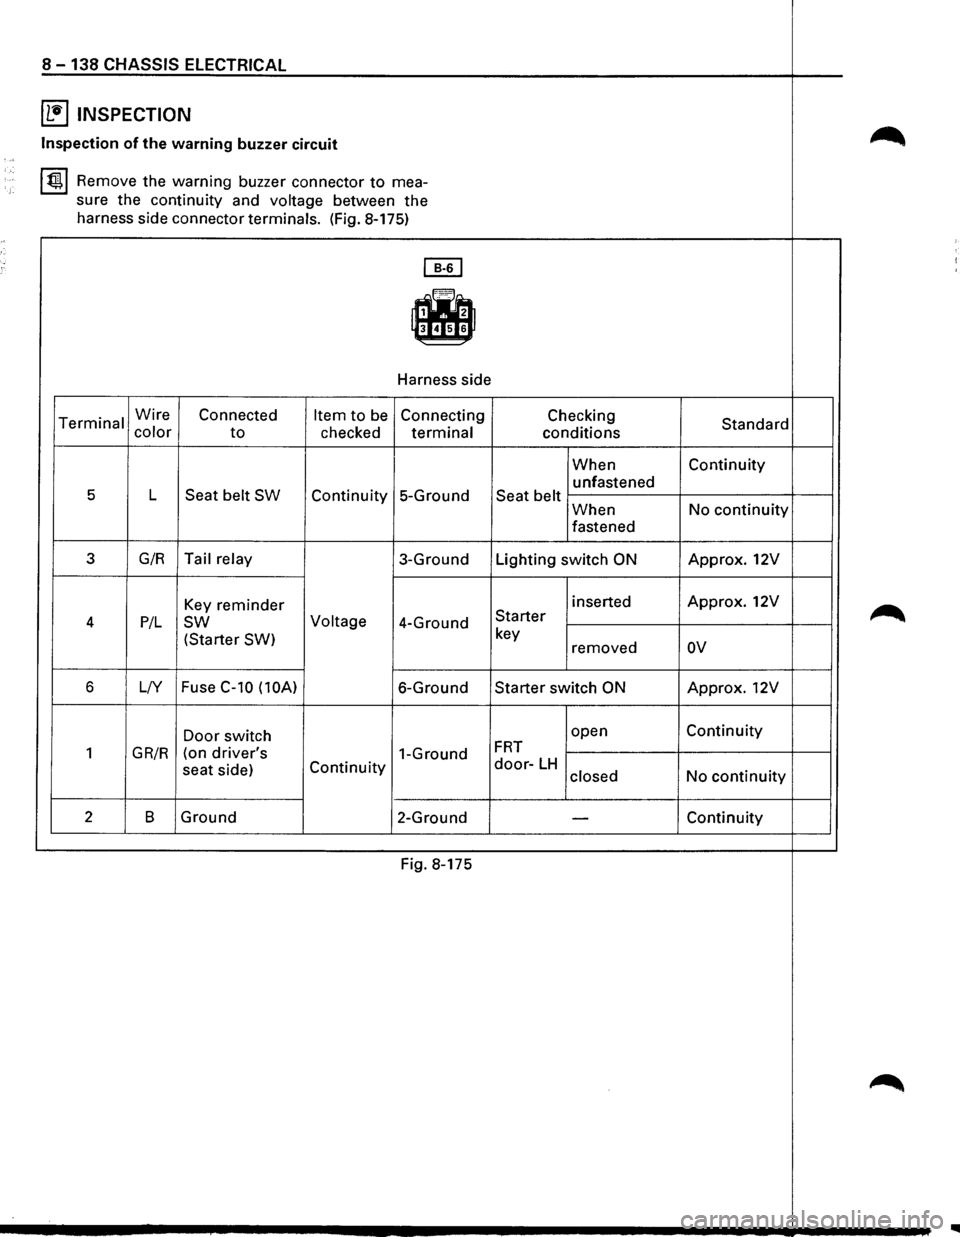
~ Inspection of the warning buzzer circuit ,,,
~ Remove the warning buzzer connector to mea-
sure the continuity and
voltage between the
harness side connector terminals. (Fig. 8-175)
~
-Harness side
Terminal Wire Connected Item to be Connecting Checking Standard color to checked terminal conditions
When Continuity
unfastened
5 L Seat belt SW Continuity 5-Ground Seat belt When No continuity
fastened
3 G/R Tail relay 3-Ground Lighting switch ON Approx. 12V
Key reminder inserted Approx. 12V
~ 4 P/L sw Voltage 4-Ground Starter
(Starter SW)
key
removed ov
6 L/Y Fuse C-10
(lOA) 6-Ground Starter switch ON Approx. 12V
Door switch open Continuity
1 GR/R (on driver's 1-Ground FRT
seat
side) Continuity door-LH No continuity closed
2 B Ground
2-Ground -Continuity
Fig. 8-175
~
Page 1329 of 1928
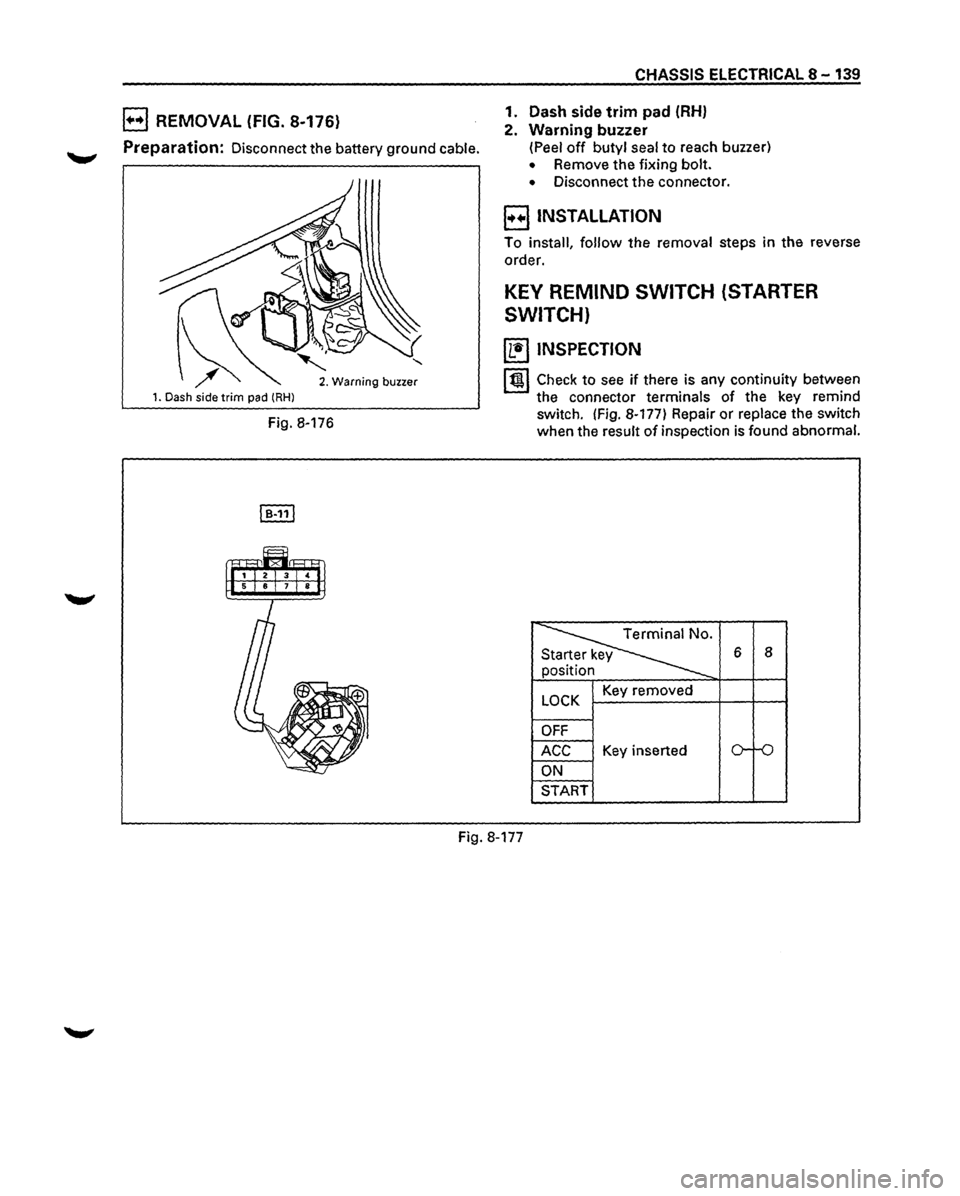
B REMOVAL (FIG. 8-176)
Preparation: Disconnect the battery ground cable.
1. Dash side trim pad (RHl
' 2. Warning buzzer
Fig. 8-176
CHASSIS ELECTRICAL 8-139
1. Dash side
trim pad (RH)
2. Warning buzzer
(Peel off butyl seal to reach buzzer)
• Remove the fixing bolt.
• Disconnect the connector.
E) INSTALLATION
To install, follow the removal steps in the reverse
order.
KEY REMIND SWITCH (STARTER
SWITCH)
~ INSPECTION
I t!tl Check to see if there is any continuity between
the connector terminals of the key remind
switch. (Fig. 8-177) Repair
or replace the switch
when the result
of inspection is found abnormal.
~
6 8
n
y
LOCK Key removed
OFF
ACC Key inserted o-ro
ON
START
Fig. 8-177
Page 1368 of 1928
8 -178 CHASSIS ELECTRICAL
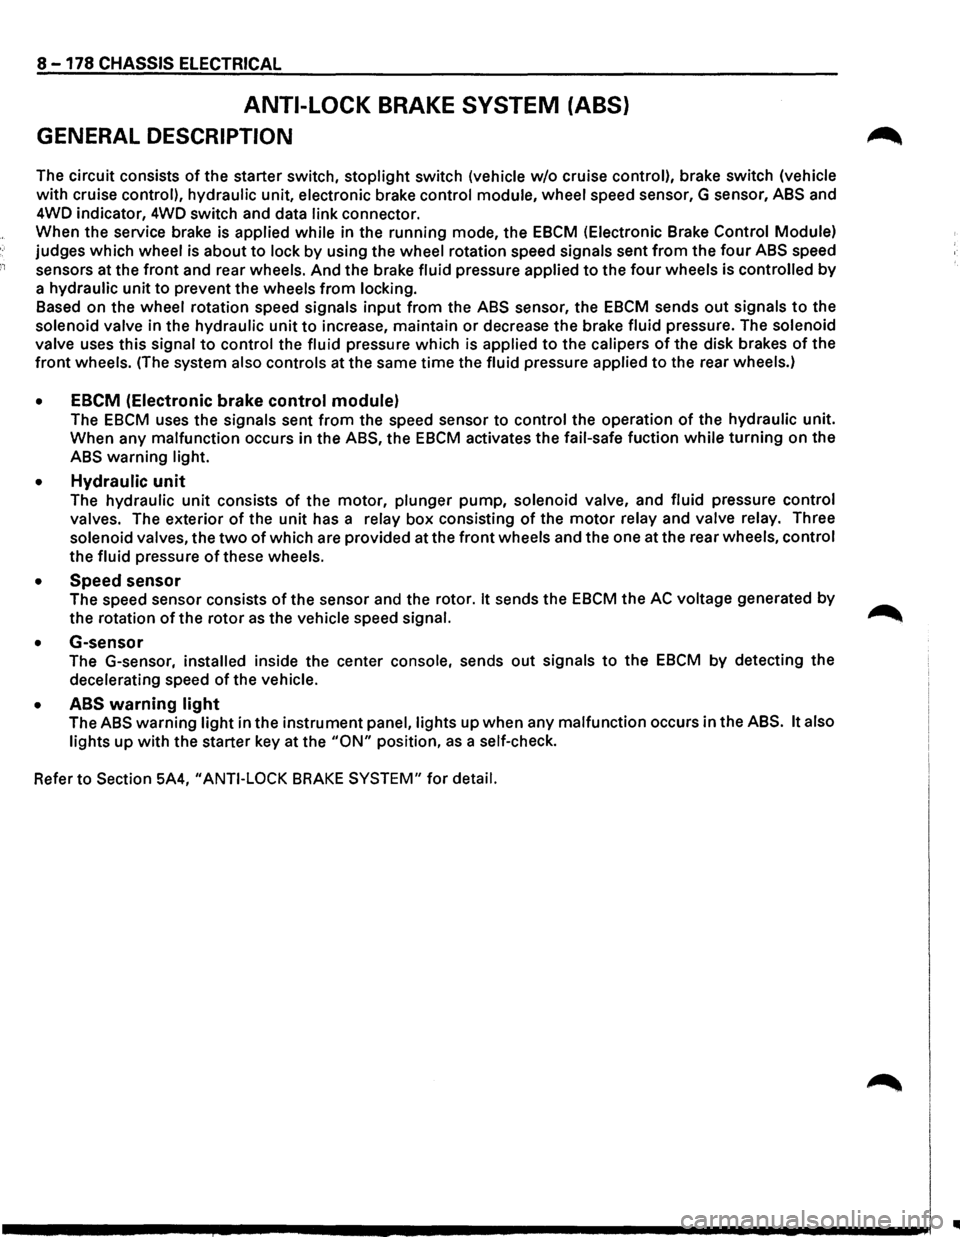
ANTI-LOCK BRAKE SYSTEM (ABS)
GENERAL DESCRIPTION
The circuit consists of the starter switch, stoplight switch (vehicle w/o cruise control), brake switch (vehicle
with cruise control), hydraulic unit, electronic brake control module, wheel speed sensor, G sensor, ABS and
4WD indicator, 4WD switch and data link connector.
When the service brake is applied while in the running mode,
the EBCM (Electronic Brake Control Module)
judges
which wheel is about to lock by using the wheel rotation speed signals sent from the four ABS speed
sensors at the
front and rear wheels. And the brake fluid pressure applied to the four wheels is controlled by
a hydraulic unit to prevent the wheels from locking.
Based on the wheel rotation speed signals
input from the ABS sensor, the EBCM sends out signals to the
solenoid valve in the hydraulic unit
to increase, maintain or decrease the brake fluid pressure. The solenoid
valve uses this signal
to control the fluid pressure which is applied to the calipers of the disk brakes of the
front wheels. (The system also controls at the same time the fluid pressure applied to the rear wheels.)
• EBCM (Electronic brake control module)
The EBCM uses the signals sent from the speed sensor to control the operation of the hydraulic unit.
When any malfunction occurs in the ABS, the
EBCM activates the fail-safe fuction while turning on the
ABS warning light.
• Hydraulic unit
The hydraulic unit consists of the motor, plunger pump, solenoid valve, and fluid pressure control
valves. The exterior
of the unit has a relay box consisting of the motor relay and valve relay. Three
solenoid valves, the
two of which are provided at the front wheels and the one at the rear wheels, control
the fluid pressure
of these wheels.
• Speed sensor
The speed sensor consists of the sensor and the rotor. It sends the EBCM the AC voltage generated by
the rotation of the rotor as the vehicle speed signal. ~
• G-sensor
The G-sensor, installed inside the center console, sends out signals to the EBCM by detecting the
decelerating speed
of the vehicle.
• ABS warning light
The ABS warning light in the instrument panel, lights up when any malfunction occurs in the ABS. It also
lights up
with the starter key at the "ON" position, as a self-check.
Refer
to Section 5A4, "ANTI-LOCK BRAKE SYSTEM" for detail.
II
Page 1377 of 1928
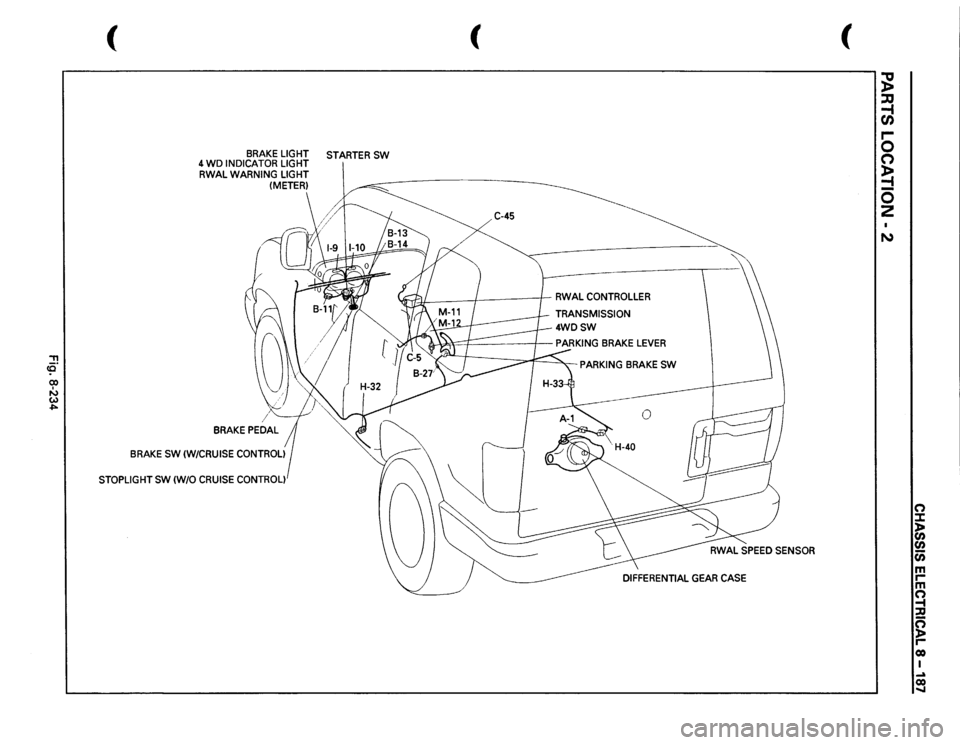
::!! (Q 00 I ....., w ..,..
(
BRAKE
LIGHT
STARTER
SW
4 WD
INDICATOR
LIGHT
RWAL
WARNING
LIGHT (METER)
BRAKE
SW
(W/CRUISE
CONTROL)
STOPLIGHT
SW
(W/0
CRUISE
CONTROL)
(
C-45
JfJI:
/
I
RWAL
CONTROLLER
TRANSMISSION
4WDSW
PARKING
BRAKE
SW
(
;g ::JJ -1 en .... 0 0 ~ -0 2 N
n :I: l> en en c;; m rm n -t :a g reo I ~ co .....
Page 1382 of 1928
8-192 CHASSIS ELECTRICAL
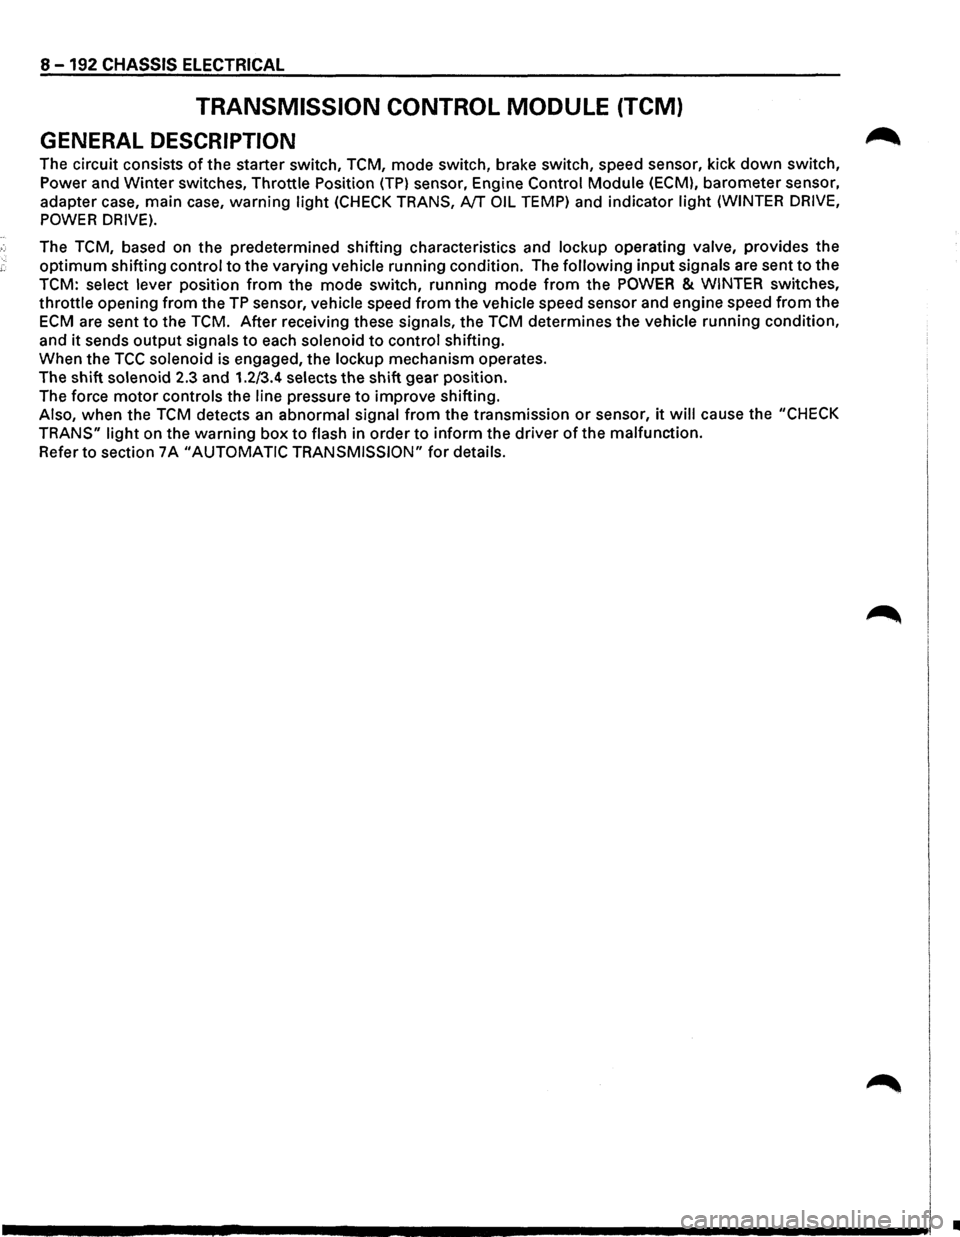
TRANSMISSION CONTROL MODULE (TCM)
GENERAL DESCRIPTION
The circuit consists of the starter switch, TCM, mode switch, brake switch, speed sensor, kick down switch,
Power and
Winter switches, Throttle Position (TP) sensor, Engine Control Module (ECM), barometer sensor,
adapter case, main case,
warning light (CHECK TRANS, NT OIL TEMP) and indicator light (WINTER DRIVE,
POWER DRIVE).
The TCM, based on the predetermined shifting characteristics and lockup operating valve, provides the
optimum shifting control to the varying vehicle running condition. The following input signals are sent to the
TCM: select lever position from the mode switch, running mode from the POWER & WINTER switches,
throttle opening from the TP sensor, vehicle speed from the vehicle speed sensor and engine speed from the
ECM are sent to the TCM. After receiving these signals, the TCM determines the vehicle running condition,
and
it sends output signals to each solenoid to control shifting.
When the
TCC solenoid is engaged, the lockup mechanism operates.
The shift
solenoid 2.3 and 1.2/3.4 selects the shift gear position.
The force
motor controls the line pressure to improve shifting.
Also, when the TCM detects an abnormal signal from the transmission or sensor, it will cause the "CHECK
TRANS"
light on the warning box to flash in order to inform the driver of the malfunction.
Refer to section 7 A "AUTOMATIC TRANSMISSION" for details.
•
Page 1383 of 1928
, cE" 00 I I'J w 00
(
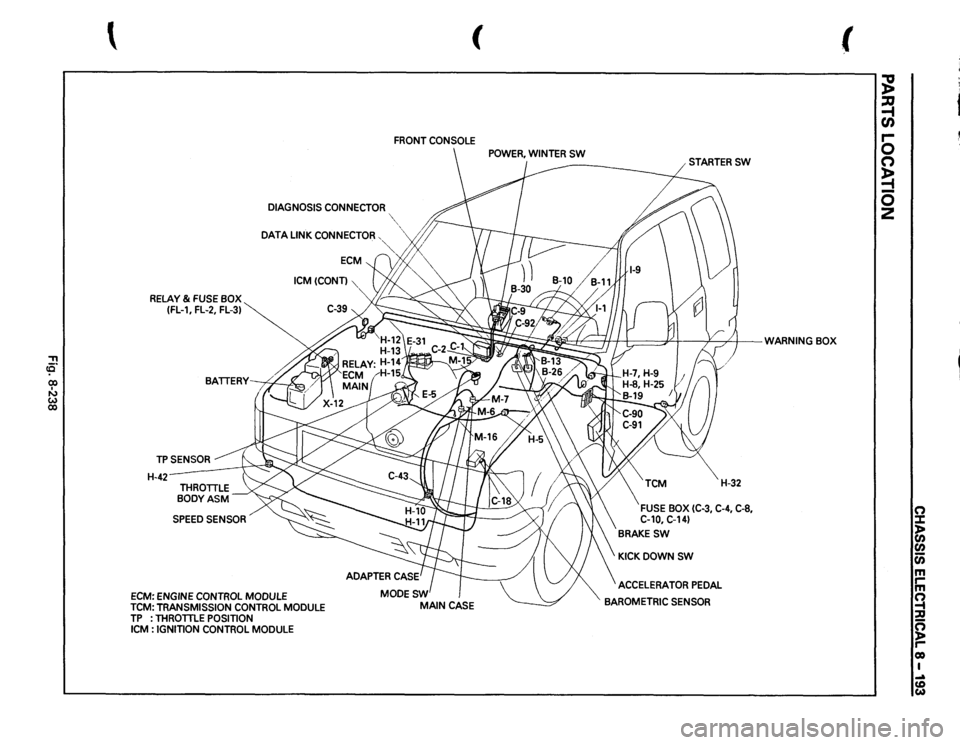
FRONT
CONSOLE
DIAGNOSIS
CONNECTOR
"~",
DATA
LINK
CONNECTOR,
·~
RELAY
& FUSE
BOX
(FL-1,
FL-2,
FL-3)
TPSENSOR H-42-
SPEED
SENSOR
ECM:
ENGINE
CONTROL
MODULE
ICM(CONT)
TCM:
TRANSMISSION
CONTROL
MODULE
TP
: THROTTLE
POSITION
ICM
: IGNITION
CONTROL
MODULE
~;
t I:;::==PI
v
/)
WARNING
BOX
' .
!I
/;;'
H-32
FUSE
BOX
(C-3,
C-4, C-8,
C-10,
C-14)
BRAKESW
KICKDOWNSW ACCELERATOR
PEDAL
BAROMETRIC
SENSOR
(
;g ~ en r-0 (") ~ 0 2
0 :::1: )> (I) (I) c;; m rm ~ :;Q ~ co I .... (D w
Page 1384 of 1928
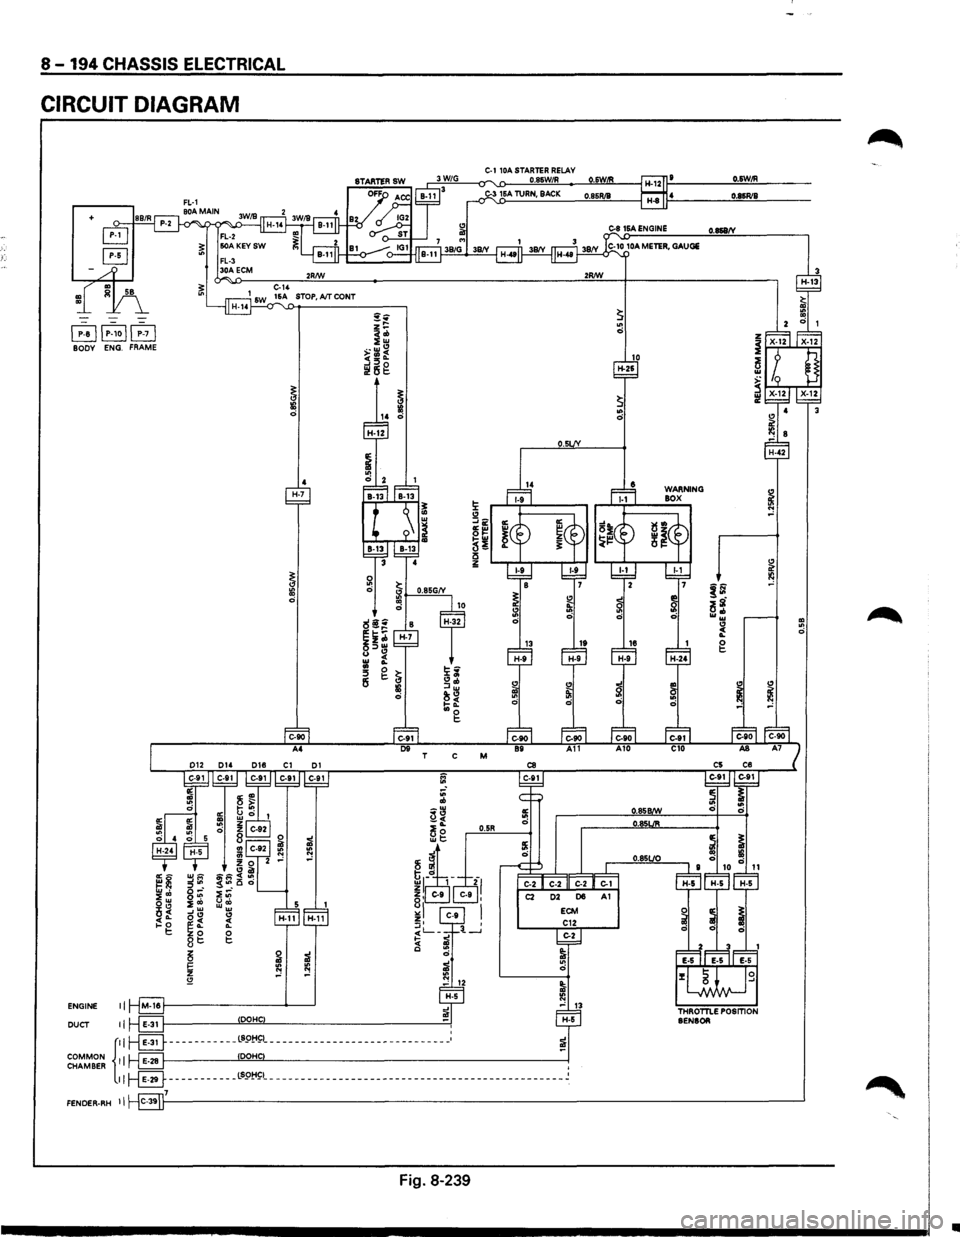
8-194 CHASSIS ELECTRICAL
CIRCUIT DIAGRAM
+
I P~al ~~ ;71 BODY ENG. FRAME
5
~~ o-· 0"1 :;co s~
~~ gt::
i5 ~ ;I
~ :e :e "" ..: £!
ENGINE II M-16
DUCT II E·31 DOHC '
C-1 10A STARTER RELAY 0.85W/R 3 16A TURN, BACK
!i:
" ~~ ol!! 5! i5 0:
COMMON CHAMBER {
II r-8----------_LS9!:1~1_----------------------------_: !
::~ ___________ ;;:~'------------------------------------------------J 7
"' 0
10 H-26
WARNING
BOX
O.&W/R
0.86R/8
0.868/Y
~
~ !(!
~ 0
" ~ ""
FENDER·RH II C·39 1----------------------------------------------------'
Fig. 8-239
•
Page 1460 of 1928
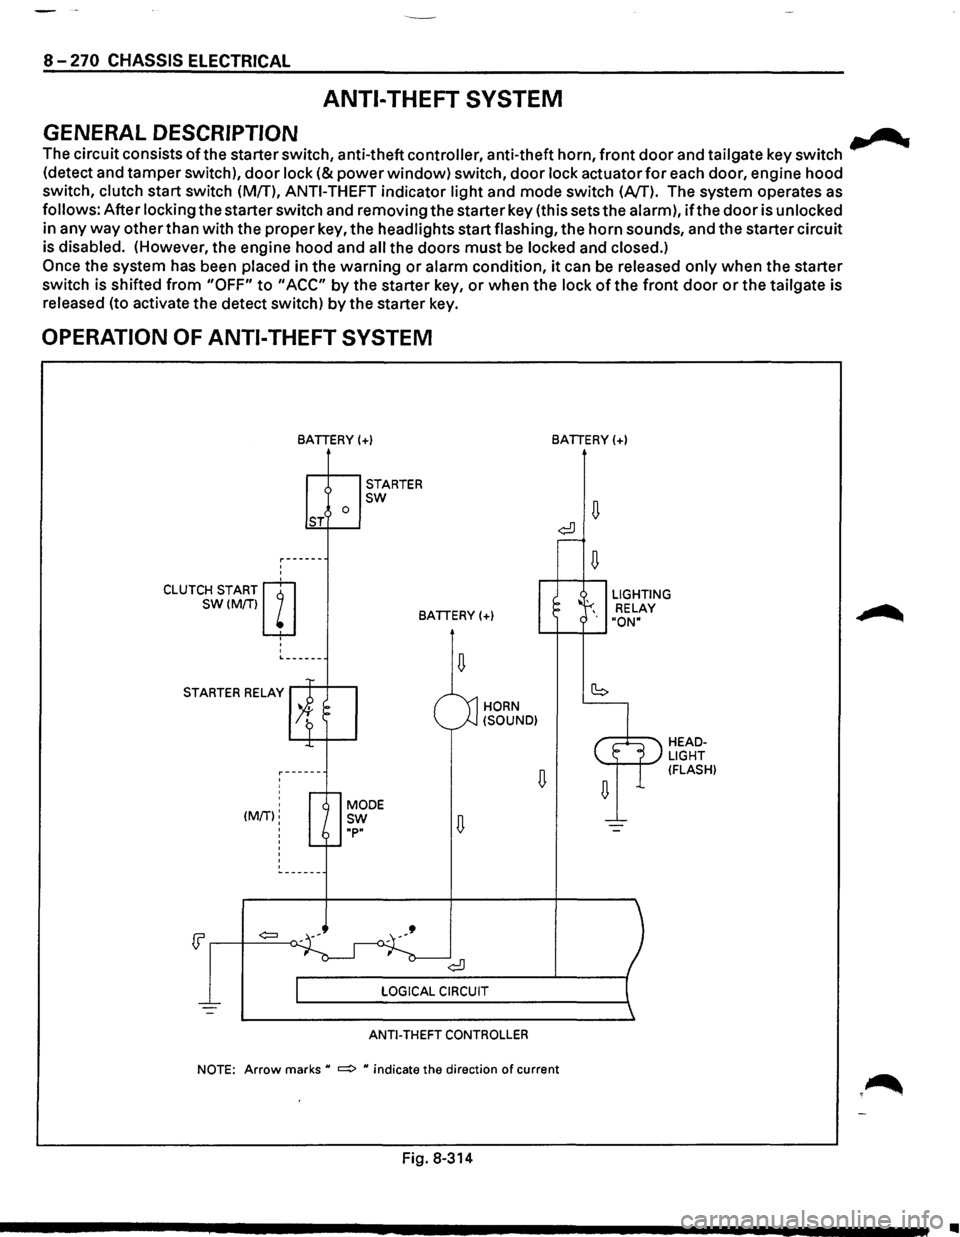
8-270 CHASSIS ELECTRICAL
ANTI-THEFT SYSTEM
GENERAL DESCRIPTION .......
The circuit consists ofthe starter switch, anti-theft controller, anti-theft horn, front door and tailgate key switch
(detect and tamper switch),
door lock (&power window) switch, door lock actuator for each door, engine hood
switch, clutch start switch (MfT),
ANTI-THEFT indicator light and mode switch (AfT). The system operates as
follows: After locking the starter switch and removing the starter key (this sets the alarm),
ifthe door is unlocked
in any
way other than with the proper key, the headlights start flashing, the horn sounds, and the starter circuit
is disabled. (However,
the engine hood and all the doors must be locked and closed.)
Once the system has been placed in the warning or alarm condition, it can be released only when the starter
switch is shifted
from "OFF" to "ACC" by the starter key, or when the lock of the front door or the tailgate is
released (to activate the detect switch)
by the starter key.
OPERATION OF ANTI-THEFT SYSTEM
'
'
CLUTCH START m
SW(M/Tiw
' '
'
BATIERY(+)
0 ST
STARTER sw
BATIERY(+)
L------
STARTER RELAY
' ' (MIT):
'
'
'
HORN
(SOUND)
ANTI-THEFT CONTROLLER
BATIERY(+)
LIGHTING
RELAY
"ON"
HEADLIGHT (FLASH)
NOTE: Arrow marks u ~ u indicate the direction of current
Fig. 8-314
•