ISUZU TROOPER 1998 Service Repair Manual
Manufacturer: ISUZU, Model Year: 1998, Model line: TROOPER, Model: ISUZU TROOPER 1998Pages: 3573, PDF Size: 60.36 MB
Page 1651 of 3573
4JG2-NA/4JG2-TURBO ENGINE 6A2 Ð 49
3. Cooling Fan Assembly
┬ĘRemove cooling fan asm fixing nuts, cooling fan
asm, fan pulley and center.
4. Radiator Assembly
┬ĘRemove bracket and radiator asm.
5. Air Cleaner Cover & Air Duct
6. Intercooler Assembly (4JG2 -T only)
┬Ę(Refer to Intercooler removal steps in this section)
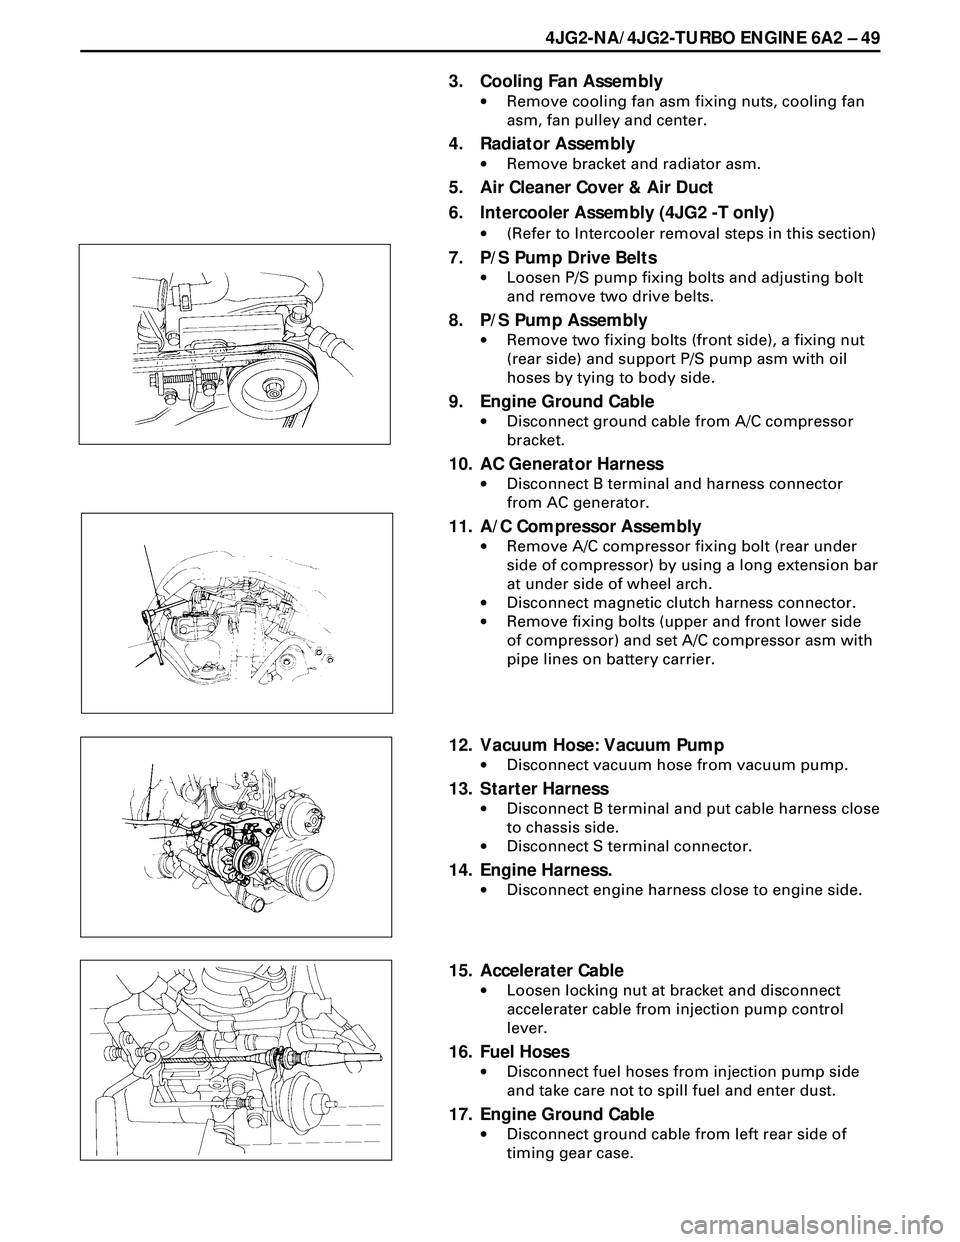
7. P/S Pump Drive Belts
┬ĘLoosen P/S pump fixing bolts and adjusting bolt
and remove two drive belts.
8. P/S Pump Assembly
┬ĘRemove two fixing bolts (front side), a fixing nut
(rear side) and support P/S pump asm with oil
hoses by tying to body side.
9. Engine Ground Cable
┬ĘDisconnect ground cable from A/C compressor
bracket.
10. AC Generator Harness
┬ĘDisconnect B terminal and harness connector
from AC generator.
11. A/C Compressor Assembly
┬ĘRemove A/C compressor fixing bolt (rear under
side of compressor) by using a long extension bar
at under side of wheel arch.
┬ĘDisconnect magnetic clutch harness connector.
┬ĘRemove fixing bolts (upper and front lower side
of compressor) and set A/C compressor asm with
pipe lines on battery carrier.
12. Vacuum Hose: Vacuum Pump
┬ĘDisconnect vacuum hose from vacuum pump.
13. Starter Harness
┬ĘDisconnect B terminal and put cable harness close
to chassis side.
┬ĘDisconnect S terminal connector.
14. Engine Harness.
┬ĘDisconnect engine harness close to engine side.
15. Accelerater Cable
┬ĘLoosen locking nut at bracket and disconnect
accelerater cable from injection pump control
lever.
16. Fuel Hoses
┬ĘDisconnect fuel hoses from injection pump side
and take care not to spill fuel and enter dust.
17. Engine Ground Cable
┬ĘDisconnect ground cable from left rear side of
timing gear case.
Page 1652 of 3573
6A2 Ð 50 4JG2-NA/4JG2-TURBO ENGINE
18. Vacuum Hose : Vacuum Tank
┬ĘDisconnect vacuum hose from vacuum pump
side.
19. Glow Plug Harness
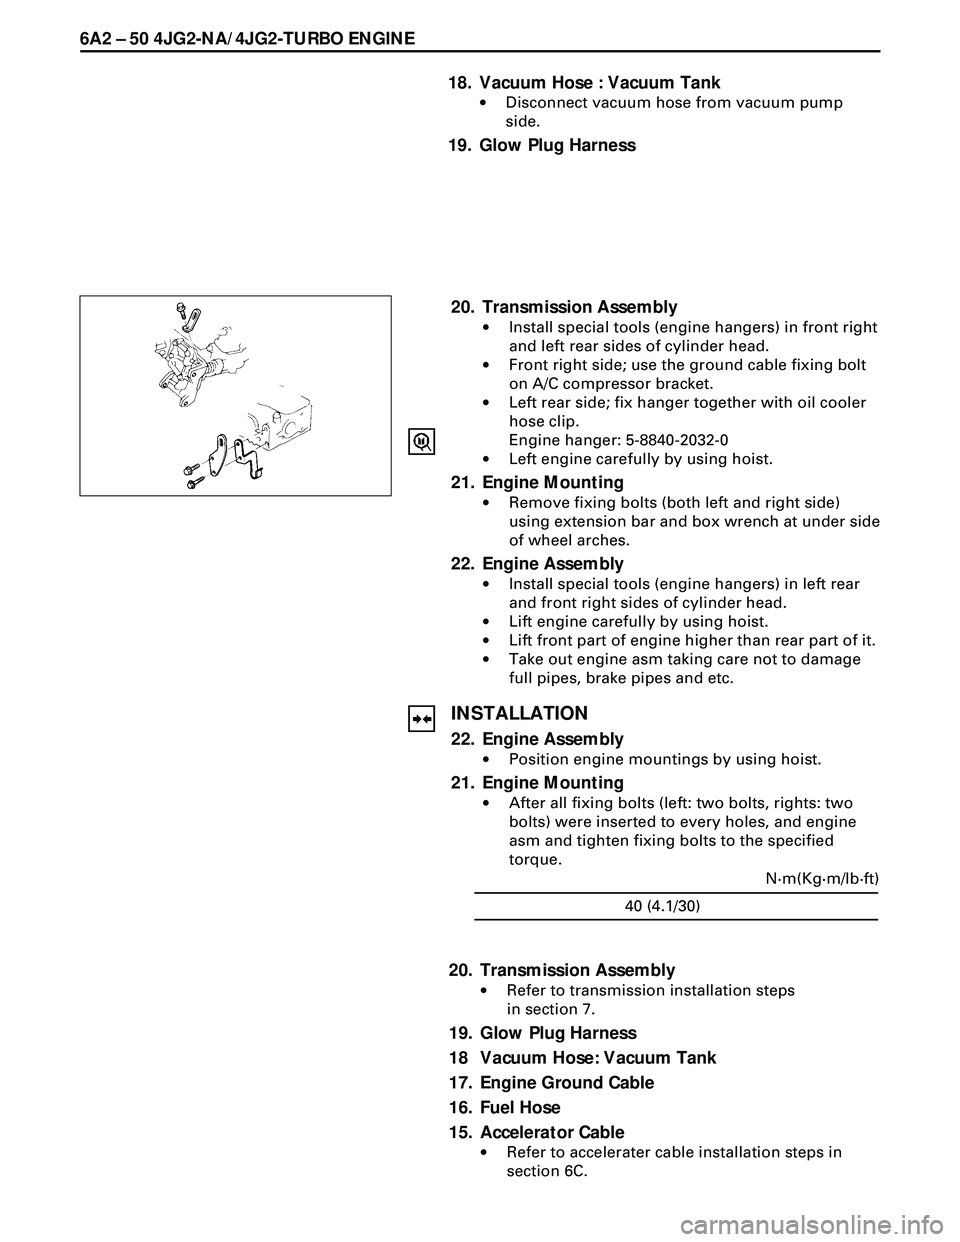
20. Transmission Assembly
┬ĘInstall special tools (engine hangers) in front right
and left rear sides of cylinder head.
┬ĘFront right side; use the ground cable fixing bolt
on A/C compressor bracket.
┬ĘLeft rear side; fix hanger together with oil cooler
hose clip.
Engine hanger: 5-8840-2032-0
┬ĘLeft engine carefully by using hoist.
21. Engine Mounting
┬ĘRemove fixing bolts (both left and right side)
using extension bar and box wrench at under side
of wheel arches.
22. Engine Assembly
┬ĘInstall special tools (engine hangers) in left rear
and front right sides of cylinder head.
┬ĘLift engine carefully by using hoist.
┬ĘLift front part of engine higher than rear part of it.
┬ĘTake out engine asm taking care not to damage
full pipes, brake pipes and etc.
INSTALLATION
22. Engine Assembly
┬ĘPosition engine mountings by using hoist.
21. Engine Mounting
┬ĘAfter all fixing bolts (left: two bolts, rights: two
bolts) were inserted to every holes, and engine
asm and tighten fixing bolts to the specified
torque.
40 (4.1/30)N┬Ęm(Kg┬Ęm/lb┬Ęft)
20. Transmission Assembly
┬ĘRefer to transmission installation steps
in section 7.
19. Glow Plug Harness
18 Vacuum Hose: Vacuum Tank
17. Engine Ground Cable
16. Fuel Hose
15. Accelerator Cable
┬ĘRefer to accelerater cable installation steps in
section 6C.
Page 1653 of 3573
4JG2-NA/4JG2-TURBO ENGINE 6A2 Ð 51
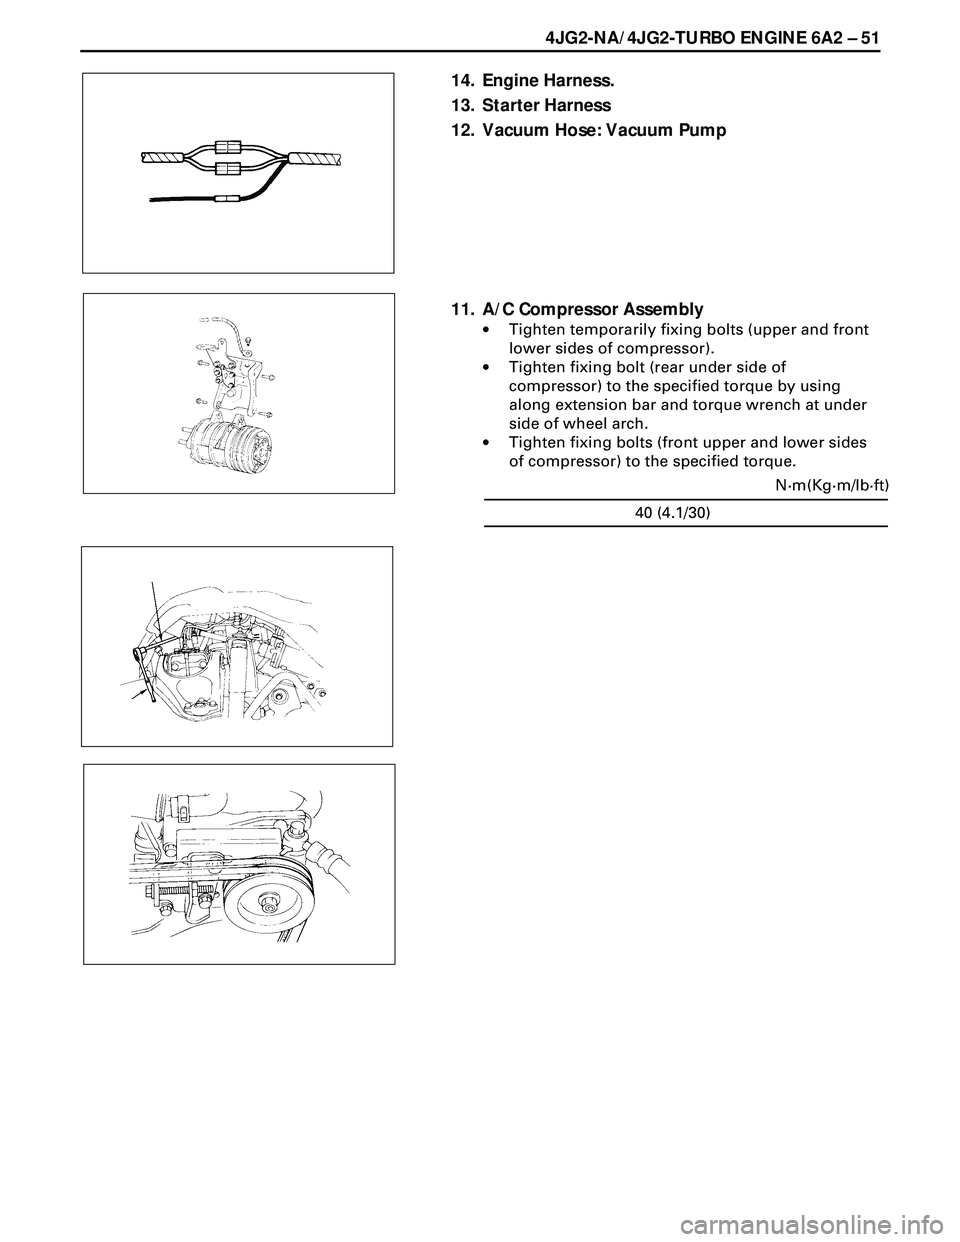
14. Engine Harness.
13. Starter Harness
12. Vacuum Hose: Vacuum Pump
11. A/C Compressor Assembly
┬ĘTighten temporarily fixing bolts (upper and front
lower sides of compressor).
┬ĘTighten fixing bolt (rear under side of
compressor) to the specified torque by using
along extension bar and torque wrench at under
side of wheel arch.
┬ĘTighten fixing bolts (front upper and lower sides
of compressor) to the specified torque.
40 (4.1/30)N┬Ęm(Kg┬Ęm/lb┬Ęft)
Page 1654 of 3573
6A2 Ð 52 4JG2-NA/4JG2-TURBO ENGINE
6. Intercooler Assembly (4JG2-T Only)
┬ĘRefer to intercooler installation steps in this
section.
5. Air Cleaner Cover & Duct
4. Radiator Assembly
┬ĘInstall cushion rubber in under left and right part
of radiator and position radiator.
┬ĘFix radiator by bracket.
3. Cooling Fan Assembly
┬ĘInstall cooling fan asm and tighten fixing bolts to
the specified torque.
2. Fan Shroud
1. Radiator Hose
┬ĘConnect upper and lower hose to engine side.
┬ĘPour coolant in to radiator.
┬ĘInstall battery.
┬ĘConnect window washer hose.
10. A.C. Generator Harness
9. Engine Ground Cable
┬ĘAttached ground cable to A/C compressor bracket.
8. P/S Pump Assembly
┬ĘInstall P/S pump asm in engine and tighten
temporarily fixing nut.
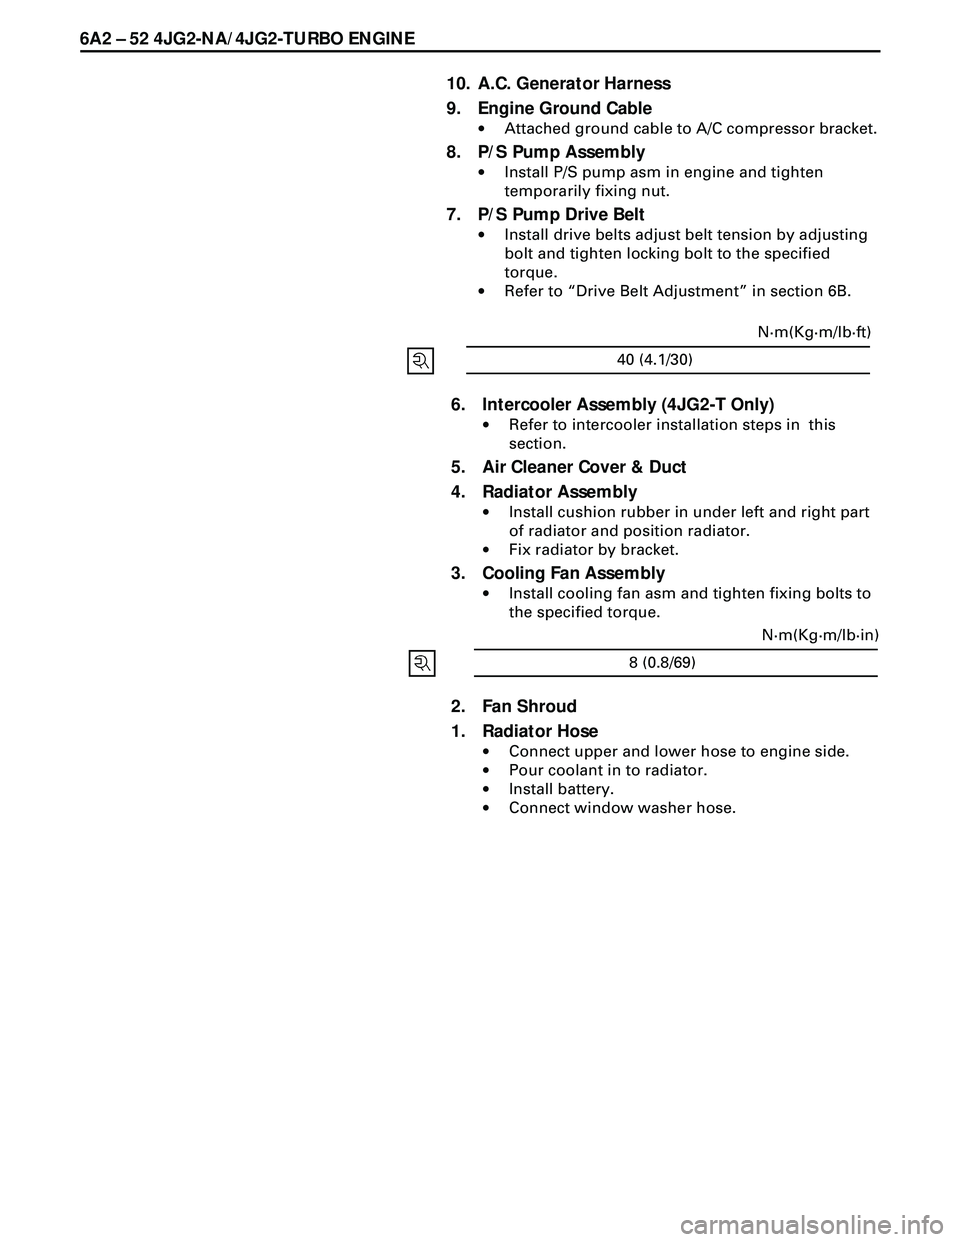
7. P/S Pump Drive Belt
┬ĘInstall drive belts adjust belt tension by adjusting
bolt and tighten locking bolt to the specified
torque.
┬ĘRefer to ├ÆDrive Belt Adjustment├ō in section 6B.
8 (0.8/69)N┬Ęm(Kg┬Ęm/lb┬Ęin)
40 (4.1/30)N┬Ęm(Kg┬Ęm/lb┬Ęft)
Page 1655 of 3573
ENGINE COOLING 6B Ð 1
SECTION 6B
ENGINE COOLING
CONTENTS
PAGE
General Description ..................................................................................................................... 6B- 1
On-Vehicle Service ....................................................................................................................... 6B- 5
Water Pump ............................................................................................................................. 6B- 5
Thermostat ............................................................................................................................... 6B- 7
Radiator .................................................................................................................................... 6B- 9
Drive Belt Adjustment ............................................................................................................ 6B-15
GENERAL DESCRIPTION
Page 1656 of 3573
6B Ð 2 ENGINE COOLING
Page 1657 of 3573
ENGINE COOLING 6B Ð 3
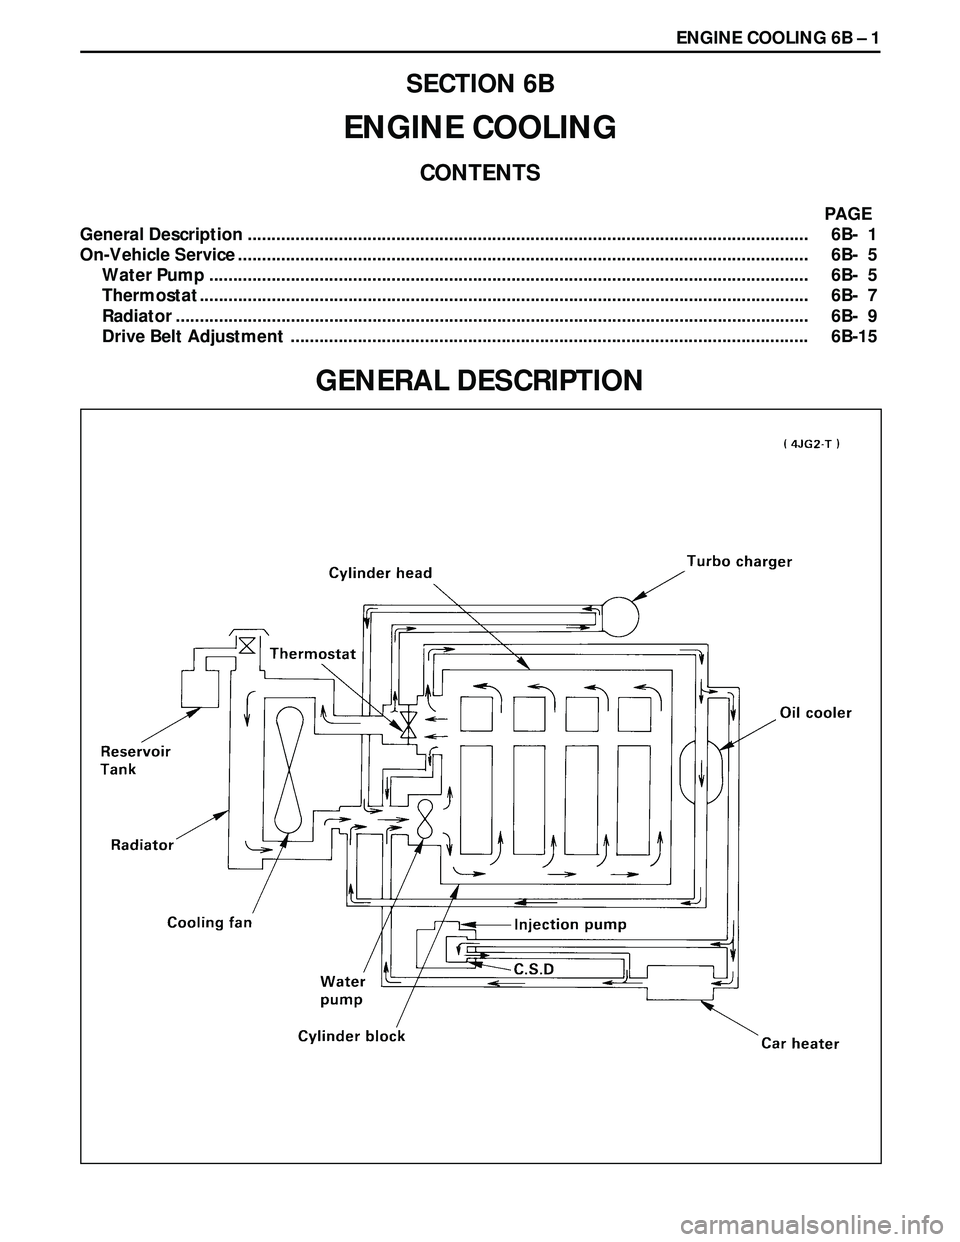
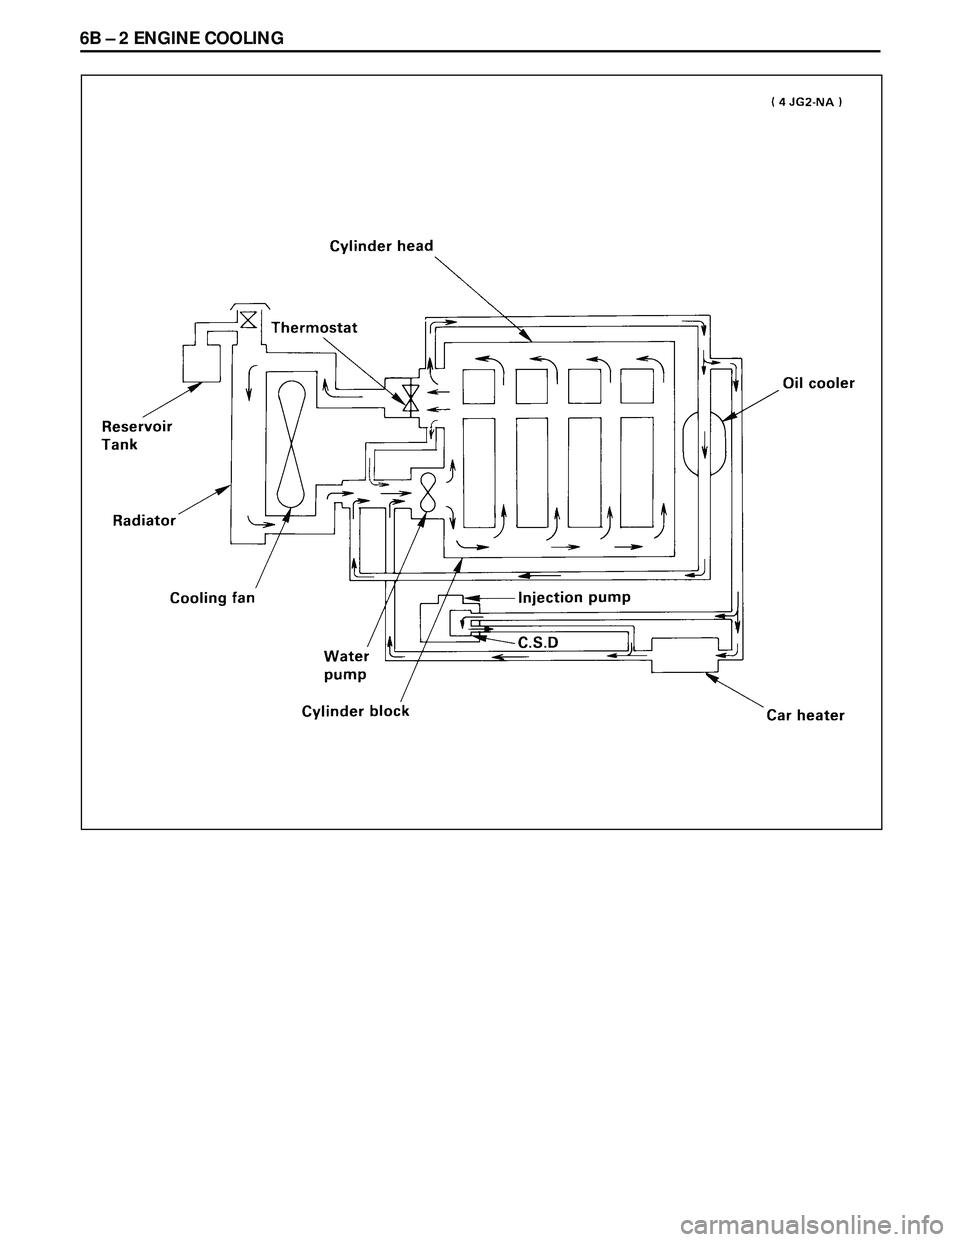
The cooling system is a pressurized coolant forced
circulation type which consists of water pump, thermostat
cooling fan, radiator and other components. The
circulating coolant cools the lubricating oil in the oil filter
and turbocharger.
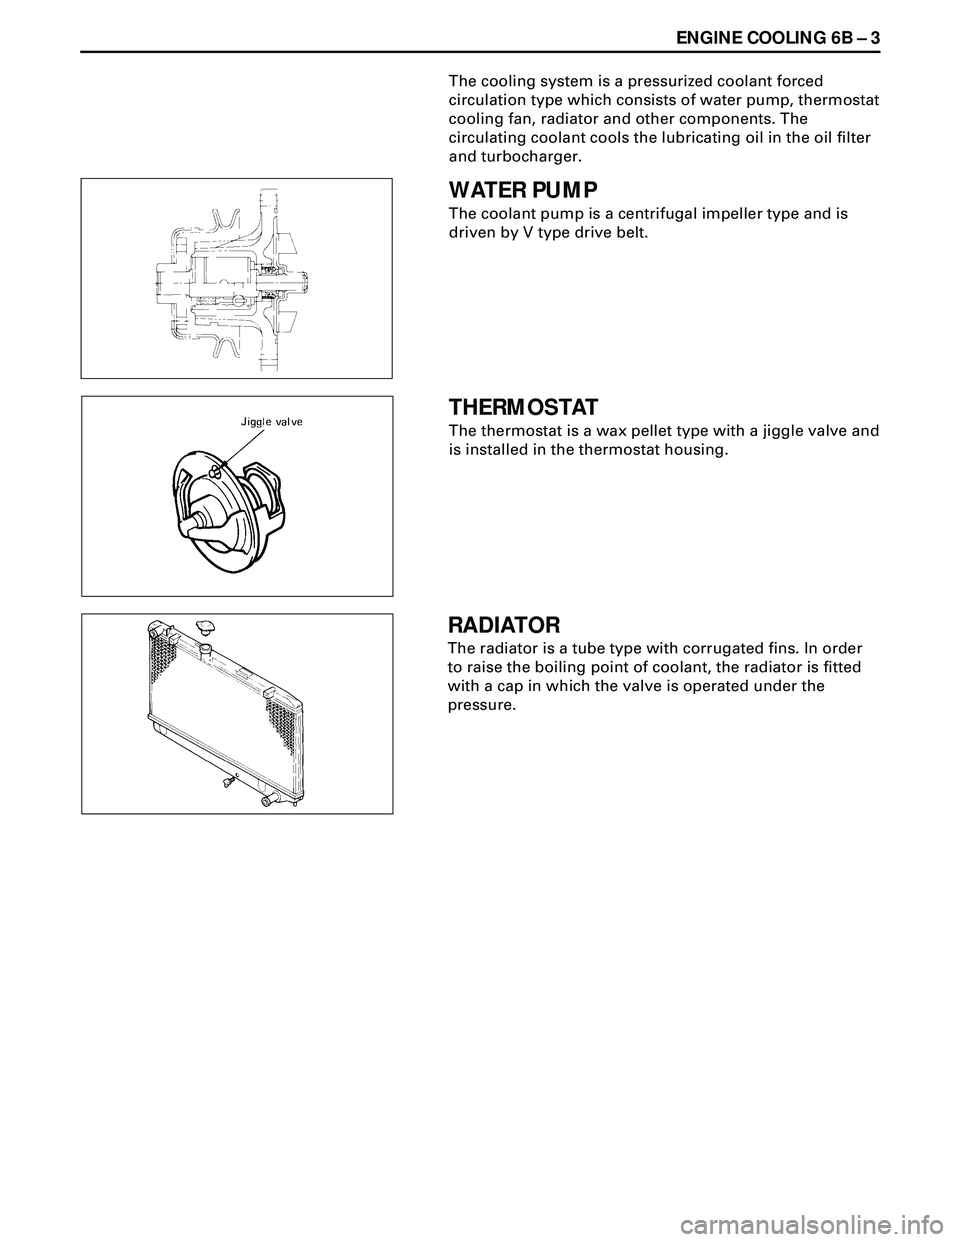
WATER PUMP
The coolant pump is a centrifugal impeller type and is
driven by V type drive belt.
THERMOSTAT
The thermostat is a wax pellet type with a jiggle valve and
is installed in the thermostat housing.
RADIATOR
The radiator is a tube type with corrugated fins. In order
to raise the boiling point of coolant, the radiator is fitted
with a cap in which the valve is operated under the
pressure.
Page 1658 of 3573
6B Ð 4 ENGINE COOLING
ANTI-FREEZE SOLUTION
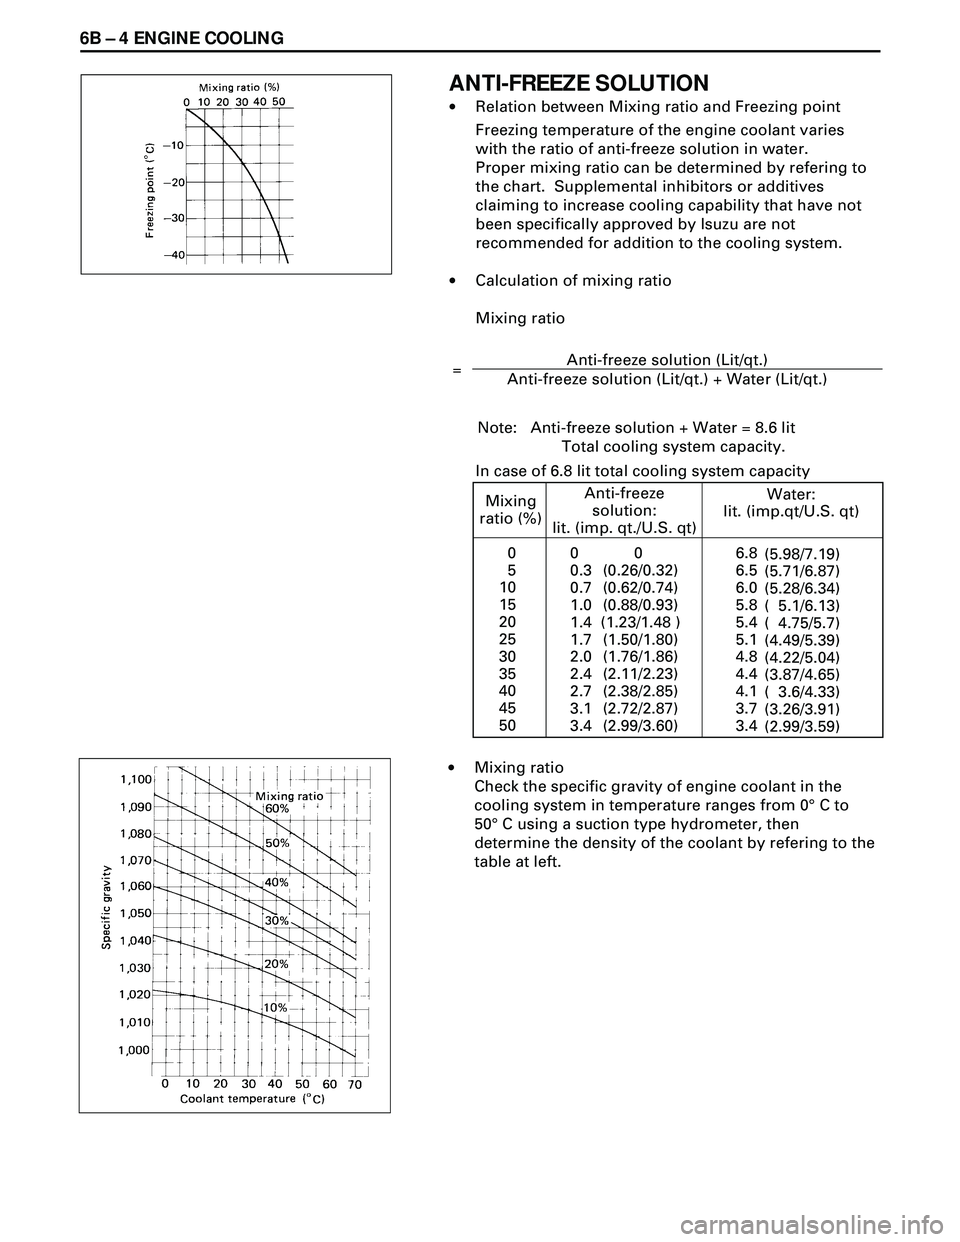
┬ĘRelation between Mixing ratio and Freezing point
Freezing temperature of the engine coolant varies
with the ratio of anti-freeze solution in water.
Proper mixing ratio can be determined by refering to
the chart. Supplemental inhibitors or additives
claiming to increase cooling capability that have not
been specifically approved by Isuzu are not
recommended for addition to the cooling system.
┬ĘCalculation of mixing ratio
Mixing ratio
Note: Anti-freeze solution + Water = 8.6 lit
Total cooling system capacity.
=Anti-freeze solution (Lit/qt.)
Anti-freeze solution (Lit/
qt.) + Water (Lit/qt.)
In case of 6.8 lit total cooling system capacity
Mixing
ratio (%)Anti-freeze
solution:
lit. (imp. qt./U.S. qt)Water:
lit. (imp.qt/U.S. qt)
0
5
10
15
20
25
30
35
40
45
500
0.3
0.7
1.0
1.4
1.7
2.0
2.4
2.7
3.1
3.40
(0.26/0.32)
(0.62/0.74)
(0.88/0.93)
(1.23/1.48 )
(1.50/1.80)
(1.76/1.86)
(2.11/2.23)
(2.38/2.85)
(2.72/2.87)
(2.99/3.60)6.8
6.5
6.0
5.8
5.4
5.1
4.8
4.4
4.1
3.7
3.4
(5.98/7.19)
(5.71/6.87)
(5.28/6.34)
( 5.1/6.13)
( 4.75/5.7)
(4.49/5.39)
(4.22/5.04)
(3.87/4.65)
( 3.6/4.33)
(3.26/3.91)
(2.99/3.59)
┬ĘMixing ratio
Check the specific gravity of engine coolant in the
cooling system in temperature ranges from 0┬Ī C to
50┬Ī C using a suction type hydrometer, then
determine the density of the coolant by refering to the
table at left.
Page 1659 of 3573
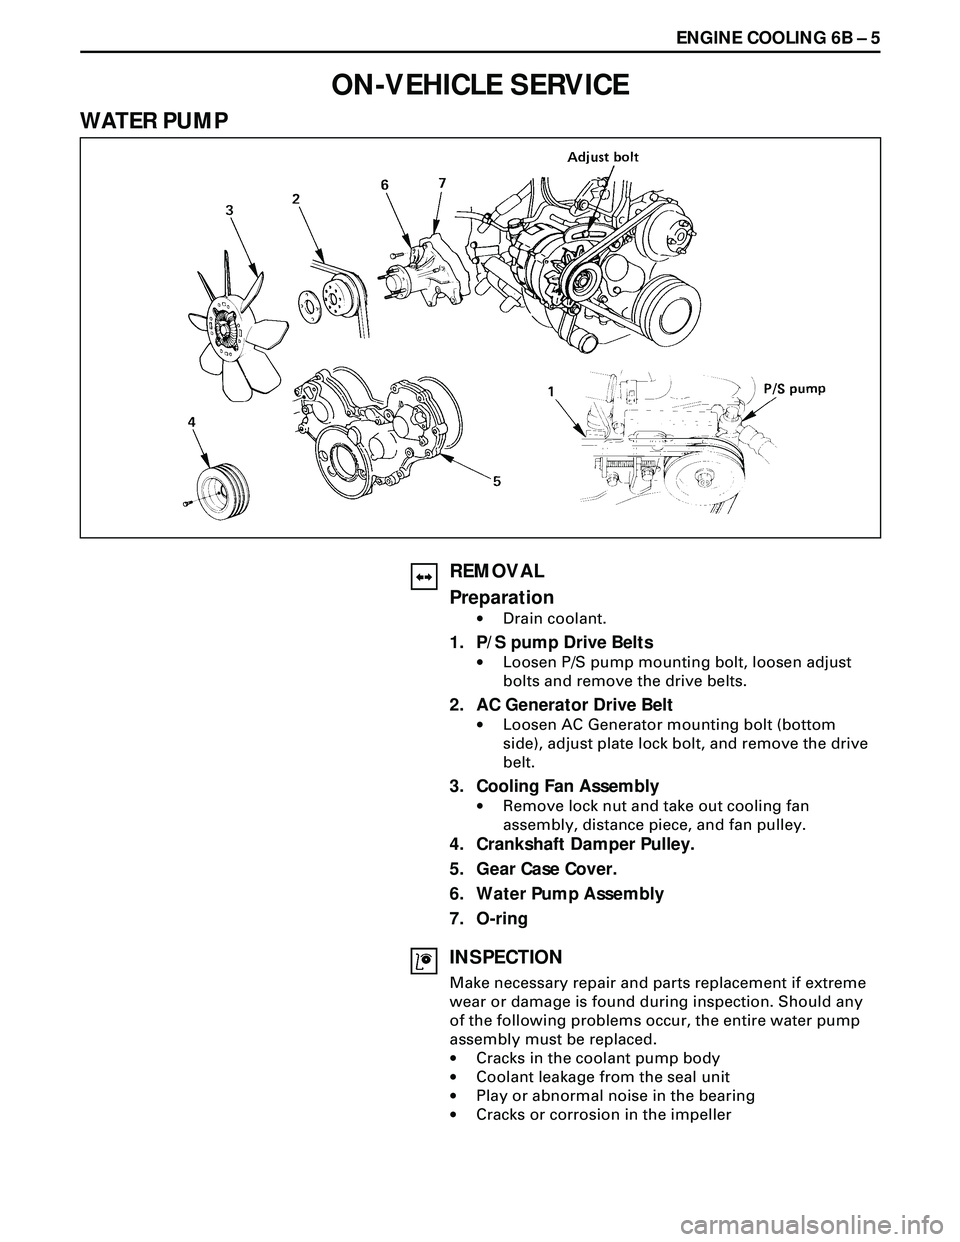
ENGINE COOLING 6B Ð 5
ON-VEHICLE SERVICE
WATER PUMP
REMOVAL
Preparation
┬ĘDrain coolant.
1. P/S pump Drive Belts
┬ĘLoosen P/S pump mounting bolt, loosen adjust
bolts and remove the drive belts.
2. AC Generator Drive Belt
┬ĘLoosen AC Generator mounting bolt (bottom
side), adjust plate lock bolt, and remove the drive
belt.
3. Cooling Fan Assembly
┬ĘRemove lock nut and take out cooling fan
assembly, distance piece, and fan pulley.
4. Crankshaft Damper Pulley.
5. Gear Case Cover.
6. Water Pump Assembly
7. O-ring
INSPECTION
Make necessary repair and parts replacement if extreme
wear or damage is found during inspection. Should any
of the following problems occur, the entire water pump
assembly must be replaced.
┬ĘCracks in the coolant pump body
┬ĘCoolant leakage from the seal unit
┬ĘPlay or abnormal noise in the bearing
┬ĘCracks or corrosion in the impeller
Page 1660 of 3573
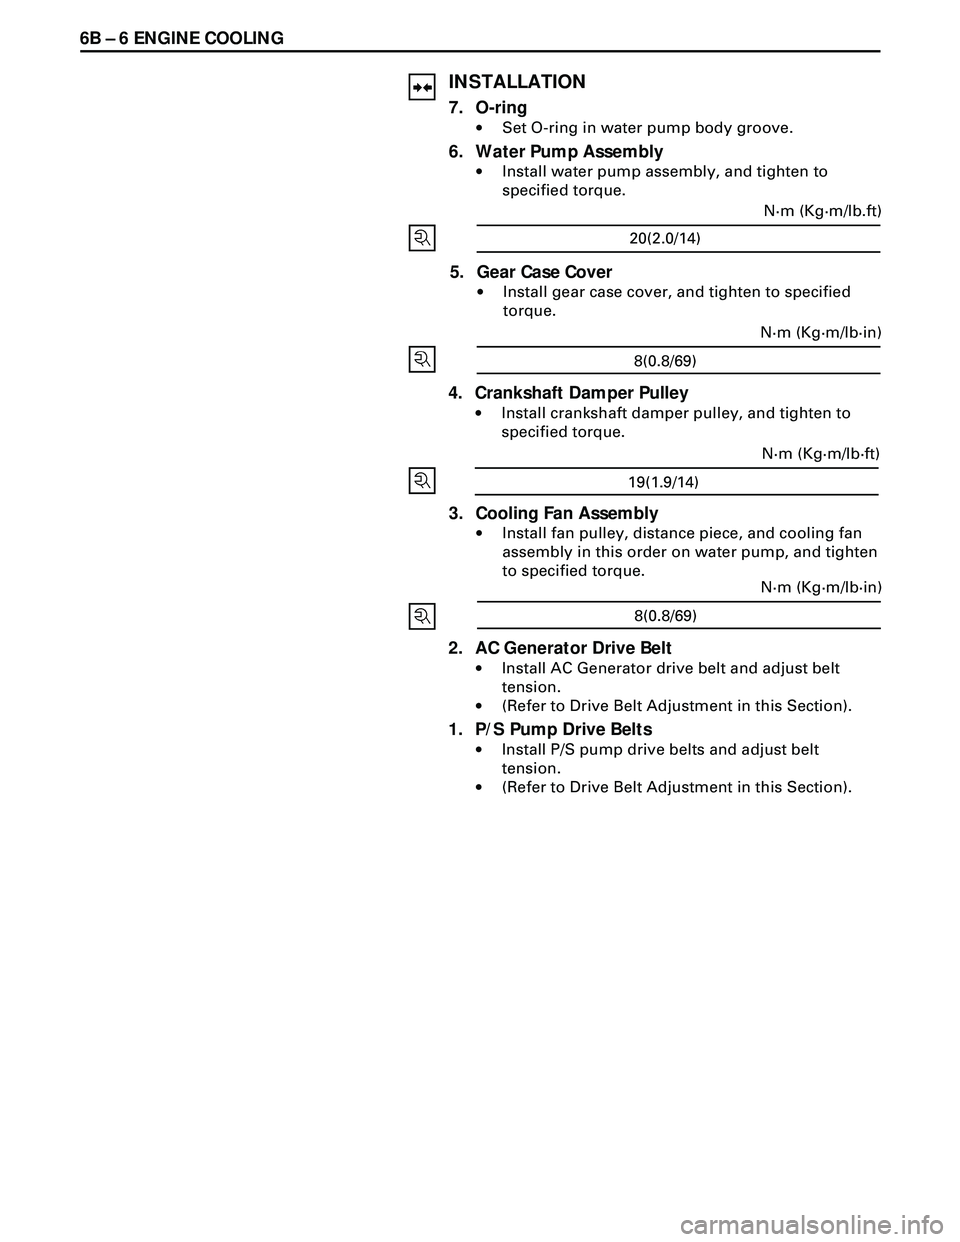
6B Ð 6 ENGINE COOLING
INSTALLATION
7. O-ring
┬ĘSet O-ring in water pump body groove.
6. Water Pump Assembly
┬ĘInstall water pump assembly, and tighten to
specified torque.
20(2.0/14)N┬Ęm (Kg┬Ęm/lb.ft)
5. Gear Case Cover
┬ĘInstall gear case cover, and tighten to specified
torque.
8(0.8/69)N┬Ęm (Kg┬Ęm/lb┬Ęin)
4. Crankshaft Damper Pulley
┬ĘInstall crankshaft damper pulley, and tighten to
specified torque.
3. Cooling Fan Assembly
┬ĘInstall fan pulley, distance piece, and cooling fan
assembly in this order on water pump, and tighten
to specified torque.
19(1.9/14)N┬Ęm (Kg┬Ęm/lb┬Ęft)
2. AC Generator Drive Belt
┬ĘInstall AC Generator drive belt and adjust belt
tension.
┬Ę(Refer to Drive Belt Adjustment in this Section).
1. P/S Pump Drive Belts
┬ĘInstall P/S pump drive belts and adjust belt
tension.
┬Ę(Refer to Drive Belt Adjustment in this Section).8(0.8/69)N┬Ęm (Kg┬Ęm/lb┬Ęin)