lower JAGUAR X308 1998 2.G Workshop Manual
[x] Cancel search | Manufacturer: JAGUAR, Model Year: 1998, Model line: X308, Model: JAGUAR X308 1998 2.GPages: 2490, PDF Size: 69.81 MB
Page 284 of 2490

Re
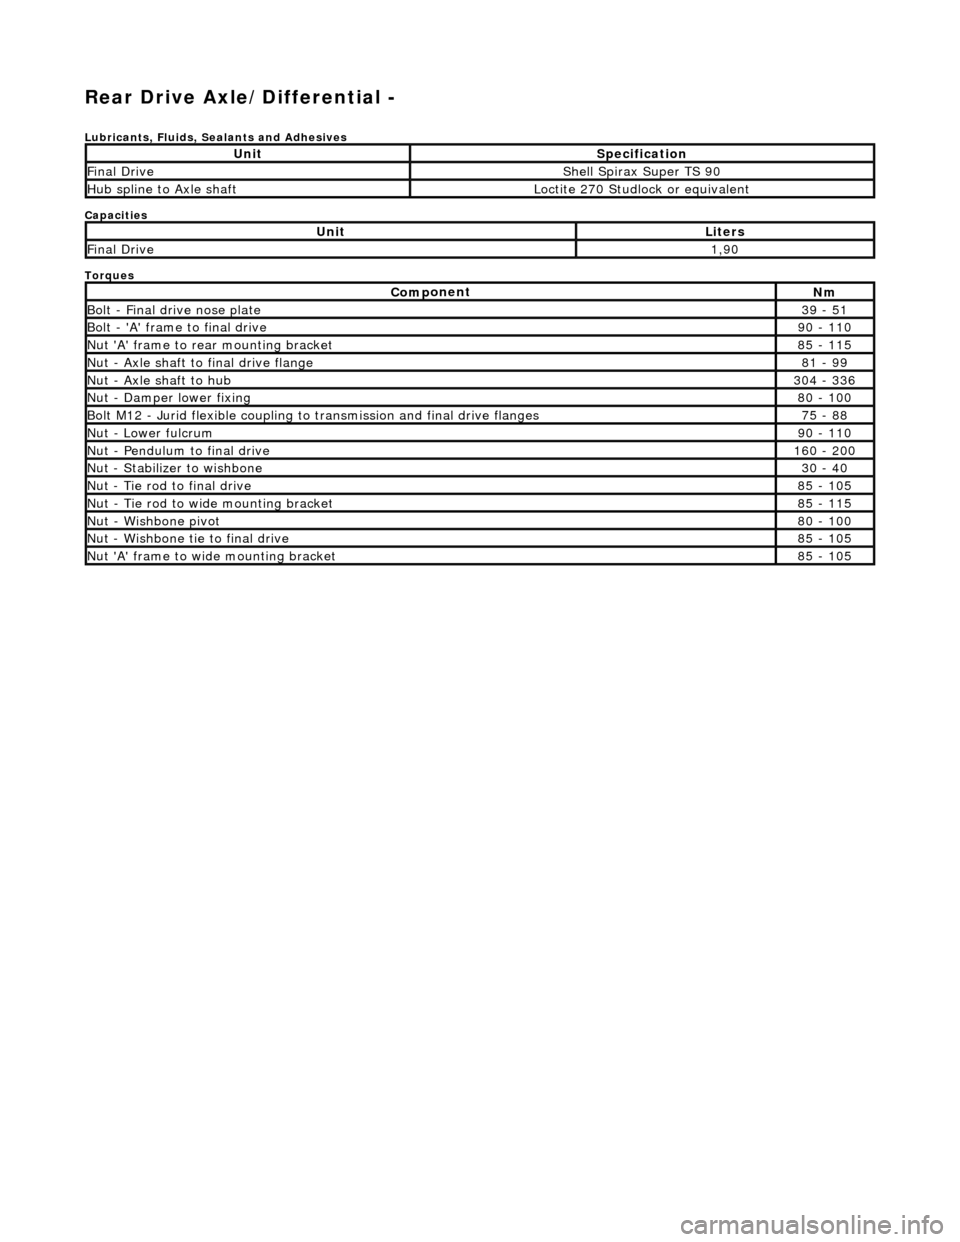
ar Drive Axle/Differential -
Lubric
ants, Fluids, Sealants and Adhesives
Capacities
Torques
UnitSp
ecification
F
i
nal Drive
Shell Sp
irax Supe
r TS 90
Hub s
p
line to Axle shaft
Loct
it
e 270 Studlock or equivalent
UnitLi
t
ers
F
i
nal Drive
1,
90
Com p
onent
Nm
B
ol
t - Final drive nose plate
39
- 51
Bol t
- 'A' frame to final drive
9
0 -
110
Nu
t 'A' f
rame to rear mounting bracket
8
5 -
115
Nu
t -
Axle shaft to final drive flange
81
-
99
Nu
t -
Axle shaft to hub
3
04 -
336
N
u
t - Damper lower fixing
8
0 -
100
Bol
t
M12 - Jurid flexible coupling to
transmission and final drive flanges
75 -
88
N
u
t - Lower fulcrum
9
0 -
110
Nu
t -
Pendulum to final drive
1
60 -
200
N
u
t - Stabilizer to wishbone
30
-
40
N
u
t - Tie rod to final drive
8
5 -
105
Nu
t -
Tie rod to wide mounting bracket
8
5 -
115
Nu
t -
Wishbone pivot
8
0 -
100
N
u
t - Wishbone tie to final drive
8
5 -
105
N
u
t 'A' frame to wide mounting bracket
8
5 -
105
Page 301 of 2490

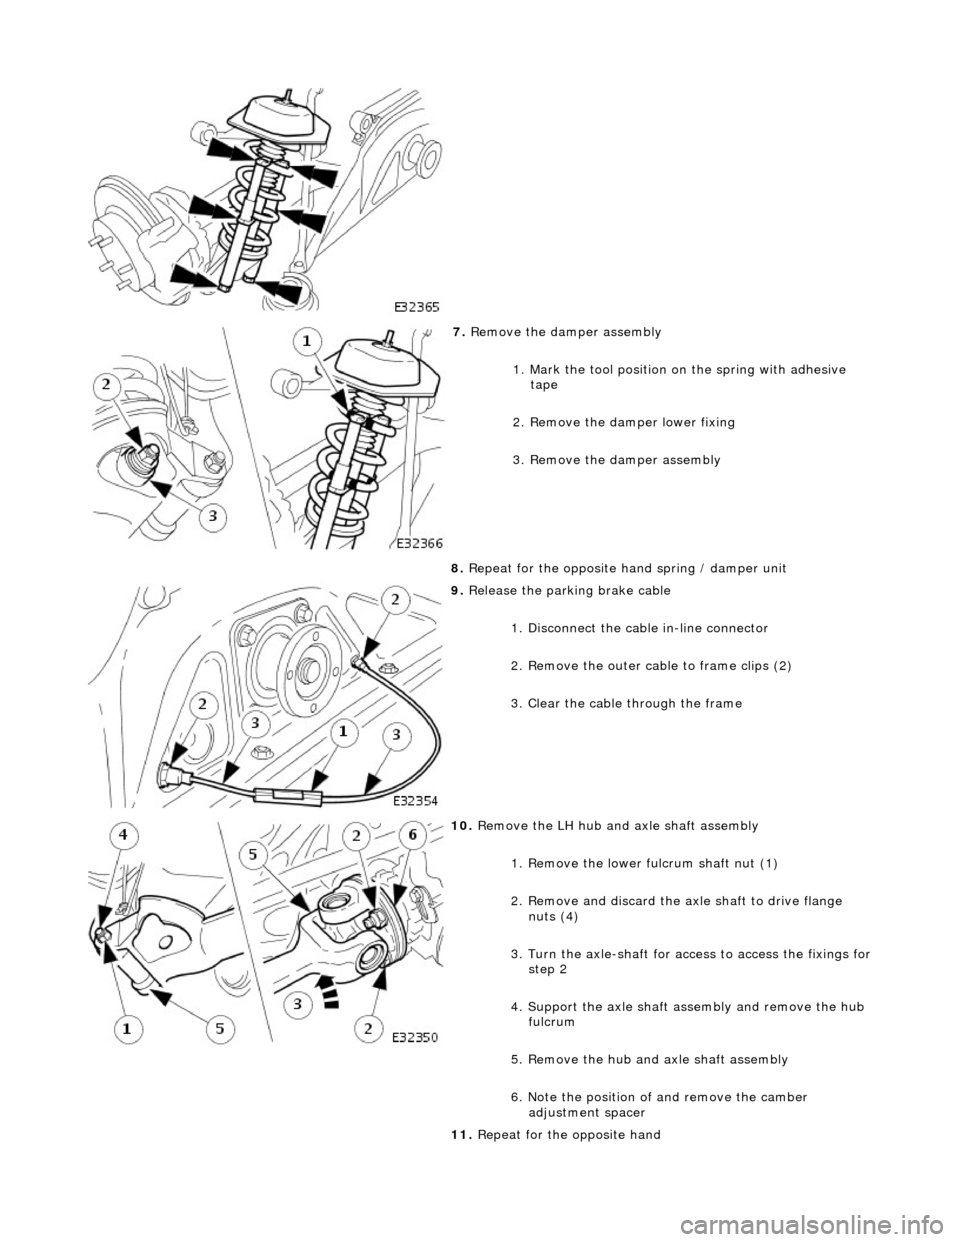
7. Re
move the damper assembly
1. Mark the tool position on the spring with adhesive
tape
2. Remove the damper lower fixing
3. Remove the damper assembly
8. Repeat for the opposite hand spring / damper unit
9. Relea
se the parking brake cable
1. Disconnect the cable in-line connector
2. Remove the outer cable to frame clips (2)
3. Clear the cable through the frame
10
.
Remove the LH hub and axle shaft assembly
1. Remove the lower fulcrum shaft nut (1)
2. Remove and discard the axle shaft to drive flange nuts (4)
3. Turn the axle-shaft for ac cess to access the fixings for
step 2
4. Support the axle shaft a ssembly and remove the hub
fulcrum
5. Remove the hub and axle shaft assembly
6. Note the position of and remove the camber adjustment spacer
11. Repeat for the opposite hand
Page 346 of 2490

2.
Remove paper backing from pads to reveal adhesive
shim. Install brake pads, insert clip located on back of
inner pad into caliper piston.
3. Inst al
l caliper housing to caliper carrier.
Align hou
s
ing to carrier.
1. Install and tighten guide pins to 25-30 Nm.
2. Install dust covers.
3. Install anti-rattle spring.
4. NOTE : Th
e brake hose must only be installed with the vehicle's
body supported and the suspension hanging.
Install and tighten brake hose to caliper housing to 10-14 Nm.
5. NO
TE: Make sure the brake
hose does not twist when
tightening the hose lock-nut.
Connect brake hose to brake tube.
1. Position hose thread through bracket.
2. Install and tighten locking nut. Refer to Specifications, section 206-03.
3. Install and tighten brake- tube union nut. Refer to
Specifications, section 206-03.
6. Remove special tool from brake pedal.
7. Fit wheels. Refer to section 204-04.
8. NOTE: Make sure the brake hose is routed correctly.
Remove stands and lower vehicl e. Refer to section 100-02.
9. Bleed brake hydraulic system. See operation 70.25.03.
Page 350 of 2490

2.
Po
sition anti-rattle spring.
3. Install pins.
4. Install 'R' clips.
3. CAUTIO
N: The brake hose must
only be installed with the
vehicle's body supported and the suspension hanging.
Install brake hose to caliper.
Remove plugs f rom caliper and hose.
Instal
l new sealing washers.
Install and tigh
ten un
ion bolt to 22-26 Nm.
4.
NO
TE: Make sure the brake
hose does not twist when
tightening the hose lock-nut.
Connect brake hose to brake tube. 1. Position hose thread through bracket.
2. Install and tighten locking nut. Refer to Specifications, section 206-03.
3. Install and tighten brake- tube union nut. Refer to
Specifications, section 206-03.
5. Remove special tool from brake pedal.
6. Fit wheels. Refer to operation 74.20.05.
7. NOTE: Make sure the brake hose is routed correctly.
Remove stands and lower vehicl e. Refer to section 100-02.
8. Bleed brake hydraulic system. See operation 70.25.06.
Page 353 of 2490

2. Check brak
e disc run-out. Refer
to General Procedures section
206-03.
3. Install
caliper carrier to vertical link.
Al
ign carrier to vertical link .
Install and tigh
ten bolts to 140 Nm.
4. CAUTI
ONS:
Always install new brake pads, irrespective of the condition
of the original pads, when renewing brake discs.
Retracting the caliper piston may cause the fluid reservoir
to over-flow. Remove brake flui d spillage immediately from paint
work, with clean water.
• NOTE: Clean caliper piston to pad mating surface.
Install brake pads in to caliper housing.
1. Slowly retract piston into caliper housing.
2. Remove paper backing from pads to reveal adhesive shim. Install brake pads, insert clip located on back of
inner pad into caliper piston.
5. Inst
all caliper housing to caliper carrier.
Align hou
sing to carrier.
1. Install and tighten guide pins to 25-30 Nm.
2. Install dust covers.
3. Install anti-rattle spring.
6. Repeat above procedure to inst all opposite side brake disc.
7. Fit wheels. Refer to operation 74.20.05.
8. Remove stands and lower vehicl e. Refer to section 100-02.
9. CAUTION: Remove brake flui d spillage immediately from
paint work, with clean water.
Check brake fluid level.
Check brak
e fluid level is
at the maximum mark.
Page 357 of 2490

3. Check brak
e disc run-out. Refer
to General Procedures section
206-03.
4. Install
caliper to vertical link.
Install and tigh
ten bolts to 140 Nm.
5. CAUTI
ONS:
Always install new brake pads, irrespective of the condition
of the original pads, when renewing brake discs.
Retracting the caliper piston may cause the fluid reservoir
to over-flow. Remove brake flui d spillage immediately from paint
work, with clean water.
Note the condition of pins and 'R' clips and replace if
necessary.
Install brake pads in to caliper housing.
Sl
owly retract caliper pistons.
1. Install pads.
2. Position anti-rattle spring.
3. Install pins.
4. Install 'R' clips.
6. Repeat
above procedure to inst
all opposite side brake disc.
7. Fit wheels. Refer to operation 74.20.05.
8. Remove stands and lower vehicl e. Refer to section 100-02.
Page 360 of 2490

In
stallation
8.
Repeat ab
ove procedure to remo
ve opposite side brake pads.
1. CAUTIO
N: Retracting the caliper piston may cause the
fluid reservoir to over-flow. Remove brake fluid spillage
immediately from paint work, with clean water.
• NOTE: Clean caliper piston to pad mating surface.
Install brake pads in to caliper housing.
1. Slowly retract piston into caliper housing.
2. Remove paper backing from pads to reveal adhesive shim. Install brake pads, insert clip located on back of
inner pad into caliper piston.
2. Instal
l caliper housing to caliper carrier.
Align hou
s
ing to carrier.
1. Install and tighten guide pins to 25-30 Nm.
2. Install dust covers.
3. Install anti-rattle spring.
3. Repeat above procedure to install opposite side brake pads.
4. Fit wheels. Refer to section 204-04.
5. Remove stands and lower vehicl e. Refer to section 100-02.
6. CAUTIO
N: Remove brake flui
d spillage immediately from
paint work, with clean water.
Check brake fluid level.
Check brak e flu
id level is
at the maximum mark.
Remo
ve cloth.
Fi
t ca
p.
7.
Re
move paint work protection
covers, and close engine
compartment.
8. Start the engine and repeatedly press the brake pedal until
brake pressure is evident.
Page 363 of 2490

Install brake pads
i
nto caliper.
Slo
wly retract caliper pi
stons into caliper.
1. Install pads.
2. Position anti-rattle spring.
3. Install pins.
4. Install 'R' clips.
4. Repeat above procedure to install opposite side brake pads.
5. Fit wheels.
For additional information, refer to: Wheel and Tire
(20
4-04
Wheels and Tires, Remo val and Installation).
6. Remove stands and lower vehicle.
For additional information, refer to: Using the Workshop Jack
(10
0-02 Jacking and Lifting, General Procedures).
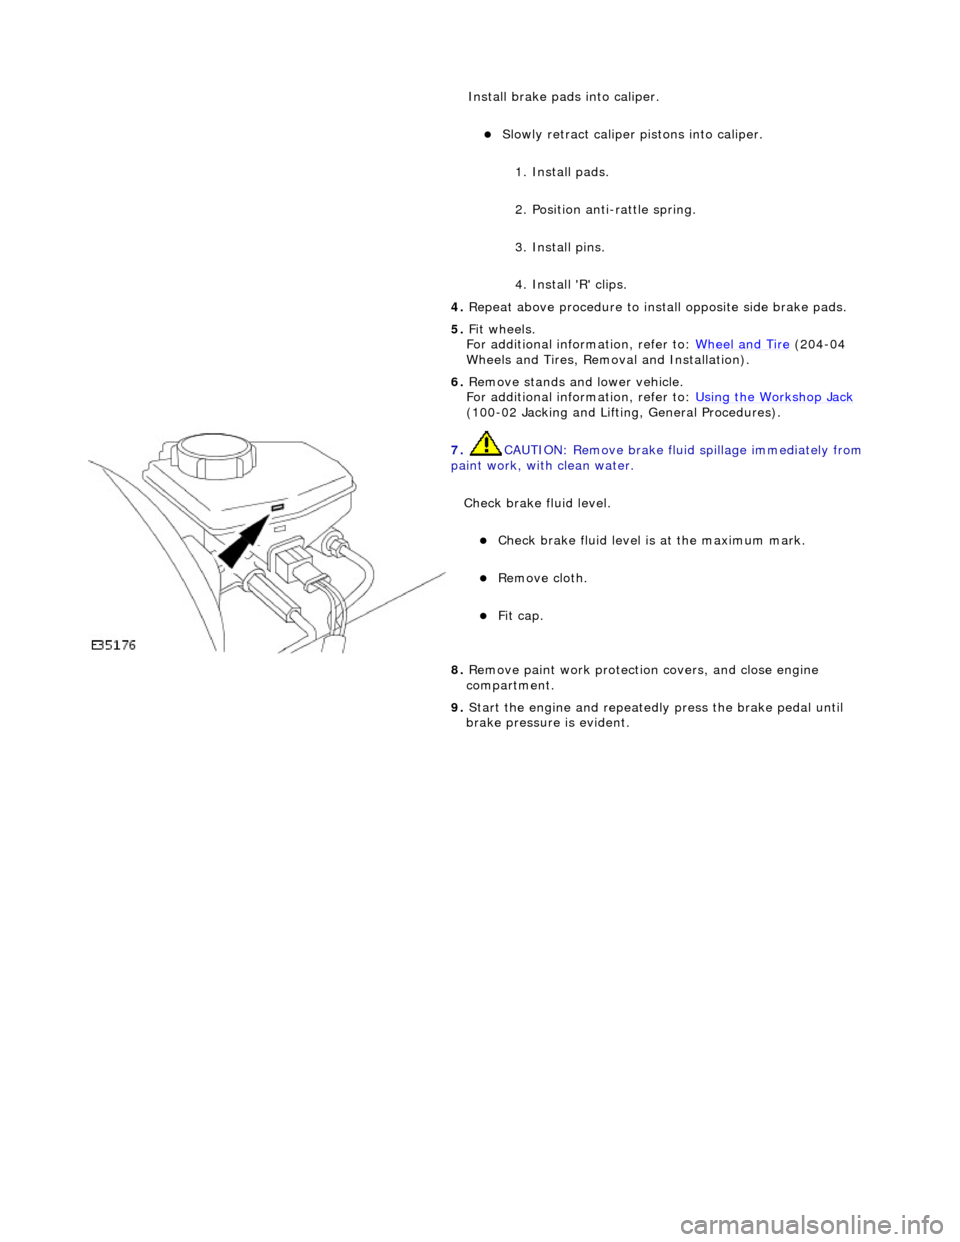
7. CAUTI
ON: Remove brake flui
d spillage immediately from
paint work, with clean water.
Check brake fluid level.
Check brak
e fluid level is
at the maximum mark.
Re
move cloth.
Fi
t cap.
8.
R
emove paint work protection
covers, and close engine
compartment.
9. Start the engine and repeatedly press the brake pedal until
brake pressure is evident.
Page 371 of 2490

into caliper piston.
4. Inst
all caliper housing to caliper carrier.
1. Align housing to carrier.
2. Install and tighten gu ide pins to 25-30 Nm.
3. Install dust covers.
4. Install anti-rattle spring.
5. Conne
ct brake hose to caliper housing.
Re
move plugs.
Install and tigh
ten bolt to 30-40 Nm.
6. Remove special tool from brake pedal.
7. Fit wheels. See Section 204-04.
8. Remove stands and lower vehicle. See Section 100-02.
9. Bleed brake hydraulic system. Refer to operation 70.25.03.
Page 375 of 2490

i
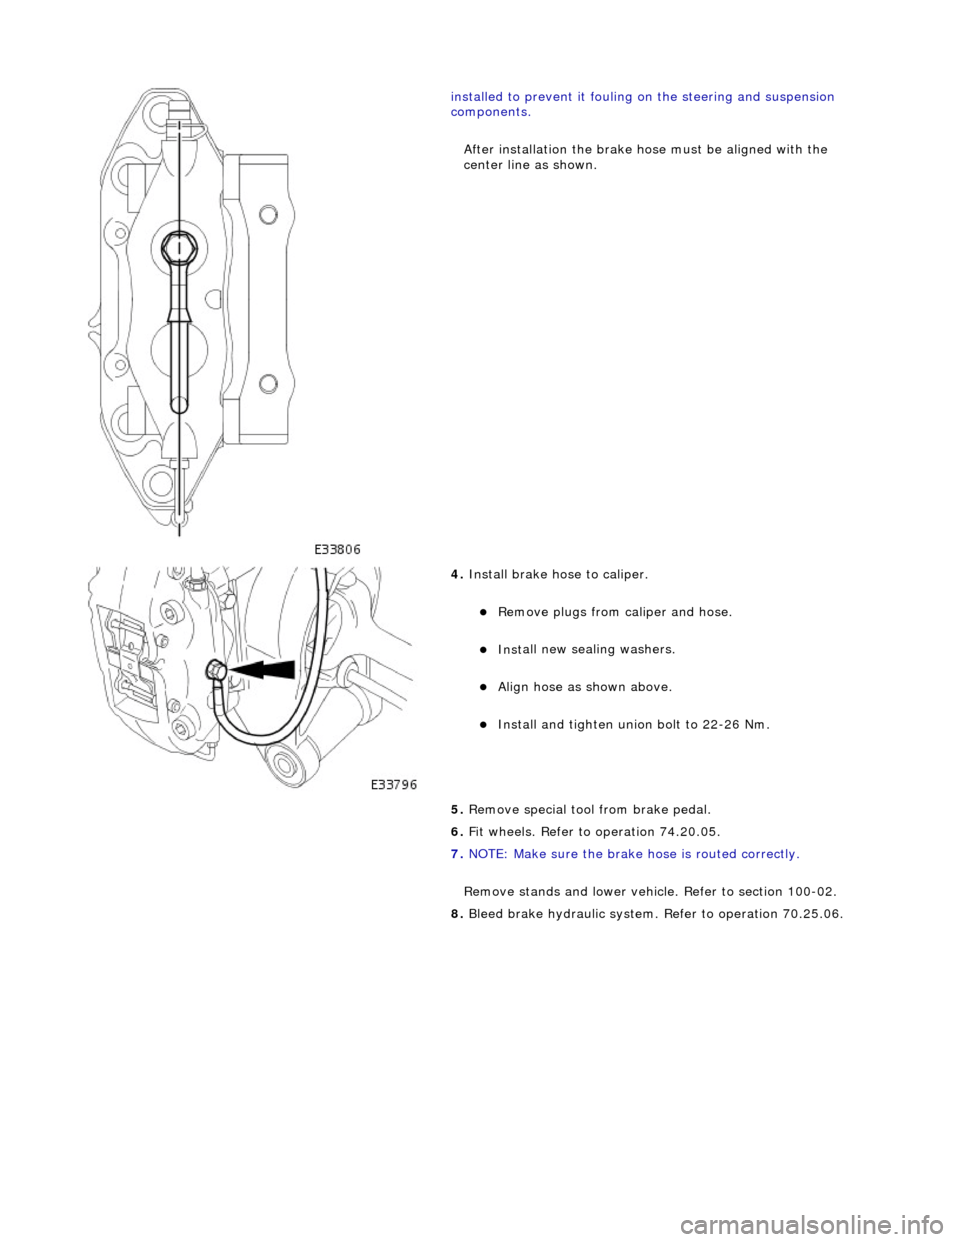
nstalled to prevent it fouling on the steering and suspension
components.
After installation the brake ho se must be aligned with the
center line as shown.
4. Install brake hose to
caliper.
Remove plugs f
rom caliper and hose.
Inst
all new sealing washers.
Align hos
e as shown above.
Install and tigh
ten union bolt to 22-26 Nm.
5. Remove special tool from brake pedal.
6. Fit wheels. Refer to operation 74.20.05.
7. NOTE: Make sure the brake hose is routed correctly.
Remove stands and lower vehicl e. Refer to section 100-02.
8. Bleed brake hydraulic system. Refer to operation 70.25.06.