vvt JAGUAR X308 1998 2.G User Guide
[x] Cancel search | Manufacturer: JAGUAR, Model Year: 1998, Model line: X308, Model: JAGUAR X308 1998 2.GPages: 2490, PDF Size: 69.81 MB
Page 541 of 2490
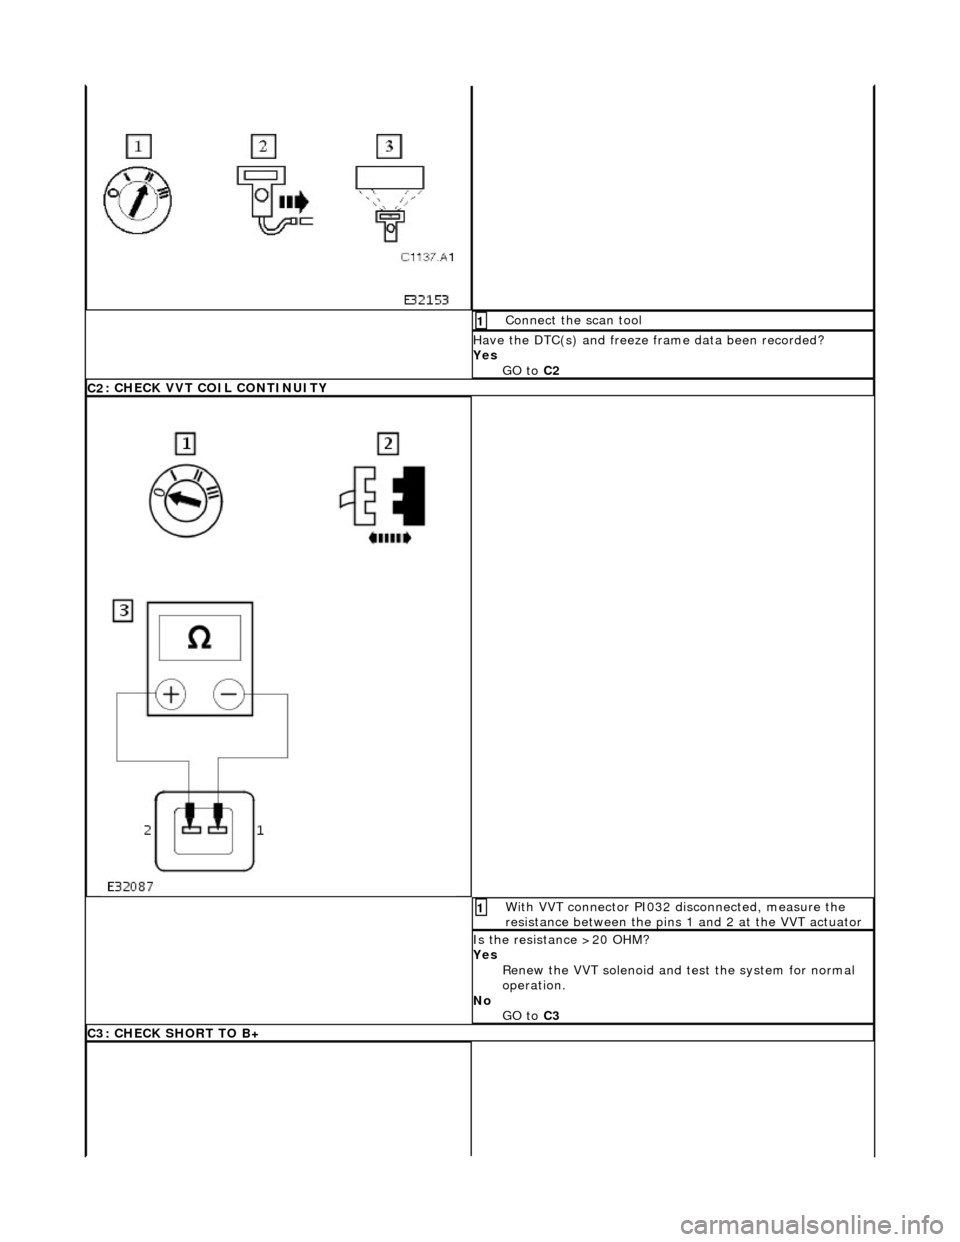
Conne
ct the scan tool
1
Have the DTC(s) and fr
eeze
frame data been recorded?
Yes GO to C2
C2
: CHECK VVT COIL CONTINUITY
Wi
th VVT connector PI032 disconnected, measure the
resistance between the pins 1 and 2 at the VVT actuator
1
I
s the resistance >20 OHM?
Yes Renew the VVT solenoid and te st the system for normal
operation.
No GO to C3
C3
: CHECK SHORT TO B+
Page 542 of 2490
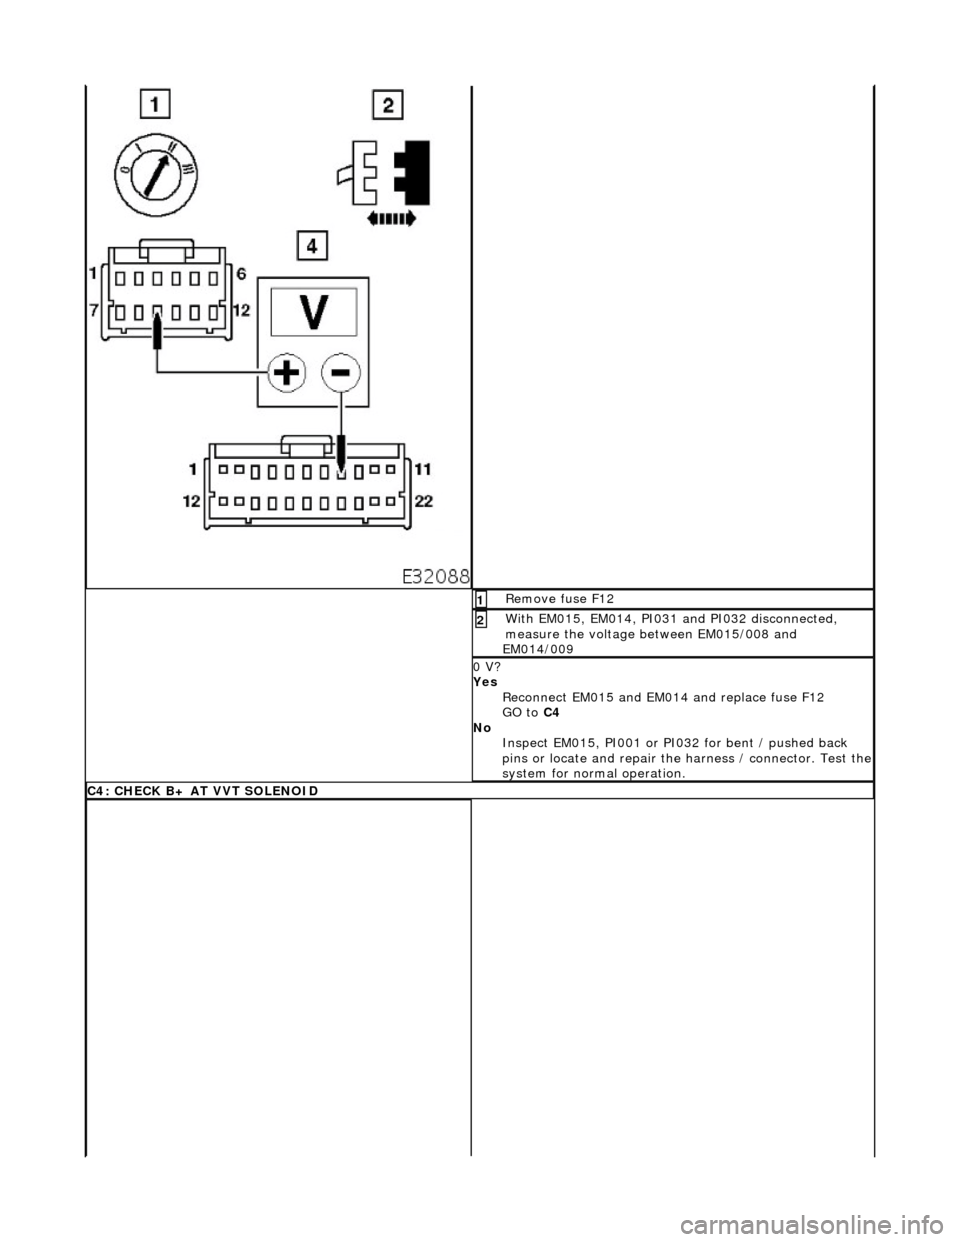
Re
move fuse F12
1
W
i
th EM015, EM014, PI031 and PI032 disconnected,
measure the voltage between EM015/008 and
EM014/009
2
0 V?
Yes
Reconnect EM015 and EM0 14 and replace fuse F12
GO to C4
No Inspect EM015, PI001 or PI032 for bent / pushed back
pins or locate and repair the harness / connector. Test the
system for normal operation.
C4 :
CHECK B+ AT VVT SOLENOID
Page 547 of 2490
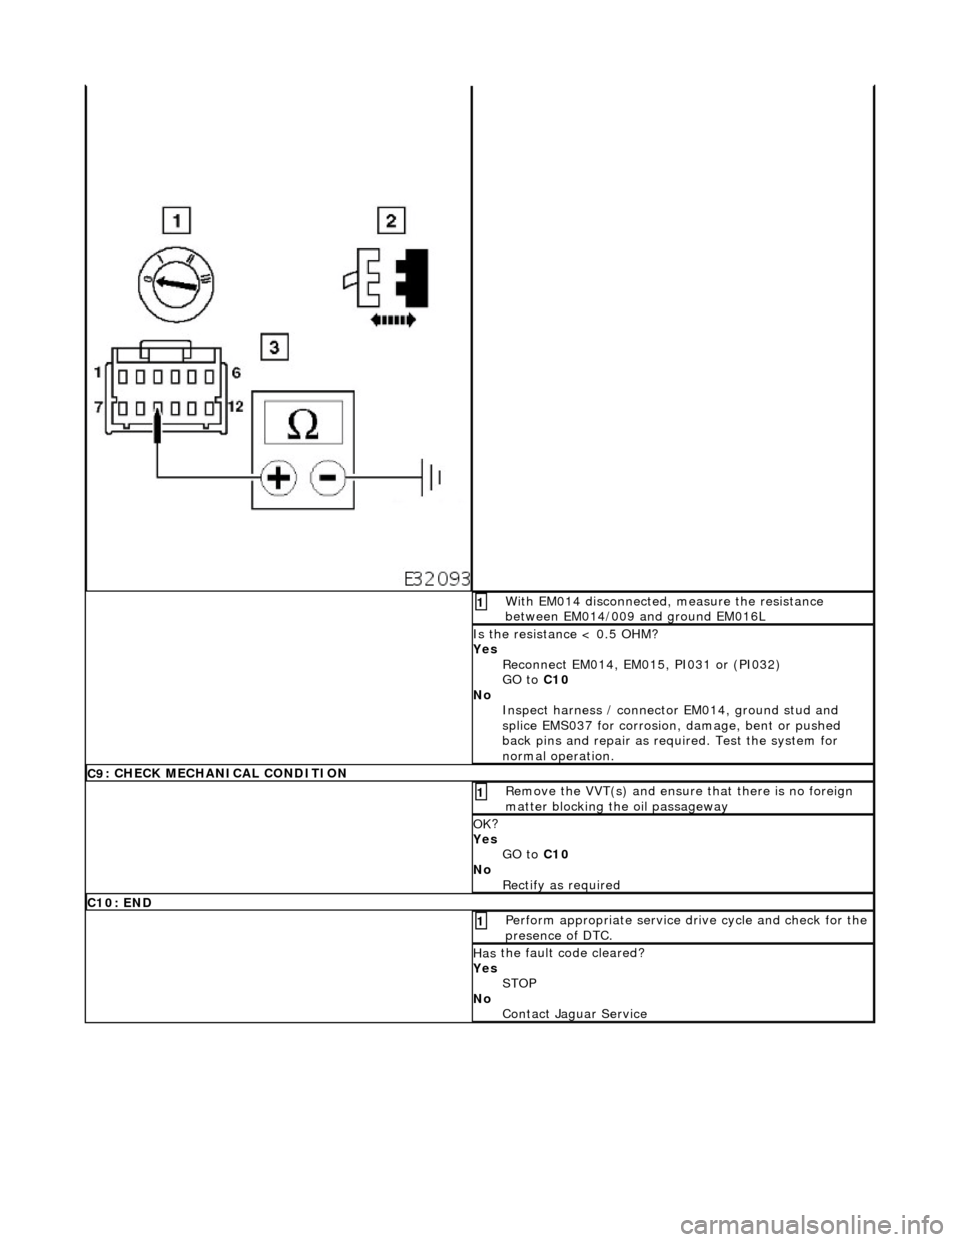
W
ith EM014 disconnected, measure the resistance
between EM014/009 and ground EM016L
1
I
s the resistance < 0.5 OHM?
Yes Reconnect EM014, EM015, PI031 or (PI032)
GO to C10
No Inspect harness / connector EM014, ground stud and
splice EMS037 for corrosion, damage, bent or pushed
back pins and repair as required. Test the system for
normal operation.
C9
: CHECK MECHANICAL CONDITION
R
emove the VVT(s) and ensure
that there is no foreign
matter blocking the oil passageway
1
OK
?
Yes GO to C10
No Rectify as required
C
10: END
Perform
appropriate service drive cycle and check for the
presence of DTC.
1
Has
the fault code cleared?
Yes STOP
No Contact Jaguar Service
Page 565 of 2490

Engine - Crankshaft
Inner Sp
rocket4.0L NA V8 - AJ27
In-v
ehicle Repair
Remov
al
S
pecial Tool(s)
Camshaft setting
3
03 - 530
T
iming chain tensioning
303 - 532
Wedges, primary ch
ain
303 - 533
Cranksh
aft setting
303 - 531
1. Open the engine compartment and fit paintwork protection
sheets.
2. Set the engine compartment cover to the service access
position.
3. Di
sconnect the batt
ery ground cable.
R
emove the battery cover.
4. Remove the Timing Co ver. Refer to Operation 12.65.01 in this
Section.
5. Remove the VVT bush carrier from the A-Bank.
1. Remove the three bolts which secure the carrier to the cylinder block.
Page 566 of 2490
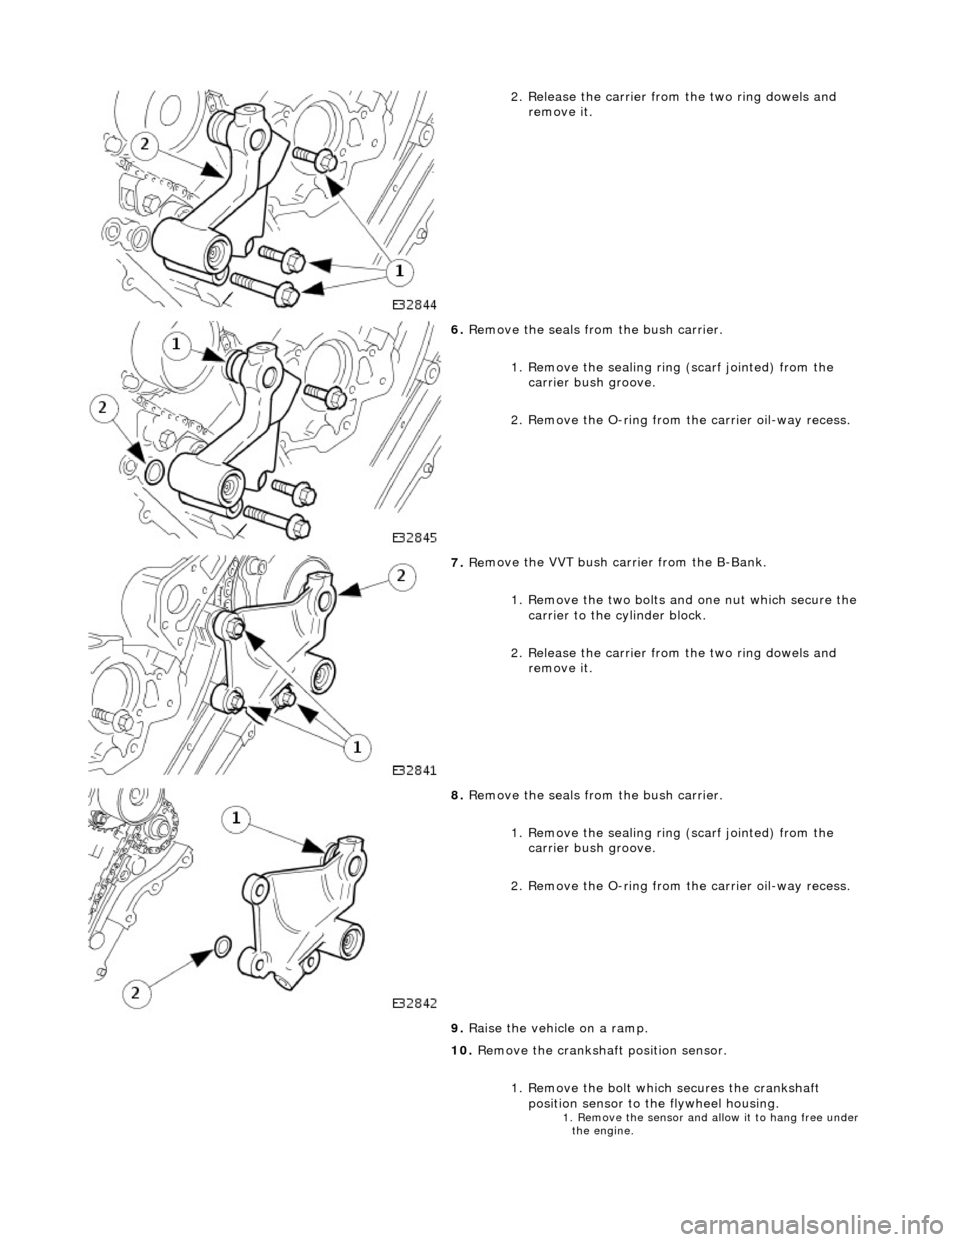
2.
Release the carrier from
the two ring dowels and
remove it.
6. Re
move the seals from the bush carrier.
1. Remove the sealing ring (scarf jointed) from the
carrier bush groove.
2. Remove the O-ring from the carrier oil-way recess.
7. Re
move the VVT bush carrier from the B-Bank.
1. Remove the two bolts and one nut which secure the carrier to the cylinder block.
2. Release the carrier from the two ring dowels and
remove it.
8. Re
move the seals from the bush carrier.
1. Remove the sealing ring (scarf jointed) from the
carrier bush groove.
2. Remove the O-ring from the carrier oil-way recess.
9. Raise the vehicle on a ramp.
10. Remove the crankshaft position sensor.
1. Remove the bolt which secures the crankshaft position sensor to the flywheel housing.
1. Re move
the sensor and allow it to hang free under
the engine.
Page 568 of 2490

18. L
oosen the bolt which secures
the VVT unit to the camshaft.
19 . Re
move the primary ch
ain tensioner bolts.
20 . R
emove the tensioner assembly.
1. Remove the tensioner.
2. Remove the tensioner back-plate.
21. Remove the chain tensioner blade.
1. Remove the pivot bolt which secures the tensioner blade.
2. Remove the tensioner blade.
Page 569 of 2490

22
.
Remove the chain from the VVT unit and from the crankshaft
pulley.
23
.
Remove the camshaft locking tool 303 - 530 and transfer it to
the B-Bank camshafts, aligning the shafts slightly as necessary.
24
.
Loosen the bolt which secures the sprocket to the camshaft.
25
.
Loosen the bolt which secures the VVT unit to the camshaft.
26. Remove the primary ch ain tensioner bolts.
Page 570 of 2490
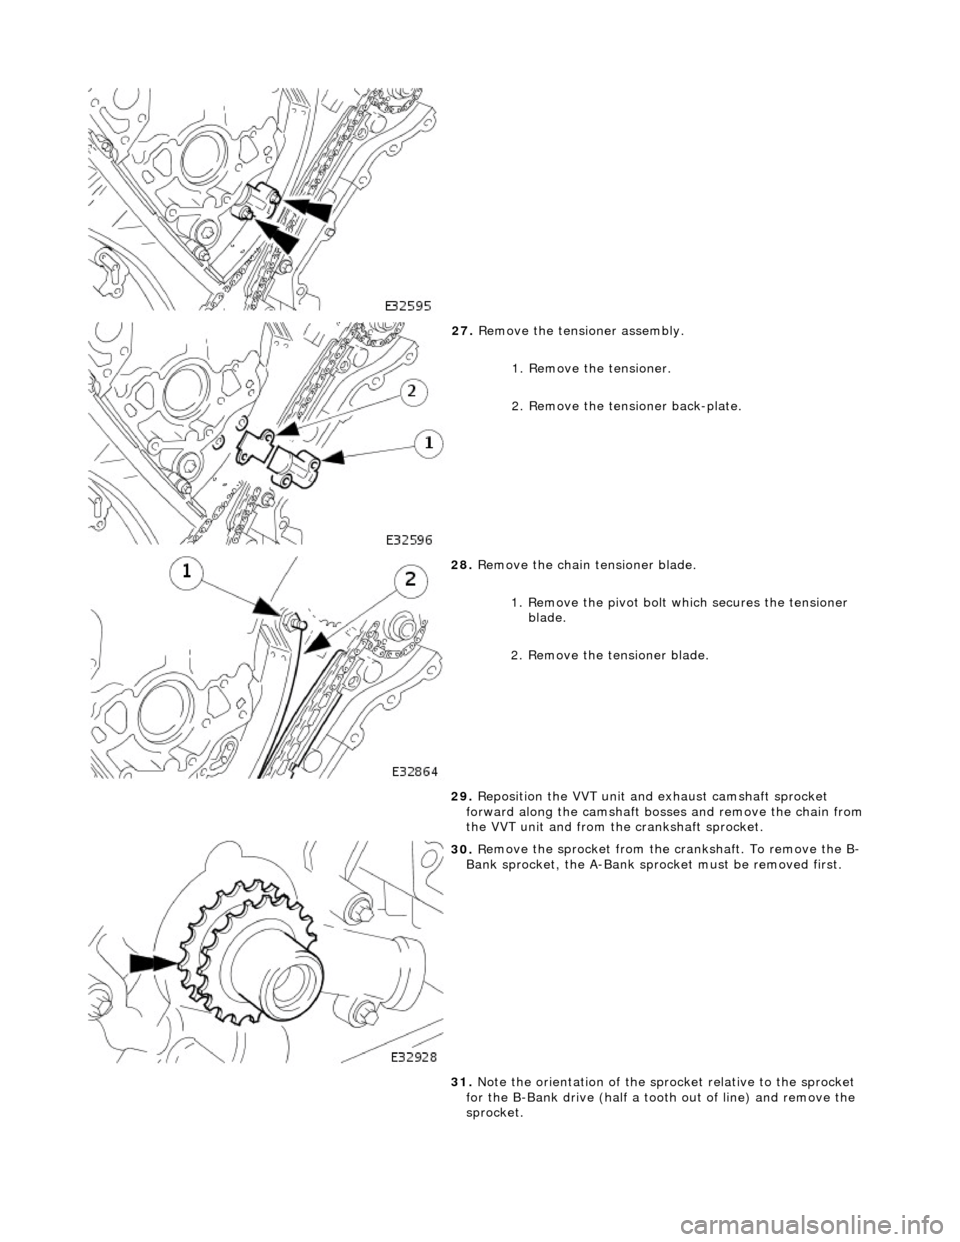
27. R
emove the tensioner assembly.
1. Remove the tensioner.
2. Remove the tensioner back-plate.
28. R
emove the chain tensioner blade.
1. Remove the pivot bolt which secures the tensioner blade.
2. Remove the tensioner blade.
29. Reposition the VVT unit and exhaust camshaft sprocket
forward along the camshaft bosses and remove the chain from
the VVT unit and from th e crankshaft sprocket.
30 . R
emove the sprocket from the
crankshaft. To remove the B-
Bank sprocket, the A-Bank spro cket must be removed first.
31. Note the orientation of the spro cket relative to the sprocket
for the B-Bank drive (half a toot h out of line) and remove the
sprocket.
Page 571 of 2490

I
nstallation
32
.
Clean and inspect all relevant components.
1. F
it the sprockets to the crankshaft.
Th
e teeth of the A-Bank and the B-Bank sprockets on the
crankshaft must be out of phas e with each other. If they
are in-phase after fitting, remove the A-Bank sprocket,
turn it on its vertical axis and refit it.
2. F
it the chain tensioning tool 303 - 532 to the exhaust camshaft
sprocket, B-Bank.
Re
position the sprocket (and
the VVT unit) for the most
advantageous position for use of the tool.
R
emove the tool.
3. R
efit the primary timing chain, B-Bank.
1. Fit the primary chain over the crankshaft sprocket and the VVT unit sprocket. There must be no slack on
the drive side of the primary chain and the VVT unit
must not be rotate d on the camshaft.
Sl
ide the VVT and exhaust sprocket fully rearwards onto
the respective camshafts.
4. Fit the primary chain tensioner blade.
1. Position the tensioner blade to the cylinder block.
Page 572 of 2490

2. Fi
t the retaining / pivot bolt and tighten it to 12 - 16
Nm.
5. Refi
t the primary chain tensione
r assembly. Refer to Operation
12.65.55 in this Section.
U s
e a wedge 303 - 533 (or two if required) between the
primary chain tensioner and te nsioner blade, to take up
the slack in the chain.
6. Tigh te
n the exhaust camshaft
sprocket securing bolt.
1. Fit the chain tensioner tool 303 - 532 to the sprocket holes.
1. Apply force to the to
ol in
an anti-clockwise direction
to tension the chain on its drive side.
2 .
Whilst applying the opposing force to the sprocket
and chain, tighten the sprock et securing bolt to 115 -
125 Nm.
7. Tigh te
n the VVT unit securing bolt.
1. Whilst still applying the opposing force to the
sprocket and chain (using 303 - 532), check that the
wedges are still in place, tighten the VVT unit
securing bolt to 115 - 125 Nm.
Re
move the chain tensioning
tool and the wedge(s).
8. Remove the camshaft locking tool 303 - 530 and transfer it to
the A-Bank camshafts, aligning the shafts slightly as necessary.