body JAGUAR X308 1998 2.G Owner's Manual
[x] Cancel search | Manufacturer: JAGUAR, Model Year: 1998, Model line: X308, Model: JAGUAR X308 1998 2.GPages: 2490, PDF Size: 69.81 MB
Page 169 of 2490
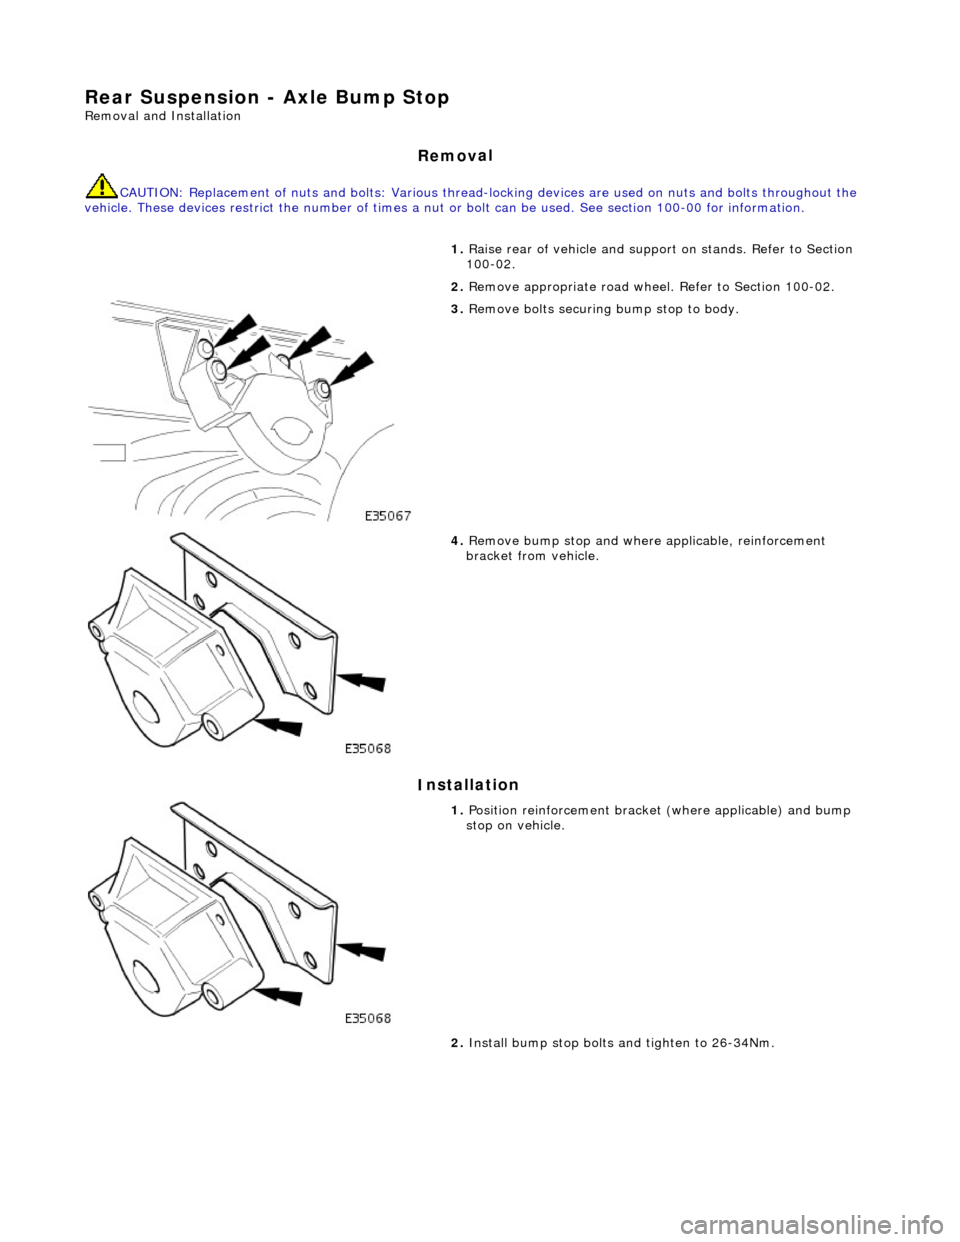
Rear Suspension - Axle B
ump Stop
Re
moval and Installation
Remov
al
CAUTI
ON: Replacement of
nuts and bolts: Various thread-locking devices are used on nuts and bolts throughout the
vehicle. These devices restrict the number of times a nut or bolt can be used. See section 100-00 for information.
I
nstallation
1.
R
aise rear of vehicle and support
on stands. Refer to Section
100-02.
2. Remove appropriate road wheel. Refer to Section 100-02.
3. Remove bolts securing bump stop to body.
4. Remove bu
mp stop and where applicable, reinforcement
bracket from vehicle.
1. Position reinforcemen t brac
ket (where a
pplicable) and bump
stop on vehicle.
2. Install bump stop bolts and tighten to 26-34Nm.
Page 172 of 2490
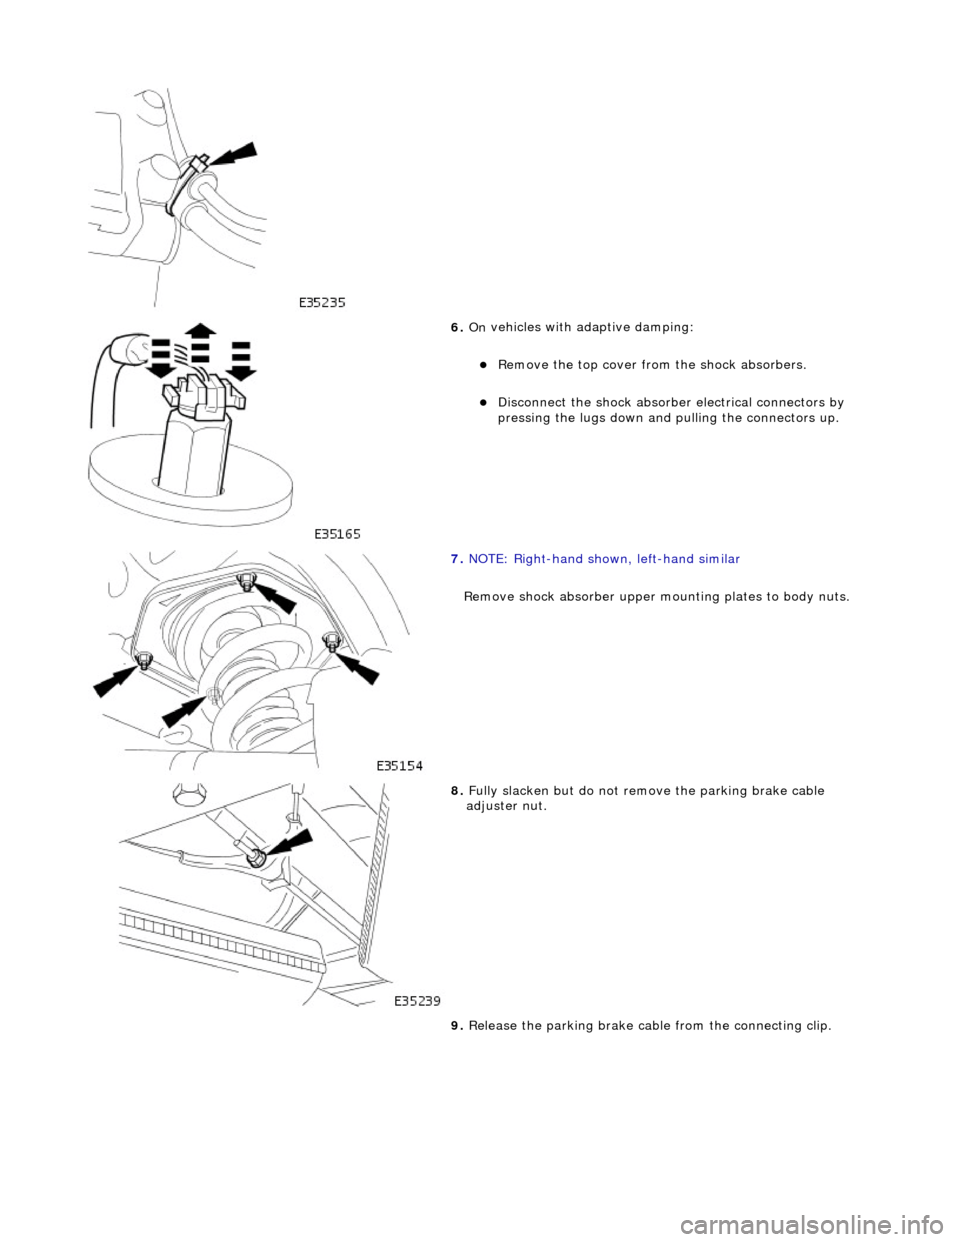
6. On
vehicles with adaptive damping:
R
e
move the top cover from
the shock absorbers.
Disc
onnect the shock absorber electrical connectors by
pressing the lugs down and pulling the connectors up.
7. NOTE : R
ight-hand shown, left-hand similar
Remove shock absorber upper mo unting plates to body nuts.
8. Fully slacken bu
t do not remove the parking brake cable
adjuster nut.
9. Release the parking brake cabl e from the connecting clip.
Page 174 of 2490
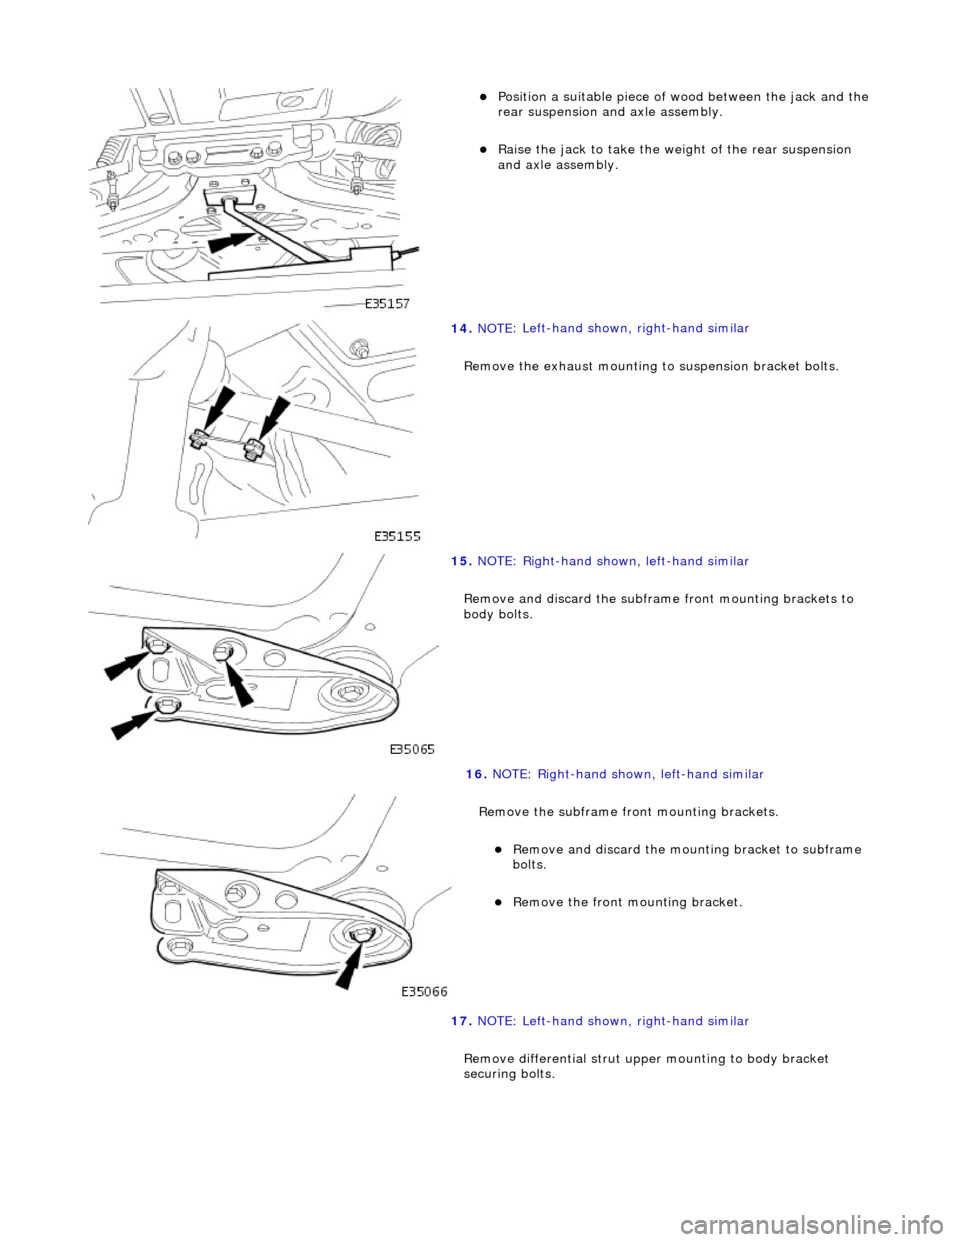
Position a suitable piece o
f wood between the jack and the
rear suspension and axle assembly.
Rai s
e the jack to take the weight of the rear suspension
and axle assembly.
14 . NOTE
: Left-hand shown, right-hand similar
Remove the exhaust mounting to suspension bracket bolts.
15 . NOTE
: Right-hand shown, left-hand similar
Remove and discard the subframe front mounting brackets to
body bolts.
16 . NOTE
: Right-hand shown, left-hand similar
Remove the subframe front mounting brackets.
Remove an d discard the mount
ing bracket to subframe
bolts.
R e
move the front mounting bracket.
17. NOTE: Left-hand shown, right-hand similar
Remove differential strut upper mounting to body bracket
securing bolts.
Page 175 of 2490
I
nstallation
18
.
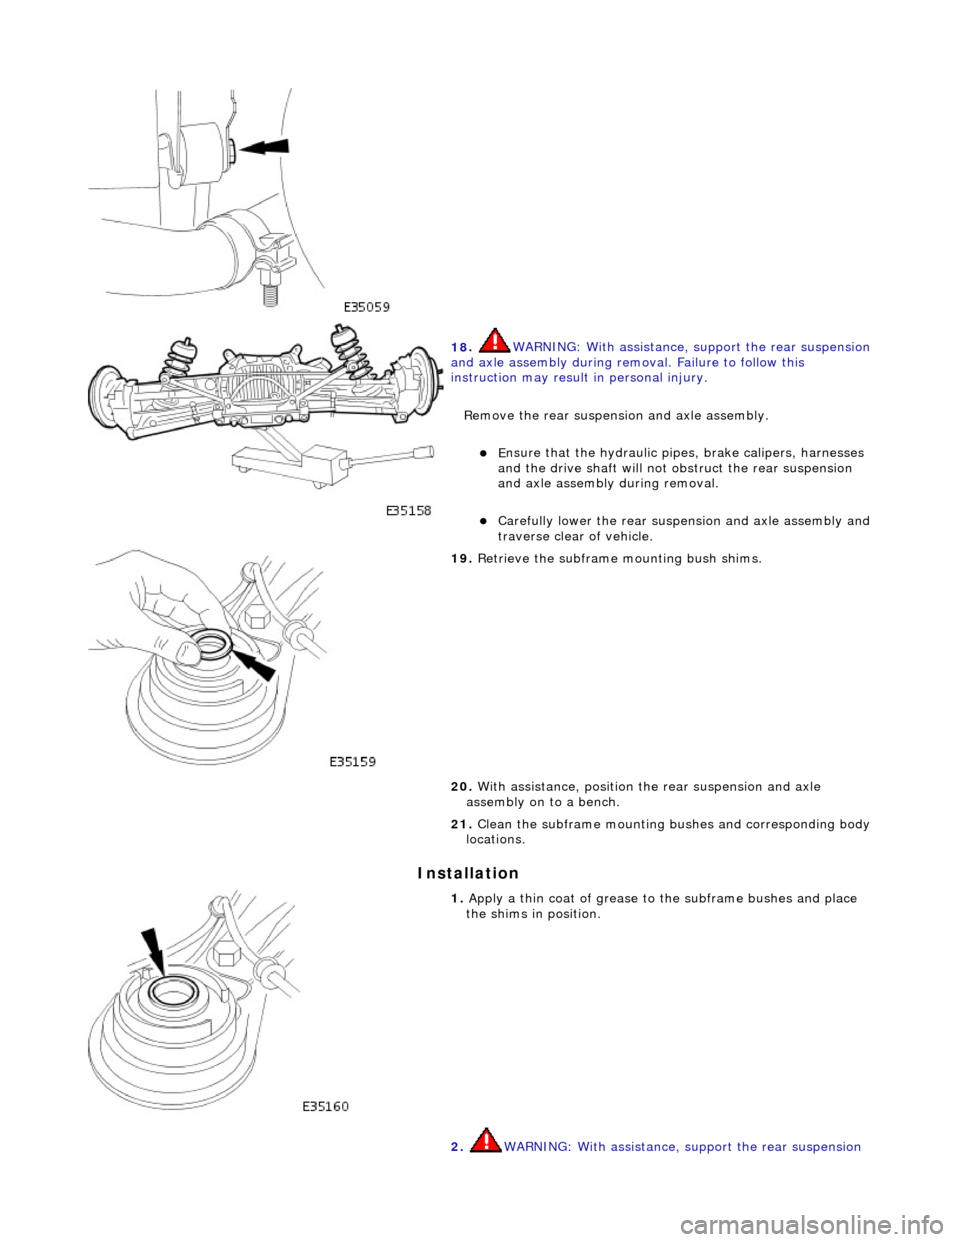
WARNING: With assistance, support the rear suspension
and axle assembly during remo val. Failure to follow this
instruction may result in personal injury.
Remove the rear suspensi on and axle assembly.
E
nsure that the hydr
aulic pipes, brake calipers, harnesses
and the drive shaft will not obstruct the rear suspension
and axle assembly during removal.
Carefull
y lower the rear suspen
sion and axle assembly and
traverse clear of vehicle.
19
.
Retrieve the subframe mounting bush shims.
20. With assistance, position th e rear suspension and axle
assembly on to a bench.
21. Clean the subframe mounting bushes and corresponding body
locations.
1. Apply a th
in coat of grease to the subframe bushes and place
the shims in position.
2. WARNING: With assistance, support the rear suspension
Page 177 of 2490

Inst
all new inner mounting bracket bolts.
Ti
ghten to 88-118 Nm.
8. NOTE
: Right-hand shown, left-hand similar
Tighten to 88-118 Nm.
9. NOTE
: Right-hand shown, left-hand similar
Install new different ial strut to body bracket bolts.
Tigh
ten to 68-92 Nm.
10. Lower and remove trolley jack.
11
.
Attach the drive shaft to the flexible coupling.
Align the marks previously pain
ted on drive shaft and
flexible coupling.
Inst
all new drive shaft coupling bolts and nuts.
12. Tighten to 76-88 Nm.
Page 182 of 2490

Withdraw th
e hub carrier and support on a block of wood.
9. CAUTIO
N: Note the position of
the shims during removal.
They must be returned to th eir original position during
installation.
Noting their positions, remove the shim from each end of the
pivot pin sleeve.
10 . WAR
NINGS:
ENSURE THE SPECIAL TOOLS ARE POSITIONED
DIAMETRICALLY OPPOSITE ON THE SPRING AND THE ARMS ARE
CORRECTLY SEATED .
WHEN COMPRESSING THE SPRING, TIGHTEN THE
SPECIAL-TOOL ADJUSTMENT BOLTS EVENLY.
Compress the spring.
Install and alig n th
e special
tools 204-179 diametrically
opposite on the spring.
Eve n
ly tighten the special tool tensioning bolts to
compress the spring.
11 . R
emove the shock absorber to
wishbone mounting nut and
bolt.
12. Remove the nuts securing th e shock absorber and spring
upper mounting to the body.
Page 188 of 2490
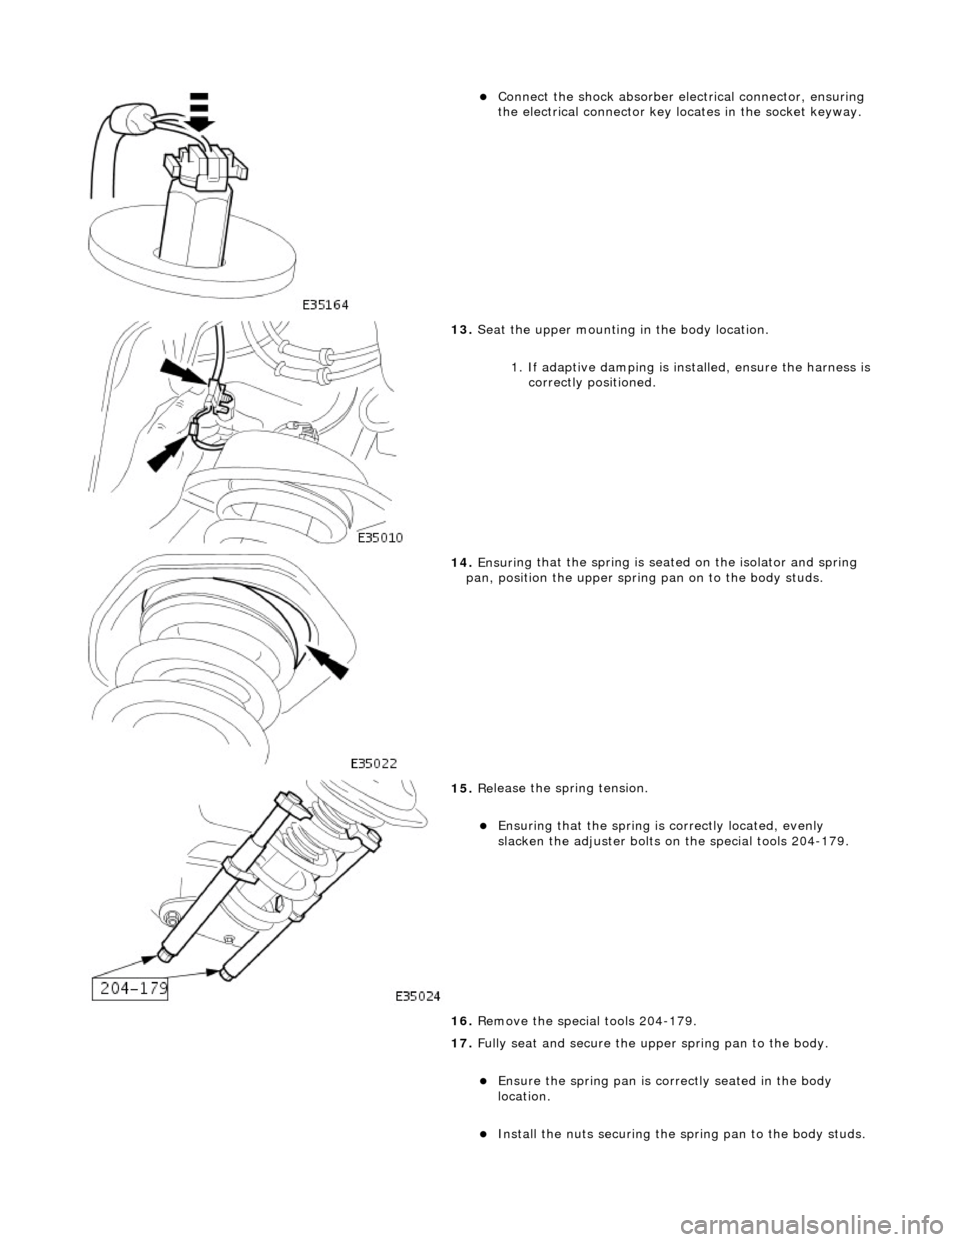
Connect
the shock absorber elec
trical connector, ensuring
the electrical connector key locates in the socket keyway.
13. Seat
the upper mounting in the body location.
1. If adaptive damping is installed, ensure the harness is
correctly positioned.
14 . Ensuri
ng that the spri
ng is seated on the isolator and spring
pan, position the u pper spring pan on to the body studs.
15 . Re
lease the spring tension.
Ensuri
ng that the spri
ng is
correctly located, evenly
slacken the adjuster bolts on the special tools 204-179.
16. Remove the special tools 204-179.
17. Fully seat and secure the u pper spring pan to the body.
Ensure the spring pan i
s correctly seated in the body
location.
Inst al
l the nuts securing the sp
ring pan to the body studs.
Page 197 of 2490

With
draw the hub carrier and support on a block of wood.
9. CAUTI
ON: Note the position of
the shims during removal.
They must be returned to th eir original position during
installation.
Noting their positions, remove the shim from each end of the
pivot pin sleeve.
10
.
WARNINGS:
ENSURE THE SPECIAL TOOLS ARE POSITIONED
DIAMETRICALLY OPPOSITE ON THE SPRING AND THE ARMS ARE
CORRECTLY SEATED .
WHEN COMPRESSING THE SPRING, TIGHTEN THE
SPECIAL-TOOL ADJUSTMENT BOLTS EVENLY.
Compress the spring.
Install and alig
n the special
tools 204-179 diametrically
opposite on the spring.
Eve
nly tighten the special tool tensioning bolts to
compress the spring.
11
.
Remove the shock absorber to wishbone mounting nut and
bolt.
12. Remove the nuts securing th e shock absorber and spring
upper mounting to the body.
Page 204 of 2490
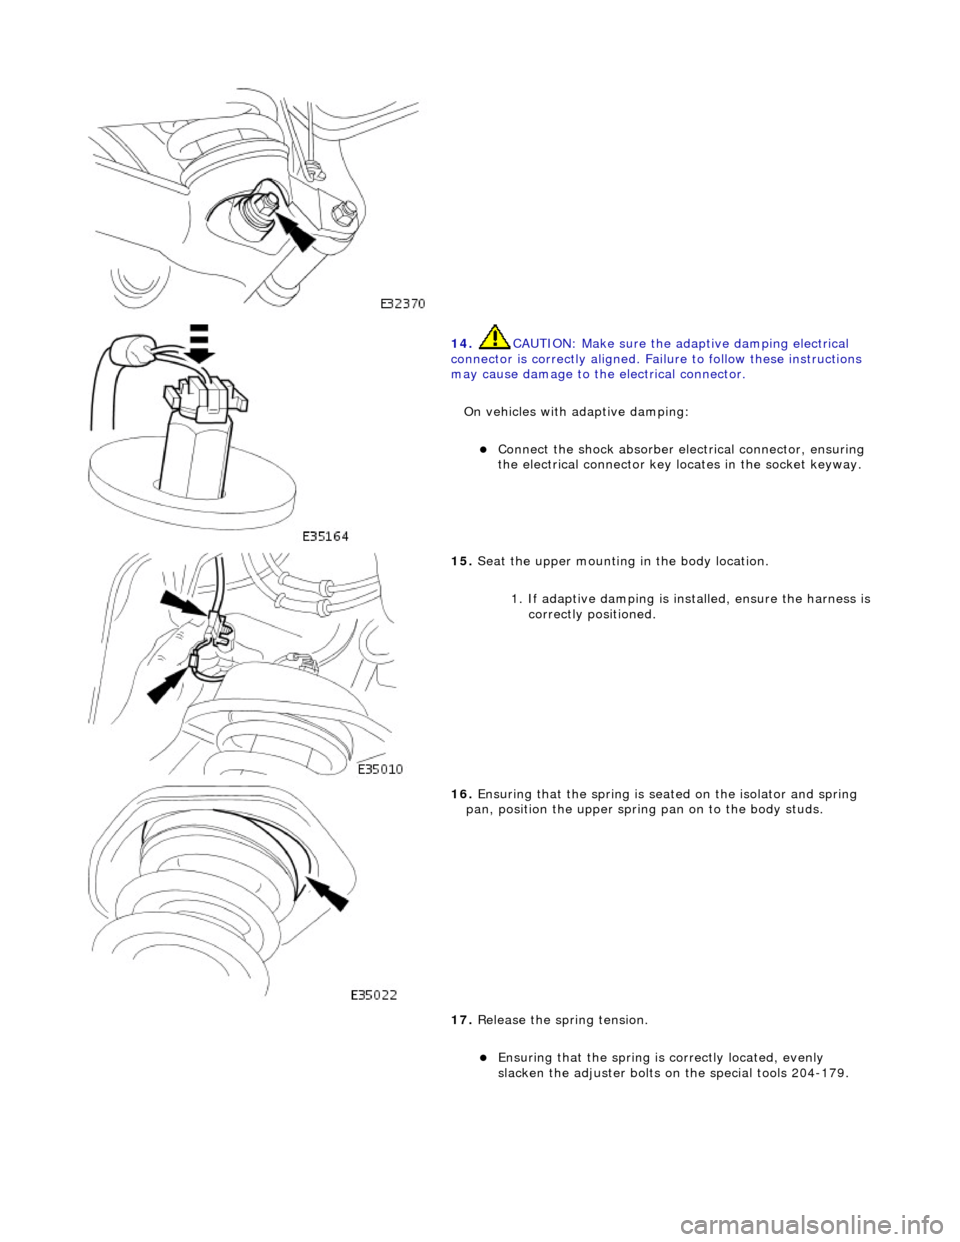
14. CAUTI
ON: Make sure the adaptive damping electrical
connector is correctly aligned. Failu re to follow these instructions
may cause damage to the electrical connector.
On vehicles with adaptive damping:
Conne ct
the shock absorber elec
trical connector, ensuring
the electrical connector key locates in the socket keyway.
15 . Seat
the upper mounting in the body location.
1. If adaptive damping is installed, ensure the harness is
correctly positioned.
16 . Ensuri
ng that the spri
ng is seated on the isolator and spring
pan, position the u pper spring pan on to the body studs.
17. Release the spring tension.
Ensuring that the spri
ng is
correctly located, evenly
slacken the adjuster bolts on the special tools 204-179.
Page 205 of 2490
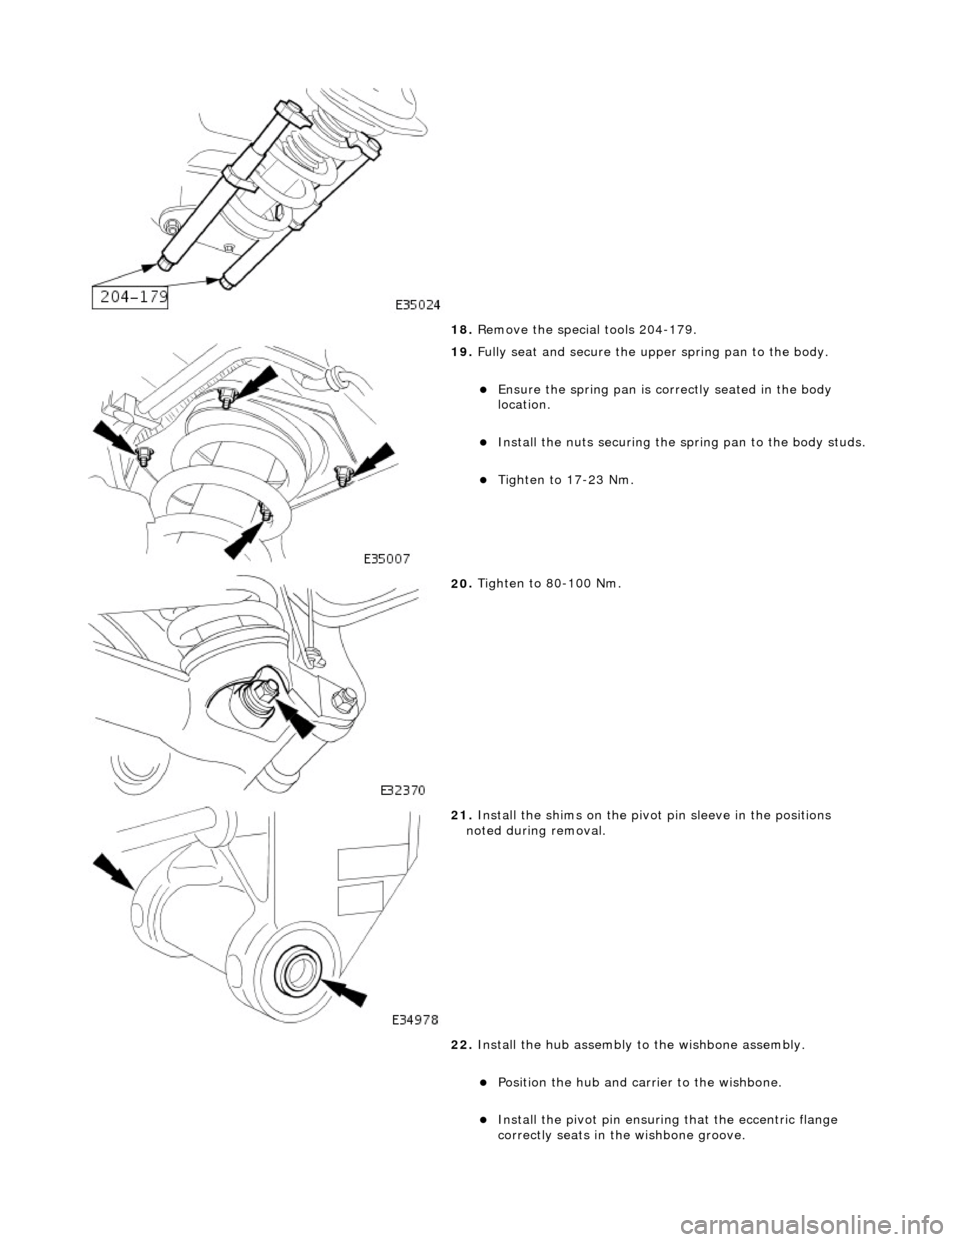
18
.
Remove the special tools 204-179.
19
.
Fully seat and secure the u pper spring pan to the body.
Ensure the spri
ng pan is correctly seated in the body
location.
Inst
all the nuts securing the sp
ring pan to the body studs.
Tigh
ten to 17-23 Nm.
20
.
Tighten to 80-100 Nm.
21
.
Install the shims on the pivot pin sleeve in the positions
noted during removal.
22. Install the hub assembly to the wishbone assembly.
Position the hub and carri
er to the wishbone.
Inst
all the pivot pin ensuring that the ecce
ntric flange
correctly seats in the wishbone groove.