lower JAGUAR X308 1998 2.G Workshop Manual
[x] Cancel search | Manufacturer: JAGUAR, Model Year: 1998, Model line: X308, Model: JAGUAR X308 1998 2.GPages: 2490, PDF Size: 69.81 MB
Page 1838 of 2490
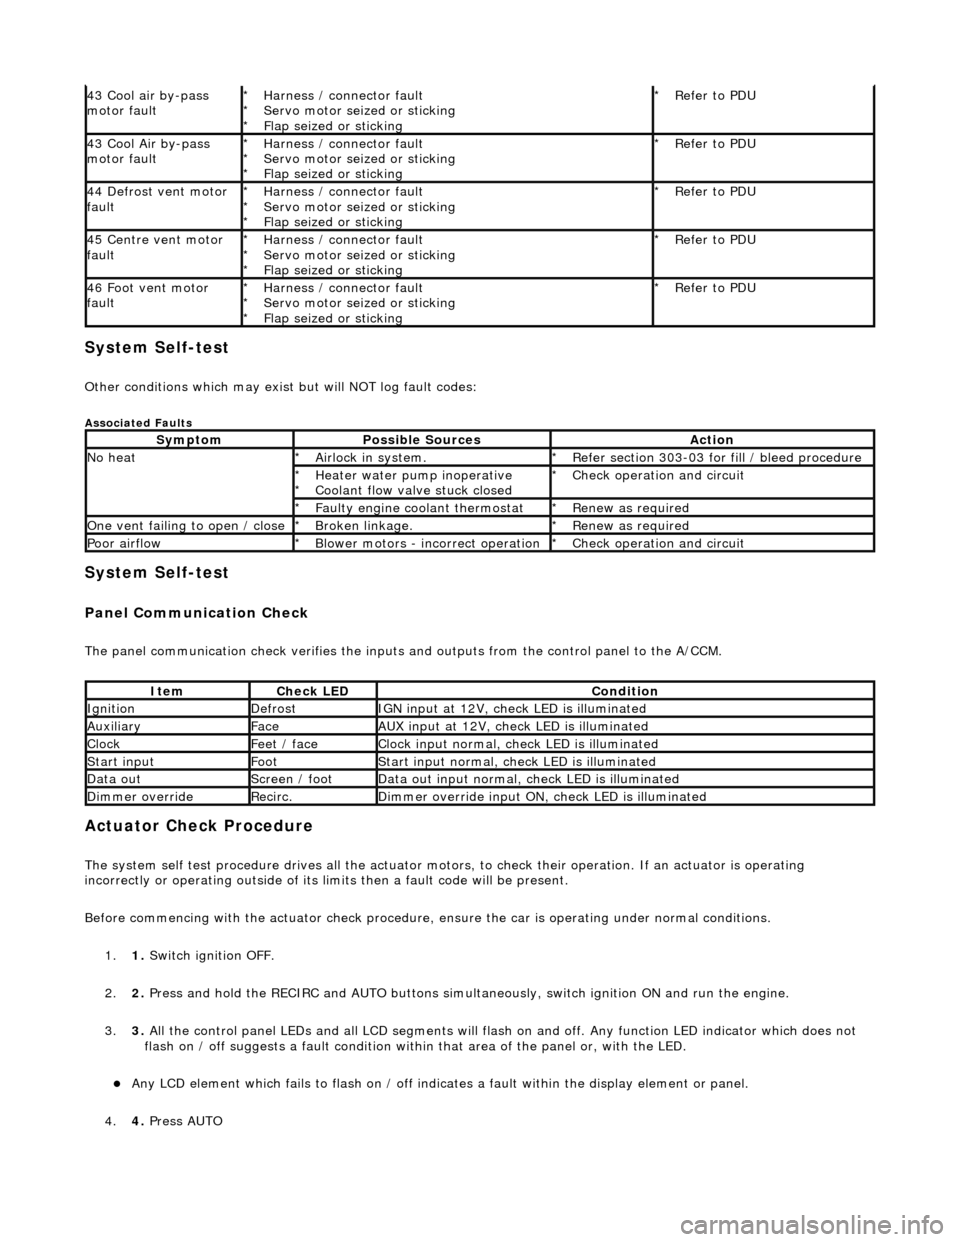
System Self-test
Other conditions which may exist but will NOT log fault codes:
Associated Faults
System Self-test
Panel Communication Check
The panel communication check veri fies the inputs and outputs from the control panel to the A/CCM.
Actuator Check Procedure
The system self test procedure drives all the actuator moto rs, to check their operation. If an actuator is operating
incorrectly or operating outside of its limi ts then a fault code will be present.
Before commencing with the actuator check procedure, ensure the ca r is operating under normal conditions.
1. 1. Switch ignition OFF.
2. 2. Press and hold the RECIRC and AUTO buttons simult aneously, switch ignition ON and run the engine.
3. 3. All the control panel LEDs and all LCD segments will flas h on and off. Any function LED indicator which does not
flash on / off suggests a fault condition within that area of the panel or, with the LED.
Any LCD element which fails to flash on / off indicates a fault within the display element or panel.
4. 4. Press AUTO
43 Cool air by-pass
motor faultHarness / connector fault
Servo motor seized or sticking
Flap seized or sticking
*
*
*Refer to PDU
*
43 Cool Air by-pass
motor faultHarness / connector fault
Servo motor seized or sticking
Flap seized or sticking
*
*
*Refer to PDU
*
44 Defrost vent motor
faultHarness / connector fault
Servo motor seized or sticking
Flap seized or sticking
*
*
*Refer to PDU
*
45 Centre vent motor
faultHarness / connector fault
Servo motor seized or sticking
Flap seized or sticking
*
*
*Refer to PDU
*
46 Foot vent motor
faultHarness / connector fault
Servo motor seized or sticking
Flap seized or sticking
*
*
*Refer to PDU
*
SymptomPossible SourcesAction
No heatAirlock in system.
*Refer section 303-03 for fill / bleed procedure
*
Heater water pump inoperative
Coolant flow valve stuck closed
*
*Check operation and circuit
*
Faulty engine coolant thermostat
*Renew as required
*
One vent failing to open / closeBroken linkage.
*Renew as required
*
Poor airflowBlower motors - incorrect operation
*Check operation and circuit
*
ItemCheck LEDCondition
IgnitionDefrostIGN input at 12V, check LED is illuminated
AuxiliaryFaceAUX input at 12V, check LED is illuminated
ClockFeet / faceClock input normal, check LED is illuminated
Start inputFootStart input normal, check LED is illuminated
Data outScreen / footData out input normal, check LED is illuminated
Dimmer overrideRecirc.Dimmer override input ON, check LED is illuminated
Page 1839 of 2490
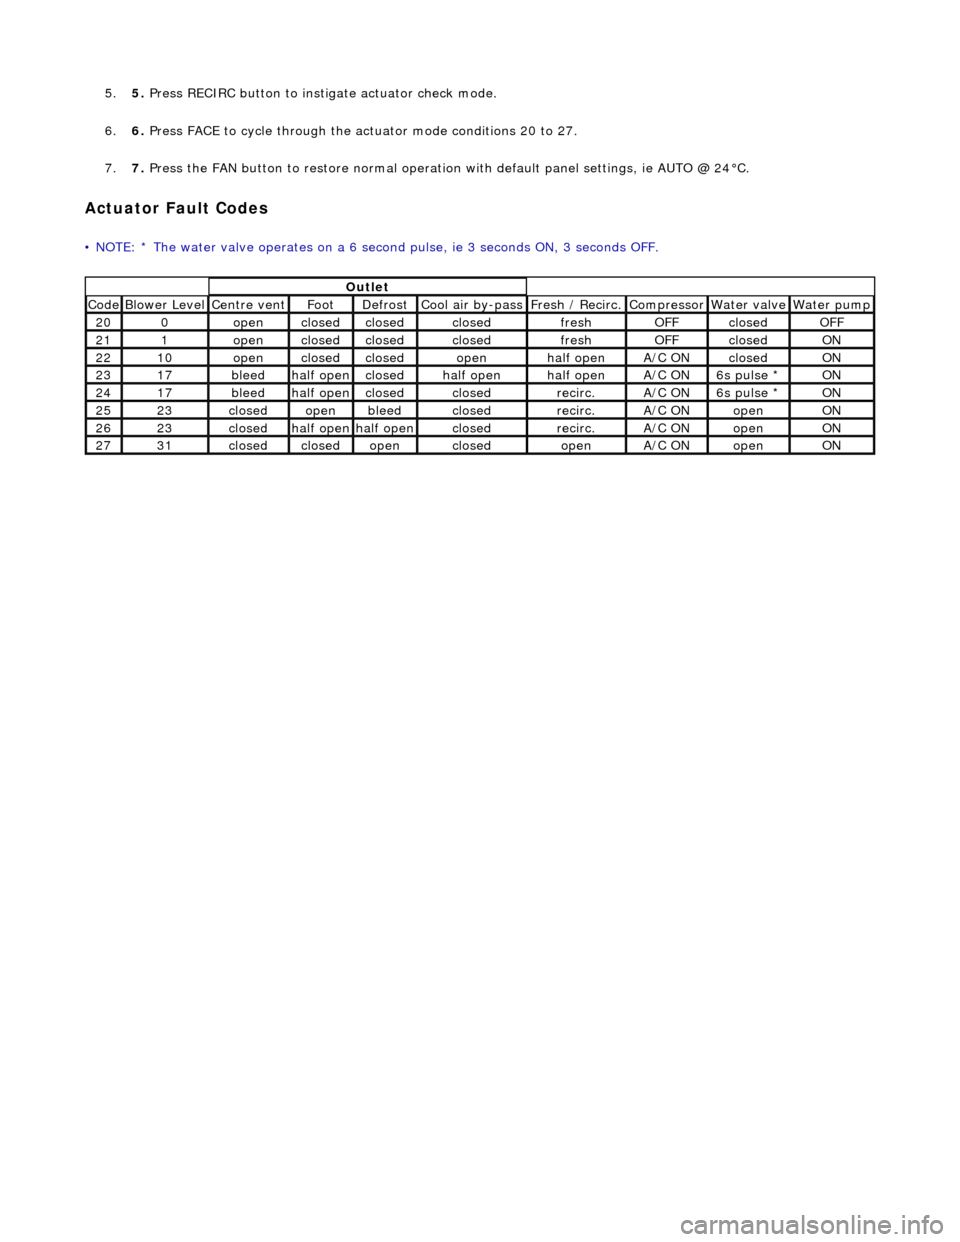
5.5. Press RECIRC button to instigate actuator check mode.
6. 6. Press FACE to cycle through the actu ator mode conditions 20 to 27.
7. 7. Press the FAN button to restore normal operation with default panel settings, ie AUTO @ 24°C.
Actuator Fault Codes
• NOTE: * The water valve operates on a 6 second pulse, ie 3 seconds ON, 3 seconds OFF.
Outlet
Code Blower Level Centre vent Foot Defrost Cool air by-pass Fresh / Recirc. Compressor Water valve Water pump
200openclosedclosedclosedfreshOFFclosedOFF
211openclosedclosedclosedfreshOFFclosedON
2210openclosedclosedopenhalf openA/C ONclosedON
2317bleedhalf openclosedhalf openhalf openA/C ON6s pulse * ON
2417bleedhalf openclosedclosedrecirc.A/C ON6s pulse * ON
2523closedopenbleedclosedrecirc.A/C ONopenON
2623closedhalf openhalf openclosedrecirc.A/C ONopenON
2731closedclosedopenclosedopenA/C ONopenON
Page 1846 of 2490
Control Components - Remote Climate Control ModuleLHD RWD
Removal and Installation
Removal
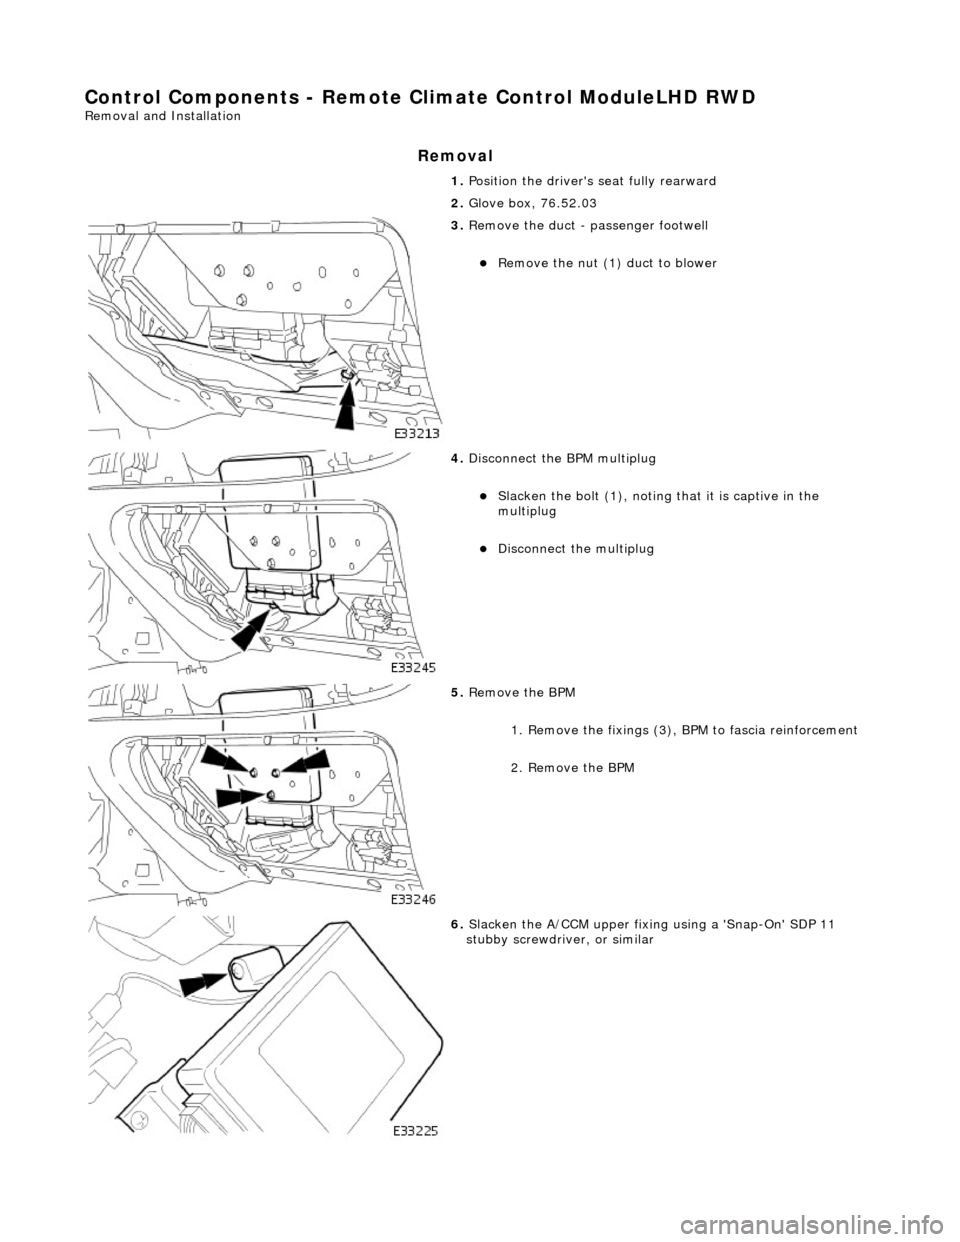
1. Position the driver's seat fully rearward
2. Glove box, 76.52.03
3. Remove the duct - passenger footwell
Remove the nut (1) duct to blower
4. Disconnect the BPM multiplug
Slacken the bolt (1), noting that it is captive in the
multiplug
Disconnect the multiplug
5. Remove the BPM
1. Remove the fixings (3), BPM to fascia reinforcement
2. Remove the BPM
6. Slacken the A/CCM upper fixing using a 'Snap-On' SDP 11
stubby screwdriver, or similar
Page 1847 of 2490
Installation
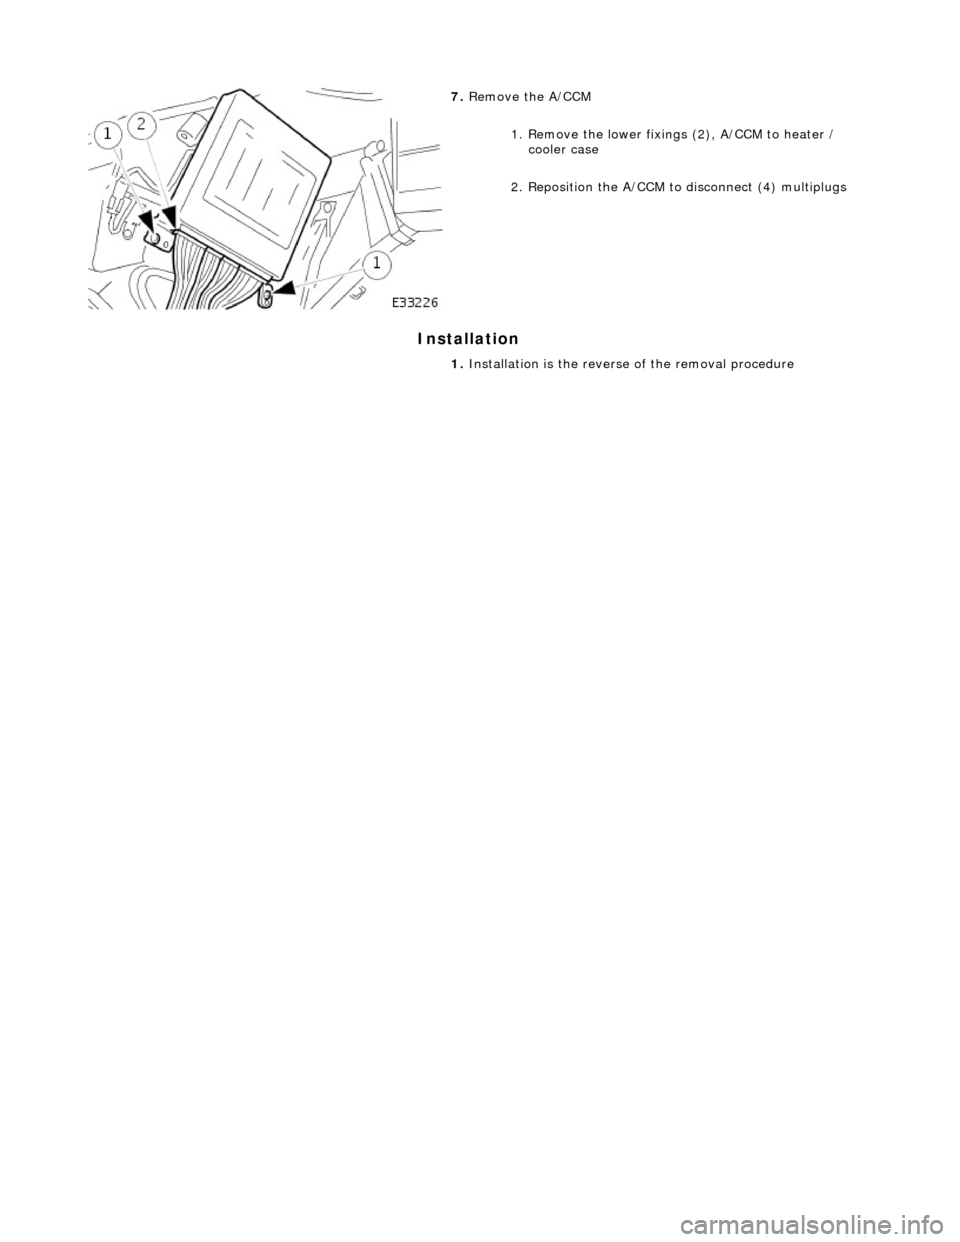
7. Remove the A/CCM
1. Remove the lower fixings (2), A/CCM to heater / cooler case
2. Reposition the A/CCM to disconnect (4) multiplugs
1. Installation is the revers e of the removal procedure
Page 1848 of 2490
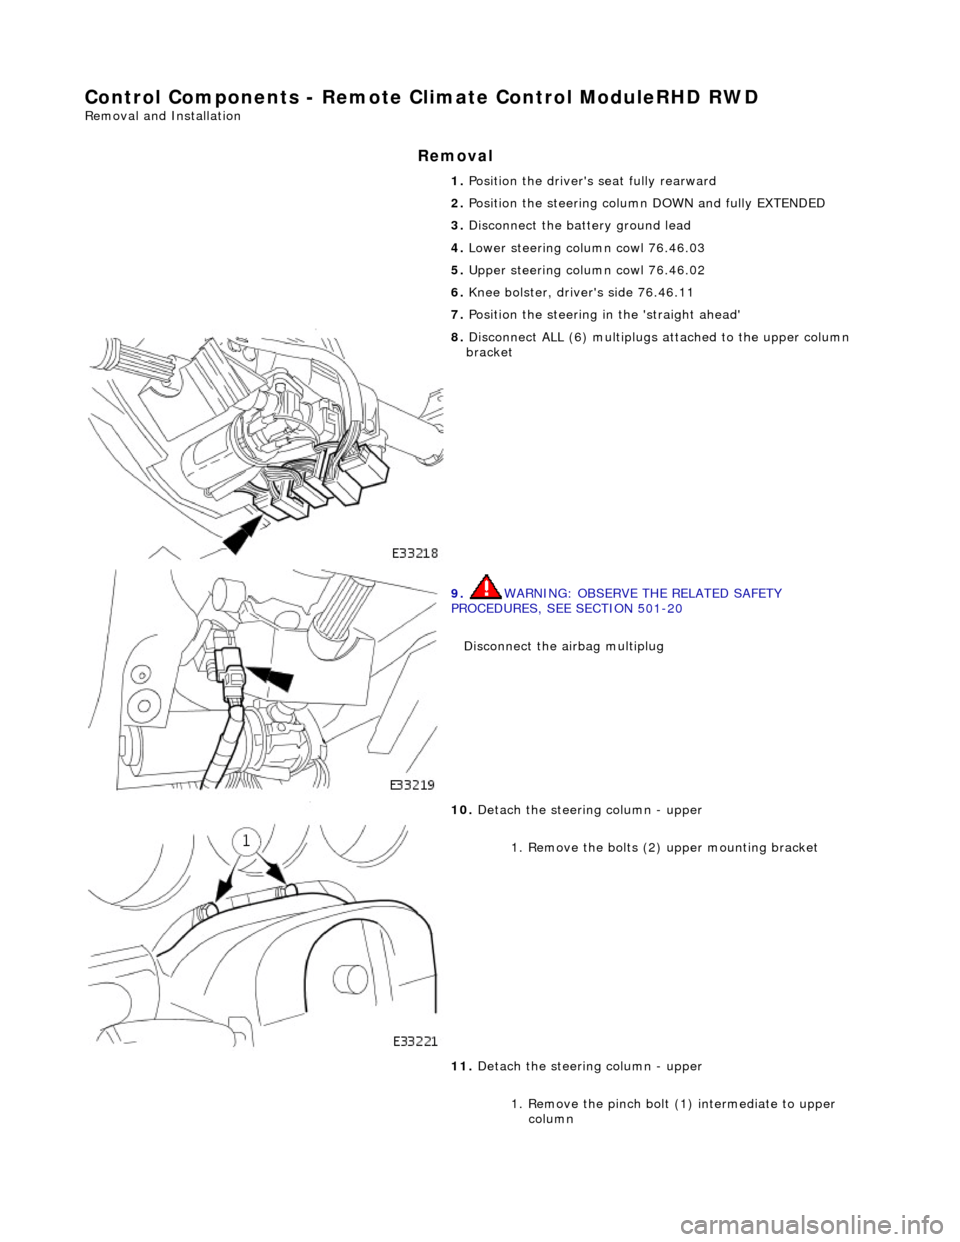
Control Components - Remote Climate Control ModuleRHD RWD
Removal and Installation
Removal
1. Position the driver's seat fully rearward
2. Position the steering column DOWN and fully EXTENDED
3. Disconnect the battery ground lead
4. Lower steering column cowl 76.46.03
5. Upper steering column cowl 76.46.02
6. Knee bolster, driver's side 76.46.11
7. Position the steering in the 'straight ahead'
8. Disconnect ALL (6) multiplugs attached to the upper column
bracket
9. WARNING: OBSERVE THE RELATED SAFETY
PROCEDURES, SEE SECTION 501-20
Disconnect the airbag multiplug
10. Detach the steering column - upper
1. Remove the bolts (2 ) upper mounting bracket
11. Detach the steering column - upper
1. Remove the pinch bolt (1) intermediate to upper column
Page 1849 of 2490

2. Remove the bolt (1) lower fixing
3. Remove the nut (1) lower fixing
Remove the column assembly from the vehicle
12. Remove the duct - driver footwell
Remove screw (1)
13. Remove the key tr ansponder module
1. Remove the screws (2) module to fascia bracket
2. Disconnect the multiplug
Reposition the transponder to gain access
14. Remove the illumination module
1. Release the module from its location
2. Disconnect the multiplug
15. Remove the plenum brace
1. Remove the bolt (1) tunnel fixing
2. Remove the bolt (1) upper fixing
3. Slide the diagnostic socket off the brace
Page 1850 of 2490
Installation
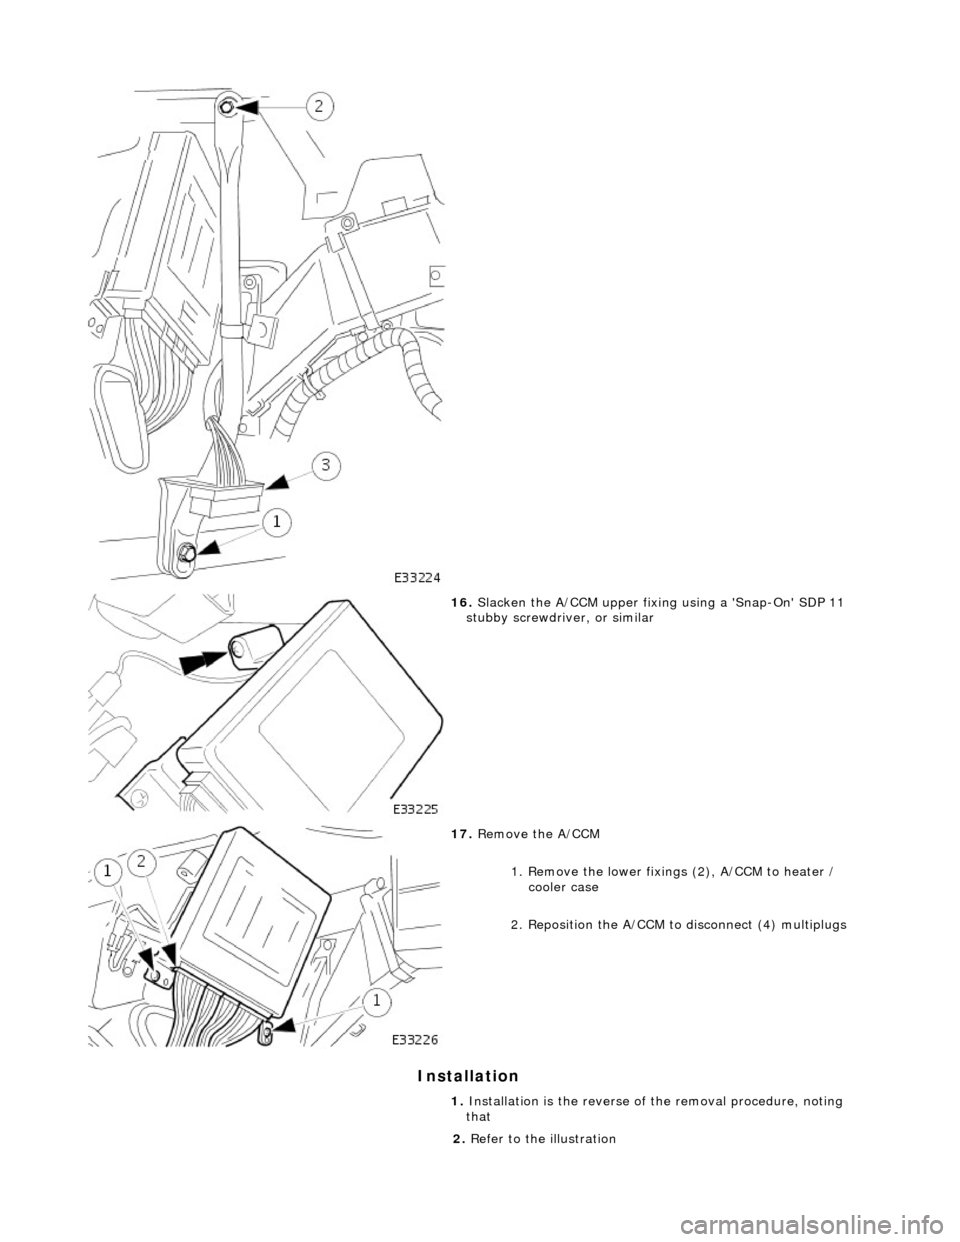
16. Slacken the A/CCM upper fixing using a 'Snap-On' SDP 11
stubby screwdriver, or similar
17. Remove the A/CCM
1. Remove the lower fixings (2), A/CCM to heater / cooler case
2. Reposition the A/CCM to disconnect (4) multiplugs
1. Installation is the reverse of the removal procedure, noting
that
2. Refer to the illustration
Page 1853 of 2490
Instrument Cluster and Panel Illumination - Instrument Panel Dimmer
Switch
Removal and Installation
Removal
Installation
1.
Move driver seat fully rearward.
2. Disconnect battery ground lead; refer to 86.15.19.
3. Displace lower cowl for access; refer to 76.46.03.
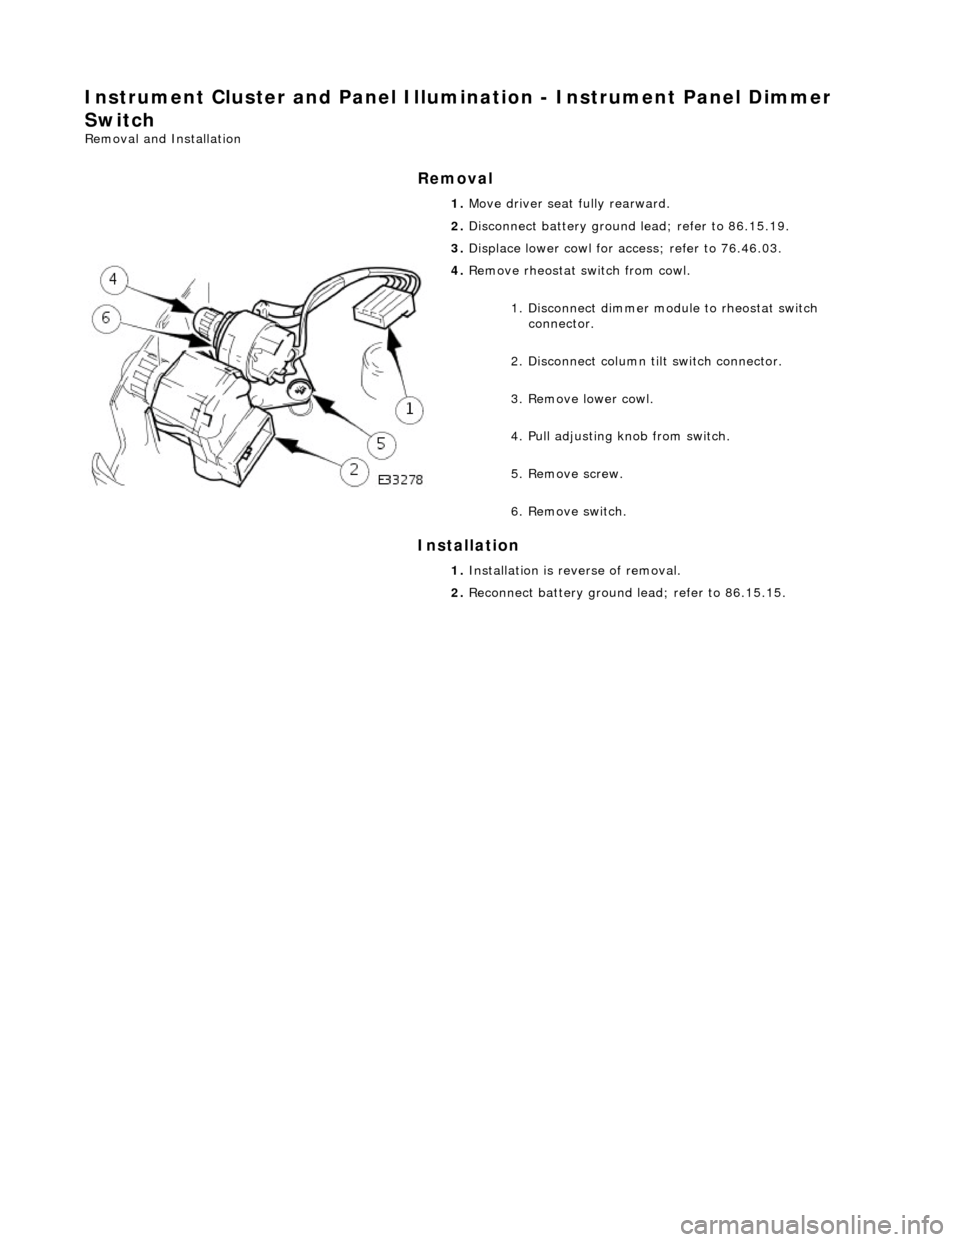
4. Remove rheostat sw itch from cowl.
1. Disconnect dimmer module to rheostat switch connector.
2. Disconnect column tilt switch connector.
3. Remove lower cowl.
4. Pull adjusting knob from switch.
5. Remove screw.
6. Remove switch.
1. Installation is reverse of removal.
2. Reconnect battery ground lead; refer to 86.15.15.
Page 1857 of 2490
Instrume
nt Cluster - Instrument Cluster
Re
moval and Installation
Remov
al
1.
Adjust steer
ing column to full
y extended and lowered position.
2. Remove battery cover and disc onnect ground cable from
battery terminal. Refer to 86.15.19.
3. Remove veneer from instrument panel. Refer to 76.47.24.
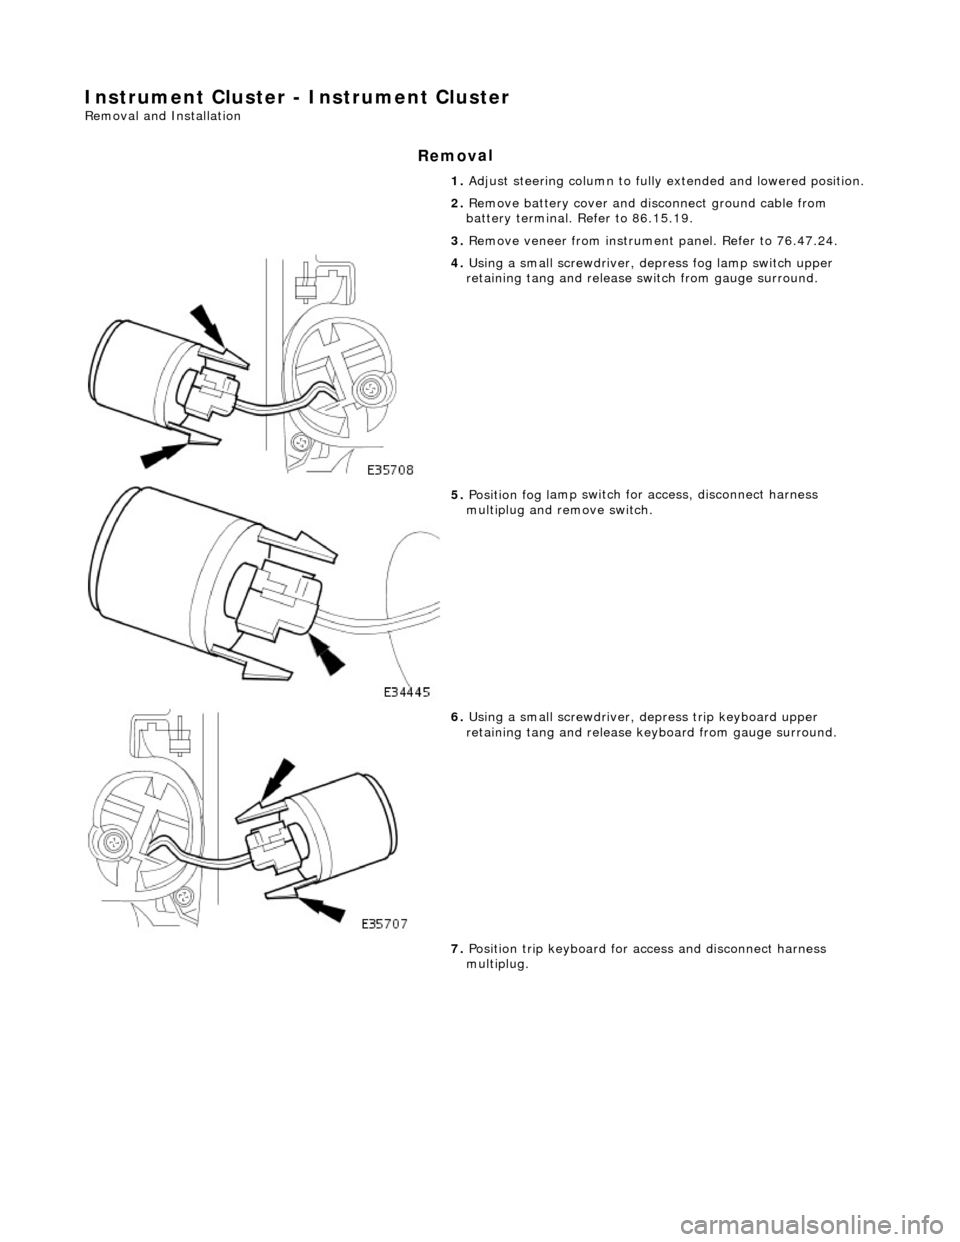
4. Using a small
screwdriver, de
press fog lamp switch upper
retaining tang and release sw itch from gauge surround.
5. Position fog l
amp switch fo
r access, disconnect harness
multiplug and remove switch.
6. Using a small
screwdriver, depress trip keyboard upper
retaining tang and release ke yboard from gauge surround.
7. Position trip keyboard for ac cess and disconnect harness
multiplug.
Page 1864 of 2490
Information and Message Center - Information and Message Center
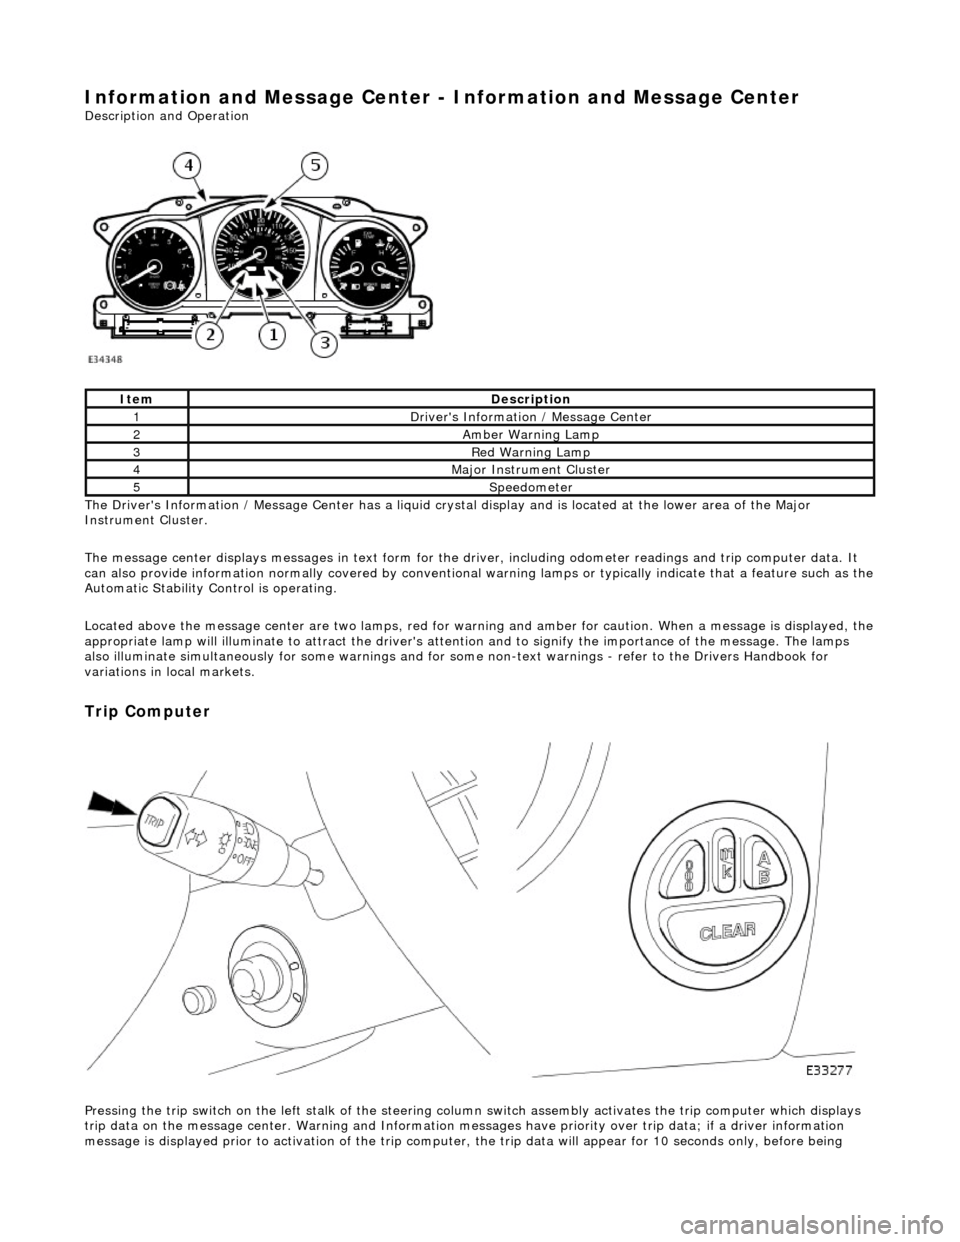
Description and Operation
The Driver's Information / Message Center has a liquid crystal display and is located at the lower area of the Major
Instrument Cluster.
The message center displays messages in text form for the driver, including odometer readings an d trip computer data. It
can also provide information normally covered by conventional wa rning lamps or typically indicate that a feature such as the
Automatic Stability Control is operating.
Located above the message center are two lamps, red for warning and amber for caution. When a message is displayed, the
appropriate lamp will illuminate to attract the driver's attention and to signify the importance of the message. The lamps
also illuminate simultaneously for some warnings and for some non-text warnin gs - refer to the Drivers Handbook for
variations in local markets.
Trip Computer
Pressing the trip switch on the left stalk of the steering colu mn switch assembly activates the trip computer which displays
trip data on the message center. Warning and Information messages have priority ov er trip data; if a driver information
message is displayed prior to activation of the trip computer , the trip data will appear for 10 seconds only, before being
ItemDescription
1Driver's Information / Message Center
2Amber Warning Lamp
3Red Warning Lamp
4Major Instrument Cluster
5Speedometer