steering JAGUAR X308 1998 2.G Repair Manual
[x] Cancel search | Manufacturer: JAGUAR, Model Year: 1998, Model line: X308, Model: JAGUAR X308 1998 2.GPages: 2490, PDF Size: 69.81 MB
Page 470 of 2490

3.CAUT
ION: DO NOT attempt to adjust the
steering gear yoke. Failure to follow this instruction will result in the
steering gear warranty to become invalid.
3. The backlash of the steering gear cannot be adjusted, in stall a new steering gear. For additional information,
REFER to Section 211
-02
Power Steering
.
4. 4. Grasp the steering wheel firm
ly and move it up an
d down and to the left and right without turning the wheel to
check for column bearing wear, steering wheel or steering column. For additional information,
REFER to Section 211
-04
Steering Column
.
Page 471 of 2490

Stee
ring System - General Informatio
n - Power Steering System Filling
and Bleeding
Gen
eral Procedures
Fluid Level Indica
tor
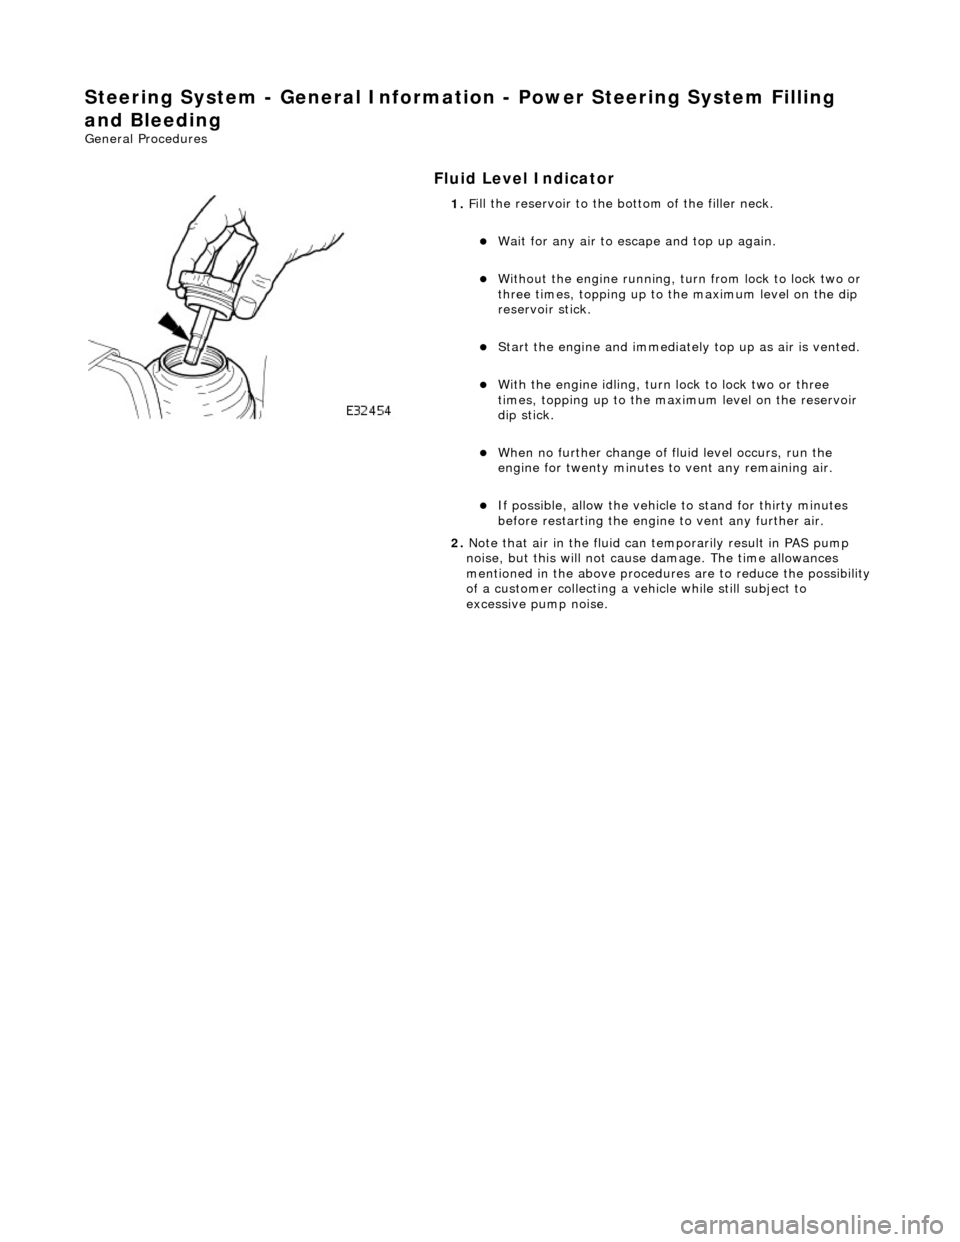
1.
F
ill the reservoir to the bo
ttom of the filler neck.
W
ait for any air to escape and top up again.
W
ithout the engine running, tu
rn from lock to lock two or
three times, topping up to the maximum level on the dip
reservoir stick.
St
art the engine and
immediately top up as air is vented.
W
ith the engine idling, turn
lock to lock two or three
times, topping up to the ma ximum level on the reservoir
dip stick.
W
hen no further change of
fluid level occurs, run the
engine for twenty minutes to vent any remaining air.
If po
ssible, allow the vehicle
to stand for thirty minutes
before restarting the engine to vent any further air.
2. Note that air in the fluid can temporarily result in PAS pump
noise, but this will not cause damage. The time allowances
mentioned in the above procedures are to reduce the possibility
of a customer collecting a vehicle while still subject to
excessive pump noise.
Page 472 of 2490

Steering System - General Information - Power Steeri
ng System Flushing
Gen
e
ral Procedures
• NOTE: If heavy steering or contamination within the power steering system is found, it is necessary to carry out the
system flush procedure as detailed below. If any components have been replaced in the power steering system the
procedure below must be carried out in full.
• NOTE: Some variation in the illustrations may occur, but the essential information is always correct.
1. Remove the power steering fluid reservoir cap.
2. Using a suitable syringe, remove the power steering fluid from
the power steering fluid reservoir.
3. CAUTIO
N: Be prepared to
collect escaping fluids.
• NOTE: Note the orientation of the clip. Detach the power steeri ng fluid reservoir.
De
tach but do not remove the power steering fluid
reservoir.
Re lea
se the power steering fluid return hose from the
power steering fluid reservoir.
If a qui
ck release coupling is fitted to the power
steering return ho se, release the powe r steering fluid
return hose from the coupling by removing the clip.
4. CAUTIO
N: Be prepared to
collect escaping fluids.
• NOTE: Make sure that all openings are sealed. Use new
blanking caps.
Using a suitable blanking cap, cap the power steering
reservoir return pipe.
5. CAUTIO
N: Be prepared to
collect escaping fluids.
• NOTE: Make sure the extended pipe is not kinked or twisted
and is correctly secure d with hose clips.
Attach a suitable pipe to the power steering return hose to
allow the fluid to drain.
Page 473 of 2490

6. NO
TE: The suitable funnel should have the a capacity of 4
litres and O-ring seal
• NOTE: The suitable funnel must be tightly sealed to the
power steering fluid reservoi r to avoid fluid leakage.
Install a suitable funnel onto the power steering fluid
reservoir.
7. WARNING: Do not work on or under a vehicle supported
only by a jack. Always support the vehicle on safety stands.
Raise and support the vehicle with the wheels just clear of the
ground.
8. CAUTI
ONS:
Steps 8 and 9 must be carried out within 2 - 3 seconds of
each other. Failure to follow this instruction may result in damage
to the power steering system.
Be prepared to collect escaping fluids.
Using the suitable funnel, top up the power steering system
with the specified fluid. Make su re the fluid level is maintained
at two thirds full in the funnel.
9. CAUTI
ONS:
Be prepared to collect escaping fluids.
Page 474 of 2490

Do not al
low the power steering fluid level in the power
steering fluid reservoir to fall below the minimum power
steering fluid level. Fa ilure to follow this instruction may result
in damage to the po wer steering system.
Make sure the engine is swit ched off as soon as the full
4 litres of power steering flui d has entered the power steering
fluid reservoir.
Flush the power steering system.
St art
the engine
W
it
h assistance turn the stee
ring slowly lock to lock 3
times at approximately 1 revo lution every 5 seconds.
Continue
to flush the power steering system until 4
litres of power steering fl uid has been added to the
power steering reservoir. This should take
approximately 30 seconds.
10 . CAUTI
ON: Be prepared to
collect escaping fluids.
Remove the suitable funnel.
11 . CAUTI
ON: Be prepared to
collect escaping fluids.
Remove the suitable pipe to th e power steering return hose.
12. CAUTI
ON: Be prepared to
collect escaping fluids.
Page 475 of 2490

•
NOTE: Note the orientation of the clip.
If a quick release coupling is fitt ed to the power steering return
hose, connect the power steerin g fluid return hose to the
coupling by installing the clip.
13. Install a new power steering fl uid reservoir. For additional
information, refer to: (211-02) Power Steering Fluid Reservoi r - 4.2L/3.0L/2.7L Diesel
(Removal and Installation),
Power Steering Fluid Reservoir - 3.0L Diesel (Removal and
Installation).
Page 476 of 2490

Steering System - Gen
eral Informatio
n - Power Steering System Vacuum
Filling and Bleeding
Gen e
ral Procedures
Fluid Ho
ses
1.
Parts L i
st
It
e
m
De
scr
iption
1R
e
turn hose
2High
pressure h
ose
2. If vacuum filling equipment is available, proceed as follows:
Disconnect both the
high pres
sure hose and return hose
from the PAS pump and the re turn hose from the steering
rack.
D rain as much fl
uid as possible from the system by
turning the steering from lock to lock two or three times.
Re conn
ect all hoses.
Fi
ll
the system using the vacuum equipment according to
the manufacturers instructions.
St art
the engine and top up
the fluid as necessary.
Turn the steering from lock to lock two or three ti mes wi
th
the engine running, topping up with fluid as necessary.
If possibl
e, run the engine for twenty minutes to expel any
remaining air.
Page 477 of 2490

Stee
ring System - General Informat
ion - Steering Gear Centralizing
Gen
eral Procedures
Rack Al
ignment Markers
1.
The steering rack should al
ways
be centralized prior to steering
column or suspension geometry adjustment.
Central
ization of the steering ra
ck is achieved by aligning
the marker on the centralizing cap with a locator on the
pinion housing.
Page 478 of 2490

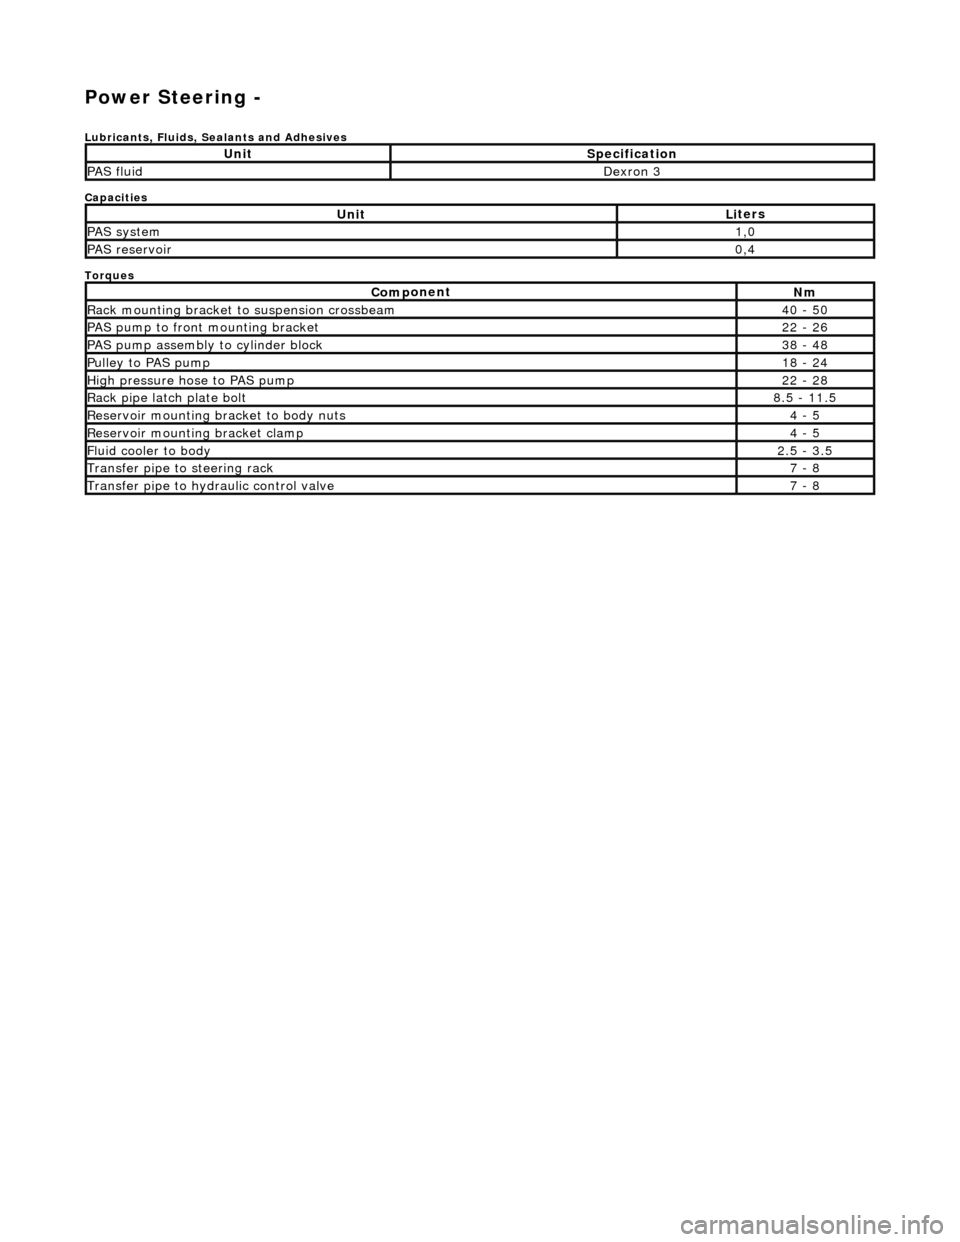
Power Steering -
Lubric
ants, Fluids, Sealants and Adhesives
Capacities
Torques
UnitSp
ecification
PAS flu
i
d
De
xr
on 3
UnitLi
t
ers
PAS syste
m1,0
PAS reservoi
r0,4
Com p
onent
Nm
Rac
k
mountin
g brac
ke
t to suspension crossbeam
40
- 50
PAS pump to front mounti
ng bracket
22
-
26
P
AS pu
mp assembly to cylinder block
38
-
48
Pul
l
ey to PAS pump
18
-
24
Hi
gh pressure hose to PAS pump22 -
28
Rack
pipe latch plate bolt8.5 -
11.5
R
e
servoir mounting bracket to body nuts
4 -
5
R
e
servoir mounting bracket clamp
4 -
5
Fluid cooler to body2.
5 -
3.5
Transfer pipe
to steering rack7 -
8
Transfer pipe
to hydraulic con
trol valve
7 -
8
Page 479 of 2490

Power Steering - Power Steering
Description an
d Operation
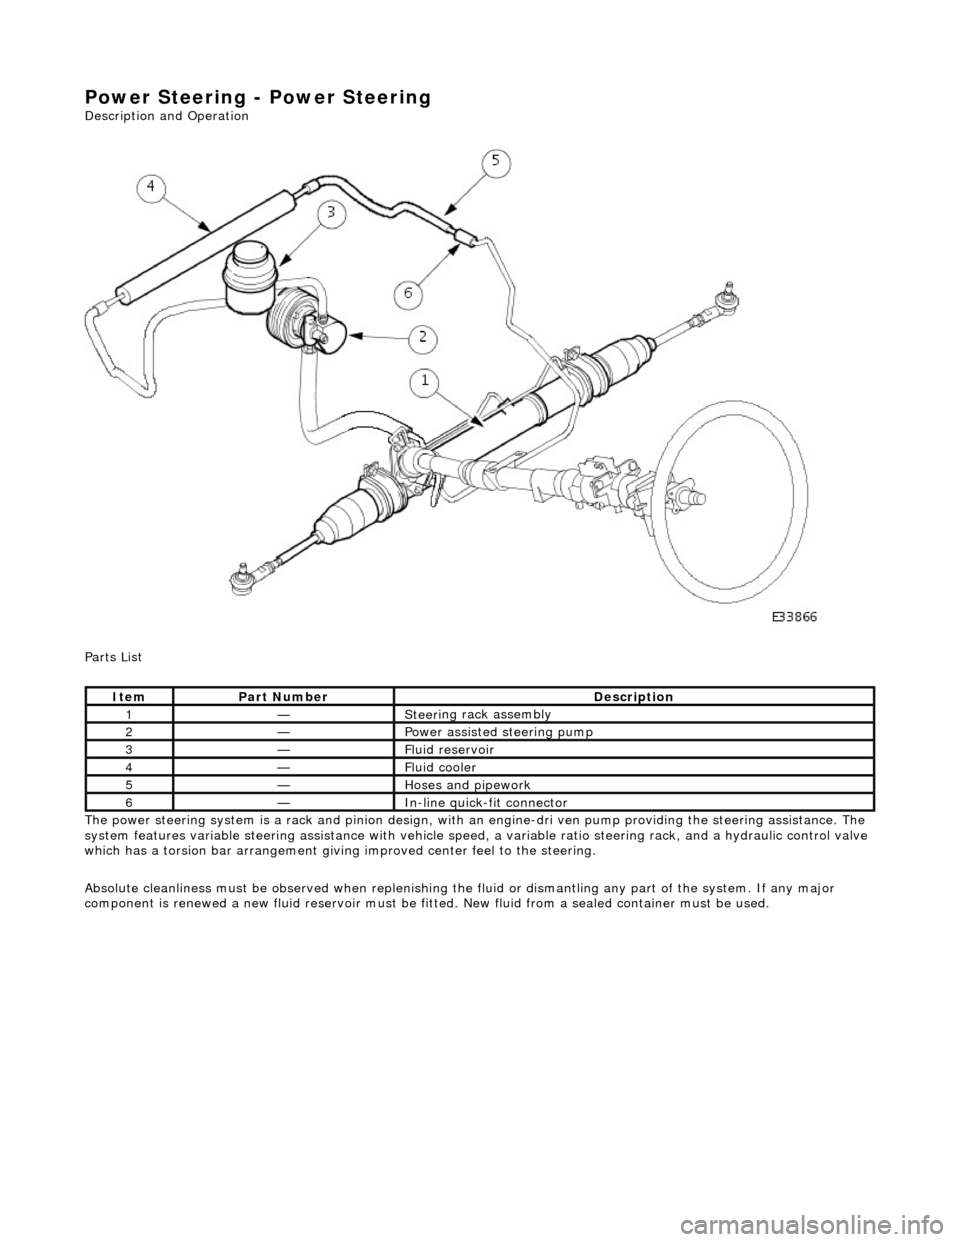
Parts List
The power steering system is a rack and pinion design, with an engine-dri ve n pump providing the steering assistance. The
system features variable steering assistance with vehicle spee d, a variable ratio steering rack, and a hydraulic control valve
which has a torsion bar arrangement giving improved center feel to the steering.
Absolute cleanliness must be observed wh en replenishing the fluid or dismantling any part of the system. If any major
component is renewed a new fluid rese rvoir must be fitted. New fluid from a sealed container must be used.
It
em
Par
t Number
De
scription
1—Steeri
ng rack assembly
2—Power as
sisted steering pump
3—F
luid reservoir
4—F
luid cooler
5—Hoses and pipework
6—In-
line quick-fit connector