JAGUAR X308 1998 2.G Workshop Manual
X308 1998 2.G
JAGUAR
JAGUAR
https://www.carmanualsonline.info/img/21/7640/w960_7640-0.png
JAGUAR X308 1998 2.G Workshop Manual
Page 2453 of 2490
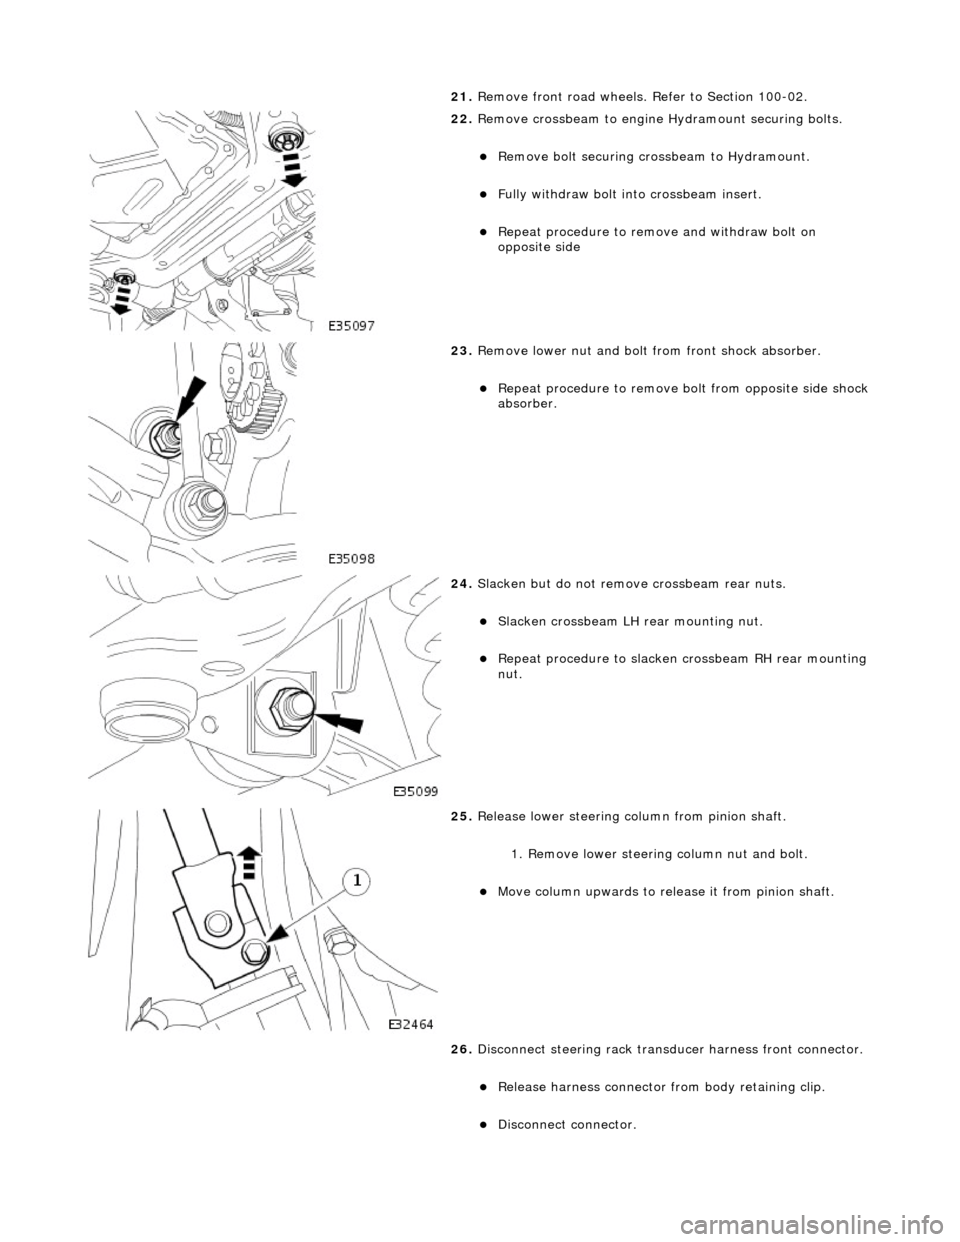
21. Remove front road wheels. Refer to Section 100-02.
22. Remove crossbeam to engine Hydramount securing bolts.
Remove bolt securing crossbeam to Hydramount.
Fully withdraw bolt into crossbeam insert.
Repeat procedure to remove and withdraw bolt on
opposite side
23. Remove lower nut and bolt from front shock absorber.
Repeat procedure to remove bo lt from opposite side shock
absorber.
24. Slacken but do not remove crossbeam rear nuts.
Slacken crossbeam LH rear mounting nut.
Repeat procedure to slacken crossbeam RH rear mounting
nut.
25. Release lower steering column from pinion shaft.
1. Remove lower steering column nut and bolt.
Move column upwards to release it from pinion shaft.
26. Disconnect steering rack transducer harness front connector.
Release harness connector from body retaining clip.
Disconnect connector.
Page 2456 of 2490
correctly seated in body locations.
3. Ensure that both engine hydram ounts are correctly seated in
crossbeam locations.
4. From engine compartment, install but do not tighten
crossbeam front RH bolts.
5. From engine compartment, install crossbeam front LH bolts
and tighten to 22-28Nm.
6. Install power steering fluid reservoir.
Position reservoir on mounting bracket.
Install reservoir securi ng nuts and bolts.
Page 2458 of 2490
3. Remove special tool 303-021 from fender channel.
11. Install crossbeam to engine Hydramount bolts.
Install bolt securing Hydramou nt to crossbeam and tighten to 34-46Nm.
Repeat procedure to install crossbeam opposite side bolt.
12. Tighten rear mounting bolt and nut to 131-185 Nm.
Repeat procedure to tighten opposite side rear mounting
bolt and nut.
13. Connect steering rack transducer harness front connector.
Connect steering ha rness connector.
Install harness connector on body retaining clip.
14. Slacken adjuster nut and remove camber tie down tool 204-
114 from suspension.
Repeat procedure to remove tie down tool from opposite
side.
Page 2459 of 2490
15. Using screws or new scrivets , secure undertray to front
bumper cover.
16. Using new tiestrap, secure undertray to crossbeam brace.
17. Using new scrivets, secure un dertray to each wheelarch
liner.
18. Install generator cool ing duct deflector.
Position deflector over rear vertical duct.
Move deflector forward to engage center tang over
undertray.
Page 2460 of 2490
Install bolt and tighten to 17-23Nm.
19. Install both front road wheels. Refer to Section 204-04.
20. Raise vehicle, remove st ands and lower vehicle.
21. Remove special tool MS53 from vehicle.
22. Install both engine co vers (normally aspirated vehicles only).
Position covers over engine.
Install securing pegs.
23. Install air intake tube/meter/ cleaner cover assembly. Refer
to 19.10.30
24. Remove fender covers and close hood.
25. Connect ground cable to batt ery terminal and fit battery
cover. Refer 86.15.19.
Page 2462 of 2490
8. Remove generator front cooling duct.
Remove bolt.
Move duct rearwards to rele ase tang from undertray.
Release front duct from rear vertical duct.
9. Remove scrivets or screws se curing undertray to bumper
cover. Discard scrivets.
10. Remove and discard tiestrap securing undertray to crossbeam front brace.
11. At each side of vehicle, remo ve and discard scrivet securing
undertray to wheelarch liner.
Page 2463 of 2490
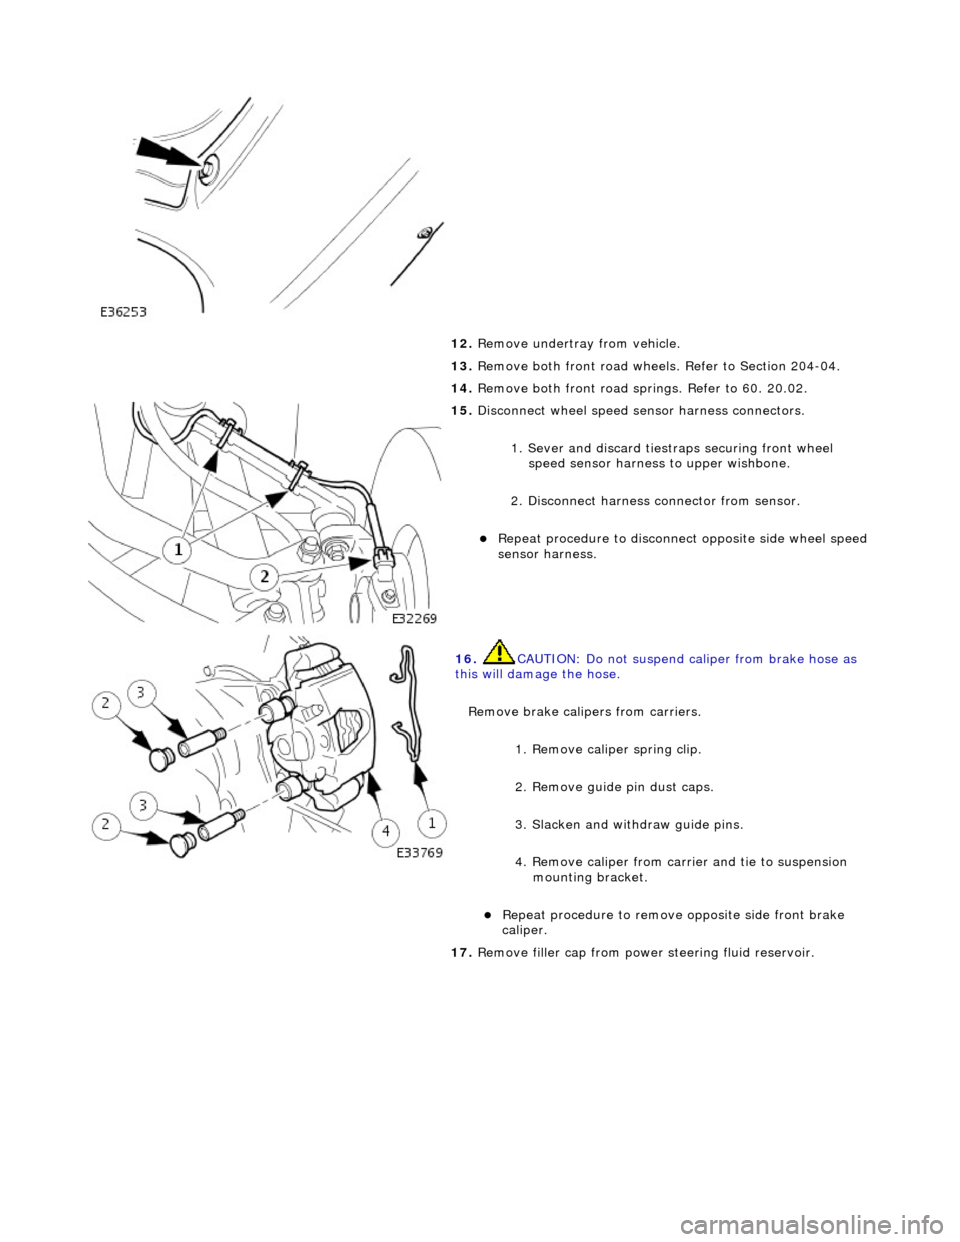
12. Remove undertray from vehicle.
13. Remove both front road wheels. Refer to Section 204-04.
14. Remove both front road springs. Refer to 60. 20.02.
15. Disconnect wheel speed sensor harness connectors.
1. Sever and discard tiestr aps securing front wheel
speed sensor harness to upper wishbone.
2. Disconnect harness connector from sensor.
Repeat procedure to disconnect opposite side wheel speed
sensor harness.
16. CAUTION: Do not suspend caliper from brake hose as
this will damage the hose.
Remove brake calipers from carriers.
1. Remove caliper spring clip.
2. Remove guide pin dust caps.
3. Slacken and withdraw guide pins.
4. Remove caliper from carrier and tie to suspension mounting bracket.
Repeat procedure to remove opposite side front brake
caliper.
17. Remove filler cap from power steering fluid reservoir.
Page 2464 of 2490
18. Disconnect steering rack transducer harness front connector.
Release harness connector from body retaining clip.
Disconnect connector.
19. Sever and discard tiestrap secu ring return pipe, harness (RHD only) and rubber support to steering rack.
20. RHD vehicles. Sever and discard tiestrap securing harness to
steering rack.
21. Route harness from behind steering return pipe.
22. Position a drain receptacle below pinion housing.
23. Remove pipe retaining plate secu ring bolt and withdraw plate.
Page 2465 of 2490
24. Drain power steering fluid.
Disconnect pipes and al low fluid to drain.
Remove and discard 'O'-ring seals from pipe connectors.
Fit blanking plugs to pipe connectors and pinion housing
ports.
25. Remove drain receptacle.
26. Remove pipe support from steering rack.
Release return pipe from support.
Remove support from rack.
27. Ensure that steering is in central position.
28. Release lower steering column from pinion shaft.
1. Remove lower steering co lumn securing nut and bolt.
Move column upwards to release it from pinion shaft.
29. Support weight of crossbeam.
Position a jack under crossbeam.
Page 2466 of 2490
Place a piece of wood between jack and crossbeam.
Raise jack to just support crossbeam.
30. From engine compartment, remove crossbeam front RH
securing bolts.
31. Remove power steering fl uid reservoir for access.
Remove reservoir securing nuts and bolts.
Position reservoir for access.
32. From engine compartment, remove crossbeam front LH
securing bolts.
33. Remove crossbeam to engine Hydramount securing bolts.
Remove bolt securing cros smember to Hydramount.
Fully withdraw bolt into crossmember insert.
Repeat procedure to remove and withdraw bolt on


