Def JAGUAR XF 2009 1.G User Guide
[x] Cancel search | Manufacturer: JAGUAR, Model Year: 2009, Model line: XF, Model: JAGUAR XF 2009 1.GPages: 391, PDF Size: 19.32 MB
Page 96 of 391
Windows and mirrors
96
Automatic folding
The mirrors can be configured to automatically
fold when the vehicle is locked and unfold
when unlocked.
Note: If the mirrors were folded using the
switches, they will not unfold when the vehicle
is unlocked.
To select or deselect automatic folding:
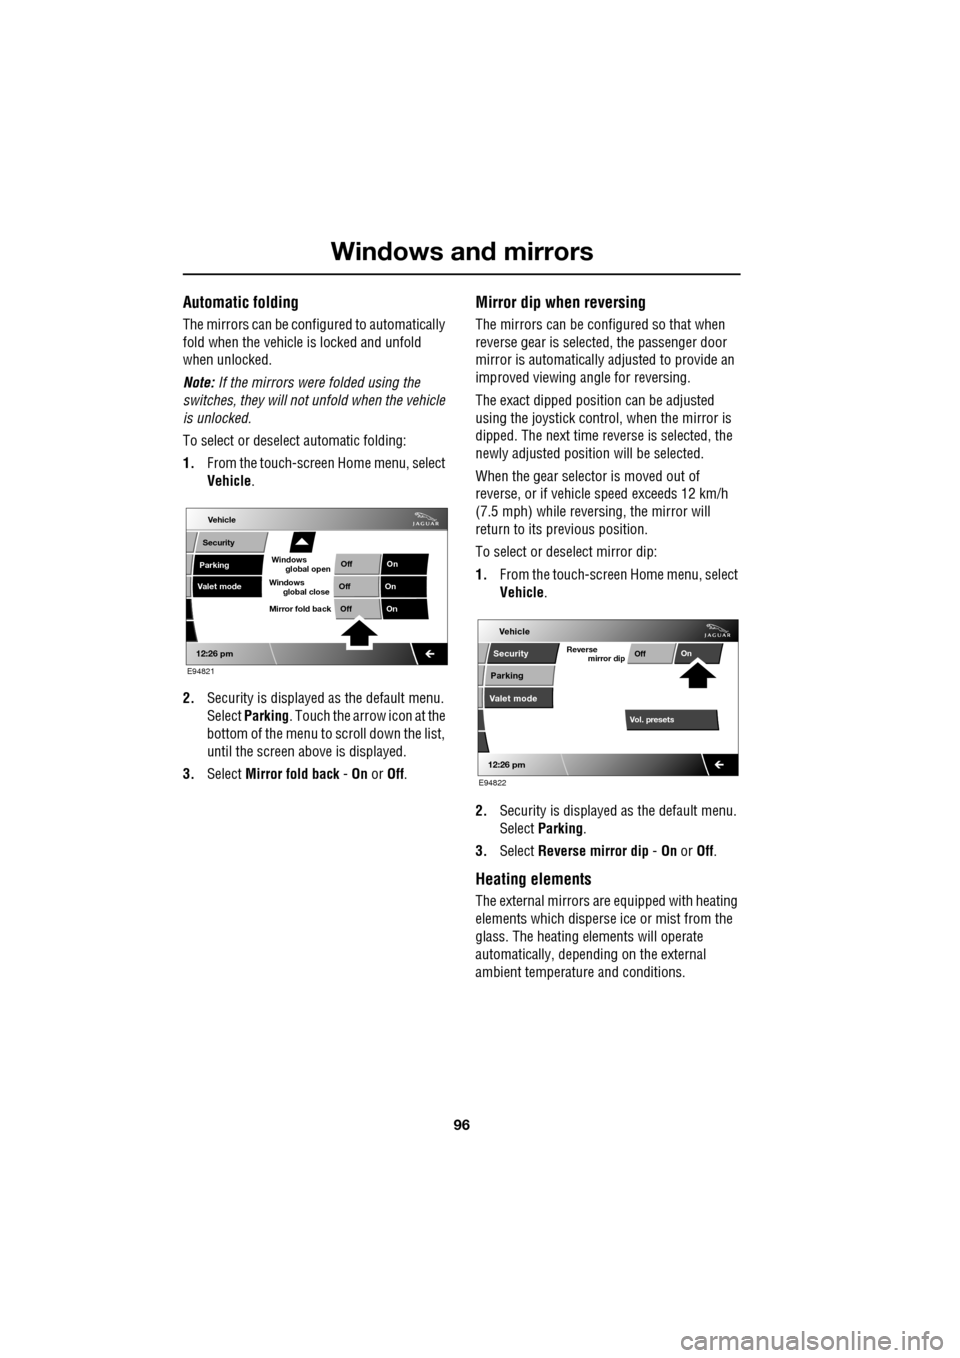
1. From the touch-screen Home menu, select
Vehicle .
2. Security is displayed as the default menu.
Select Parking . Touch the arrow icon at the
bottom of the menu to scroll down the list,
until the screen a bove is displayed.
3. Select Mirror fold back - On or Off.
Mirror dip when reversing
The mirrors can be configured so that when
reverse gear is select ed, the passenger door
mirror is automatically adjusted to provide an
improved viewing a ngle for reversing.
The exact dipped positi on can be adjusted
using the joystick contro l, when the mirror is
dipped. The next time reverse is selected, the
newly adjusted position will be selected.
When the gear selector is moved out of
reverse, or if vehicle speed exceeds 12 km/h
(7.5 mph) while revers ing, the mirror will
return to its previous position.
To select or deselect mirror dip:
1. From the touch-screen Home menu, select
Vehicle .
2. Security is displayed as the default menu.
Select Parking .
3. Select Reverse mirror dip - On or Off.
Heating elements
The external mirrors are equipped with heating
elements which disperse ice or mist from the
glass. The heating el ements will operate
automatically, depending on the external
ambient temperatur e and conditions.
Vehicle
Valet mode
Security
Parking Off
On
Off On
12:26 pm
OffOn
Mirror fold back
E94821
global open
Windows
global close
Windows
mirror dip
Vol. presetsOff
On
Vehicle
Security
Parking
Valet mode
Reverse
12:26 pm
E94822
Page 114 of 391
Information displays
114
Timeout to home menu
The time period before the touch-screen
display reverts to the Home menu, after the last
user input, can be adjusted to suit personal
preference.
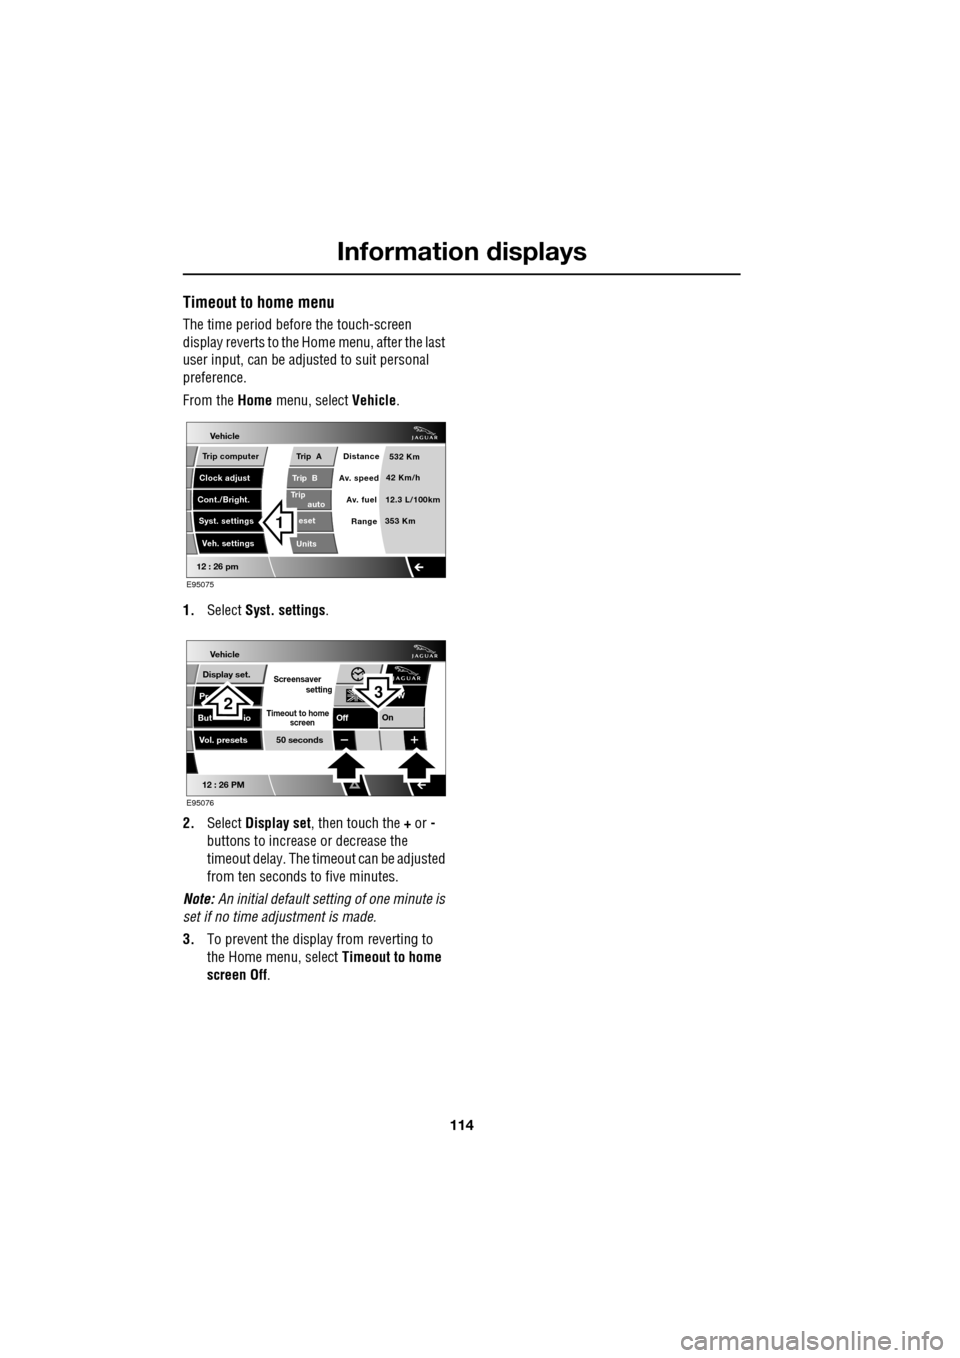
From the Home menu, select Vehicle.
1. Select Syst. settings .
2. Select Display set , then touch the + or -
buttons to increase or decrease the
timeout delay. The time out can be adjusted
from ten seconds to five minutes.
Note: An initial defa ult setting of one minute is
set if no time adjustment is made.
3. To prevent the display from reverting to
the Home menu, select Timeout to home
screen Off .
Vehicle
Trip B
Trip
auto eset
Units Distance
Av. speed
Av. fuel 532 Km
42 Km/h
12.3 L/100km
353 Km
RangeClock adjust
Cont./Bright. Trip computer
Syst. settings Veh. settings
Trip A
12 : 26 pm
E95075
1
Vehicle
Display set.
Pr
But io
Vol. presets
12 : 26 PM
50 seconds
OnOff
Screensaver
Timeout to home
setting
screen
W
E95076
32
Page 116 of 391
Climate control
116
AUTOMATIC CLIMATE CONTROL
Automatic climate control provides efficient
regulation of the vehicle environment, without
constant adjustments from the occupant.
Sensors inside the vehicle monitor
temperature, humidity an d direct sunlight. The
electronic control system automatically adjusts
the heat input, blower speed, air intake and
airflow distribution, to maintain the selected
temperature(s) and re duce misting. The air
conditioning system al so incorporates a
pollen/odour filter, to further increase the
comfort of the vehicle environment.
Automatic operation provides optimum
comfort under most driving conditions. It is recommended that automatic control
(AUTO) is selected as the normal operating
mode.
Automatic control can be overridden at any
time.
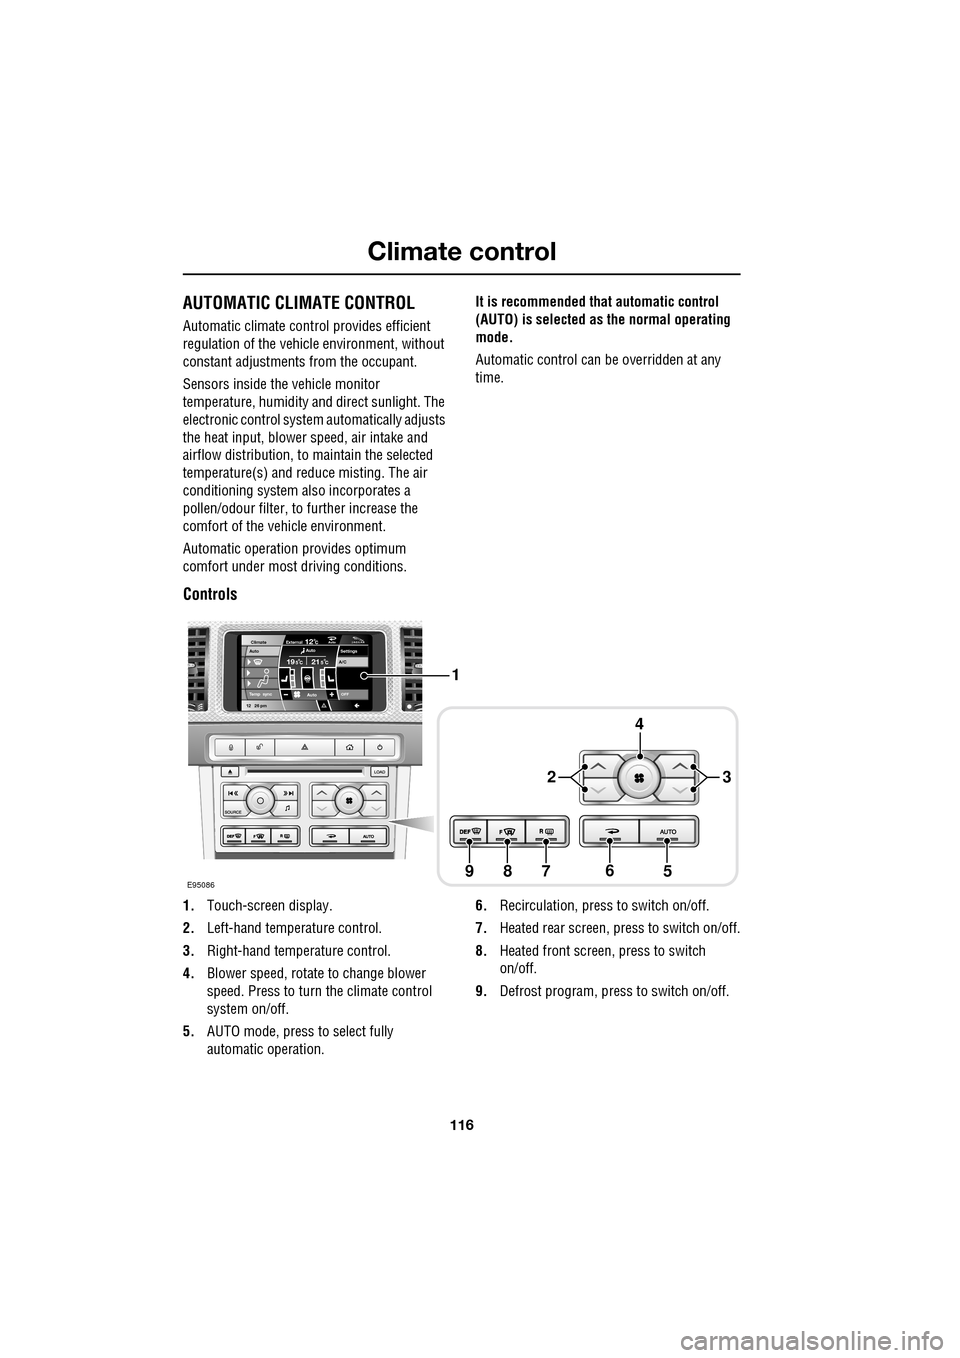
Controls
1.
Touch-screen display.
2. Left-hand temperature control.
3. Right-hand temperature control.
4. Blower speed, rotate to change blower
speed. Press to turn the climate control
system on/off.
5. AUTO mode, press to select fully
automatic operation. 6.
Recirculation, press to switch on/off.
7. Heated rear screen, press to switch on/off.
8. Heated front screen, press to switch
on/off.
9. Defrost program, press to switch on/off.
Settings
Temp sync External12CAuto19 21C5 CAuto
A/C5
Climate
12 26 pmAutoOFF
Auto
E95086
1
4
65789
23
Page 117 of 391
117
Climate control
Temperature controls
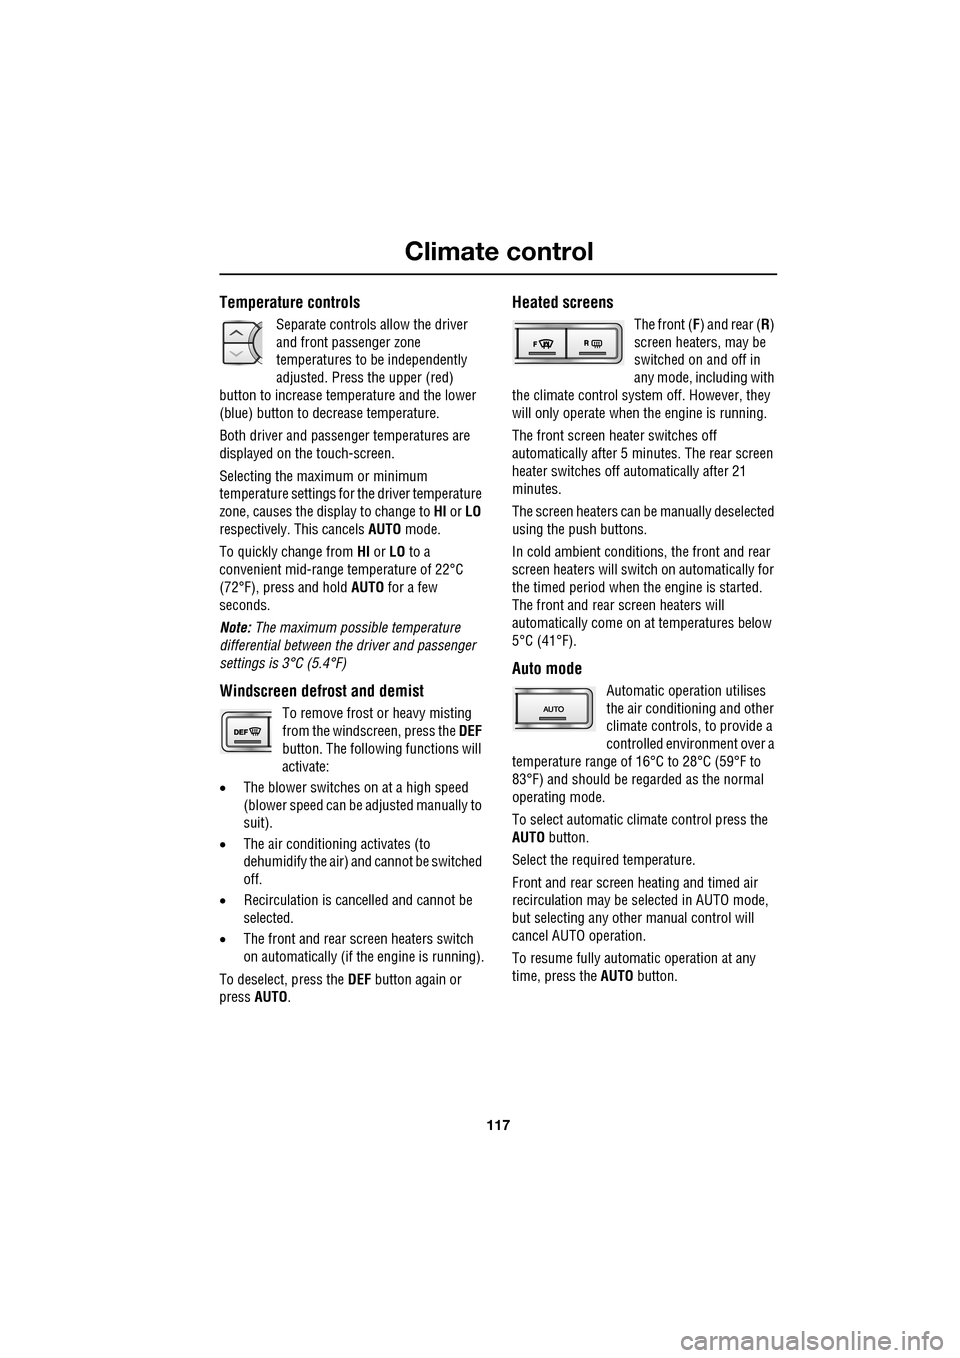
Separate controls allow the driver
and front passenger zone
temperatures to be independently
adjusted. Press the upper (red)
button to increase temperature and the lower
(blue) button to decrease temperature.
Both driver and passenger temperatures are
displayed on the touch-screen.
Selecting the maximum or minimum
temperature settings for the driver temperature
zone, causes the disp lay to change to HI or LO
respectively. This cancels AUTO mode.
To quickly change from HI or LO to a
convenient mid-rang e temperature of 22°C
(72°F), press and hold AUTO for a few
seconds.
Note: The maximum possible temperature
differential between the driver and passenger
settings is 3°C (5.4°F)
Windscreen defrost and demist
To remove frost or heavy misting
from the windscreen, press the DEF
button. The following functions will
activate:
• The blower switches on at a high speed
(blower speed can be adjusted manually to
suit).
• The air conditioni ng activates (to
dehumidify the air) and cannot be switched
off.
• Recirculation is canc elled and cannot be
selected.
• The front and rear screen heaters switch
on automatically (if th e engine is running).
To deselect, press the DEF button again or
press AUTO .
Heated screens
The front (F) and rear ( R)
screen heaters, may be
switched on and off in
any mode, including with
the climate control system off. However, they
will only operate when the engine is running.
The front screen heater switches off
automatically after 5 minutes. The rear screen
heater switches off automatically after 21
minutes.
The screen heaters can be manually deselected
using the push buttons.
In cold ambient conditions, the front and rear
screen heaters will switch on automatically for
the timed period when the engine is started.
The front and rear screen heaters will
automatically come on at temperatures below
5°C (41°F).
Auto mode
Automatic operation utilises
the air conditioning and other
climate controls , to provide a
controlled environment over a
temperature range of 16°C to 28°C (59°F to
83°F) and should be rega rded as the normal
operating mode.
To select automatic climate control press the
AUTO button.
Select the required temperature.
Front and rear screen heating and timed air
recirculation may be se lected in AUTO mode,
but selecting any othe r manual control will
cancel AUTO operation.
To resume fully automatic operation at any
time, press the AUTO button.
Page 118 of 391
Climate control
118
Blower speed
Set the blower speed as required by
adjusting the rotary control.
Press to turn the climate control
system on or off.
When operating in AUTO mode, blower speed
is controlled au tomatically and AUTO is
displayed on the touch-screen. Any adjustment
of the knob will cancel AUTO mode.
Note: In AUTO mode, if heating is required, the
blower only operates at low speed, until the
engine reaches normal operating temperature.
Recirculation
Press to turn recirculation on
or off. The button indicator
illuminates when recirculation
is turned on.
When selected, the air is recirculated inside the
vehicle. This helps to ma intain a high or low
temperature, and is useful for preventing
fumes from entering the vehicle.
Recirculation may also be selected in AUTO
mode, if the climate control system detects
high levels of pollution in the atmosphere
outside the vehicle (if a smog sensor is fitted).
Manual operation of the recirculation control
will override the automatic setting. This facility
can be switched off through the Settings menu
on the touch-screen.
Note: Prolonged use at low temperatures may
cause the windows to mist.
Air conditioning
Press the AUTO button to turn
the air conditioning on.
The air conditioning system is
controlled automatically in AUTO mode to
maintain the desired temperature and humidity
(even if higher temperature settings are
selected).
The air conditioning system is also switched on
automatically in defrost mode ( DEF) in order to
dehumidify the air.
Note: Water may collect unde rneath the vehicle
when parked. This is moisture expelled from
the interior of the vehicle by the air
conditioning system a nd is not cause for
concern.
Heated/climate seats and heated
steering wheel
The heated seats, climate seats and heated
steering wheel can be controlled from both the
Home and Climate menus on the touch-screen.
See HEATED SEATS (page 47). See CLIMATE
SEATS (page 48). See HEATED STEERING
WHEEL (page 68).
Page 160 of 391
Adaptive cruise control (ACC)
160
Setting the speed
Accelerate as normal until the required speed is
reached.
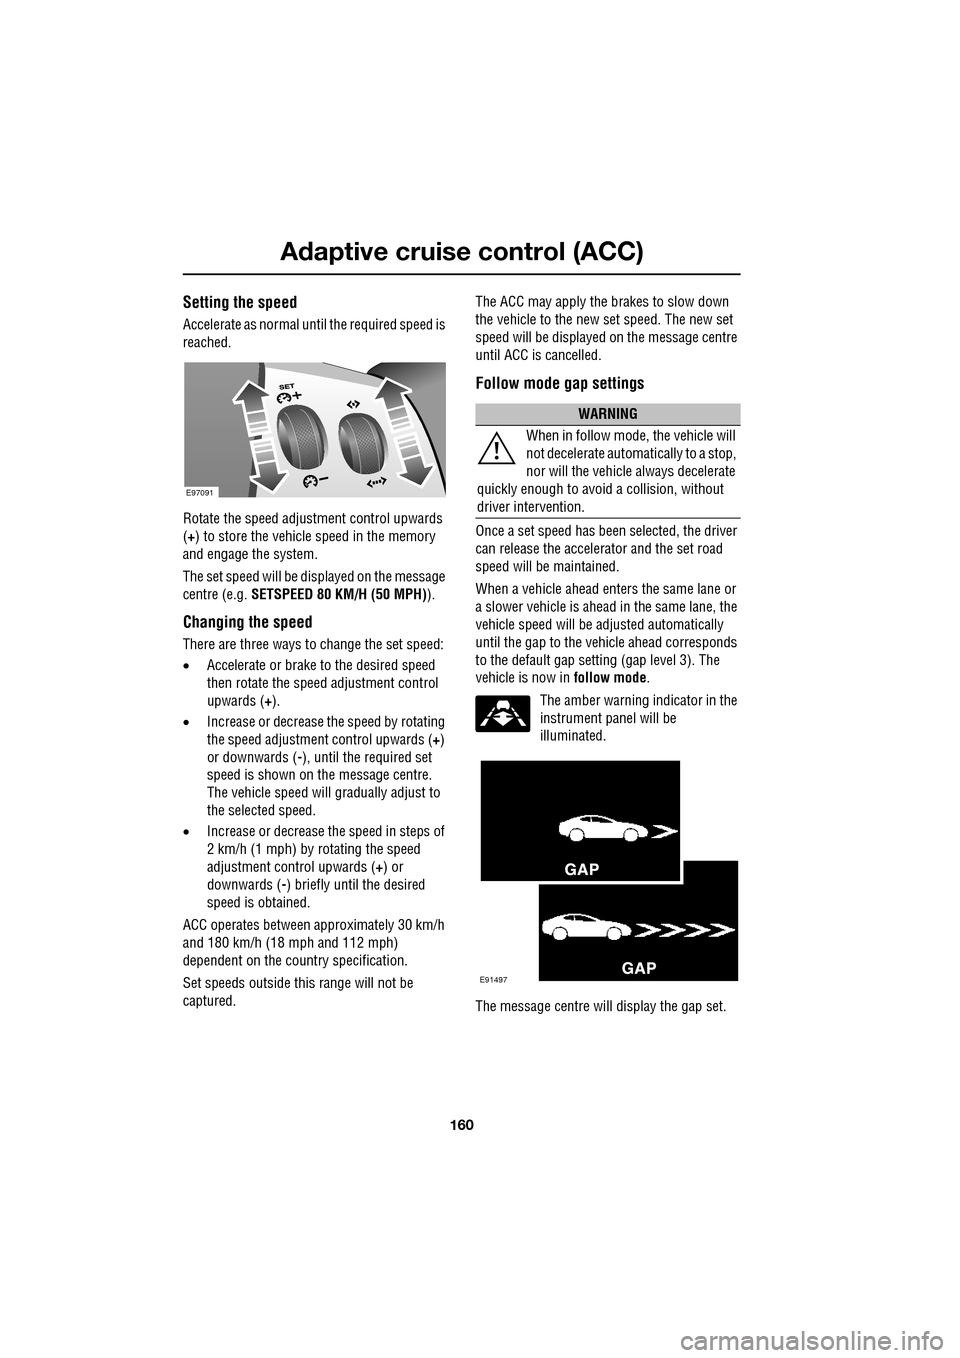
Rotate the speed adjustment control upwards
(+) to store the vehicle speed in the memory
and engage the system.
The set speed will be displayed on the message
centre (e.g. SETSPEED 80 KM/H (50 MPH) ).
Changing the speed
There are three ways to change the set speed:
•Accelerate or brake to the desired speed
then rotate the speed adjustment control
upwards ( +).
• Increase or decrease the speed by rotating
the speed adjustment control upwards ( +)
or downwards ( -), until the required set
speed is shown on the message centre.
The vehicle speed will gradually adjust to
the selected speed.
• Increase or decrease the speed in steps of
2 km/h (1 mph) by rotating the speed
adjustment control upwards (+) or
downwards ( -) briefly until the desired
speed is obtained.
ACC operates between approximately 30 km/h
and 180 km/h (18 mph and 112 mph)
dependent on the c ountry specification.
Set speeds outside th is range will not be
captured. The ACC may apply the brakes to slow down
the vehicle to the new set speed. The new set
speed will be displayed on the message centre
until ACC is cancelled.
Follow mode gap settings
Once a set speed has been selected, the driver
can release the accelerator and the set road
speed will be maintained.
When a vehicle ahead enters the same lane or
a slower vehicle is ahead in the same lane, the
vehicle speed will be adjusted automatically
until the gap to the vehicle ahead corresponds
to the default gap setting (gap level 3). The
vehicle is now in
follow mode.
The amber warning indicator in the
instrument panel will be
illuminated.
The message centre will display the gap set.
E97091
WARNING
When in follow mode, the vehicle will
not decelerate automatically to a stop,
nor will the vehicle always decelerate
quickly enough to avoid a collision, without
driver intervention.
E91497
Page 161 of 391
161
Adaptive cruise control (ACC)
The vehicle will then maintain the constant time
gap to the vehicle ahead until:
•The vehicle ahead accelerates to a speed
above the set speed.
• The vehicle ahead moves out of lane or out
of view.
• A new gap distance is set.
If necessary, the vehicle brakes will be
automatically applied to slow the vehicle to
maintain the gap to the vehicle in front.
The maximum braking which is applied by the
ACC system is limited and can be overridden by
the driver applying the brakes, if required.
Note: Driver braking will cancel ACC.
If the ACC system predicts that its maximum
braking level will not be sufficient, then an
audible warning will sound while the ACC
continues to brake. DRIVER INTERVENE will be
displayed on the message centre. The driver
should take immediate action.
When in follow mode, the vehicle will
automatically return to the set speed when the
road ahead is clear, for instance when:
• The vehicle in front accelerates or changes
lane.
• The driver changes lane to either side or
enters an exit lane.
The driver should intervene if appropriate.
Changing the follow mode set gap
The gap from the vehicle ahead can be
decreased or increased by rolling the
thumbwheel on the stee ring wheel. Four gap
settings are available and the selected gap
setting will be displaye d on the message centre
when either ACC button is pressed. Each gap level is indicated by an
additional
chevron in front of th e vehicle icon in the
message centre (one chevron (gap level 1)
being the shortest, four chevrons (gap level 4)
being the longest). A fter the ignition is
switched on, the default gap (gap level 3) will
be automatically selected ready for ACC
operation.
Note: When the ignition is switched off, the
gap setting will revert to the default setting
(gap level 3) when switched on again.
Note: It is the driver’s responsibility to select a
gap appropriate to the driving conditions.
Overriding the speed and follow mode
The set speed and gap ca n be overridden by
pressing the accelerator pedal when cruising at
constant speed or in follow mode. If the vehicle
is in follow mode, the instrument warning
indicator will go out when the ACC is
overridden by the driver using the accelerator
and CRUISE OVERRIDE will be displayed on
the message centre. When the accelerator is
released the ACC functi on will operate again
and vehicle speed will decrease to the set
speed, or a lower spee d if follow mode is
active.
WARNING
Whenever the driver is overriding the
ACC by depressing the accelerator
pedal, the ACC will not automatically
apply the brakes to ma intain separation from
any vehicle ahead.
Page 169 of 391
169
Driving dynamics
GENERAL INFORMATION
JaguarDrive Control
JaguarDrive Control is a selectable vehicle
optimisation system, designed to fine-tune the
driving characteristics of the vehicle by
accommodating different dr iving conditions or
driving styles.
The system allows the performance envelope
of the vehicle to be stretched and prevents the
necessity for a single, compromised
configuration for all conditions, thereby
increasing the vehicle's abilities.
The vehicle systems optimised by JaguarDrive
Control are:
• Engine management.
• Transmission management.
• Dynamic Stability Control and traction
control.
• Adaptive dynamics.
• Active Differential Control (E-diff) -
Supercharged vehicles only.
Note: Changing from one special mode to
another, will introduce noticeably different
vehicle responses. For example, the engine
revs produced by the accelerator position when
a special mode is not selected, may increase or
decrease when a mode is selected.
To familiarise y ourself with, and get the best
from, the JaguarDrive Control modes, you
should try out the mode s in circumstances
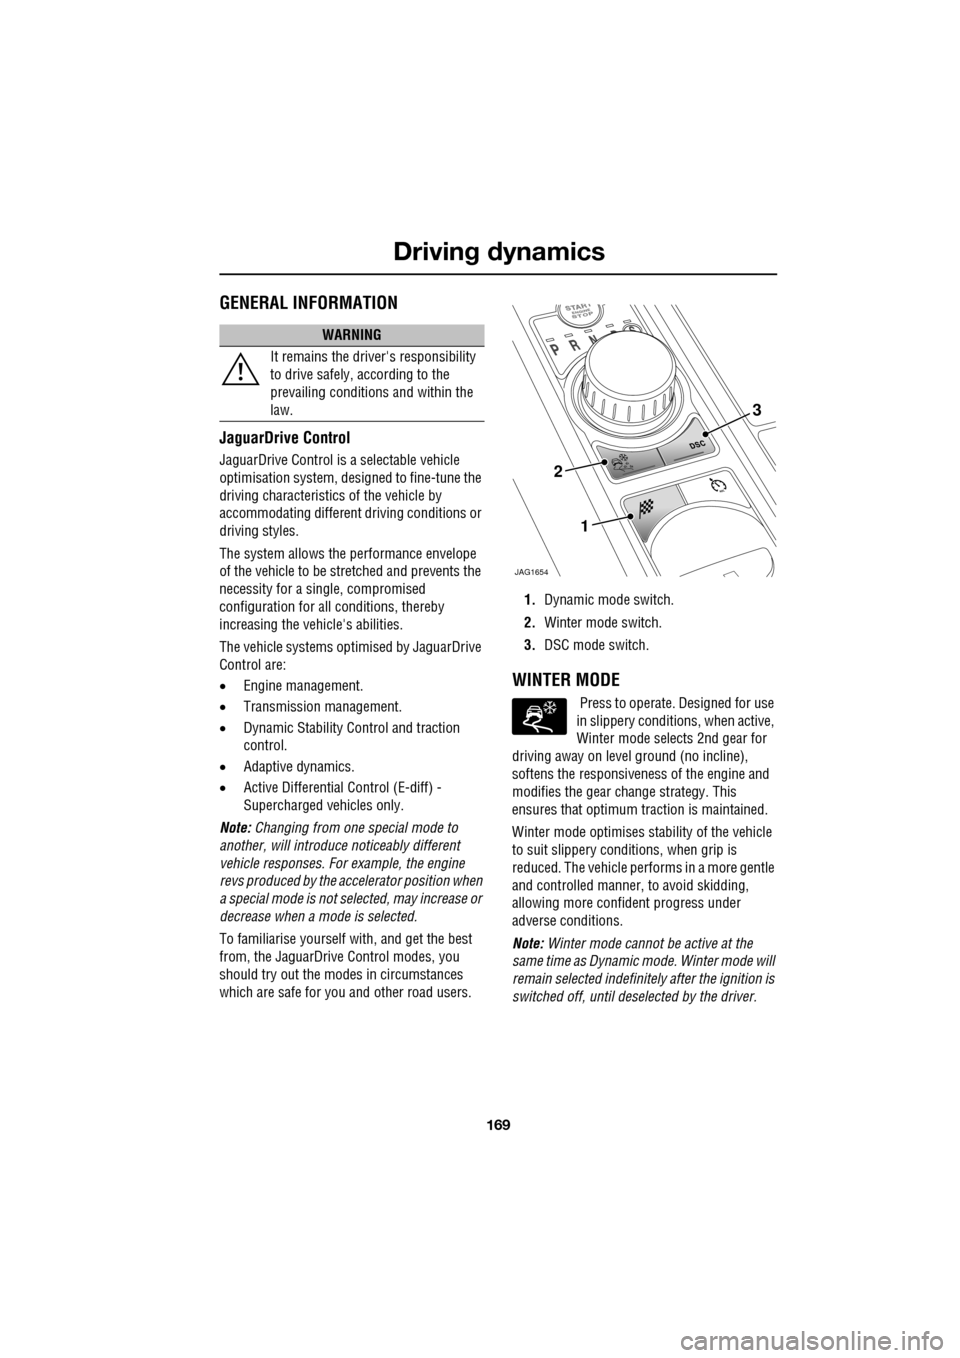
which are safe for you and other road users. 1.
Dynamic mode switch.
2. Winter mode switch.
3. DSC mode switch.
WINTER MODE
Press to operate. Designed for use
in slippery conditi ons, when active,
Winter mode selects 2nd gear for
driving away on level ground (no incline),
softens the responsiveness of the engine and
modifies the gear ch ange strategy. This
ensures that optimum traction is maintained.
Winter mode optim ises stability of the vehicle
to suit slippery conditions, when grip is
reduced. The vehicle perfor ms in a more gentle
and controlled manner, to avoid skidding,
allowing more confident progress under
adverse conditions.
Note: Winter mode cannot be active at the
same time as Dynamic mode. Winter mode will
remain selected indefinite ly after the ignition is
switched off, until deselected by the driver.
WARNING
It remains the driver's responsibility
to drive safely, according to the
prevailing conditions and within the
law.
JAG1654
1
2
3
Page 173 of 391
173
Driving dynamics
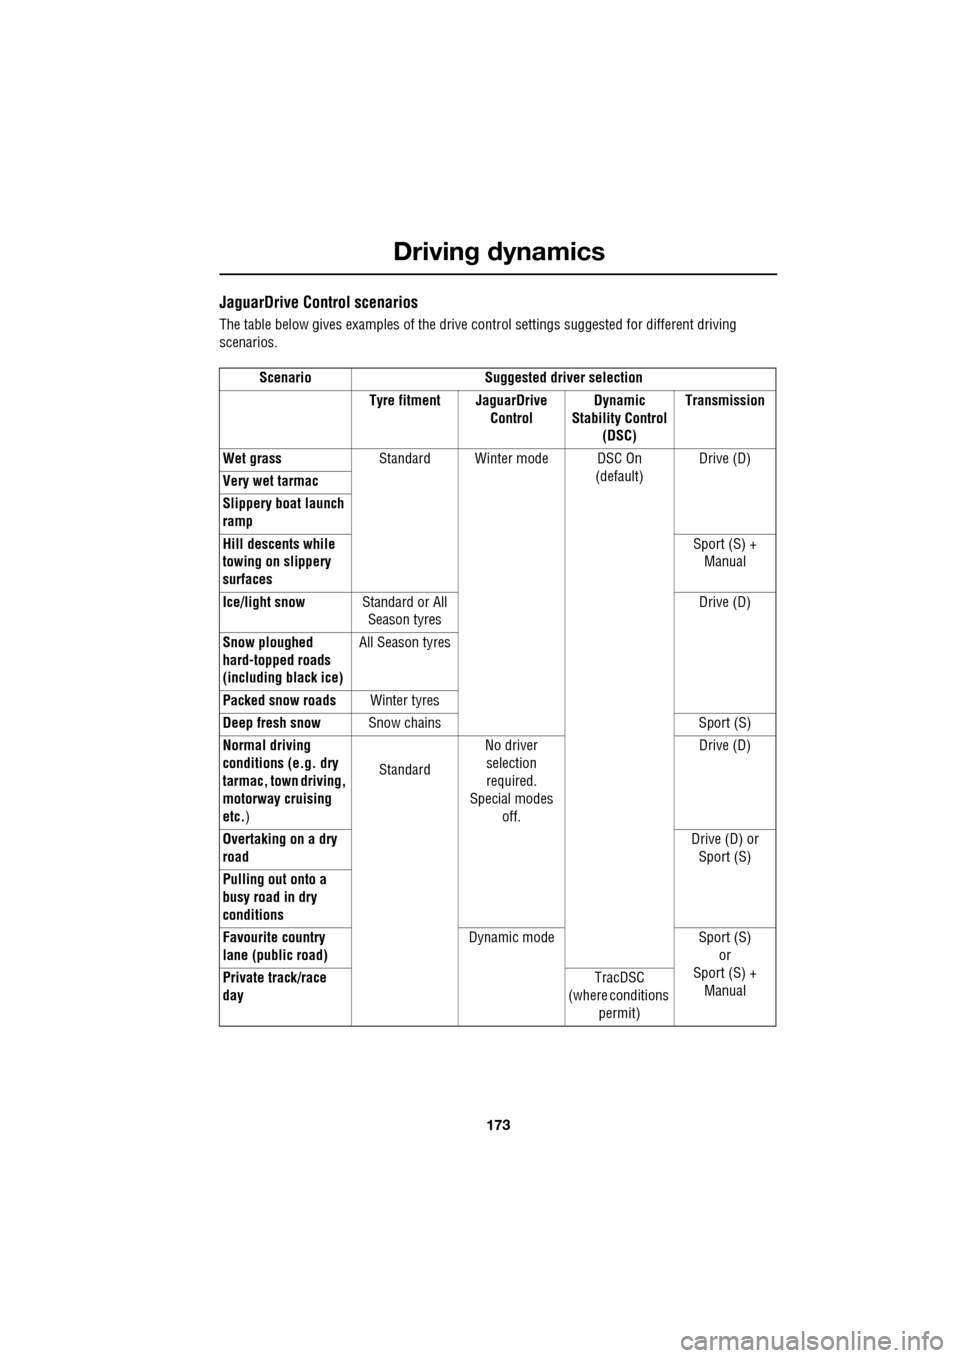
JaguarDrive Control scenarios
The table below gives examples of the drive control settings suggested for different driving
scenarios.
Scenario Suggested driver selection Tyre fitment JaguarDrive ControlDynamic
Stability Control (DSC) Transmission
Wet grass Standard Winter mode DSC On
(default)Drive (D)
Very wet tarmac
Slippery boat launch
ramp
Hill descents while
towing on slippery
surfaces Sport (S) +
Manual
Ice/light snow Standard or All
Season tyres Drive (D)
Snow ploughed
hard-topped roads
(including black ice) All Season tyres
Packed snow roads Winter tyres
Deep fresh snow Snow chains Sport (S)
Normal driving
conditions (e.g. dry
tarmac, town driving,
motorway cruising
etc. ) Standard
No driver
selection
required.
Special modes off. Drive (D)
Overtaking on a dry
road Drive (D) or
Sport (S)
Pulling out onto a
busy road in dry
conditions
Favourite country
lane (public road) Dynamic mode Sport (S)
or
Sport (S) + Manual
Private track/race
day TracDSC
(where conditions
permit)
Page 217 of 391
217
Wheels and tyres
11.Wear rate indicator. A tyre rated at 400 for
example, will last twice as long as a tyre
rated at 200.
12. The traction rating grades a tyres
performance when stopping on a wet road
surface. The higher the grade the better the
braking performance. The grades from
highest to lowest are, AA, A, B, and C.
13. The maximum load which can be carried
by the tyre.
14. Heat resistance grading. The tyre's
resistance to heat is grade A, B, or C, with
A indicating the greatest resistance to heat.
This grading is provided for a correctly
inflated tyre, which is being used within its
speed and loading limits.
15. The maximum inflation pressure for the
tyre. This pressure should not be used for
normal driving.
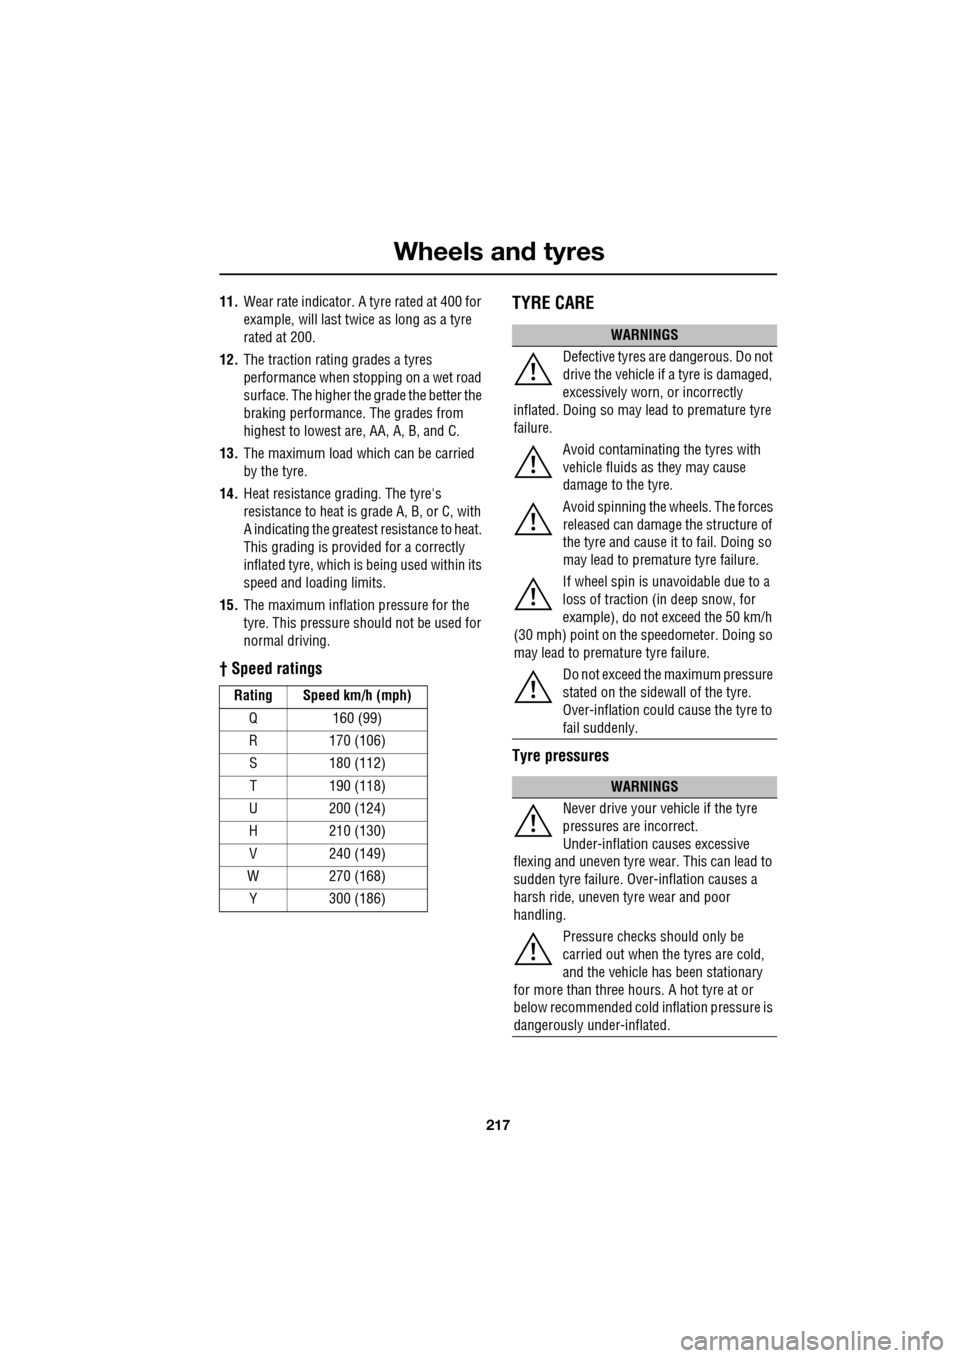
† Speed ratings
TYRE CARE
Tyre pressures
Rating Speed km/h (mph)
Q 160 (99)
R 170 (106)S 180 (112)
T 190 (118)
U 200 (124)
H 210 (130)
V 240 (149)
W 270 (168) Y 300 (186)
WARNINGS
Defective tyres are dangerous. Do not
drive the vehicle if a tyre is damaged,
excessively worn, or incorrectly
inflated. Doing so may lead to premature tyre
failure.
Avoid contaminating the tyres with
vehicle fluids as they may cause
damage to the tyre.
Avoid spinning the wh eels. The forces
released can damage the structure of
the tyre and cause it to fail. Doing so
may lead to premature tyre failure.
If wheel spin is unavoidable due to a
loss of traction (i n deep snow, for
example), do not exceed the 50 km/h
(30 mph) point on the speedometer. Doing so
may lead to premature tyre failure.
Do not exceed the maximum pressure
stated on the sidewall of the tyre.
Over-inflation could cause the tyre to
fail suddenly.
WARNINGS
Never drive your vehicle if the tyre
pressures are incorrect.
Under-inflation causes excessive
flexing and uneven tyre we ar. This can lead to
sudden tyre failure. Ov er-inflation causes a
harsh ride, uneven tyre wear and poor
handling.
Pressure checks should only be
carried out when the tyres are cold,
and the vehicle has been stationary
for more than three hours. A hot tyre at or
below recommended cold inflation pressure is
dangerously under-inflated.