Interior JAGUAR XFR 2010 1.G Workshop Manual
[x] Cancel search | Manufacturer: JAGUAR, Model Year: 2010, Model line: XFR, Model: JAGUAR XFR 2010 1.GPages: 3039, PDF Size: 58.49 MB
Page 2836 of 3039

(414-01 Battery, Mounting and Cables, General Procedures).
6. Disconnect the generator electrical connectors.
7. Remove the windshield glass.
For additional information, refer to: Windshield Glass (501-11 Glass, Frames and Mechanisms, Removal and Installation).
8. Remove the rear window glass.
For additional information, refer to: Rear Window Glass (501-11 Glass, Frames and Mechanisms, Removal and Installation).
9. Remove the headliner.
For additional information, refer to: Headliner (501-05 Interior Trim and Ornamentation, Removal and Installation).
10. Remove the driver and passenger side front scuff plate trim panels.
For additional information, refer to: Front Scuff Plate Trim Panel (501-05 Interior Trim and Ornamentation, Removal and Installation).
11. Remove the driver and passenger side rear scuff plate trim panels.
For additional information, refer to: Rear Scuff Plate Trim Panel (501-05 Interior Trim and Ornamentation, Removal and Installation).
12. Remove the driver and passenger side air curtain modules.
For additional information, refer to: Side Air Curtain Module (501-20B Supplemental Restraint System, Removal and Installation).
13. Remove the rear seat backrest.
14. Remove the driver and passenger side rear safety belt retractors.
For additional information, refer to: Rear Safety Belt Retractor (501-20A Safety Belt System, Removal and Installation).
15. Remove the rear center safety belt retractor.
For additional information, refer to: Rear Center Safety Belt Retractor (501-20A Safety Belt System, Removal and Installation).
16. Remove the driver and passenger side RF filters.
17. Remove the diversity antenna module.
18. Remove the antenna.
For additional information, refer to: Navigation System Antenna (419-07 Navigation System, Removal and Installation).
19. Release and position the roof wiring harnesses to one side
20. Remove the driver and passenger side roof mouldings.
21. Drill out the spot welds.
Page 2893 of 3039

Interior Trim and Ornamentation, Removal and Installation).
9. Remove the front safety belt retractor.
For additional information, refer to: Front Safety Belt Retractor (501-20A Safety Belt System, Removal and Installation).
10. Remove the B-pillar side impact sensor.
For additional information, refer to: B-Pillar Side Impact Sensor (501-20B Supplemental Restraint System, Removal and Installation).
11. Remove the C-pillar side impact sensor.
For additional information, refer to: C-Pillar Side Impact Sensor (501-20B Supplemental Restraint System, Removal and Installation).
12. Release and position the floor covering to one side.
13. Release and position the inner rocker panel wiring harness to one side.
14. Remove the rear wheel and tire.
For additional information, refer to: Wheel and Tire (204-04 Wheels and Tires, Removal and Installation).
15. Remove the rear fender splash shield.
16.
Remove the rocker panel outer moulding.
17. Remove the underfloor splash shield.
18. If the right-hand rocker panel is to be repaired, release and position the
underfloor wiring harness to one side.
19. Remove the front fender.
For additional information, refer to: Front Fender (501-27 Front End Sheet Metal Repairs, Removal and Installation).
20. Remove the front door.
Page 2903 of 3039

and Installation).
5. Disconnect the generator electrical connectors.
6. Remove the right-hand and left-hand front scuff plate trim panels.
For additional information, refer to: Front Scuff Plate Trim Panel (501-05 Interior Trim and Ornamentation, Removal and Installation).
7. Remove the front and rear door weatherstrips.
8. Remove the right-hand and left-hand rear scuff plate trim panels.
For additional information, refer to: Rear Scuff Plate Trim Panel (501-05 Interior Trim and Ornamentation, Removal and Installation).
9. Remove the headliner.
For additional information, refer to: Headliner (501-05 Interior Trim and Ornamentation, Removal and Installation).
10. Remove the side air curtain module.
For additional information, refer to: Side Air Curtain Module (501-20B Supplemental Restraint System, Removal and Installation).
11. Remove the rear seat cushion.
For additional information, refer to: Rear Seat Cushion (501-10 Seating, Removal and Installation).
12. Remove the rear seat backrest.
13. Release and position the roof wiring harness to one side.
14. Remove the roof moulding.
15. Remove the cowl side trim panel.
For additional information, refer to: Cowl Side Trim Panel (501-05 Interior Trim and Ornamentation, Removal and Installation).
16. Remove the front safety belt retractor.
For additional information, refer to: Front Safety Belt Retractor (501-20A Safety Belt System, Removal and Installation).
17. Remove the B-pillar side impact sensor.
For additional information, refer to: B-Pillar Side Impact Sensor (501-20B Supplemental Restraint System, Removal and Installation).
18. Remove the C-pillar side impact sensor.
For additional information, refer to: C-Pillar Side Impact Sensor (501-20B Supplemental Restraint System, Removal and Installation).
19. Release and position the floor covering to one side.
20. Release and position the inner rocker panel wiring harness to one side.
21. Remove the rear wheel and tire.
For additional information, refer to: Wheel and Tire (204-04 Wheels and
Page 2916 of 3039

Interior Trim and Ornamentation, Removal and Installation).
9. Remove the front safety belt retractor.
For additional information, refer to: Front Safety Belt Retractor (501-20A Safety Belt System, Removal and Installation).
10. Remove the B-pillar side impact sensor.
For additional information, refer to: B-Pillar Side Impact Sensor (501-20B Supplemental Restraint System, Removal and Installation).
11. Remove the C-pillar side impact sensor.
For additional information, refer to: C-Pillar Side Impact Sensor (501-20B Supplemental Restraint System, Removal and Installation).
12. Release and position the floor covering to one side.
13. Release and position the inner rocker panel wiring harness to one side.
14. Remove the rocker panel outer moulding.
15. Remove the underfloor splash shield.
16. If the right-hand rocker panel front section is to be repaired, release and
position the underfloor wiring harness to one side.
17. Remove the front fender.
For additional information, refer to: Front Fender (501-27 Front End Sheet Metal Repairs, Removal and Installation).
18. Remove the front door.
For additional information, refer to: Front Door (501-03 Body Closures, Removal and Installation).
19. Remove the rear door.
For additional information, refer to: Rear Door (501-03 Body Closures, Removal and Installation).
20. Cut the new rocker panel front section from the new rocker panel service
panel.
Page 2932 of 3039

Interior Trim and Ornamentation, Removal and Installation).
9. Remove the front safety belt retractor.
For additional information, refer to: Front Safety Belt Retractor (501-20A Safety Belt System, Removal and Installation).
10. Remove the B-pillar side impact sensor.
For additional information, refer to: B-Pillar Side Impact Sensor (501-20B Supplemental Restraint System, Removal and Installation).
11. Remove the C-pillar side impact sensor.
For additional information, refer to: C-Pillar Side Impact Sensor (501-20B Supplemental Restraint System, Removal and Installation).
12. Release and position the floor covering to one side.
13. Release and position the inner rocker panel wiring harness to one side.
14. Remove the rear wheel and tire.
For additional information, refer to: Wheel and Tire (204-04 Wheels and Tires, Removal and Installation).
15. Remove the rear fender splash shield.
16.
Remove the rocker panel outer moulding.
17. Remove the underfloor splash shield.
18. If the right-hand rocker panel rear section is to be repaired, release and
position the underfloor wiring harness to one side.
19. Remove the front door.
For additional information, refer to: Front Door (501-03 Body Closures, Removal and Installation).
20. Remove the rear door.
Page 2943 of 3039
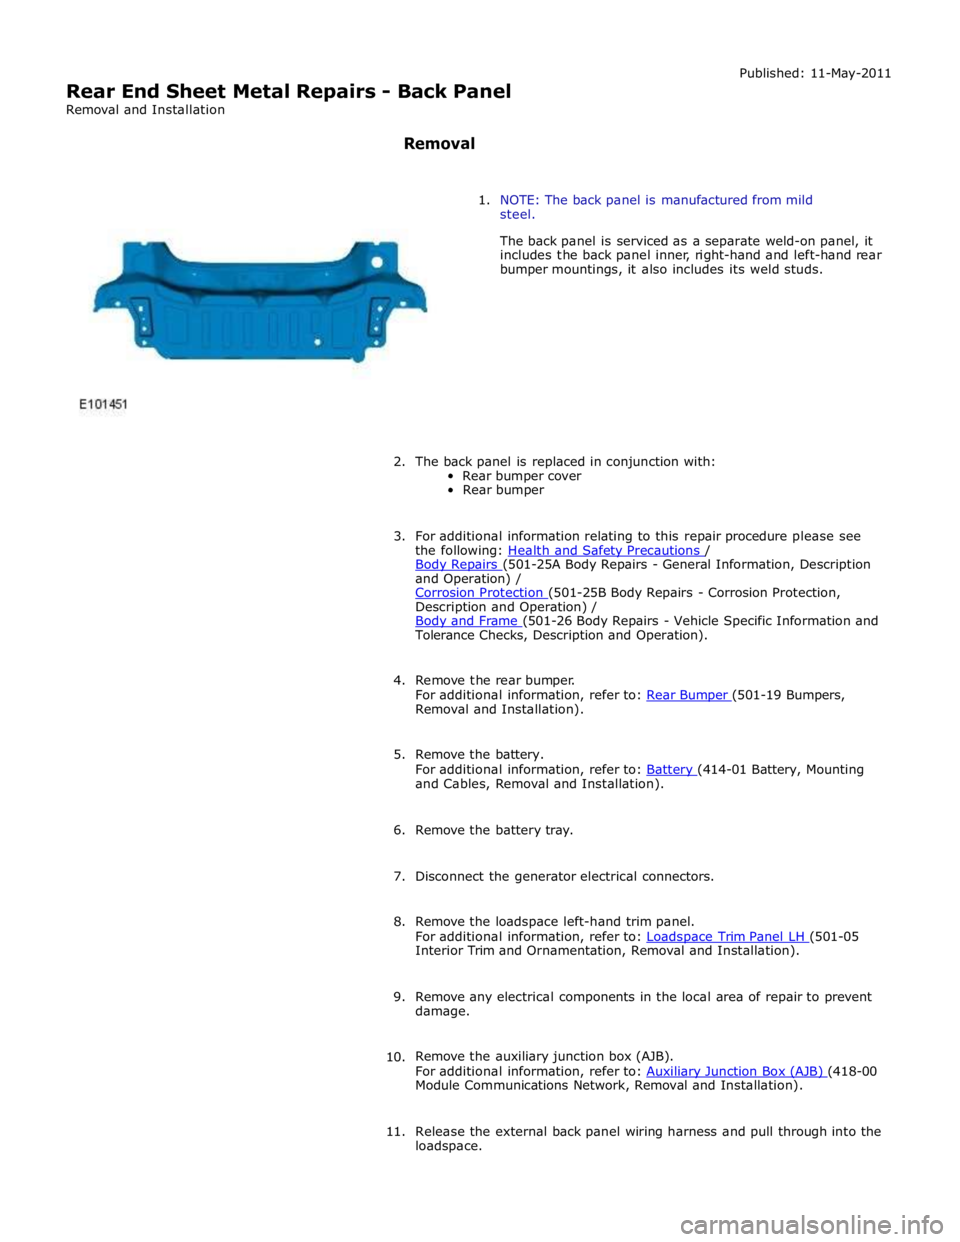
Rear End Sheet Metal Repairs - Back Panel
Removal and Installation
Removal Published: 11-May-2011
1. NOTE: The back panel is manufactured from mild
steel.
The back panel is serviced as a separate weld-on panel, it
includes the back panel inner, right-hand and left-hand rear
bumper mountings, it also includes its weld studs.
2. The back panel is replaced in conjunction with:
Rear bumper cover
Rear bumper
3. For additional information relating to this repair procedure please see
the following: Health and Safety Precautions / Body Repairs (501-25A Body Repairs - General Information, Description and Operation) /
Corrosion Protection (501-25B Body Repairs - Corrosion Protection, Description and Operation) /
Body and Frame (501-26 Body Repairs - Vehicle Specific Information and Tolerance Checks, Description and Operation).
4. Remove the rear bumper.
For additional information, refer to: Rear Bumper (501-19 Bumpers, Removal and Installation).
5. Remove the battery.
For additional information, refer to: Battery (414-01 Battery, Mounting and Cables, Removal and Installation).
6. Remove the battery tray.
7. Disconnect the generator electrical connectors.
8. Remove the loadspace left-hand trim panel.
For additional information, refer to: Loadspace Trim Panel LH (501-05 Interior Trim and Ornamentation, Removal and Installation).
9. Remove any electrical components in the local area of repair to prevent
damage.
10. Remove the auxiliary junction box (AJB).
For additional information, refer to: Auxiliary Junction Box (AJB) (418-00 Module Communications Network, Removal and Installation).
11. Release the external back panel wiring harness and pull through into the
loadspace.
Page 2944 of 3039
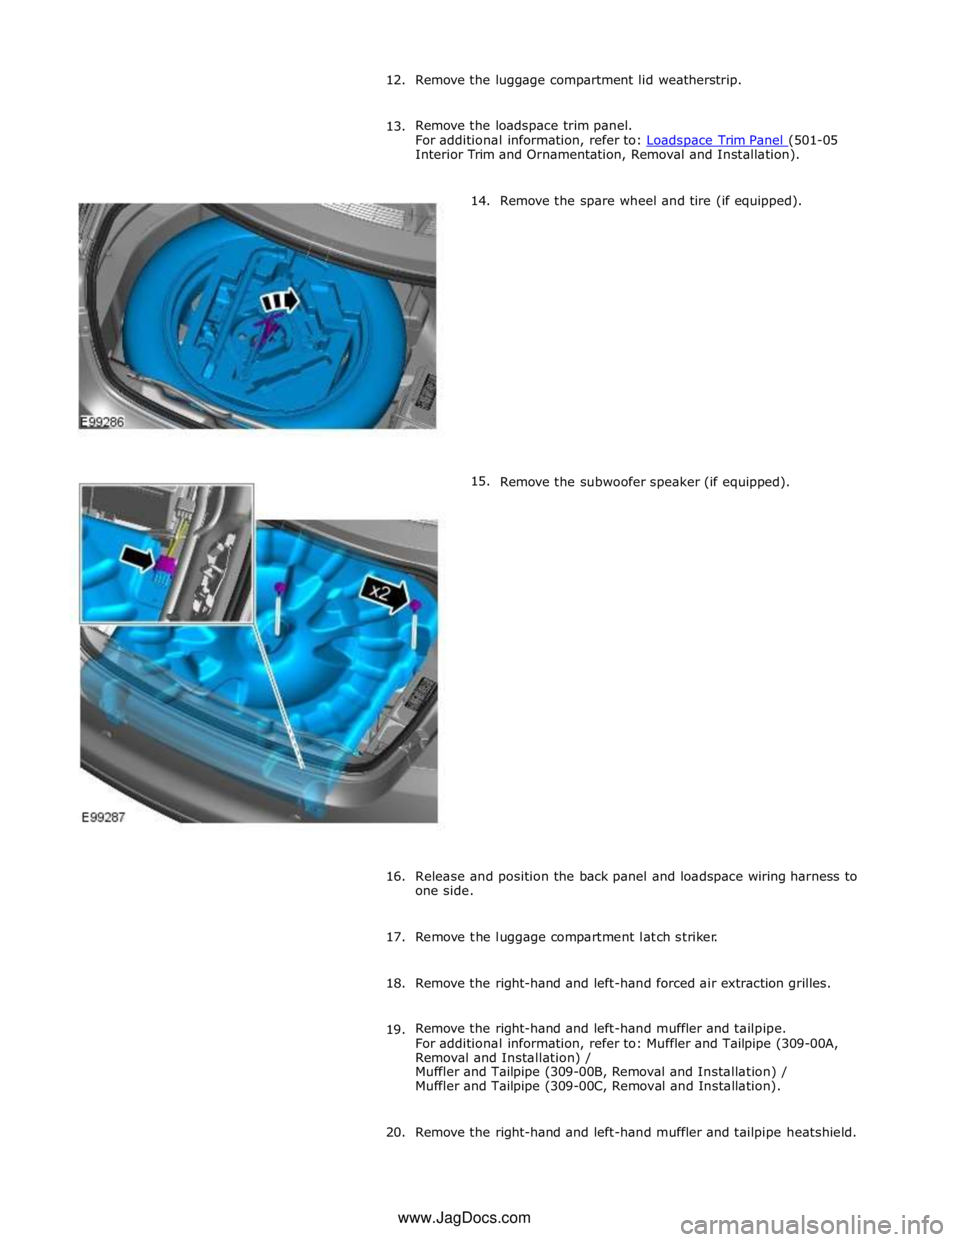
Interior Trim and Ornamentation, Removal and Installation).
14.
15. Remove the spare wheel and tire (if equipped).
Remove the subwoofer speaker (if equipped).
16.
Release and position the back panel and loadspace wiring harness to
one side.
17. Remove the luggage compartment latch striker.
18. Remove the right-hand and left-hand forced air extraction grilles.
19. Remove the right-hand and left-hand muffler and tailpipe.
For additional information, refer to: Muffler and Tailpipe (309-00A,
Removal and Installation) /
Muffler and Tailpipe (309-00B, Removal and Installation) /
Muffler and Tailpipe (309-00C, Removal and Installation).
20. Remove the right-hand and left-hand muffler and tailpipe heatshield. www.JagDocs.com
Page 2949 of 3039
Removal and Installation).
7. Remove the battery.
For additional information, refer to: Battery (414-01 Battery, Mounting and Cables, Removal and Installation).
8. Disconnect the generator electrical connectors.
9. If the left-hand rear quarter panel is to be repaired, remove the
loadspace left-hand trim panel.
For additional information, refer to: Loadspace Trim Panel LH (501-05 Interior Trim and Ornamentation, Removal and Installation).
10. If the right-hand rear quarter panel is to be repaired, remove the
auxiliary junction box (AJB).
For additional information, refer to: Auxiliary Junction Box (AJB) (418-00 Module Communications Network, Removal and Installation).
11. Remove any electrical components in the local area of repair to prevent
damage.
12. Remove the rear muffler.
For additional information, refer to: Rear Muffler (309-00C Exhaust System - V8 5.0L Petrol/V8 S/C 5.0L Petrol, Removal and Installation) /
Rear Muffler (309-00C Exhaust System - V8 5.0L Petrol/V8 S/C 5.0L Petrol, Removal and Installation) /
Rear Muffler (309-00C Exhaust System - V8 5.0L Petrol/V8 S/C 5.0L Petrol, Removal and Installation).
13. Remove the exhaust muffler and tailpipe heatshield.
14. Remove the rear scuff plate trim panel.
For additional information, refer to: Rear Scuff Plate Trim Panel (501-05 Interior Trim and Ornamentation, Removal and Installation).
15. Remove the loadspace trim panel.
For additional information, refer to: Loadspace Trim Panel (501-05 Interior Trim and Ornamentation, Removal and Installation).
16. Remove the forced air extraction grille.
17. Release and lay aside the back panel and loadspace wiring harness.
18. Remove the luggage compartment lid weatherstrip.
19. Remove the rear bumper cover side retainer.
20. Remove the roof moulding.
21. Remove the headliner.
For additional information, refer to: Headliner (501-05 Interior Trim and Ornamentation, Removal and Installation).
22. Remove the side air curtain module.
www.JagDocs.com
Page 3014 of 3039
Published: 31-Jul-2013
Uni-Body, Subframe and Mounting System - Front Subframe V8 5.0L Petrol/V8 S/C 5.0L Petrol
Removal and Installation
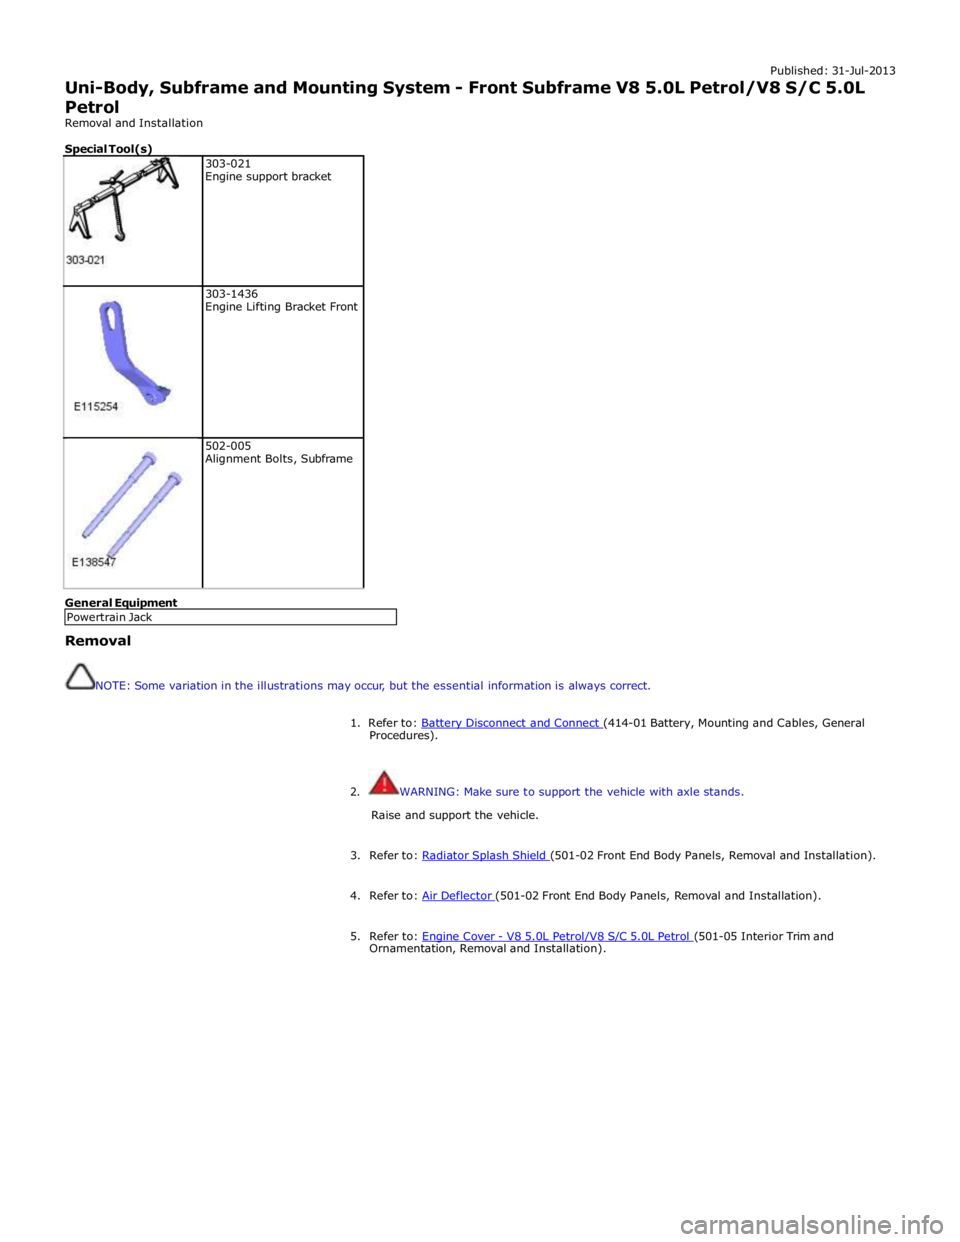
Special Tool(s)
303-021
Engine support bracket
303-1436
Engine Lifting Bracket Front
502-005
Alignment Bolts, Subframe General Equipment
Removal
NOTE: Some variation in the illustrations may occur, but the essential information is always correct.
1. Refer to: Battery Disconnect and Connect (414-01 Battery, Mounting and Cables, General Procedures).
2. WARNING: Make sure to support the vehicle with axle stands.
Raise and support the vehicle.
3. Refer to: Radiator Splash Shield (501-02 Front End Body Panels, Removal and Installation). 4. Refer to: Air Deflector (501-02 Front End Body Panels, Removal and Installation). 5. Refer to: Engine Cover - V8 5.0L Petrol/V8 S/C 5.0L Petrol (501-05 Interior Trim and Ornamentation, Removal and Installation). Powertrain Jack
Page 3031 of 3039
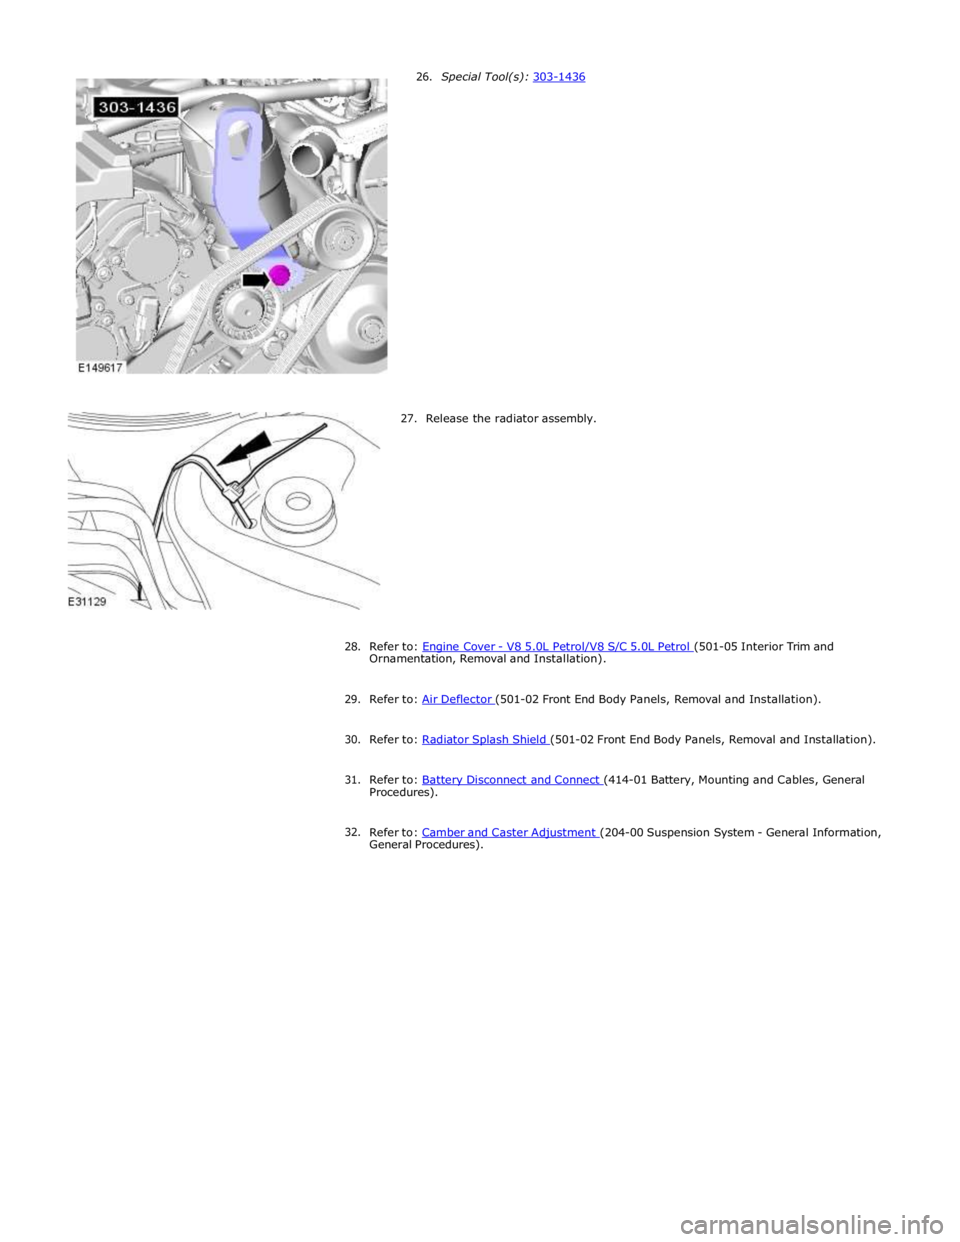
27. Release the radiator assembly.
28.
Refer to: Engine Cover - V8 5.0L Petrol/V8 S/C 5.0L Petrol (501-05 Interior Trim and Ornamentation, Removal and Installation).
29. Refer to: Air Deflector (501-02 Front End Body Panels, Removal and Installation). 30. Refer to: Radiator Splash Shield (501-02 Front End Body Panels, Removal and Installation). 31. Refer to: Battery Disconnect and Connect (414-01 Battery, Mounting and Cables, General Procedures).
32.
Refer to: Camber and Caster Adjustment (204-00 Suspension System - General Information, General Procedures).