Bolt JAGUAR XFR 2010 1.G Service Manual
[x] Cancel search | Manufacturer: JAGUAR, Model Year: 2010, Model line: XFR, Model: JAGUAR XFR 2010 1.GPages: 3039, PDF Size: 58.49 MB
Page 536 of 3039
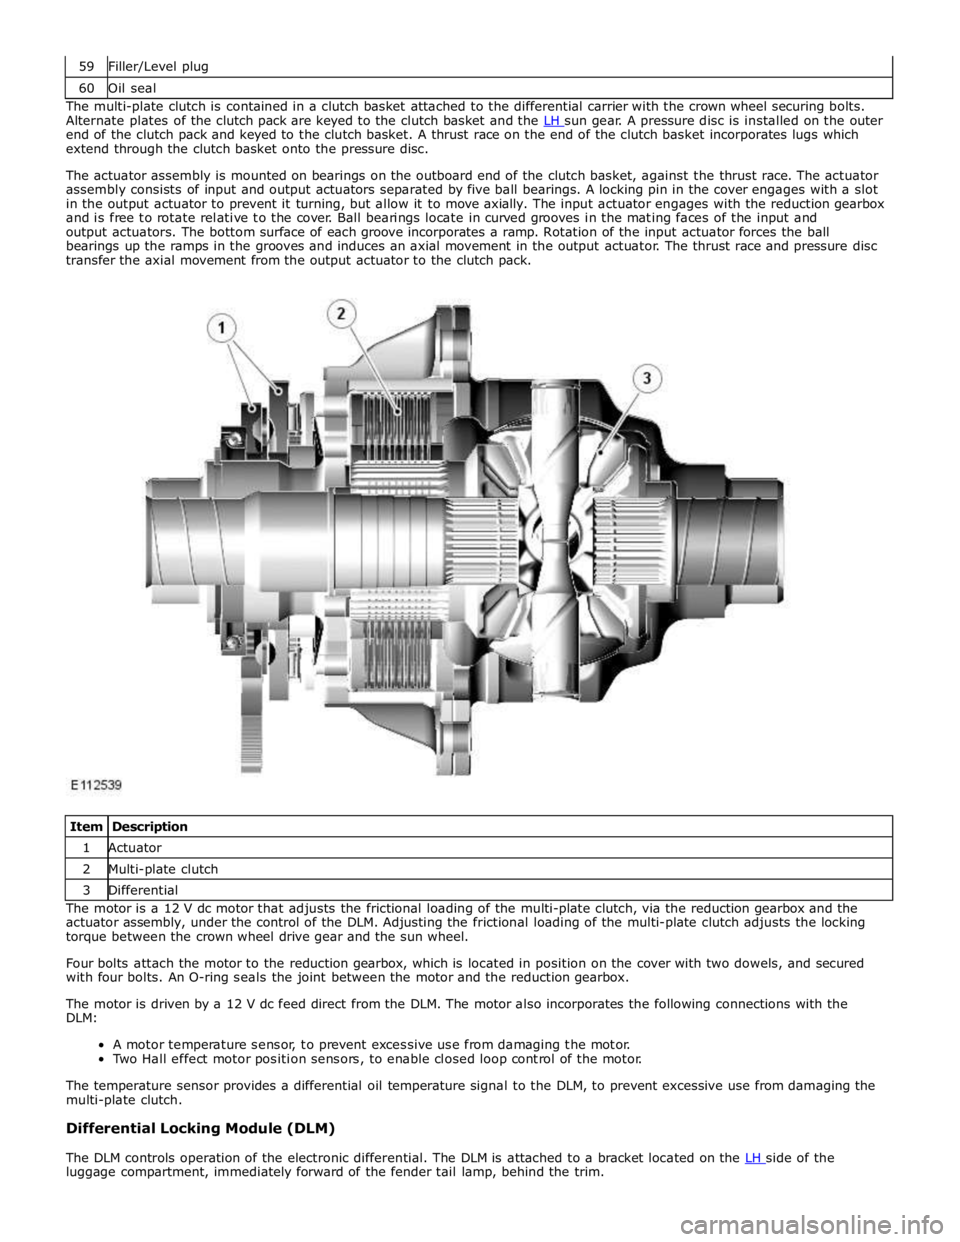
60 Oil seal The multi-plate clutch is contained in a clutch basket attached to the differential carrier with the crown wheel securing bolts.
Alternate plates of the clutch pack are keyed to the clutch basket and the LH sun gear. A pressure disc is installed on the outer end of the clutch pack and keyed to the clutch basket. A thrust race on the end of the clutch basket incorporates lugs which
extend through the clutch basket onto the pressure disc.
The actuator assembly is mounted on bearings on the outboard end of the clutch basket, against the thrust race. The actuator
assembly consists of input and output actuators separated by five ball bearings. A locking pin in the cover engages with a slot
in the output actuator to prevent it turning, but allow it to move axially. The input actuator engages with the reduction gearbox
and is free to rotate relative to the cover. Ball bearings locate in curved grooves in the mating faces of the input and
output actuators. The bottom surface of each groove incorporates a ramp. Rotation of the input actuator forces the ball
bearings up the ramps in the grooves and induces an axial movement in the output actuator. The thrust race and pressure disc
transfer the axial movement from the output actuator to the clutch pack.
Item Description 1 Actuator 2 Multi-plate clutch 3 Differential The motor is a 12 V dc motor that adjusts the frictional loading of the multi-plate clutch, via the reduction gearbox and the
actuator assembly, under the control of the DLM. Adjusting the frictional loading of the multi-plate clutch adjusts the locking
torque between the crown wheel drive gear and the sun wheel.
Four bolts attach the motor to the reduction gearbox, which is located in position on the cover with two dowels, and secured
with four bolts. An O-ring seals the joint between the motor and the reduction gearbox.
The motor is driven by a 12 V dc feed direct from the DLM. The motor also incorporates the following connections with the
DLM:
A motor temperature sensor, to prevent excessive use from damaging the motor.
Two Hall effect motor position sensors, to enable closed loop control of the motor.
The temperature sensor provides a differential oil temperature signal to the DLM, to prevent excessive use from damaging the
multi-plate clutch.
Differential Locking Module (DLM)
The DLM controls operation of the electronic differential. The DLM is attached to a bracket located on the LH side of the luggage compartment, immediately forward of the fender tail lamp, behind the trim.
Page 583 of 3039
If the concern becomes evident during this check, verify it fits the description given before the road test. If the concern is not
evident, attempt to duplicate the condition using the information from the description.
If a concern exists, use the Symptom Chart in order to isolate it to a specific sub-system and condition description. From this
description, a list of possible sources can be used to further narrow the cause to a specific component or condition.
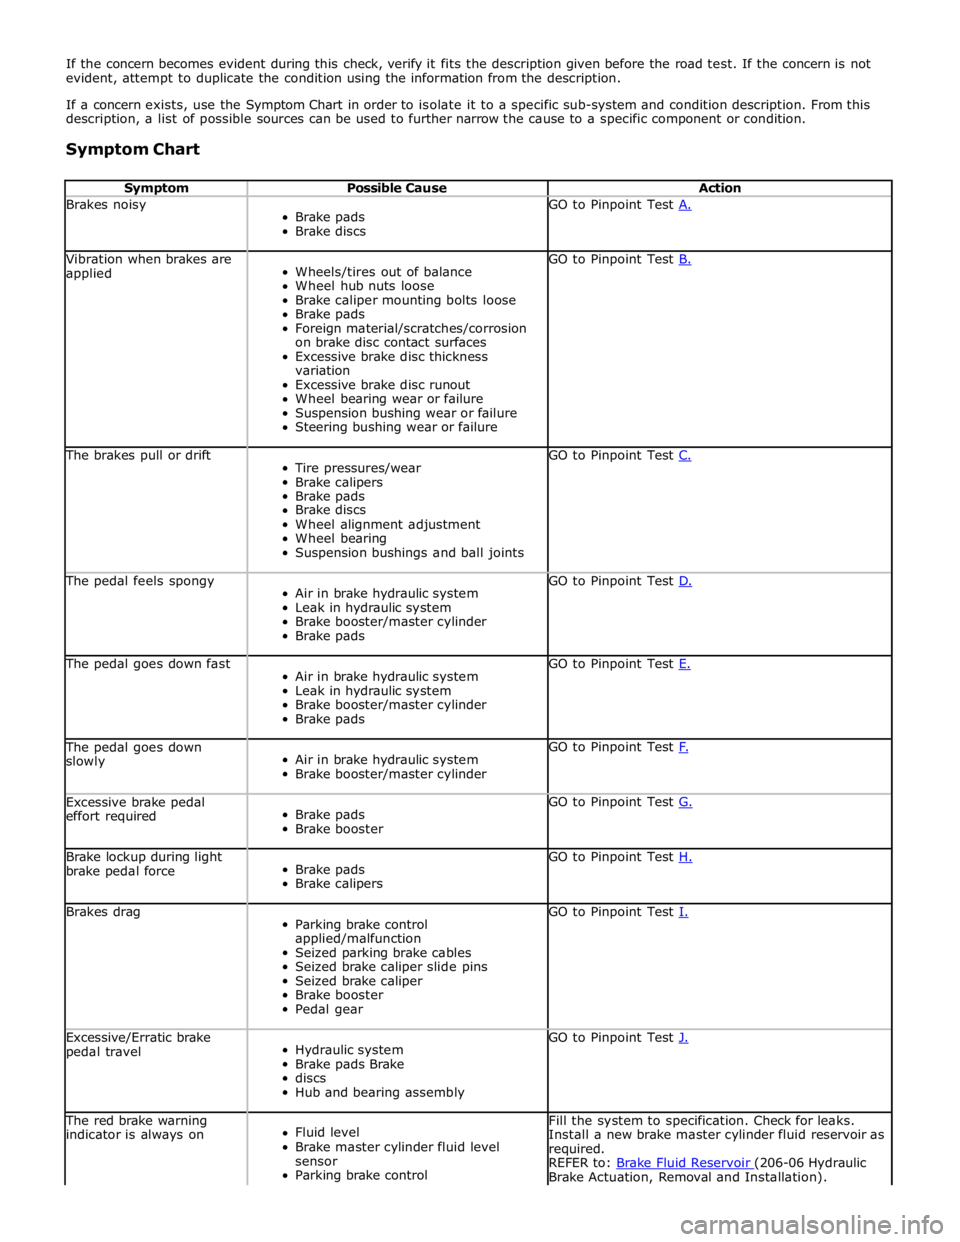
Symptom Chart
Symptom Possible Cause Action Brakes noisy
Brake pads
Brake discs GO to Pinpoint Test A. Vibration when brakes are
applied
Wheels/tires out of balance
Wheel hub nuts loose
Brake caliper mounting bolts loose
Brake pads
Foreign material/scratches/corrosion
on brake disc contact surfaces
Excessive brake disc thickness
variation
Excessive brake disc runout
Wheel bearing wear or failure
Suspension bushing wear or failure
Steering bushing wear or failure GO to Pinpoint Test B. The brakes pull or drift
Tire pressures/wear
Brake calipers
Brake pads
Brake discs
Wheel alignment adjustment
Wheel bearing
Suspension bushings and ball joints GO to Pinpoint Test C. The pedal feels spongy
Air in brake hydraulic system
Leak in hydraulic system
Brake booster/master cylinder
Brake pads GO to Pinpoint Test D. The pedal goes down fast
Air in brake hydraulic system
Leak in hydraulic system
Brake booster/master cylinder
Brake pads GO to Pinpoint Test E. The pedal goes down
slowly
Air in brake hydraulic system
Brake booster/master cylinder GO to Pinpoint Test F. Excessive brake pedal
effort required
Brake pads
Brake booster GO to Pinpoint Test G. Brake lockup during light
brake pedal force
Brake pads
Brake calipers GO to Pinpoint Test H. Brakes drag
Parking brake control
applied/malfunction
Seized parking brake cables
Seized brake caliper slide pins
Seized brake caliper
Brake booster
Pedal gear GO to Pinpoint Test I. Excessive/Erratic brake
pedal travel
Hydraulic system
Brake pads Brake
discs
Hub and bearing assembly GO to Pinpoint Test J. The red brake warning
indicator is always on
Fluid level
Brake master cylinder fluid level
sensor
Parking brake control Fill the system to specification. Check for leaks.
Install a new brake master cylinder fluid reservoir as
required.
REFER to: Brake Fluid Reservoir (206-06 Hydraulic Brake Actuation, Removal and Installation).
Page 584 of 3039
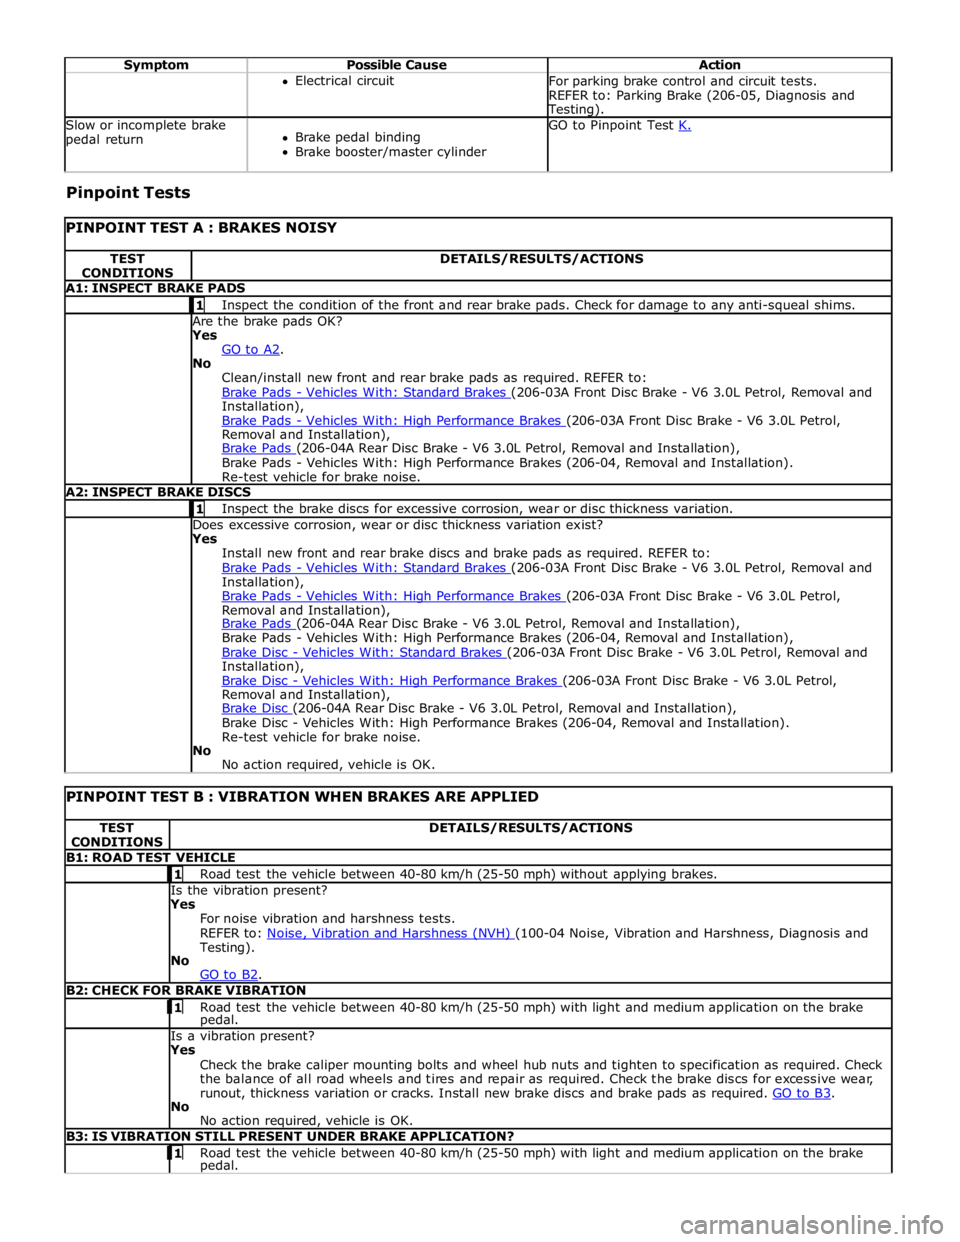
Symptom Possible Cause Action Electrical circuit
For parking brake control and circuit tests.
REFER to: Parking Brake (206-05, Diagnosis and Testing). Slow or incomplete brake
pedal return
Brake pedal binding
Brake booster/master cylinder GO to Pinpoint Test K. Pinpoint Tests
PINPOINT TEST A : BRAKES NOISY TEST
CONDITIONS DETAILS/RESULTS/ACTIONS A1: INSPECT BRAKE PADS 1 Inspect the condition of the front and rear brake pads. Check for damage to any anti-squeal shims. Are the brake pads OK? Yes
GO to A2. No
Clean/install new front and rear brake pads as required. REFER to:
Brake Pads - Vehicles With: Standard Brakes (206-03A Front Disc Brake - V6 3.0L Petrol, Removal and Installation),
Brake Pads - Vehicles With: High Performance Brakes (206-03A Front Disc Brake - V6 3.0L Petrol, Removal and Installation),
Brake Pads (206-04A Rear Disc Brake - V6 3.0L Petrol, Removal and Installation), Brake Pads - Vehicles With: High Performance Brakes (206-04, Removal and Installation).
Re-test vehicle for brake noise. A2: INSPECT BRAKE DISCS 1 Inspect the brake discs for excessive corrosion, wear or disc thickness variation. Does excessive corrosion, wear or disc thickness variation exist? Yes
Install new front and rear brake discs and brake pads as required. REFER to:
Brake Pads - Vehicles With: Standard Brakes (206-03A Front Disc Brake - V6 3.0L Petrol, Removal and Installation),
Brake Pads - Vehicles With: High Performance Brakes (206-03A Front Disc Brake - V6 3.0L Petrol, Removal and Installation),
Brake Pads (206-04A Rear Disc Brake - V6 3.0L Petrol, Removal and Installation), Brake Pads - Vehicles With: High Performance Brakes (206-04, Removal and Installation),
Brake Disc - Vehicles With: Standard Brakes (206-03A Front Disc Brake - V6 3.0L Petrol, Removal and Installation),
Brake Disc - Vehicles With: High Performance Brakes (206-03A Front Disc Brake - V6 3.0L Petrol, Removal and Installation),
Brake Disc (206-04A Rear Disc Brake - V6 3.0L Petrol, Removal and Installation), Brake Disc - Vehicles With: High Performance Brakes (206-04, Removal and Installation).
Re-test vehicle for brake noise.
No
No action required, vehicle is OK.
PINPOINT TEST B : VIBRATION WHEN BRAKES ARE APPLIED TEST
CONDITIONS DETAILS/RESULTS/ACTIONS B1: ROAD TEST VEHICLE 1 Road test the vehicle between 40-80 km/h (25-50 mph) without applying brakes. Is the vibration present?
Yes
For noise vibration and harshness tests.
REFER to: Noise, Vibration and Harshness (NVH) (100-04 Noise, Vibration and Harshness, Diagnosis and Testing).
No
GO to B2. B2: CHECK FOR BRAKE VIBRATION 1 Road test the vehicle between 40-80 km/h (25-50 mph) with light and medium application on the brake pedal. Is a vibration present?
Yes
Check the brake caliper mounting bolts and wheel hub nuts and tighten to specification as required. Check
the balance of all road wheels and tires and repair as required. Check the brake discs for excessive wear,
runout, thickness variation or cracks. Install new brake discs and brake pads as required. GO to B3. No
No action required, vehicle is OK. B3: IS VIBRATION STILL PRESENT UNDER BRAKE APPLICATION? 1 Road test the vehicle between 40-80 km/h (25-50 mph) with light and medium application on the brake pedal.
Page 591 of 3039

Non Pressure Leaks
Any reduced fluid volume in the brake master cylinder reservoir may be caused by two types of none pressure external leaks.
Type 1: An external leak may occur at the brake master cylinder reservoir cap because of incorrect positioning of the gasket
and cap. Reposition cap and gasket.
Type 2: An external leak may occur at the brake master cylinder reservoir mounting seals. Repair such a leak by installing new
seals and make sure that the brake master cylinder reservoir retaining bolt is correctly installed.
Page 597 of 3039
Published: 17-Feb-2012
Brake System - General Information - Front Brake Disc Runout Check - With
Wheel On Vehicles With: High Performance Brakes
General Procedures
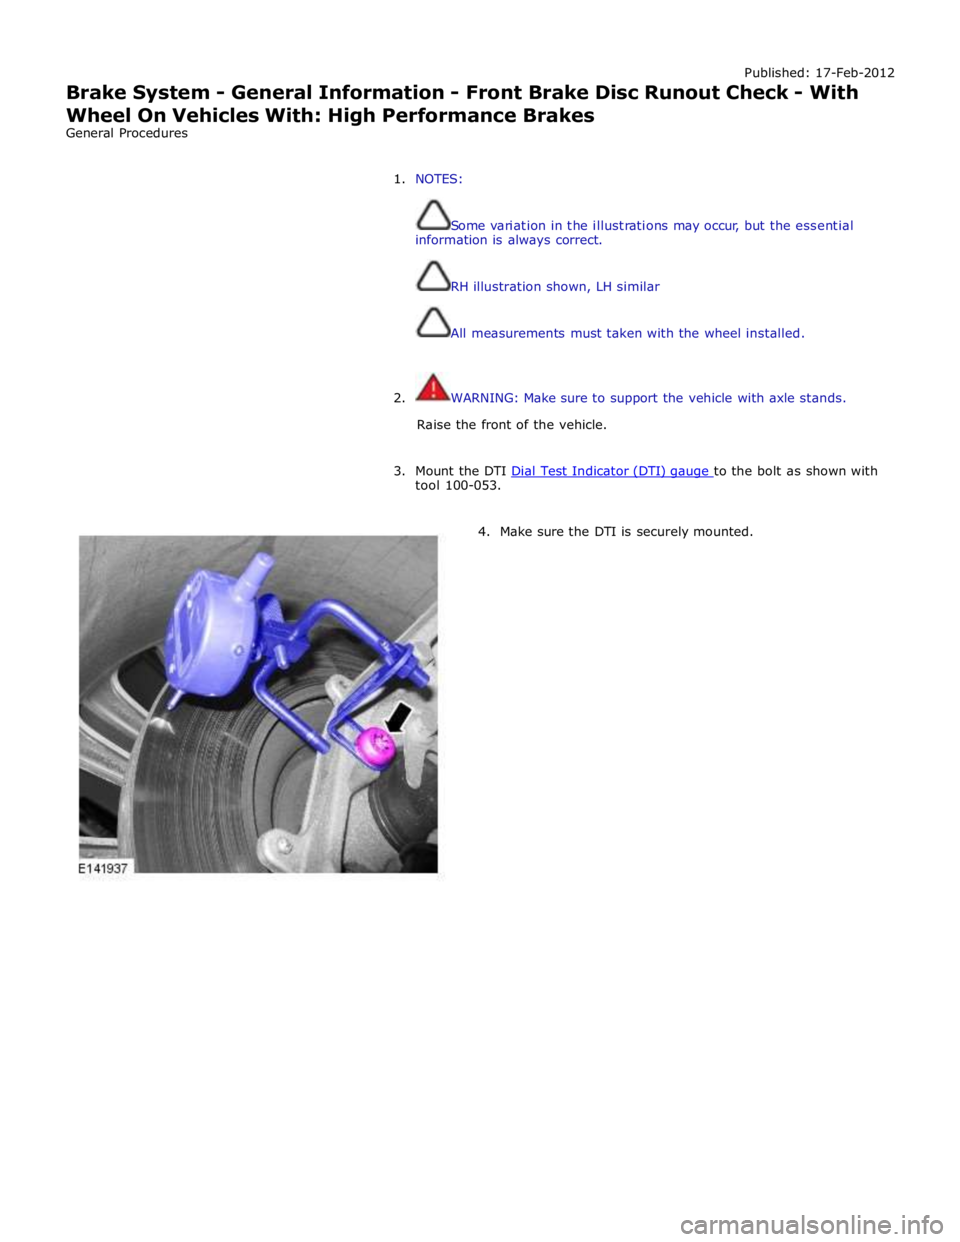
1. NOTES:
Some variation in the illustrations may occur, but the essential
information is always correct.
RH illustration shown, LH similar
All measurements must taken with the wheel installed.
2. WARNING: Make sure to support the vehicle with axle stands.
Raise the front of the vehicle.
3. Mount the DTI Dial Test Indicator (DTI) gauge to the bolt as shown with tool 100-053.
4. Make sure the DTI is securely mounted.
Page 601 of 3039
Published: 27-Feb-2012
Brake System - General Information - Rear Brake Disc Runout Check - With
Wheel On
General Procedures
1. NOTES:
Some variation in the illustrations may occur, but the essential
information is always correct.
RH illustration shown, LH similar.
All measurements must be taken with the wheel installed.
2. WARNING: Make sure to support the vehicle with axle stands.
Raise the rear of the vehicle.
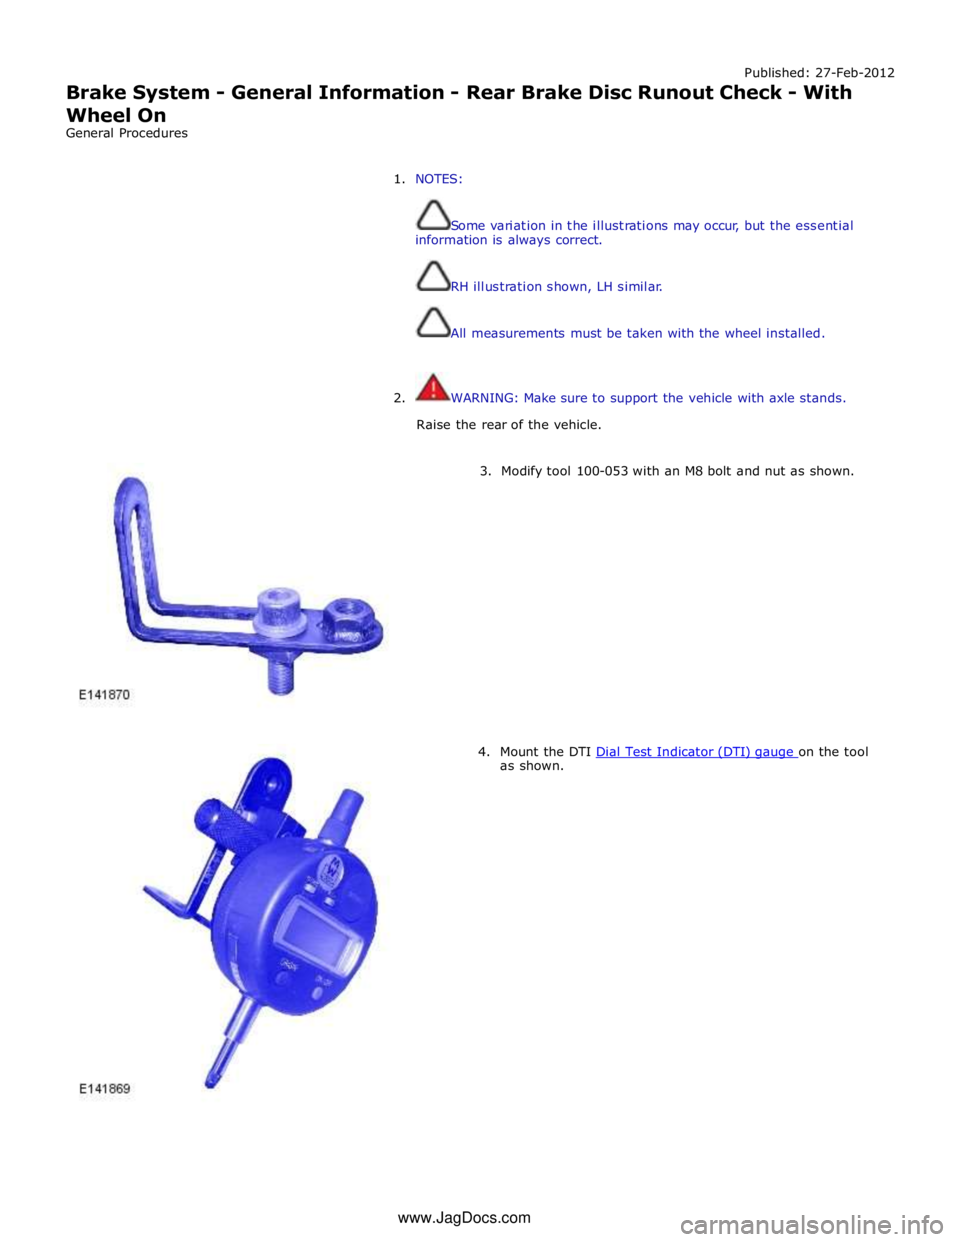
3. Modify tool 100-053 with an M8 bolt and nut as shown.
4. Mount the DTI Dial Test Indicator (DTI) gauge on the tool as shown. www.JagDocs.com
Page 605 of 3039

Brake caliper anchor plate retaining bolts 115 85 - Brake caliper retaining bolts 58 43 - Brake hose retaining bolt 42 31 -
Page 607 of 3039

1 Brake pad wear sensor 2 Caliper body 3 Anti-rattle spring 4 Piston (2 off) 5 Piston seal (2 off) 6 Piston dust cover (2 off) 7 Inboard brake pad 8 Outboard brake pad 9 Retaining washer (2 off) 10 Brake disc 11 Rivet (2 off) 12 Heat shield 13 Front wheel knuckle/hub and bearing assembly 14 Caliper bolt (2 off) 15 Caliper carrier 16 Guide pin dust cover (2 off) 17 Guide pin bush (2 off) 18 Guide pin (2 off) 19 Bleed screw 20 Bleed screw dust cap
Page 610 of 3039
BRAKE CALIPERS System Operation
When hydraulic pressure is supplied to the caliper, the pistons extend to force the inner pad against the brake disc. The caliper
reacts and slides along two guide pins to bring the outer pad into contact with the brake disc.
BRAKE PAD WEAR SENSORS
When a brake pad incorporating a brake pad wear sensor is approximately 75% worn, the sensor wire within the pad material
is worn through and the brake pad wear sensor goes open circuit. When the instrument cluster detects the open circuit, it
illuminates the amber LED (light emitting diode) in the brake warning indicator, displays an appropriate warning in the
message center and sounds a warning chime.
Refer to: Instrument Cluster (413-01 Instrument Cluster, Description and Operation).
NOTE: A new pad wear sensor lead must be fitted whenever the brake pads are changed, irrespective of the brake pad
warning sensor being triggered.
BRAKE CALIPERS Component Description
Each caliper is mounted within a fixed carrier that is secured to the front wheel knuckle with two bolts. The inboard brake pad
of the LH (left-hand) brake incorporates a wear sensor.
Each outboard brake pad is installed with a pressed steel anti-rattle spring. On SC (supercharger) vehicles, a badge with the
'R' symbol is formed on the anti-rattle spring.
BRAKE PAD WEAR SENSORS
The brake pad wear sensor is wired in series with a wear sensor on the RH (right-hand) rear brake and the instrument cluster.
If the thickness of one of the brake pads connected to a wear sensor decreases to a predetermined limit, the instrument
cluster illuminates the brake warning indicator.
Page 627 of 3039

Brake hose to brake caliper 42 31 - Brake caliper anchor plate 103 76 - Brake caliper retaining bolts 28 21 - Brake caliper logo badge retaining bolts - Vehicles with high performance brakes 10 7 -