Bolt JAGUAR XFR 2010 1.G Repair Manual
[x] Cancel search | Manufacturer: JAGUAR, Model Year: 2010, Model line: XFR, Model: JAGUAR XFR 2010 1.GPages: 3039, PDF Size: 58.49 MB
Page 629 of 3039

1 Retaining washer (2 off) 2 Brake disc 3 Rivet (3 off) 4 Brake dust shield 5 Rear wheel knuckle/hub and bearing assembly 6 Caliper carrier bolt (2 off) 7 Brake pad wear sensor 8 Guide pin dust cover (2 off) 9 Guide pin bush (2 off) 10 Guide pin (2 off) 11 Caliper carrier 12 Brake caliper housing 13 Piston 14 Piston dust cover 15 Inboard brake pad and shim 16 Outboard brake pad 17 Anti-rattle spring 18 Bleed screw 19 Bleed screw dust cap 20 Knurled pin 21 Parking brake lever 22 Parking brake return spring
Page 632 of 3039
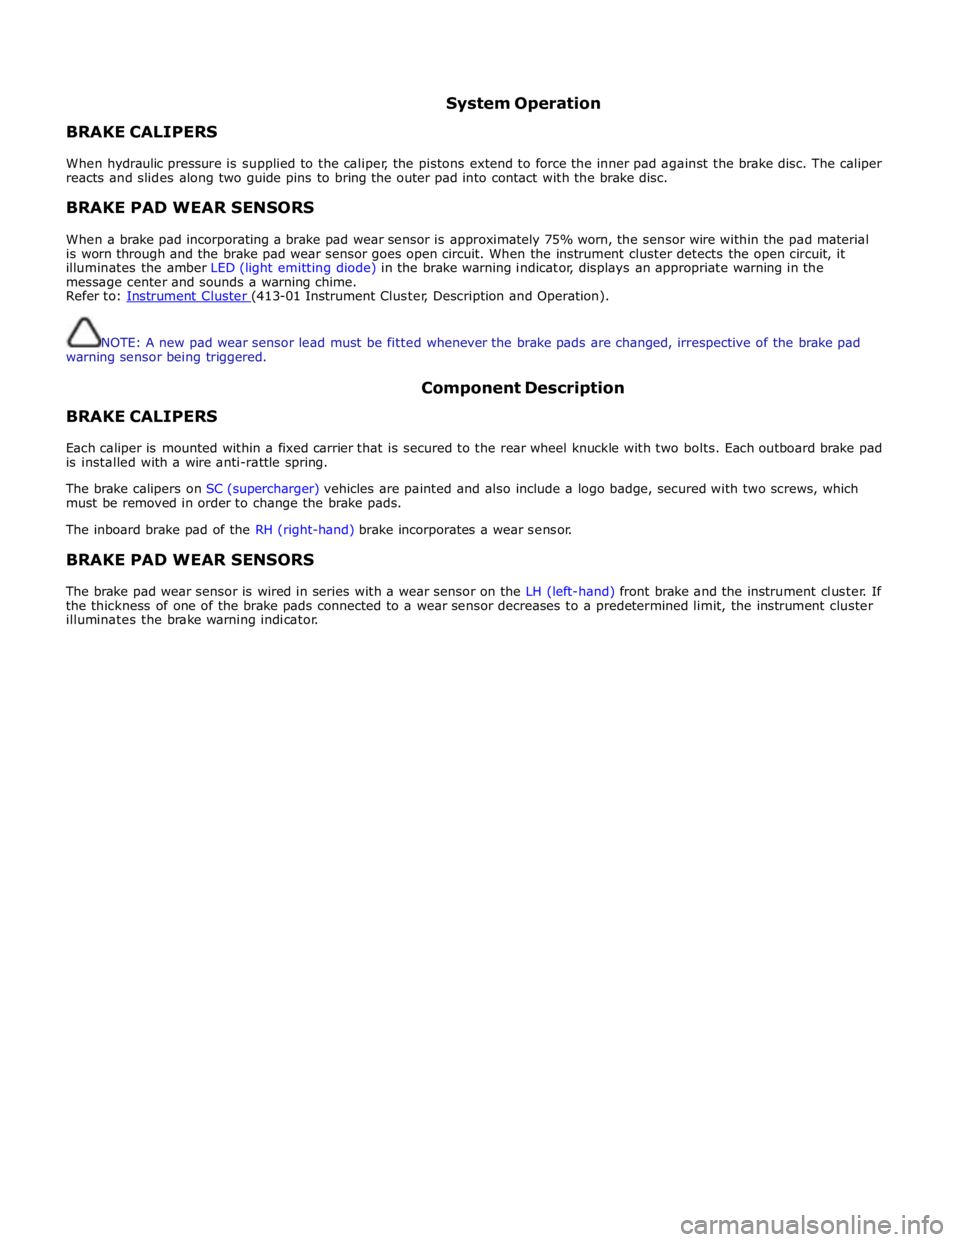
BRAKE CALIPERS System Operation
When hydraulic pressure is supplied to the caliper, the pistons extend to force the inner pad against the brake disc. The caliper
reacts and slides along two guide pins to bring the outer pad into contact with the brake disc.
BRAKE PAD WEAR SENSORS
When a brake pad incorporating a brake pad wear sensor is approximately 75% worn, the sensor wire within the pad material
is worn through and the brake pad wear sensor goes open circuit. When the instrument cluster detects the open circuit, it
illuminates the amber LED (light emitting diode) in the brake warning indicator, displays an appropriate warning in the
message center and sounds a warning chime.
Refer to: Instrument Cluster (413-01 Instrument Cluster, Description and Operation).
NOTE: A new pad wear sensor lead must be fitted whenever the brake pads are changed, irrespective of the brake pad
warning sensor being triggered.
BRAKE CALIPERS Component Description
Each caliper is mounted within a fixed carrier that is secured to the rear wheel knuckle with two bolts. Each outboard brake pad
is installed with a wire anti-rattle spring.
The brake calipers on SC (supercharger) vehicles are painted and also include a logo badge, secured with two screws, which
must be removed in order to change the brake pads.
The inboard brake pad of the RH (right-hand) brake incorporates a wear sensor.
BRAKE PAD WEAR SENSORS
The brake pad wear sensor is wired in series with a wear sensor on the LH (left-hand) front brake and the instrument cluster. If
the thickness of one of the brake pads connected to a wear sensor decreases to a predetermined limit, the instrument cluster
illuminates the brake warning indicator.
Page 638 of 3039
Published: 11-May-2011
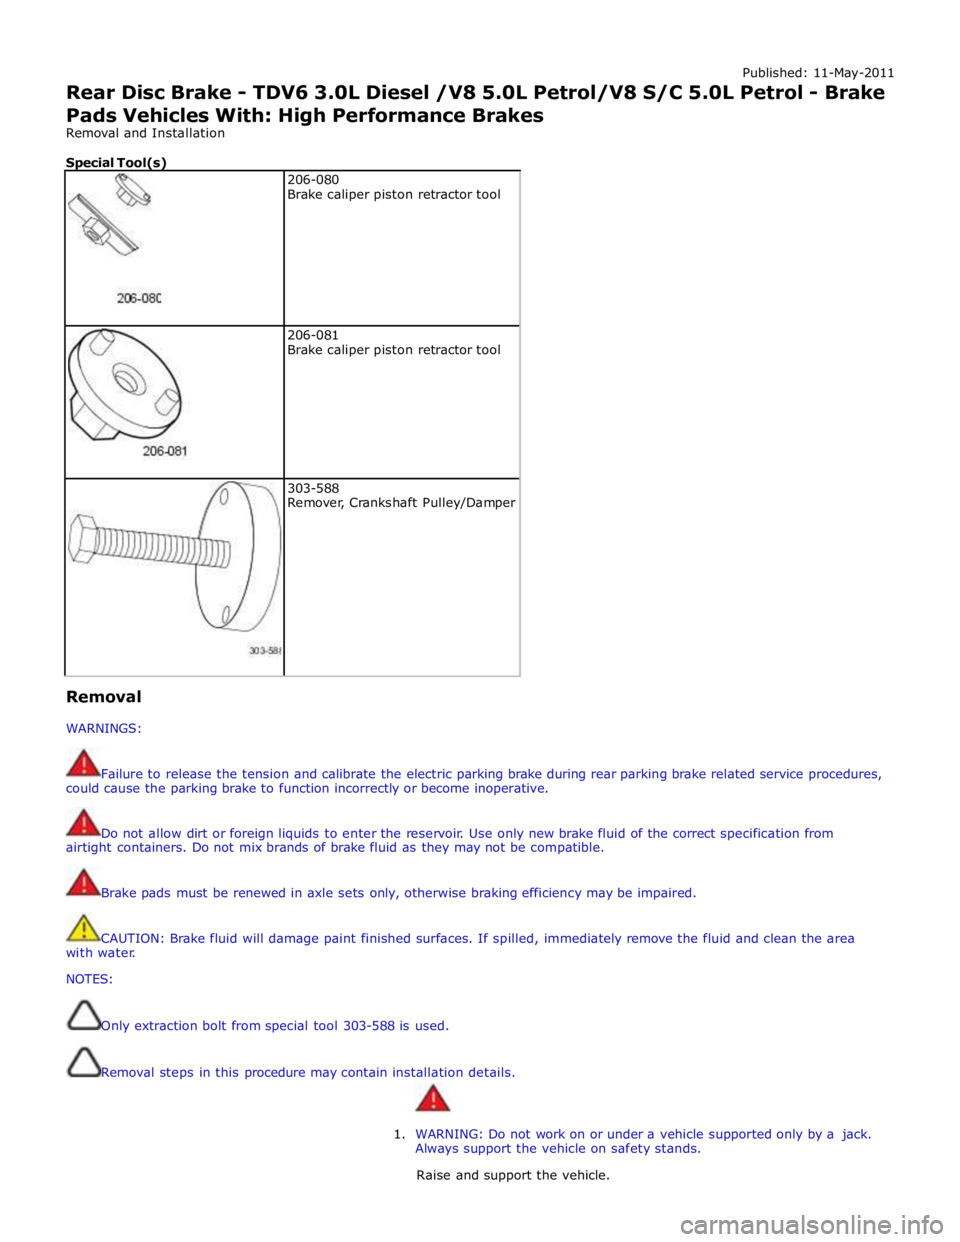
Rear Disc Brake - TDV6 3.0L Diesel /V8 5.0L Petrol/V8 S/C 5.0L Petrol - Brake
Pads Vehicles With: High Performance Brakes
Removal and Installation
Special Tool(s)
206-080
Brake caliper piston retractor tool
206-081
Brake caliper piston retractor tool
303-588
Remover, Crankshaft Pulley/Damper Removal
WARNINGS:
Failure to release the tension and calibrate the electric parking brake during rear parking brake related service procedures,
could cause the parking brake to function incorrectly or become inoperative.
Do not allow dirt or foreign liquids to enter the reservoir. Use only new brake fluid of the correct specification from
airtight containers. Do not mix brands of brake fluid as they may not be compatible.
Brake pads must be renewed in axle sets only, otherwise braking efficiency may be impaired.
CAUTION: Brake fluid will damage paint finished surfaces. If spilled, immediately remove the fluid and clean the area
with water.
NOTES:
Only extraction bolt from special tool 303-588 is used.
Removal steps in this procedure may contain installation details.
1. WARNING: Do not work on or under a vehicle supported only by a jack.
Always support the vehicle on safety stands.
Raise and support the vehicle.
Page 644 of 3039
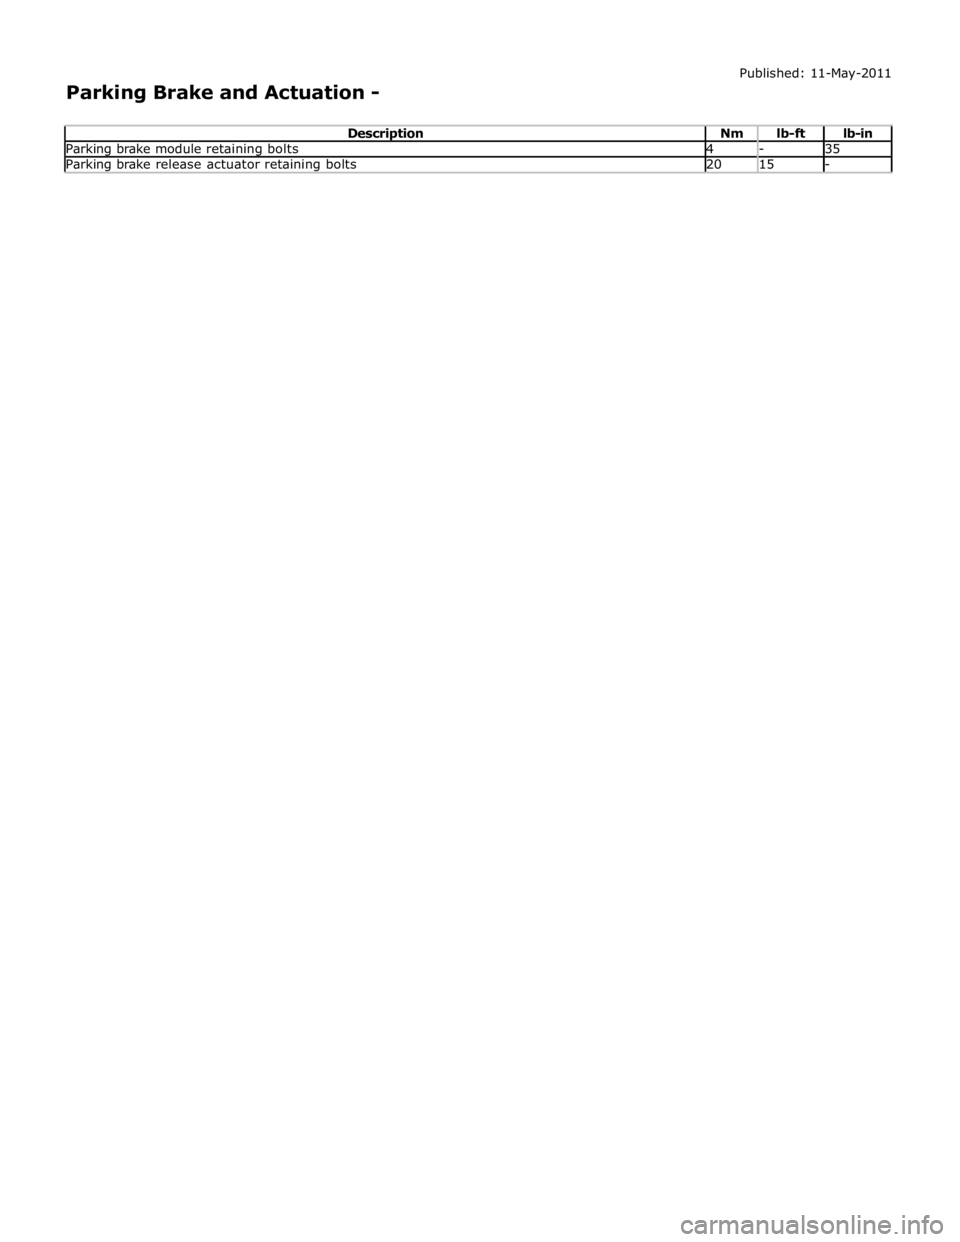
Parking brake module retaining bolts 4 - 35 Parking brake release actuator retaining bolts 20 15 -
Page 667 of 3039
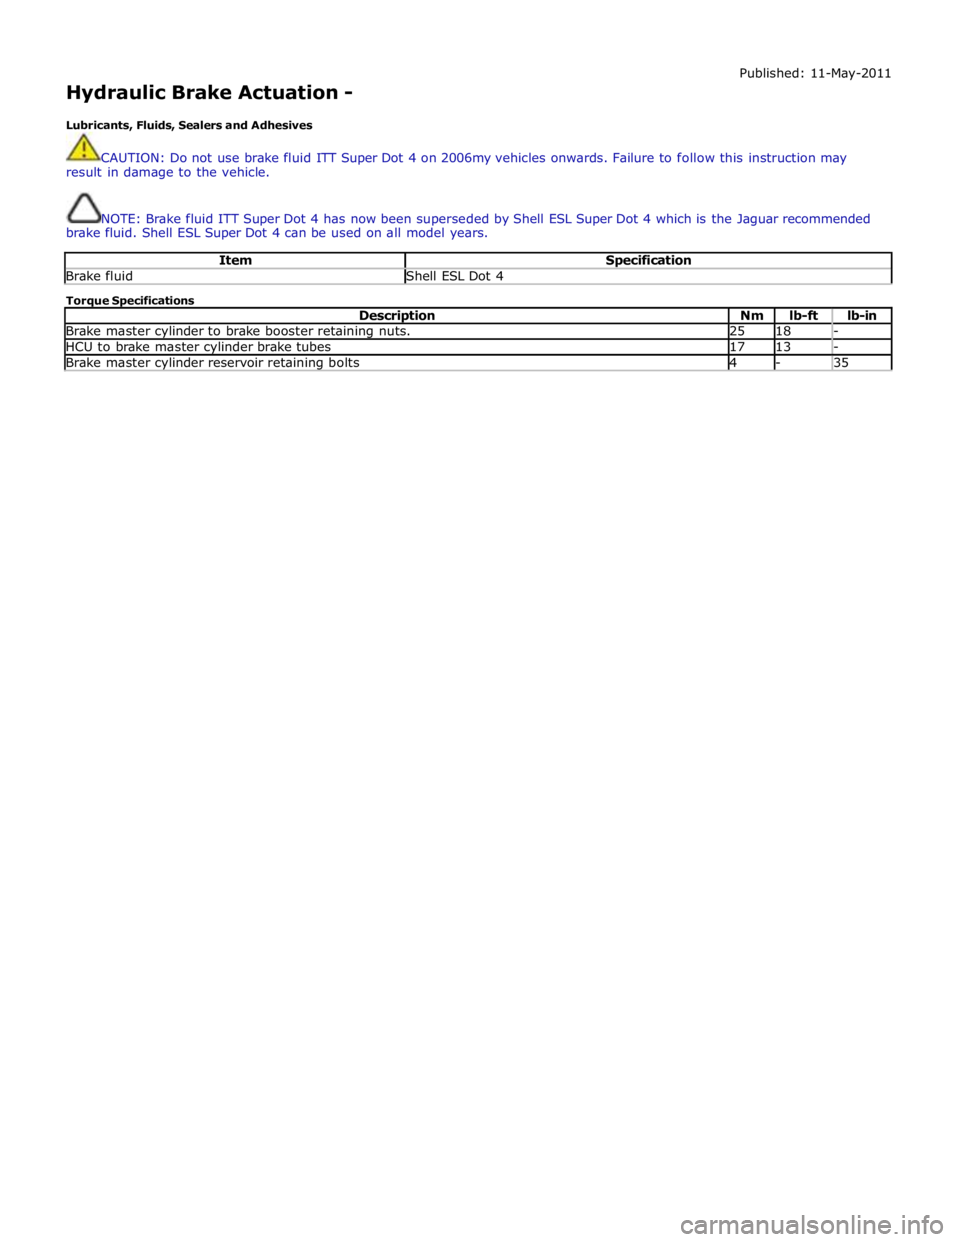
Hydraulic Brake Actuation -
Lubricants, Fluids, Sealers and Adhesives Published: 11-May-2011
CAUTION: Do not use brake fluid ITT Super Dot 4 on 2006my vehicles onwards. Failure to follow this instruction may
result in damage to the vehicle.
NOTE: Brake fluid ITT Super Dot 4 has now been superseded by Shell ESL Super Dot 4 which is the Jaguar recommended
brake fluid. Shell ESL Super Dot 4 can be used on all model years.
Item Specification Brake fluid Shell ESL Dot 4 Torque Specifications
Description Nm lb-ft lb-in Brake master cylinder to brake booster retaining nuts. 25 18 - HCU to brake master cylinder brake tubes 17 13 - Brake master cylinder reservoir retaining bolts 4 - 35
Page 672 of 3039
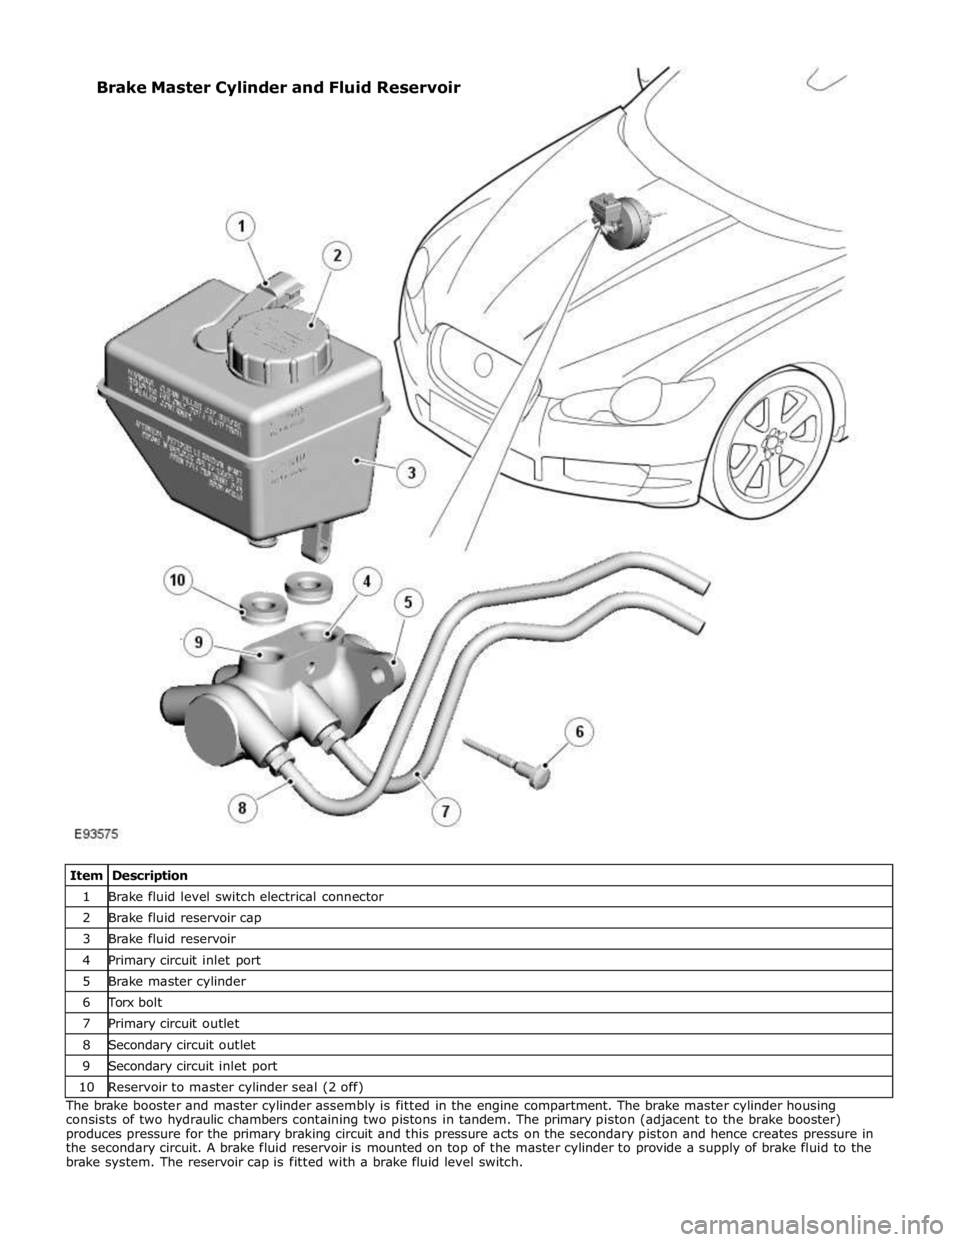
1 Brake fluid level switch electrical connector 2 Brake fluid reservoir cap 3 Brake fluid reservoir 4 Primary circuit inlet port 5 Brake master cylinder 6 Torx bolt 7 Primary circuit outlet 8 Secondary circuit outlet 9 Secondary circuit inlet port 10 Reservoir to master cylinder seal (2 off) The brake booster and master cylinder assembly is fitted in the engine compartment. The brake master cylinder housing
consists of two hydraulic chambers containing two pistons in tandem. The primary piston (adjacent to the brake booster)
produces pressure for the primary braking circuit and this pressure acts on the secondary piston and hence creates pressure in
the secondary circuit. A brake fluid reservoir is mounted on top of the master cylinder to provide a supply of brake fluid to the
brake system. The reservoir cap is fitted with a brake fluid level switch. Brake Master Cylinder and Fluid Reservoir
Page 682 of 3039
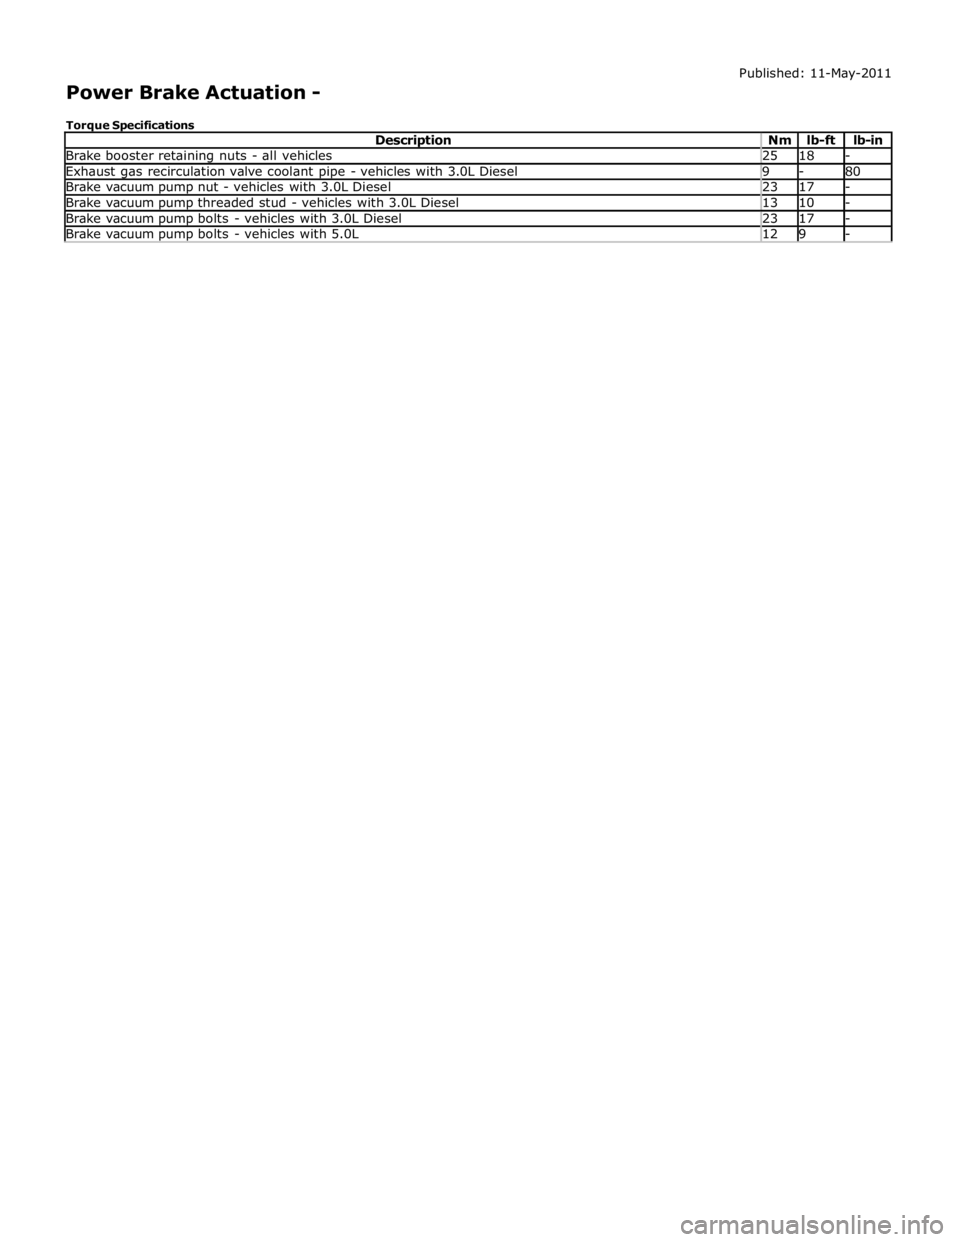
Brake booster retaining nuts - all vehicles 25 18 - Exhaust gas recirculation valve coolant pipe - vehicles with 3.0L Diesel 9 - 80 Brake vacuum pump nut - vehicles with 3.0L Diesel 23 17 - Brake vacuum pump threaded stud - vehicles with 3.0L Diesel 13 10 - Brake vacuum pump bolts - vehicles with 3.0L Diesel 23 17 - Brake vacuum pump bolts - vehicles with 5.0L 12 9 -
Page 690 of 3039
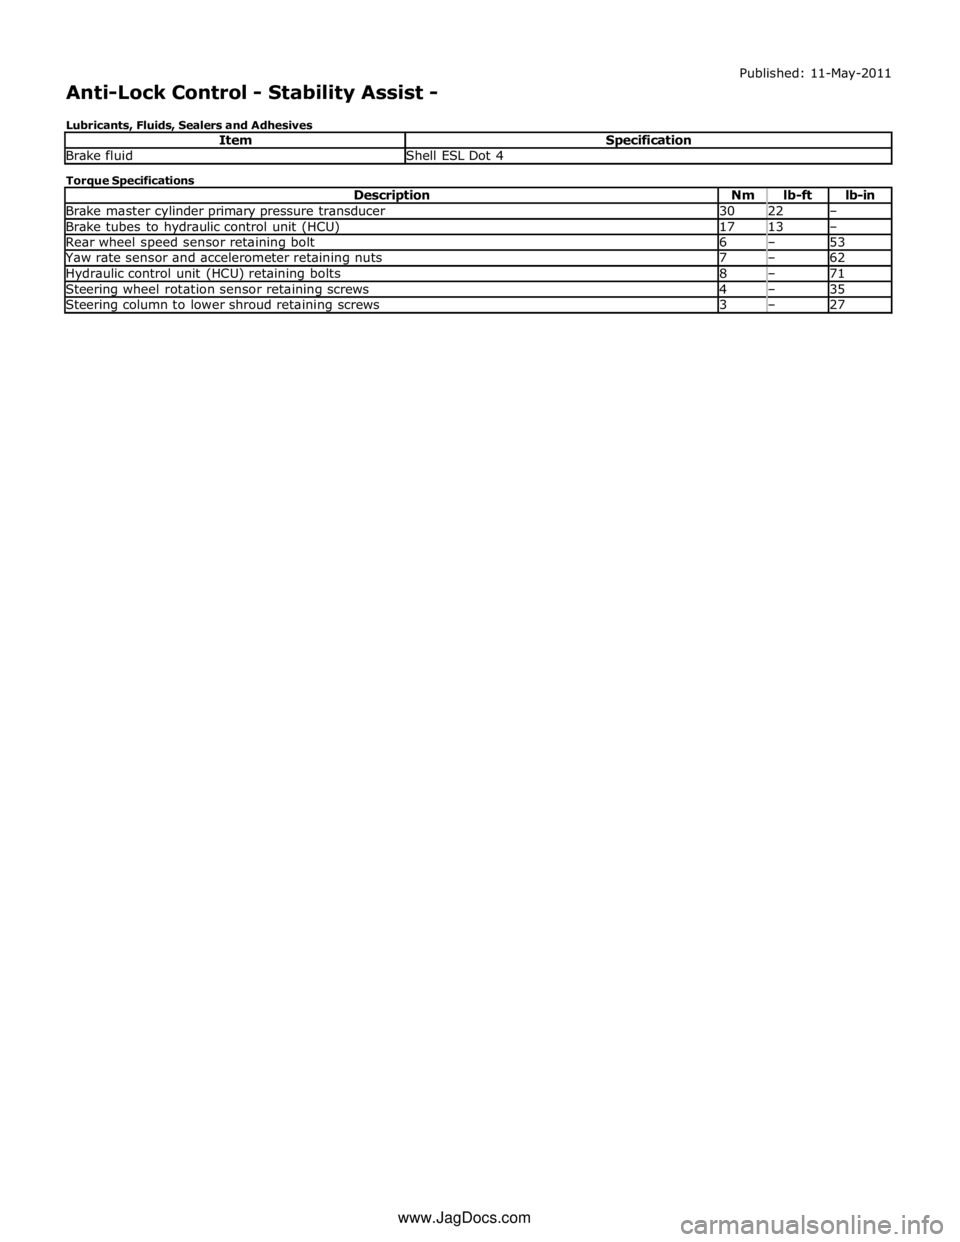
Brake fluid Shell ESL Dot 4 Torque Specifications
Description Nm lb-ft lb-in Brake master cylinder primary pressure transducer 30 22 – Brake tubes to hydraulic control unit (HCU) 17 13 – Rear wheel speed sensor retaining bolt 6 – 53 Yaw rate sensor and accelerometer retaining nuts 7 – 62 Hydraulic control unit (HCU) retaining bolts 8 – 71 Steering wheel rotation sensor retaining screws 4 – 35 Steering column to lower shroud retaining screws 3 – 27 www.JagDocs.com
Page 713 of 3039
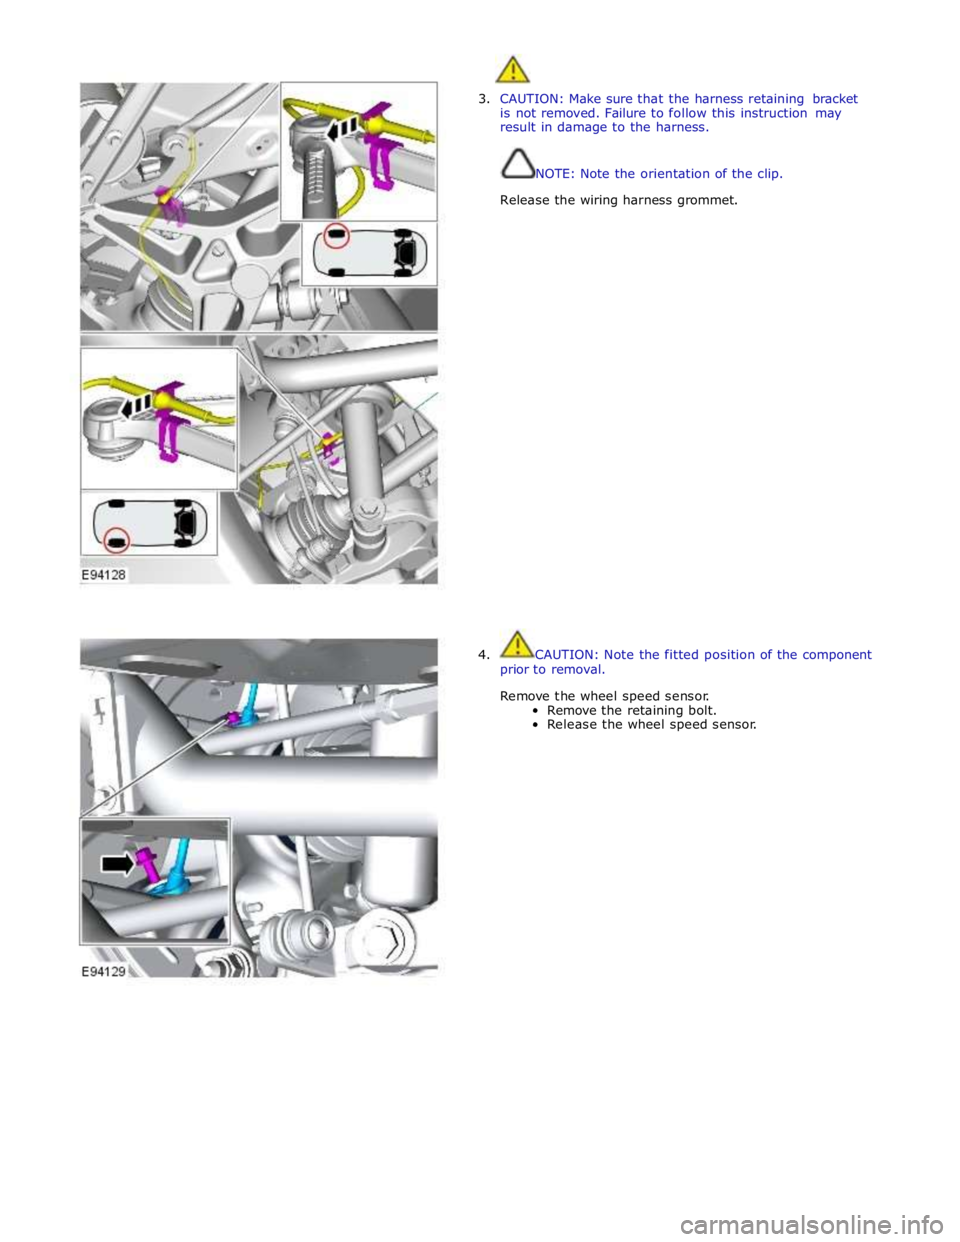
3. CAUTION: Make sure that the harness retaining bracket
is not removed. Failure to follow this instruction may
result in damage to the harness.
NOTE: Note the orientation of the clip.
Release the wiring harness grommet.
4. CAUTION: Note the fitted position of the component
prior to removal.
Remove the wheel speed sensor.
Remove the retaining bolt.
Release the wheel speed sensor.
Page 718 of 3039
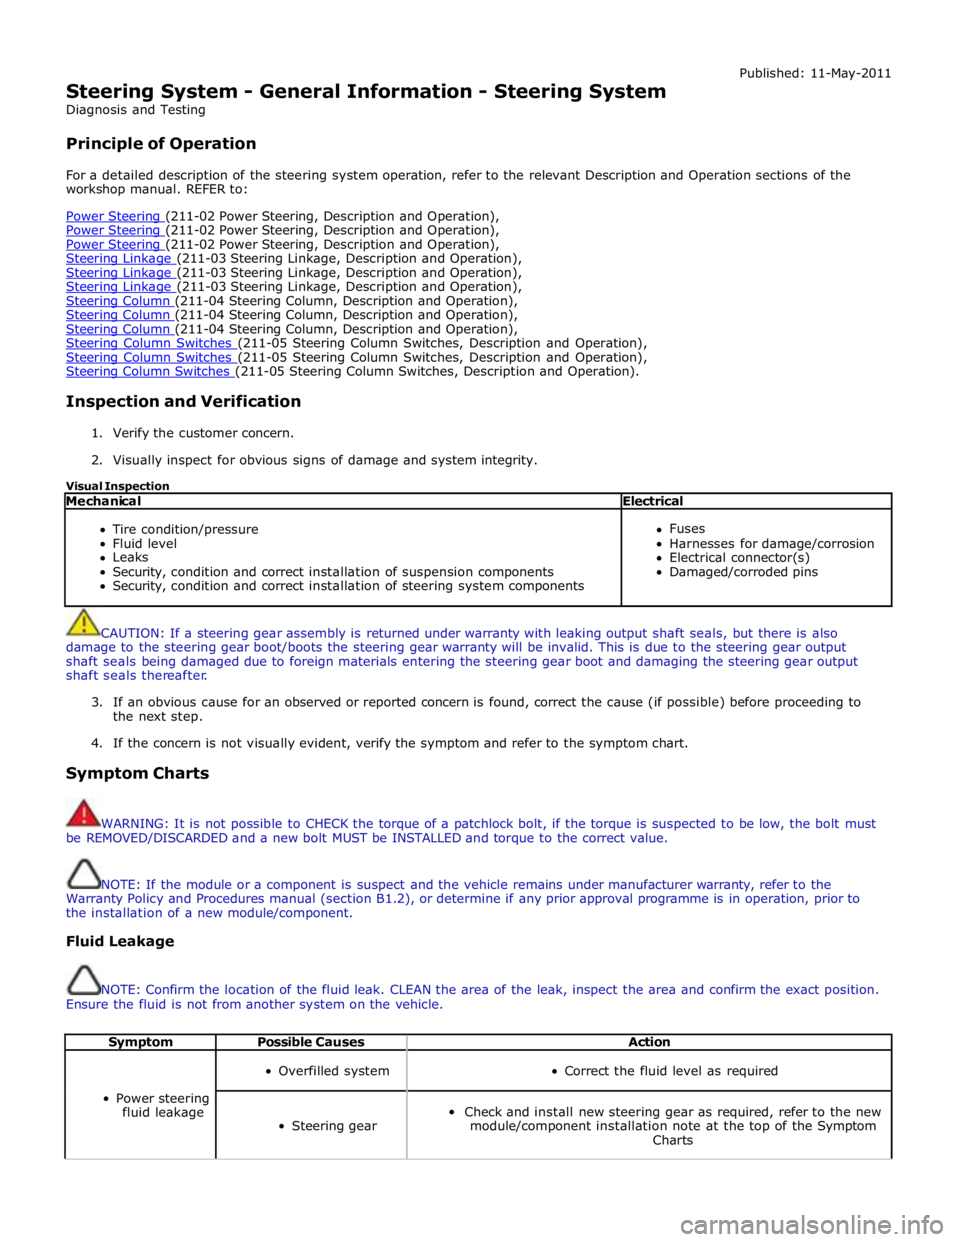
Steering System - General Information - Steering System
Diagnosis and Testing
Principle of Operation Published: 11-May-2011
For a detailed description of the steering system operation, refer to the relevant Description and Operation sections of the
workshop manual. REFER to:
Power Steering (211-02 Power Steering, Description and Operation), Power Steering (211-02 Power Steering, Description and Operation), Power Steering (211-02 Power Steering, Description and Operation), Steering Linkage (211-03 Steering Linkage, Description and Operation), Steering Linkage (211-03 Steering Linkage, Description and Operation), Steering Linkage (211-03 Steering Linkage, Description and Operation), Steering Column (211-04 Steering Column, Description and Operation), Steering Column (211-04 Steering Column, Description and Operation), Steering Column (211-04 Steering Column, Description and Operation), Steering Column Switches (211-05 Steering Column Switches, Description and Operation), Steering Column Switches (211-05 Steering Column Switches, Description and Operation), Steering Column Switches (211-05 Steering Column Switches, Description and Operation).
Inspection and Verification
1. Verify the customer concern.
2. Visually inspect for obvious signs of damage and system integrity.
Visual Inspection
Mechanical Electrical
Tire condition/pressure
Fluid level
Leaks
Security, condition and correct installation of suspension components
Security, condition and correct installation of steering system components
Fuses
Harnesses for damage/corrosion
Electrical connector(s)
Damaged/corroded pins
CAUTION: If a steering gear assembly is returned under warranty with leaking output shaft seals, but there is also
damage to the steering gear boot/boots the steering gear warranty will be invalid. This is due to the steering gear output
shaft seals being damaged due to foreign materials entering the steering gear boot and damaging the steering gear output
shaft seals thereafter.
3. If an obvious cause for an observed or reported concern is found, correct the cause (if possible) before proceeding to
the next step.
4. If the concern is not visually evident, verify the symptom and refer to the symptom chart.
Symptom Charts
WARNING: It is not possible to CHECK the torque of a patchlock bolt, if the torque is suspected to be low, the bolt must
be REMOVED/DISCARDED and a new bolt MUST be INSTALLED and torque to the correct value.
NOTE: If the module or a component is suspect and the vehicle remains under manufacturer warranty, refer to the
Warranty Policy and Procedures manual (section B1.2), or determine if any prior approval programme is in operation, prior to
the installation of a new module/component.
Fluid Leakage
NOTE: Confirm the location of the fluid leak. CLEAN the area of the leak, inspect the area and confirm the exact position.
Ensure the fluid is not from another system on the vehicle.
Symptom Possible Causes Action
Power steering
fluid leakage
Overfilled system
Correct the fluid level as required
Steering gear
Check and install new steering gear as required, refer to the new
module/component installation note at the top of the Symptom
Charts