sensor JAGUAR XJ6 1994 2.G Electrical Diagnostic Manual
[x] Cancel search | Manufacturer: JAGUAR, Model Year: 1994, Model line: XJ6, Model: JAGUAR XJ6 1994 2.GPages: 327, PDF Size: 13.73 MB
Page 89 of 327
Climate Control Systems
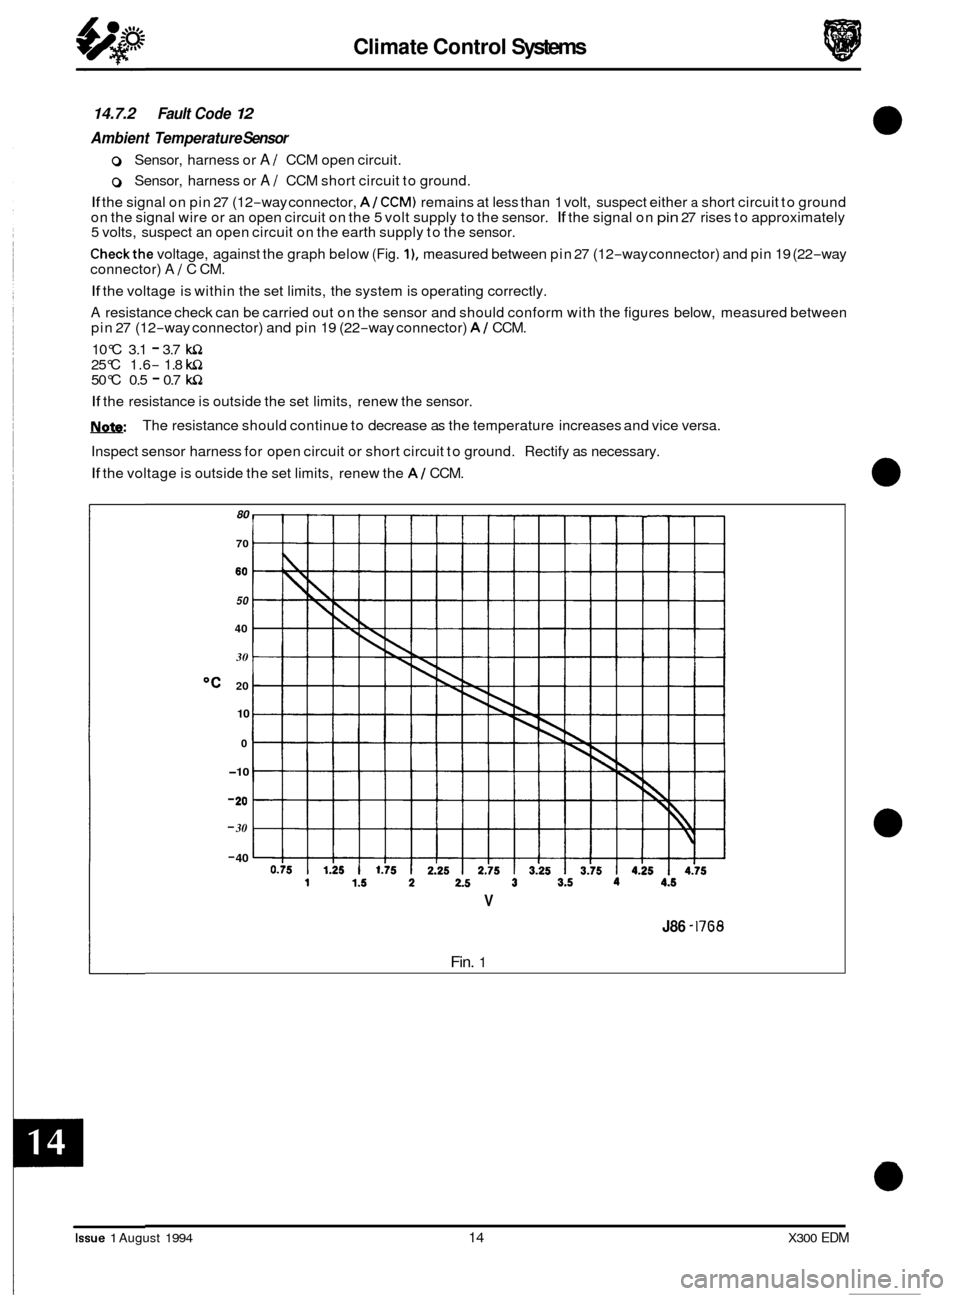
14.7.2 Fault Code 12
Ambient Temperature Sensor
0 Sensor, harness or A 1 CCM open circuit.
0 Sensor, harness or A 1 CCM short circuit to ground.
If the signal on pin 27 (12-way connector, AI CCM) remains at less than 1 volt, suspect either a short circuit to ground
on the signal wire or an open circuit on the 5 volt supply to the sensor. If the signal on pin 27 rises to approximately 5 volts, suspect an open circuit on the earth supply to the sensor.
Checkthe voltage, against the graph below (Fig. I), measured between pin 27 (12-way connector) and pin 19 (22-way
connector) A 1 C CM.
If the voltage is within the set limits, the system is operating correctly.
A resistance check can be carried out on the sensor and should conform with the figures below, measured between
pin 27 (12-way connector) and pin 19 (22-way connector) AI CCM.
10°C 3.1
- 3.7 w1 25°C 1.6- 1.8 w1 50°C 0.5 - 0.7 w1
If the resistance is outside the set limits, renew the sensor.
Nnfe:
Inspect sensor harness for open circuit or short circuit to ground. Rectify as necessary.
If the voltage is outside the set limits, renew the AI CCM.
The resistance
should continue to decrease as the temperature increases and vice versa.
80
70
80
50
40
30
OC 20
10
0
-10
- 20
- 30
- 40
V
Fin. 1
J86 -17'38
0
0
0
0
Issue 1 August 1994 14 X300 EDM
Page 90 of 327
Climate Control Systems
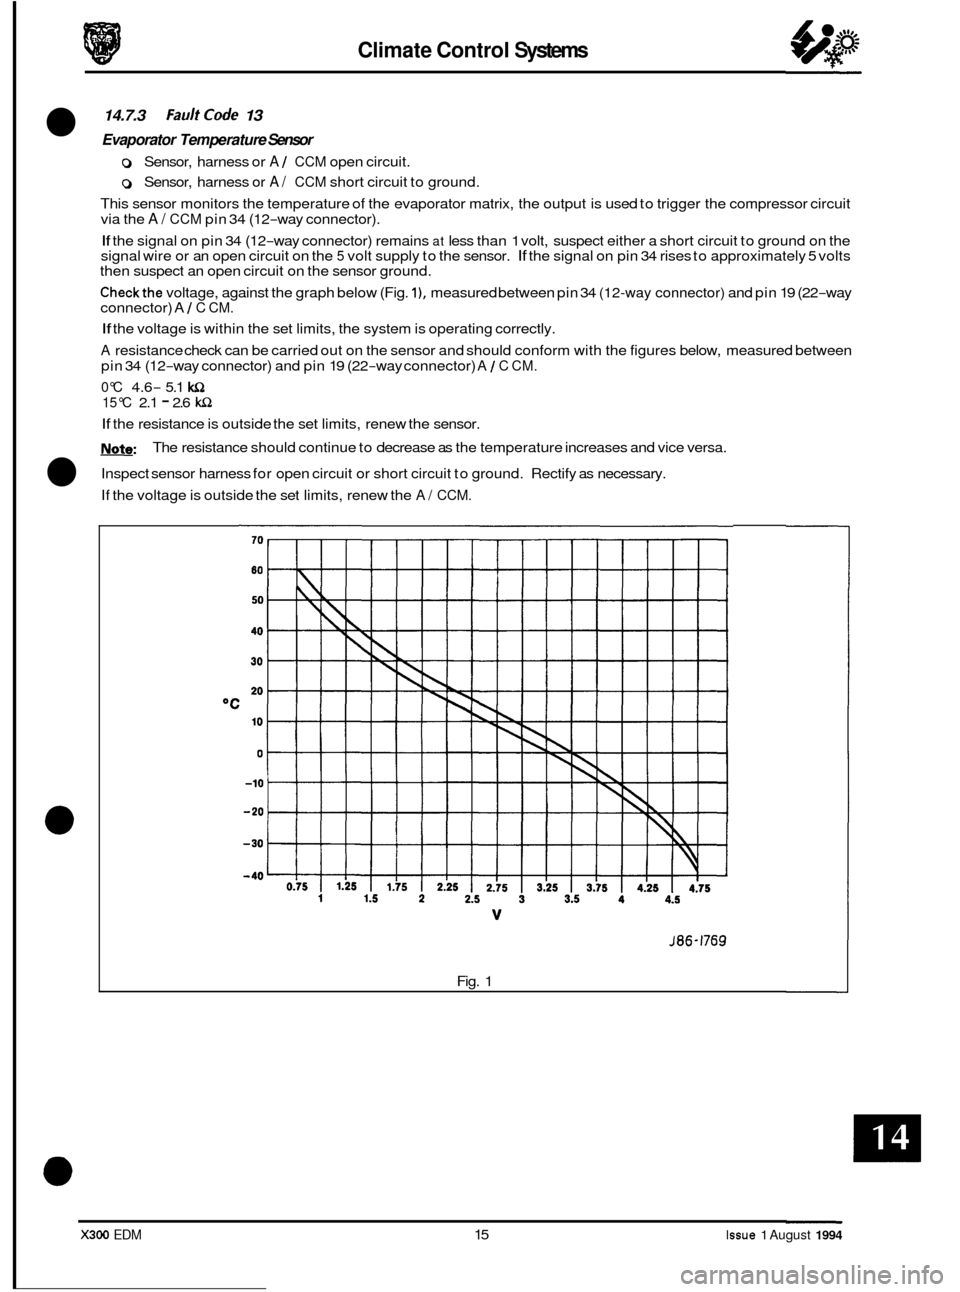
14.7.3 Faultcode 13
Evaporator Temperature Sensor
0 Sensor, harness or A / CCM open circuit.
0 Sensor, harness or A/ CCM short circuit to ground.
This sensor monitors the temperature of the evaporator matrix, the output is used to trigger the compressor circuit
via the
A/ CCM pin 34 (12-way connector).
If the signal on pin 34 (12-way connector) remains at less than 1 volt, suspect either a short circuit to ground on the
signal wire or an open circuit on the 5 volt supply to the sensor. If the signal on pin 34 rises to approximately 5 volts
then suspect an open circuit on the sensor ground.
Checkthe voltage, against the graph below (Fig. I), measured between pin 34 (12-way connector) and pin 19 (22-way
connector) A / C CM.
If the voltage is within the set limits, the system is operating correctly.
A resistance check can be carried out on the sensor and should conform with the figures below, measured between
pin 34 (12
-way connector) and pin 19 (22-way connector) A / C CM.
0°C
4.6- 5.1 WZ
15°C 2.1 - 2.6 WZ
If the resistance is outside the set limits, renew the sensor.
Note:
Inspect sensor harness for open circuit or short circuit to ground. Rectify as necessary.
If the voltage is outside the set limits, renew the
A/ CCM.
The resistance should continue to decrease as the temperature increases and vice versa.
*C
J86-1769
Fig. 1
X300 EDM 15 Issue 1 August 1994
Page 91 of 327
Climate Control Systems
14.7.4 Fault Code 14
Coolant Temperature
Input
0 Sensor, harness or A / CCM open circuit.
0 Sensor, harness or A / CCM short circuit to ground.
This input is derived from the instrument pack,
a continuity check can be carried out from pin 22, instrument pack (24-wayconnector), to pin 40 (16-way connector) of the A / C CM.
The instrument pack input from the engine coolant temperature sensor, is covered in the EDM, section 15, Instrument
Pack and Trip Computer.
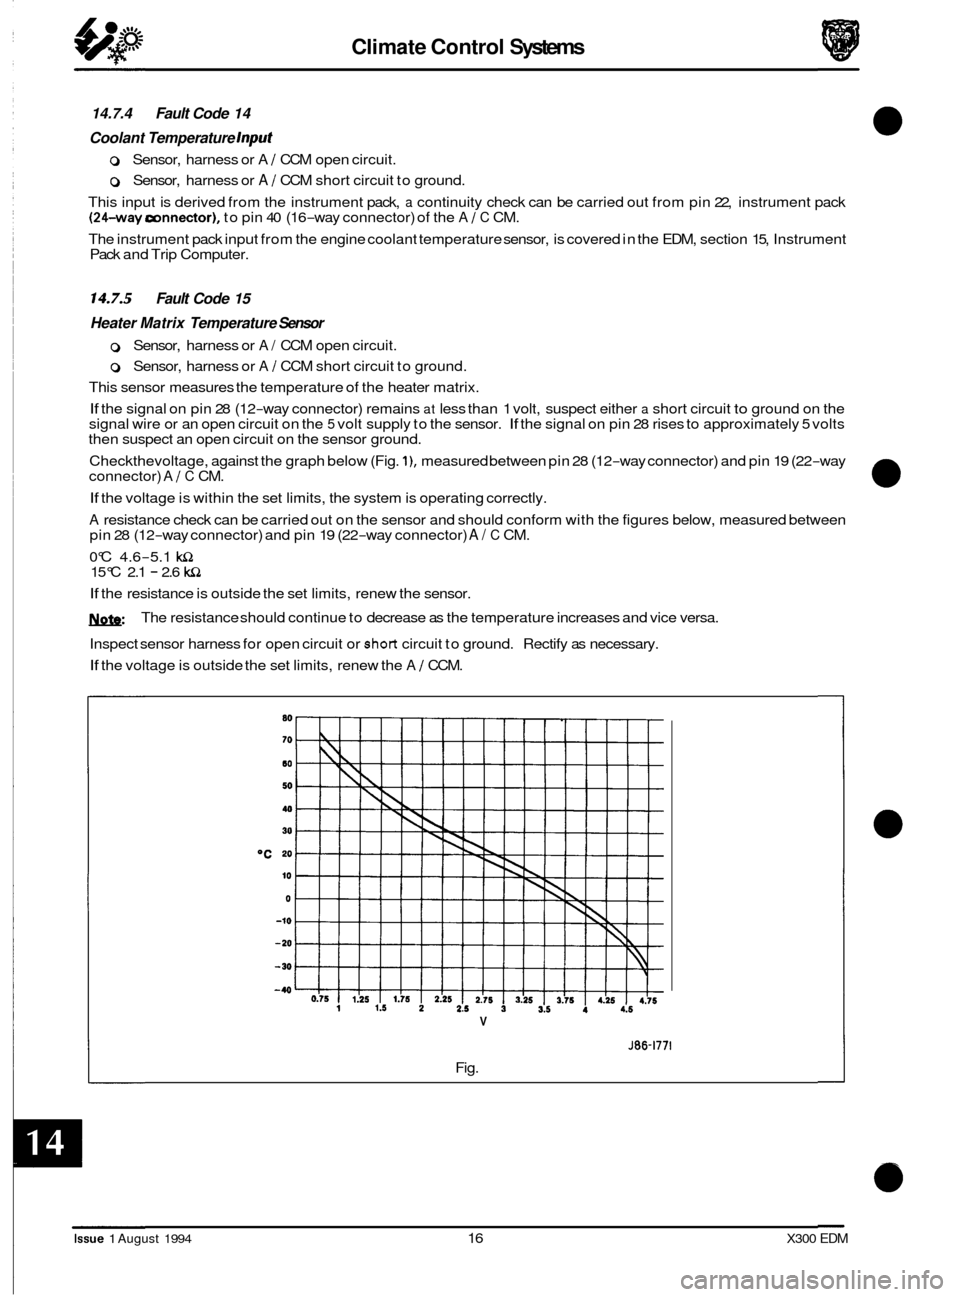
14.7.5 Fault Code 15
Heater Matrix Temperature Sensor
0 Sensor, harness or A/ CCM open circuit.
0 Sensor, harness or A / CCM short circuit to ground.
This sensor measures the temperature of the heater matrix.
If the signal on pin 28 (12-way connector) remains at less than 1 volt, suspect either a short circuit to ground on the
signal wire or an open circuit on the 5 volt supply to the sensor. If the signal on pin 28 rises to approximately 5 volts
then suspect an open circuit on the sensor ground.
Checkthevoltage, against the graph below (Fig.
I), measured between pin 28 (12-way connector) and pin 19 (22-way
connector) A / C CM.
If the voltage is within the set limits, the system is operating correctly.
A resistance check can be carried out on the sensor and should conform with the figures below, measured between
pin 28 (12-way connector) and pin 19 (22-way connector) A/ C CM.
0°C 4.6
-5.1 lclL 15°C 2.1 - 2.6 lclL
If the resistance is outside the set limits, renew the sensor.
1ynfe:
Inspect sensor harness for open circuit or short circuit to ground. Rectify as necessary.
If the voltage is outside the set limits, renew the A / CCM.
The
resistance should continue to decrease as the temperature increases and vice versa.
*C
V
J86-1771
Fig.
Issue 1 August 1994 16 X300 EDM
Page 92 of 327
Climate Control Systems
14.7.6 FaulfCode21
Solar Sensor
0 Sensor, harness or A / CCM open circuit.
0 Sensor, harness or A / CCM short circuit to ground.
The sensor provides a linear output response signal to
pin 35 (16-way connector) A/ CCM; the output ranges from 0 to 5 volts, the voltage will drop as light intensity increases.
A resistance check can be carried out on the sensor and should conform with the figures below:
With no light on the sensor, the resistance should read approximately 15
kL2.
With increasing light intensity, the resistance should decrease from 15 kQ.
Inspect the sensor harness for open circuit or short circuit to ground. Rectify as necessary.
If the sensor and harness appear correct, suspect the A/ CCM.
14.7.7 Fadf Code 22
Compressor lock Signal
(12 cy/. vehicles only)
0 Sensor, harness or A / CCM open circuit.
0 Sensor, harness or A/ CCM short circuit to ground.
The compressor lock sensor provides an
a.c. signal proportional to engine speed. As engine speed increases the a.c. signal voltage value will increase.
A voltage checkcan be carried out on the sensor and should read approximately 0.5V a.c. whilst the compressor is ON and OV whilst the compressor is OFF, measured between pin 26 (12-way connector) and pin 19 (22-way connector) A
/ C CM.
If the reading is OV whilst the compressor is ON, suspect the sensor or the sensor harness (open circuit or short circuit
to ground).
Check the resistance between pins 1 and 2 of the compressor lock sensor, value should be
190a & 20%.
If the resistance measured falls outside the limits, renew the compressor lock sensor.
Inspect the sensor harness for open circuit or short circuit to ground. Rectify as necessary.
If the sensor and harness appear correct, suspect the AI CCM.
X300 EDM 17 Issue 1 August 1994
Page 101 of 327
E I ect r ica I rl
SECTION CONTENTS
m: For ease of access to the required information, this Section has been divided into four sub-sections with the
page numbers of each prefixed 15.1, 15.2, 15.3 or 15.4. Each subsection has its own contents list, and these
are given on the following pages
Sub-Section 15.1 Supplemental Restraint Systems
Subsection Title SRO Page
15.1 ............. Supplemental Restraint System .................................................... 15.1-1
15.1.1 ............ System Description .............................................................. 15.1- 1
15.1.2 ............ Component Descriptions ......................................................... 15.1- 7
15.1.2.1 .......... Diagnostic Module .............................................................. 7 5.1 - 7
15.1.2.2 .......... Wiring Harness ................................................................. 15.1-1
15.1.2.3 .......... AirBagModules ................................................................ 75.1-7
15.1.3 ............ Air Bag Disarming / Arming Procedure ............................................. 15.1-3
15.1.4
............ Diagnostic Module Fault Codes ................................................... 15.1-4
15.1.2.4 .......... ImpactSensors ................................................................. 15.7-2
X300 EDM i Issue 1 August 1994
Page 107 of 327
E I ect r ica I
15.1 SUPPLEMENTAL RESTRAINT SYSTEM
15.1.1 System Description
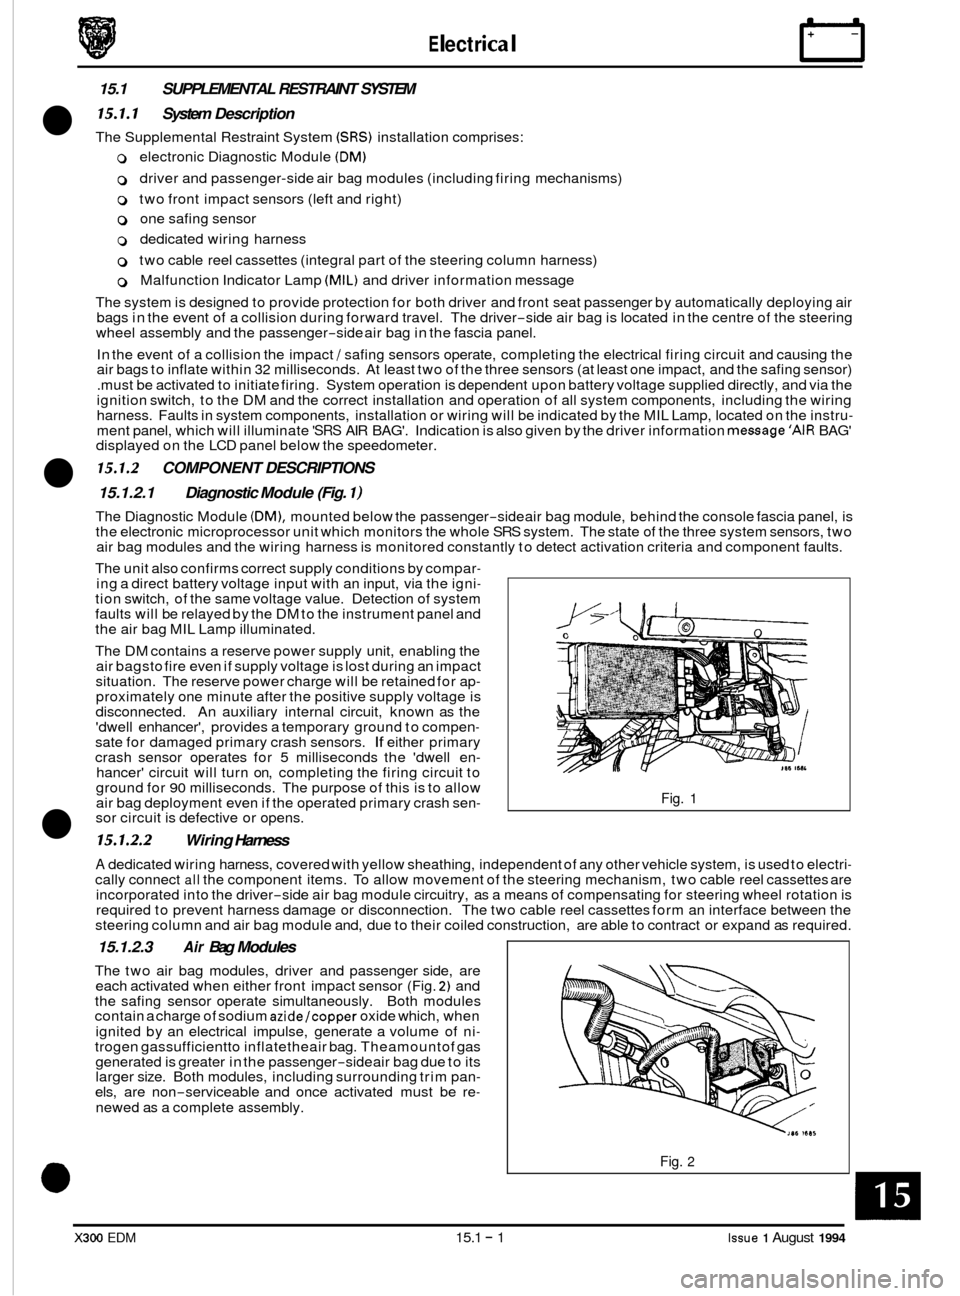
The Supplemental Restraint System (SRS) installation comprises:
0 electronic Diagnostic Module (DM)
0 driver and passenger-side air bag modules (including firing mechanisms)
0 two front impact sensors (left and right)
0 one safing sensor
0 dedicated wiring harness
0 two cable reel cassettes (integral part of the steering column harness)
0 Malfunction Indicator Lamp (MIL) and driver information message
The system is designed to provide protection for both driver and front seat passenger by automatically deploying air
bags in the event of a collision during forward travel. The driver
-side air bag is located in the centre of the steering
wheel assembly and the passenger-side air bag in the fascia panel.
In the event of a collision the impact
/ safing sensors operate, completing the electrical firing circuit and causing the
air bags to inflate within 32 milliseconds. At least two of the three sensors (at least one impact, and the safing sensor)
.must be activated to initiate firing. System operation is dependent upon battery voltage supplied directly, and via the
ignition switch, to the DM and the correct installation and operation of all system components, including the wiring
harness. Faults in system components, installation or wiring will be indicated by the MIL Lamp, located on the instru
- ment panel, which will illuminate 'SRS AIR BAG'. Indication is also given by the driver information message'AIR BAG'
displayed on the LCD panel below the speedometer.
15.1.2.1 Diagnostic Module (Fig. I)
The Diagnostic Module (DM), mounted below the passenger-side air bag module, behind the console fascia panel, is
the electronic microprocessor unit which monitors the whole SRS system. The state of the three system sensors, two
air bag modules and the wiring harness is monitored constantly to detect activation criteria and component faults.
15.1.2 COMPONENT DESCRIPTIONS
The unit also confirms correct supply conditions by compar- ing a direct battery voltage input with an input, via the igni- tion switch, of the same voltage value. Detection of system
faults will be relayed by the DM to the instrument panel and
the air bag MIL Lamp illuminated.
The DM contains a reserve power supply unit, enabling the
air bagsto fire even if supply voltage is lost during an impact
situation. The reserve power charge will be retained for ap
- proximately one minute after the positive supply voltage is
disconnected. An auxiliary internal circuit, known as the
'dwell enhancer', provides a temporary ground to compen
- sate for damaged primary crash sensors. If either primary
crash sensor operates for 5 milliseconds the 'dwell en- hancer' circuit will turn on, completing the firing circuit to
ground for 90 milliseconds. The purpose of this is to allow
air bag deployment even if the operated primary crash sen- sor circuit is defective or opens.
15.1.2.2 Wiring Harness
Fig. 1
A dedicated wiring harness, covered with yellow sheathing, independent of any other vehicle system, is used to electri- cally connect all the component items. To allow movement of the steering mechanism, two cable reel cassettes are
incorporated into the driver-side air bag module circuitry, as a means of compensating for steering wheel rotation is
required to prevent harness damage or disconnection. The two cable reel cassettes form an interface between the
steering column and air bag module and, due to their coiled construction, are able to contract or expand as required.
15.1.2.3 Air Bag Modules
The two air bag modules, driver and passenger side, are
each activated when either front impact sensor (Fig. 2) and
the safing sensor operate simultaneously. Both modules
contain a charge of sodium
azide/copper oxide which, when
ignited by an electrical impulse, generate a volume of ni
- trogen gassufficientto inflatetheair bag. Theamountof gas
generated is greater in the passenger-side air bag due to its
larger size. Both modules, including surrounding trim pan- els, are non-serviceable and once activated must be re-
newed as a complete assembly.
Fig. 2
X300 EDM 15.1 - 1 Issue 1 August 1994
Page 108 of 327
IT Electrical
15.1.2.4 Impact Sensors
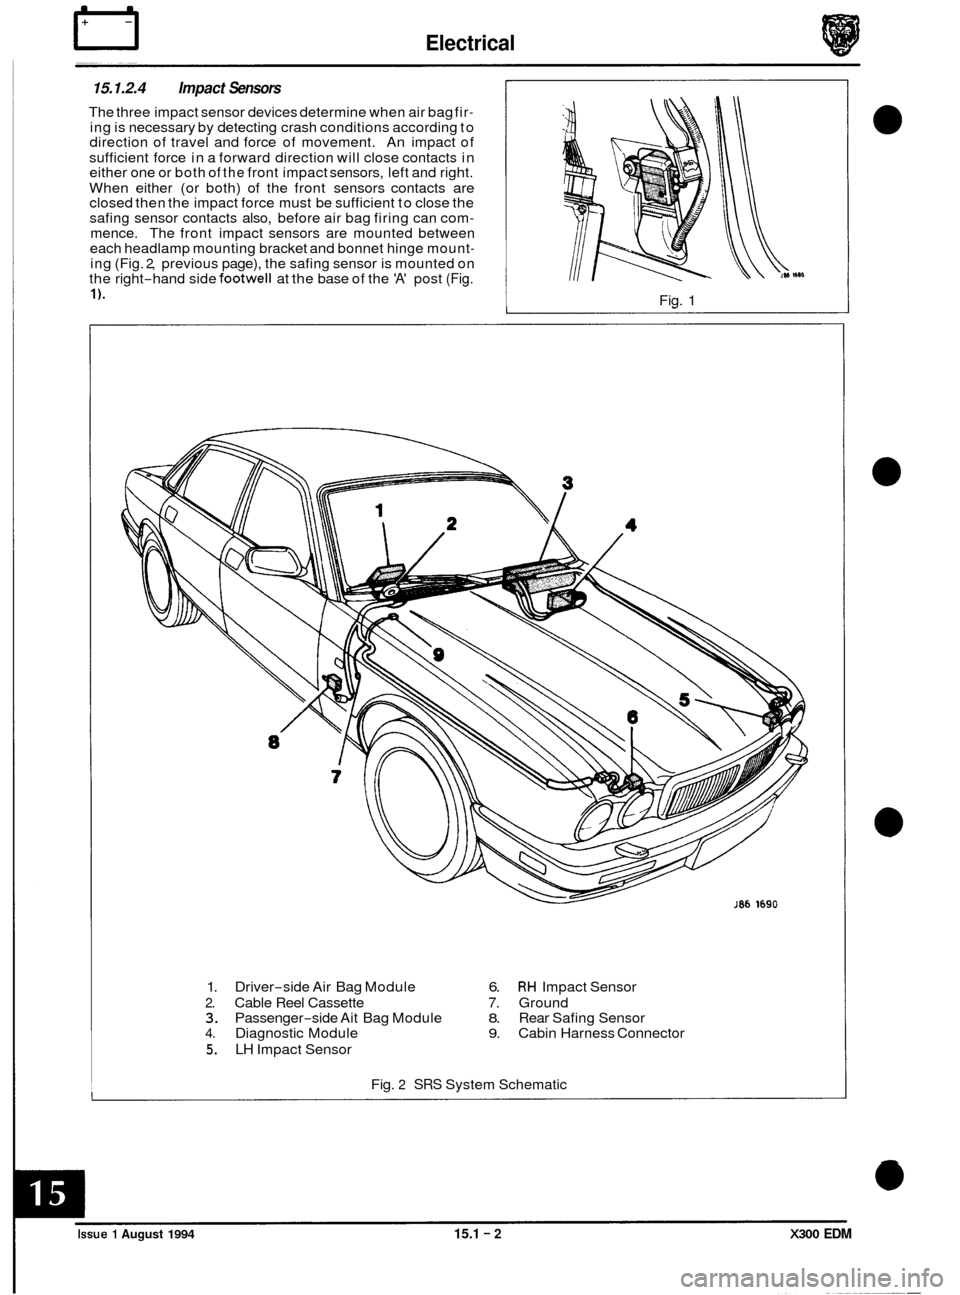
The three impact sensor devices determine when air bag fir- ing is necessary by detecting crash conditions according to
direction of travel and force of movement. An impact of
sufficient force in a forward direction will close contacts in
either one or both of
the front impact sensors, left and right.
When either (or both) of the front sensors contacts are
closed then the impact force must be sufficient to close the
safing sensor contacts also, before air bag firing can com
- mence. The front impact sensors are mounted between
each headlamp mounting bracket and bonnet hinge mount- ing (Fig. 2, previous page), the safing sensor is mounted on
the right-hand side footwell at the base of the 'A' post (Fig.
1). Fig. 1
1.
Driver-side Air Bag Module 6. RH Impact Sensor
2. Cable Reel Cassette 7. Ground 3. Passenger-side Ait Bag Module 8. Rear Safing Sensor 4. Diagnostic Module 9. Cabin Harness Connector
5. LH Impact Sensor
Fig.
2 SRS System Schematic
Issue 1 August 1994 15.1 - 2 X300 EDM
Page 111 of 327
Electrical IT
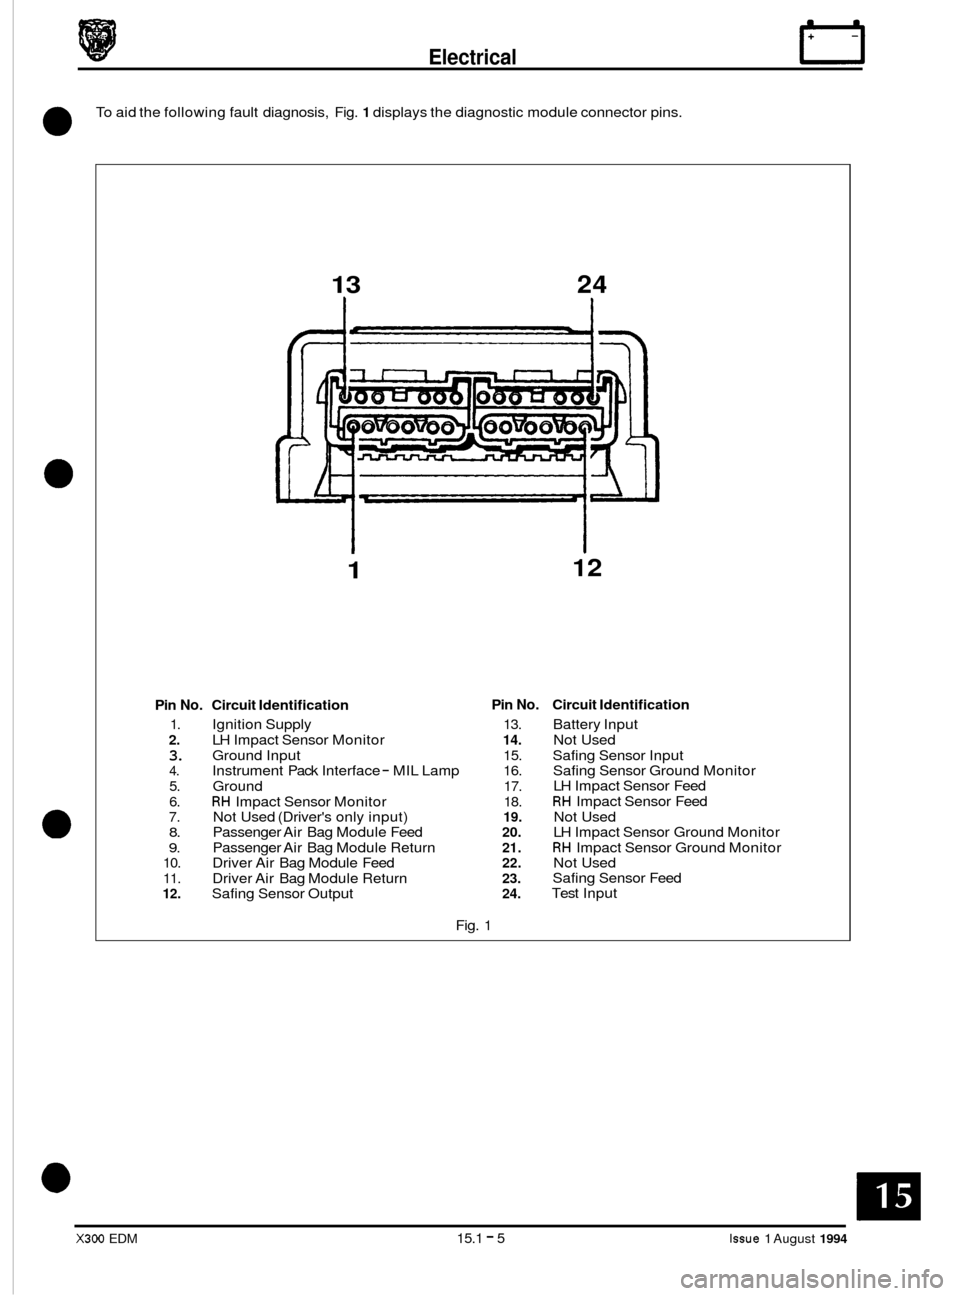
To aid the following fault diagnosis, Fig. 1 displays the diagnostic module connector pins.
0
13 24
1
Pin No. Circuit Identification
1. Ignition Supply
2. LH Impact Sensor Monitor
3. Ground Input 4.
5. Ground
6. RH Impact Sensor Monitor 7. 8.
9. 10.
11.
12. Safing Sensor Output
Instrument
Pack Interface
- MIL Lamp
Not Used (Driver's only input)
Passenger Air Bag Module Feed
Passenger Air Bag Module Return
Driver Air Bag Module Feed
Driver Air Bag Module Return
Fig.
1
Pin No.
13.
14.
15.
16. 17.
18.
19.
20.
21.
22.
23.
24.
12
Circuit Identification
Battery Input
Not Used
Safing Sensor Input
Safing Sensor Ground Monitor
LH Impact Sensor Feed
RH Impact Sensor Feed
Not Used
LH Impact Sensor Ground Monitor
RH Impact Sensor Ground Monitor
Not Used
Safing Sensor Feed
Test Input
X300 EDM 15.1 - 5 Issue 1 August 1994
Page 113 of 327
E I ect r ica I rl
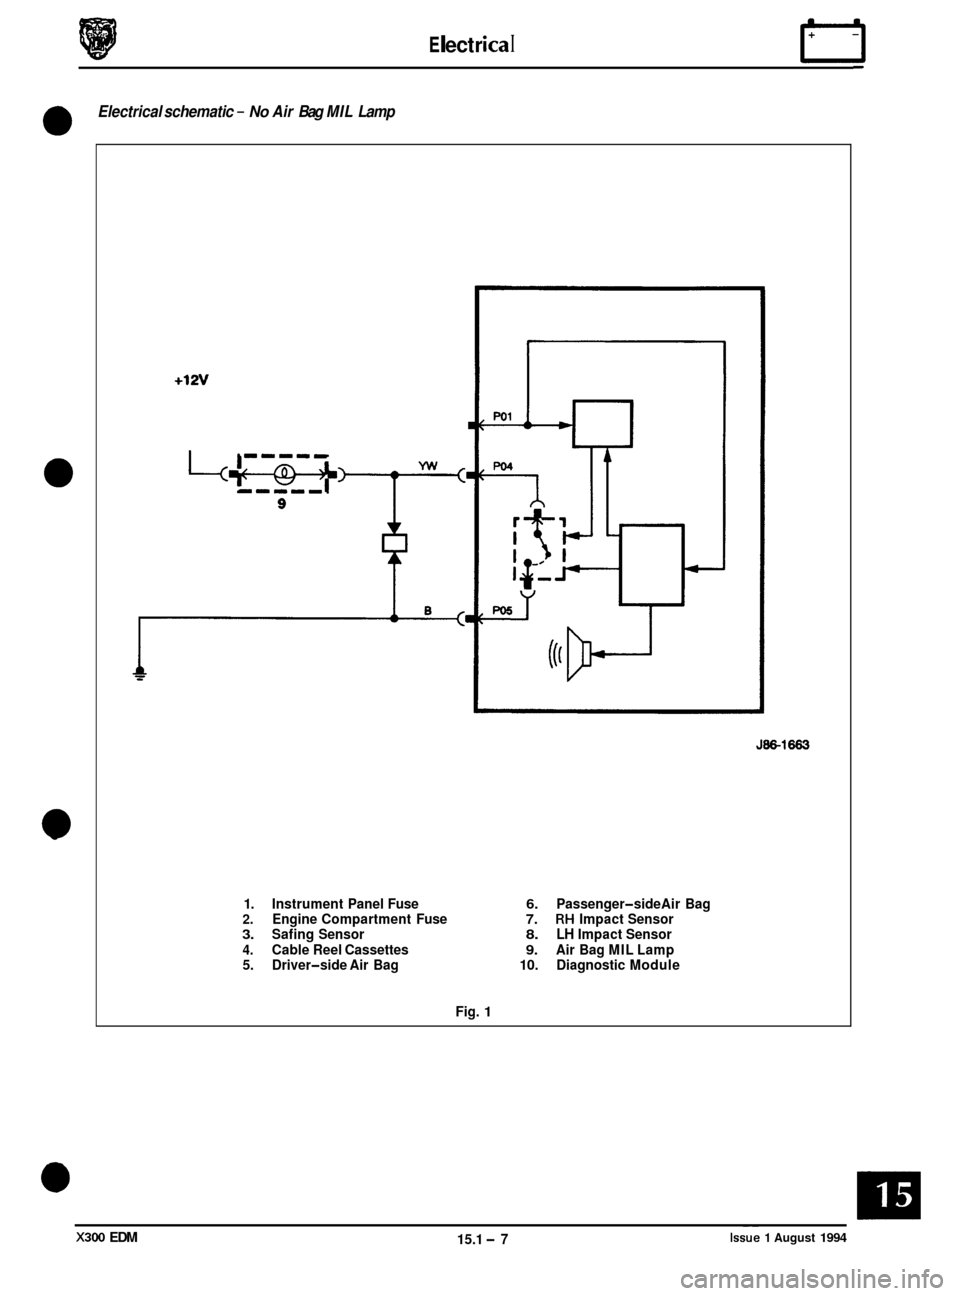
Electrical schematic - No Air Bag MIL Lamp
0
+12v
1. Instrument Panel Fuse 2. Engine Compartment Fuse 3. Safing Sensor
4. Cable Reel Cassettes
5. Driver-side Air Bag
Fig.
1
J86-1663
6. Passenger-side Air Bag 7. RH Impact Sensor 8. LH Impact Sensor
9. Air Bag MIL Lamp
10. Diagnostic Module
X300 EDM 15.1 -7 ~~ Issue 1 August 1994
Page 115 of 327
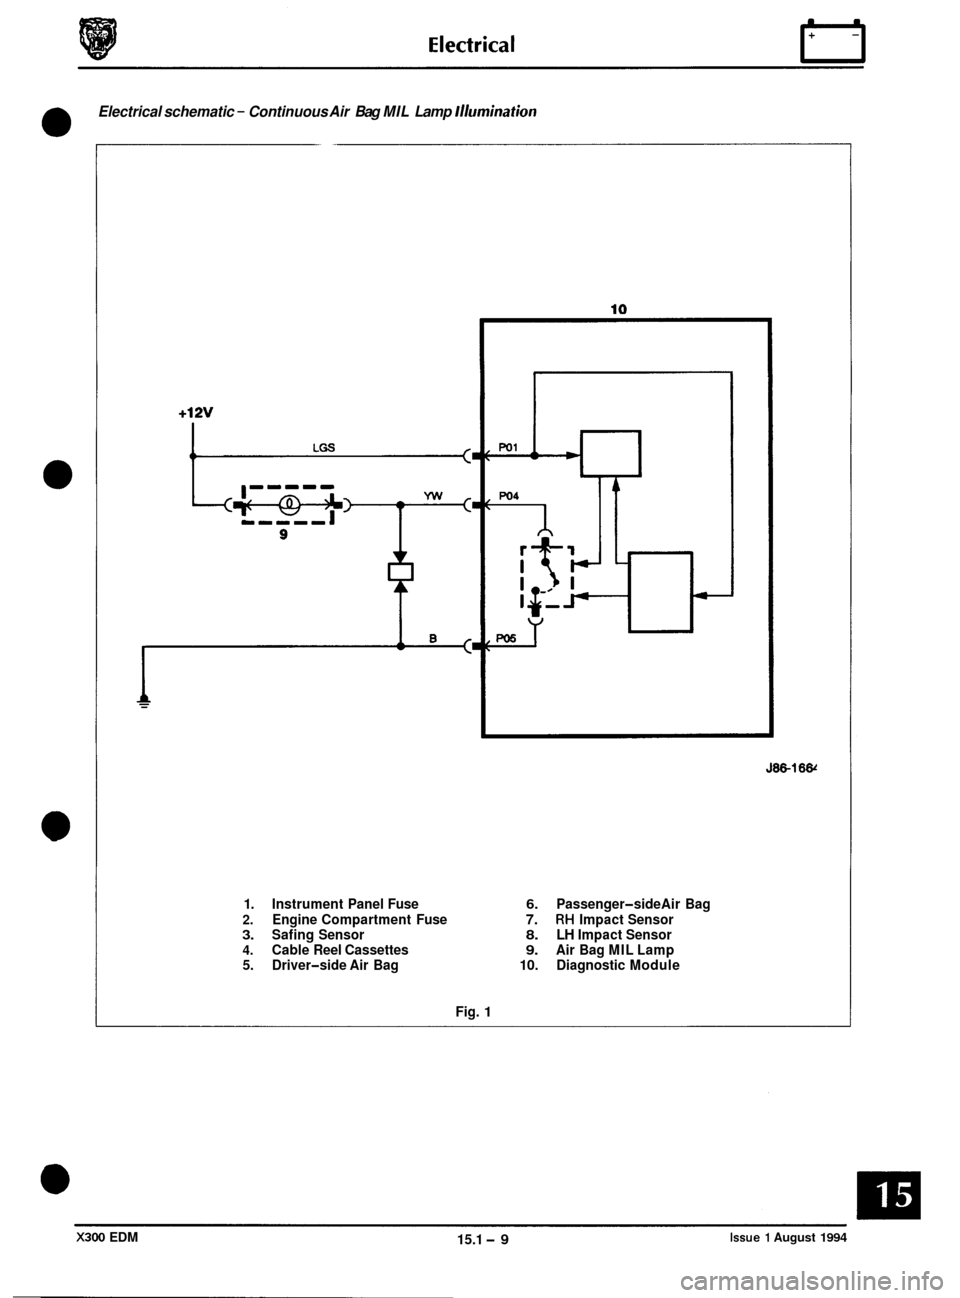
Electrical schematic - Continuous Air Bag MIL Lamp Illumination
0
J86-16&
1. Instrument Panel Fuse
2. Engine Compartment Fuse 3. Safing Sensor 4. Cable Reel Cassettes
5. Driver-side Air Bag
Fig.
1
6. Passenger-side Air Bag
7. RH Impact Sensor 8. LH Impact Sensor 9. Air Bag MIL Lamp
10. Diagnostic Module
X300 EDM 15.1 -9 Issue 1 August 1994