torque JAGUAR XJ6 1994 2.G User Guide
[x] Cancel search | Manufacturer: JAGUAR, Model Year: 1994, Model line: XJ6, Model: JAGUAR XJ6 1994 2.GPages: 521, PDF Size: 17.35 MB
Page 65 of 521
Lower radiator cradle to body
Radiator drain plug
1,5-2,5
Radiator temperature switch 13-17
Receiver drier to cooling fan assembly
Top radiator panel to body 7
-1 0
2,5-3,5
7-10
111. SERVICE
MATERIALS
Description USeS Notes
I to be issued I I I
0
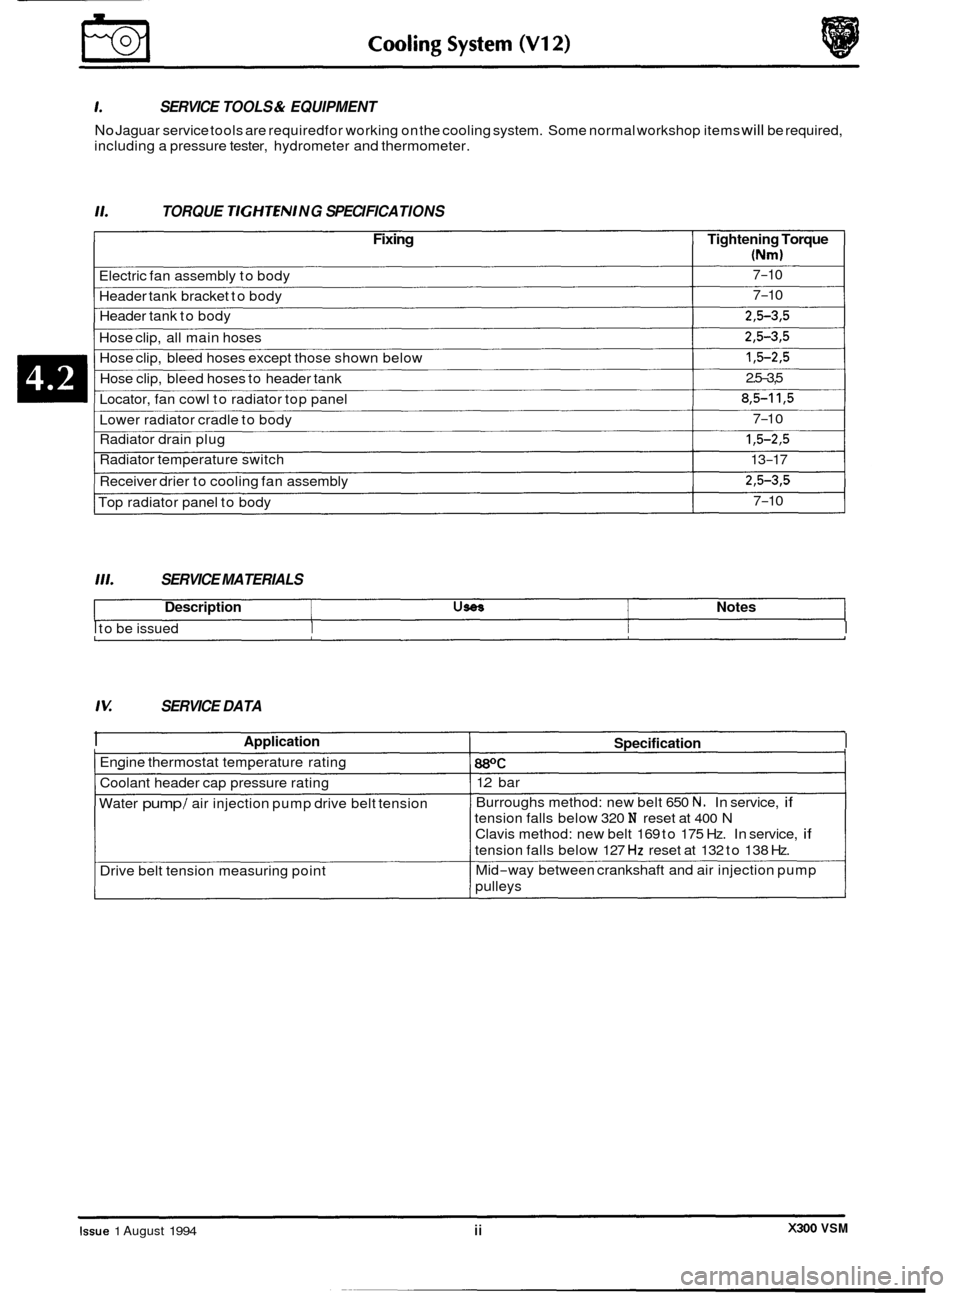
SERVICE TOOLS & EQUIPMENT
No Jaguar service tools are required for working on the cooling system. Some normal workshop items will be required,
including a pressure tester, hydrometer and thermometer.
TORQUE TIGHTEN/ NG SPECI FICA TIONS
Fixing Tightening Torque
(Nm)
Electric fan assembly to body
Header tank bracket to body 7-10
7-10
Header tank to body
2,5-3,5
Hose clip, bleed hoses except those shown below 13-2.5
Hose clip, all main hoses 2,5-3,5
Hose clip, bleed hoses to header tank
Locator, fan cowl to radiator top panel 2.5-3,5
8,5-11,5
0
0
/U SERVICE
DATA
I Application
I Engine thermostat temperature rating
I Coolant header cap pressure rating
Water
pump / air injection pump drive belt tension
Drive belt tension measuring point
Specification I
88OC I
1.2 bar
Burroughs method: new belt 650
N. In service, if
tension falls below 320 N reset at 400 N
Clavis method: new belt 169 to 175 Hz. In service, if
tension falls below 127 Hz reset at 132 to 138 Hz.
Mid
-way between crankshaft and air injection pump
pulleys
X300 VSM Issue 1 August 1994 ii
Page 68 of 521
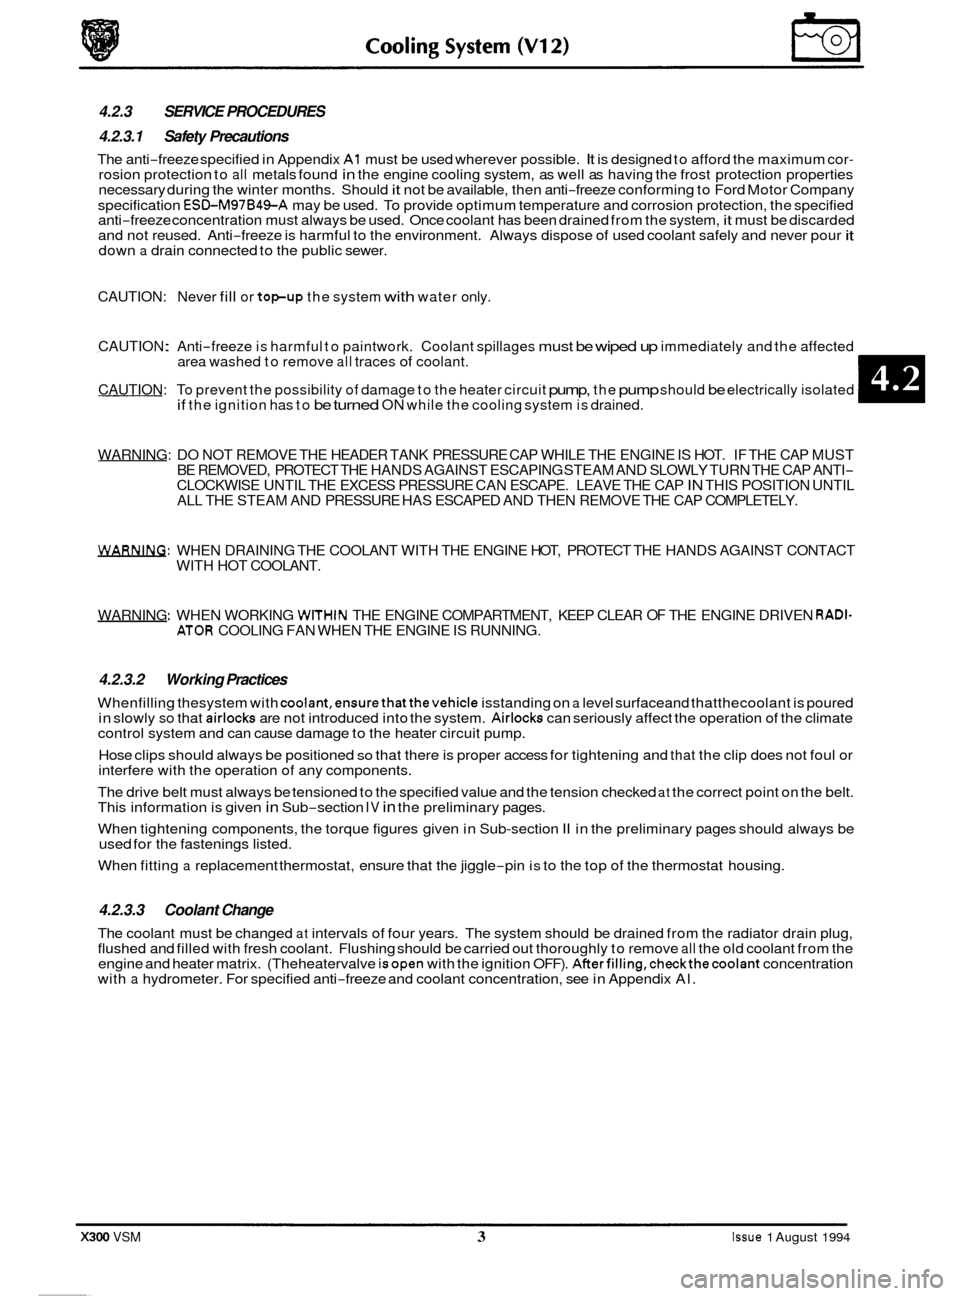
WARNING: DO NOT REMOVE THE HEADER TANK PRESSURE CAP WHILE THE ENGINE IS HOT. IF THE CAP MUST
BE REMOVED, PROTECT THE HANDS AGAINST ESCAPING STEAM AND SLOWLY TURN THE CAP ANTI- CLOCKWISE UNTIL THE EXCESS PRESSURE CAN ESCAPE. LEAVE THE CAP IN THIS POSITION UNTIL
ALL THE STEAM AND PRESSURE HAS ESCAPED AND THEN REMOVE THE CAP COMPLETELY.
WARNING: WHEN DRAINING THE COOLANT WITH THE ENGINE HOT, PROTECT THE HANDS AGAINST CONTACT
WITH HOT COOLANT.
WARNING
: WHEN WORKING WITHIN THE ENGINE COMPARTMENT, KEEP CLEAR OF THE ENGINE DRIVEN RADI- ATOR COOLING FAN WHEN THE ENGINE IS RUNNING.
4.2.3.2 Working Practices
Whenfilling thesystem with coolant,ensurethatthevehicle isstanding on a level surfaceand thatthecoolant is poured
in slowly so that airlocks are not introduced into the system. Airlocks can seriously affect the operation of the climate
control system and can cause damage to the heater circuit pump.
Hose clips should always be positioned
so that there is proper access for tightening and that the clip does not foul or
interfere with the operation of any components.
4.2.3 SERVICE PROCEDURES
4.2.3.1 Safety Precautions
The anti-freeze specified in Appendix A1 must be used wherever possible. It is designed to afford the maximum cor- rosion protection to all metals found in the engine cooling system, as well as having the frost protection properties
necessary during the winter months. Should it not be available, then anti-freeze conforming to Ford Motor Company
specification
ESBM97B49-A may be used. To provide optimum temperature and corrosion protection, the specified
anti-freeze concentration must always be used. Once coolant has been drained from the system, it must be discarded
and not reused. Anti-freeze is harmful to the environment. Always dispose of used coolant safely and never pour it down a drain connected to the public sewer.
CAUTION: Never fill or topup the system with water only.
CAUTION
: Anti-freeze is harmful to paintwork. Coolant spillages must be wiped up immediately and the affected
area washed to remove all traces of coolant.
CAUTION: To prevent the possibility of damage to the heater circuit
pump, the pump should be electrically isolated if the ignition has to be turned ON while the cooling system is drained.
The drive belt must always be tensioned to the specified value and the tension checked at the correct point on the belt.
This information is given in Sub-section IV in the preliminary pages.
When tightening components, the torque figures given in Sub
-section II in the preliminary pages should always be
used for the fastenings listed.
When fitting a replacement thermostat, ensure that the jiggle-pin is to the top of the thermostat housing.
4.2.3.3 Coolant Change
The coolant must be changed at intervals of four years. The system should be drained from the radiator drain plug,
flushed and filled with fresh coolant. Flushing should be carried out thoroughly to remove all the old coolant from the
engine and heater matrix. (The heatervalve isopen with the ignition OFF). AfterfilIing,checkthecoolant concentration
with a hydrometer. For specified anti-freeze and coolant concentration, see in Appendix Al.
X300 VSM 3 Issue 1 August 1994
Page 103 of 521
Exhaust System (AJ16)
9
/ 7 I
3;
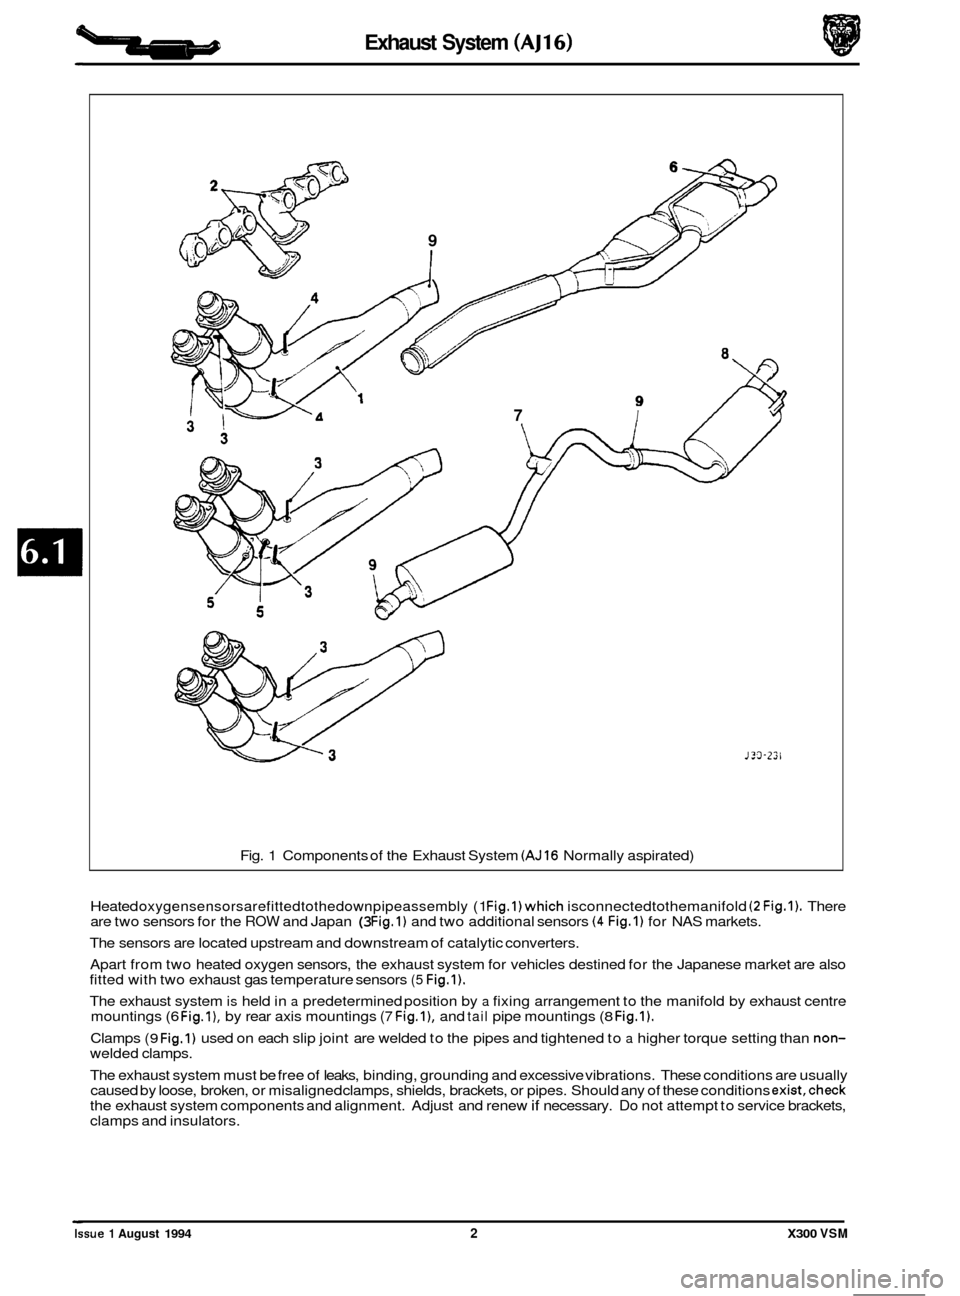
Fig. 1 Components of the Exhaust System (AJ16 Normally aspirated)
J?3-Z2l
Heated oxygensensorsarefittedtothedownpipeassembly (1 Fig.l)which isconnectedtothemanifold (2 Fig.1). There
are two sensors for the ROW and Japan (3 Fig.1) and two additional sensors (4 Fig.1) for NAS markets.
The sensors are located upstream and downstream of catalytic converters.
Apart from two heated oxygen sensors, the exhaust system for vehicles destined for the Japanese market are also
fitted with two exhaust gas temperature sensors
(5 Fig.1).
The exhaust system is held in a predetermined position by a fixing arrangement to the manifold by exhaust centre
mountings (6 Fig.l), by rear axis mountings (7 Fig.l), and tail pipe mountings (8 Fig.1).
Clamps (9 Fig.1) used on each slip joint are welded to the pipes and tightened to a higher torque setting than non- welded clamps.
The exhaust system must be free of leaks, binding, grounding and excessive vibrations. These conditions are usually
caused by loose, broken, or misaligned clamps, shields, brackets, or pipes. Should any of these conditions
exist,check the exhaust system components and alignment. Adjust and renew if necessary. Do not attempt to service brackets,
clamps and insulators.
Issue 1 August 1994 2 X300 VSM
Page 111 of 521
b Exhaust System (V12)
8
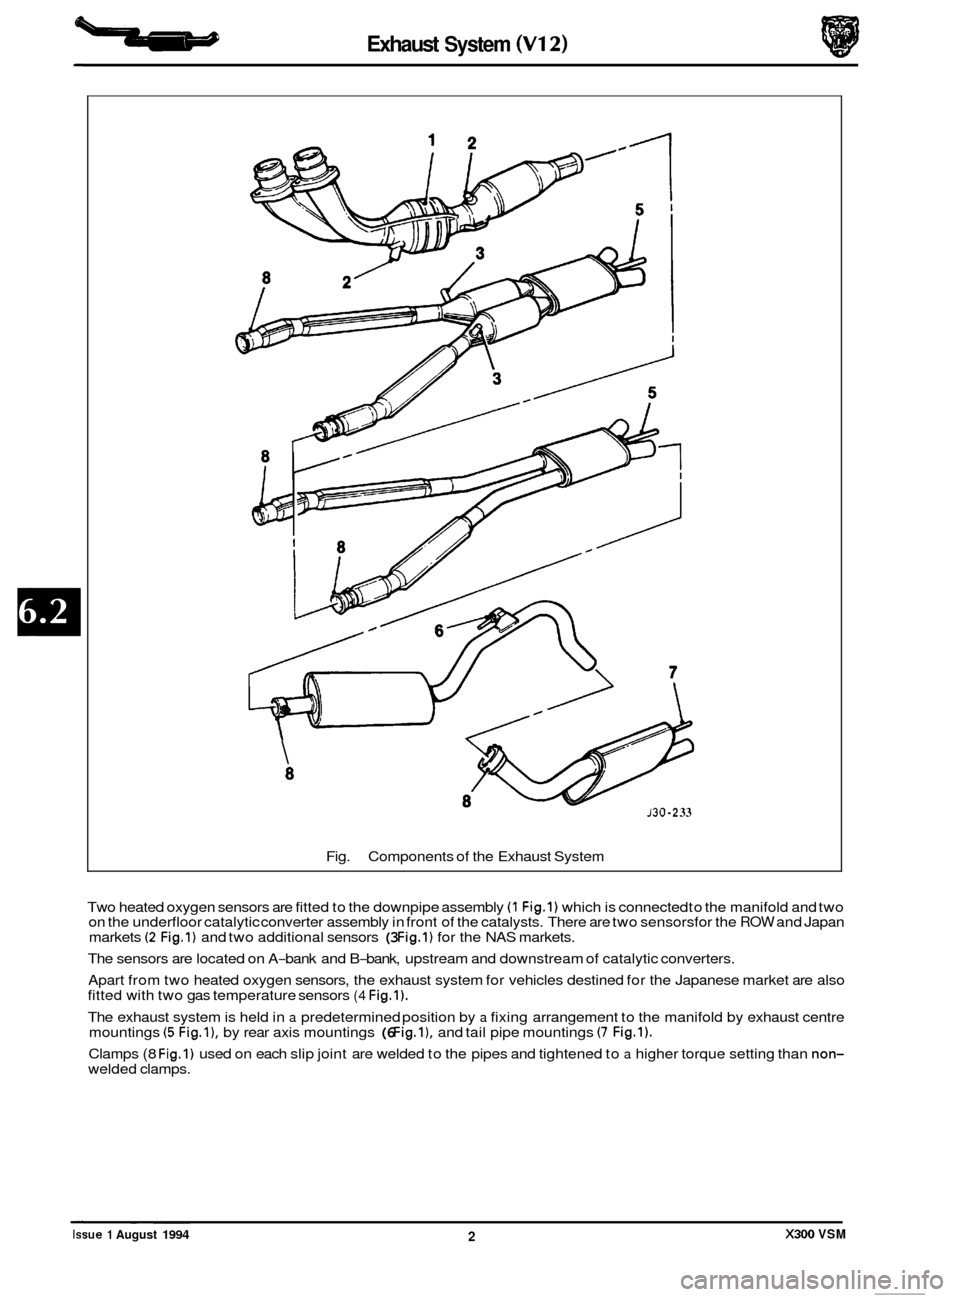
Fig.
P
Components of the Exhaust System
130 -2 33
Two heated oxygen sensors are fitted to the downpipe assembly (1 Fig.1) which is connected to the manifold and two
on the underfloor catalytic converter assembly in front of the catalysts. There are two sensorsfor the ROW and Japan
markets (2 Fig.1) and two additional sensors (3 Fig.1) for the NAS markets.
The sensors are located on A
-bank and B-bank, upstream and downstream of catalytic converters.
Apart from two heated oxygen sensors, the exhaust system for vehicles destined for the Japanese market are also
fitted with two gas temperature sensors
(4 Fig.1).
The exhaust system is held in a predetermined position by a fixing arrangement to the manifold by exhaust centre
mountings (5 Fig.l), by rear axis mountings (6 Fig.1). and tail pipe mountings (7 Fig.1).
Clamps (8 Fig.1) used on each slip joint are welded to the pipes and tightened to a higher torque setting than non- welded clamps. ~ ~~~
Issue 1 August 1994 2 X300 VSM
Page 115 of 521
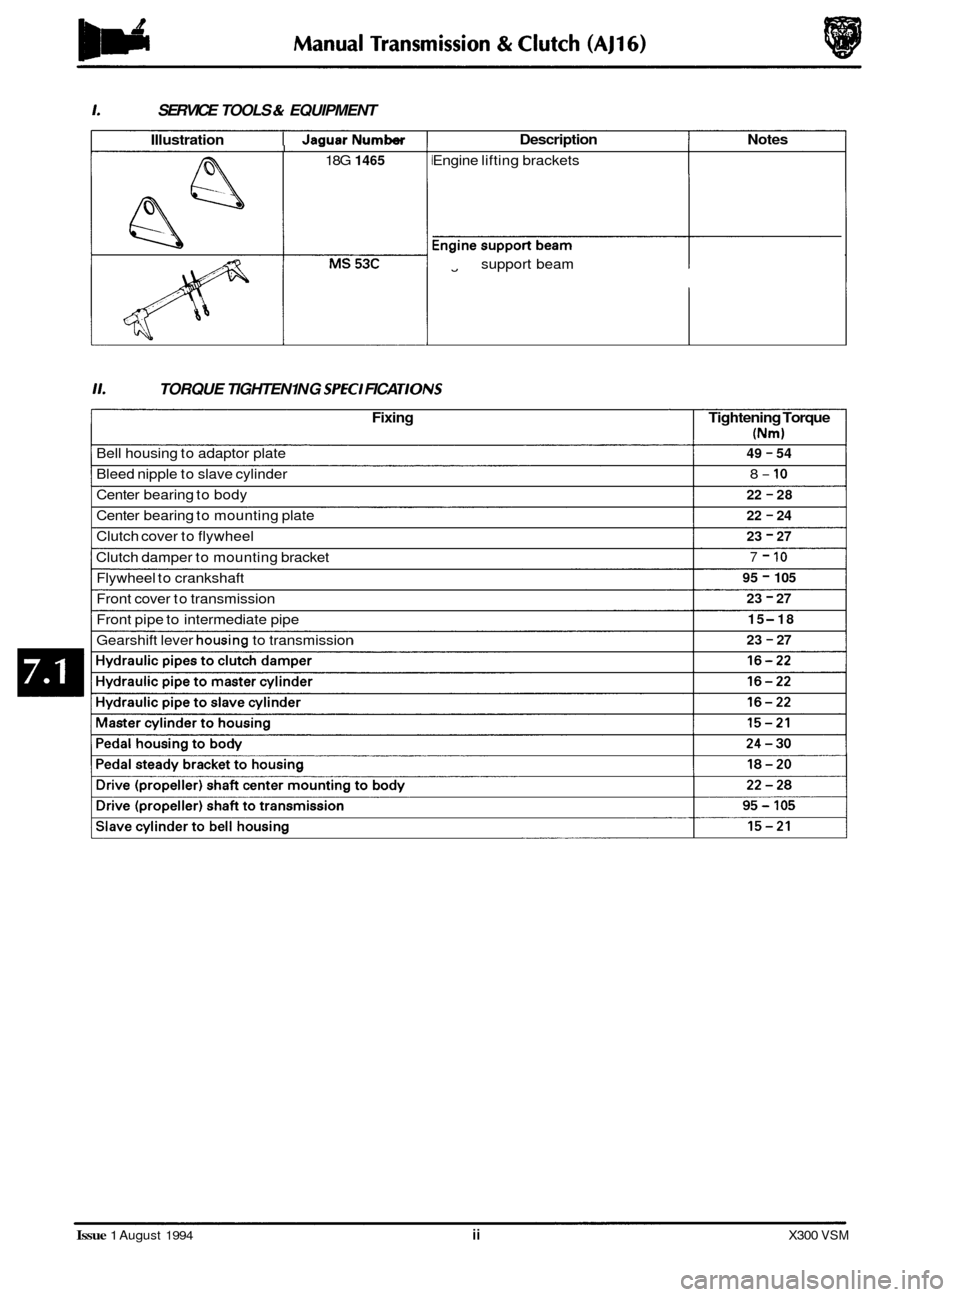
1. SERVICE TOOLS & EQUIPMENT
Illustration I JaauarNumber I -
18G 1465
Description Notes
Engine lifting brackets
Engine
fl support beam
11. TORQUE TIGHTEN1 NG SPEC1 FICA TIONS
Fixing Tightening Torque
(Nm)
49 - 54
8- 10
22 - 28
22
- 24
23 - 27
7 - 10
95 - 105
23
- 27
15
-18
23
- 27
Bell housing to adaptor plate
Bleed nipple to slave cylinder
Center bearing to body
Center bearing to mounting plate
Clutch cover to flywheel
Clutch damper to mounting bracket
Flywheel to crankshaft
Front cover to transmission
Front pipe to intermediate pipe
Gearshift lever
housing to transmission
Issue 1 August 1994 ii X300 VSM
Page 128 of 521
Manual Transmission & Clutch (AJl6)
0
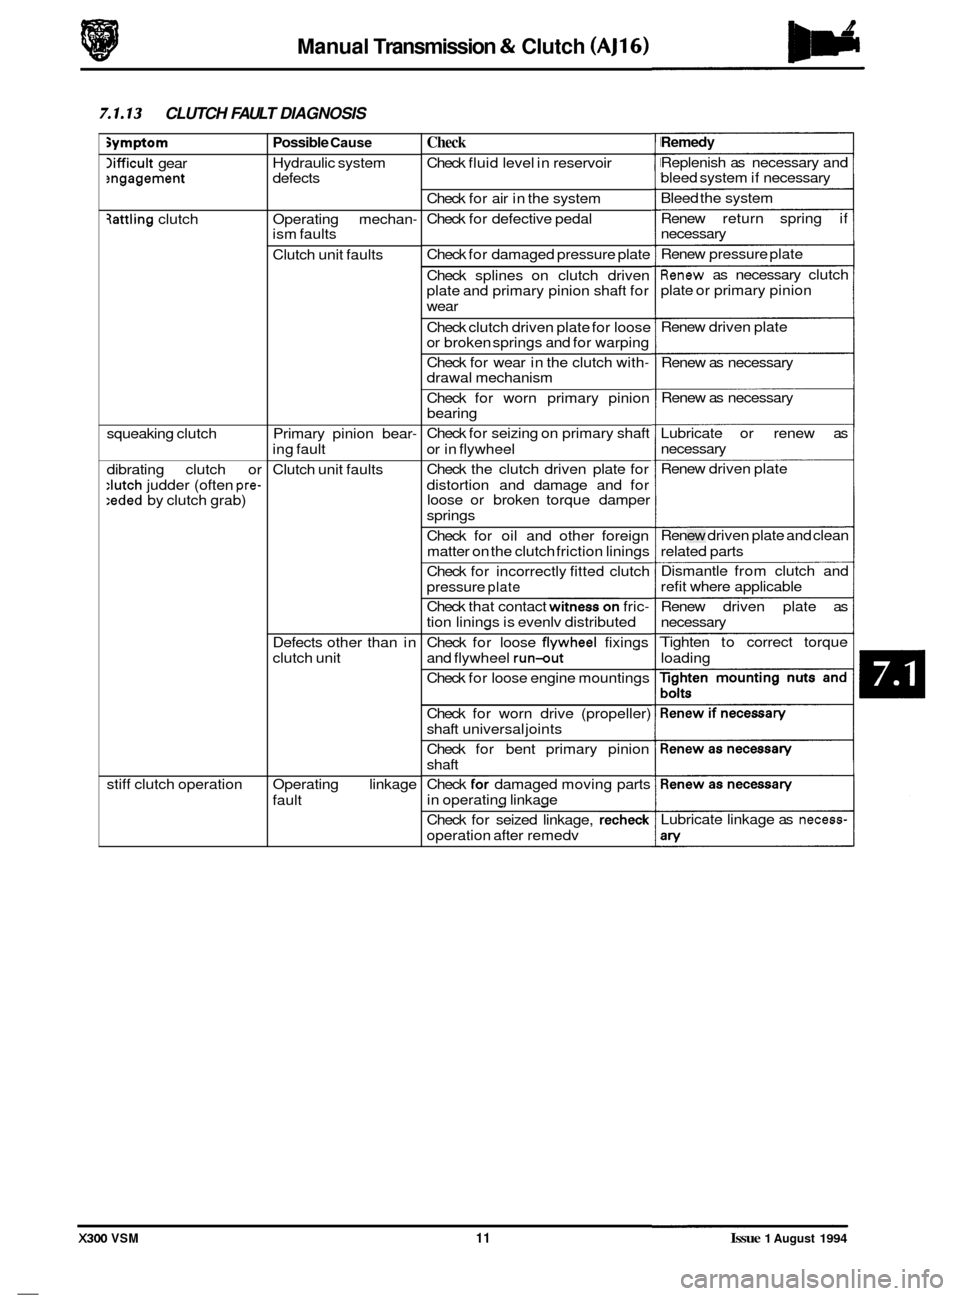
7.1.13 CLUTCH FAULT DIAGNOSIS
symptom
lifficult gear ?ngagement
3attling clutch
squeaking clutch
dibrating clutch or
:lutch judder (often pre- :eded by clutch grab)
stiff clutch operation
Possible Cause
Hydraulic system
defects
Operating mechan
- ism faults
Clutch unit faults
Primary pinion bear
-
ing fault
Clutch unit faults
Defects other than in
clutch unit
Operating linkage
fault
Check
Check fluid level in reservoir
Check for air in the system
Check for defective pedal
Check for damaged pressure plate
Check splines on clutch driven
plate and primary pinion shaft for
wear
Check clutch driven plate for loose
or broken springs and for warping
Check for wear in the clutch with
- drawal mechanism
Check for worn primary pinion
bearing
Check for seizing on primary shaft
or in flywheel
Check the clutch driven plate for
distortion and damage and for
loose or broken torque damper
springs
Check for oil and other foreign
matter on the clutch friction linings
Check for incorrectly fitted clutch
pressure
plate
Check that contact witness on fric-
tion linings is evenlv distributed -
Check for loose flvwheel fixings
and flywheel
run-out
Check for loose engine mountings
Check for worn drive (propeller)
shaft universal joints
Check for bent primary pinion
shaft
-
Check for damaged moving parts
in operating linkage
- -
Check for seized linkage, recheck
operation after remedv
Remedy
Replenish as necessary and
bleed system if necessary
Bleed the system
Renew return spring if
necessary
Renew pressure plate
Renew as necessary clutch
plate or primary pinion
Renew driven plate
Renew as necessary
Renew as necessary
Lubricate or renew as
necessary
Renew driven plate
Renew driven plate and clean
related parts
Dismantle from clutch and
refit where applicable
Renew driven plate as
necessary
Tighten to correct torque
loading
Lubricate linkage as
necess-
X300 VSM 11 Issue 1 August 1994
Page 129 of 521
Manual Transmission & Clutch (AJ16)
'ossible Cause
:Iutch Fault
'rimary pinion bear-
ng
ncorrect fitting nethod
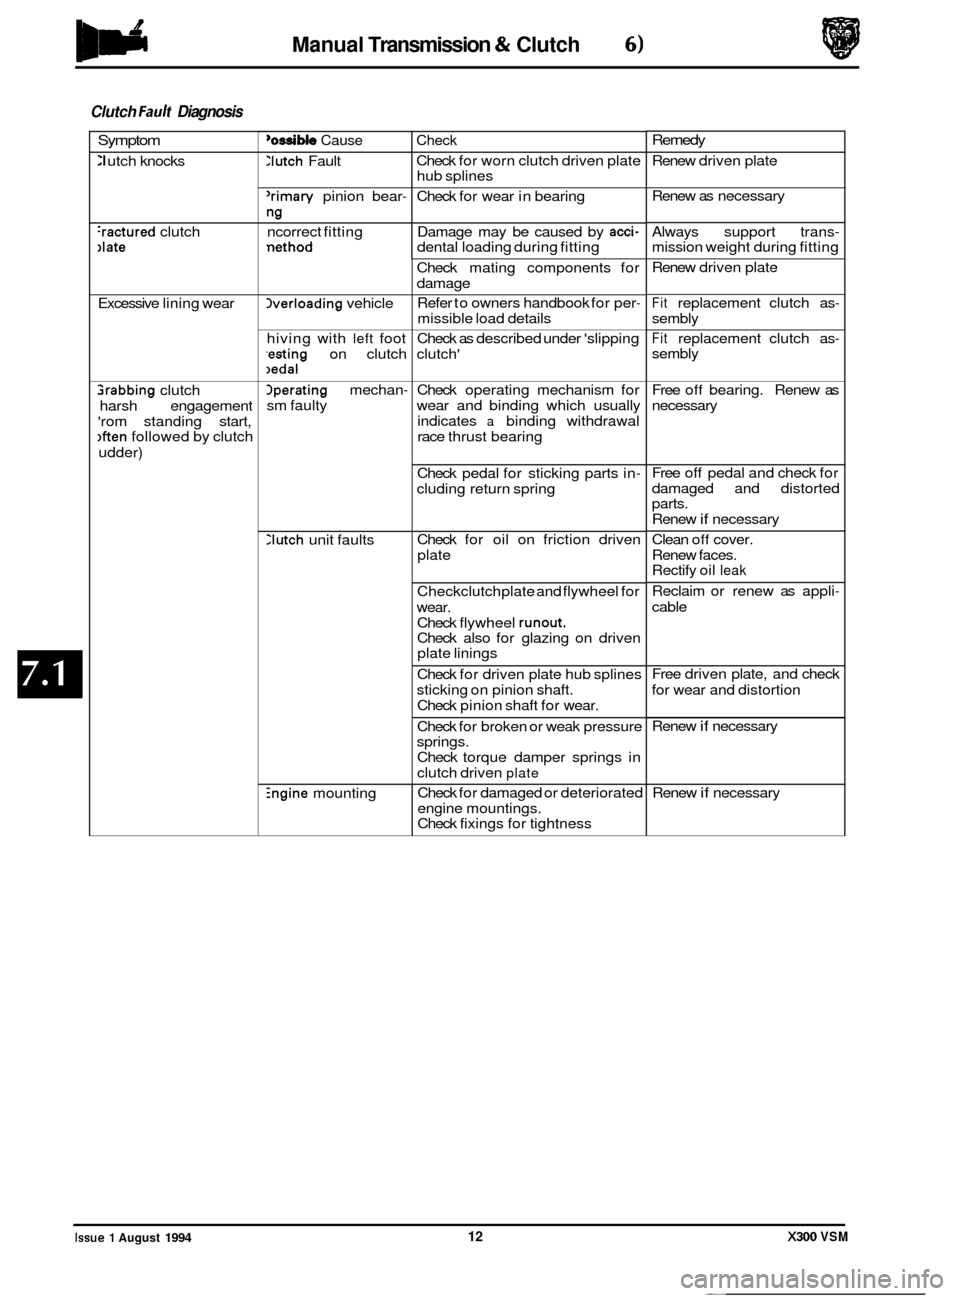
Clutch Fault Diagnosis
Check
Check for worn clutch driven plate
hub splines
Check for wear in bearing
Damage may be caused by
acci- dental loading during fitting
Symptom
:I utch knocks
herloading vehicle
hiving with
left foot
,esting on clutch )edal
:ractured clutch )late
Check mating components for
damage
Refer to owners handbook for per
-
missible load details
Check as described under 'slipping
clutch'
Excessive
lining wear
lperating mechan-
sm faulty
:Iutch unit faults
3rabbing clutch
harsh engagement
'rom standing start,
Iften followed by clutch
udder) Check
operating mechanism for
wear and binding which usually
indicates
a binding withdrawal
race thrust bearing
Check pedal for sticking parts in
-
cluding return spring
Check for oil on friction driven
plate
Checkclutch plate and flywheel for
wear. Check flywheel
runout. Check also for glazing on driven
plate linings
Check for driven plate hub splines
sticking on pinion shaft.
Check pinion shaft for wear.
Check for broken or weak pressure
springs.
Check torque damper springs in
clutch driven
plate
hgine mounting Check
for damaged or deteriorated
engine mountings.
Check fixings for tightness
Remedy
Renew driven plate
Renew as necessary
Always support trans
- mission weight during fitting
Renew driven plate
Fit replacement clutch as-
sembly
Fit replacement clutch as- sembly
Free
off bearing. Renew as
necessary
Free
off pedal and check for
damaged and distorted
parts.
Renew
if necessary
Clean
off cover.
Renew faces.
Rectify oil
leak
Reclaim or renew as appli-
cable
Free driven plate, and check
for wear and distortion
Renew
if necessary
Renew
if necessary
Issue 1 August 1994 12 X300 VSM
Page 137 of 521
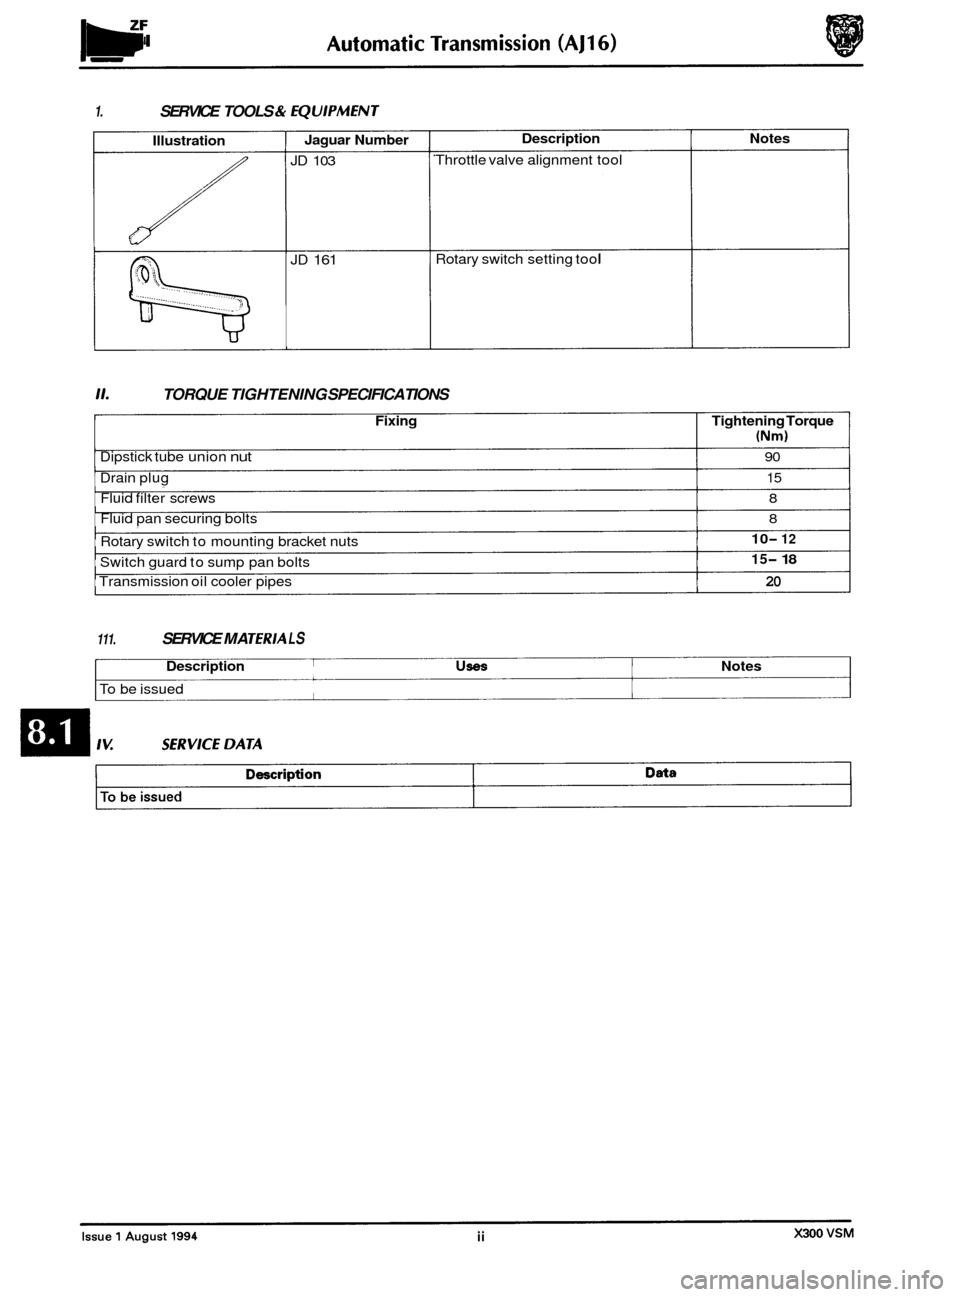
1. SERVICE TOOLS & fQUlPMENT
Illustration
::(())(((((
Jaguar Number
JD 103
JD 161
Description Notes
Throttle valve alignment tool
Rotary switch setting tool
11. TORQUE TIGHTENING SPECIFICATIONS
Fixing Tightening Torque
(Nm)
Dipstick tube union nut 90
Drain plug 15
Fluid filter screws 8
Fluid pan securing bolts 8
Rotary switch to mounting bracket nuts
Transmission oil cooler pipes
20
10- 12
15- 18 Switch guard to sump pan bolts
111. SERVICE MA TERlA L S
Description USeS Notes
To be issued
Page 138 of 521
Automatic Transmission (AJ16)
8.1.1 GENERAL DESCRIPTION
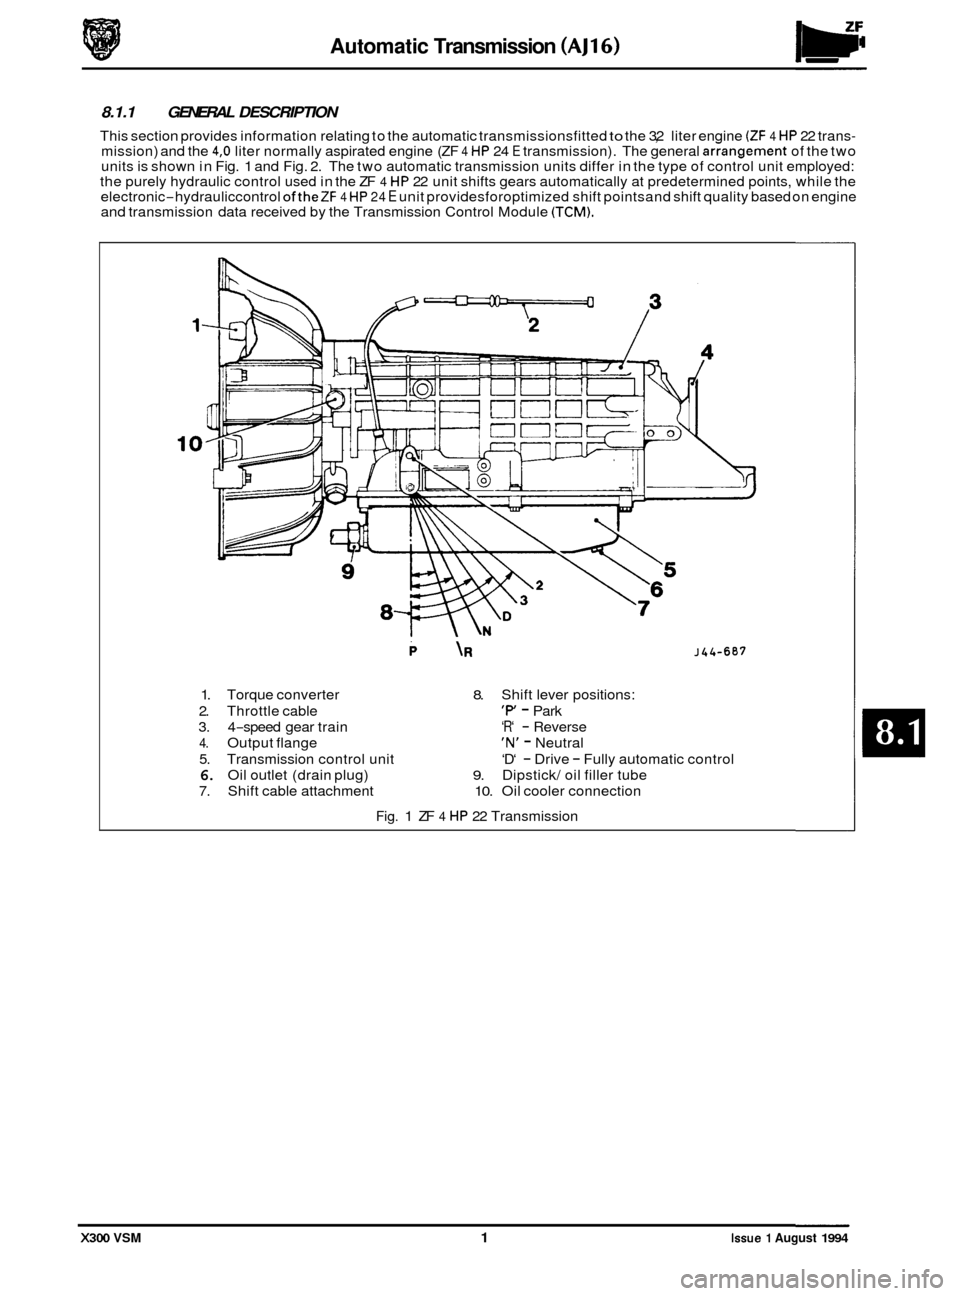
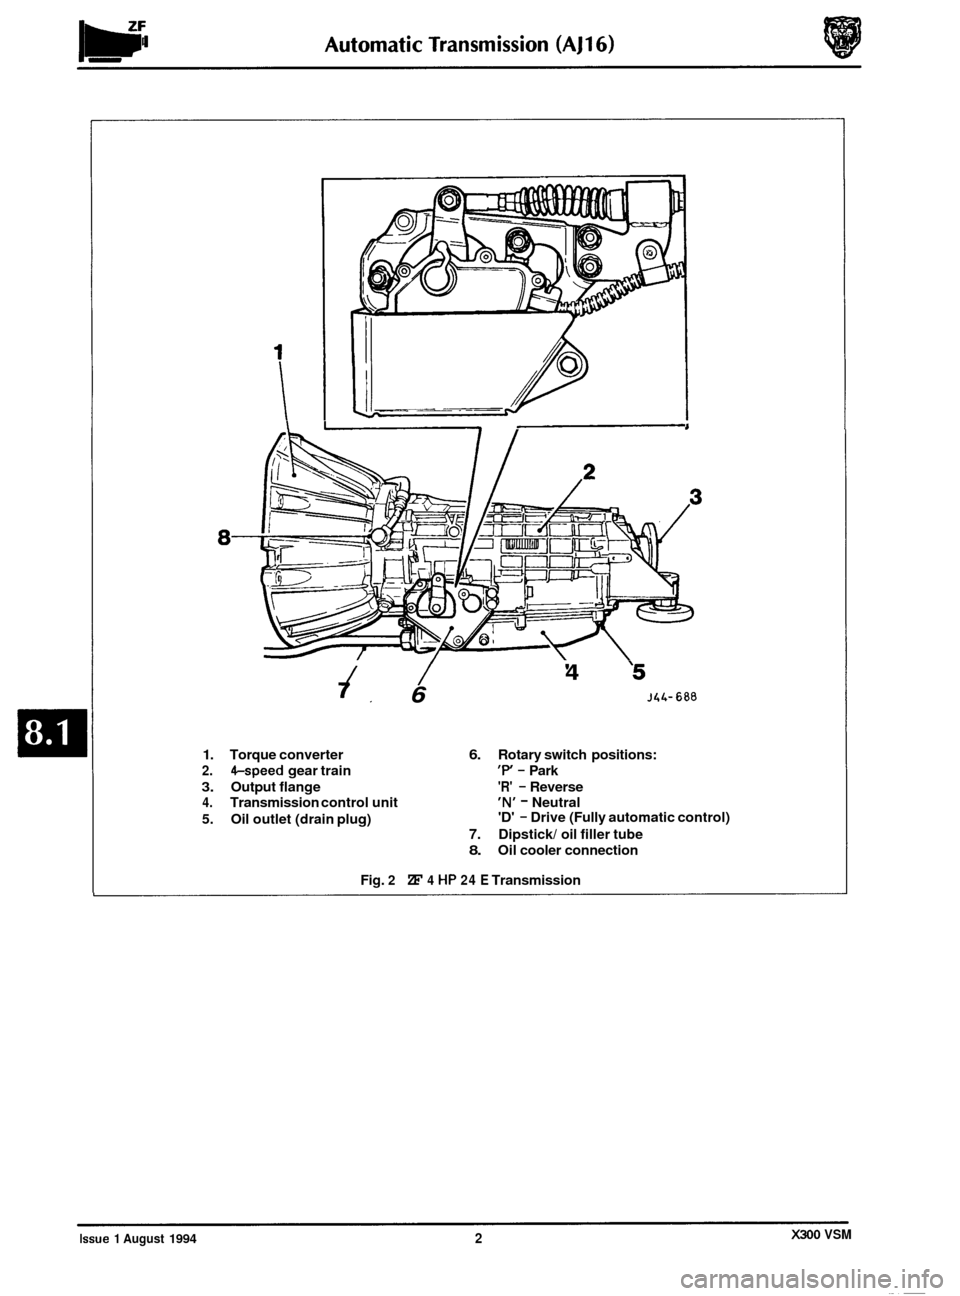
’ This section provides information relating to the automatic transmissionsfitted to the 3,2 liter engine (ZF 4 HP 22 trans- mission) and the 4,O liter normally aspirated engine (ZF 4 HP 24 E transmission). The general arrangement of the two
units is shown in Fig. 1 and Fig. 2. The two automatic transmission units differ in the type of control unit employed:
the purely hydraulic control used in the ZF 4 HP 22 unit shifts gears automatically at predetermined points, while the
electronic-hydrauliccontrol oftheZF 4 HP 24 E unit providesforoptimized shift point sand shift quality based on engine
and transmission data received by the Transmission Control Module (TCM).
P \R J44-607
1. Torque converter 8. Shift lever positions:
2. Throttle cable
‘P - Park
3. 4
-speed gear train ‘R‘ - Reverse
4. Output flange ‘N’ - Neutral
5. Transmission control unit
6. Oil outlet (drain plug) 9. Dipstick/ oil filler tube
7. Shift cable attachment 10. Oil cooler connection
‘D‘
- Drive - Fully automatic
control
Fig. 1 ZF 4 HP 22 Transmission
X300 VSM 1 Issue 1 August 1994
Page 139 of 521
I 1 I
8-
/ /
7, 6
'4 '5
J4L- 688
1. Torque converter 6. Rotary switch positions:
2. &speed gear train 'P - Park
3. Output flange 'R' - Reverse
4. Transmission control unit 'N' - Neutral
5. Oil outlet (drain plug) 'D' - Drive
(Fully automatic control)
7. Dipstick/ oil filler tube
8. Oil cooler connection
Fig.
2 ZF 4 HP 24 E Transmission
X300 VSM Issue 1 August 1994 2