JEEP CJ 1953 Service Manual
Manufacturer: JEEP, Model Year: 1953, Model line: CJ, Model: JEEP CJ 1953Pages: 376, PDF Size: 19.96 MB
Page 341 of 376
'Jeep'
UNIVERSAL
SERIES
SERVICE
MANUAL
R
FRAME
Contents
SUBJECT
PAR.
Draw
Bar
R-6
Frame
Alignment
.R-2
Frame
Dimensions
.R-3
Front
Axle Alignment.
R-5
Straightening
Frame
R-4
R-1.
GENERAL
equipped with V6 engines, refer
to
measurements
The
frame
is the
structural center
of
the vehicle,
B£?wn
in
FiB-
R"f
, _ , r' .
for in addition
to
carrying
the load,
it
provides and The inost convenient method
of
making this check,
maintains
correct relationship
between
other units
Particularly
when
the
body
is on the
chassis,
is by
to assure their normal functioning. marking
on the
floor
all
dimensional points from
Of
rugged design, the frame
is
constructed of heavy
fhlch
measurements should
be
taken.
This
is
channel
steel side
rails
and cross-members.
Brack-
known
a\
Plumb-bobbing
the
frame Select
a
ets and diagonal braces
are
used
to
maintain
the
?Pace
on the
floof
^hlch
»
extr«nely
level If
work-
proper
longitudinal position
of the
side
rails
rela-
ing Pn
a.,fPen^
c*ean
* s°
that
the fha*k
tive
to
each other, and
at the
same time provide
*****
Jl!*
be
vJs.lble
underneath
the
frame
to be
additional
resistance
to
torsional strains. Fig. R-1, checked
If
workmg
on a
wooden
floor
it is ad-
R-2,
and R-3 illustrate
the
subject models. disable
la^
f f * V
Underneath
*he ve"
Vehicles
that have been
in an
accident
of any
hide
and
carefully tack them
m
place. Drop
a
nature,
which
may
result
in a
swayed
or
sprung gumb-bob from each point indicated
in
Figures
frame,
should always
be
carefully checked
for ^
an?
L'maJkl?g the uflo?r
Meetly underneath
proper
frame alignment, steering geometry,
and the
point. Satisfactory checking depends entirely
axle alignment.
on the
accuracy
of the
marks
in
relation
to the
frame.
To
check points that have been marked, carefully
move
the vehicle away from the layout on the floor,
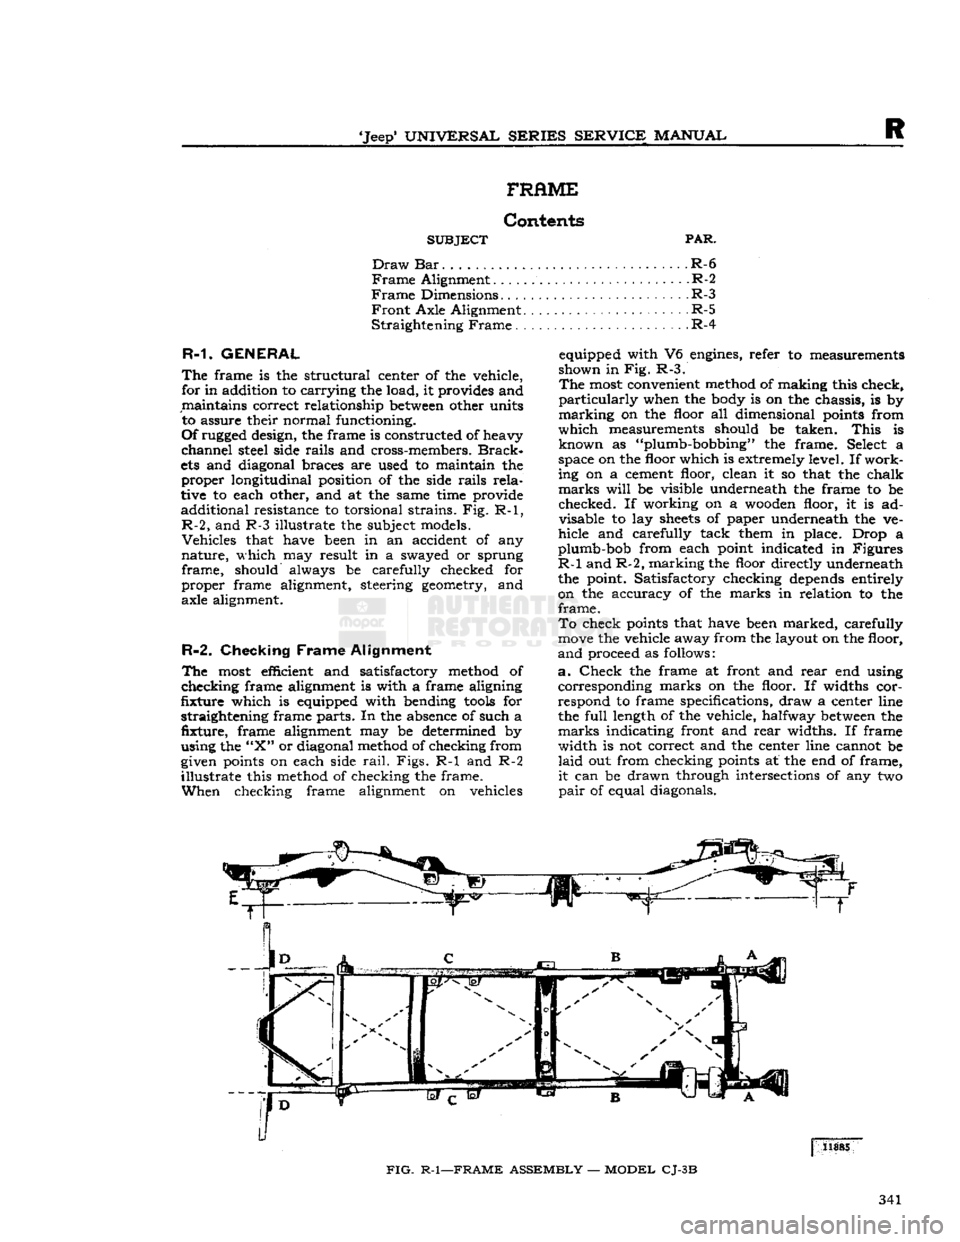
R-2.
Checking
Frame
Alignment
anci
proceed
as
follows:
The
most efficient
and
satisfactory method
of a.
Check
the
frame
at
front
and
rear
end
using
checking
frame alignment
is
with
a
frame aligning corresponding marks
on the
floor.
If
widths
cor-
fixture
which
is
equipped with bending
tools
for
respond
to
frame specifications, draw
a
center line
straightening frame parts. In the absence
of
such
a the
full
length
of
the vehicle, halfway
between
the
fixture,
frame
alignment
may be
determined
by
marks indicating front and
rear
widths.
If
frame
using the
"X"
or diagonal method of checking from width
is not
correct and
the
center line cannot
be
given points
on
each side
rail.
Figs.
R-1 and R-2
laid
out
from checking points
at the
end
of
frame,
illustrate
this method
of
checking
the
frame.
it
can
be
drawn through intersections
of
any
two
When
checking frame alignment
on
vehicles
pair
of
equal diagonals.
FIG.
R-1—FRAME
ASSEMBLY
—
MODEL
CJ-3B
341
Page 342 of 376
R
FRAME
11900
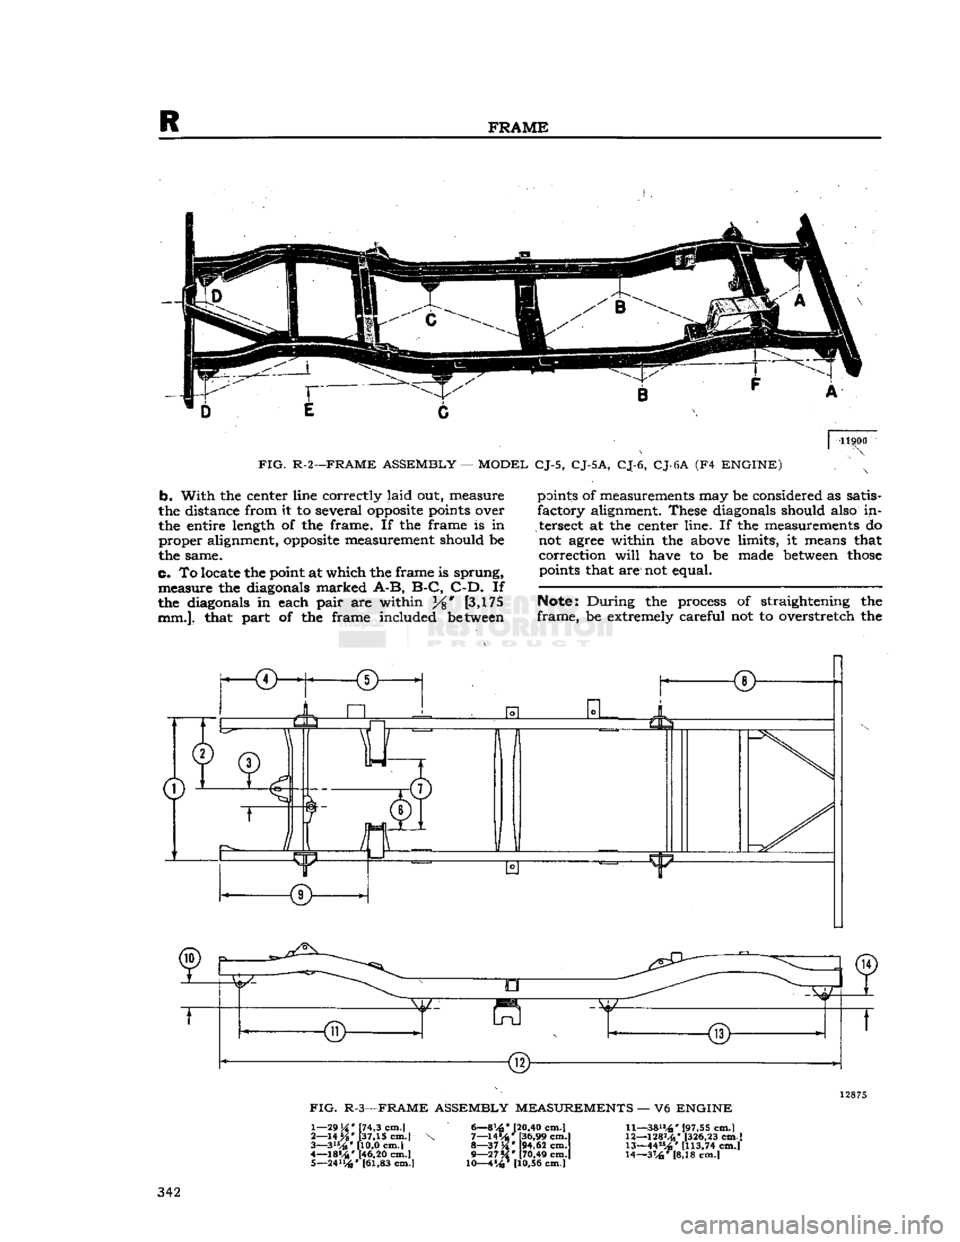
FIG.
R-2—FRAME ASSEMBLY
—
MODEL
CJ-5,
CJ-5A,
CJ-6,
CJ-6A
(F4
ENGINE)
b.
With
the
center line correctly
laid
out,
measure
the distance from
it to
several
opposite
points over
the entire length
of the
frame.
If the
frame
is in
proper
alignment,
opposite
measurement should
be
the same.
c.
To locate the point at
which
the
frame
is
sprung,
measure
the
diagonals marked
A-B,
B-C,
C-D.
If
the diagonals
in
each
pair
are
within [3,175
mm.],
that
part
of the
frame included between points
of
measurements may
be
considered
as
satis
factory
alignment. These diagonals should also
in
tersect
at the
center line.
If the
measurements
do
not agree within
the
above limits,
it
means that
correction
will
have
to be
made between
those
points that are not equal.
Note:
During
the
process
of
straightening
the
frame,
be
extremely careful
not to
overstretch
the
JiL
R
TET
12875
FIG.
R-3—FRAME ASSEMBLY MEASUREMENTS
— V6
ENGINE
1—
29H'
[74,3 cm.l 6—8[20.40 Cm.|
11—38»4*
[97,55 cm.)
2—
14 %' [37,15 cm.|
\ 7—14»4*t36,99
cm.l
12—128Mb'
[326,23
cm.]
3—
3i*4*
110,0 cm.l
8—37K*
[94.62
cm.l
13—44"^' [113,74 cm.l
4— 18«4* [46,20
cm.|
9—27**' [70,49 cm.j 14—316'
[8,18
cm.l
5—
24114»
[61,83 cm.) 10—4%* [10.56 cm.] 342
Page 343 of 376
'Jeep*
UNIVERSAL
SERIES
SERVICE
MANUAL
R
frame.
This
could cause the already aligned sec
tions of the frame to
become
misaligned or weak ened.
R-3.
Frame Dimensions
Points for measuring frame alignment on vehicles
equipped with the F4
engine
are shown in
Fig.
R-l
and
R-2.
The correct measurements for each model
are
given in the table. Point A is at the front of the
frame.
A-B
and C-D are the distances
between
spring
shackle
bolt and spring pivot bolt frame centers
measured
on a line parallel with the frame center-
line.
E and F show the shackle bolt centers in
rela
tion (above or below) to the pivot bolt centers.
On
vehicles equipped with V6
engines
the frame dimensions are shown in Fig. R-3.
CJ-3B
A-B
44.31"
[112,55
cm.]
C-D
. . . . . .48.48"
[123,14
cm.]
Width
Front
29%" [74,3 cm.]
Width
Rear
29M" [74,3 cm.]
"E"
above .3W [8,18 cm.]
"F"
above 4%* [10,56 cm.]
CJ-5,
CJ-5A,
CJ-6,
CJ-6A,
DJ-5, DJ-6
A-B
.47.08"
[119,58
cm.]
C-D.
52.37"
[133,02
cm.]
Width
Front
2934"
[74,3 cm.]
Width
Rear
29j|" [74,3 cm.]
"E"
above 3%" [8,18 cm.]
"F"
above. .5%" [15,0 cm.]
R-4.
Straightening Frame
In
case the bending or twisting of the frame is not
excessive, it may be straightened.
This
should be
done
cold, as excessive heat applied to the frame
will
weaken it. For this reason it is recommended that badly damaged frame parts be replaced.
Note:
A technique known as "controlled heat" can
be utilized where a frame section is "squashed" and must be brought out without "tearing" or excessive
stretch
to the metal.
R-5.
Front
Axle
Alignment
After
it has been determined that the frame is prop
erly
aligned, the front axle alignment with the
frame
can be checked. The front axle is square
with
the frame if the distance
between
the front
and
rear
axle is the same on both sides. The dis
tance from the spring upper bushings to the front
axle on both sides should be equal.
Note:
Always inspect the springs for broken spring
center
bolts
when checking the frame and axle
alignment.
R-6. Draw Bar
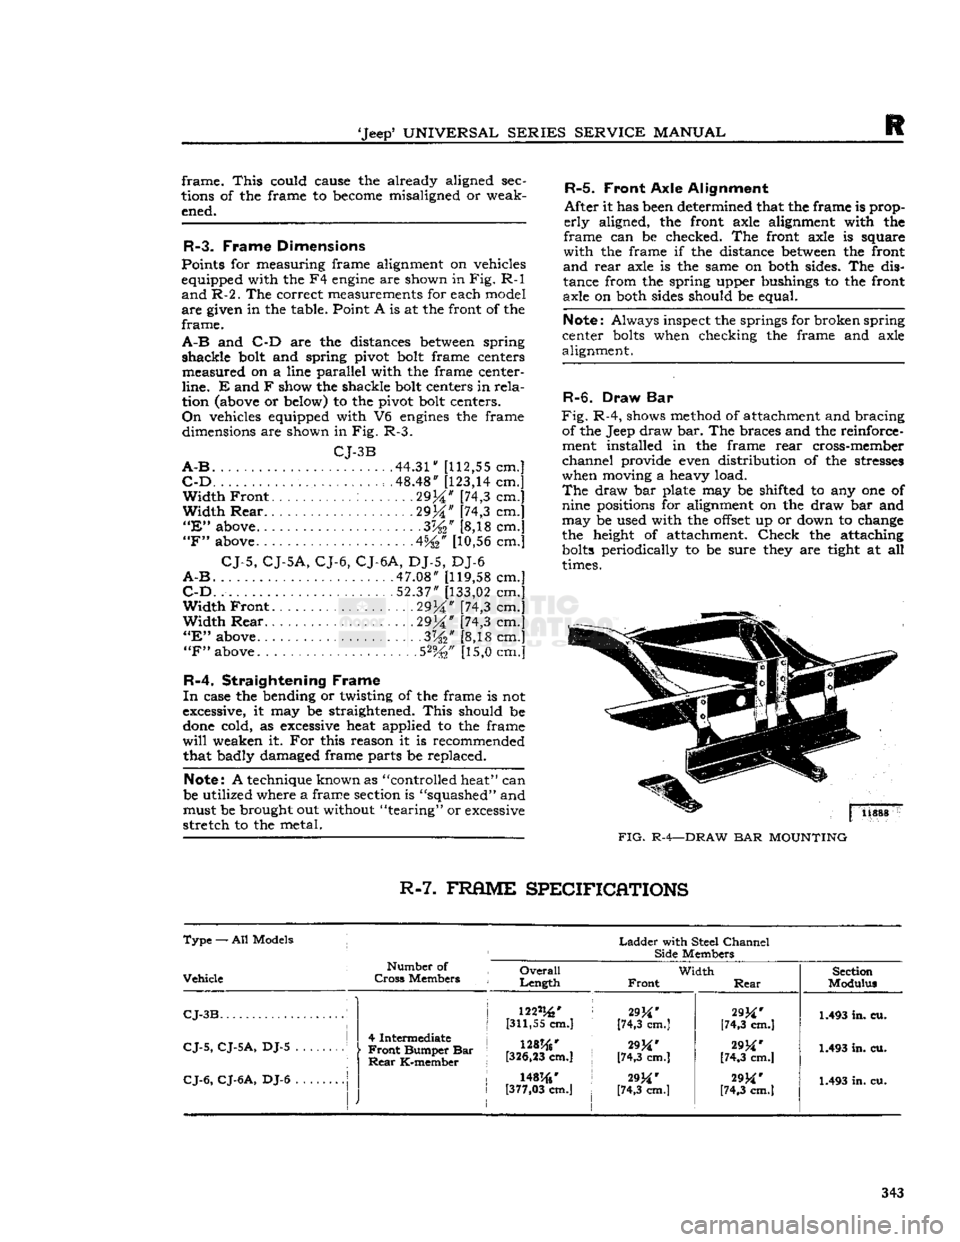
Fig.
R-4, shows method of attachment and bracing of the Jeep draw bar. The braces and the reinforce
ment installed in the frame
rear
cross-member
channel
provide even distribution of the stresses
when moving a heavy load.
The
draw bar plate may be shifted to any one of
nine positions for alignment on the draw bar and
may
be used with the
offset
up or down to change
the height of attachment.
Check
the attaching
bolts
periodically to be sure they are tight at all
times.
FIG.
R-4—DRAW
BAR
MOUNTING
R-7.
FRflME
SPECIFICATIONS
Type
— All Models j
Ladder
with Steel
Channel
Side
Members
Vehicle
Number
of
Cross
Members
Overall
Length
Width
Front
Rear
Section
Modulus
CJ-3B
i
CJ-5,
CJ-5A,
DJ-5 1
j
4 Intermediate j
•
Front
Bumper Bar
Rear
K-member 122%'
[311,55 cm.]
128%'
[326,23
cm.] 29^*
[74,3 cm.]
[74,3 cm.]
29M'
[74,3 cm.]
[74,3 cm.] 1.493 in. cu.
1.493 in. cu.
CJ-6,
CJ-6A,
DJ-6
|
J
1
I
r
\mw t
[377,03
cm.]
29M'
[74,3 cm.]
29M'
[74,3 cm.] 1.493 in. cu.
343
Page 344 of 376

Page 345 of 376
'Jeep'
UNIVERSAL
SERIES
SERVICE
MANUAL
s
SPRINGS
AND
SHOCK
ABSORBERS
Contents
SUBJECT
PAR. SUBJECT PAR.
Pivot Bolts S-3 Spring Removal S-4
Shock
Absorbers S-7 Spring Shackles S-2
Spring
Installation S-5 U-Shackles S-6
S-1.
GENERAL
Semielliptical
leaf springs are used for all models.
The
springs are hung longitudinally from the frame
side rails by means of brackets welded to the
rails.
All
axles are firmly attached to the springs by U-
bolts
(spring clips), spring saddles welded to the
underside of the axles, and spring plates under the
springs.
Early
model DJ-5 and DJ-6 front axles (I beam) are attached to the springs with conven
tional
bolts
and spring plates. Spring center
bolts
are
inserted in the axle spring saddles to prevent
shifting of the axle.
All
front springs, except as noted below, are provided with shackles at the front ends of the springs
and
pivot
bolts
at the
rear
ends of the springs. Model CJ-5 up to
Serial
No. 44437 and Model
CJ-6
up to
Serial
No. 11981 are provided with shackles at the
rear
ends of the front springs, and
pivot
bolts
at the front ends.
Note:
Models
CJ-5A
and
CJ-6A
are equipped with
the two
stage
type front and
rear
spring.
All
rear
springs are provided with shackles at the
rear
end and pivot
bolts
at the front end.
Springs
should be examined periodically for broken
or
shifted leaves,
loose
or missing rebound clips,
angle of spring shackles, and position of springs
on the saddles. Springs with shifted leaves do not have their normal strength. Missing rebound clips may permit the spring leaves to fan out or break
on rebound. Broken leaves may make the vehicle
hard
to handle or permit the axle to shift out of
line.
Weakened springs may break causing difficulty
in
steering. Spring attaching clips or
bolts
must be tight. It is
suggested
that they be checked at each
vehicle inspection and torqued 45 to 55 lb-ft. [6,2 a 7,6 kg-m.].
S-2.
Spring Shackles
Rubber-bushed
shackles are provided on all current
production vehicles. The steel-backed rubber (silent bloc) bushings are pressed into the spring
eyes
and mounting brackets. The shackle
bolts
tighten the side plates against the inner steel back
ing of the bushings. Oscillation of the springs is
taken in the rubber bushings.
All
vehicles produced before early 1957 were
equipped with U-shackles and threaded core bush-
*3(
21-
to It is
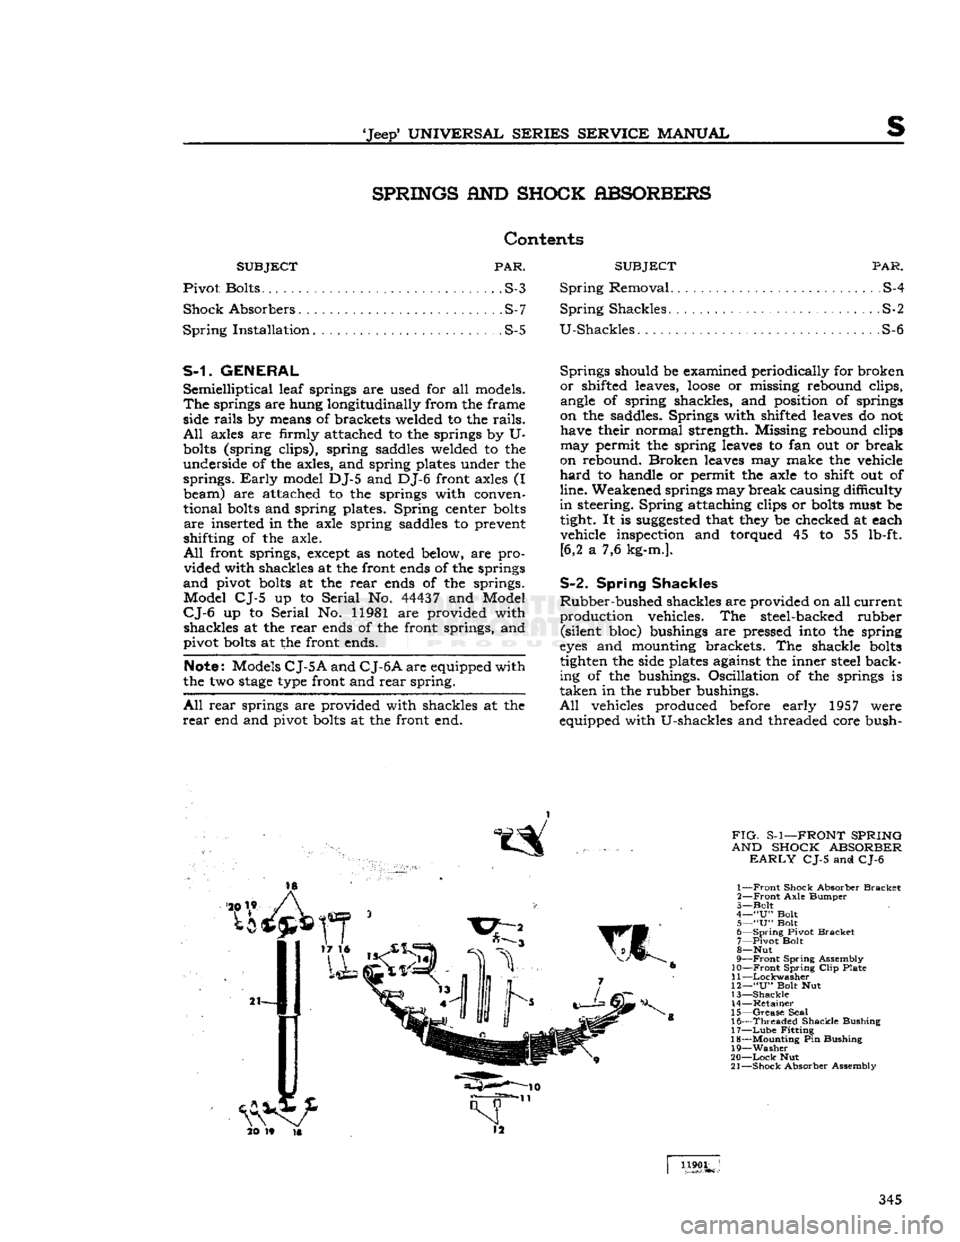
FIG-
S-1—FRONT SPRING
AND SHOCK ABSORBER
EARLY
CJ-5 and CJ-6
1—
Front
Shock Absorber
Bracket
2—
Front
Axle
Bumper
3—
Bolt
4—
"U"
Bolt
5—
"U"
Bolt
6—
Spring
Pivot
Bracket
7—
Pivot
Bolt
8—
Nut
9—
Front
Spring
Assembly
10—Front
Spring
Clip
Plate
11
—Lockwasher
12—
"U"
Bolt Nut
13—
Shackle
14—
Retainer
15—
Grease
Seal
16—
Threaded
Shackle
Bushing
17—
Lube
Fitting
18—
Mounting
Pin Bushing
19—
Washer
20—
Lock
Nut
21—
Shock
Absorber Assembly
1190L
345
Page 346 of 376
SPRINGS
AND
SHOCK
ABSORBERS
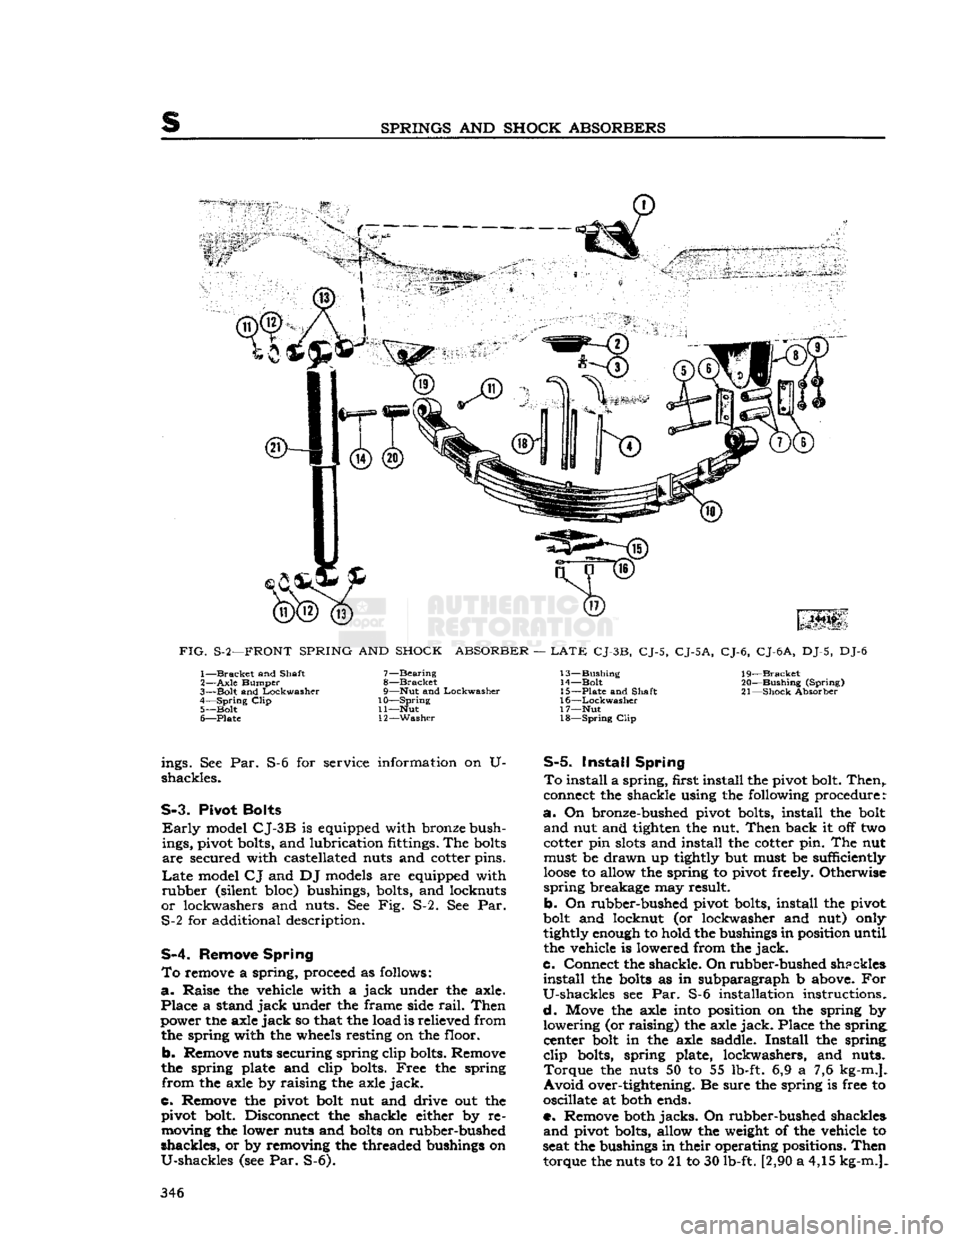
FIG.
S-2—FRONT
SPRING
AND
SHOCK
ABSORBER
—
LATE
CJ-3B,
CJ-5,
CJ-5A,
CJ-6,
CJ-6
A,
DJ-5, DJ-6 1—
Bracket
and Shaft
2—
Axle
Bumper
3—
Bolt
and
Lockwasher
4—
Spring
Clip
5—
Bolt
6—
Plate
7—
Bearing
8—
Bracket
9—
Nut
and
Lockwasher
10—
Spring
11—
Nut
12—
Washer
13—
Bushing
14—
Bolt
15—
Plate
and Shaft
16—
Lockwasher
17—
Nut
18—
Spring
Clip
19—
Bracket
20—
Bushing
(Spring)
21—
Shock
Absorber ings. See Par.
shackles.
S-6 for service information on U-
S-3.
Pivot
Bolts
Early
model
CJ-3B
is equipped with bronze bush
ings, pivot bolts, and lubrication fittings. The
bolts
are
secured with castellated nuts and cotter pins.
Late
model
CJ
and DJ models are equipped with
rubber
(silent bloc) bushings, bolts, and locknuts
or
lockwashers and nuts. See Fig. S-2. See Par. S-2 for additional description.
S-4.
Remove
Spring
To
remove a spring, proceed as follows:
a.
Raise
the vehicle with a
jack
under the axle.
Place
a stand
jack
under the frame side
rail.
Then
power the axle
jack
so that the load is relieved from the spring with the wheels resting on the floor.
b.
Remove nuts securing spring clip bolts. Remove
the spring plate and clip bolts.
Free
the spring
from
the axle by raising the axle
jack.
C.
Remove the pivot bolt nut and drive out the pivot bolt. Disconnect the shackle either by removing the lower nuts and
bolts
on rubber-bushed
shackles,
or by removing the threaded bushings on
U-shackles
(see Par. S-6).
S-5.
Install
Spring
To
install a
spring,
first install the pivot bolt.
Then,,
connect the shackle using the following procedure:
a.
On bronze-bushed pivot bolts, install the bolt
and
nut and tighten the nut.
Then
back it off two
cotter pin
slots
and install the cotter pin. The nut must be
drawn
up tightly but must be sufficiently
loose
to allow the spring to pivot freely. Otherwise
spring
breakage may result.
b.
On rubber-bushed pivot bolts, install the pivot
bolt and locknut (or lockwasher and nut) only
tightly enough to hold the bushings in position until
the vehicle is lowered from the
jack.
c.
Connect the shackle. On
rubber-bushed
shpckles
install
the
bolts
as in subparagraph b above. For
U-shackles
see Par. S-6 installation instructions.
d.
Move the axle into position on the spring by
lowering
(or raising) the axle
jack.
Place the spring, center bolt in the axle saddle.
Install
the spring
clip
bolts, spring plate, lockwashers, and nuts.
Torque
the nuts 50 to 55 lb-ft. 6,9 a 7,6 kg-m.].
Avoid
over-tightening. Be sure the spring is free to
oscillate at both ends.
e. Remove both
jacks.
On rubber-bushed shackles
and
pivot bolts, allow the weight of the vehicle to
seat the bushings in their operating positions.
Then
torque the nuts to 21 to 30 lb-ft. [2,90 a 4,15 kg-m.]. 346
Page 347 of 376
'Jeep'
UNIVERSAL
SERIES
SERVICE
MANUAL
S
FIG.
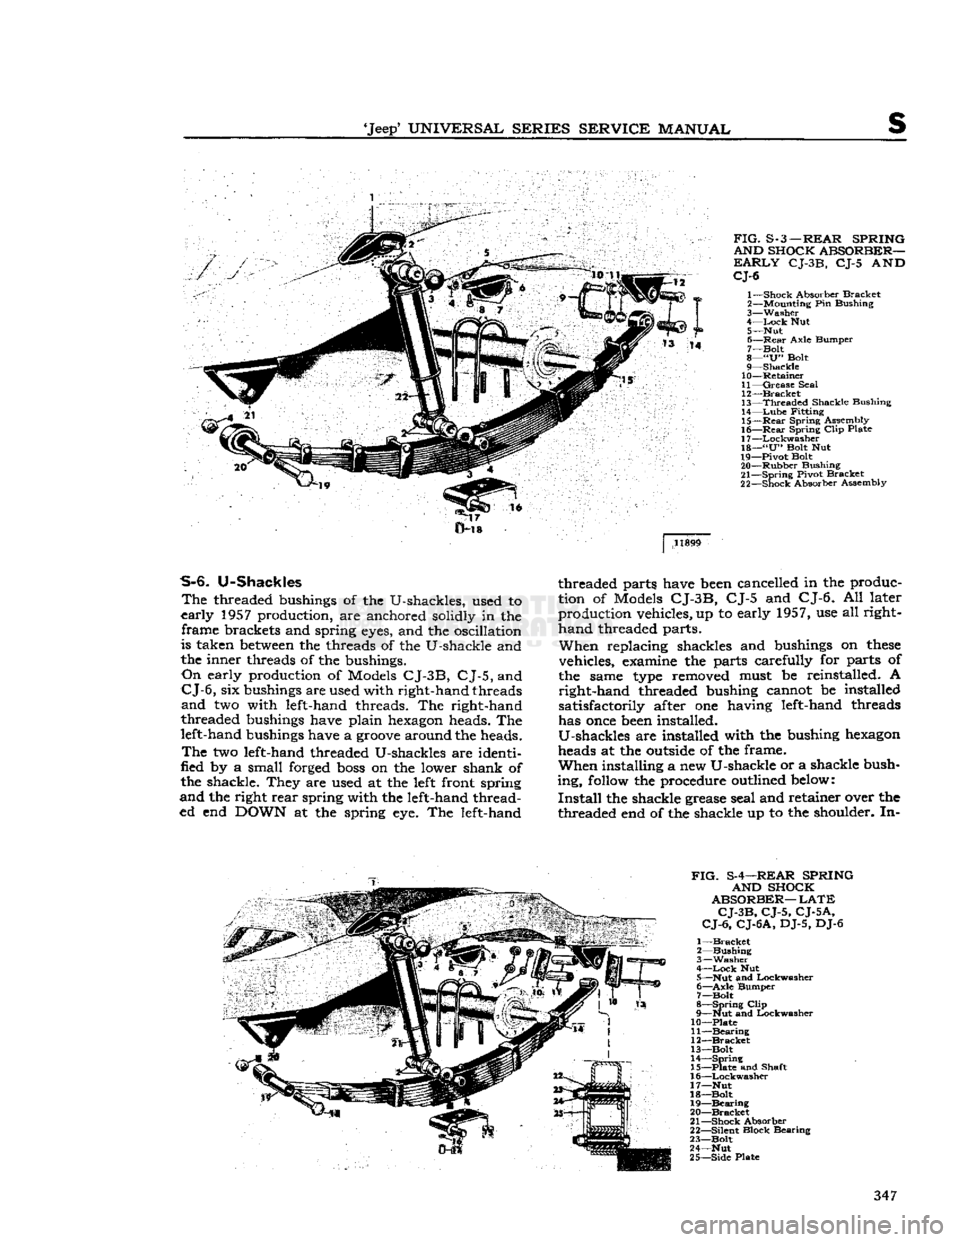
S-3—REAR SPRING
AND SHOCK ABSORBER—
EARLY
CJ-3B,
CJ-5 AND
CJ-6
1— Shock Absorber Bracket
2— Mounting Pin Bushing
3—
Washer
4—
Lock
Nut 5— Nut
6—
Rear
Axle Bumper
7— Bolt
8—
"U"
Bolt
9—
Shackle
10—
Retainer
11—
Grease
Seal
12—
Bracket
13—
Threaded
Shackle Bushing
14—
Lube
Fitting
15—
Rear
Spring Assembly
16—
Rear
Spring
Clip
Plate
17—
Lockwasher
18—
"U"
Bolt Nut
19— Pivot Bolt 20—
Rubber
Bushing
21—
Spring
Pivot Bracket
22— Shock Absorber Assembly 11899
S-6. U-Shackles
The
threaded bushings of the U-shackles, used to
early
1957 production, are anchored solidly in the frame brackets and spring
eyes,
and the oscillation
is taken
between
the threads of the U-shackle and
the inner threads of the bushings.
On
early production of Models
CJ-3B, CJ-5,
and
CJ-6,
six bushings are used with right-hand threads
and
two with left-hand threads. The right-hand
threaded bushings have plain
hexagon
heads. The
left-hand bushings have a
groove
around the heads.
The
two left-hand threaded U-shackles are identi
fied by a small forged
boss
on the lower shank of
the shackle. They are used at the
left
front spring
and
the right
rear
spring with the left-hand thread
ed end
DOWN
at the spring eye. The left-hand threaded parts have
been
cancelled in the produc
tion of Models
CJ-3B,
CJ-5 and CJ-6. All later production vehicles, up to early 1957, use all right-
hand
threaded parts.
When
replacing shackles and bushings on
these
vehicles, examine the parts carefully for parts of
the same
type
removed must be reinstalled. A right-hand threaded bushing cannot be installed
satisfactorily after one having left-hand threads
has
once
been
installed.
U-shackles are installed with the bushing
hexagon
heads at the
outside
of the frame.
When
installing a new U-shackle or a shackle bush
ing,
follow
the procedure outlined
below:
Install
the shackle grease seal and retainer over the threaded end of the shackle up to the shoulder. In-
FIG.
S-4—REAR SPRING AND SHOCK
ABSORBER—
LATE
CJ-3B, CJ-5, CJ-5A,
CJ-6, CJ-6 A, DJ-5,
DJ-6
1—
Bracket
2—
Bushing
3—
Washer
4—
Lock
Nut
5— Nut and Lockwasher 6—
Axle
Bumper 7—Bolt
8—
Spring
Clip
9— Nut and Lockwasher
10— Plate 11—
Bearing
12—
Bracket
13— Bolt
14—
Spring
15— Plate and Shaft
16—
Lockwasher
17— Nut
18—Bolt 19—
Bearing
20—
Bracket
21— Shock Absorber
22— Silent Block Bearing
23—Bolt
24—Nut
25— Side Plate 347
Page 348 of 376
SPRINGS
AND
SHOCK ABSORBERS
10016
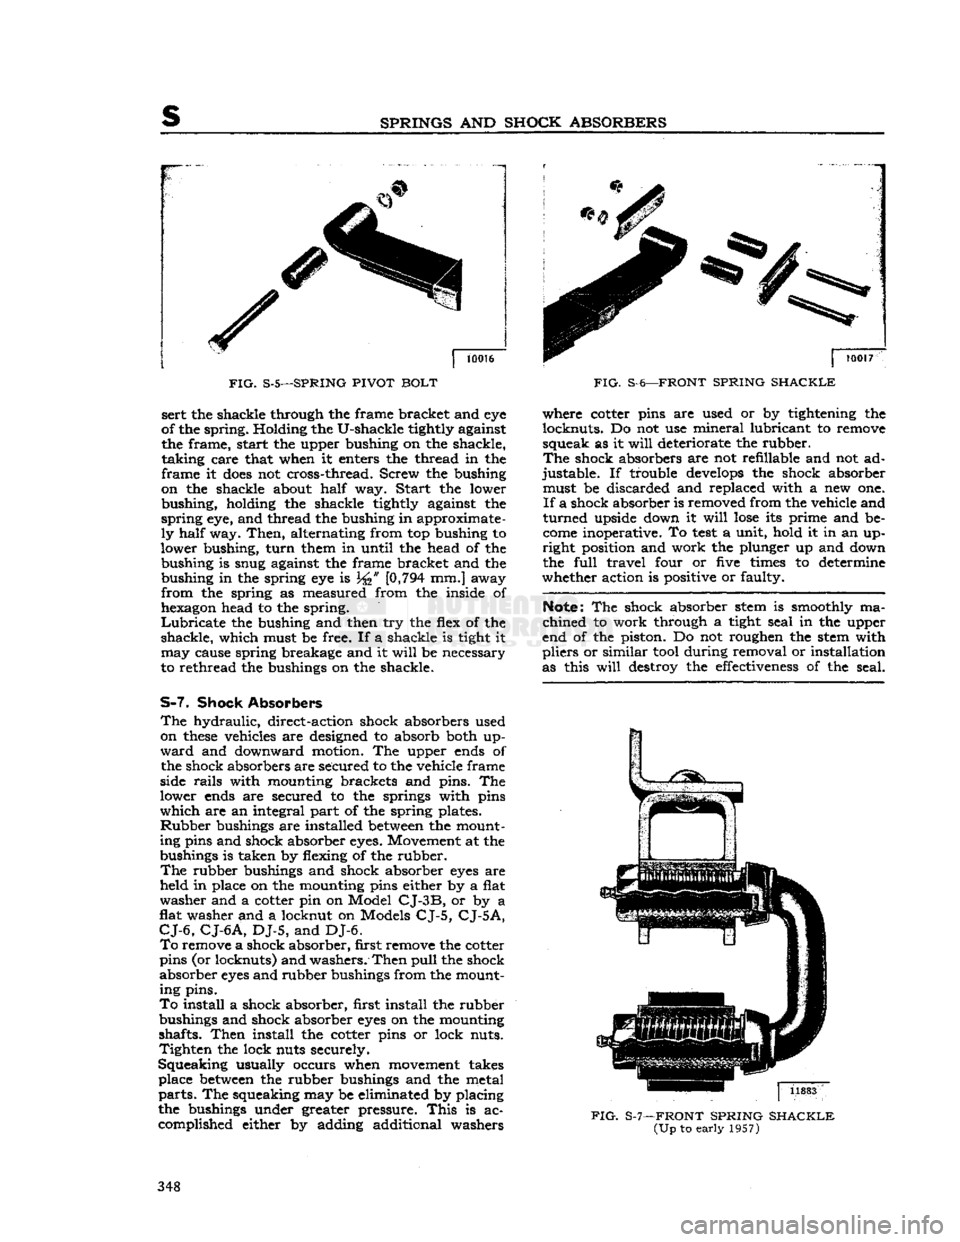
FIG.
S-5—SPRING
PIVOT BOLT
FIG.
S-6—FRONT
SPRING SHACKLE
sert the shackle through the frame bracket and eye
of the spring. Holding the U-shackle tightly against
the frame, start the upper bushing on the shackle,
taking
care that when it enters the thread in the
frame it
does
not cross-thread. Screw the bushing
on the shackle about
half
way.
Start
the lower bushing, holding the shackle tightly against the
spring
eye, and thread the bushing in approximate
ly
half
way.
Then,
alternating from top bushing to
lower bushing,
turn
them in until the head of the bushing is snug against the frame bracket and the bushing in the spring eye is
\{%
[0,794
mm.] away
from
the spring as measured from the inside of hexagon head to the spring.
Lubricate
the bushing and then try the flex of the
shackle,
which must be free. If a shackle is tight it may cause spring breakage and it
will
be necessary
to rethread the bushings on the shackle.
S-7. Shock Absorbers
The
hydraulic, direct-action shock absorbers used
on
these
vehicles are designed to absorb both up
ward
and downward motion. The upper ends of the shock absorbers are secured to the vehicle frame
side
rails
with mounting brackets and pins. The
lower ends are secured to the springs with pins
which
are an integral part of the spring plates.
Rubber
bushings are installed
between
the mount
ing pins and shock absorber
eyes.
Movement at the
bushings is taken by flexing of the rubber.
The
rubber bushings and shock absorber
eyes
are
held in place on the mounting pins either by a flat
washer and a cotter pin on Model
CJ-3B,
or by a
flat washer and a locknut on Models
CJ-5, CJ-5A,
CJ-6, CJ-6A,
DJ-5, and DJ-6.
To
remove a shock absorber, first remove the cotter
pins (or locknuts) and washers.
Then
pull
the shock
absorber
eyes
and rubber bushings from the mount ing pins.
To
install a shock absorber, first install the rubber
bushings and shock absorber
eyes
on the mounting
shafts.
Then
install the cotter pins or lock nuts.
Tighten
the lock nuts securely.
Squeaking usually occurs when movement takes place
between
the rubber bushings and the metal
parts.
The squeaking may be eliminated by placing
the bushings under greater pressure.
This
is ac
complished either by adding additional washers where cotter pins are used or by tightening the
locknuts. Do not use mineral lubricant to remove squeak as it
will
deteriorate the rubber.
The
shock absorbers are not refillable and not ad
justable.
If trouble
develops
the shock absorber must be discarded and replaced with a new one.
If
a shock absorber is removed from the vehicle and
turned
upside down it
will
lose
its prime and be
come
inoperative. To
test
a unit, hold it in an up
right
position and work the plunger up and down
the
full
travel four or five times to determine
whether action is positive or faulty.
Note:
The shock absorber stem is smoothly ma
chined to work through a tight seal in the upper
end of the piston. Do not roughen the stem with
pliers
or similar tool during removal or installation
as this
will
destroy the
effectiveness
of the seal. 11883
FIG.
S-7—FRONT
SPRING SHACKLE (Up
to early 1957)
348
Page 349 of 376
•Jeep'
UNIVERSAL SERIES SERVICE
MANUAL
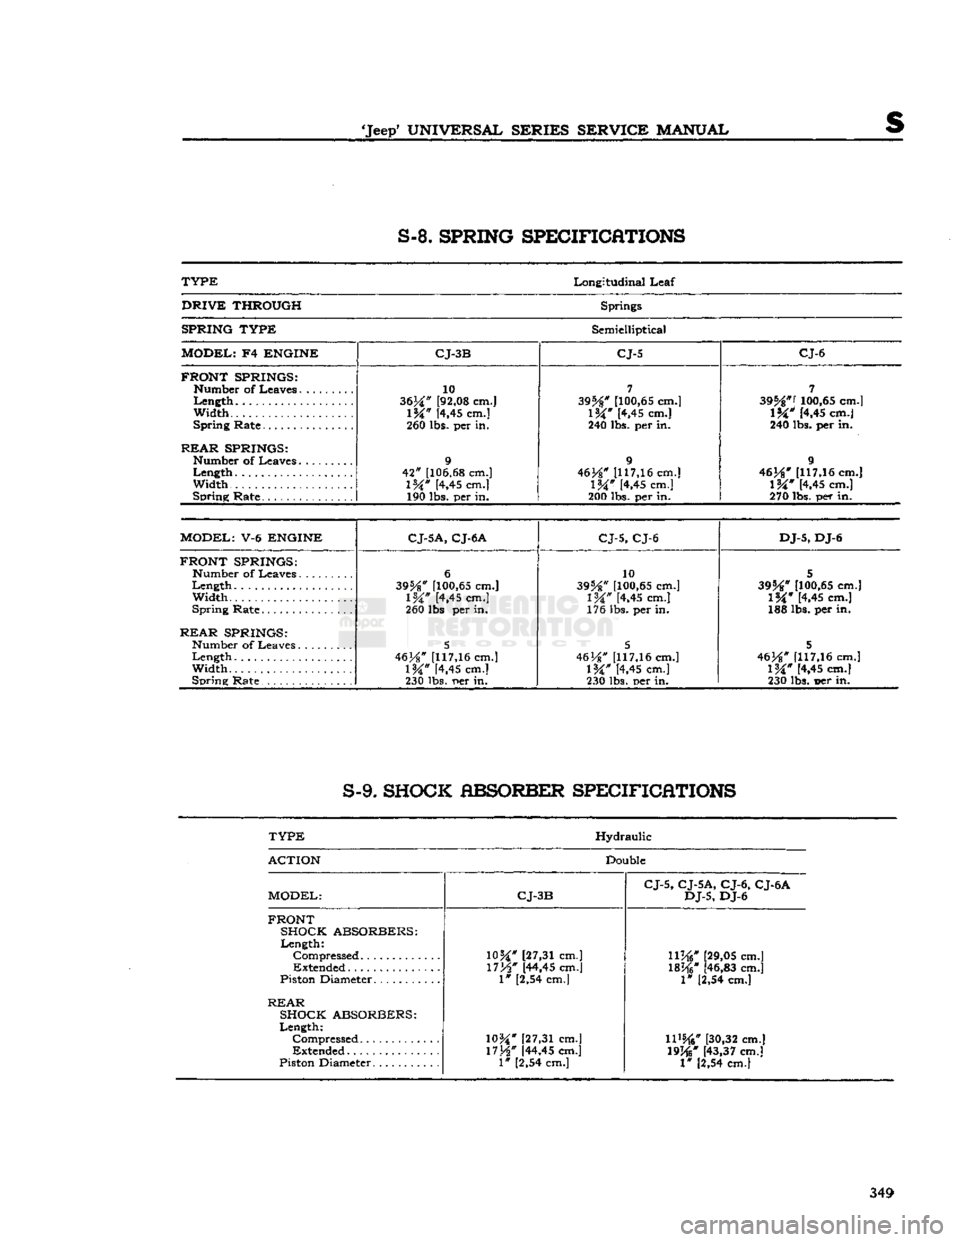
S-8.
SPRING SPECIFICATIONS
TYPE
Longitudinal
Leaf
DRIVE
THROUGH
Springs
SPRING TYPE
Semielliptical
MODEL;
F4
ENGINE CJ-3B CJ-5 CJ-6
FRONT SPRINGS:
Width...
REAR
SPRINGS:
Width
Spring
Rate
10
3634" [92,08 cm.]
\W
[4,45 cm.]
260 lbs. per in.
9
42"
[106.68 cm.]
l%"
[4,45 cm.] 190 lbs. per in.
7
395**
[100,65 cm.]
1&"
[4,45 cm.]
240 lbs. per in.
9
46J*#
[117,16 cm.]
IW
[4,45 cm.]
200 lbs. per in.
7
395*"'
100,65 cm.]
l%"
[4.45 cm.]
240 lbs. per in.
9
46}*"
1117,16 cm.]
l%"
[4,45 cm.]
270
lbs.
per in.
MODEL:
V-6
ENGINE
C
J-5A, CJ-6 A
CJ-5, CJ-6 DJ-5,
DJ-6
FRONT SPRINGS:
Number
of
Leaves
Width.....
Spring
Rate
REAR
SPRINGS:
Width
Spring
Rate
6
395*"
[100,65 cm.]
1%"
[4,45 cm.]
260 lbs per in.
5
46H"
[117,16 cm.]
\W
K,45
cm.]
230 lbs.
r»er
in. 10
39%"
[100,65 cm.]
IW
[4,45 cm.]
176 lbs. per in.
5
46
H"
[117,16 cm.]
IW
[4,45 cm.]
230 lbs. per in.
5
395**
[100,65 cm.]
1%"
[4,45 cm.]
188 lbs. per in.
5
463*"
[117,16 cm.]
1%"
[4,45 cm.]
230 lbs. t>er in.
S-9.
SHOCK ABSORBER SPECIFICATIONS
TYPE
Hydraulic
ACTION
Double
MODEL:
CJ-3B CJ-5, CJ-5A, CJ-6, CJ-6A
DJ-5,
DJ-6
FRONT SHOCK ABSORBERS:
Length:
"
[27,31 cm.]
Compressed
"
[27,31 cm.]
llj*i"
[29,05 cm.]
Extended
*
[44,45 cm.]
1%W
[46,83 cm.]
Piston Diameter
I" [2,54 cm.]
1* [2,54 cm.]
REAR
SHOCK ABSORBERS:
Length:
Compressed
10H
[27,31 cm.]
11%*
[30,32 cm.]
Extended
17H"
[44,45 cm.]
19j*j"
[43,37 cm.]
Piston Diameter
1"
[2,54 cm.] 1" [2,54 cm.]
349
Page 350 of 376
