tow JEEP COMPASS 2020 Owner handbook (in English)
[x] Cancel search | Manufacturer: JEEP, Model Year: 2020, Model line: COMPASS, Model: JEEP COMPASS 2020Pages: 328, PDF Size: 8.85 MB
Page 97 of 328
95
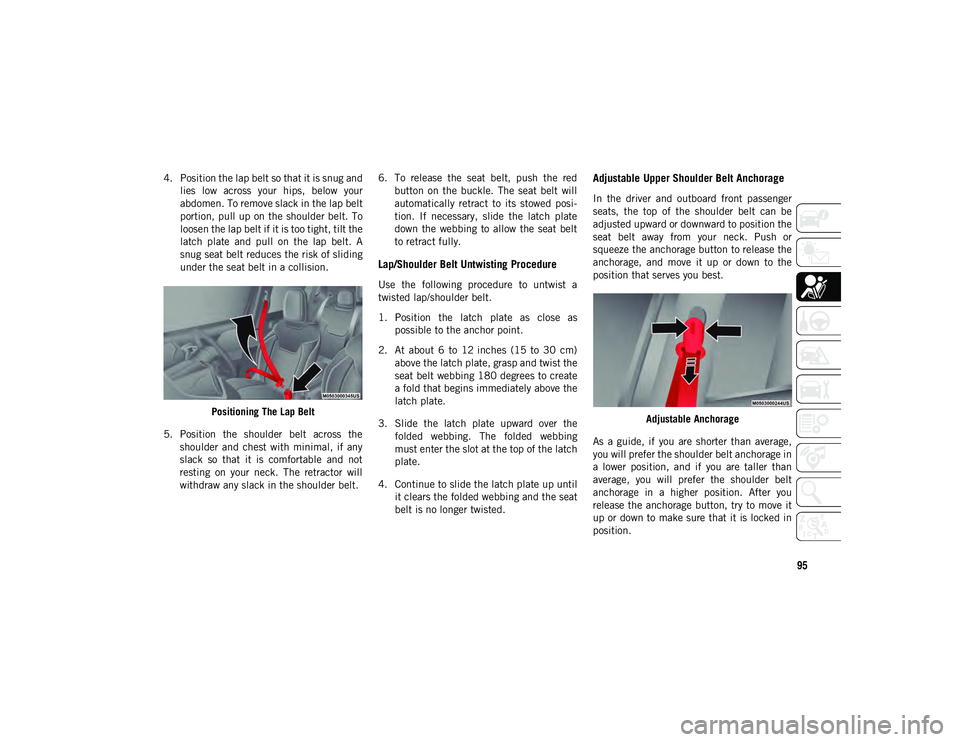
4. Position the lap belt so that it is snug andlies low across your hips, below your
abdomen. To remove slack in the lap belt
portion, pull up on the shoulder belt. To
loosen the lap belt if it is too tight, tilt the
latch plate and pull on the lap belt. A
snug seat belt reduces the risk of sliding
under the seat belt in a collision.
Positioning The Lap Belt
5. Position the shoulder belt across the shoulder and chest with minimal, if any
slack so that it is comfortable and not
resting on your neck. The retractor will
withdraw any slack in the shoulder belt. 6. To release the seat belt, push the red
button on the buckle. The seat belt will
automatically retract to its stowed posi -
tion. If necessary, slide the latch plate
down the webbing to allow the seat belt
to retract fully.
Lap/Shoulder Belt Untwisting Procedure
Use the following procedure to untwist a
twisted lap/shoulder belt.
1. Position the latch plate as close as possible to the anchor point.
2. At about 6 to 12 inches (15 to 30 cm) above the latch plate, grasp and twist the
seat belt webbing 180 degrees to create
a fold that begins immediately above the
latch plate.
3. Slide the latch plate upward over the folded webbing. The folded webbing
must enter the slot at the top of the latch
plate.
4. Continue to slide the latch plate up until it clears the folded webbing and the seat
belt is no longer twisted.
Adjustable Upper Shoulder Belt Anchorage
In the driver and outboard front passenger
seats, the top of the shoulder belt can be
adjusted upward or downward to position the
seat belt away from your neck. Push or
squeeze the anchorage button to release the
anchorage, and move it up or down to the
position that serves you best.
Adjustable Anchorage
As a guide, if you are shorter than average,
you will prefer the shoulder belt anchorage in
a lower position, and if you are taller than
average, you will prefer the shoulder belt
anchorage in a higher position. After you
release the anchorage button, try to move it
up or down to make sure that it is locked in
position.
2020_JEEP_M6_UG_UK.book Page 95
Page 132 of 328
SAFETY
130
Periodic Safety Checks You Should Make
Outside The Vehicle
Tires
Examine tires for excessive tread wear and
uneven wear patterns. Check for stones,
nails, glass, or other objects lodged in the
tread or sidewall. Inspect the tread for cuts
and cracks. Inspect sidewalls for cuts,
cracks, and bulges. Check the wheel nuts for
tightness. Check the tires (including spare)
for proper cold inflation pressure.
Lights
Have someone observe the operation of
brake lights and exterior lights while you
work the controls. Check turn signal and high
beam indicator lights on the instrument
panel.
Door Latches
Check for proper closing, latching, and
locking.
Fluid Leaks
Check area under the vehicle after overnight
parking for fuel, coolant, oil, or other fluid
leaks. Also, if gasoline fumes are detected or
if fuel, or brake fluid leaks are suspected, the
cause should be located and corrected
immediately.
NEVER place any objects under the floor
mat (e.g., towels, keys, etc.). These
objects could change the position of the
floor mat and may cause interference
with the accelerator, brake, or clutch
pedals.
If the vehicle carpet has been removed
and re-installed, always properly attach
carpet to the floor and check the floor
mat fasteners are secure to the vehicle
carpet. Fully depress each pedal to
check for interference with the acceler-
ator, brake, or clutch pedals then
re-install the floor mats.
It is recommended to only use mild soap
and water to clean your floor mats. After
cleaning, always check your floor mat
has been properly installed and is
secured to your vehicle using the floor
mat fasteners by lightly pulling mat.
WARNING! (Continued)
2020_JEEP_M6_UG_UK.book Page 130
Page 144 of 328
STARTING AND OPERATING
142(Continued)
(Continued)
(Continued)
When parking on a level surface, you may
shift the transmission into PARK first, and
then apply the parking brake.
When parking on a hill, apply the parking
brake before shifting the transmission to
PARK, otherwise the load on the transmis -
sion locking mechanism may make it diffi -
cult to move the gear selector out of PARK.
As an added precaution, turn the front
wheels toward the curb on a downhill grade
and away from the curb on an uphill grade.
When exiting the vehicle, always:
1. Apply the parking brake.
2. Shift the transmission into PARK.
3. Turn the ignition OFF.
4. Remove the key fob from the vehicle.
NOTE:
Block the wheels with a wedge or a stone if
the vehicle is parked on a steep slope.
WARNING!
Never use the PARK position as a substi -
tute for the park brake. Always apply the
park brake fully when exiting the vehicle
to guard against vehicle movement and
possible injury or damage.
Your vehicle could move and injure you
and others if it is not in PARK. Check by
trying to move the gear selector out of
PARK with the brake pedal released.
Make sure the transmission is in PARK
before exiting the vehicle.
It is dangerous to shift out of PARK or
NEUTRAL if the engine speed is higher
than idle speed. If your foot is not firmly
pressing the brake pedal, the vehicle
could accelerate quickly forward or in
reverse. You could lose control of the
vehicle and hit someone or something.
Only shift into gear when the engine is
idling normally and your foot is firmly
pressing the brake pedal.
The vehicle may not engage a newly
selected gear when shifting between
PARK, REVERSE, or DRIVE if the
vehicle is moving while shifting.
WARNING! (Continued)
Unintended movement of a vehicle could
injure those in or near the vehicle. As
with all vehicles, you should never exit a
vehicle while the engine is running.
Before exiting a vehicle always come to a
complete stop, then apply the park
brake, shift the transmission into PARK,
turn the engine OFF, and remove the key
fob. When the ignition is in the LOCK/
OFF (key removal) position (or, with push
button start, when the ignition is in the
OFF mode), the transmission is locked in
PARK, securing the vehicle against
unwanted movement.
When leaving the vehicle, always make
sure the ignition is in the OFF mode,
remove the key fob from the vehicle, and
lock the vehicle.
Never leave children alone in a vehicle,
or with access to an unlocked vehicle.
Allowing children to be in a vehicle unat -
tended is dangerous for a number of
reasons. A child or others could be seri -
ously or fatally injured. Children should
be warned not to touch the park brake,
brake pedal or the transmission gear
selector.
WARNING! (Continued)
2020_JEEP_M6_UG_UK.book Page 142
Page 145 of 328
143
The following indicators should be used to
ensure that you have properly engaged the
transmission into the PARK position:
When shifting into PARK, push the lock
button on the gear selector, and firmly
move the selector all the way forward until
it stops and is fully seated.
Look at the transmission gear position
display and verify that it indicates the
PARK (P) position.
With brake pedal released, verify that the
gear selector will not move out of PARK.
REVERSE (R)
This range is for moving the vehicle back-
ward. Shift into REVERSE only after the
vehicle has come to a complete stop.
NEUTRAL (N)
Use this range when the vehicle is standing
for prolonged periods with the engine
running. The engine may be started in this
range. Apply the park brake and shift the
transmission into PARK if you must exit the
vehicle.
DRIVE (D)
This range should be used for most city and
highway driving. It provides the smoothest
upshifts and downshifts, and the best fuel
economy. The transmission automatically
upshifts through all forward gears. The
DRIVE position provides optimum driving
characteristics under all normal operating
conditions.
When frequent transmission shifting occurs
(such as when operating the vehicle under
heavy loading conditions, in hilly terrain,
traveling into strong head winds, or while
towing a heavy trailer), use the AutoStick
shift control to select a lower gear (refer to
"AutoStick" in this section for further infor -
mation). Under these conditions, using a
Do not leave the key fob in or near the
vehicle (or in a location accessible to
children), and do not leave the ignition
(in a vehicle equipped with push button
start) in the ON/RUN mode. A child
could operate power windows, other
controls, or move the vehicle.
CAUTION!
Before moving the transmission gear
selector out of PARK, you must turn the
ignition to the ON/RUN mode, and also
press the brake pedal. Otherwise,
damage to the gear selector could result.
DO NOT race the engine when shifting
from PARK or NEUTRAL into another
gear range, as this can damage the drive-
train.
WARNING! (Continued)
WARNING!
Do not coast in NEUTRAL and never turn
off the ignition to coast down a hill. These
are unsafe practices that limit your
response to changing traffic or road
conditions. You might lose control of the
vehicle and have a collision.
CAUTION!
Towing the vehicle, coasting, or driving for
any other reason with the transmission in
NEUTRAL can cause severe transmission
damage.
Refer to “Recreational Towing” in
“Starting And Operating” and “Towing A
Disabled Vehicle” in “In Case Of
Emergency” for further information.
2020_JEEP_M6_UG_UK.book Page 143
Page 146 of 328
STARTING AND OPERATING
144
lower gear will improve performance and
extend transmission life by reducing exces-
sive shifting and heat buildup.
If the transmission temperature exceeds
normal operating limits, the transmission
controller may modify the transmission shift
schedule, reduce engine torque, and/or
expand the range of torque converter clutch
engagement. This is done to prevent trans -
mission damage due to overheating.
If the transmission becomes extremely hot,
the "Transmission Temperature Warning
Light" may illuminate, and the transmission
may operate differently until the transmis -
sion cools down.
During cold temperatures, transmission
operation may be modified depending on
engine and/or transmission temperature as
well as vehicle speed. This feature improves
warm up time of the engine and transmission
to achieve maximum efficiency. Engagement
of the torque converter clutch (and, for the
nine-speed, shifts into 8th or 9th gear), are
inhibited until the engine and/or transmis -
sion is warm (refer to the “Note” under
“Torque Converter Clutch” in this section).
Normal operation will resume once the
temperature(s) have risen to a suitable level.AUTOSTICK
AutoStick is a driver-interactive transmission
feature providing manual shift control, giving
you more control of the vehicle. AutoStick
allows you to maximize engine braking, elim -
inate undesirable upshifts and downshifts,
and improve overall vehicle performance.
This system can also provide you with more
control during passing, city driving, cold slip -
pery conditions, mountain driving, trailer
towing, and many other situations.
Operation
When the gear selector is in the AutoStick
position (beside the DRIVE position), it can
be moved forward and rearward. This allows
the driver to manually select the transmis -
sion gear being used. Moving the gear
selector forward (-) triggers a downshift and
rearward (+) an upshift. The current gear is
displayed in the instrument cluster.
In AutoStick mode, the transmission will
shift up or down when the driver moves the
gear selector rearward (+) or forward (-),
unless an engine lugging or overspeed condi -
tion would result. It will remain in the
selected gear until another upshift or down -
shift is chosen, except as described below.
Six-speed transmissions will automatically
upshift when necessary to prevent engine
over-speed.
The transmission will automatically down -
shift as the vehicle slows (to prevent
engine lugging) and will display the
current gear.
The transmission will automatically down -
shift to FIRST gear when coming to a stop.
After a stop, the driver should manually
upshift (+) the transmission as the vehicle
is accelerated.
You can start out, from a stop, in FIRST or
SECOND gear (or THIRD gear, in six-speed
models, or in 4WD LOW range, SNOW
mode, or SAND mode, where available).
Tapping (+) (at a stop) will allow starting
in SECOND gear. Starting out in SECOND
gear can be helpful in snowy or icy condi -
tions.
If a requested downshift would cause the
engine to over-speed, that shift will not
occur.
The system will ignore attempts to upshift
at too low of a vehicle speed.
2020_JEEP_M6_UG_UK.book Page 144
Page 157 of 328
155
Enabling And Disabling ParkSense
ParkSense can be enabled and
disabled with the ParkSense switch,
located on the switch panel below
the Uconnect display.
When the ParkSense switch is pushed to
disable the system, the instrument cluster
display will show the “PARKSENSE OFF”
message for approximately five seconds.
Refer to “Instrument Cluster Display” in
“Getting To Know Your Instrument Panel” in
the Owner’s Manual for further details. When
the gear selector is moved to REVERSE and
the system is disabled, the instrument
cluster display will show the “PARKSENSE
OFF” message for as long as the vehicle is in
REVERSE.
The ParkSense switch LED will be on when
ParkSense is disabled or requires service.
The ParkSense switch LED will be off when
the system is enabled. If the ParkSense
switch is pushed, and requires service, the
ParkSense switch LED will blink momen -
tarily, and then the LED will be on.
ParkSense System Usage Precautions
Ensure that the rear bumper is free of
snow, ice, mud, dirt and debris to keep the
ParkSense system operating properly.
Jackhammers, large trucks, and other
vibrations could affect the performance of
ParkSense.
When you turn ParkSense off, the instru -
ment cluster display will read “PARK -
SENSE OFF.” Furthermore, once you turn
ParkSense off, it remains off until you turn
it on again, even if you cycle the ignition.
ParkSense, when on, will reduce the
volume of the radio when it is sounding a
tone.
Clean the ParkSense sensors regularly,
taking care not to scratch or damage them.
The sensors must not be covered with ice,
snow, slush, mud, dirt or debris. Failure to
do so can result in the system not working
properly. The ParkSense system might not
detect an obstacle behind the fascia/
bumper, or it could provide a false indica-
tion that an obstacle is behind the fascia/
bumper.
Use the ParkSense switch to turn the
ParkSense system off if objects such as
bicycle carriers, etc. are attached to the
rear fascia/bumper. Failure to do so can
result in the system misinterpreting a
close object as a sensor problem, causing
the “PARKSENSE UNAVAILABLE
SERVICE REQUIRED” message to be
displayed in the instrument cluster
display.
NOTE:
If any objects are attached to the bumper
within a 6.5 ft (2 m) field of view, they will
interfere and cause false alerts and possibly
blockage.
The operation of the rear sensors is auto-
matically deactivated when the trailer's
electric plug is inserted in the vehicle's
tow hook socket. The rear sensors are
automatically reactivated when the
trailer's cable plug is removed.
2020_JEEP_M6_UG_UK.book Page 155
Page 158 of 328
STARTING AND OPERATING
156
PARKSENSE FRONT AND
REAR PARK ASSIST — IF
EQUIPPED
The ParkSense Park Assist system provides
visual and audible indications of the
distance between the rear and/or front fascia
and a detected obstacle when backing up or
moving forward (e.g. during a parking
maneuver).
Refer to “ParkSense System Usage Precau-
tions” in “Starting And Operating” in your Owner’s Manual for limitations of this system
and recommendations.
ParkSense will retain the last system state
(enabled or disabled) from the last ignition
cycle when the ignition is changed to the ON/
RUN position.
ParkSense is active in all gear selector posi
-
tions (including PARK), as long as the
system is on. The system will remain active
until the vehicle speed is increased to
approximately 7 mph (11 km/h) or above.
While in REVERSE and above the system's
operating speed, a warning will appear in the
instrument cluster display indicating the
vehicle speed is too fast. The system will
become active again if the vehicle speed is
decreased to speeds less than approximately
6 mph (9 km/h).
ParkSense Sensors
The six ParkSense sensors, located in the
rear fascia/bumper, monitor the area behind
the vehicle that is within the sensors’ field of
view. The sensors can detect obstacles from
approximately 12 inches (30 cm) up to
79 inches (200 cm) from the rear fascia/
bumper in the horizontal direction,
depending on the location, type and orienta -
tion of the obstacle.
WARNING!
Drivers must be careful when backing up
even when using ParkSense. Always
check carefully behind your vehicle, look
behind you, and be sure to check for
pedestrians, animals, other vehicles,
obstructions, and blind spots before
backing up. You are responsible for
safety and must continue to pay atten -
tion to your surroundings. Failure to do
so can result in serious injury or death.
Before using ParkSense, it is strongly
recommended that the ball mount and
hitch ball assembly is disconnected from
the vehicle when the vehicle is not used
for towing. Failure to do so can result in
injury or damage to vehicles or obstacles
because the hitch ball will be much
closer to the obstacle than the rear fascia
when the loudspeaker sounds the contin -
uous tone. Also, the sensors could detect
the ball mount and hitch ball assembly,
depending on its size and shape, giving
a false indication that an obstacle is
behind the vehicle.
CAUTION!
ParkSense is only a parking aid and it is
unable to recognize every obstacle,
including small obstacles. Parking curbs
might be temporarily detected or not
detected at all. Obstacles located above
or below the sensors will not be detected
when they are in close proximity.
The vehicle must be driven slowly when
using ParkSense in order to be able to
stop in time when an obstacle is
detected. It is recommended that the
driver looks over his/her shoulder when
using ParkSense.
2020_JEEP_M6_UG_UK.book Page 156
Page 160 of 328
STARTING AND OPERATING
158
“SDW Not Available” — This message is
displayed if the Side Distance Warning
system is not available. The failed operation
of the system might be due to the insuffi-
cient voltage from the battery or other fail -
ures on the electrical system. Contact an
authorized dealer as soon as possible to have
the electrical system checked.
Operation With A Trailer
The system is automatically deactivated
when the trailer's electric plug is inserted in
the vehicle's tow hook socket. The rear
sensors are automatically reactivated when
the trailer's cable plug is removed.
ParkSense Usage Precautions
Some conditions may influence the perfor -
mance of the Side Distance Warning System:
NOTE:
Ensure that the front and rear bumper are
free of snow, ice, mud, dirt and debris to
keep the ParkSense system operating
properly.
Construction equipment, large trucks, and
other vibrations could affect the perfor -
mance of ParkSense.
When you turn ParkSense off, the message
to appear in the instrument cluster display
will read “PARKSENSE OFF.” Further -
more, once you turn ParkSense off, it
remains off until you turn it on again, even
if you cycle the ignition key.
ParkSense, when on, will reduce the
volume of the radio when it is sounding a
tone.
Clean the ParkSense sensors regularly,
taking care not to scratch or damage them.
The sensors must not be covered with ice,
snow, slush, mud, dirt or debris. Failure to
do so can result in the system not working
properly. The ParkSense system might not
detect an obstacle behind or in front of the
fascia/bumper, or it could provide a false
indication that an obstacle is behind or in
front of the fascia/bumper.
The presence of a tow hook without a
trailer may interfere with the correct oper -
ation of the parking sensors. Before using
the ParkSense system, it is recommended
to remove the removable tow hook ball
assembly and any attachments from the
vehicle when it is not used for towing oper -
ations. If you wish to leave the tow hook
fitted without towing a trailer, it is advis- able to contact an authorized dealer for
the ParkSense system update operations
because the tow hook could be detected
as an obstacle by the central sensors.
WARNING!
Drivers must be careful when backing up
even when using ParkSense. Always
check carefully behind your vehicle, look
behind you, and be sure to check for
pedestrians, animals, other vehicles,
obstructions, and blind spots before
backing up. You are responsible for
safety and must continue to pay atten
-
tion to your surroundings. Failure to do
so can result in serious injury or death.
Before using ParkSense, it is strongly
recommended that the ball mount and
hitch ball assembly is disconnected from
the vehicle when the vehicle is not used
for towing. Failure to do so can result in
injury or damage to vehicles or obstacles
because the hitch ball will be much
closer to the obstacle than the rear fascia
when the loudspeaker sounds the contin -
uous tone. Also, the sensors could detect
the ball mount and hitch ball assembly,
depending on its size and shape, giving
a false indication that an obstacle is
behind the vehicle.
2020_JEEP_M6_UG_UK.book Page 158
Page 163 of 328
161
During the maneuver, the system asks to
shift to REVERSE, select the direction indi-
cator in the direction you want to exit. Let go
of the steering wheel and press the dedi -
cated pedals, while the system handles the
steering automatically for exiting the parking
space. If the driver continues to carry out a
voluntary or involuntary action on the
steering wheel during the exit maneuver
(touching or holding the steering wheel to
prevent its movement), the maneuver will be
interrupted.
End Of Maneuver
The semi-automatic maneuver ends when
the display shows the message of a
completed maneuver. At the end of the
maneuver, the system gives back the vehicle
control to the driver.
Important Information
If the sensors undergo impact which alters
their position, the system operation could
be greatly affected.
The sensors reach top performance after
the vehicle has gone about 30 miles
(50 km) due to the dynamic tire circum -
ference calculations used for parking.
Clean the ParkSense sensors regularly,
taking care not to scratch or damage them.
The sensors must not be covered with ice,
snow, slush, mud, dirt or debris. Failure to
do so can result in the system not working
properly. The ParkSense system might not
detect an obstacle behind or in front of the
fascia/bumper, or it could provide a false
indication that an obstacle is behind or in
front of the fascia/bumper.
Construction equipment, large trucks, and
other vibrations could affect the perfor -
mance of ParkSense.
Sensors may detect a nonexistent obstacle
(echo noise) due to mechanical noises, for
example while washing the vehicle or in
the case of rain, strong wind, and hail.
The sensors may not detect objects of a
particular shape or made from particular
materials (very thin poles, trailer beams,
panels, nets, bushes, anti-parking posts,
pavements, rubbish bins, motor vehicles,
etc.). Always take great care to check that
the vehicle and its path are actually
compatible with the parking place identi -
fied by the system.
The use of wheels and tires that are
different size to the original equipment
could affect the operation of the system.
The operation of the rear sensors is auto-
matically deactivated when the trailer's
electric plug is inserted in the vehicle's
tow hook socket, while the front sensors
stay active and can provide acoustic and
visual warnings. The rear sensors are auto-
matically reactivated when the trailer's
cable plug is removed.
In "Search in progress" mode, the system
could incorrectly identify a parking place
to carry out the maneuver (e.g. by a junc-
tion, driveways, roads crossing the direc-
tion of travel, etc.).
In the case of parking maneuvers on roads
on a slope, the performance of the system
could be inferior and it may deactivate.
If a parking maneuver is being carried out
between two parked vehicles alongside the
pavement, the system may cause the
vehicle to mount the pavement.
Some maneuvers at very tight bends might
be impossible to be carried out.
2020_JEEP_M6_UG_UK.book Page 161
Page 173 of 328
171
Do not add additives or other fluids to
AdBlue® (UREA), doing so could damage
the system.
The use of non-conforming or degraded
AdBlue® (UREA) may lead to indications
appearing on the instrument panel display
refer to “Warning Lights And Messages" in
the “Getting To Know Your Instrument
Panel” for further information.
Never pour AdBlue® (UREA) into another
container: it could be contaminated.
If the AdBlue® (UREA) runs out, see refer
to “Warning Lights And Messages" in the
“Getting To Know Your Instrument Panel”
for further information to continue using
the car normally.
VEHICLE LOADING
Certification Label
As required by local traffic regulations, your
vehicle has a certification label affixed to the
driver's side door or pillar.
Refer to “Tire Safety” in “Servicing And
Maintenance” for further informationThis label contains the month and year of
manufacture, Gross Vehicle Weight Rating
(GVWR), Gross Axle Weight Rating (GAWR)
front and rear, and Vehicle Identification
Number (VIN). A Month-Day-Hour (MDH)
number is included on this label and indi
-
cates the Month, Day and Hour of manufac -
ture. The bar code that appears on the
bottom of the label is your VIN.
TRAILER TOWING
Common Towing Definitions
The following trailer towing related defini -
tions will assist you in understanding the
following information:
Gross Vehicle Weight Rating (GVWR)
The GVWR is the total allowable weight of
your vehicle. This includes driver, passen -
gers, cargo and tongue weight. The total load
must be limited so that you do not exceed
the GVWR. Refer to “Vehicle Loading/Vehicle
Certification Label” in “Starting And Oper -
ating” for further information.
Gross Trailer Weight (GTW)
The GTW is the weight of the trailer plus the
weight of all cargo, consumables and equip -
ment (permanent or temporary) loaded in or
on the trailer in its "loaded and ready for
operation" condition.
The recommended way to measure GTW is to
put your fully loaded trailer on a vehicle
scale. The entire weight of the trailer must be
supported by the scale.
Gross Axle Weight Rating (GAWR)
The GAWR is the maximum capacity of the
front and rear axles. Distribute the load over
the front and rear axles evenly. Make sure
that you do not exceed either front or rear
GAWR. Refer to “Vehicle Loading/Vehicle
Certification Label” in “Starting And Oper -
ating” for further information.
WARNING!
It is important that you do not exceed the
maximum front or rear GAWR. A dangerous
driving condition can result if either rating
is exceeded. You could lose control of the
vehicle and have a collision.
2020_JEEP_M6_UG_UK.book Page 171