Start JEEP COMPASS 2020 Owner handbook (in English)
[x] Cancel search | Manufacturer: JEEP, Model Year: 2020, Model line: COMPASS, Model: JEEP COMPASS 2020Pages: 328, PDF Size: 8.85 MB
Page 171 of 328
169
AdBlue® (UREA) — If Equipped
The vehicle is equipped with an UREA injec -
tion system and Selective Catalytic Reduc -
tion to meet emission standards. These two
systems ensure compliance with the diesel
emissions requirements; at the same time,
they ensure fuel-efficiency, handling, torque
and power. For messages and system warn -
ings, refer to the "Warning Lights And
Messages" in the "Getting To Know Your
Instrument Panel" section. AdBlue® (UREA)
is a very stable product with a long shelf life.
Stored at temperatures LOWER than 90°F
(32°C), it has a shelf life of at least one year.
For more information on the AdBlue® liquid
type, see the “Fluids and lubricants” in the
“Technical specifications” section. The
vehicle is equipped with an automatic
AdBlue® heating system when the engine
starts allowing the system to work correctly
at temperatures lower than 12°F (-11°C).
NOTE:
AdBlue® freezes at temperatures lower than
12 °F (-11 °C).
AdBlue® (UREA) Storage
AdBlue® (UREA) is considered a very stable
product with a long shelf life. If AdBlue®
(UREA) is kept in temperatures between 10°
and 90°F (-12° and 32°C), it will last a
minimum of one year.
AdBlue® (UREA) is subject to freezing at the
lowest temperatures. For example, AdBlue®
(UREA) may freeze at temperatures at or
below 12°F (-11°C). The system has been
designed to operate in this environment.
NOTE:
When working with AdBlue® (UREA), it is
important to know that:
Any containers or parts that come into
contact with AdBlue® (UREA) must be
AdBlue® (UREA) compatible (plastic or
stainless steel). Copper, brass, aluminum,
iron or non-stainless steel should be
avoided as they are subject to corrosion by
AdBlue® (UREA).
If AdBlue® (UREA) is spilled, it should be
wiped up completely.
Adding AdBlue® (UREA)
Preliminary Conditions
AdBlue® (UREA) freezes at temperatures
lower than 12°F (-11°C). If the car stands for
a long time at this temperature refilling
could be difficult. For this reason, it is
advised to park the vehicle in a garage and/
or heated environment and wait for the urea
to return to liquid state before topping up.
Proceed as follows:
Park the car on flat ground and stop the
engine by cycling the ignition to the OFF
position.
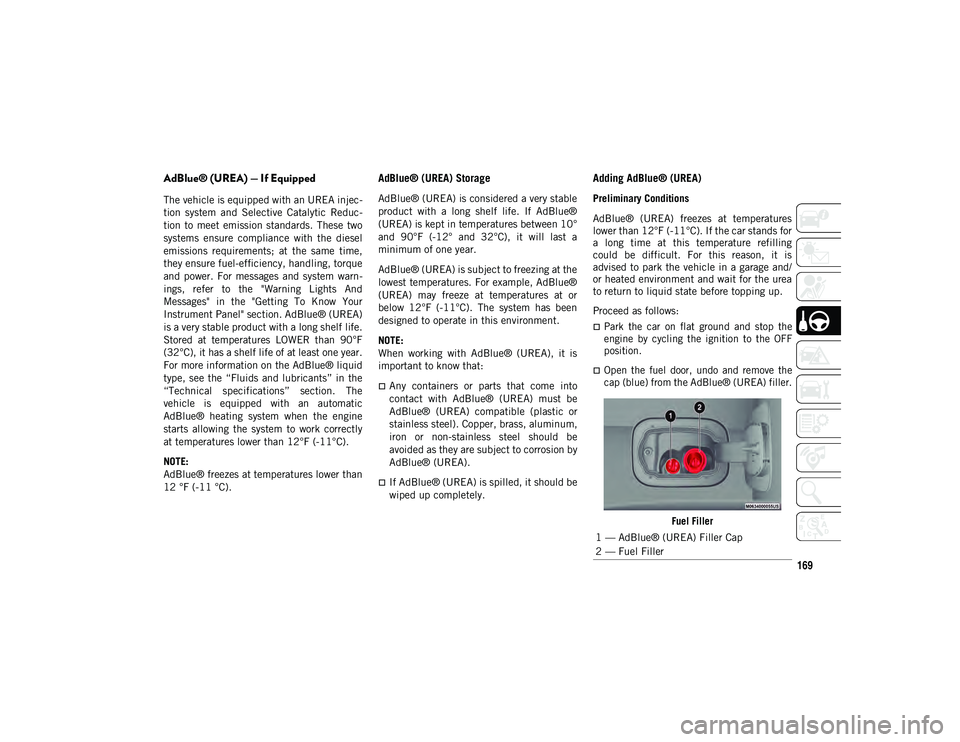
Open the fuel door, undo and remove the
cap (blue) from the AdBlue® (UREA) filler.
Fuel Filler
1 — AdBlue® (UREA) Filler Cap
2 — Fuel Filler
2020_JEEP_M6_UG_UK.book Page 169
Page 172 of 328
STARTING AND OPERATING
170
Refilling With Nozzles
You can fill up at any AdBlue® (UREA)
distributor.
Proceed as follows:
Insert the AdBlue® (UREA) nozzle in the
filler, start refilling and stop refilling at the
first shut-off (the shut-off indicates that
the AdBlue® (UREA) tank is full). Do not
proceed with the refilling, to prevent
spillage of AdBlue® (UREA).
Extract the nozzle.
Refilling With Containers
Proceed as follows:
Check the expiration date.
Read the advice for use on the label before
pouring the content of the bottle into the
AdBlue® (UREA) tank.
If systems which cannot be screwed in
(e.g. tanks) are used for refilling, after the
indication appears on the instrument
panel display refer to “Warning lights And
Messages" in the “Getting To Know Your
Instrument Panel” for further information,
fill the AdBlue® (UREA) tank with no
more than 2 Gallons (8 liters).
If containers which can be screwed to the
filler are used, the reservoir is full when
the AdBlue® (UREA) level in the
container stops pouring out. Do not
proceed further.
Operations After Refilling
Proceed as follows:
Fit the cap back on the AdBlue® (UREA)
filler by turning it clockwise and screwing
it completely.
Cycle the ignition to RUN (it is not neces-
sary to start the engine).
Wait for the indication on the instrument
panel to switch off before moving the car.
The indication may stay on for a few
seconds to approximately half a minute. If
the engine is started and the car is moved,
the indication will remain on for longer.
This will not compromise engine opera-
tion.
If the AdBlue® (UREA) was topped up
when the tank was empty, wait for
2 minutes before starting the engine. NOTE:
If AdBlue® (UREA) is spilled out of the
filler neck, clean up well the area and
proceed to filling up again. If the liquid
crystallizes, eliminate it with a sponge and
warm water.
DO NOT EXCEED THE MAXIMUM LEVEL:
this could cause damage to the reservoir.
AdBlue® (UREA) freezes at under 12°F
(-11°C). Although the system is designed
to operate below the freezing point of the
UREA, it is advisable not to fill the tank
beyond the maximum level because if the
UREA freezes the system can be
damaged. Follow the instructions in this
section.
If the AdBlue® (UREA) is spilled on
painted surfaces or aluminium, immedi
-
ately clean the area with water and use
absorbent material to collect the fluid that
has been spilled on the ground.
Do not try to start the engine if AdBlue®
(UREA) was accidentally added to the
diesel fuel tank, this can result in serious
engine damage, contact an authorized
dealer.
2020_JEEP_M6_UG_UK.book Page 170
Page 173 of 328
171
Do not add additives or other fluids to
AdBlue® (UREA), doing so could damage
the system.
The use of non-conforming or degraded
AdBlue® (UREA) may lead to indications
appearing on the instrument panel display
refer to “Warning Lights And Messages" in
the “Getting To Know Your Instrument
Panel” for further information.
Never pour AdBlue® (UREA) into another
container: it could be contaminated.
If the AdBlue® (UREA) runs out, see refer
to “Warning Lights And Messages" in the
“Getting To Know Your Instrument Panel”
for further information to continue using
the car normally.
VEHICLE LOADING
Certification Label
As required by local traffic regulations, your
vehicle has a certification label affixed to the
driver's side door or pillar.
Refer to “Tire Safety” in “Servicing And
Maintenance” for further informationThis label contains the month and year of
manufacture, Gross Vehicle Weight Rating
(GVWR), Gross Axle Weight Rating (GAWR)
front and rear, and Vehicle Identification
Number (VIN). A Month-Day-Hour (MDH)
number is included on this label and indi
-
cates the Month, Day and Hour of manufac -
ture. The bar code that appears on the
bottom of the label is your VIN.
TRAILER TOWING
Common Towing Definitions
The following trailer towing related defini -
tions will assist you in understanding the
following information:
Gross Vehicle Weight Rating (GVWR)
The GVWR is the total allowable weight of
your vehicle. This includes driver, passen -
gers, cargo and tongue weight. The total load
must be limited so that you do not exceed
the GVWR. Refer to “Vehicle Loading/Vehicle
Certification Label” in “Starting And Oper -
ating” for further information.
Gross Trailer Weight (GTW)
The GTW is the weight of the trailer plus the
weight of all cargo, consumables and equip -
ment (permanent or temporary) loaded in or
on the trailer in its "loaded and ready for
operation" condition.
The recommended way to measure GTW is to
put your fully loaded trailer on a vehicle
scale. The entire weight of the trailer must be
supported by the scale.
Gross Axle Weight Rating (GAWR)
The GAWR is the maximum capacity of the
front and rear axles. Distribute the load over
the front and rear axles evenly. Make sure
that you do not exceed either front or rear
GAWR. Refer to “Vehicle Loading/Vehicle
Certification Label” in “Starting And Oper -
ating” for further information.
WARNING!
It is important that you do not exceed the
maximum front or rear GAWR. A dangerous
driving condition can result if either rating
is exceeded. You could lose control of the
vehicle and have a collision.
2020_JEEP_M6_UG_UK.book Page 171
Page 174 of 328
STARTING AND OPERATING
172
Tongue Weight (TW)
The tongue weight is the downward force
exerted on the hitch ball by the trailer. You
must consider this as part of the load on your
vehicle.
Trailer Frontal Area
The frontal area is the maximum height
multiplied by the maximum width of the
front of a trailer.
Trailer Sway Control
The trailer sway control can be a mechanical
telescoping link that can be installed
between the hitch receiver and the trailer
tongue that typically provides adjustable fric-
tion associated with the telescoping motion
to dampen any unwanted trailer swaying
motions while traveling.
If equipped, the electronic Trailer Sway
Control (TSC) recognizes a swaying trailer
and automatically applies individual wheel
brakes and/or reduces engine power to
attempt to eliminate the trailer sway.
Weight-Carrying Hitch
A weight-carrying hitch supports the trailer
tongue weight, just as if it were luggage
located at a hitch ball or some other
connecting point of the vehicle. These kinds
of hitches are the most popular on the
market today and they are commonly used to
tow small and medium sized trailers.
Weight-Distributing Hitch
A weight-distributing system works by
applying leverage through spring (load) bars.
They are typically used for heavier loads to
distribute trailer tongue weight to the tow
vehicle's front axle and the trailer axle(s).
When used in accordance with the manufac -
turer's directions, it provides for a more level
ride, offering more consistent steering and
brake control thereby enhancing towing
safety. The addition of a friction/hydraulic
sway control also dampens sway caused by
traffic and crosswinds and contributes posi -
tively to tow vehicle and trailer stability. Trailer sway control and a weight distributing
(load equalizing) hitch are recommended for
heavier Tongue Weights (TW) and may be
required depending on vehicle and trailer
configuration/loading to comply with Gross
Axle Weight Rating (GAWR) requirements.
WARNING!
An improperly adjusted Weight Distrib
-
uting Hitch system may reduce
handling, stability, braking performance,
and could result in a collision.
Weight Distributing Systems may not be
compatible with Surge Brake Couplers.
Consult with your hitch and trailer manu -
facturer or a reputable Recreational
Vehicle dealer for additional informa-
tion.
2020_JEEP_M6_UG_UK.book Page 172
Page 175 of 328
173
(Continued)
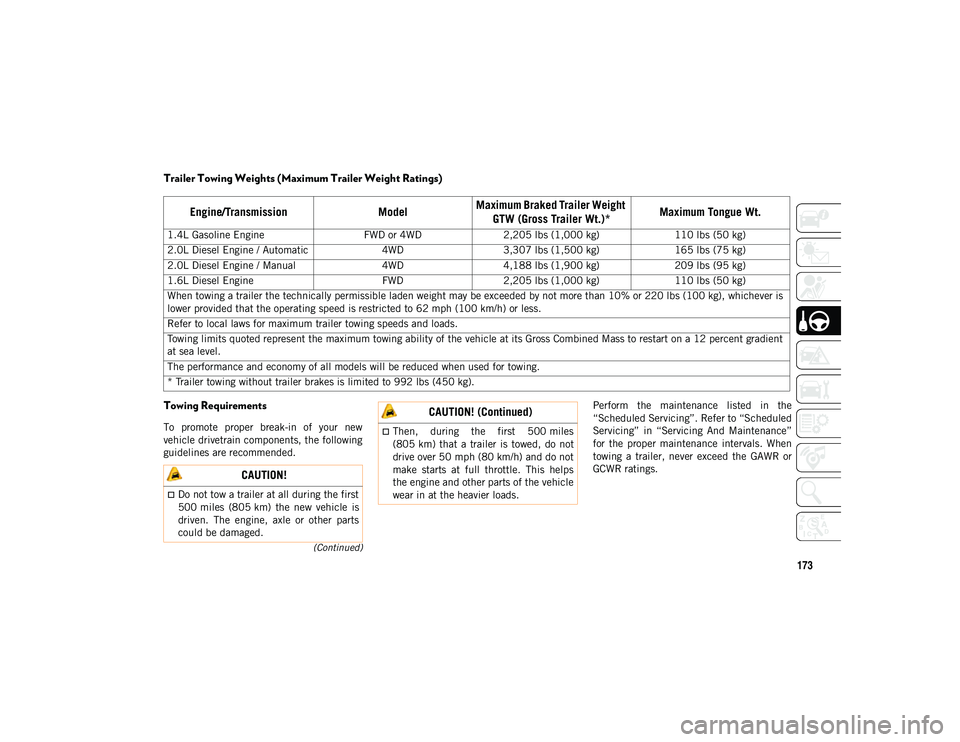
Trailer Towing Weights (Maximum Trailer Weight Ratings)
Towing Requirements
To promote proper break-in of your new
vehicle drivetrain components, the following
guidelines are recommended.Perform the maintenance listed in the
“Scheduled Servicing”. Refer to “Scheduled
Servicing” in “Servicing And Maintenance”
for the proper maintenance intervals. When
towing a trailer, never exceed the GAWR or
GCWR ratings.
Engine/Transmission
ModelMaximum Braked Trailer Weight
GTW (Gross Trailer Wt.)* Maximum Tongue Wt.
1.4L Gasoline Engine
FWD or 4WD2,205 lbs (1,000 kg) 110 lbs (50 kg)
2.0L Diesel Engine / Automatic 4WD3,307 lbs (1,500 kg) 165 lbs (75 kg)
2.0L Diesel Engine / Manual 4WD4,188 lbs (1,900 kg) 209 lbs (95 kg)
1.6L Diesel Engine FWD2,205 lbs (1,000 kg) 110 lbs (50 kg)
When towing a trailer the technically permissible laden weight may be exceeded by not more than 10% or 220 lbs (100 kg), whichever is
lower provided that the operating speed is restricted to 62 mph (100 km/h) or less.
Refer to local laws for maximum trailer towing speeds and loads.
Towing limits quoted represent the maximum towing ability of the vehicle at its Gross Combined Mass to restart on a 12 percent gradient
at sea level.
The performance and economy of all models will be reduced when used for towing.
* Trailer towing without trailer brakes is limited to 992 lbs (450 kg).
CAUTION!
Do not tow a trailer at all during the first
500 miles (805 km) the new vehicle is
driven. The engine, axle or other parts
could be damaged.
Then, during the first 500 miles
(805 km) that a trailer is towed, do not
drive over 50 mph (80 km/h) and do not
make starts at full throttle. This helps
the engine and other parts of the vehicle
wear in at the heavier loads.
CAUTION! (Continued)
2020_JEEP_M6_UG_UK.book Page 173
Page 176 of 328
STARTING AND OPERATING
174
(Continued)
(Continued)
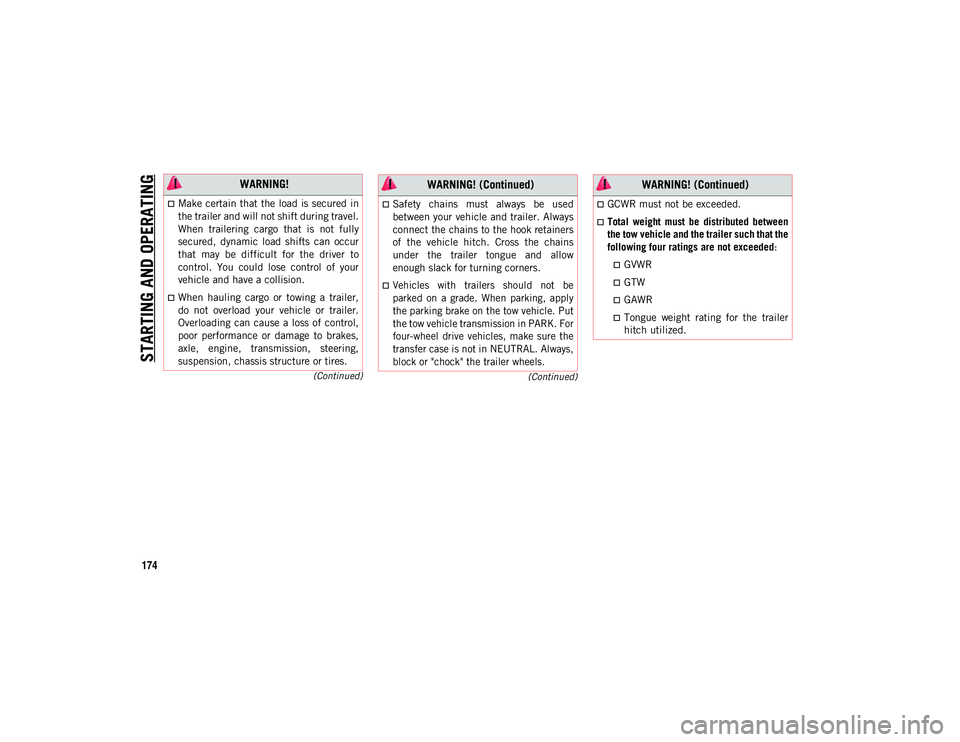
WARNING!
Make certain that the load is secured in
the trailer and will not shift during travel.
When trailering cargo that is not fully
secured, dynamic load shifts can occur
that may be difficult for the driver to
control. You could lose control of your
vehicle and have a collision.
When hauling cargo or towing a trailer,
do not overload your vehicle or trailer.
Overloading can cause a loss of control,
poor performance or damage to brakes,
axle, engine, transmission, steering,
suspension, chassis structure or tires.
Safety chains must always be used
between your vehicle and trailer. Always
connect the chains to the hook retainers
of the vehicle hitch. Cross the chains
under the trailer tongue and allow
enough slack for turning corners.
Vehicles with trailers should not be
parked on a grade. When parking, apply
the parking brake on the tow vehicle. Put
the tow vehicle transmission in PARK. For
four-wheel drive vehicles, make sure the
transfer case is not in NEUTRAL. Always,
block or "chock" the trailer wheels.
WARNING! (Continued)
GCWR must not be exceeded.
Total weight must be distributed between
the tow vehicle and the trailer such that the
following four ratings are not exceeded
:
GVWR
GTW
GAWR
Tongue weight rating for the trailer
hitch utilized.
WARNING! (Continued)
2020_JEEP_M6_UG_UK.book Page 174
Page 177 of 328
175
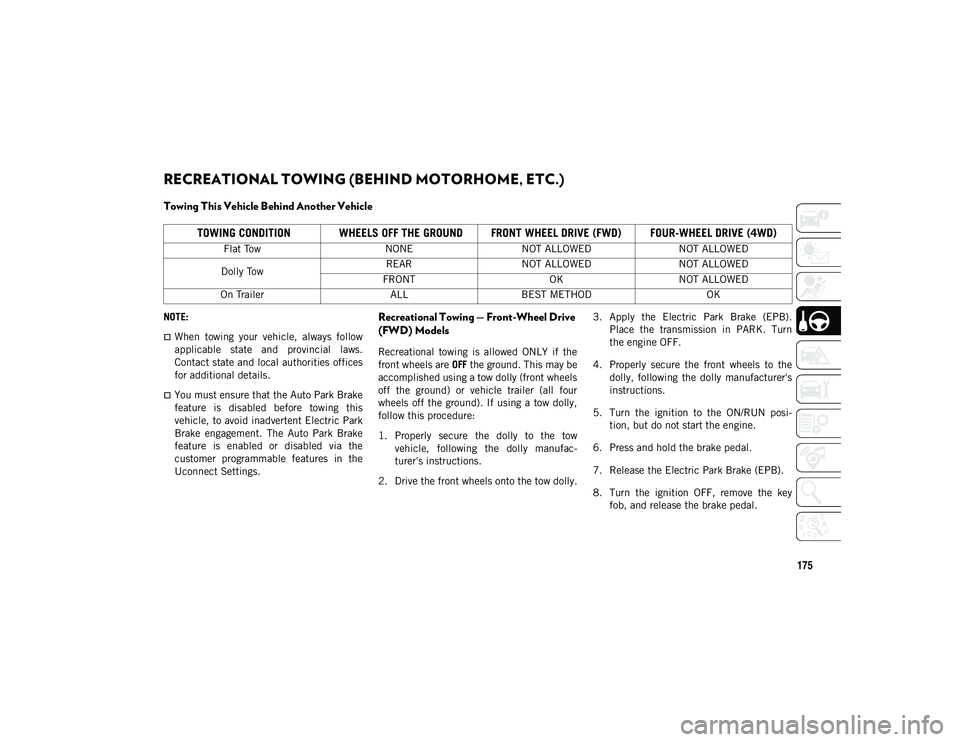
RECREATIONAL TOWING (BEHIND MOTORHOME, ETC.)
Towing This Vehicle Behind Another Vehicle
NOTE:
When towing your vehicle, always follow
applicable state and provincial laws.
Contact state and local authorities offices
for additional details.
You must ensure that the Auto Park Brake
feature is disabled before towing this
vehicle, to avoid inadvertent Electric Park
Brake engagement. The Auto Park Brake
feature is enabled or disabled via the
customer programmable features in the
Uconnect Settings.
Recreational Towing — Front-Wheel Drive
(FWD) Models
Recreational towing is allowed ONLY if the
front wheels are OFF the ground. This may be
accomplished using a tow dolly (front wheels
off the ground) or vehicle trailer (all four
wheels off the ground). If using a tow dolly,
follow this procedure:
1. Properly secure the dolly to the tow vehicle, following the dolly manufac -
turer's instructions.
2. Drive the front wheels onto the tow dolly. 3. Apply the Electric Park Brake (EPB).
Place the transmission in PARK. Turn
the engine OFF.
4. Properly secure the front wheels to the dolly, following the dolly manufacturer's
instructions.
5. Turn the ignition to the ON/RUN posi -
tion, but do not start the engine.
6. Press and hold the brake pedal.
7. Release the Electric Park Brake (EPB).
8. Turn the ignition OFF, remove the key fob, and release the brake pedal.
TOWING CONDITION WHEELS OFF THE GROUND FRONT WHEEL DRIVE (FWD) FOUR-WHEEL DRIVE (4WD)
Flat Tow NONENOT ALLOWED NOT ALLOWED
Dolly Tow REAR
NOT ALLOWED NOT ALLOWED
FRONT OKNOT ALLOWED
On Trailer ALLBEST METHOD OK
2020_JEEP_M6_UG_UK.book Page 175
Page 178 of 328
STARTING AND OPERATING
176
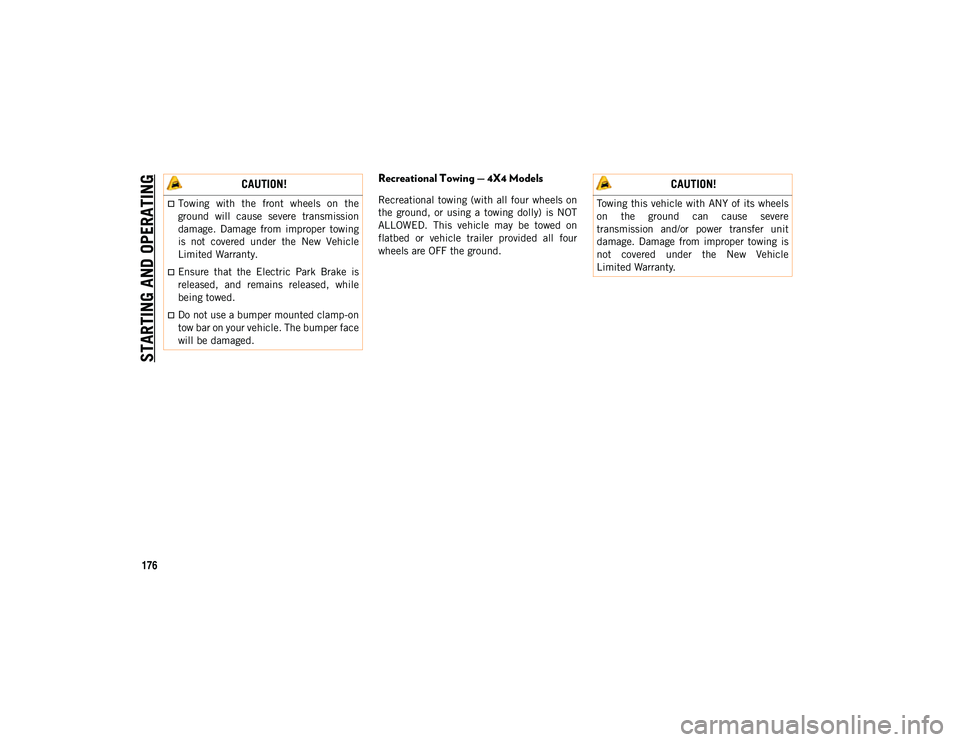
Recreational Towing — 4X4 Models
Recreational towing (with all four wheels on
the ground, or using a towing dolly) is NOT
ALLOWED. This vehicle may be towed on
flatbed or vehicle trailer provided all four
wheels are OFF the ground.
CAUTION!
Towing with the front wheels on the
ground will cause severe transmission
damage. Damage from improper towing
is not covered under the New Vehicle
Limited Warranty.
Ensure that the Electric Park Brake is
released, and remains released, while
being towed.
Do not use a bumper mounted clamp-on
tow bar on your vehicle. The bumper face
will be damaged.
CAUTION!
Towing this vehicle with ANY of its wheels
on the ground can cause severe
transmission and/or power transfer unit
damage. Damage from improper towing is
not covered under the New Vehicle
Limited Warranty.
2020_JEEP_M6_UG_UK.book Page 176
Page 185 of 328
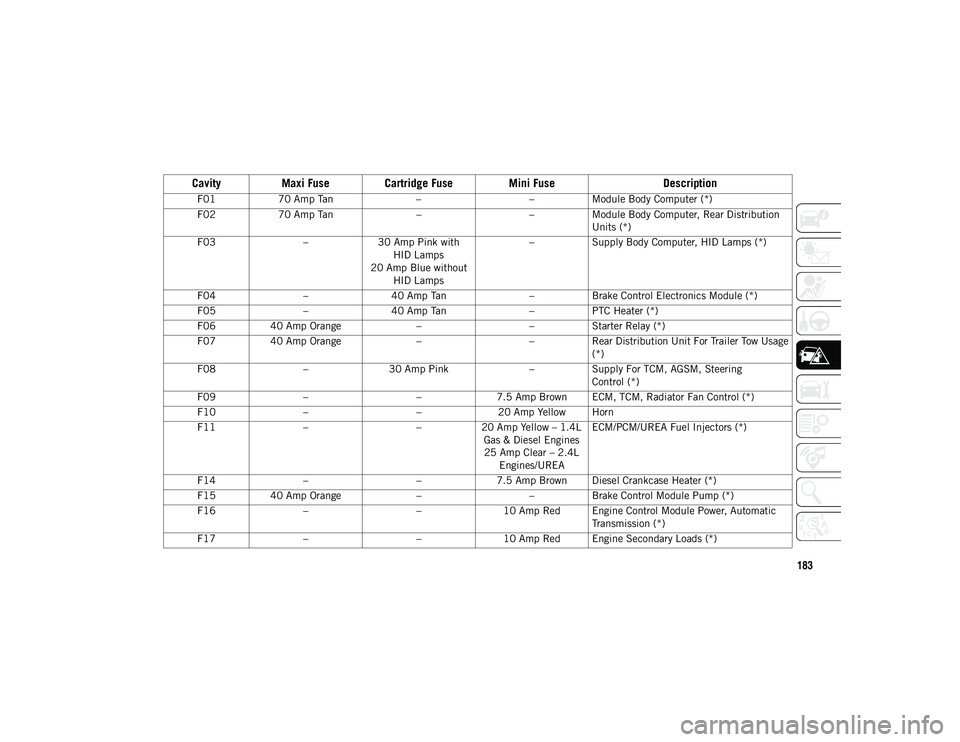
183
Cavity
Maxi Fuse Cartridge Fuse Mini Fuse Description
F0170 Amp Tan ––Module Body Computer (*)
F02 70 Amp Tan ––Module Body Computer, Rear Distribution
Units (*)
F03 –30 Amp Pink with
HID Lamps
20 Amp Blue without HID Lamps –
Supply Body Computer, HID Lamps (*)
F04 –40 Amp Tan –Brake Control Electronics Module (*)
F05 –40 Amp Tan –PTC Heater (*)
F06 40 Amp Orange ––Starter Relay (*)
F07 40 Amp Orange ––Rear Distribution Unit For Trailer Tow Usage
(*)
F08 –30 Amp Pink –Supply For TCM, AGSM, Steering
Control (*)
F09 – –7.5 Amp Brown ECM, TCM, Radiator Fan Control (*)
F10 – –20 Amp Yellow Horn
F11 – –20 Amp Yellow – 1.4L
Gas & Diesel Engines25 Amp Clear – 2.4L Engines/UREA ECM/PCM/UREA Fuel Injectors (*)
F14 – –7.5 Amp Brown Diesel Crankcase Heater (*)
F15 40 Amp Orange ––Brake Control Module Pump (*)
F16 – –10 Amp Red Engine Control Module Power, Automatic
Transmission (*)
F17 – –10 Amp Red Engine Secondary Loads (*)
2020_JEEP_M6_UG_UK.book Page 183
Page 187 of 328
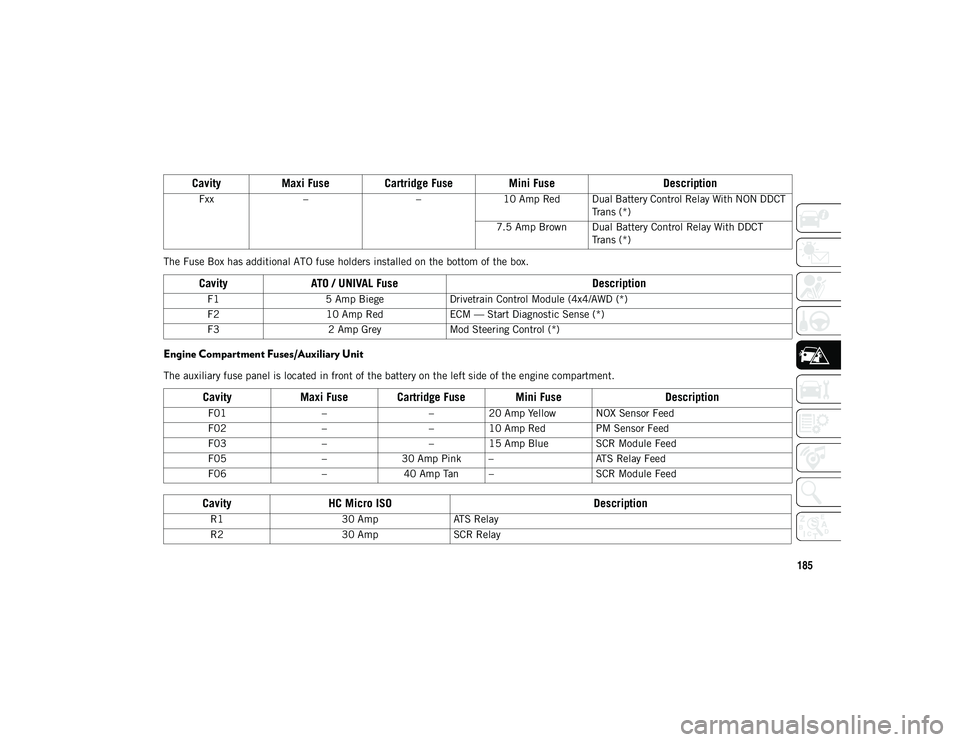
185
The Fuse Box has additional ATO fuse holders installed on the bottom of the box.
Engine Compartment Fuses/Auxiliary Unit
The auxiliary fuse panel is located in front of the battery on the left side of the engine compartment.Fxx
– –10 Amp Red Dual Battery Control Relay With NON DDCT
Trans (*)
7.5 Amp Brown Dual Battery Control Relay With DDCT Trans (*)
Cavity ATO / UNIVAL Fuse Description
F15 Amp Biege Drivetrain Control Module (4x4/AWD (*)
F2 10 Amp Red ECM — Start Diagnostic Sense (*)
F3 2 Amp Grey Mod Steering Control (*)
CavityMaxi Fuse Cartridge Fuse Mini Fuse Description
F01––20 Amp Yellow NOX Sensor Feed
F02 ––10 Amp Red PM Sensor Feed
F03 ––15 Amp Blue SCR Module Feed
F05 –30 Amp Pink – ATS Relay Feed
F06 –40 Amp Tan – SCR Module Feed
CavityHC Micro ISO Description
R130 AmpATS Relay
R2 30 AmpSCR Relay
CavityMaxi Fuse Cartridge Fuse Mini Fuse Description
2020_JEEP_M6_UG_UK.book Page 185