Start JEEP COMPASS 2020 Owner handbook (in English)
[x] Cancel search | Manufacturer: JEEP, Model Year: 2020, Model line: COMPASS, Model: JEEP COMPASS 2020Pages: 328, PDF Size: 8.85 MB
Page 152 of 328
STARTING AND OPERATING
150
Exceeding The Set Speed
By fully pressing the accelerator pedal, the
programmed maximum speed can be
exceeded while the device is active.
In the event that the Active Speed Limiter
set value is exceeded manually with a driver
acceleration, an audible indicator will sound,
the indicator light will rapidly flash, and a
message will appear in the instrument
cluster display.
The feature will remain disabled until the
vehicle speed drops below the set Active
Speed Limiter value, where it will reactivate
automatically.
Deactivation
To turn off Active Speed Limiter, push the
Active Speed Limiter button on the right side
of the steering wheel. A message will appear
in the instrument cluster display to confirm
that the feature has been turned off.
SPEED CONTROL — IF
EQUIPPED
When engaged, the Speed Control takes over
accelerator operations at speeds greater than
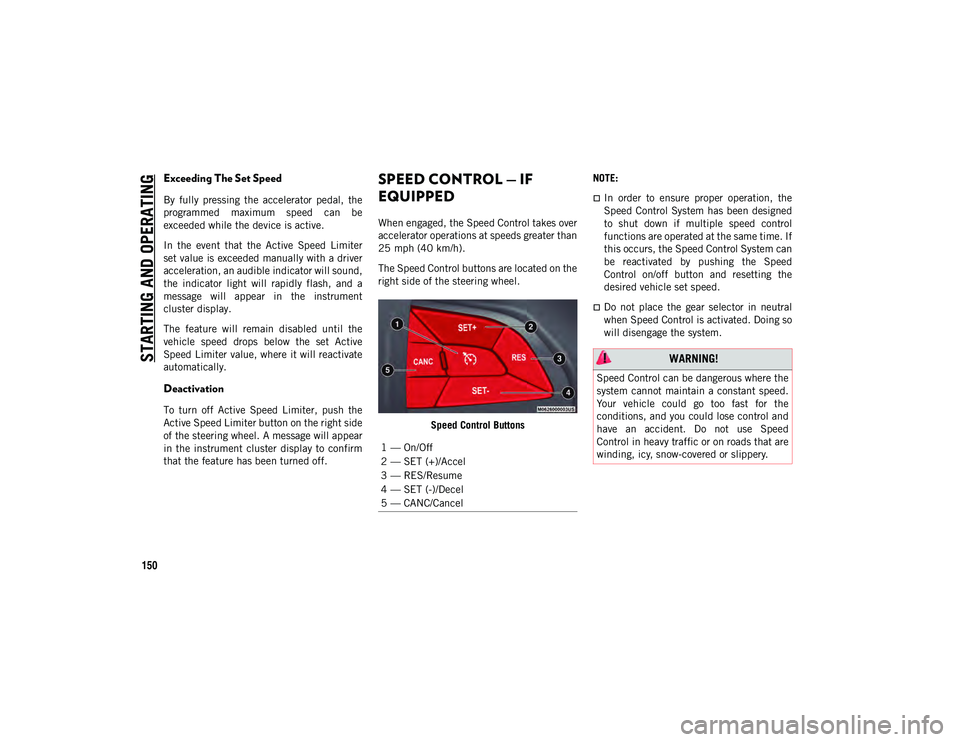
25 mph (40 km/h).The Speed Control buttons are located on the
right side of the steering wheel.
Speed Control Buttons NOTE:
In order to ensure proper operation, the
Speed Control System has been designed
to shut down if multiple speed control
functions are operated at the same time. If
this occurs, the Speed Control System can
be reactivated by pushing the Speed
Control on/off button and resetting the
desired vehicle set speed.
Do not place the gear selector in neutral
when Speed Control is activated. Doing so
will disengage the system.
1 — On/Off
2 — SET (+)/Accel
3 — RES/Resume
4 — SET (-)/Decel
5 — CANC/Cancel
WARNING!
Speed Control can be dangerous where the
system cannot maintain a constant speed.
Your vehicle could go too fast for the
conditions, and you could lose control and
have an accident. Do not use Speed
Control in heavy traffic or on roads that are
winding, icy, snow-covered or slippery.
2020_JEEP_M6_UG_UK.book Page 150
Page 154 of 328
STARTING AND OPERATING
152
ACC will allow you to keep cruise control
engaged in light to moderate traffic condi-
tions without the constant need to reset your
cruise control. ACC utilizes a radar sensor
and a forward facing camera designed to
detect a vehicle directly ahead of you.
NOTE:
If the sensor does not detect a vehicle
ahead of you, ACC will maintain a fixed set
speed.
If the ACC sensor detects a vehicle ahead,
ACC will apply limited braking or acceler -
ation (not to exceed the original set speed)
automatically to maintain a preset
following distance, while matching the
speed of the vehicle ahead.
To Activate/Deactivate
Push and release the Adaptive Cruise Control
(ACC) on/off button. The ACC menu in the
instrument cluster display will read “ACC
Ready.”
To turn the system off, push and release the
Adaptive Cruise Control (ACC) on/off button
again. At this time, the system will turn off
and the instrument cluster display will read
“Adaptive Cruise Control (ACC) Off.”
To Set A Desired ACC Speed
When the vehicle reaches the speed desired,
push the SET (+) button or the SET (-) button
and release. The instrument cluster display
will show the set speed.
If the system is set when the vehicle speed is
below 19 mph (30 km/h), the set speed shall be defaulted to 19 mph (30 km/h). If the
system is set when the vehicle speed is
above 19 mph (30 km/h), the set speed shall
be the current speed of the vehicle.
NOTE:
ACC cannot be set if there is a stationary
vehicle in front of your vehicle in close prox -
imity. Remove your foot from the accelerator pedal.
If you do not, the vehicle may continue to
accelerate beyond the set speed. If this
occurs:
The message “DRIVER OVERRIDE” will
display in the instrument cluster display.
The system will not be controlling the
distance between your vehicle and the
vehicle ahead. The vehicle speed will only
be determined by the position of the
accelerator pedal.
To Resume
If there is a set speed in the memory, push
the RES button and then remove your foot
from the accelerator pedal. The instrument
cluster display will show the last set speed.
WARNING!
Leaving the Adaptive Cruise Control (ACC)
system on when not in use is dangerous.
You could accidentally set the system or
cause it to go faster than you want. You
could lose control and have a collision.
Always leave the system off when you are
not using it.
WARNING!
The Resume function should only be used
if traffic and road conditions permit.
Resuming a set speed that is too high or
too low for prevailing traffic and road
conditions could cause the vehicle to
accelerate or decelerate too sharply for
safe operation. Failure to follow these
warnings can result in a collision and
death or serious personal injury.
2020_JEEP_M6_UG_UK.book Page 152
Page 156 of 328
STARTING AND OPERATING
154
If equipped with a automatic transmis-
sion, The ACC system decelerates the
vehicle to a full stop when following a
target vehicle. If an ACC host vehicle
follows a target vehicle to a standstill,
after two seconds the driver will either
have to push the RES (resume) button, or
apply the accelerator pedal to reengage
the ACC to the existing set speed.
The ACC system maintains set speed when
driving uphill and downhill. However, a
slight speed change on moderate hills is
normal. In addition, downshifting may
occur while climbing uphill or descending
downhill. This is normal operation and
necessary to maintain set speed. When
driving uphill and downhill, the ACC
system will cancel if the braking tempera-
ture exceeds normal range (overheated).
Setting The Following Distance In ACC
The specified following distance for ACC can
be set by varying the distance setting
between four bars (longest), three bars
(long), two bars (medium) and one bar
(short). Using this distance setting and the
vehicle speed, ACC calculates and sets the
distance to the vehicle ahead. This distance
setting will show in the instrument cluster
display.To decrease the distance setting, push the
Distance Button and release. Each time the
button is pushed, the distance setting
decreases by one bar (shorter). Once the
shortest setting is reached, if the button is
pushed again it will be set to the longest
setting available.
PARKSENSE REAR PARK
ASSIST — IF EQUIPPED
The ParkSense Rear Park Assist system
provides visual and audible indications of
the distance between the rear fascia and a
detected obstacle when backing up (e.g.
during a parking maneuver). Refer to “Park
-
Sense System Usage Precautions” for limita -
tions of this system and recommendations.
ParkSense will retain the last system state
(enabled or disabled) from the last ignition
cycle when the ignition is changed to the ON/
RUN position.
ParkSense can be active only when the gear
selector is in REVERSE. The system will
remain active until the vehicle speed is
increased to approximately 7 mph (11 km/h)
or above. While in REVERSE and above the
system's operating speed, a warning will
appear in the instrument cluster display indi -
cating the vehicle speed is too fast. The system will become active again if the
vehicle speed is decreased to speeds less
than approximately 6 mph (9 km/h).
ParkSense Sensors
The four ParkSense sensors, located in the
rear fascia/bumper, monitor the area behind
the vehicle that is within the sensors’ field of
view. The sensors can detect obstacles from
approximately 12 inches (30 cm) up to
79 inches (200 cm) from the rear fascia/
bumper in the horizontal direction,
depending on the location, type and orienta
-
tion of the obstacle.
ParkSense Warning Display
The ParkSense Warning screen will only be
displayed if “Sound and Display” is selected
from the Customer - Programmable Features
section of the Uconnect System. Refer to
"Uconnect Settings” in “Multimedia” in the
Owner’s Manual for further information.
The ParkSense Warning screen is located
within the instrument cluster display. It
provides visual warnings to indicate the
distance between the rear fascia/bumper and
the detected obstacle. Refer to “Instrument
Cluster Display” in “Getting To Know Your
Instrument Panel” in the Owner’s Manual for
further information.
2020_JEEP_M6_UG_UK.book Page 154
Page 158 of 328
STARTING AND OPERATING
156
PARKSENSE FRONT AND
REAR PARK ASSIST — IF
EQUIPPED
The ParkSense Park Assist system provides
visual and audible indications of the
distance between the rear and/or front fascia
and a detected obstacle when backing up or
moving forward (e.g. during a parking
maneuver).
Refer to “ParkSense System Usage Precau-
tions” in “Starting And Operating” in your Owner’s Manual for limitations of this system
and recommendations.
ParkSense will retain the last system state
(enabled or disabled) from the last ignition
cycle when the ignition is changed to the ON/
RUN position.
ParkSense is active in all gear selector posi
-
tions (including PARK), as long as the
system is on. The system will remain active
until the vehicle speed is increased to
approximately 7 mph (11 km/h) or above.
While in REVERSE and above the system's
operating speed, a warning will appear in the
instrument cluster display indicating the
vehicle speed is too fast. The system will
become active again if the vehicle speed is
decreased to speeds less than approximately
6 mph (9 km/h).
ParkSense Sensors
The six ParkSense sensors, located in the
rear fascia/bumper, monitor the area behind
the vehicle that is within the sensors’ field of
view. The sensors can detect obstacles from
approximately 12 inches (30 cm) up to
79 inches (200 cm) from the rear fascia/
bumper in the horizontal direction,
depending on the location, type and orienta -
tion of the obstacle.
WARNING!
Drivers must be careful when backing up
even when using ParkSense. Always
check carefully behind your vehicle, look
behind you, and be sure to check for
pedestrians, animals, other vehicles,
obstructions, and blind spots before
backing up. You are responsible for
safety and must continue to pay atten -
tion to your surroundings. Failure to do
so can result in serious injury or death.
Before using ParkSense, it is strongly
recommended that the ball mount and
hitch ball assembly is disconnected from
the vehicle when the vehicle is not used
for towing. Failure to do so can result in
injury or damage to vehicles or obstacles
because the hitch ball will be much
closer to the obstacle than the rear fascia
when the loudspeaker sounds the contin -
uous tone. Also, the sensors could detect
the ball mount and hitch ball assembly,
depending on its size and shape, giving
a false indication that an obstacle is
behind the vehicle.
CAUTION!
ParkSense is only a parking aid and it is
unable to recognize every obstacle,
including small obstacles. Parking curbs
might be temporarily detected or not
detected at all. Obstacles located above
or below the sensors will not be detected
when they are in close proximity.
The vehicle must be driven slowly when
using ParkSense in order to be able to
stop in time when an obstacle is
detected. It is recommended that the
driver looks over his/her shoulder when
using ParkSense.
2020_JEEP_M6_UG_UK.book Page 156
Page 160 of 328
STARTING AND OPERATING
158
“SDW Not Available” — This message is
displayed if the Side Distance Warning
system is not available. The failed operation
of the system might be due to the insuffi-
cient voltage from the battery or other fail -
ures on the electrical system. Contact an
authorized dealer as soon as possible to have
the electrical system checked.
Operation With A Trailer
The system is automatically deactivated
when the trailer's electric plug is inserted in
the vehicle's tow hook socket. The rear
sensors are automatically reactivated when
the trailer's cable plug is removed.
ParkSense Usage Precautions
Some conditions may influence the perfor -
mance of the Side Distance Warning System:
NOTE:
Ensure that the front and rear bumper are
free of snow, ice, mud, dirt and debris to
keep the ParkSense system operating
properly.
Construction equipment, large trucks, and
other vibrations could affect the perfor -
mance of ParkSense.
When you turn ParkSense off, the message
to appear in the instrument cluster display
will read “PARKSENSE OFF.” Further -
more, once you turn ParkSense off, it
remains off until you turn it on again, even
if you cycle the ignition key.
ParkSense, when on, will reduce the
volume of the radio when it is sounding a
tone.
Clean the ParkSense sensors regularly,
taking care not to scratch or damage them.
The sensors must not be covered with ice,
snow, slush, mud, dirt or debris. Failure to
do so can result in the system not working
properly. The ParkSense system might not
detect an obstacle behind or in front of the
fascia/bumper, or it could provide a false
indication that an obstacle is behind or in
front of the fascia/bumper.
The presence of a tow hook without a
trailer may interfere with the correct oper -
ation of the parking sensors. Before using
the ParkSense system, it is recommended
to remove the removable tow hook ball
assembly and any attachments from the
vehicle when it is not used for towing oper -
ations. If you wish to leave the tow hook
fitted without towing a trailer, it is advis- able to contact an authorized dealer for
the ParkSense system update operations
because the tow hook could be detected
as an obstacle by the central sensors.
WARNING!
Drivers must be careful when backing up
even when using ParkSense. Always
check carefully behind your vehicle, look
behind you, and be sure to check for
pedestrians, animals, other vehicles,
obstructions, and blind spots before
backing up. You are responsible for
safety and must continue to pay atten
-
tion to your surroundings. Failure to do
so can result in serious injury or death.
Before using ParkSense, it is strongly
recommended that the ball mount and
hitch ball assembly is disconnected from
the vehicle when the vehicle is not used
for towing. Failure to do so can result in
injury or damage to vehicles or obstacles
because the hitch ball will be much
closer to the obstacle than the rear fascia
when the loudspeaker sounds the contin -
uous tone. Also, the sensors could detect
the ball mount and hitch ball assembly,
depending on its size and shape, giving
a false indication that an obstacle is
behind the vehicle.
2020_JEEP_M6_UG_UK.book Page 158
Page 162 of 328
STARTING AND OPERATING
160
The ParkSense Active Park Assist system will
turn off automatically for any of the following
conditions:
The parking maneuver is completed.
Vehicle speed greater than 18 mph
(30 km/h) when searching for a parking
space.
Vehicle speed greater than 5 mph (7 km/h)
during active steering guidance into the
parking space.
Touching the steering wheel during active
steering guidance into the parking space.
Pushing the ParkSense Front and Rear
Park Assist switch.
Driver's door is opened.
Rear liftgate is opened.
Electronic Stability Control/Anti-Lock
Braking System intervention.
The ParkSense Active Park Assist system
will allow a maximum number of shifts
between DRIVE and REVERSE. If the
maneuver cannot be completed within the
maximum amount of shifts, the system
will cancel and the instrument cluster
display will instruct the driver to complete
the maneuver manually.The ParkSense Active Park Assist system will
only operate and search for a parking space
when the following conditions are present:
Gear position is in DRIVE.
Ignition is in the RUN position.
ParkSense Active Park Assist switch is
activated.
Driver's door is closed.
Rear liftgate is closed.
Vehicle speed is less than 15 mph
(25 km/h).
NOTE:
If the vehicle is driven above approximately
15 mph (25 km/h), the instrument cluster
display will instruct the driver to slow down.
If the vehicle is driven above approximately
18 mph (30 km/h), the system will cancel.
The driver must then reactivate the system
by pushing the ParkSense Active Park Assist
switch.
The outer surface and the underside of the
front and rear fascias/bumpers are clean
and clear of snow, ice, mud, dirt or other
obstruction. When pushed, the LED on the ParkSense
Active Park Assist switch will blink momen
-
tarily, and then the LED will turn off if any of
the above conditions are not present.
Exiting The Parking Space
NOTE:
The function does not work for exiting a
perpendicular parking space, but only exiting
parallel parking spaces.
Activation
To activate this function, push the Active
ParkSense hard switch and then use the
steering wheel arrow buttons to select the
Parallel Park Exit feature. After the selection,
the system activates and warns the driver on
the instrument panel display about the oper -
ations that have to be carried out to perform
the maneuver correctly.
Selection Of The Maneuver Side
Use the right and left arrow buttons on the
steering wheel to select between parallel or
perpendicular parking mode. Then use the
direction indicators (turn signals) to choose
the direction that you want to perform the
maneuver.
2020_JEEP_M6_UG_UK.book Page 160
Page 164 of 328
STARTING AND OPERATING
162
Take great care to ensure that conditions
do not change during the parking
maneuver (e.g. if there are persons and/or
animals in the parking place, moving vehi-
cles, etc.) and intervene immediately if
necessary.
During parking maneuvers, pay attention
to vehicles approaching from the opposite
direction. Always abide by the law and
road regulations.
NOTE:
Correct system operation is not guaranteed
if snow chains or the space-saver wheel
are fitted.
The function only informs the driver about
the last appropriate parking place (parallel
or perpendicular) detected by the parking
sensors.
Some messages displayed are accompa-
nied by acoustic warnings.
LANESENSE — IF EQUIPPED
LaneSense Operation
The LaneSense system is operational at
speeds above 37 mph (60 km/h) and below
112 mph (180 km/h). The LaneSense system uses a forward looking camera to
detect lane markings and measure vehicle
position within the lane boundaries.
When both lane markings are detected and
the driver unintentionally drifts out of the
lane (no turn signal applied), the LaneSense
system provides a haptic warning in the form
of torque applied to the steering wheel, as
well as a visual warning in the instrument
cluster display, to prompt the driver to
remain within the lane boundaries.
The driver may manually override the haptic
warning by applying torque into the steering
wheel at any time.
When only a single lane marking is detected
and the driver unintentionally drifts across
the lane marking (no turn signal applied), the
LaneSense system provides a visual warning
through the instrument cluster display to
prompt the driver to remain within the lane.
When only a single lane marking is detected,
a haptic (torque) warning will not be
provided.
NOTE:
When operating conditions have been met,
the LaneSense system will monitor if the
driver’s hands are on the steering wheel and
provide an audible and visual warning to the
driver when the driver’s hands are not
detected on the steering wheel. The system
will cancel if the driver does not return their
hands to the wheel.
Turning LaneSense On Or Off
The default status of LaneSense is
“Off”.
The LaneSense button is located on the
switch panel below the Uconnect display.
To turn the LaneSense system on, push the
LaneSense button (LED turns off). A “Lane
Sense On” message is shown in the instru -
ment cluster display.
To turn the LaneSense system off, push the
LaneSense button again (LED turns on).
NOTE:
The LaneSense system will retain the last
system state on or off from the last ignition
cycle when the ignition is changed to the ON/
RUN position.
LaneSense Warning Message
The LaneSense system will indicate the
current lane drift condition through the
instrument cluster display.
2020_JEEP_M6_UG_UK.book Page 162
Page 166 of 328
STARTING AND OPERATING
164
When the LaneSense system senses the
lane has been approached and is in a lane
departure situation, the left thick lane line
flashes yellow, the left thin line remains
solid yellow and the LaneSense telltale
changes from solid white to flashing
yellow.
NOTE:
The LaneSense system operates with the
similar behavior for a right lane departure
when only the right lane marking has been
detected.
Left Lane Departure — Both Lanes Detected
When the LaneSense system is on, the
lane lines turn from grey to white to indi-
cate that both of the lane markings have
been detected. The LaneSense telltale
is solid green when both lane markings
have been detected and the system is
“armed” to provide visual warnings in the
instrument cluster display and a torque
warning in the steering wheel if an unin -
tentional lane departure occurs.
When the LaneSense system senses a lane
drift situation, the left thick lane line and
left thin line turn solid yellow. The Lane-
Sense telltale changes from solid green to solid yellow. At this time torque is
applied to the steering wheel in the oppo-
site direction of the lane boundary.
For example: if approaching the left side
of the lane the steering wheel will turn to
the right.
When the LaneSense system senses the
lane has been approached and is in a lane
departure situation, the left thick lane line
flashes yellow and the left thin line
remains solid yellow. The LaneSense tell
-
tale stays solid yellow. At this time
torque is applied to the steering wheel in
the opposite direction of the lane
boundary.
For example: if approaching the left side
of the lane the steering wheel will turn to
the right.
NOTE:
The LaneSense system operates with the
similar behavior for a right lane departure.
Changing LaneSense Status
The LaneSense system has settings to adjust
the intensity of the torque warning (Low/
Medium/High) and the warning zone sensi -
tivity (Early/Medium/Late) that you can
configure through the Uconnect system screen. Refer to “Uconnect Settings” in
“Multimedia” in the Owner’s Manual for
further details.
NOTE:
The system will not apply torque to the
steering wheel whenever a safety system
engages (Anti-Lock Brakes, Traction
Control System, Electronic Stability
Control, Forward Collision Warning, etc.).
Use of the turn signals and Hazard
Warning flashers also suppresses the
warnings.
PARKVIEW REAR BACK UP
CAMERA — IF EQUIPPED
You can see an on-screen image of the rear
of your vehicle whenever the transmission is
shifted into REVERSE. The ParkView Rear
Back Up Camera image will be displayed on
the Uconnect Display, located on the center
stack of the instrument panel.
If the Uconnect Display appears foggy, clean
the camera lens located on the rear of the
vehicle above the rear license plate
Refer to “ParkView Back Up Camera” in
“Starting And Operating” in your Owner's
Manual for further information.
2020_JEEP_M6_UG_UK.book Page 164
Page 168 of 328
STARTING AND OPERATING
166
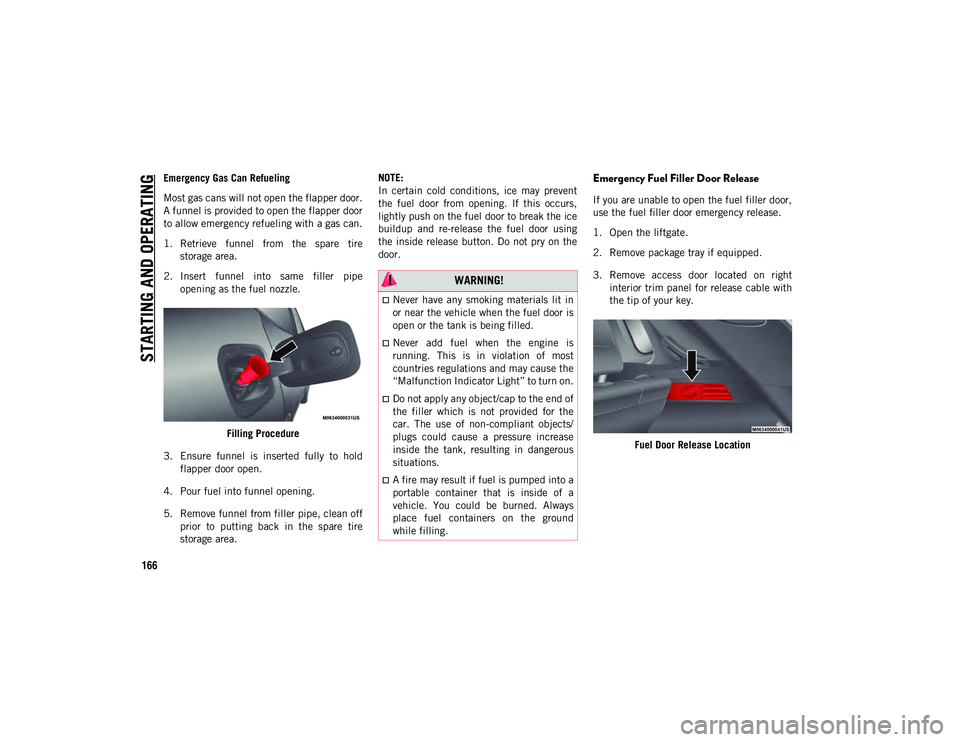
Emergency Gas Can Refueling
Most gas cans will not open the flapper door.
A funnel is provided to open the flapper door
to allow emergency refueling with a gas can.
1. Retrieve funnel from the spare tirestorage area.
2. Insert funnel into same filler pipe opening as the fuel nozzle.
Filling Procedure
3. Ensure funnel is inserted fully to hold flapper door open.
4. Pour fuel into funnel opening.
5. Remove funnel from filler pipe, clean off prior to putting back in the spare tire
storage area. NOTE:
In certain cold conditions, ice may prevent
the fuel door from opening. If this occurs,
lightly push on the fuel door to break the ice
buildup and re-release the fuel door using
the inside release button. Do not pry on the
door.Emergency Fuel Filler Door Release
If you are unable to open the fuel filler door,
use the fuel filler door emergency release.
1. Open the liftgate.
2. Remove package tray if equipped.
3. Remove access door located on right
interior trim panel for release cable with
the tip of your key.
Fuel Door Release Location
WARNING!
Never have any smoking materials lit in
or near the vehicle when the fuel door is
open or the tank is being filled.
Never add fuel when the engine is
running. This is in violation of most
countries regulations and may cause the
“Malfunction Indicator Light” to turn on.
Do not apply any object/cap to the end of
the filler which is not provided for the
car. The use of non-compliant objects/
plugs could cause a pressure increase
inside the tank, resulting in dangerous
situations.
A fire may result if fuel is pumped into a
portable container that is inside of a
vehicle. You could be burned. Always
place fuel containers on the ground
while filling.
2020_JEEP_M6_UG_UK.book Page 166
Page 170 of 328
STARTING AND OPERATING
168
(Continued)
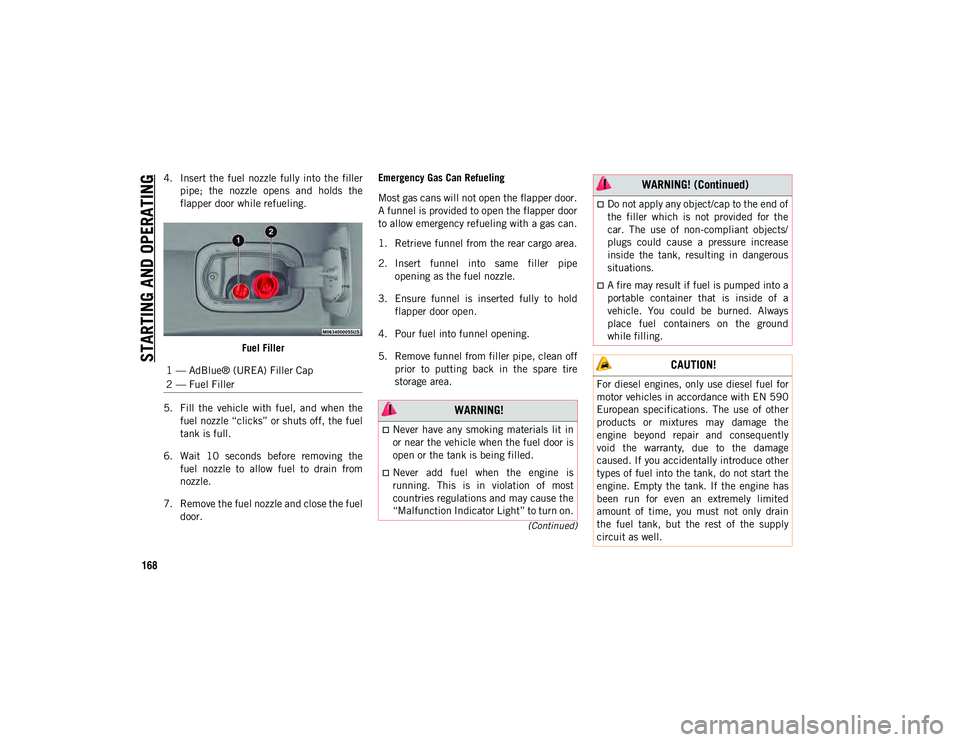
4. Insert the fuel nozzle fully into the fillerpipe; the nozzle opens and holds the
flapper door while refueling.
Fuel Filler
5. Fill the vehicle with fuel, and when the fuel nozzle “clicks” or shuts off, the fuel
tank is full.
6. Wait 10 seconds before removing the fuel nozzle to allow fuel to drain from
nozzle.
7. Remove the fuel nozzle and close the fuel door. Emergency Gas Can Refueling
Most gas cans will not open the flapper door.
A funnel is provided to open the flapper door
to allow emergency refueling with a gas can.
1. Retrieve funnel from the rear cargo area.
2. Insert funnel into same filler pipe
opening as the fuel nozzle.
3. Ensure funnel is inserted fully to hold flapper door open.
4. Pour fuel into funnel opening.
5. Remove funnel from filler pipe, clean off prior to putting back in the spare tire
storage area.
1 — AdBlue® (UREA) Filler Cap
2 — Fuel Filler
WARNING!
Never have any smoking materials lit in
or near the vehicle when the fuel door is
open or the tank is being filled.
Never add fuel when the engine is
running. This is in violation of most
countries regulations and may cause the
“Malfunction Indicator Light” to turn on.
Do not apply any object/cap to the end of
the filler which is not provided for the
car. The use of non-compliant objects/
plugs could cause a pressure increase
inside the tank, resulting in dangerous
situations.
A fire may result if fuel is pumped into a
portable container that is inside of a
vehicle. You could be burned. Always
place fuel containers on the ground
while filling.
CAUTION!
For diesel engines, only use diesel fuel for
motor vehicles in accordance with EN 590
European specifications. The use of other
products or mixtures may damage the
engine beyond repair and consequently
void the warranty, due to the damage
caused. If you accidentally introduce other
types of fuel into the tank, do not start the
engine. Empty the tank. If the engine has
been run for even an extremely limited
amount of time, you must not only drain
the fuel tank, but the rest of the supply
circuit as well.
WARNING! (Continued)
2020_JEEP_M6_UG_UK.book Page 168