boot Lancia Musa 2007 Owner handbook (in English)
[x] Cancel search | Manufacturer: LANCIA, Model Year: 2007, Model line: Musa, Model: Lancia Musa 2007Pages: 346, PDF Size: 5.15 MB
Page 131 of 346

130
SAFETY
DEVICES
CORRECT
USE OF
THE CAR
WARNING
LIGHTS AND
MESSAGES
IN AN
EMERGENCY
CAR
MAINTENANCE
TECHNICALSPECIFICATIONS
INDEX
DASHBOARD
AND
CONTROLS
TAILGATE CLOSING
First lower the tailgate using the appropriate handles, as shown in the
figure, and then push the tailgate until it clicks into place.
IMPORTANT If option “Independent boot” is on, before closing the
boot check whether you have with you the ignition key since the boot
will be locked automatically.
L0D0105m
The addition of objects (speakers, spoilers, etc.) on the rear shelf or boot lid, except those
envisaged by the manufacturer, may prevent the gas filled struts at the sides of the boot from
working properly.
WARNING
WARNING
When using the boot, make sure the loads do not exceed the permitted weight (see
“Technical specifications” chapter). Also make sure the items in the boot are
arranged properly to prevent them being thrown forwards and injuring
passengers should you brake sharply.
Never travel with objects on the rear shelf to prevent them being thrown forwards
and injuring passengers in case of accident or sharp braking.
Page 132 of 346

131
SAFETY
DEVICES
CORRECT
USE OF
THE CAR
WARNING
LIGHTS AND
MESSAGES
IN AN
EMERGENCY
CAR
MAINTENANCE
TECHNICALSPECIFICATIONS
INDEX
DASHBOARD
AND
CONTROLS
EMERGENCY OPENING OF TAILGATE
To succeed in opening the tailgate from the inside, should the car
battery be flat, or because of a defect of the electric lock of the
tailgate, proceed as follows (refer to “Extending the boot” in this
section):
❒remove the rear head restraints;
❒tilt seat backrests to "table" configuration;
❒tilt cushion / backrest completely.
❒operate lever B, to obtain tailgate mechanical release, operating
from the inside of the boot.
REAR PARCEL SHELF REMOVAL
To remove the rear parcel shelf in order to extend the boot, proceed as
follows:
❒Front parcel shelf: release and turn the parcel shelf from its seat
and release the two pins from the side seats.
❒Rear parcel shelf: release the two pins from the side seats
L0D0338m
L0D0108m
Page 133 of 346

132
SAFETY
DEVICES
CORRECT
USE OF
THE CAR
WARNING
LIGHTS AND
MESSAGES
IN AN
EMERGENCY
CAR
MAINTENANCE
TECHNICALSPECIFICATIONS
INDEX
DASHBOARD
AND
CONTROLS
EXTENDING THE BOOT
Before extending the boot, release the seat belt buckle (with black
button, if fastened) and accompany the webbing in the reel to prevent
it from twisting; insert the tongues, overlapping them, in the retaining
system A inside the reel compartment.
Moving the seat backwards or forwards
The rear seat is of the double-seat type. It is possible to move the rear
seat backwards or forwards from the boot using handles B or C; pull
the handle and at the same time move the seats forwards. This makes
it possible to extend the boot capacity.
To extend the boot totally
Proceed as follows:
❒remove the rear parcel and previously shown;
❒make sure the headrests are completely lowered;
❒use levers D and E to fold the rear seat backs on the cushions;
❒make sure the seats are completely in backward position by means
of handles B or C;
❒use tapes F and G to tilt the seats completely.
L0D0132m
L0D0109m
L0D0048m
WARNING
WARNING
If the central seat belt is fastened to the
seat, release it before tilting the seat.
Never pull tapes B or C with seats in load
position as they will slide vertically thus
hindering seat repositioning.
Page 134 of 346

133
SAFETY
DEVICES
CORRECT
USE OF
THE CAR
WARNING
LIGHTS AND
MESSAGES
IN AN
EMERGENCY
CAR
MAINTENANCE
TECHNICALSPECIFICATIONS
INDEX
DASHBOARD
AND
CONTROLS
The tilted seats are fastened in this position by the action of the side
struts.
IMPORTANT Tilting is only possible with rear seats positioned
completely backwards.
Partial extension
Operating the required part (right or left) of the seat in the same way
it is possible to obtain partial extension of the boot as illustrated.
IMPORTANT For rear seat complete tilting it could be necessary to
move the front seats forward.
To return the cushions on the floor
Use tapes (B) to return the cushions on the floor.
L0D0111m
L0D0112m
L0D0110m
WARNING
With table folded seats, in the event of a
crash it can be dangerous to carry heavy
objects on the rear seat back.
WARNING
The position of the rear seat backs folded
on the respective cushions shall not be
considered a loading position and
therefore cannot bear heavy weights.
Page 138 of 346

137
SAFETY
DEVICES
CORRECT
USE OF
THE CAR
WARNING
LIGHTS AND
MESSAGES
IN AN
EMERGENCY
CAR
MAINTENANCE
TECHNICALSPECIFICATIONS
INDEX
DASHBOARD
AND
CONTROLS
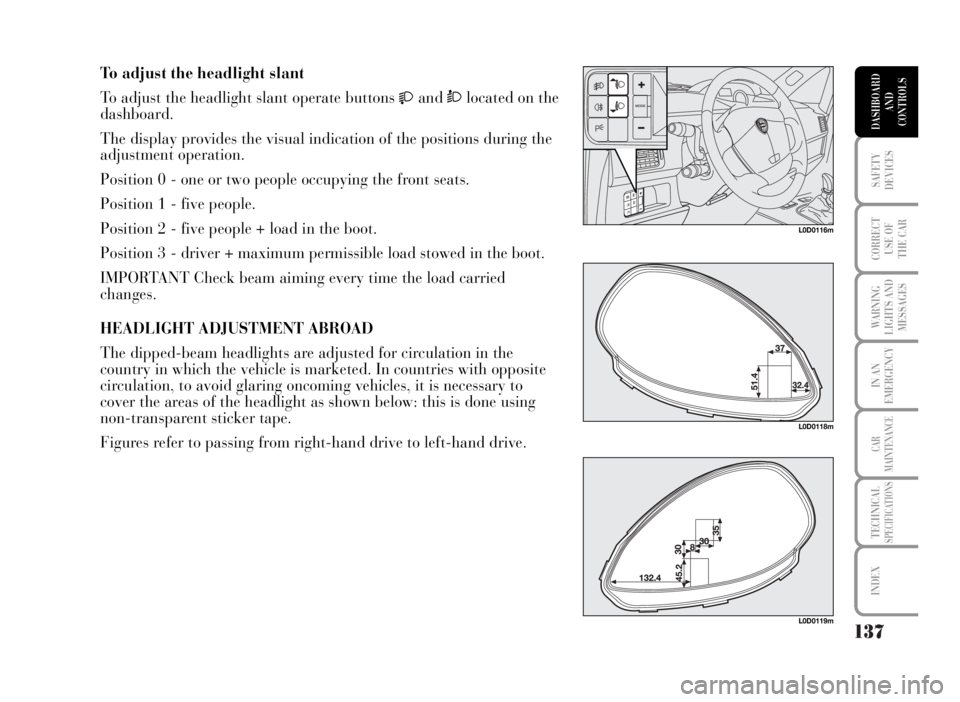
To adjust the headlight slant
To adjust the headlight slant operate buttons
andÒlocated on the
dashboard.
The display provides the visual indication of the positions during the
adjustment operation.
Position 0 - one or two people occupying the front seats.
Position 1 - five people.
Position 2 - five people + load in the boot.
Position 3 - driver + maximum permissible load stowed in the boot.
IMPORTANT Check beam aiming every time the load carried
changes.
HEADLIGHT ADJUSTMENT ABROAD
The dipped-beam headlights are adjusted for circulation in the
country in which the vehicle is marketed. In countries with opposite
circulation, to avoid glaring oncoming vehicles, it is necessary to
cover the areas of the headlight as shown below: this is done using
non-transparent sticker tape.
Figures refer to passing from right-hand drive to left-hand drive.
L0D0116m
L0D0118m
L0D0119m
Page 201 of 346

CONTAINING RUNNING COSTS
Here are some suggestions which may help you to
keep the running costs of your car down and lower
the amount of toxic emissions released into the
atmosphere.
GENERAL CONSIDERATIONS
Car maintenance
Have checks and adjustments carried out in
accordance with the “Service schedule”.Tyres
Check the pressure of the tyres routinely at an
interval of no more than 4 weeks: if the pressure is
too low, consumption levels increase as resistance to
rolling is higher.
Unnecessary loads
Do not travel with too much luggage stowed in the
boot. The weight of the car (especially when driving
in town) and its trim greatly affects consumption
and stability.
200
WARNING
LIGHTS AND
MESSAGES
IN AN
EMERGENCY
CAR
MAINTENANCE
TECHNICALSPECIFICATIONS
INDEX
DASHBOARD
AND CONTROLS
SAFETY
DEVICES
CORRECT
USE OF
THE CAR
Page 218 of 346

217
IN AN
EMERGENCY
CAR
MAINTENANCE
TECHNICALSPECIFICATIONS
INDEX
DASHBOARD
AND CONTROLS
SAFETY
DEVICES
CORRECT
USE OF
THE CAR
WARNING
LIGHTS AND
MESSAGES
INCOMPLETE DOOR LOCKING
The warning light on the dial turns on (together with the message on
the display) when one or more doors, the boot or the bonnet are not
properly shut.
Symbols
¯/˙shown on the display indicate incomplete left/right door
closing.
´
(*) Or rear
red(*)
“DUALDRIVE” ELECTRIC POWER STEERING SYSTEM
The wording CITY is only displayed when the “dualdrive” electric
power steering is engaged.
Warning
light on
dial Message on
multifunction
display
Page 257 of 346

256
WARNING
LIGHTS AND
MESSAGES
CAR
MAINTENANCE
TECHNICALSPECIFICATIONS
INDEX
DASHBOARD
AND CONTROLS
SAFETY
DEVICES
CORRECT
USE OF
THE CAR
IN AN
EMERGENCY
QUICK TYRE REPAIR KIT - FIX & GO
automatic (where provided)
The quick tyre repair kit Fix & Go automatic is placed in the boot.
The kit includes:
❒bottle A containing sealer and fitted with:
– filling pipe B;
– sticker C bearing the notice “max. 80 km/h”, to be placed in a po-
sition visible to the driver (on the instrument panel) after fixing
the tyre;
❒instruction brochure, to be used for prompt and proper use of the quick
repair kit and to be then handed to the personnel charged with han-
dling the treated tyre;
❒compressor D including gauge and connections;
❒a pair of protection gloves located in the side space of the compres-
sor;
❒adapters for inflating different elements.
In the kit container (placed in the boot under the carpet) are also
housed the screwdriver and the tow hitch.
L0D0361m
L0D0362m
Hand the instruction brochure to the personnel charged with treating the tyre
repaired with the kit.WARNING
Page 268 of 346

267
WARNING
LIGHTS AND
MESSAGES
CAR
MAINTENANCE
TECHNICALSPECIFICATIONS
INDEX
DASHBOARD
AND CONTROLS
SAFETY
DEVICES
CORRECT
USE OF
THE CAR
IN AN
EMERGENCY
For versions with alloy rims
❒Make sure that hub contact surfaces are clean;
❒Refit the standard wheel fitting it on the pins, refit the fastening
bolts and tighten them using the wrench provided;
❒Lower the car and remove the jack;
❒Using the wrench provided, tighten the bolts in the sequence
shown previously for the space-saver spare wheel (see figure);
❒Refit the snap-fitted wheel hub cap.
When you have finished
❒Stow the spare wheel C in the space provided in the boot;
❒Insert the jack partially open in its container B forcing it lightly to
prevent it from vibrating when travelling;
❒Put the tools back into their places in the container;
❒Stow the container complete with tools on the spare wheel and
secure everything with the clamping device A;
❒Correctly re-position the stiff cover.
L0D0161m
Page 271 of 346

270
WARNING
LIGHTS AND
MESSAGES
CAR
MAINTENANCE
TECHNICALSPECIFICATIONS
INDEX
DASHBOARD
AND CONTROLS
SAFETY
DEVICES
CORRECT
USE OF
THE CAR
IN AN
EMERGENCY
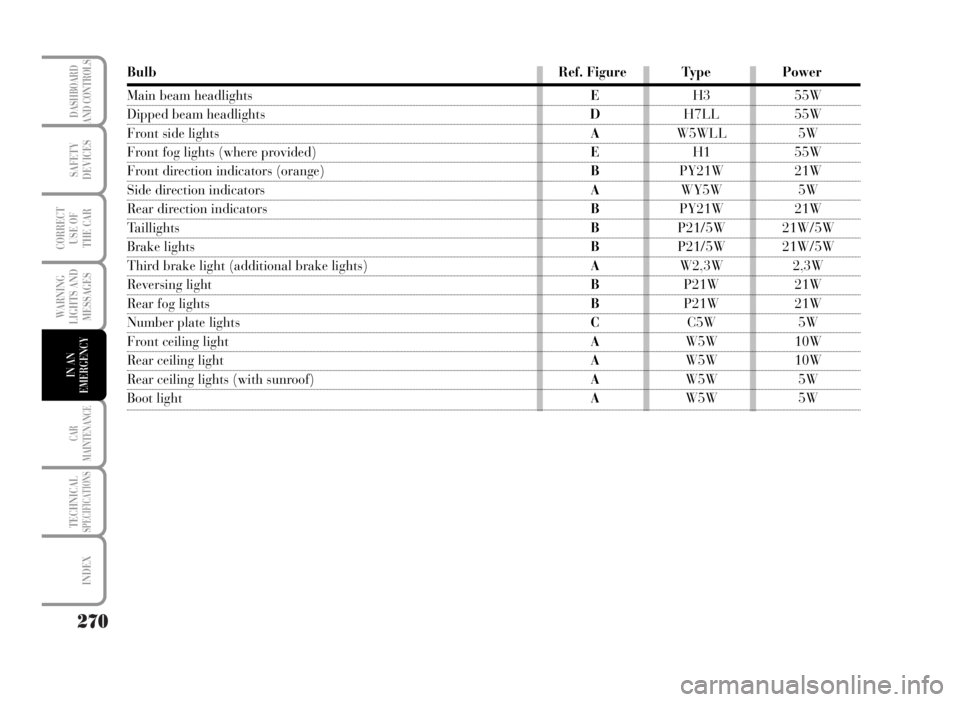
Bulb Ref. Figure Type Power
Main beam headlightsEH3 55W
Dipped beam headlights DH7LL 55W
Front side lights AW5WLL 5W
Front fog lights (where provided)EH1 55W
Front direction indicators (orange)BPY21W 21W
Side direction indicators AWY5W 5W
Rear direction indicators BPY21W 21W
Taillights BP21/5W 21W/5W
Brake lightsBP21/5W 21W/5W
Third brake light (additional brake lights) AW2,3W 2,3W
Reversing light BP21W 21W
Rear fog lights BP21W 21W
Number plate lights CC5W 5W
Front ceiling lightAW5W 10W
Rear ceiling lightAW5W 10W
Rear ceiling lights (with sunroof)AW5W 5W
Boot light AW5W 5W